Schlagwort: Uno
-

BiTipText enables text entry across two index finger-worn keyboards
Reading Time: < 1 minuteBiTipText enables text entry across two index finger-worn keyboards Arduino Team — May 5th, 2020 Typing with your thumbs on a smartphone has become an everyday activity for many, but what if you could enter text by simply tapping on your index fingers? With BiTipText, that may soon be a reality. …
-

WraPr is a spool-based system for creating and modifying 3D objects
Reading Time: < 1 minuteWraPr is a spool-based system for creating and modifying 3D objects Arduino Team — April 24th, 2020 When you purchase a spool of thread or wire, you expect it to be relatively uniform, spun in place with automated machinery that has been developed over hundreds of years. Researchers from MIT’s Media…
-

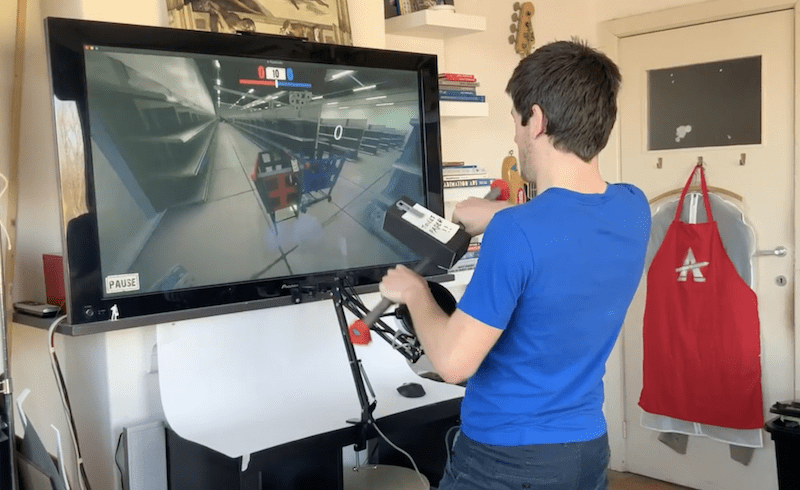
Manic toilet paper shopping simulated with Arduino
Reading Time: < 1 minuteManic toilet paper shopping simulated with Arduino Arduino Team — April 22nd, 2020 Toilet paper is a hot commodity these days, and if you’re loathe to fight with actual people over these rolls, then Jelle Vermandere’s game could be the next best thing. While the game can be enjoyed on your…
-

This garbage-bot trash talked TEDx Copenhagen attendees
Reading Time: 2 minutesThis garbage-bot trash talked TEDx Copenhagen attendees Arduino Team — April 21st, 2020 For TEDx Copenhagen 2019, MAKESOME was contacted about building a trash can. Not just any ordinary waste bin, however, but one that would fit in with their theme of “expect the unexpected” by driving around and being rude to…
-

Can’t find a pulse oximeter? Create your own!
Reading Time: < 1 minuteCan’t find a pulse oximeter? Create your own! Arduino Team — April 17th, 2020 As John Keefe notes in his project writeup, at-home pulse oximeters — which monitor the oxygen saturation in your blood — have been selling out due to the COVID-19 pandemic. While you could try hunt around and…
-

Electromechanical 7-segment clock made with an Arduino and 28 servos
Reading Time: < 1 minuteElectromechanical 7-segment clock made with an Arduino and 28 servos Arduino Team — April 15th, 2020 Digital clocks are often made out of a series of 7-segment displays, which light up to represent the needed numbers. Michael Klements’ electromechanical project, however, doesn’t use LEDs, but instead physically flips 3D-printed segments into…
-

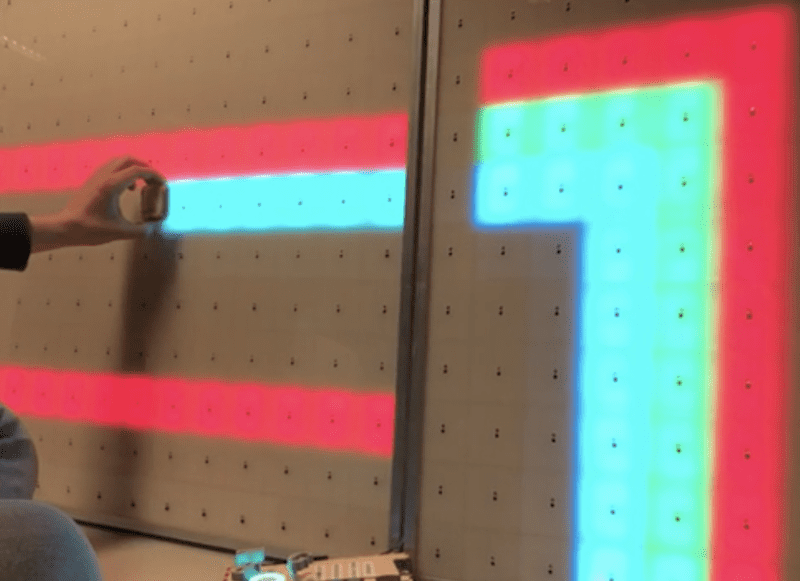
This system enables users to create room-sized interactive surfaces with spray paint
Reading Time: 2 minutesThis system enables users to create room-sized interactive surfaces with spray paint Arduino Team — April 11th, 2020 If you’ve ever thought of adding a user interface to an everyday surface — like a concrete wall, or even a sofa — MIT CSAIL’s SprayableTech system presents a variety of interesting possibilities. Input…
-

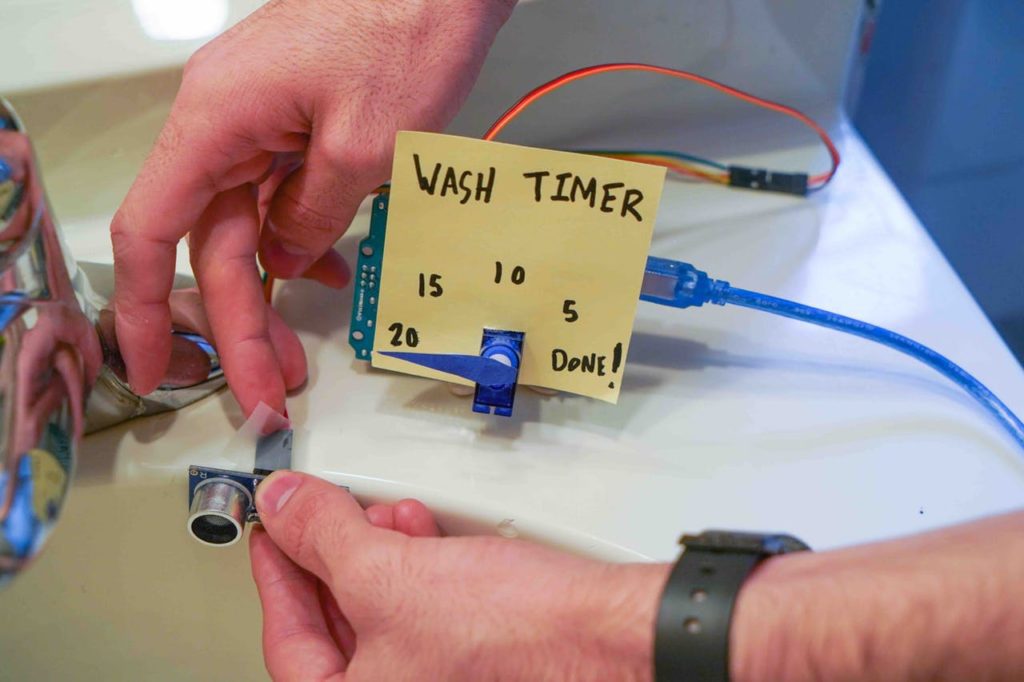
The Wash-A-Lot-Bot is a DIY handwashing timer
Reading Time: 2 minutesThe Wash-A-Lot-Bot is a DIY handwashing timer Arduino Team — March 29th, 2020 With the current coronavirus situation, we’ve been encouraged to wash our hands regularly for 20 seconds – or approximately how long it takes you to hum “Happy Birthday” from beginning to end twice. That sounds easy enough, but do…
-

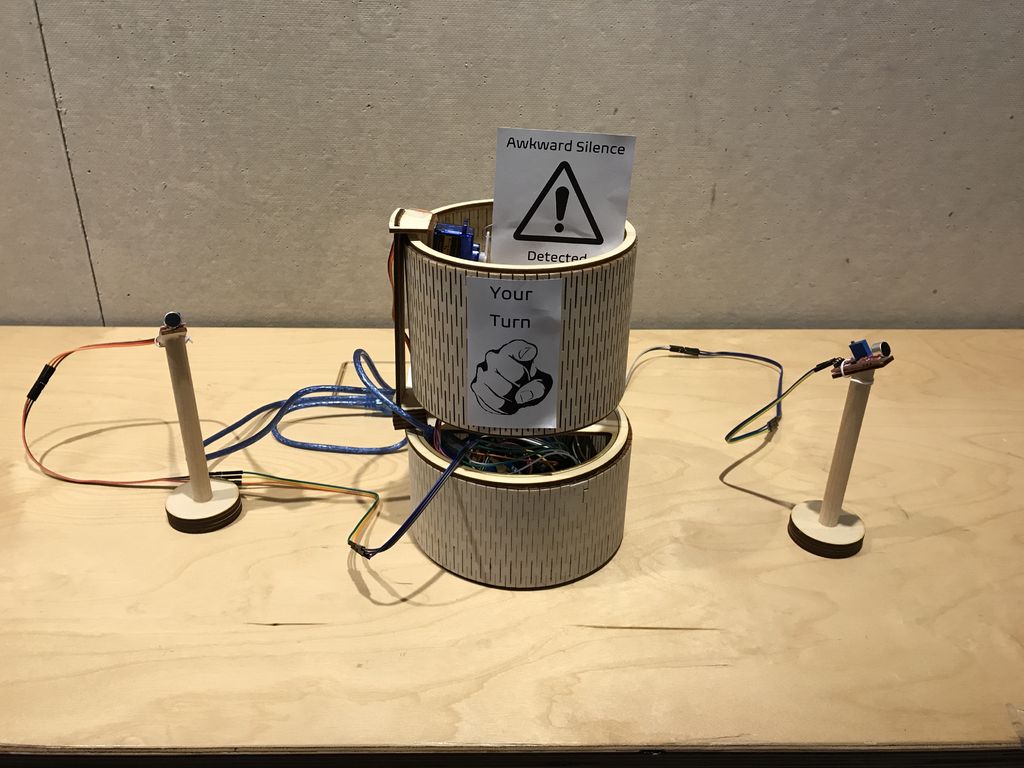
SASSIE helps prevent awkward gaps in conversation
Reading Time: < 1 minuteSASSIE helps prevent awkward gaps in conversation Arduino Team — March 24th, 2020 Whether it’s with an old friend or new acquaintance, we’ve all had those awkward gaps in conversation. Do you speak next, or let the other person lead the discussion? If that’s not happening naturally, then SASSIE, or “System…
-

1,156 LEDs make up these dual acrylic light-up panels
Reading Time: 2 minutes1,156 LEDs make up these dual acrylic light-up panels Arduino Team — March 24th, 2020 What does one do with over 1,000 LEDs, white acrylic, and 288 IR sensors? If you’re Redditor “jordy_essen,” you create an interactive light panel. In one mode, the user pull a reflective tool across the sensors to…
-

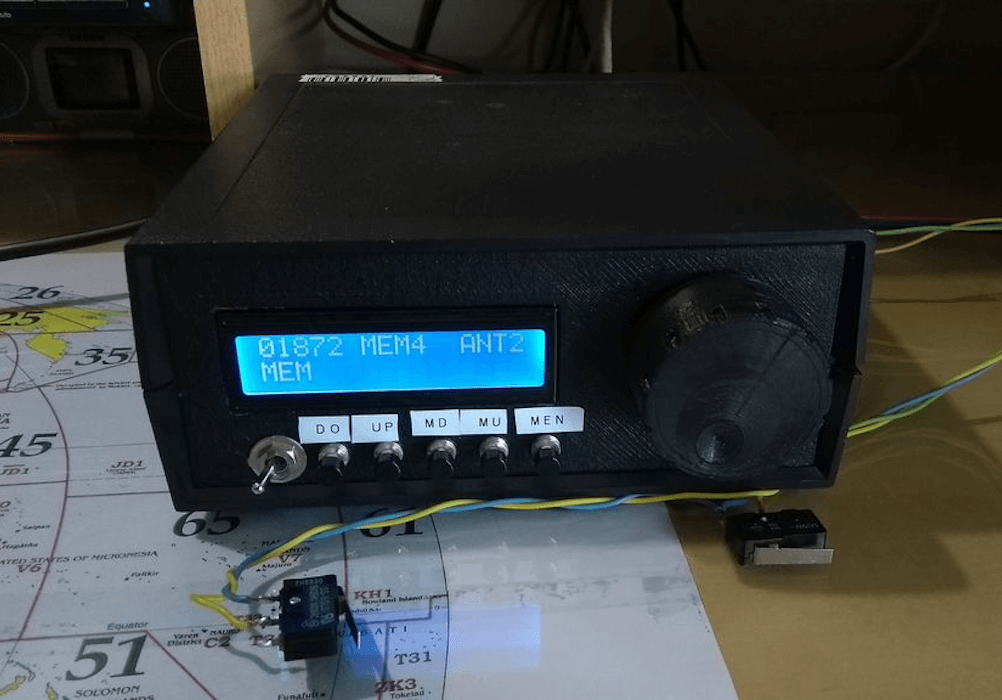
Using an Arduino/CNC shield setup for ham radio control
Reading Time: < 1 minuteUsing an Arduino/CNC shield setup for ham radio control Arduino Team — March 16th, 2020 Loop antennas for ham radios use heavy duty variable capacitors for tuning. Since such capacitors need to be physically turned for adjustment, radio enthusiast Jose B.O. made his own remote rig using an Arduino Uno and…
-

The Watchman is a 3D-printed robot head that follows your face with realistic eyeballs
Reading Time: 2 minutesThe Watchman is a 3D-printed robot head that follows your face with realistic eyeballs Arduino Team — March 9th, 2020 When you step out in public, you’ll often be filmed by a number of cameras and perhaps even be analyzed by tracking software of some kind. The Watchman robot head by Graham…
-
Start a 1976 Jeep with voice commands using a MacBook and an Arduino
Reading Time: < 1 minuteStart a 1976 Jeep with voice commands using a MacBook and an Arduino Arduino Team — March 9th, 2020 After being given a 2009 MacBook, John Forsyth decided to use it to start a 1976 Jeep via voice control. The build uses the laptop’s Enhanced Dictation functionality to convert text into…
-

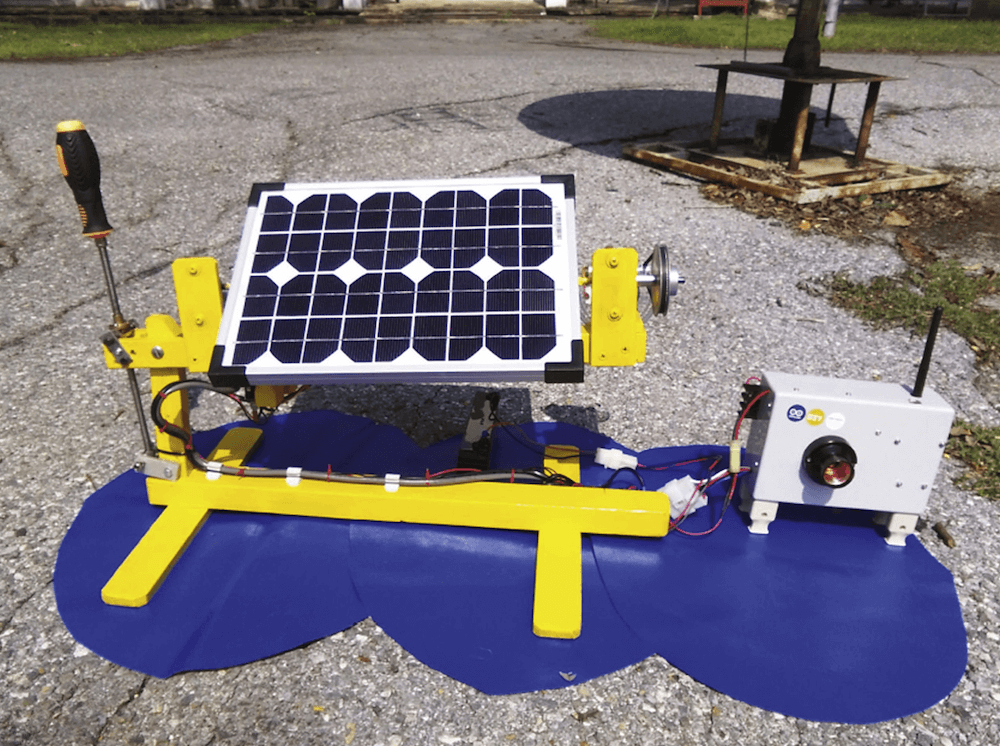
A wireless monitoring solution for solar power systems in remote locations
Reading Time: 2 minutesA wireless monitoring solution for solar power systems in remote locations Arduino Team — March 2nd, 2020 Researchers in Thailand have developed a ZigBee-based wireless monitoring solution for off-grid PV installations capable of tracking the sun across the sky, tilting the panel hourly. The elevation for the setup is adjusted manually once…
-

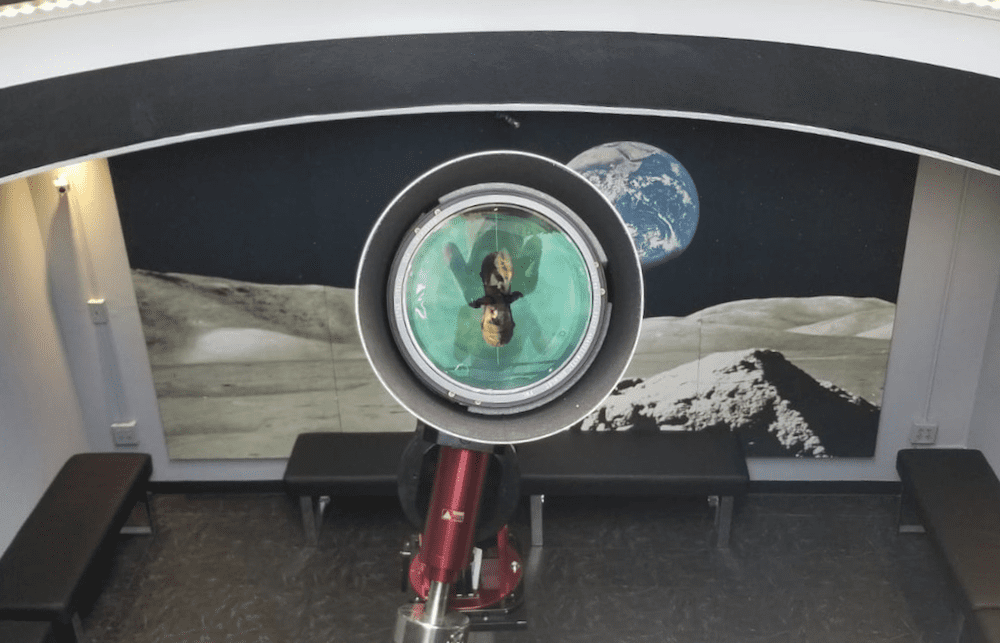
An Arduino-enabled observatory dome door opener
Reading Time: 2 minutesAn Arduino-enabled observatory dome door opener Arduino Team — February 27th, 2020 The South Florida Science Center recently commissioned a beautiful new 10” aperture refactor telescope. Its dome, however, was opened by hand; so in an effort to modernize this part of the setup, Andres Paris and his brother “patanwilson” added a windshield…
-

OpenAstroTracker is a tracking and GoTo mount for DSLR astrophotography
Reading Time: 2 minutesOpenAstroTracker is a tracking and GoTo mount for DSLR astrophotography Arduino Team — February 26th, 2020 Stars appear to stand still, but wait a few minutes and they won’t be in quite the same place. This means that if you want to take a long-exposure image of the sky with your DSLR you’ll…
-
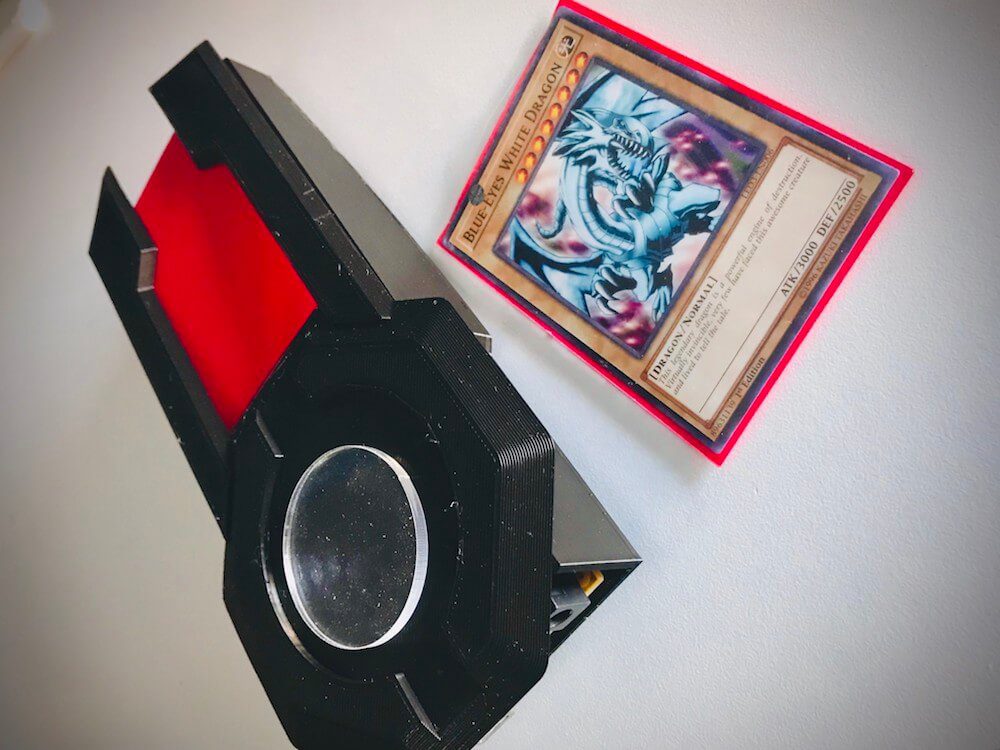
Duel Disk System blends physical cards with a virtual playfield
Reading Time: < 1 minuteDuel Disk System blends physical cards with a virtual playfield Arduino Team — February 21st, 2020 Yu-Gi-Oh! and other similar card games can be quite popular, but actually finding a group to play with can be challenging. Online games, on the other hand, have their advantages yet render your deck pretty…
-

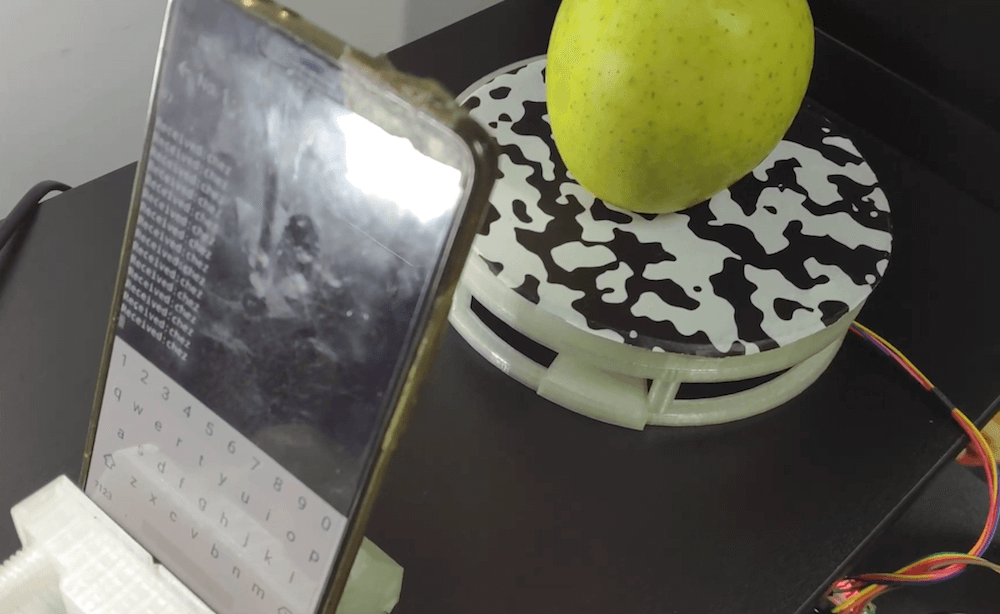
AAScan is an open source, Arduino-powered 3D scanner that uses your phone
Reading Time: < 1 minuteAAScan is an open source, Arduino-powered 3D scanner that uses your phone Arduino Team — February 18th, 2020 3D scanners are amazing tools that literally let you turn everyday things into three-dimensional computer models. As seen on Reddit, if you want to make one yourself — using little more than a…
-

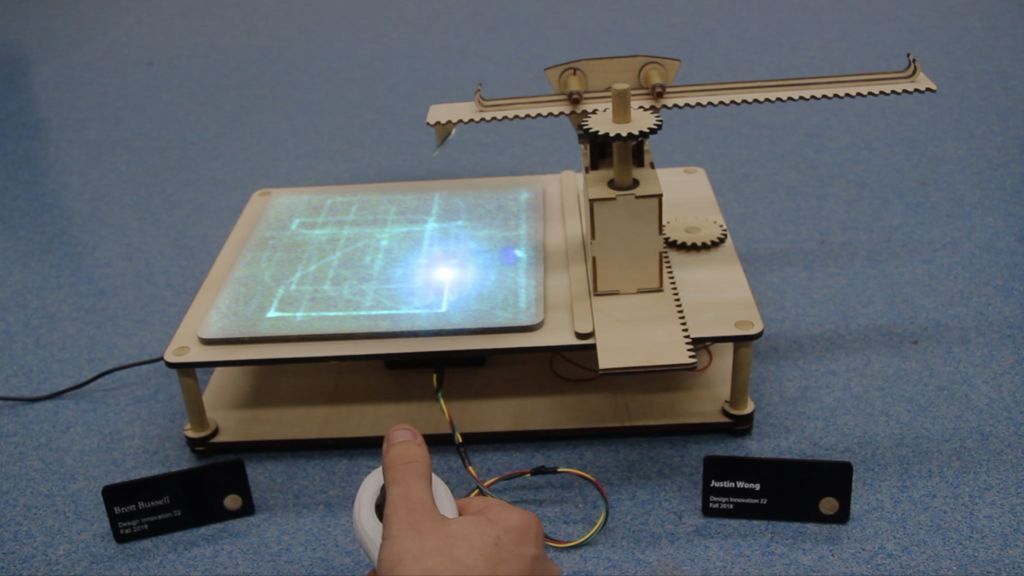
This joystick-controlled machine draws light trails using a laser
Reading Time: 2 minutesThis joystick-controlled machine draws light trails using a laser Arduino Team — February 10th, 2020 Lasers are awesome. Glow-in-the-dark surfaces are, too. As seen here, Justin and Brett were able to combine the two into an excellent drawing machine made from scrap materials and discarded wood. Their device uses a pair of…
-

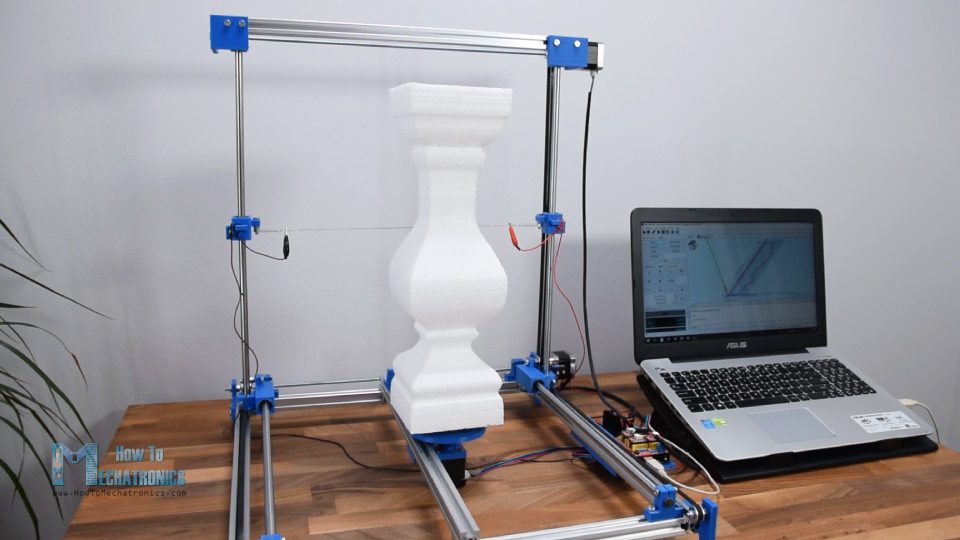
Carve 2.5D shapes out of foam with this Arduino-controlled hot wire cutter
Reading Time: 2 minutesCarve 2.5D shapes out of foam with this Arduino-controlled hot wire cutter Arduino Team — February 8th, 2020 You may have a 3D printer or other “digital” tools like a laser engraver or CNC router, but what if you want to work with Styrofoam? As How To Mechatronics demonstrates in his latest…
-
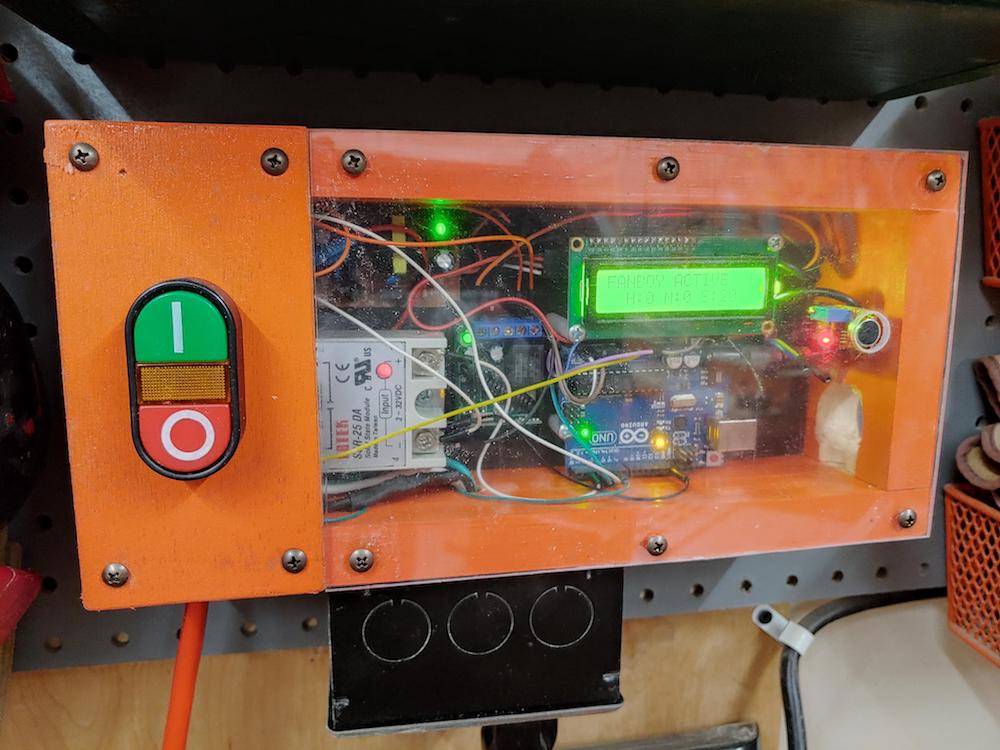
This Arduino device turns on a workshop’s air filtration system whenever it hears a saw
Reading Time: 2 minutesThis Arduino device turns on a workshop’s air filtration system whenever it hears a saw Arduino Team — February 3rd, 2020 Modern woodworking tools are amazing, allowing you to make any number of useful or decorative objects from the comfort of your garage. Unfortunately, they also produce a lot of dust, so…