Schlagwort: Uno
-

Monitor your heart rate while asleep with ZazHRM
Reading Time: < 1 minuteMonitor your heart rate while asleep with ZazHRM Arduino Team — November 20th, 2020 Have you ever wondered what your heart rate looked like when you were catching some Zs? Or perhaps you would like to check up on how someone nearby is sleeping, without actually disturbing that person. The ZazHRM…
-

What’s not to love about this realistic beating heart?
Reading Time: < 1 minuteWhat’s not to love about this realistic beating heart? Arduino Team — November 20th, 2020 Your heart is an amazing organ, pumping blood through your body and literally keeping you alive. However, building a realistic model of one — as explained in this write-up by Holiday McAllister — can actually be pretty simple.…
-

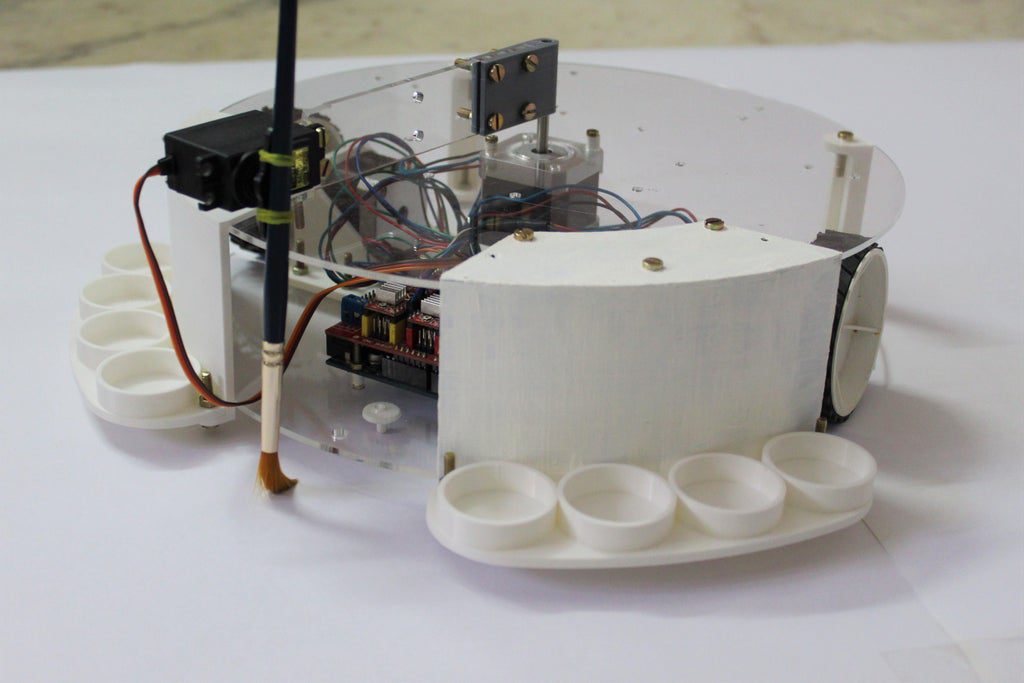
This Arduino-powered robot is like a Roomba with a paintbrush
Reading Time: 2 minutesThis Arduino-powered robot is like a Roomba with a paintbrush Arduino Team — November 16th, 2020 Can robots paint? More specifically, can they create art? The second question is, of course, open for debate, but Technovation’s robotic build shows that they can indeed wield a paintbrush. The device, shaped vaguely like a…
-

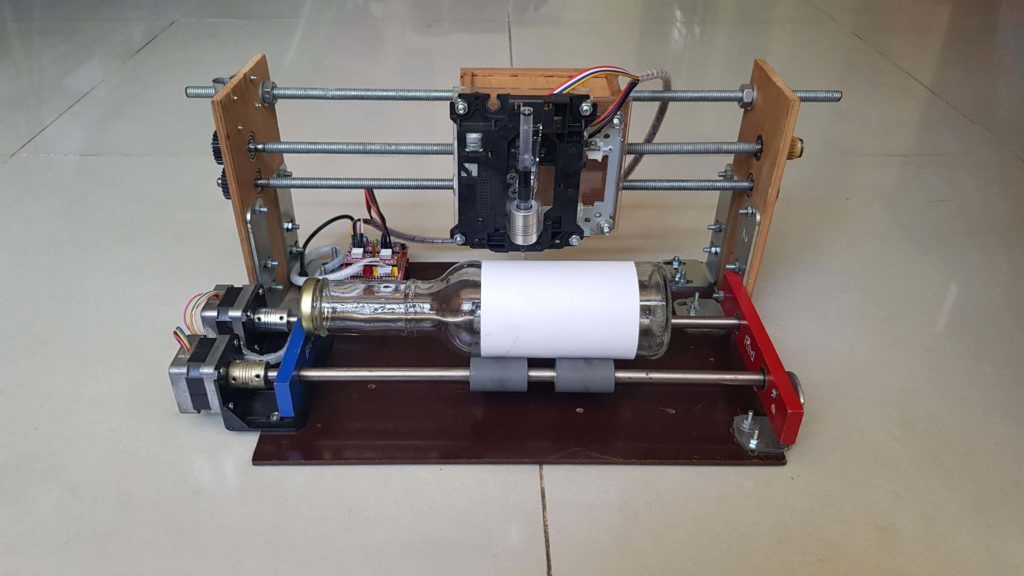
Draw on bottles using a CNC plotter made from old printer rollers and other scraps
Reading Time: 2 minutesDraw on bottles using a CNC plotter made from old printer rollers and other scraps Arduino Team — November 12th, 2020 To label used bottles that would otherwise go to waste, “tuenhidiy” created a CNC plotter that itself consists mostly of scraps! The machine’s X and Z axes are formed out of…
-
An old-school “neon” sign made with LEDs
Reading Time: 2 minutesAn old-school “neon” sign made with LEDs Arduino Team — November 5th, 2020 Can you make an Arduino-controlled neon sign? While certainly possible, such a setup would involve working with rather high voltages, and the skill to shape glass tubing. As an easier alternative, Max Danilin (who also goes by “gabbapeople”) created an…
-

Pump and Surf uses an air pump to ‘manually’ surf the web
Reading Time: 2 minutesPump and Surf uses an air pump to ‘manually’ surf the web Arduino Team — November 3rd, 2020 Everyday you likely visit websites like this one, browsing the content without giving much thought to how it gets to your eyeballs. Of course there is plenty technology required throughout this process, but how…
-

Researchers propose a coil spring-based soft actuator using two flexible ultrasonic motors
Reading Time: < 1 minuteResearchers propose a coil spring-based soft actuator using two flexible ultrasonic motors Arduino Team — November 3rd, 2020 Researchers Yunosuke Sato, Ayato Kanada, and Tomoaki Mashimo have developed a novel continuum (snake) robot actuator that can flex and sense its position with twin coil spring assemblies. Each uses a couple of piezoelectric…
-

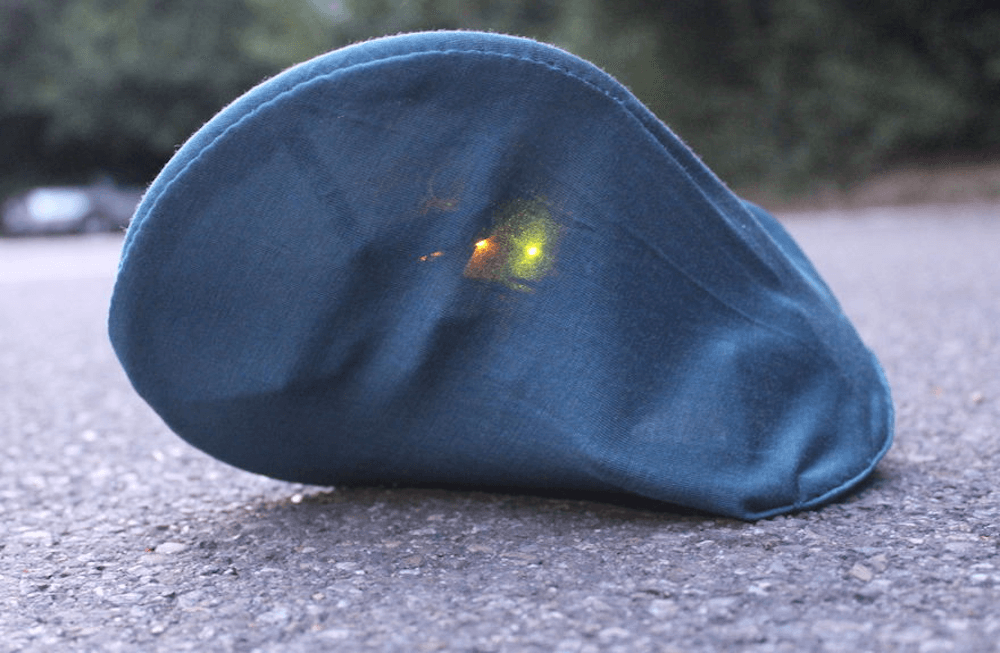
Transform a pile of clothing into the robot of your nightmares
Reading Time: 2 minutesTransform a pile of clothing into the robot of your nightmares Arduino Team — October 26th, 2020 While whatever you heard bump in the night was probably nothing to be concerned about, if you see a suspicious blob of clothing on the floor, you might give it another look. Although not particularly…
-

Driving a mini RC bumper car with a Nintendo Wii Balance Board
Reading Time: 2 minutesDriving a mini RC bumper car with a Nintendo Wii Balance Board Arduino Team — October 23rd, 2020 Taking inspiration from Colin Furze’s 600cc bumper car constructed a few years ago, Henry Forsyth decided to build his own RC miniature version. His device features a 3D-printed and nicely-painted body, along with a…
-

S.H.I.E.L.D. yourself from unwanted mic and camera access
Reading Time: < 1 minuteS.H.I.E.L.D. yourself from unwanted mic and camera access Arduino Team — October 19th, 2020 If you haven’t heard, a lot of us are working from home these days, making mic and camera discipline more important than ever. To help avoid unwanted recording, Tovi Levis created the S.H.I.E.L.D. device, which stands for…
-
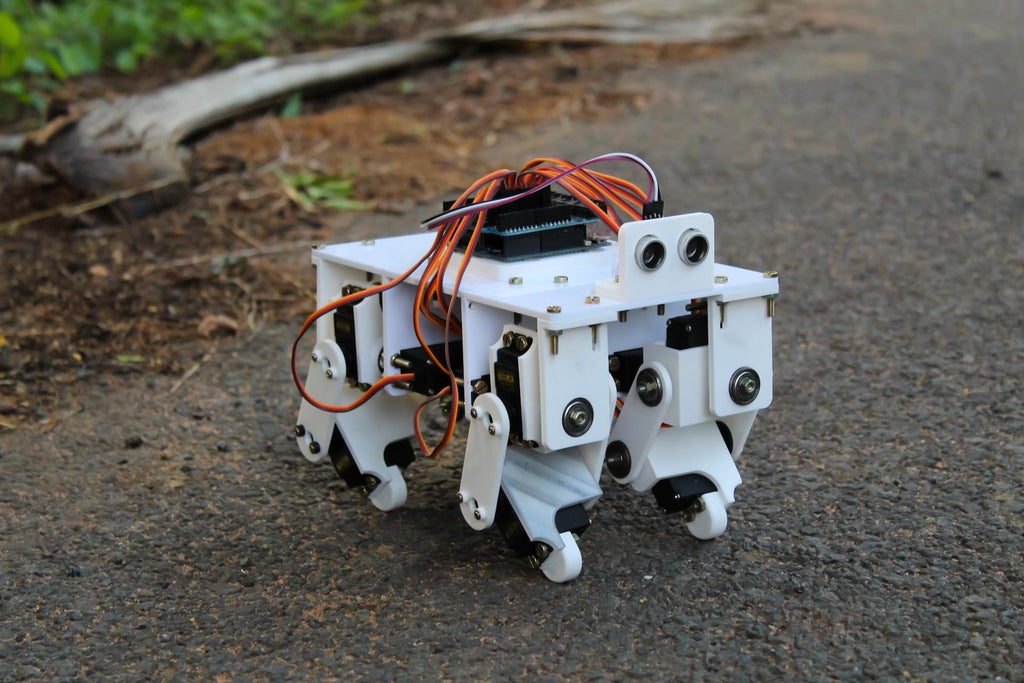
DIY quadruped robot brought to life for under $60
Reading Time: 2 minutesDIY quadruped robot brought to life for under $60 Arduino Team — October 10th, 2020 Animals like dogs, cats, raccoons, rhinoceroses, and many more get around on four legs. To help imitate this natural phenomenon, maker “Technovation” decided to create a low-cost quadruped robot using 12 servo motors and a variety of…
-
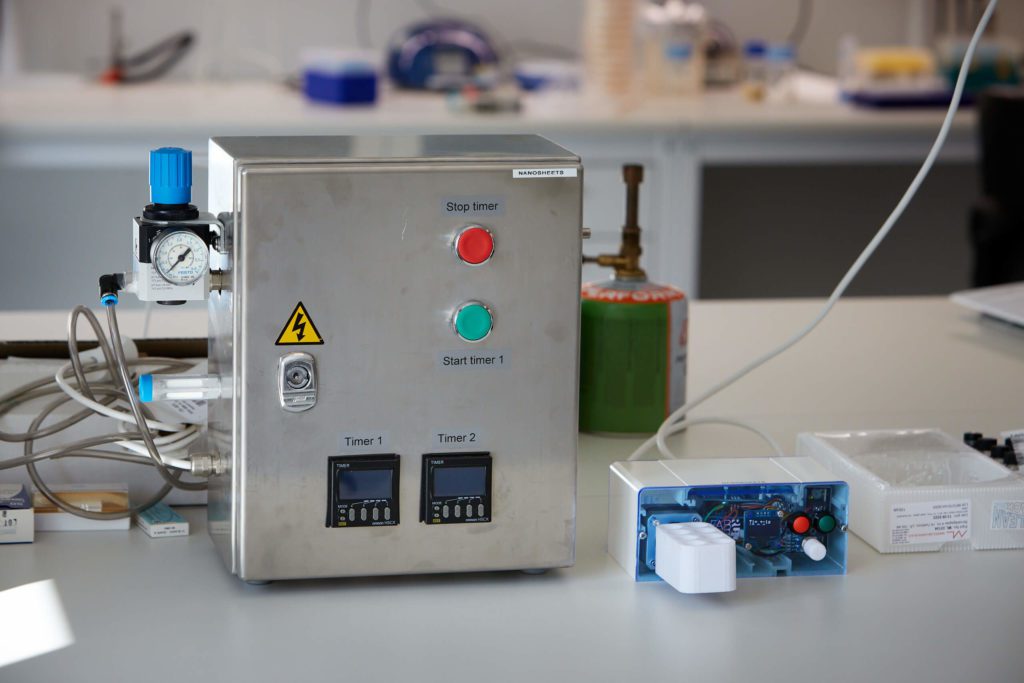
Building a cheap and easy nanosheet machine
Reading Time: < 1 minuteBuilding a cheap and easy nanosheet machine Arduino Team — October 9th, 2020 Chemist Biljana Mojsoska at Roskilde University in Denmark has been working on nanosheets, an anti-bacterial coating for medical surfaces. During her research, a piece of expensive equipment failed, causing Jakub Klust and Bo Thorning at FabLab RUC to…
-

Light painting with a gesture-controlled drone
Reading Time: < 1 minuteLight painting with a gesture-controlled drone Arduino Team — October 9th, 2020 Researchers at the Skolkovo Institute of Science and Technology (Skoltech) in Moscow, Russia have come up with a novel way to interface with a drone via hand movements. As shown in the video below, the device can be used to create…
-

This Arduino-powered clock tells time in colors
Reading Time: 2 minutesThis Arduino-powered clock tells time in colors Arduino Team — October 7th, 2020 As humans, we’ve divided time up into 24 hours per day, 60 minutes per hour, and 60 seconds per minute. With many of us now working from home on differing schedules, time may seem a bit less concrete than…
-

This interactive screen slides smoothly from side to side
Reading Time: < 1 minuteThis interactive screen slides smoothly from side to side Arduino Team — September 29th, 2020 When you need to grab someone’s attention at an event, an interactive screen is a good idea. MakerMan, however, went several steps beyond this, creating an installation with a bank of static screens that depict the…
-
This Arduino-controlled soft robot gets around like an earthworm
Reading Time: < 1 minuteThis Arduino-controlled soft robot gets around like an earthworm Arduino Team — September 28th, 2020 After studying the way a worm wiggles, Nicholas Lauer decided to create his own soft robotic version. What he came up with uses an Arduino Uno for control, inflating six 3D-printed segments sequentially to order to…
-

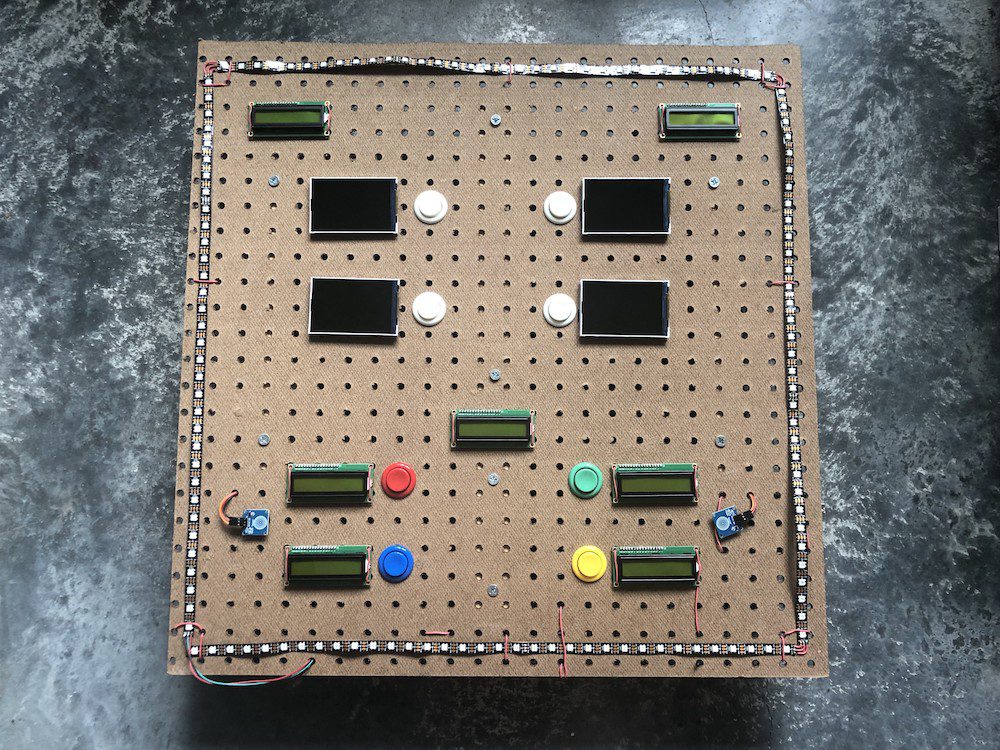
Learning Greek with an arcade-style vocabulary reviewer
Reading Time: 2 minutesLearning Greek with an arcade-style vocabulary reviewer Arduino Team — September 24th, 2020 Learning a new language is always a challenge, but can also be extremely rewarding. To help with this task — specifically learning Greek — Angeliki Beyko created an arcade-style review machine. Her device cleverly uses a sheet of pegboard…
-

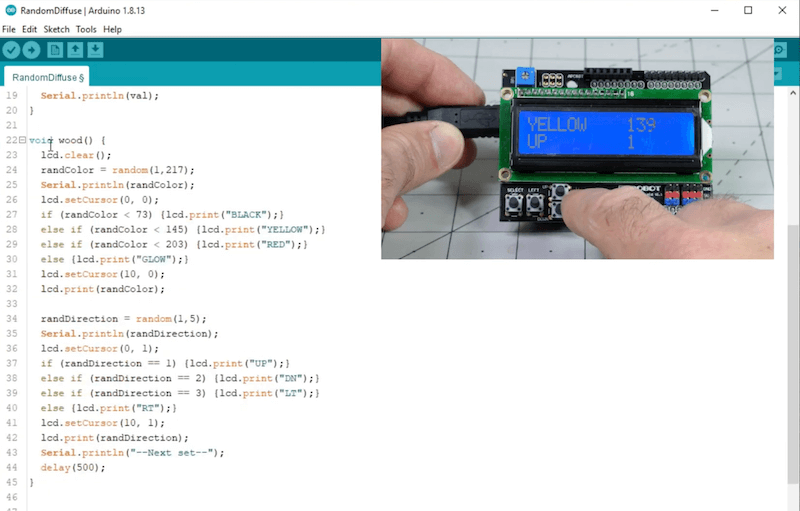
Making a random sound diffuser with Arduino
Reading Time: < 1 minuteMaking a random sound diffuser with Arduino Arduino Team — September 23rd, 2020 Humans are generally quite bad at coming up with random patterns, so when Jeremy Cook wanted to make a sound diffuser with angled blocks of wood, he created a “pseudorandomness console” using an Arduino Uno and an LCD…
-

Convert an old cassette player into a synthesizer
Reading Time: < 1 minuteConvert an old cassette player into a synthesizer Arduino Team — September 22nd, 2020 Cassettes (if you remember those) are normally used to play back music and other audio, but what about using an old Walkman-style tape player as the instrument itself? That’s exactly what this project by Zack Scholl allows you to do,…
-
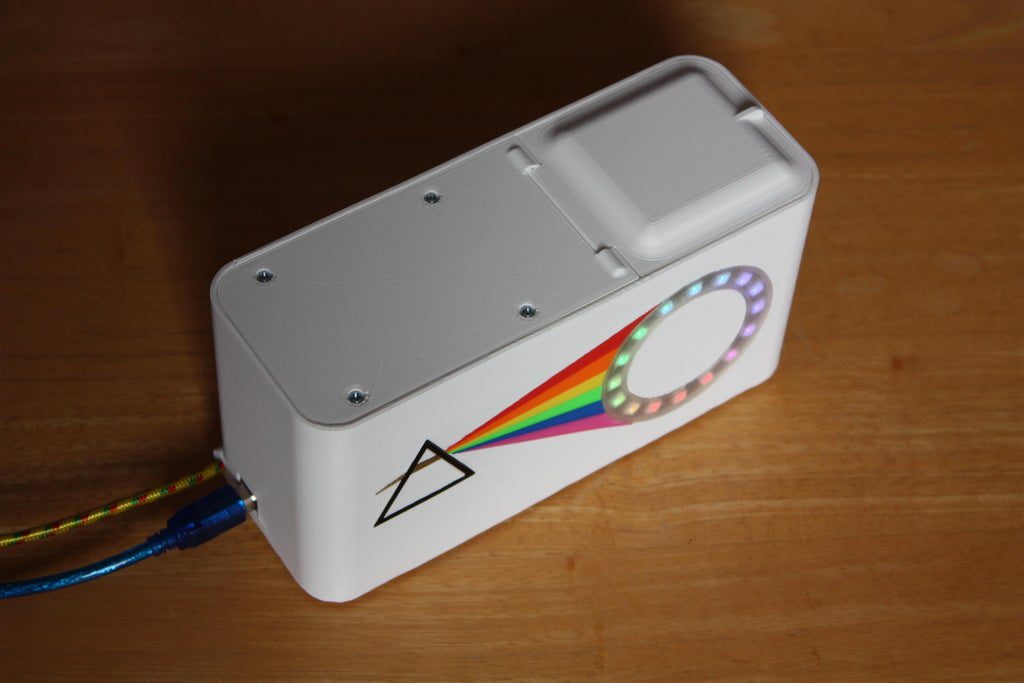
This Arduino-powered spectrophotometer uses a little prism to create rainbows
Reading Time: < 1 minuteThis Arduino-powered spectrophotometer uses a little prism to create rainbows Arduino Team — August 17th, 2020 Invented back in the 1940s, a spectrophotometer is a scientific instrument used to measure how different wavelengths of light are absorbed by a sample. Daniel Hingston decided to build his own spectrum analysis device as…
-

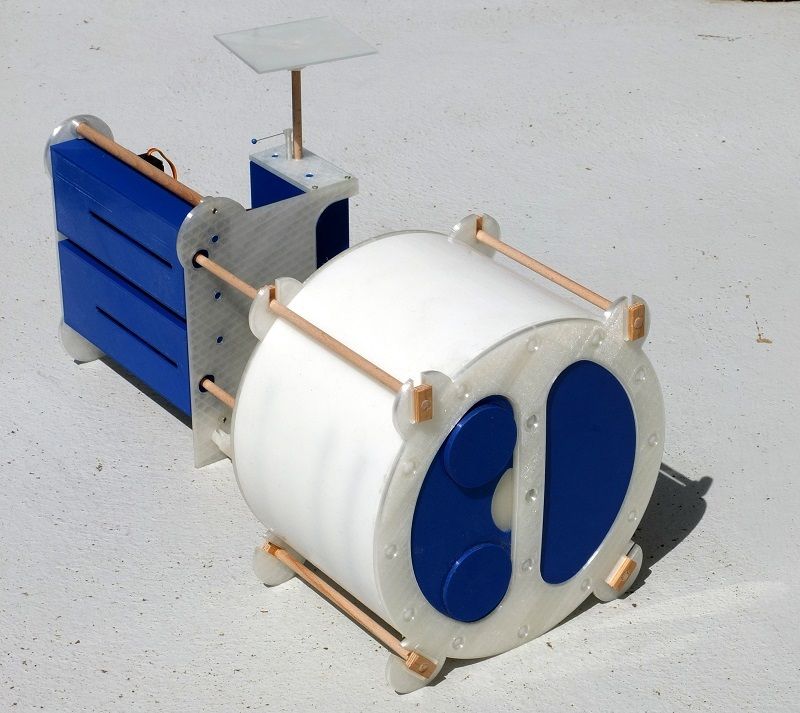
Arduino X-ray imaging phantom simulates lung movement
Reading Time: < 1 minuteArduino X-ray imaging phantom simulates lung movement Arduino Team — August 5th, 2020 Imaging phantoms are used to evaluate and test medical devices, such as X-ray machinery, where a human subject would be impractical and/or dangerous. In order to simulate the motion and deformation of a lung, Stefan Grimm created an…
-
mOLOID is a pet like no other
Reading Time: 2 minutesmOLOID is a pet like no other Arduino Team — August 4th, 2020 As a part of their masters program at the University of Stuttgart, Jan Ingo Haller and Lorin Samija created a robotic pet that moves in a manner that may not be immediately evident. With the internals obscured by a…