Schlagwort: Uno
-

Allen Pan’s Arduino-controlled microwave only works while gaming
Reading Time: 2 minutesAllen Pan’s Arduino-controlled microwave only works while gaming Arduino Team — April 26th, 2021 Microwave ovens have been the peak of convenient cooking since the 1960s, and nobody appreciates that convenience more than gamers. Normally you would microwave some pizza rolls between Call of Duty death matches, but Allen Pan decided to…
-

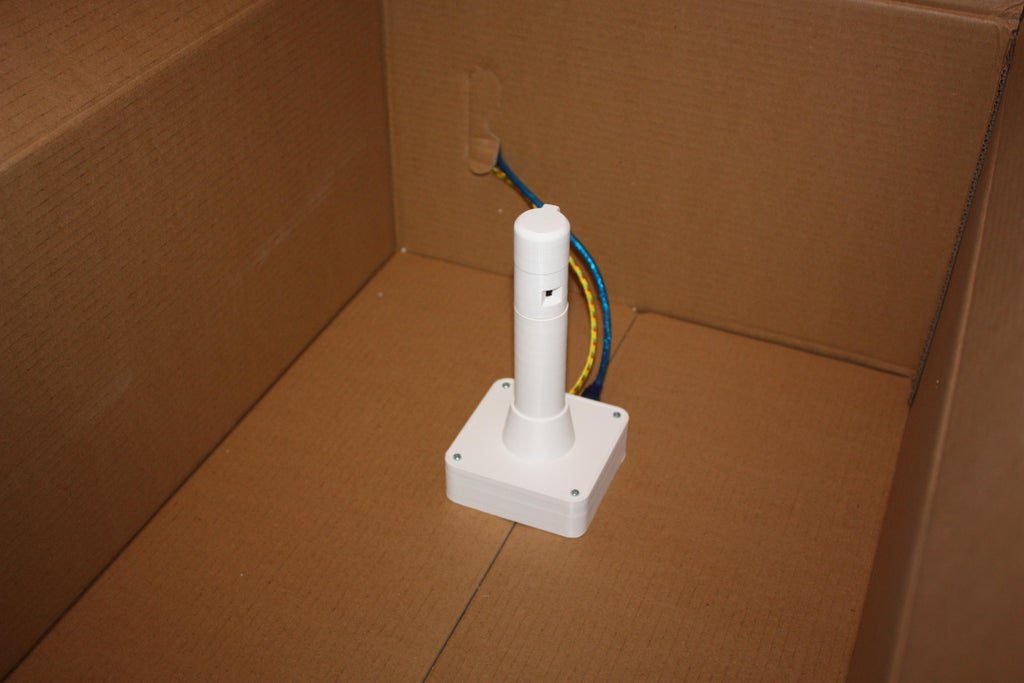
This auto-adjusting PVC system lifts hand sanitizer to the perfect height
Reading Time: < 1 minuteArduino Team — April 12th, 2021 You’ve probably seen hand sanitizer stations popping up all over the place. While this seems to be a good thing, if you’re not exactly average height-wise, it’s likely they weren’t exactly designed for you. As a way to help both tall and short, and especially…
-

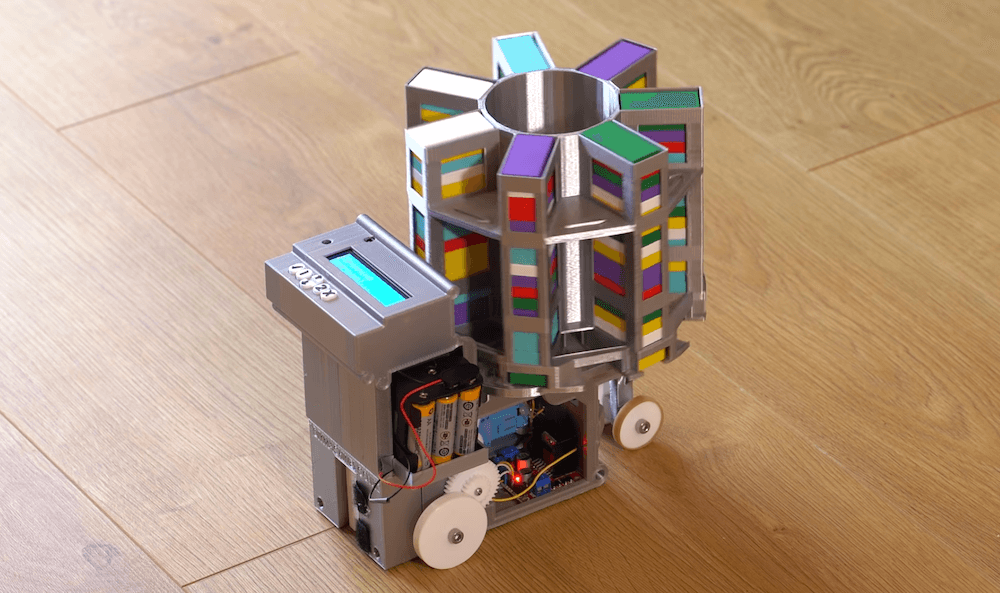
Creating an over-engineered random number generator Arduino shield
Reading Time: 2 minutesCreating an over-engineered random number generator Arduino shield Arduino Team — March 17th, 2021 Often when working with Arduino projects, you’ll need to generate a random number. There’s a random() function built into the IDE that works acceptably in many cases, but maker_ATOM wanted to take things to the next level, creating an “over…
-

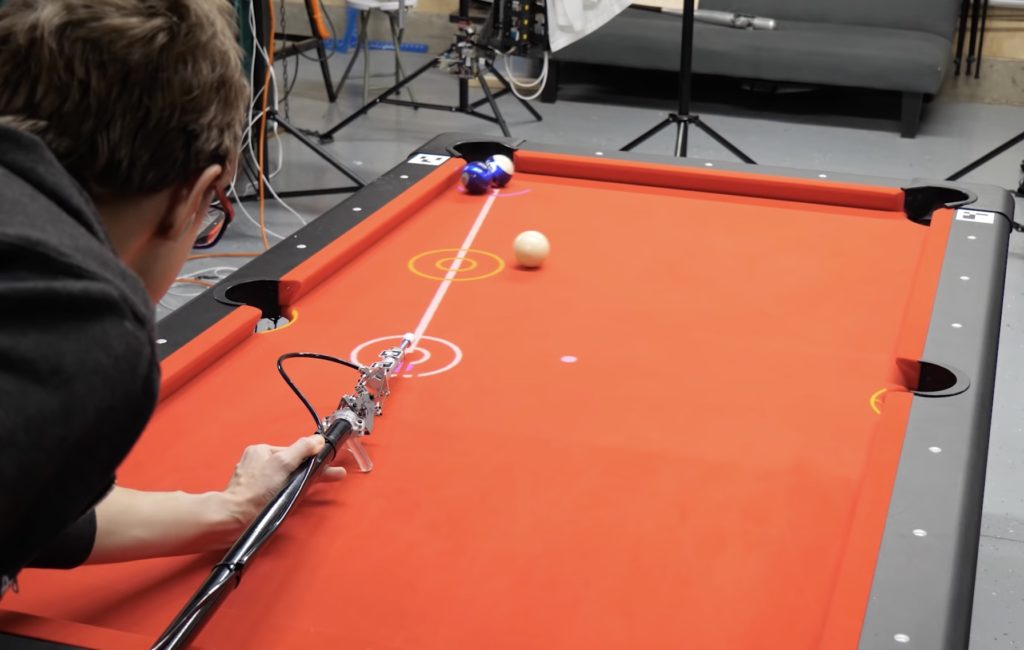
This robotic cue can turn anyone into a pool shark
Reading Time: < 1 minuteThis robotic cue can turn anyone into a pool shark Arduino Team — February 22nd, 2021 If you want to get better at billiards, the conventional wisdom is to practice. However, if you’re YouTuber Shane Wighton, you build a robotic cue to play the game for you. His device looks like a…
-

This bin will sort your trash and recyclables automatically
Reading Time: < 1 minuteThis bin will sort your trash and recyclables automatically Arduino Team — February 18th, 2021 Often you might see a recycling bin next to a trash can, and notice that someone else has thrown their waste into the wrong container. To help with this conundrum, the team of Shalin Jain, Viraj Singh, Edward Chen,…
-

This program can tell if you paid attention to text
Reading Time: < 1 minuteThis program can tell if you paid attention to text Arduino Team — February 18th, 2021 When you read a book, or… other website, you may find your mind wandering from time to time. This isn’t always a big deal, but if you want to ensure that you’re getting every last bit…
-

Play Simon and the piano on this glowing geodesic dome
Reading Time: < 1 minutePlay Simon and the piano on this glowing geodesic dome Arduino Team — February 18th, 2021 Geodesic domes, approximately spherical structures made from an arrangement of triangular faces, are fascinating in and of themselves. Add light and sound, as was done here by students at the University of Málaga in Spain, and you…
-

Say hi to HuggieBot 2.0, a robot that knows when to hug and when to let go
Reading Time: < 1 minuteSay hi to HuggieBot 2.0, a robot that knows when to hug and when to let go Arduino Team — February 16th, 2021 Do you need a hug? Are friends and family not around? As seen here, researchers from the Max Planck Institute for Intelligent Systems (MPI-IS) and ETH Zürich may have…
-

James Bruton demonstrates the Coanda effect with an Arduino-controlled rig
Reading Time: < 1 minuteJames Bruton demonstrates the Coanda effect with an Arduino-controlled rig Arduino Team — January 20th, 2021 The Coanda effect, as you may or may not know, is what causes flowing air to follow a convex surface. In his latest video, James Bruton shows how the concept can used as a sort…
-

This Arduino-based speed bag counts your punches
Reading Time: < 1 minuteThis Arduino-based speed bag counts your punches Arduino Team — January 19th, 2021 Creator DuctTapeMechanic loves sports and electronics, so for a recent project he decided to combine his two passions by hacking a speed bag to keep track of his punches. As shown in the video below, the first step…
-

Making your own Segway, the Arduino way
Reading Time: < 1 minuteMaking your own Segway, the Arduino way Arduino Team — January 18th, 2021 After obtaining motors from a broken wheelchair, this father-son duo went to work turning them into a new “Segway.” The DIY transporter is controlled by an Arduino Uno, along with a pair of motor drivers that handle the device’s…
-

Fighting smartphone addiction with Arduino
Reading Time: 2 minutesFighting smartphone addiction with Arduino Arduino Team — January 11th, 2021 How many times a day do you grab your phone for trivial purposes, such as scrolling through social media? Nick O’Hara found that his number was around 100 times during the workday, which sounds like a lot, but is likely pretty…
-

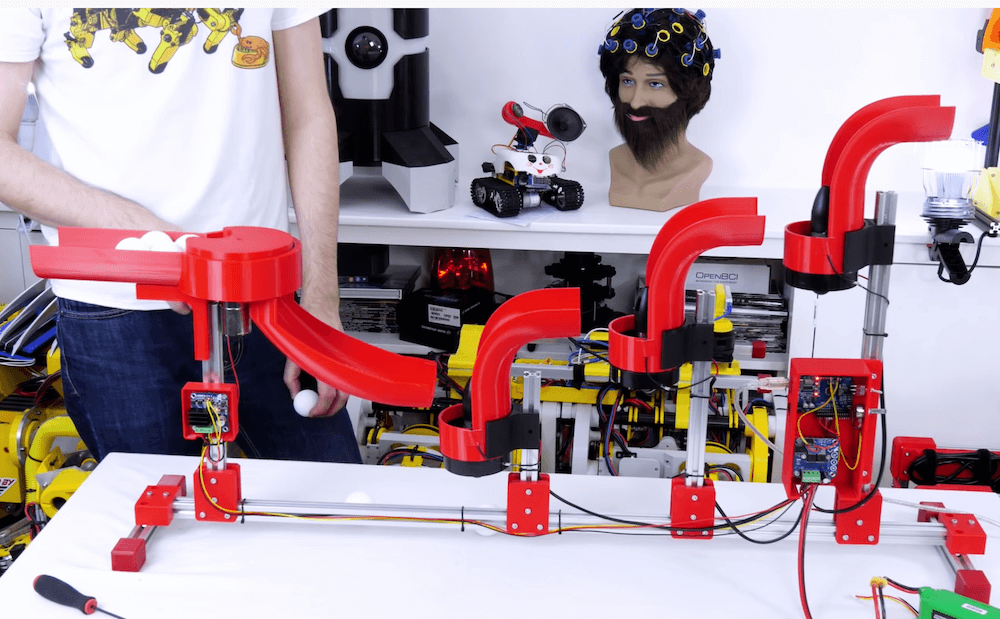
Let this robotic system sort your LEGO bricks for you
Reading Time: 2 minutesIf you don’t enjoy sorting LEGO, you will be pleased to know that students at Bruface – or the Brussels Faculty of Engineering in Belgium – are working on an automated machine to do it for you! The team’s prototype device detects brick colors on a conveyor belt and picks them up…
-

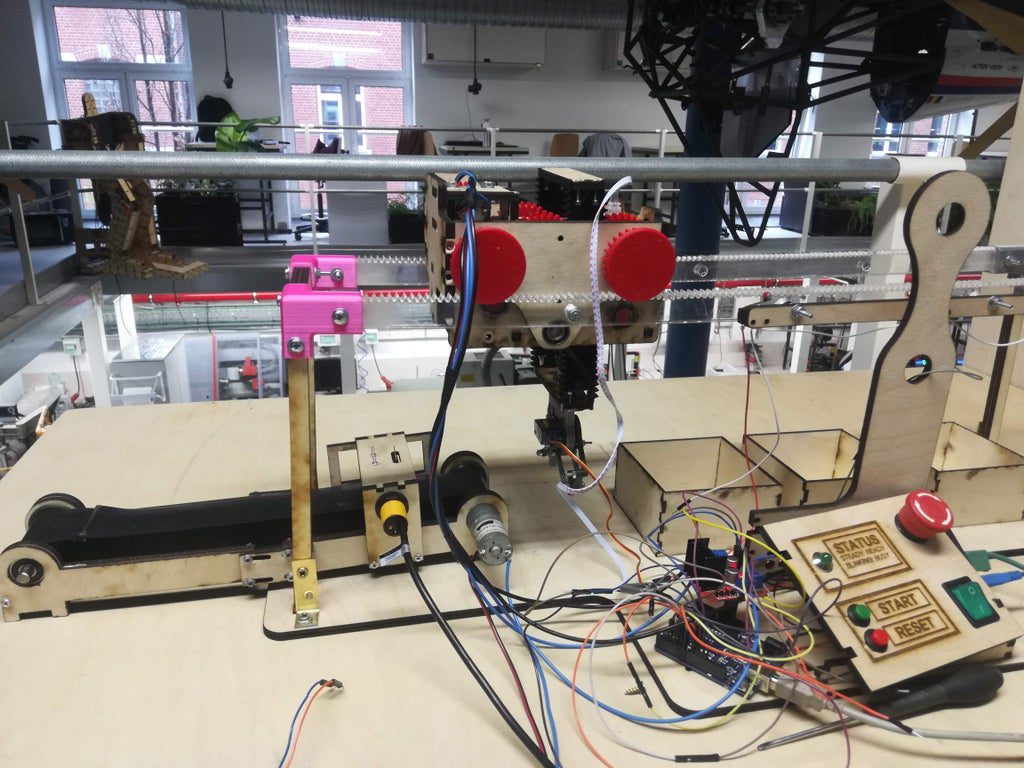
This machine stacks dominoes automatically
Reading Time: < 1 minuteThis machine stacks dominoes automatically Arduino Team — December 26th, 2020 Arranging dominoes in such a way that they knock each other down in sequence can be a fun pastime, but what if you would like a machine to take care of lining them up for you? As seen in the…
-

Making a mini 360° LiDAR for $40
Reading Time: 2 minutesMaking a mini 360° LiDAR for $40 Arduino Team — December 21st, 2020 LiDAR (or “light detection and ranging”) sensors are all the rage these days, from their potential uses in autonomous vehicles, to their implementation on the iPhone 12. As cool as they are, these (traditionally) spinning sensors tend to be…
-

Use an Arduino and a pair of stepper motors to automatically wind pickups
Reading Time: 2 minutesUse an Arduino and a pair of stepper motors to automatically wind pickups Arduino Team — December 18th, 2020 Electric guitars use pickups to sense string vibrations and make music. While a wide variety are available for purchase, what if you would like to make your own custom device for audio experimentation?…
-

A fully-animated, Arduino-powered launchpad for the LEGO Saturn V model rocket
Reading Time: 2 minutesA fully-animated, Arduino-powered launchpad for the LEGO Saturn V model rocket Arduino Team — December 16th, 2020 Approximately 18 months ago, Mark Howe embarked on a journey to build an animatronic launchpad and gantry for a LEGO Saturn V model rocket. After approximately 1,000 hours of CAD work, hundreds of hours of…
-

This system lets you take close-up photos of water droplets with a DSLR camera
Reading Time: 2 minutesThis system lets you take close-up photos of water droplets with a DSLR camera Arduino Team — December 16th, 2020 Rain comes and goes, but as shown in alexpikkert’s water droplet photography write-up, the exact moment of impact can look spectacular when magnified. Capturing that, however, takes a specialized system — and his…
-
Living Pixels is a light frame that comes alive when you leave
Reading Time: 2 minutesLiving Pixels is a light frame that comes alive when you leave Arduino Team — December 15th, 2020 As smart devices become more ingrained in our everyday lives, it’s perhaps only natural that we start to think of them as living things. What if such gadgets actually did have personalities and emotions…
-

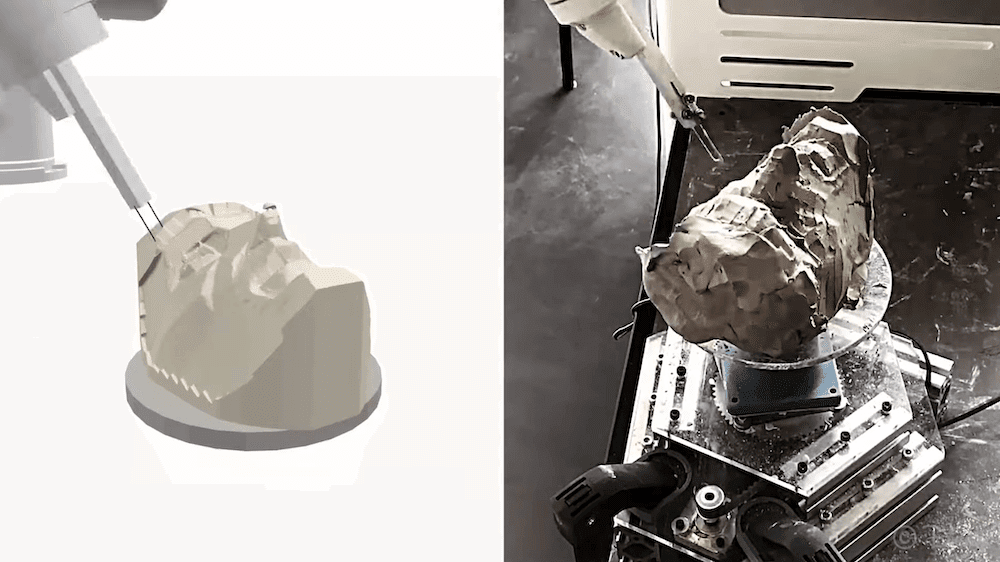
RobotSculptor uses a six-axis robot arm to sculpt clay models
Reading Time: < 1 minuteRobotSculptor uses a six-axis robot arm to sculpt clay models Arduino Team — December 3rd, 2020 Robotic fabrication techniques such as 3D printing enable you to make a copy of a wide variety of items. Actually sculpting something out of clay, however, remains a largely human pursuit. One might also miss…
-

10 most popular modules and sensors for the Arduino UNO all on one board
Reading Time: 2 minutes10 most popular modules and sensors for the Arduino UNO all on one board Arduino Team — December 1st, 2020 Getting started with electronics and sensing the world around you is now easier than ever with the new all-in-one Arduino Sensor Kit from Arduino, in partnership with Seeed. The 10 most popular…
-

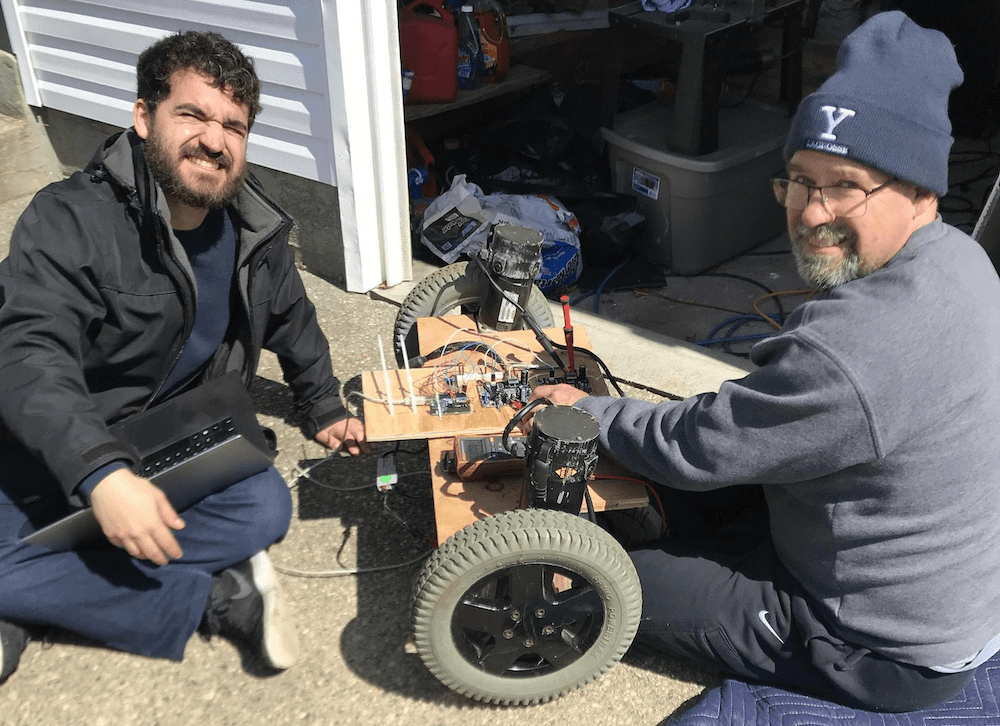
Control a wheelchair using an EEG headset and Arduino
Reading Time: < 1 minuteControl a wheelchair using an EEG headset and Arduino Arduino Team — November 25th, 2020 In an effort to help provide paralyzed patients with an easier way to operate their wheelchairs, these makers have developed a system that uses an OpenBCI brainwave cap to collect electroencephalogram (EEG) and electromyography (EMG) signals,…