Schlagwort: tutorials

  • Arduino Docs has all the info you ever need about Arduino boards

    Arduino Docs has all the info you ever need about Arduino boards

    Reading Time: 4 minutes

    The truth is, we never entirely got to grips with Arduino documentation. Until now. Now there’s a new standard for gathering together product info, tech specs and tutorials, that we’re calling Arduino Docs. We’re excited to share it with the Arduino community who’ll soon be able to help it grow.

    Arduino Docs is now live

    It Began with the Uno

    When the Arduino Uno was launched around 15 years ago, its detailed documentation was a vital part of its success. It wouldn’t be at all unreasonable to say that its online resources were a driving factor in the establishment and growth of the primordial Arduino community.

    But you’re probably quite aware of Arduino’s history, and the rapid growth that followed. Creating, organizing and maintaining that level of documentation around each and every board became a huge task. The complexity was one thing, but the open-source nature also meant that a lot of third party content was generated. Which is great, and is still very much encouraged, but it also muddied the waters of supporting content. 

    So getting all that essential info together in one place, while providing a great experience for the users, has been a passion project for a lot of people at Arduino. And now, it’s ready.

    Which brings us back to today, and the launch of a whole new approach to the online presence of Arduino boards. Welcome to Arduino Docs.

    The All New Arduino Docs Site

    The new Arduino Docs site launches with a detailed, but easy-to-use breakdown of everything you ever wanted to know about the official boards and products.

    Every product will get its own page, broken down into standardized sections so you have instant, easy access to what you need.

    • Overview: You’ll begin here when you take a look at a board on the Arduino Docs site. It’s a bird’s-eye-view of the board’s description and purpose, its main features, tech specs, revision logs (where applicable) and compatibility options.
    • Essentials: This section gets you started with using the board in question. Here you’ll find quick start guides, suggestions for libraries, and useful basics on using Arduino. Perfect for newcomers or anyone needing a refresher.
    • Tutorials: Any and all tutorials connected to the board will be marshalled here. You’ll never have to go hunting when you’re looking to build something awesome. These tutorials will showcase the different features of each board, giving you a full understanding of what’s possible.
    • Resources: This is where we’ll keep the datasheets, downloads, pinout diagrams, schematics and other useful documents and files.
    Pinout Diagrams on Arduino Docs

    It’s been no small feat collating all this information, and reformatting into something that’s as useful for beginners as it is for experts and engineers. It’ll kick off with over 130 tutorials, dozens of boards, and a great selection of shields, all given a brand new home.

    But it’s not just about the hardware. The new Arduino Docs site aims to be the most encyclopedic resource we’ve ever compiled, so it includes sections for software (such as the IDEs), Cloud (for the web editor and other Arduino Cloud tools) and a great asset for understanding the foundations of Arduino’s approach to electronics.

    Cool Community Content

    Lots of companies say they’re all about community. But in our case it’s actually true! Arduino isn’t a company or a board or a platform. It’s a community.

    You guys created much of the content, tutorials and documentation out there. That’s not going to change now that we’ve launched Arduino Docs. GitHub is home to the whole system (we’re tech nerds, we can’t help it). That means members of the community will soon be able to add, edit and influence the Arduino Docs content.

    Resources for all boards on Arduino Docs

    The content team will review and approve submissions and branches made through GitHub. So what you’re seeing right now is the embryonic stage of Arduino Docs. We envisage amazing things once the community is able to get involved. Sign up to our newsletter so we can keep you posted on when that becomes possible, and about updates, leaks and more.

    We’re very proud of the work that the various internal teams have done in making this happen. We hope you are too, and as always we really want any and all feedback you have on this new and valuable Arduino resource.

    Please go and take a look, and do stop by the forums to tell us all about your experience.

    Website: LINK

  • Learn to write games for the BBC Micro with Eben

    Learn to write games for the BBC Micro with Eben

    Reading Time: 5 minutes

    Long-time fans of the Raspberry Pi will know that we were inspired to make a programmable computer for kids by our own experiences with a machine called the BBC Micro, which many of us learned with in the 1980s.

    This post is the first of what’s going to be an irregular series where I’ll walk you through building the sort of game we used to play when we were kids. You’ll need a copy of BeebEm (scroll down for a Linux port if you’re using a Pi – but this tutorial can be carried out on a PC or Mac as well as on an original BBC Micro if you have access to one).

    I’m going to be presenting the next game in this series, tentatively titled Eben Goes Skiing, at the Centre for Computing History in Cambridge at 2pm this afternoon – head on down if you’d like to learn how to make scrolling ascii moguls.

    Helicopter tutorial

    We’re going to build a simple helicopter game in BBC BASIC. This will demonstrate a number of neat features, including user-defined characters, non-blocking keyboard input using INKEY, and positioning text and graphics using PRINT TAB.

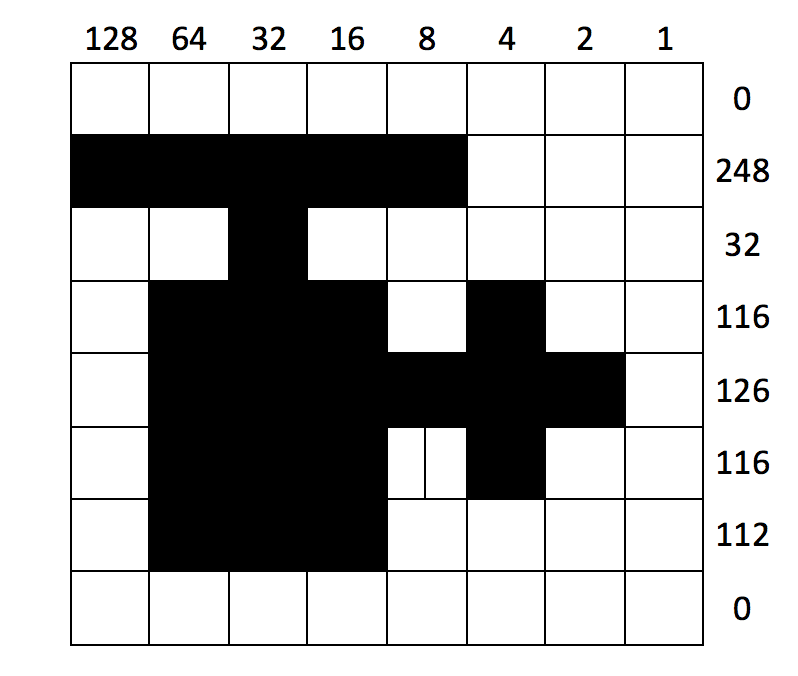
    Let’s start with user-defined characters. These provide us with an easy way to create a monochrome 8×8-pixel image by typing in 8 small numbers. As an example, let’s look at our helicopter sprite:

    Each column pixel position in a row is “worth” a different power of 2, from 1 for the rightmost pixel up to 128 for the leftmost. To generate our 8 numbers, we process one row at a time, adding up the value for each occupied pixel position. We can now create custom character number 226 using the VDU 23 command. To display the character, we change to a graphics mode using the MODE command and display it using the PRINT command.

    Type the following:

    10MODE 2
    
    70VDU 23,226,0,248,32,116,126,116,112,0
    
    RUN
    
    PRINT CHR$(226)

    You should see the little helicopter on the screen just above your prompt. Let’s define some more characters for our game, with character numbers 224 through 229. These represent leftward and rightward flying birds, a rightward flying helicopter, the surface of the sea, and a landing pad.

    Type the following:

    50VDU 23,224,0,14,12,104,16,28,8,0
    
    60VDU 23,225,0,112,48,22,8,56,16,0
    
    80VDU 23,227,0,31,4,46,126,46,14,0
    
    90VDU 23,228,0,102,255,255,255,255,255,255
    
    100VDU 23,229,255,255,0,0,0,0,0,0

    Trying running your program and using print to view the new characters!

    Now we’re ready to use our sea and platform characters to build the game world. Mode 2 on the BBC Micro has 20 character positions across, and 32 down. We’ll draw 20 copies of the sea character in row 30 (remember, rows and columns are numbered from zero) using a FOR loop and the PRINT TAB command, and pick a random position for the platform using the RND() function.

    Type the following:

    110FOR I%=0 TO 19
    
    120PRINT TAB(I%,30) CHR$(228);
    
    130NEXT
    
    140P%=RND(20)-1
    
    150PRINT TAB(P%,30) CHR$(229);
    
    RUN

    You should see something like this:

    Don’t worry about that cursor and prompt: they won’t show up in the finished game.

    It’s time to add the helicopter. We’ll create variables X% and Y% to hold the position of the helicopter, and Z% to tell us if it last moved left or right. We’ll initialise X% to a random position, Y% to the top of the screen, and Z% to zero, meaning “left”. We can use PRINT TAB again to draw the helicopter (either character 226 or 227 depending on Z%) at its current position. The whole thing is wrapped up in a REPEAT loop, which keeps executing until the helicopter reaches the ground (in row 29).

    Type the following:

    160X%=RND(20)-1:Y%=0:Z%=0
    
    180REPEAT
    
    260PRINT TAB(X%,Y%) CHR$(226+Z%);
    
    290UNTIL Y%=29
    
    RUN

    You’ll see the helicopter sitting at the top of the screen.

    We’re almost there: let’s give our helicopter the ability to move left, right and down. On each trip round the loop, we move down one row, and use the INKEY() function to read the Z and X keys on the keyboard. If Z is pressed, and we’re not already at the left of the
    screen, we move one column left. If X is pressed, and we’re not already at the right of the screen, we move one column right.

    Type the following:

    210IF INKEY(-98) AND X%>0 THEN X%=X%-1:Z%=0
    
    220IF INKEY(-67) AND X%<19 THEN X%=X%+1:Z%=1
    
    230Y%=Y%+1
    
    RUN

    You should see something like this:

    The game is much, much too fast to control, and the helicopter leaves trails: not surprising, as we didn’t do anything to erase the previous frame. Let’s use PRINT TAB to place a “space” character over the previous position of the helicopter, and add an empty FOR loop to slow things down a bit.

    Type the following:

    190PRINT TAB (%,Y%)"";
    
    280FOR I%=1 TO 200:NEXT
    
    RUN

    Much better! This is starting to feel like a real game. Let’s finish it off by:

    • Adding a bird that flies back and forth
    • Detecting whether you hit the pad or not
    • Getting rid of the annoying cursor using a “magic” VDU 23 command
    • Putting an outer loop in to let you play again

    Type the following:

    20REPEAT
    
    30CLS
    
    40VDU 23,1,0;0;0;0;
    
    170A%=RND(18):B%=10:C%=RND(2)-1
    
    200PRINT TAB(A%,B%) "";
    
    240A%=A%+2*C%-1
    
    250IF A%=0 OR A%=19 THEN C%=1-C%
    
    270PRINT TAB(A%,B%) CHR$(224+C%);
    
    300IF X%=P% PRINT TAB(6,15) "YOU WIN" ELSE PRINT TAB(6,15) "YOU
    LOSE"
    
    310PRINT TAB(4,16) "PRESS SPACE"
    
    320REPEAT UNTIL INKEY(-99)
    
    330UNTIL FALSE
    
    RUN

    And here it is in all its glory.

    You might want to try adding some features to the game: collision with the bird, things to collect, vertical scrolling. The sky’s the limit!

    I created a full version of the game, using graphics from our very own Sam Alder, for the Hackaday 1K challenge; you can find it here.

    Appendix

    Here’s the full source for the game in one block. If you get errors when you run your code, type:

    MODE 0
    LIST

    And compare the output very carefully with what you see here.

    10MODE 2
    20REPEAT
    30CLS
    40VDU 23,1,0;0;0;0;
    50VDU 23,224,0,14,12,104,16,28,8,0   
    60VDU 23,225,0,112,48,22,8,56,16,0
    70VDU 23,226,0,248,32,116,126,116,112,0
    80VDU 23,227,0,31,4,46,126,46,14,0
    90VDU 23,228,0,102,255,255,255,255,255,255
    100VDU 23,229,255,255,0,0,0,0,0,0
    110FOR I%=0 TO 19
    120PRINT TAB(I%,30) CHR$(228);
    130NEXT
    140P%=RND(20)-1
    150PRINT TAB(P%,30) CHR$(229);
    160X%=RND(20)-1:Y%=0:Z%=0
    170A%=RND(18):B%=10:C%=RND(2)-1
    180REPEAT
    190PRINT TAB(X%,Y%) " ";
    200PRINT TAB(A%,B%) " ";  
    210IF INKEY(-98) AND X%>0 THEN X%=X%-1:Z%=0  
    220IF INKEY(-67) AND X%<19 THEN X%=X%+1:Z%=1
    230Y%=Y%+1
    240A%=A%+2*C%-1
    250IF A%=0 OR A%=19 THEN C%=1-C%
    260PRINT TAB(X%,Y%) CHR$(226+Z%);
    270PRINT TAB(A%,B%) CHR$(224+C%);
    280FOR I%=1 TO 200:NEXT
    290UNTIL Y%=29
    300IF X%=P% PRINT TAB(6,15) "YOU WIN" ELSE PRINT TAB(6,15) "YOU LOSE"
    310PRINT TAB(4,16) "PRESS SPACE"
    320REPEAT UNTIL INKEY(-99)
    330UNTIL FALSE


    Website: LINK