Schlagwort: tech

  • A beautifully-designed LEGO pneumatic compressor

    A beautifully-designed LEGO pneumatic compressor

    Reading Time: 2 minutes

    A beautifully-designed LEGO pneumatic compressor

    Arduino TeamSeptember 10th, 2018

    LEGO sets have long been able to work with simple pneumatic controls, but what about a full air compressor built out of these components? Would this be possible?

    As demonstrated in the video below, this can in fact be accomplished, and in brilliant style no less. The design uses four motors, eight pneumatic pumps, and 10 air tanks to produce a pressure of 35PSI and beyond.

    Controls consist of an Arduino board, along with a pair of resistors to set two separate tank pressures. User feedback is provided by two external displays, and the setup even features a lighting system to allow “workers” to perform maintenance access 24 hours a day!

    For a quick start, the compressor has a Turbo function which is enabled under 35 psi this makes the motors run on 12V instead of the rated 9V. This way the air tanks are filled a bit faster but without overloading the motors.

    The compressor has two sections which can be used separately with their own setpoint or as one big compressor. This selection is done by switching the outlet valves at the back of the compressor and by setting a jumper on the circuit board.

    The Arduino control also tracks the running time of each section in hours and is shown when a switch on the circuit board is pressed.

    The pressure is measured by a non official LEGO pneumatic sensor by Mindsensors.com.

    [youtube https://www.youtube.com/watch?v=AFrECDkbugg?feature=oembed&w=500&h=281]

    Website: LINK

  • Two-way lamp reborn with LEDs and Arduino

    Two-way lamp reborn with LEDs and Arduino

    Reading Time: 2 minutes

    Two-way lamp reborn with LEDs and Arduino

    Arduino TeamSeptember 7th, 2018

    After finding a broken lamp at a scrapyard, which as meant to throw light both up and down, “tuenhidiy” decided to fix it. However, instead of using the normal two-bulb configuration, he replaced these lights with 64 individual RGB LEDs. The results are beautiful, as seen in the videos below.

    Interestingly, this maker didn’t use NeoPixel-style programmable RGB lighting, but rather opted to control each RGB component directly using an Arduino, along with a shift register and transistor assembly. LED soldering was accomplished with the help of a flat wooden jig. The attached LEDs were then rolled up to fit the cylindrical fixture.

    Lighting can be controlled in three modes—color wheel, morph, and HSB to RGB—with a potentiometer, selectable via a 3-way switch.

    [youtube https://www.youtube.com/watch?v=rTP0-jJkLNQ?feature=oembed&w=500&h=281]

    [youtube https://www.youtube.com/watch?v=VbcXEYWFZyo?feature=oembed&w=500&h=281]

    [youtube https://www.youtube.com/watch?v=19xdfSauOIk?feature=oembed&w=500&h=281]

    Website: LINK

  • Build your own Arduino-powered portable function generator

    Build your own Arduino-powered portable function generator

    Reading Time: < 1 minute

    Build your own Arduino-powered portable function generator

    Arduino TeamSeptember 4th, 2018

    If you need a certain electrical signal for testing, there are a variety of function generators available at a wide range of prices and capabilities. If, however, you’d like to build your own, this project by maker “Faransky” looks like a great place to start.

    An Arduino Nano forms the core of this device, which interfaces with an AD9833 waveform generator module to produce the proper wave output. User interface is via a single encoder, which steps through different menu options using a built-in pushbutton, and a two-line LCD display provides feedback.

    Everything is housed inside a nice compact enclosure, along with a lithium-ion battery to make it portable. Its capabilities are shown off in the video below, and build instructions and code are available here. 

    [youtube https://www.youtube.com/watch?v=Xt2-HlCfXGs?feature=oembed&w=500&h=281]

    Website: LINK

  • Shy robotic sculpture imitates nature

    Shy robotic sculpture imitates nature

    Reading Time: 2 minutes

    Shy robotic sculpture imitates nature

    Arduino TeamAugust 28th, 2018

    In nature, animals often are sensitive to the outside environment, retreating into a hole, shell, or other protective structure upon sensing sudden movements. If you were to envision this kind of behavior in robot form, you might come up with something like “The Shy Machine” from Daric Gill Studios.

    When it detects motion via a PIR sensor, the shell-like robot takes a reading of the ambient sound level using an internal microphone. If things are sufficiently quiet, it opens up using a stepper motor and lead screw, revealing a rainbow of colors provided by an array of RGB LEDs inside.

    Its construction and a demo video are shown below, and you can see more about how this Arduino-powered robot was built and the results on Gill’s website.

    [youtube https://www.youtube.com/watch?v=fsOVbV1oEfg?feature=oembed&w=500&h=281]

    [youtube https://www.youtube.com/watch?v=d6BIDxh3jnA?feature=oembed&w=500&h=281]

    Website: LINK

  • Wheatley from Portal 2 comes to life with Arduino

    Wheatley from Portal 2 comes to life with Arduino

    Reading Time: < 1 minute

    Wheatley from Portal 2 comes to life with Arduino

    Arduino TeamAugust 27th, 2018

    If you’re a fan of Portal games, you’d probably like nothing more than to have your own Wheatley Personality Core to accompany you on real-life adventures. While that would be a passing thought for most, Luke Albertson has created his own amazing replica of the Portal 2 character. 

    The device not only can say over 40 phrases from the game via an Adafruit soundboard, but contains a glowing blue eyeball that can pan, tilt, twist, and blink to help express what it’s thinking. It even has handles that move up and down, adding a kind of “flailing arms” effect to convey its emotions. 

    Albertson’s animatronic project is controlled by an Arduino Uno, along with a Bluetooth shield and PS3 controller for user interface. It’s shown off quite nicely in the video below, and more info and clips are available here.

    [youtube https://www.youtube.com/watch?v=6__rQSXZcFM?feature=oembed&w=500&h=281]

    Website: LINK

  • Create a constant current and power load with Arduino

    Create a constant current and power load with Arduino

    Reading Time: < 1 minute

    Create a constant current and power load with Arduino

    Arduino TeamAugust 27th, 2018

    If you need a device which draws a certain amount of current and power for testing, then GreatScott! has just the solution. 

    His project uses an Arduino Nano, along with a separate IC and a voltage divider, to measure both current and voltage input from the power source. It then employs this data to properly adjust a MOSFET, dissipating the correct amount of voltage and power as required.

    Interface is handled via a rotary encoder and a 16×2 I2C LCD display, and the electronics are housed in a solid-looking enclosure. 

    As seen in the video below, the adjustable constant load features an impressively large heat sink, needed to take care of the 30V and 20A that the setup is capable of drawing.

    [youtube https://www.youtube.com/watch?v=VwCHtwskzLA?feature=oembed&w=500&h=281]

    Website: LINK

  • Keep your ideas safe and secure with this biometric diary locker

    Keep your ideas safe and secure with this biometric diary locker

    Reading Time: 2 minutes

    Keep your ideas safe and secure with this biometric diary locker

    Arduino TeamAugust 27th, 2018

    If you want to keep your personal thoughts and ideas to yourself, here’s a diary locker from TechKiwiGadgets that opens with your personal fingerprint.

    As shown in the demo video, this Arduino-based device can house a small notebook and even a smartphone, and locks with the press of a button. When you need your secured materials, you simply insert your finger into the fingerprint reader, and the small servo inside moves to allow access.

    An infrared sensor is also implemented to make sure the door is closed, and a series of programmable LEDs toward the bottom provide visible user feedback. If you’d like to build your own, code and instructions are available here, and the needed 3D print files can be found on Thingiverse.

    [youtube https://www.youtube.com/watch?v=AEk6FkyBG4A?feature=oembed&w=500&h=281]

    Website: LINK

  • Announcing the Arduino Command Line Interface (CLI)

    Announcing the Arduino Command Line Interface (CLI)

    Reading Time: 3 minutes

    [youtube https://www.youtube.com/watch?v=3vtIisvxewc?feature=oembed&w=500&h=375]

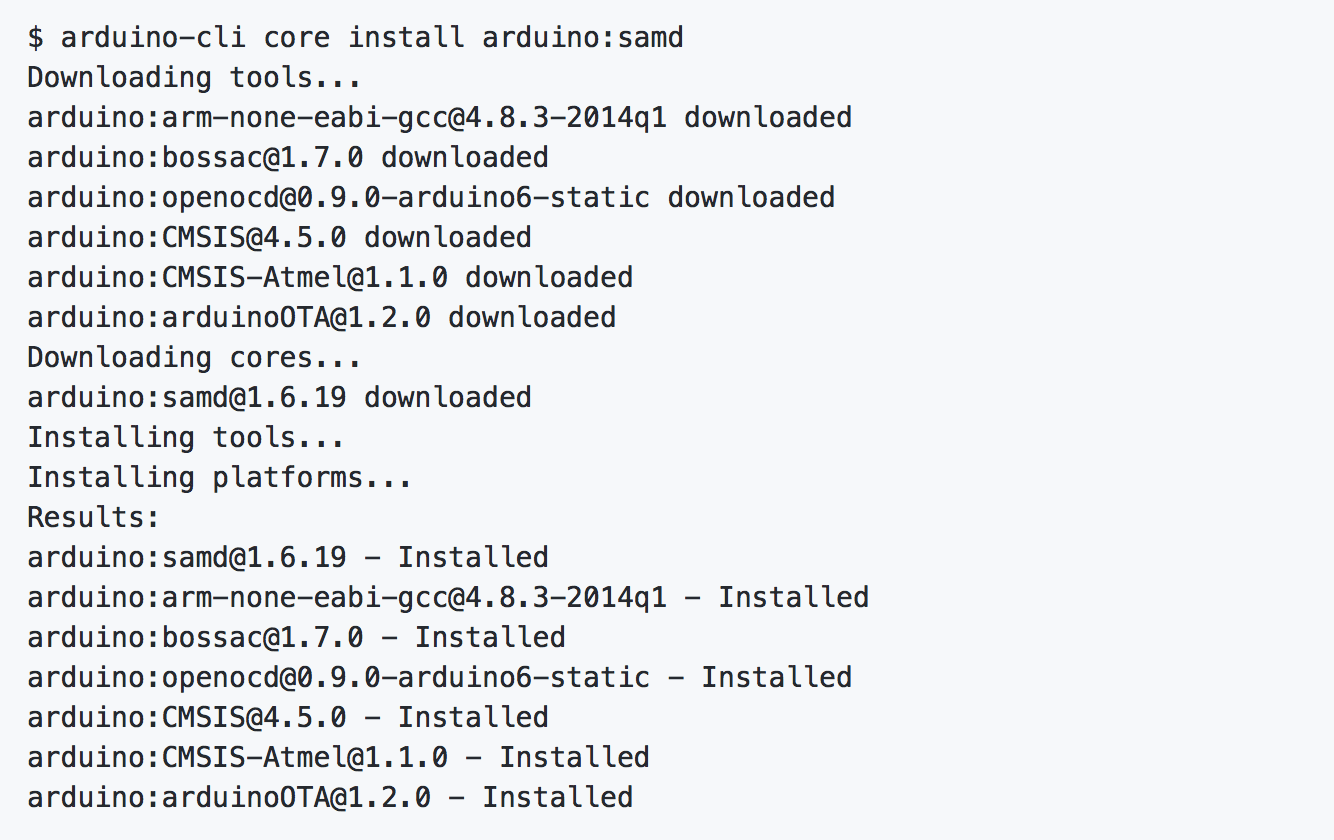
    The Arduino team has been working hard to support the needs of our professional developer community. Many of you requested a way to use our tools in Makefiles, and wanted Arduino IDE features available via a fast, clean command line interface.  How cool would it be to install project dependencies with:

    arduino-cli lib install "WiFi101” “WiFi101OTA”

    So that’s what we’ve done! To make it even cooler, most Arduino CLI commands have the option to output JSON for easy parsing by other programs:

    arduino-cli --format json lib search wifinina | jq
    {
 "libraries": [
    {
 "Name": "WiFiNINA",
 "Author": "Arduino",
 "Maintainer": "Arduino <info@arduino.cc>",
 "Sentence": "Enables network connection (local and Internet) with the Arduino MKR WiFi 1010, Arduino MKR VIDOR 4000 and Arduino UNO WiFi Rev.2.",
 "Paragraph": "With this library you can instantiate Servers, Clients and send/receive UDP packets through WiFi. The board can connect either to open or encrypted networks (WEP, WPA). The IP address can be assigned statically or through a DHCP. The library can also manage DNS.",
 "Website": "http://www.arduino.cc/en/Reference/WiFiNINA",
 "Category": "Communication",
 "Architectures": [
 "*"
    ],
 "types": [
 "Arduino"
    ],
 "releases": {
 "1.0.0": {
 "version": "1.0.0",
 "resource": {
 "URL": "http://downloads.arduino.cc/libraries/github.com/arduino-libraries/WiFiNINA-1.0.0.zip",
 "ArchiveFileName": "WiFiNINA-1.0.0.zip",
 "Checksum": "SHA-256:79f133fedf86411ca7add773a4293137dec057a3b8f1a7904db2d444ed8f4246",
 "Size": 65651,
 "CachePath": "libraries"
    }
    }
    },
 "Folder": null,
 "SrcFolder": null,
 "UtilityFolder": null,
 "Layout": 0,
 "RealName": "",
 "DotALinkage": false,
 "Precompiled": false,
 "LDflags": "",
 "IsLegacy": false,
 "Version": "",
 "License": "",
 "Properties": null
    }
    ]
    }

    The other big news is you can run Arduino CLI on both ARM and Intel (x86, x86_64) architectures. This means you can install Arduino CLI on a Raspberry Pi or on your servers, and use it to compile Sketches targeting the board of your choice (Don’t forget you can also remotely manage your Linux device with Arduino Create Device Manager!)

    Getting Started

    This first release is an alpha, and we would like your feedback to help us improve it. You can download the Arduino CLI alpha preview binaries from:

    Linux (64-bit): https://downloads.arduino.cc/arduino-cli/0.1.0-alpha.preview/arduino-cli-0.1.0-alpha.preview-linux64.tar.bz2

    Linux (32-bit): https://downloads.arduino.cc/arduino-cli/0.1.0-alpha.preview/arduino-cli-0.1.0-alpha.preview-linux32.tar.bz2

    Linux (ARM): https://downloads.arduino.cc/arduino-cli/0.1.0-alpha.preview/arduino-cli-0.1.0-alpha.preview-linuxarm.tar.bz2

    OSX: https://downloads.arduino.cc/arduino-cli/0.1.0-alpha.preview/arduino-cli-0.1.0-alpha.preview-osx.zip

    Windows: https://downloads.arduino.cc/arduino-cli/0.1.0-alpha.preview/arduino-cli-0.1.0-alpha.preview-windows.zip

    Once you’ve installed Arduino CLI, you can try it out using our getting started guide: https://github.com/arduino/arduino-cli#getting-started

    The Arduino CLI code repository is also available at: https://github.com/arduino/arduino-cli. As usual, it’s open source – but if you’re a company who wants to use it to create a customized tool, you can also contact us for a commercial license.

    Integrate Arduino Support Into Your Preferred Platform

    After we used Arduino CLI for awhile, we decided to make it the standard way our software communicates. Imagine having the Arduino IDE or Arduino Create Editor speaking directly to Arduino CLI – and you having full control of it. You will be able to compile on your machine or on our online servers, detect your board or create your own IDE on top of it!

    We want you to be able to add Arduino support to whatever development flow you prefer. Whether you use Atom, Eclipse, Emacs, Vim, VSCode, or are even building your own tools, Arduino CLI makes this possible. Let us know what you think!

    Website: LINK

  • Blow out this Arduino LED candle!

    Blow out this Arduino LED candle!

    Reading Time: 2 minutes

    Blow out this Arduino LED candle!

    Arduino TeamAugust 21st, 2018

    LED candles can provide a nice sense of ambiance, without the inherent associated risk of fire. For better or worse, however, they don’t normally respond to air currents. 

    Paul Dietz, however, shows that this kind of response is actually possible, as an LED’s forward voltage drop is affected by how well it dissipates heat due to ambient air conditions.

    This means that when you puff on an LED, the resulting voltage changes can be picked up by an Arduino Uno.

    LEDs are designed to emit light, but they also make surprisingly capable sensors. Using only an Arduino UNO, an LED and a resistor, we will build a hot LED anemometer that measures wind speed, and turns off the LED for two seconds when it detects you are blowing on it. You can use this to make breath controlled interfaces, or even an electronic candle that you can blow out!

    How Does This Work? 

    When you run current through an LED, its temperature rises. The amount of rise depends on how effectively you are cooling it. When you blow on a hot LED, the extra cooling lowers the running temperature. We can detect this because the forward voltage drop of an LED increases as it gets cooler.

    The circuit is very simple and looks much like driving an LED. The only difference is that we will add an extra wire to measure the voltage drop of the LED while it is on. To work well, you want to use a very small LED (I suggest using an 0402 surface mount LED) connected by the thinnest possible wires. This will allow the LED to heat and cool very quickly, and minimize the heat lost through the wires. The voltage changes we are looking for are just millivolts – at the very edge of what can be reliably detected via the UNOs analog pins. If the LED is resting on something that conducts heat away, it may not be able to get hot enough, so it works best if it is up in the air.

    As shown in the video below, he turned this concept into a novel “candle” setup, blowing his tiny 0402 SMD-format LED out over and over—like a trick birthday candle!

    [youtube https://www.youtube.com/watch?v=TD6A_tvbKT0?feature=oembed&w=500&h=281]

    Website: LINK

  • DeepWay helps the visually impaired navigate with a tap

    DeepWay helps the visually impaired navigate with a tap

    Reading Time: 3 minutes

    DeepWay helps the visually impaired navigate with a tap

    Arduino TeamAugust 20th, 2018

    In order to help those with visual impairments navigate streets, college student Satinder Singh has come up with an innovative solution that literally pokes the user in the right direction. 

    Singh’s system, called DeepWay, uses a chest-mounted camera to take images of the road that a wearer is walking down, then feeds this information to a laptop for processing. 

    If the deep learning algorithm determines that the user needs to move left or right to stay on the path, a serial signal is sent to an Arduino Uno, which in turn commands one of two servos mounted to a pair of glasses to tap the person to indicate which way to walk. Additional environmental feedback is provided through a pair of earphones.

    This project is an aid to the blind. Till date there has been no technological advancement in the way the blind navigate. So I have used deep learning particularly convolutional neural networks so that they can navigate through the streets.

    My project is an implementation of CNNs, and we all know that they require a large amount of training data. So the first obstruction in my way was a correclty labeled dataset of images. So I went around my college and recorded a lot of videos (of all types of roads and also off-roads). Then I wrote a basic Python script to save images from the video (I saved 1 image out of every 5 frames, because the consecutive frame are almost identical). I collected almost 10,000 such images almost 3,300 for each class (i.e. left right and center).

    I made a collection of CNN architectures and trained the model. Then I evaluated the performance of all the models and chose the one with the best accuracy. I got a training accuracy of about 97%. I got roughly same accuracy for all the trained model but I realized that the model in which implemented regularization performed better on the test set.

    The next problem was how can I tell the blind people in which direction to move. So I connected my Python program to an Arduino. I connected the servo motors to Arduino and fixed the servo motors to the sides of a spectacle. Using serial communication I can tell the Arduino which servo motor to move which would then press to one side of the blind person’s head and would indicate him in which direction to move.

    A demo of DeepWay can be seen in the video below, while code for this open source project is available on GitHub.

    [youtube https://www.youtube.com/watch?v=qkmU8mN0LwE?feature=oembed&w=500&h=281]

    Website: LINK

  • Build a 4-button arcade game out of LEGO

    Build a 4-button arcade game out of LEGO

    Reading Time: 2 minutes

    Build a 4-button arcade game out of LEGO

    Arduino TeamAugust 17th, 2018

    If your kids (or you) have somehow gotten tired of playing with LEGO bricks, Lenka Design Workshop has a great way for you to breathe new life into this unused pile. 

    Their game enclosure consists of a 32×32 LEGO baseplate, along with walls made of blocks to support a clear acrylic cover. This in turn holds four large arcade buttons for gameplay control. Five games are currently implemented to run on the game’s Arduino, with light and sound feedback.

    We decided to recycle the unwanted Lego bricks and created an arcade game.

    The code has been written in such a way that it doesn’t have dependencies and will compile on any Arduino board. And of course the games have been intensively tested by our kids. 🙂

    How is this game different from many others that have been published before?

    First of all, there are 5 games built into it:

    • Memory game (“Simon-Says”-like, similar to Touch Me game)
    • Reaction game (similar to Whack-a-Mole)
    • Contest/competition game (for 2-4 players)
    • Melody game (push and play free mode for toddlers and smaller ones)
    • War game (for 2-4 adults)

    Secondly, it has a great design (from our perspective) and can be easily repeated.

    And thirdly, it is earth-friendly because it allows you to recycle the plastic.

    You can see a short demo of the system in the video below, or check out the project write-up for more info. 

    [youtube https://www.youtube.com/watch?v=XALGzy7yIRY?feature=oembed&w=500&h=281]

    Website: LINK

  • Make your own soda fountain out of cardboard

    Make your own soda fountain out of cardboard

    Reading Time: 2 minutes

    Make your own soda fountain out of cardboard

    Arduino TeamAugust 16th, 2018

    If you’re ever wanted to make something awesome, but thought that you just didn’t have the right tools to do so, this soda fountain by “The Wrench” could provide the needed inspiration. 

    The project uses an Arduino Nano to control a small air pump via a relay, which turns on when a glass is the correct dispensing position. This pushes air into a sealed soda bottle, and soda is pushed out of another tube to equalize the pressure.

    It’s a certainly a neat trick. Given its frame made out of cardboard stuck together with hot glue, the raw materials are very easy to obtain and dispose of when needed. The build process is explained in the video below, while the circuit diagram and Arduino code can be found here.

    [youtube https://www.youtube.com/watch?v=0kzQJLXK8CI?feature=oembed&w=500&h=281]

    Website: LINK

  • An Arduino-controlled turntable for 3D scanning

    An Arduino-controlled turntable for 3D scanning

    Reading Time: 2 minutes

    An Arduino-controlled turntable for 3D scanning

    Arduino TeamAugust 16th, 2018

    Many DSLR cameras can be operated with a simple infrared signal, making them perfect targets for Arduino control. Travis Antoniello took advantage of this with his brilliantly simple 3D scanning rig.

    Electronics are handled by an Arduino Uno, which commands a stepper motor to rotate a scanning platform 10 degrees per photo. After rotation, it stops for a set amount of time to let scanned objects settle, and triggers the camera, a Nikon D3200, via an infrared LED. It then repeats this process over and over until a full set of photos is taken. 

    Code for the build can be found on GitHub, and the device’s 3D-printed components are available on Thingiverse. The project video seen here gives a good overview of how it works, and the scanned object on display just after 2:30 looks absolutely brilliant.

    [youtube https://www.youtube.com/watch?v=s2mI0JuVWBc?feature=oembed&w=500&h=281]

    Website: LINK

  • Turn the pages on your Kindle remotely with Arduino

    Turn the pages on your Kindle remotely with Arduino

    Reading Time: 2 minutes

    Turn the pages on your Kindle remotely with Arduino

    Arduino TeamAugust 16th, 2018

    As seen here, Alex Mikes enjoys reading his Kindle in bed at night, but prefers to use a stand rather than hold it in his hands. The one disadvantage to this is that one normally has to lift his or her hand up to change pages. Thanks to a clever bit of engineering, Mikes only has to press the button on a small RF remote, signaling an Arduino Nano-based robot to press it for him.

    The device uses a micro servo motor to actuate the fake finger, which swings into the correct position to advance pages on command. A 3D-printed frame holds everything in place, and in order to properly control his Kindle’s capacitive touchscreen, a wire is wrapped inside the stylus tip and connected to the circuit ground. 

    Not since Rick and Morty’s butter-passing robot has there been a more hyper-specific, purpose-built device than perhaps Alex Mikes’ automatic Kindle page turner. Instead of having to raise his arm to tap the edge of the screen while reading in bed, a simple click of a wireless remote makes the attached contraption do all of that hard work for him.

    More photos of the project are up on Imgur.

    Website: LINK

  • Monopoly transformed into the world of Skyrim with LEDs and Arduino

    Monopoly transformed into the world of Skyrim with LEDs and Arduino

    Reading Time: 2 minutes

    Monopoly transformed into the world of Skyrim with LEDs and Arduino

    Arduino TeamAugust 14th, 2018

    While “Boardwalk” and “Park Place” may not mean anything to you outside of the game of Monopoly, there is a plethora of custom versions to suit your particular interest. If you enjoy the world of Skyrim, then you need to check out this board by Charles Ledford. 

    The build features an anodized aluminum playfield coated in epoxy, along with a wooden frame that conceals electronics including an Arduino Uno inside. This enables a set of programmable LED strips to light up a dragon and lettering in the middle, as well as properties in the correct Monopoly color. 

    Custom coins, playing cards, characters, and even farms and castles (houses and hotels) complete the project, allowing for fully Skyrim-themed gameplay!

    You can find more details in Ledford’s write-up, and see a quick demo of it below! 

    [youtube https://www.youtube.com/watch?v=9Nw06nXSIbM?feature=oembed&w=500&h=375]

    Website: LINK

  • Thomas the Tank Engine turned into a karaoke robot

    Thomas the Tank Engine turned into a karaoke robot

    Reading Time: < 1 minute

    Thomas the Tank Engine turned into a karaoke robot

    Arduino TeamAugust 13th, 2018

    When Hunter Irving spotted a knockoff Thomas the Tank Engine toy at a thrift store, he simply had to buy it, telling himself that he’d turn it into an animatronic contraption at some point. While these kind of promises often go unfulfilled, Irving converted it into an egg-shaped, karaoke-singing robot, with a mouth and eyes that move along with music.

    The body of this new robotic device is designed in Blender and 3D-printed, while the mechanicals inside are actuated with a servo. Control is handled by an Arduino, which responds to MIDI signals from a speech synthesizer, used to produce its eerie electronic voice. 

    [youtube https://www.youtube.com/watch?v=IbHfiO7Sy8U?feature=oembed&w=500&h=281]

    Website: LINK

  • Electric-powered fan rocket takes off and lands(?) vertically

    Electric-powered fan rocket takes off and lands(?) vertically

    Reading Time: 2 minutes

    Electric-powered fan rocket takes off and lands(?) vertically

    Arduino TeamAugust 13th, 2018

    Does a rocket need to use a certain type of fuel, or even be capable of spaceflight? While James Bruton’s build might not fit everyone’s definition of this type of craft because of its electric ducted fan (EDF) propulsion, it does face the same major challenge of controlling a tall pipe-like structure from thrust coming from the tail. It’s meant to both take off and land in a vertical orientation as well, something inconceivable in traditional rockets until very recently.

    For control, Bruton uses an Arduino Mega inside the main fuselage of the craft, which regulates the speed of the three EDFs. It also turns two of these fans with a servo and linkage system in order to compensate for unwanted roll. A second Arduino and an IMU are embedded in the nose cone, which passes data to the Mega board via a serial connection. 

    The build and early tests can be seen in the video below, and a full test is planned for the future alongside Ivan Miranda, who has been working on his own version.

    [youtube https://www.youtube.com/watch?v=ZCzXICeH7hY?feature=oembed&w=500&h=281]

    Website: LINK

  • Check the weather on this Arduino-controlled split-flap display

    Check the weather on this Arduino-controlled split-flap display

    Reading Time: < 1 minute

    Check the weather on this Arduino-controlled split-flap display

    Arduino TeamAugust 9th, 2018

    Split-flap displays show information using characters changed by an electric motor. While they’ve largely been replaced by more modern means, hobbyists like “gabbapeople” have been keeping this this technique alive, in this case as a four-character IoT weather display.

    The device is built using laser-cut plexiglass, and uses four individual servos to actuate the character flaps. Control is accomplished using an Arduino Mega programmed in the XOD visual programming environment, along with the requisite driver modules. Weather data is pulled from the AccuWeather API. 

    You can see it flapping away in the video below, displaying the weather in abbreviations such as “ICLO” for intermittent clouds, as well as the temperature in degrees Celsius.

    [youtube https://www.youtube.com/watch?v=UUt0KVzSsMc?feature=oembed&w=500&h=281]

    Website: LINK

  • Automate motor winding with Arduino

    Automate motor winding with Arduino

    Reading Time: 2 minutes

    Automate motor winding with Arduino

    Arduino TeamAugust 7th, 2018

    When you want to make a mobile robot, DC motors can be a great choice. We normally accept that they can be purchased for a few dollars each, but what if you want to make your own?

    In order to assist with the winding process for a self-built—or at least self-wound—motor, Mr. Innovative created an… innovative fixture with two stepper motors and an Arduino Nano for control. 

    The bare motor armature is held in a vertical orientation by one stepper, while the other winds wire using a hollow 3D-printed feeder mechanism. User interface consists of an OLED screen and buttons that let you select the number of windings and another to advance the armature to the next coil location. 

    Arduino code and electrical drawings can be found here, and 3D-printed parts are available on Thingiverse.

    [youtube https://www.youtube.com/watch?v=05jpsSEF_Qs?feature=oembed&w=500&h=281]

    Website: LINK

  • Feed Barbie with the J’ai faim! mechatronic game

    Feed Barbie with the J’ai faim! mechatronic game

    Reading Time: < 1 minute

    Feed Barbie with the J’ai faim! mechatronic game

    Arduino TeamAugust 7th, 2018

    According to this project’s write-up, while some struggle to get enough nourishment, those in more developed countries often aspire to consume too little food. As an apparent commentary on this situation, Niklas Roy and Kati Hyyppä have created a mechatronic game called J’ai faim!, French for “I’m hungry!”

    In this Arduino-controlled game, participants rotate a Barbie head to point her comically over-sized tongue over a piece of sushi lit up by an LED. When in position, the player fires her solenoid-actuated tongue using the joystick, and if the correct sushi is eaten the score progresses from “starving” to “well fed.” 

    You can see the game—reminiscent of a very strange version of whack-a-mole—in the video below.

    [youtube https://www.youtube.com/watch?v=KKAWjVZ9pTI?feature=oembed&w=500&h=281]

    Website: LINK

  • Generating waves with Arduino

    Generating waves with Arduino

    Reading Time: < 1 minute

    Generating waves with Arduino

    Arduino TeamAugust 6th, 2018

    Need a wave generator to test out your latest boat, barge, or submarine design, but can’t quite afford one? If so, then you might consider Subham Bhatt’s DIY tank that he was able to construct for around $1,200 USD. 

    Bhatt’s device features a pair of stepper motors and lead screws that push a stainless steel paddle through the water, producing waves formed to his precise specifications. An Arduino Mega is used for control, along with a single stepper driver to power both motors. 

    User interface is provided through the Arduino IDE’s serial interface, set up to take commands via a simple text-based menu system. 

    [youtube https://www.youtube.com/watch?v=wovaaC5p6dg?feature=oembed&w=500&h=281]

    Website: LINK

  • Develophead takes (some) of the work out of film photography

    Develophead takes (some) of the work out of film photography

    Reading Time: 2 minutes

    Develophead takes (some) of the work out of film photography

    Arduino TeamAugust 6th, 2018

    Today, if you take a photograph, more than likely it’s digital. This presents many advantages over its film counterpart, but many serious photographers still use the format in order to produce just the right effect. Pablo Zárate is one such photographer, and combined this passion with Arduino and 3D printing knowledge to produce the “Develophead.”

    Develophead is meant as an augmentation to AP brand developing tanks, adding an automatic agitation function. This previously had to be done by hand, including 16 minutes of manipulation in the case of C41 rolls. 

    Develophead is built on Arduino Nano and uses a 5-volt power source. It’s a cap that fits onto the top of a development tank, inserting an agitation rod into the hole that chemicals are poured into and out of. Turn the cap on and the rod begins to turn the film reel back and forth. A knob on the top of the cap lets you adjust the speed/intensity of the agitation.

    As of now, this labor-saving device is meant for AP Classic development tanks, but  Zárate has released the plans on GitHub and hopes others will help expand on this concept.

    [youtube https://www.youtube.com/watch?v=VPRG-3OeSoE?feature=oembed&w=500&h=281]

    Website: LINK