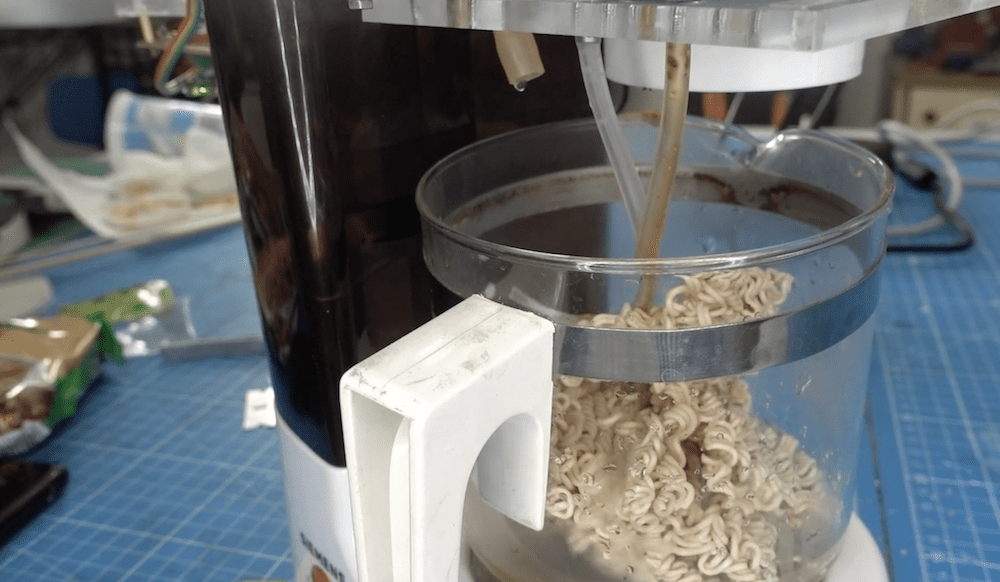
Ramen noodles can be a quick snack or meal, but per this IoT ramen maker by Clem Mayer, you don’t even have to run to the microwave to prepare them.
His project used a vintage electric filter coffee machine to heat and dribble water into the waiting brick-o-food, then a stepper-driven pusher adds flavor powder. More seasoning can be dispensed via a servo-actuated syringe, and another stepper is used to stir everything.
The setup is controlled by a MKR WiFi 1010 board, giving Mayer the ability to start meals/mix in hot sauce from the convenience of his phone via a simple web app. Results are… edible-ish, but if you want to build your own, files and more info can be found here.
Become a certified member of the Arduino community
Arduino Team — July 19th, 2019
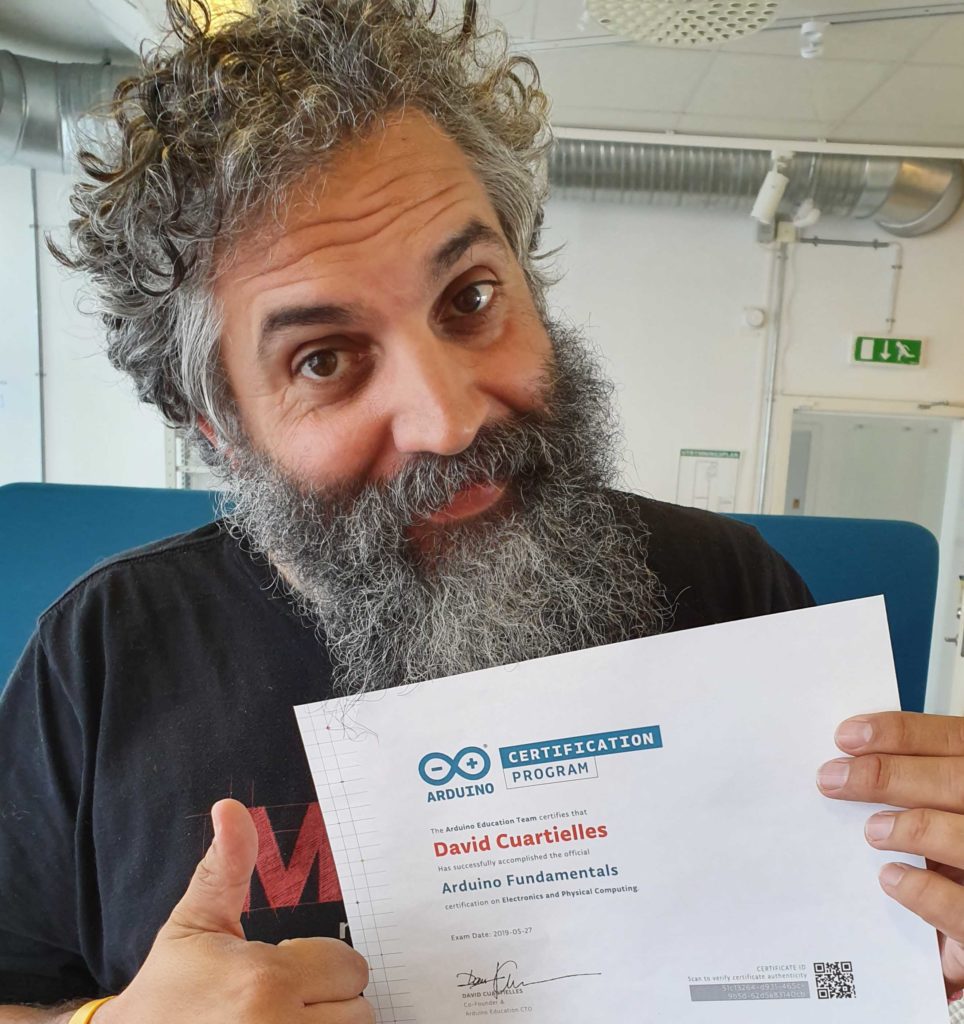
As recently announced, the Arduino Certification Program: Arduino Fundamentals is a structured way for you to enhance and validate your Arduino skills. Although the exam has been available in the U.S. since May, we’re excited to roll it out to the EU and rest of the world (except Brazil).
Arduino Fundamentals provides you with the opportunity to gain official recognition for your knowledge in Arduino-related electronics, programming, and physical computing. If you pass the test, you will be rewarded with an Arduino Fundamentals certificate in your name containing a unique QR code to ensure authenticity.
If you think you can answer 36 questions in 75 minutes, then you can become a fully certified member of the Arduino community and enhance your resume for just $30.
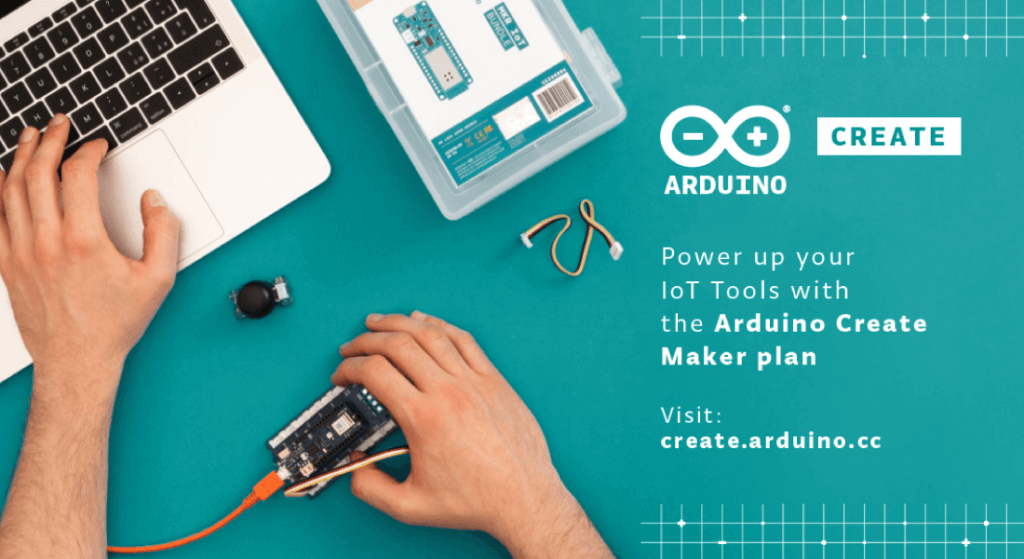
Arduino Create, the integrated online platform that enables makers and professional developers to write code, access content, configure boards and share projects, now offers users the ability to upgrade their service by opting for the Create Maker plan to experience the Arduino IoT Cloud to the fullest.
Aside from no ad interruptions in their working space, for a monthly fee of $6.99 USD (plus applicable taxes), Create Maker plan subscribers will enjoy an array of extra features and benefits over the free Create plan.
Here’s a quick glimpse of what subscribers can look forward to:
250 sketches allowed in your sketchbook
200MB space to store sketches and libraries
Unlimited compilation time to verify code and upload it to your board
Five ‘things’ (connected objects) and 20 properties per each ‘thing’
Access to set up and remotely control five of each cloud-enabled Arduino board type
Access to set up and remotely control three cloud-enabled Linux devices
Access to set up and remotely control one cloud-enabled generic third-party board
Custom library editing
Web Editor support for third-party boards (ESP8266)
Access to Arduino Create Chrome app
All of the above are in addition to the standard features that are available to all Arduino Create users, such as an always up-to-date online IDE and the option to tap into the power of the community on the Arduino Project Hub by browsing projects and making them their own. Users can share their builds and receive feedback from others, while the in-depth guided flows make it easy to configure online services like the Web Editor and Cloud.
Ready to subscribe? If you’re fortunate enough to be one of the first 500 to do so, we’ll include a FREE MKR WiFi 1010 board with your monthly plan!
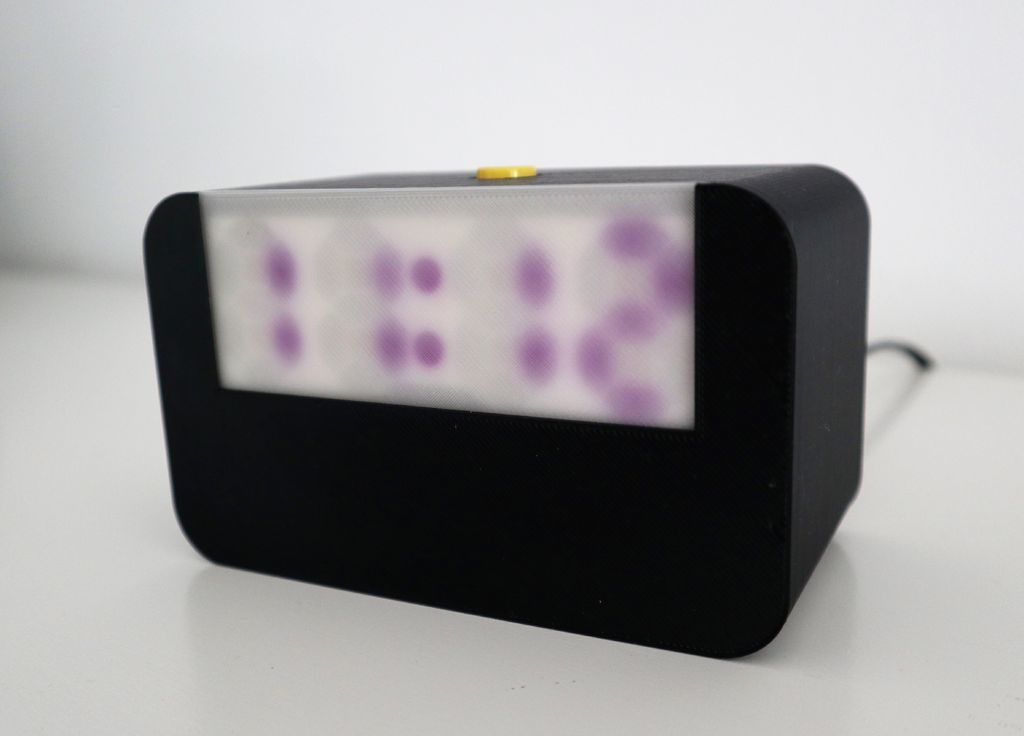
With many LED projects—like clocks—you’ll want to use a diffuser to keep light somewhat even over a wide area. Diffusers, as their name implies, diffuse light, but what if one was to instead use it as the light source itself?
This clever timepiece from Zaphunk does just that, employing an array of UV LEDs to illuminate a photochromic face. In the case of the glowing screen, the material first shines in response to the lit LEDs, then stays ‘on’ after they turn off, showing four numbers and a colon. When the photochromic cover is in use, the filament instead changes color based on the LEDs.
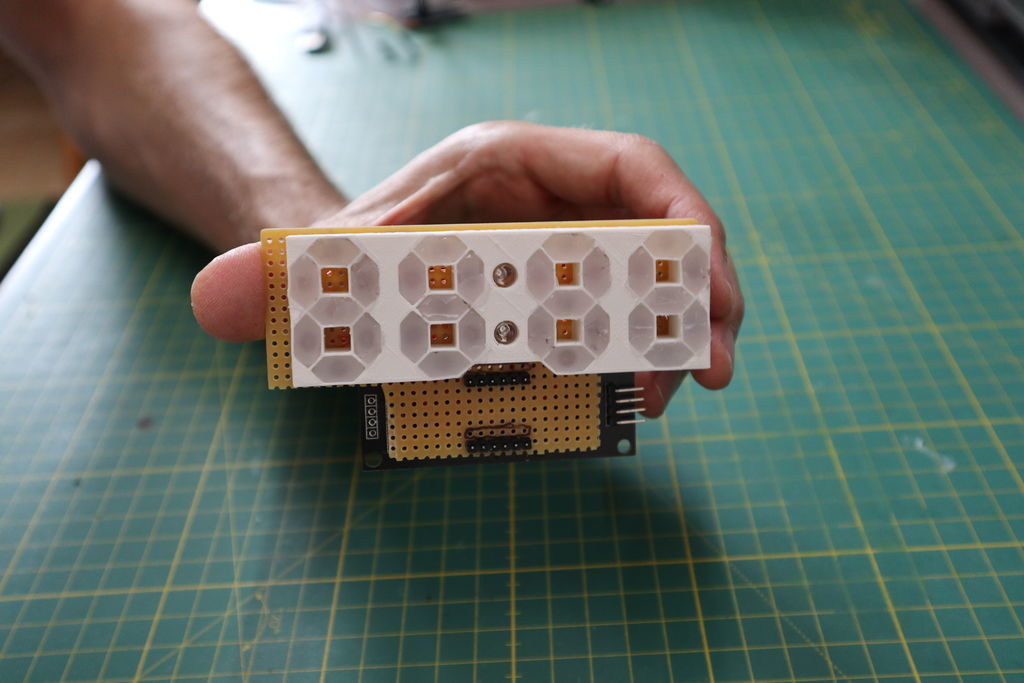
The clock is implemented with an Arduino Nano, an RTC module, and a heavily modified 8-digit 7-segment display, and triggered via the press of a button on top.
This clock uses a custom built 4-digit 7-segment display made from UV LEDs. In front of the display a screen is placed that consists either of phosphorescent (“glow-in-the-dark”) or photochromic material. A push button on the top lights up the UV display which then illuminates the screen for a few seconds so that it starts glowing or changes color which then slowly fades away.
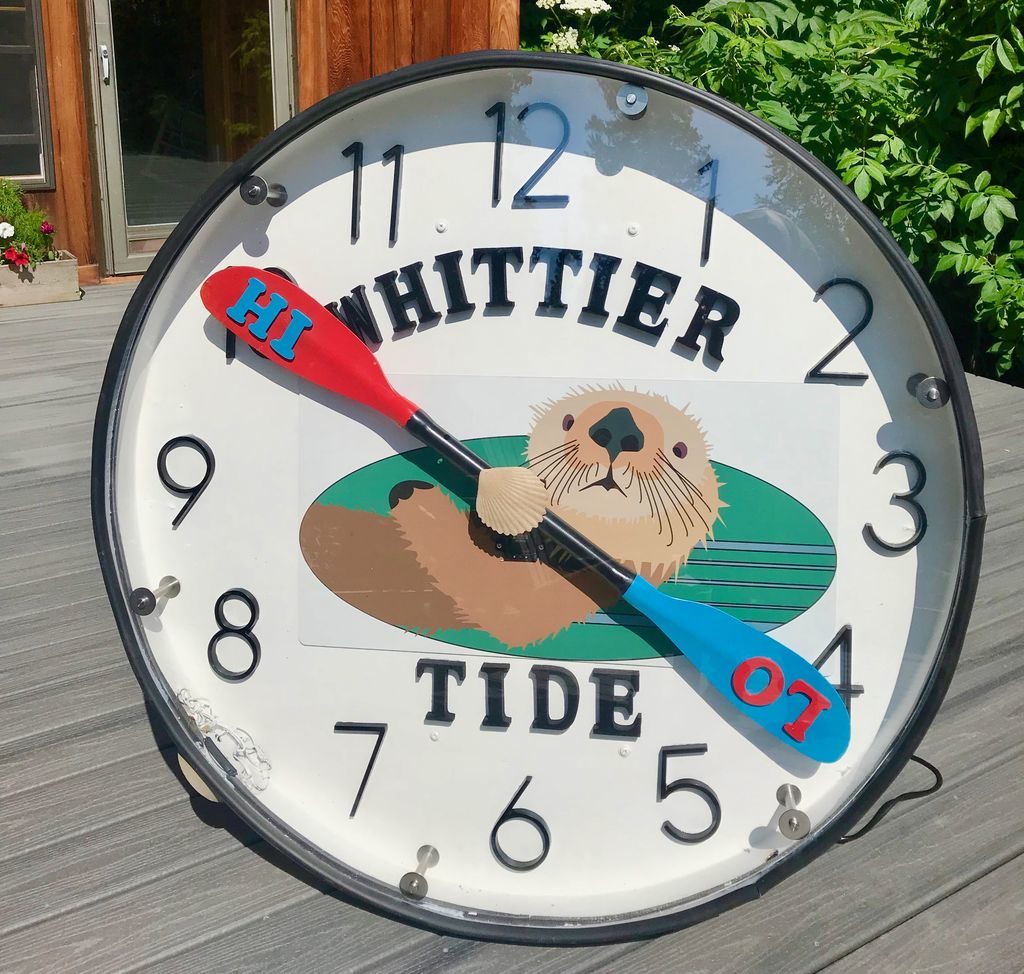
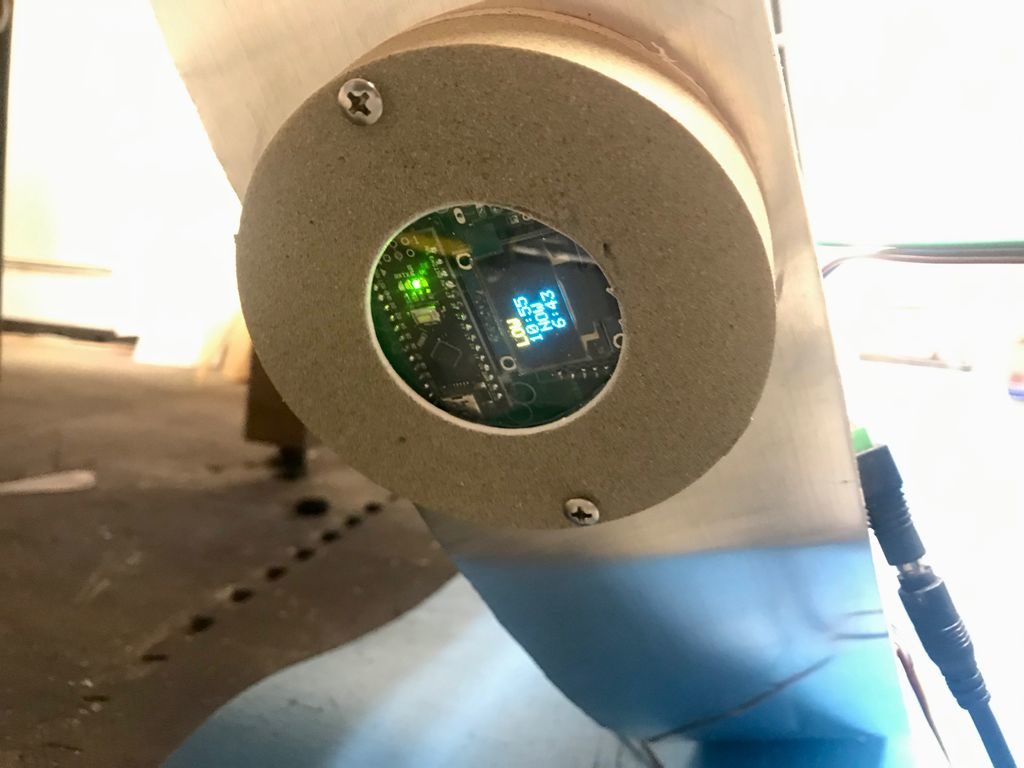
As a gift for friends that operate tours of Prince William Sound in Alaska, maker ‘rabbitcreek’ decided to create a humongous (4’ diameter) tide clock, controlled by dual Arduino Nanos.
One Nano operates the adorable—though very large—otter on the clock’s face via a servo and gear reduction setup that holds a kayak paddle to indicate high and low tides. The other board handles the unit’s RGB LED lighting, which shines the appropriate color to indicate the vast swings in daylight time of that region.
An RTC module for each Nano provides accurate timekeeping—thus proper tide and daylight indications—and a small monitor is used for maintenance tasks. It’s a brilliant build that is certain to delight residents and tourists to the area alike!
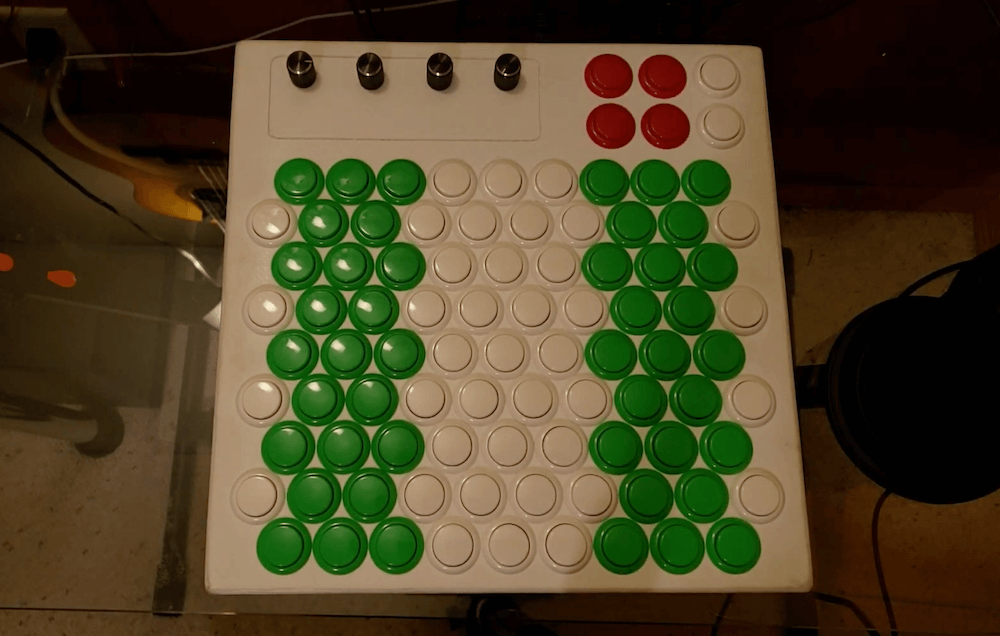
A 3D-printed, Arduino Due-based MIDI jammer keyboard
Arduino Team — July 11th, 2019
Michael Koopman wanted to learn piano. However, after finding this pursuit frustrating, he instead decided to assemble his own 3D-printed MIDI jammer keyboard, inspired by the AXiS-49 interface pad.
His instrument is controlled via an Arduino Due, with 85 buttons arranged in a diagonal pattern. This allows for whole steps on the horizontal axis, fourths on one diagonal, fifths on the other diagonal, and octaves on the vertical axis.
This configuration enables the device to be used in a variety of ways, and features an additional six buttons and four potentiometers to vary playing style, along with ¼ inch jacks for auxiliary inputs.
As seen in the video below, while Koopman had a hard time with the piano, apparently that wasn’t case with his MIDI keyboard, as he’s able to play it beautifully—even using two at a time around 8:15!
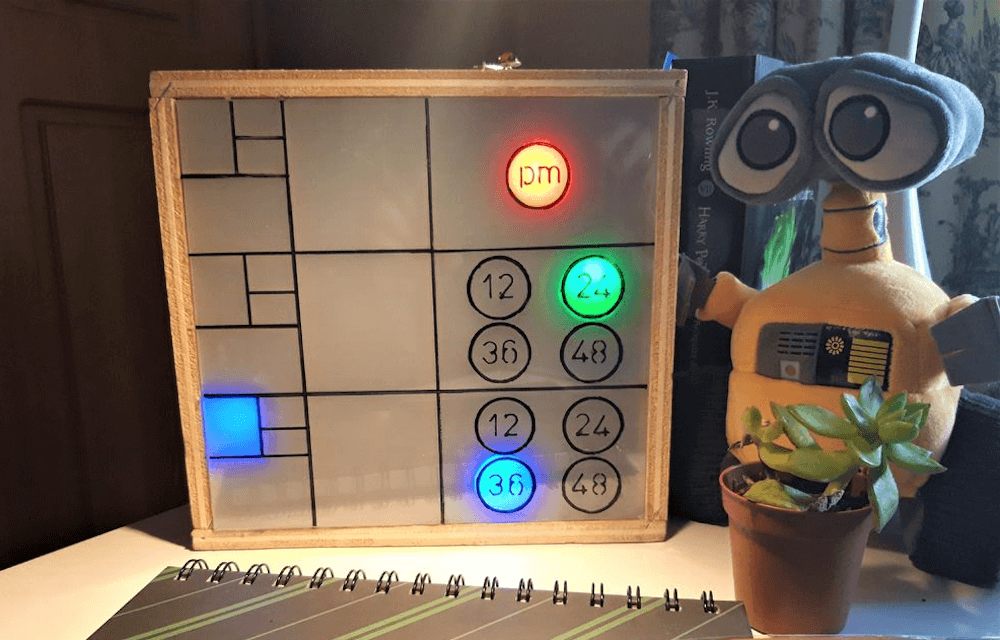
In the early 1200s, Fibonacci introduced a series of numbers that now bear his name, starting with 0, then 1, and continuing on as the sum of the two preceding numbers. This gives values of 0, 1, 1, 2, 3, 5, 8, and so on, and after being prompted by a friend, “TecnoProfesor” decided to turn this numerical pattern into a clock.
The concept here is that instead of using the conventional 1-12 to display the time, this device uses blocks corresponding to Fibonacci numbers 1-5, with circular icons adding increments of 12 for minute and second values.
It’s an interesting concept, somewhat akin to the world of binary or even word clocks. The build consists of an Arduino Mega and a DS3231 RTC module for control, a wood and methacrylate housing, and a number of programmable RGB LEDs to indicate numbers.
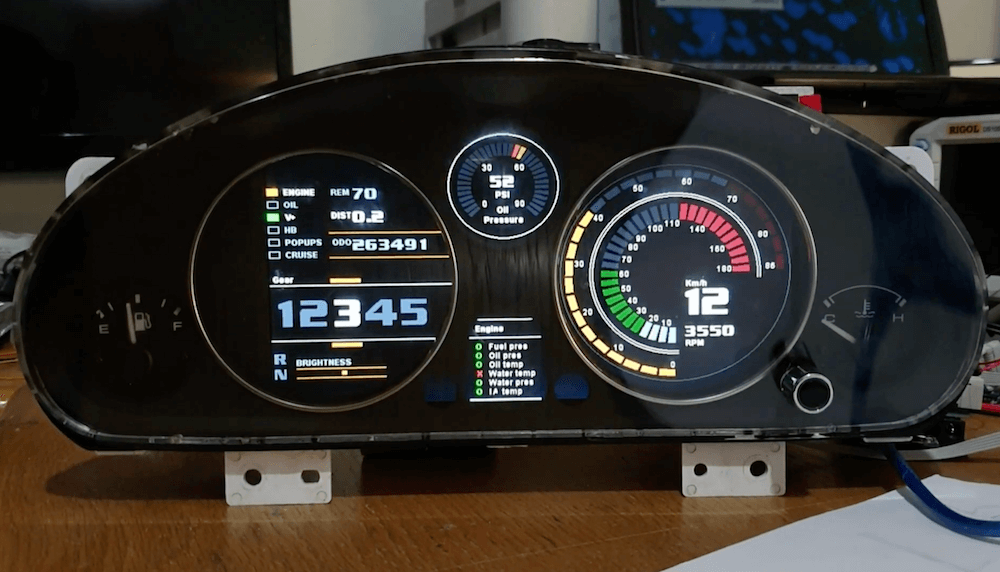
Nearly any car comes with the proper dashboard to get you from point A to point B, but what if you want something all your own displaying important stats? While there aren’t a lot of technical details on the Arduino-based builds, these MX5 Miata JDM-style TFT cockpits by Jroobi are sure to inspire.
The first version puts RPM and KPH values on coaxial sliders in the right circular display. That leaves the second round display for info such as what gear you’re in, along with auxiliary displays for extra data. The second splits up RPM and KPH between the main circles. It also features interesting light-up alerts in the middle, as well as a gauge similar to the first on top.
The first iteration—and presumably the second—includes a clever user interface setup, where a rotary encoder surrounds the existing trip reset button for brightness control while still preserving its reset ability.
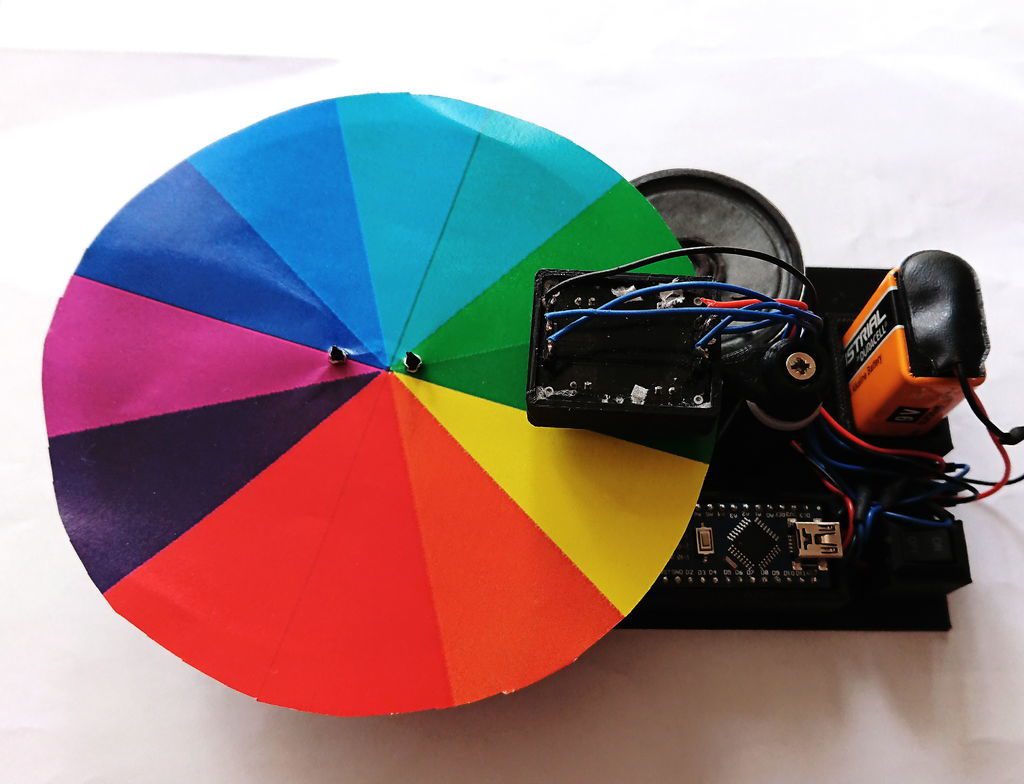
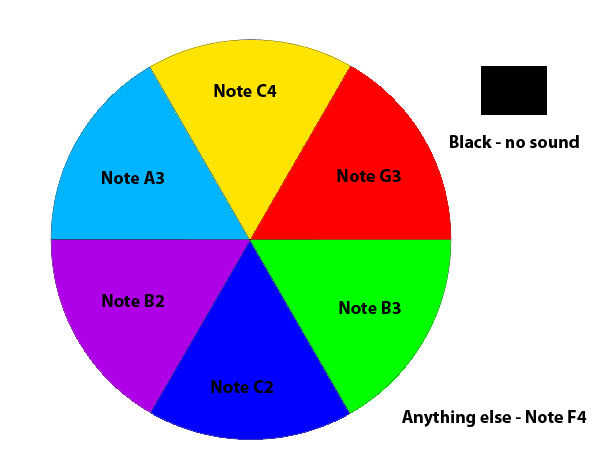
How we see colors is an interesting concept, and as a conversation starter about the physics of color and sound, maker Marcin Poblocki created his own ‘Color Instrument.’
Poblocki’s device rotates a wheel of colors around under a TCS3200/TCS230 sensor via a continuous rotation-modded SG90 servo motor. An Arduino Nano then spits out the tone corresponding to the color it senses using a small speaker, allowing for simple songs to be produced according to hue arrangements.
It’s a neat idea that could be taken in many different directions. At the very least, it would certainly spark conversation, perhaps questioning, as noted in the project write-up, why the color pink isn’t included in the natural light spectrum.
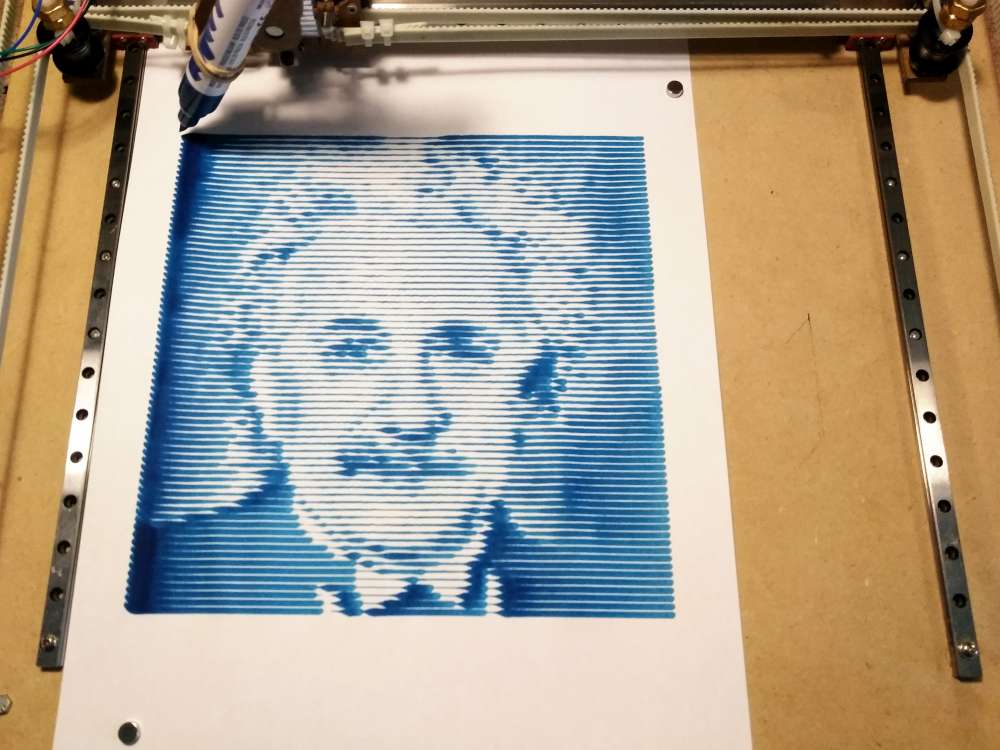
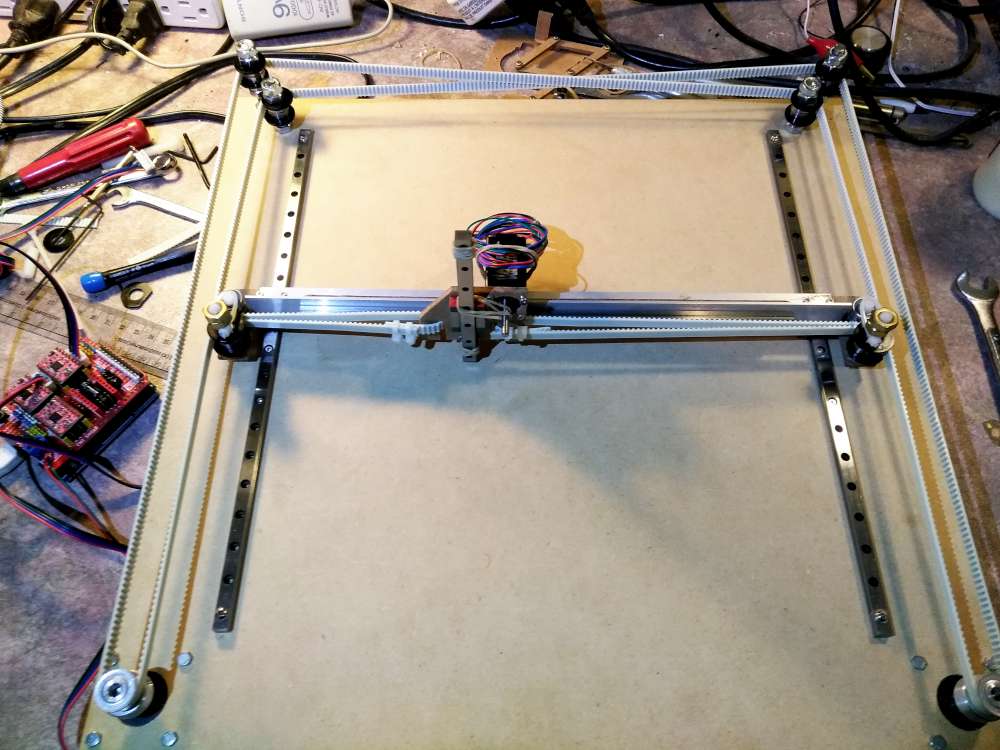
Facere-Bot is a portable machine that draws iconic photos
Arduino Team — July 10th, 2019
Inventor Artist Darcy Whyte wanted a drawing robot that was light enough to carry around, and could quickly produce drawings. Naturally, he turned to an Arduino Uno, along with a CNC shield and a trio of A4988 stepper drivers. These control a NEMA 8 and two NEMA17 stepper motors in a gantry-style artistic setup.
The build is able to drag a marker across a page, apparently varying pressure applied with the z-axis, and thus how much ink is applied. In another mode, a pen can be used, which wobbles back and forth to create volume when needed.
Both methods, as seen in the clips below, can sketch a very recognizable—though certainly distinct—portrait of Marilyn Monroe, or presumably whatever other image you choose to program in.
BluePump protects and controls your pool’s filter pump
Arduino Team — July 9th, 2019
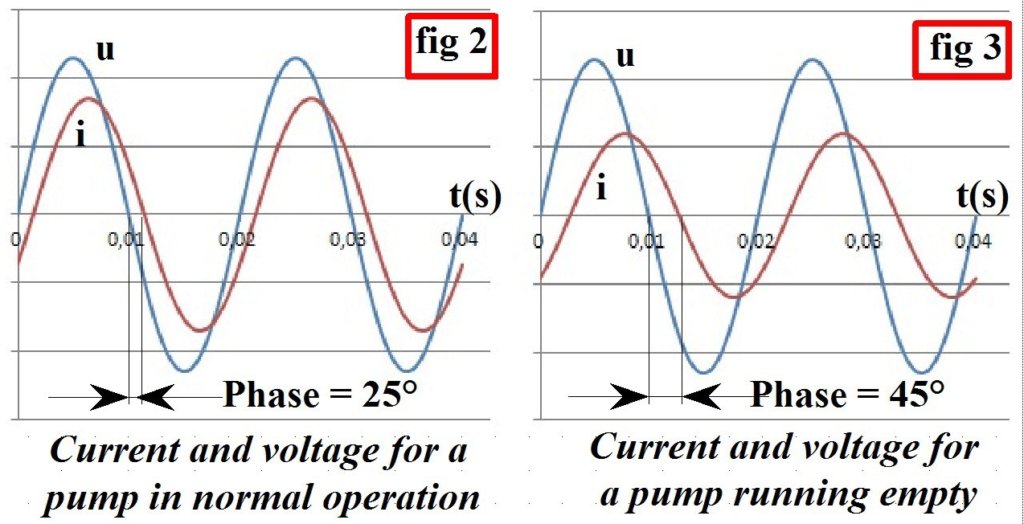
Most pools feature a powered pump system to help filter out debris, but what if your water level gets too low? Pumps designed for ‘wet’ operation generally don’t work well when water isn’t present, so Luc Brun came up with an innovative monitoring solution.
His setup uses an Arduino Nano and an ACS712 sensor to observe both voltage and current, detecting the phase shift between the two. If this shift is too large, this indicates dry operation, and shuts down the pump via a relay until things are resolved.
To complement this ability, BluePump also includes a temperature sensor, an RTC, and a Bluetooth module, allowing it to schedule cleanings as needed, or work under human control via a custom Android app.
This machine creates images using Skittles as pixels
Arduino Team — July 9th, 2019
Skittles candies come in various vibrant colors. While they may be a tasty treat, JohnO3 had another idea: to create an amazing automated display for the little circles.
His device, dubbed the “Skittle Pixel8r,” uses an Arduino Mega to pull a dispensing funnel between one of 46 channels, covered on one side with a piece of glass.
On top of the shuttle mechanism, eight boxes release the correct flavor/color into an intermediate tube via individual metal gear servos. The Arduino then commands the linear axis to move the funnel to the appropriate bin. This process is repeated 2,760 times until an image, measuring up to 785 x 610mm (31 x 24 inches), is completed.
The Skittle Pixel8r an incredible build, and perhaps we could see it expanded even further to not just dispense, but also sort Skittles as an all-in-one auto art installation! Code and files for the project can be found here.
After constructing a regen (regenerative) radio receiver several years ago, Michael LeBlanc decided to upgrade to a direct conversion receiver in order to gain some performance improvements as well as support AM and SSB signals between 160m and 20m. His build is based on Ashhar Farhan’s DC40 design available here, along with a couple modifications by Ryan Flowers, and of course his own experimentation to get things working properly.
The device is controlled by an Arduino, which changes the frequency via an Si6351 oscillator depending on encoder input. Visual frequency feedback is provided by a small OLED display, and the assembly is encased in a very cool 3D-printed enclosure—or rather ‘enclosures’ as two boxes separate the digital and analog circuits.
It’s a simple configuration and the result, as shown in the video below, is a very clean looking and sounding project!
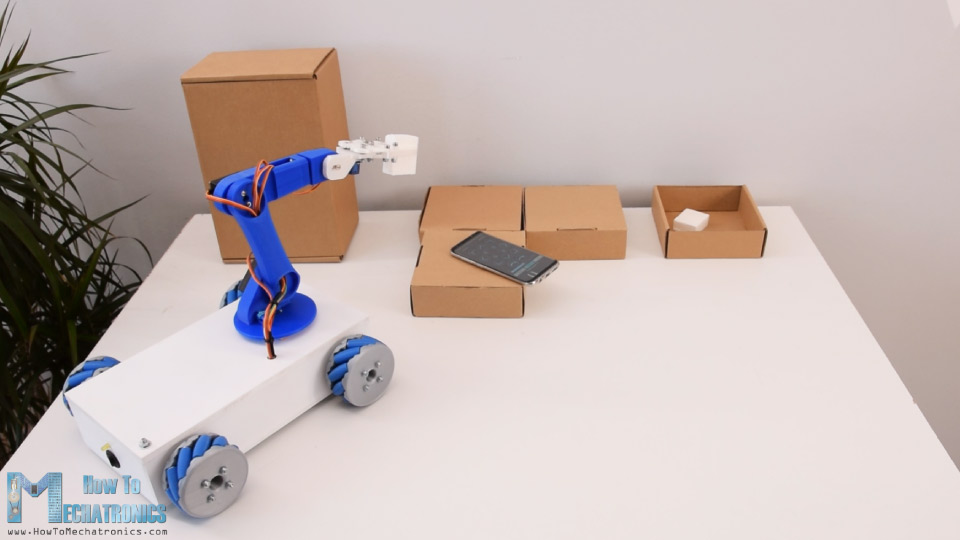
Store and replay this robot’s movements from your phone
Arduino Team — July 8th, 2019
Robotic arms can be interesting, as are robots that roll around—especially on a semi-exotic Mecanum wheel setup. Dejan Nedelkovski’s latest How To Mechatronics build, however, combines both into one package.
This project actually starts out in a previous post, where he constructs the moving base with Mecanum wheels, enabling it to slide and rotate in any direction.
In this final(?) stage, he adds a five-axis robot arm mounted on top of its boxy frame, or six-axis if you count the gripper. Either way, the arm uses a total of six servos for actuation, and the base of the bot travels around under the power of four stepper motors. Each motor is controlled by an Arduino Mega, using a custom shield, allowing repeatable movements in any direction. These can be stored and replayed via the robot’s custom Android app as desired.
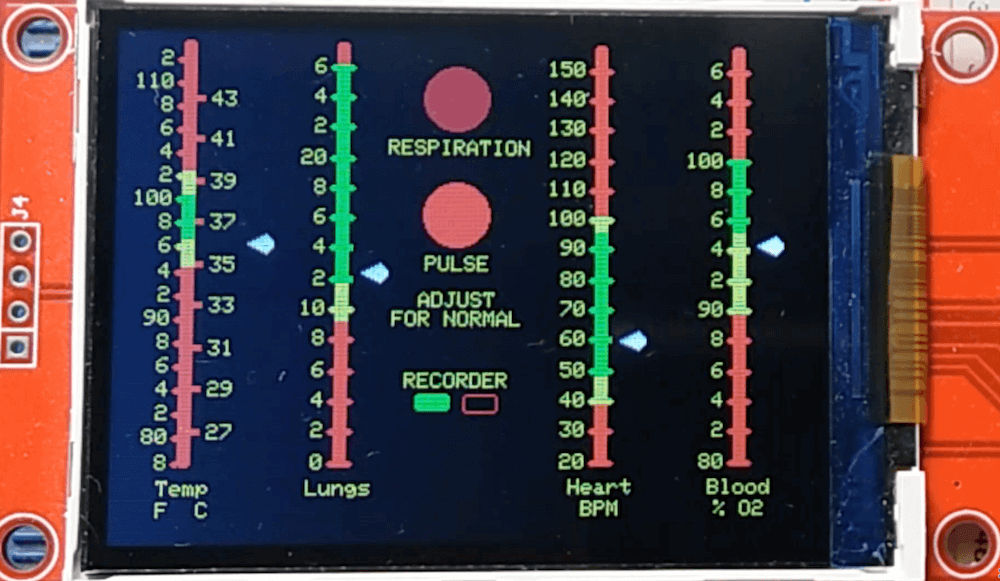
The future envisioned in the original Star Trek included, among other things, a shipboard sickbay with electronic monitors strangely reminiscent of the machines that medical personnel use today. To recreate a functional mini-replica of these displays, YouTuber Xtronical turned to a 2.8” TFT screen, a breadboard, and an Arduino Nano—noting that an Uno would also work.
The LCD display nails the look of Dr. McCoy’s device, and heartbeat sound can be played along with an onscreen flashing “PULSE” circle. A MAX30100 pulse/oximeter sensor and a temperature sensor take body readings, while a second DS18B20 is implemented to read ambient conditions for increased accuracy.
It’s a fun Trekkie project, and Xtronical plans to elaborate on how it was made in future videos.
A build of a working original Star Trek display with real sampled heart beat sound. Uses various sensors to get the readings from your body (via just your fingers) and displays them in the style of the 60’s sick bay screen. This bare “Bones” system could be built into a model unit or even a replica Tricorder.
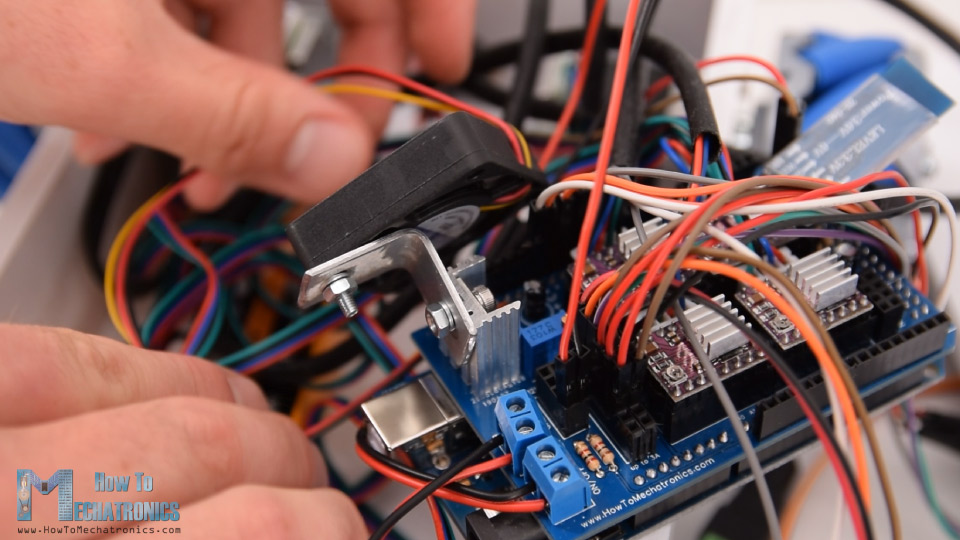
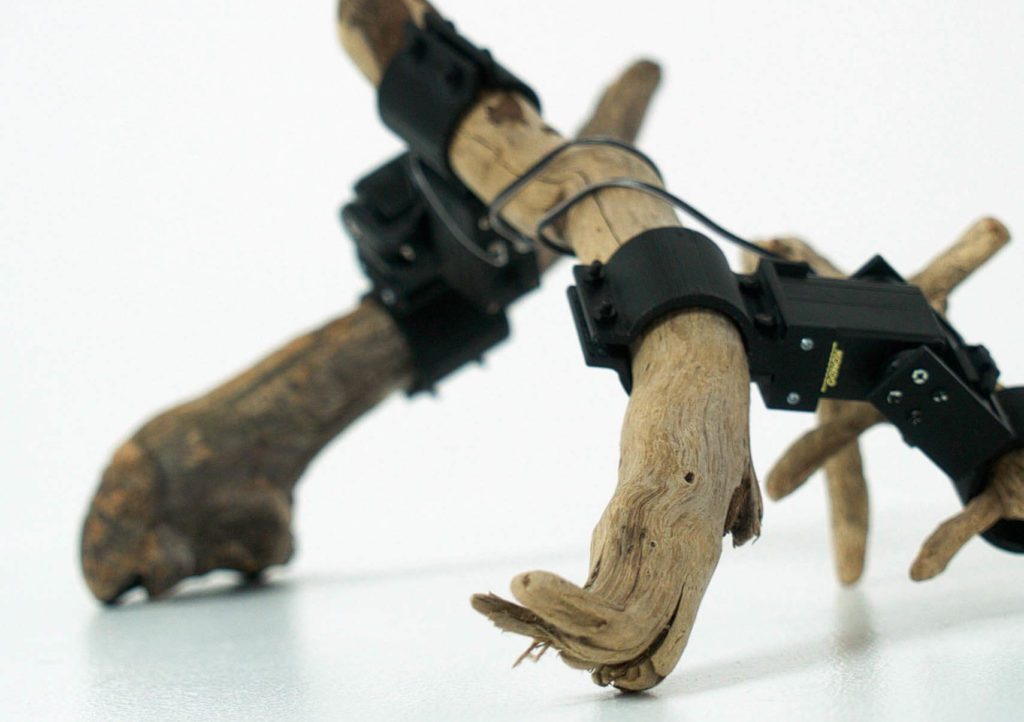
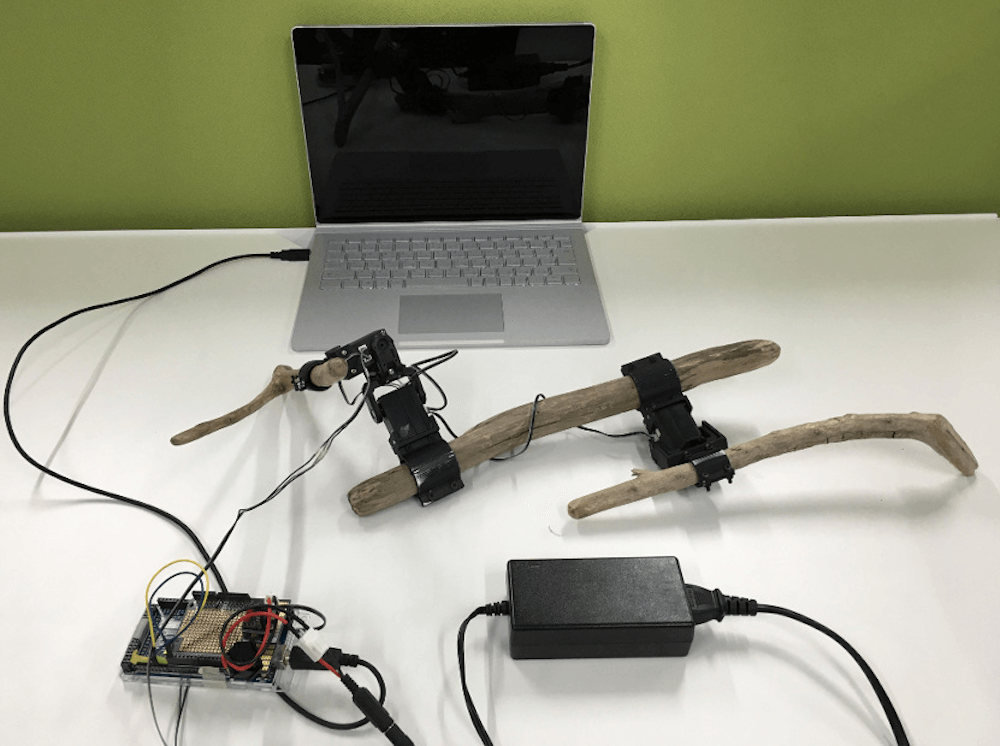
What if you were to neglect a robot’s mechanical design entirely and instead construct it out of unusual materials like random sticks? Researchers from the University of Tokyo and Preferred Networks have done just that. To accomplish this feat, the engineers first scanned and weighed the branches, then used deep reinforcement learning to teach the new contraption to walk.
The branch-bots were then constructed in the real world using generic servos, and controlled via an Arduino Mega tether setup with a motor driver and a separate power supply.
You can see one of these bots moving around in the video below, though this configuration ironically seems to have more trouble when dropped off at its native forest habitat. Be sure to read more about this research in IEEE Spectrum‘s article here.
This project aims at creating bricolages of robots out of tree branches found at hand. Through the process in which natural objects learn how to walk by themselves, the artwork portrays the perspectives of objects. Unlike the top-down process where functions of mechanical systems are explicitly defined by designers, this project puts an emphasis on the emergence of functions, which is a bottom-up process where found objects seek for the function as a whole.
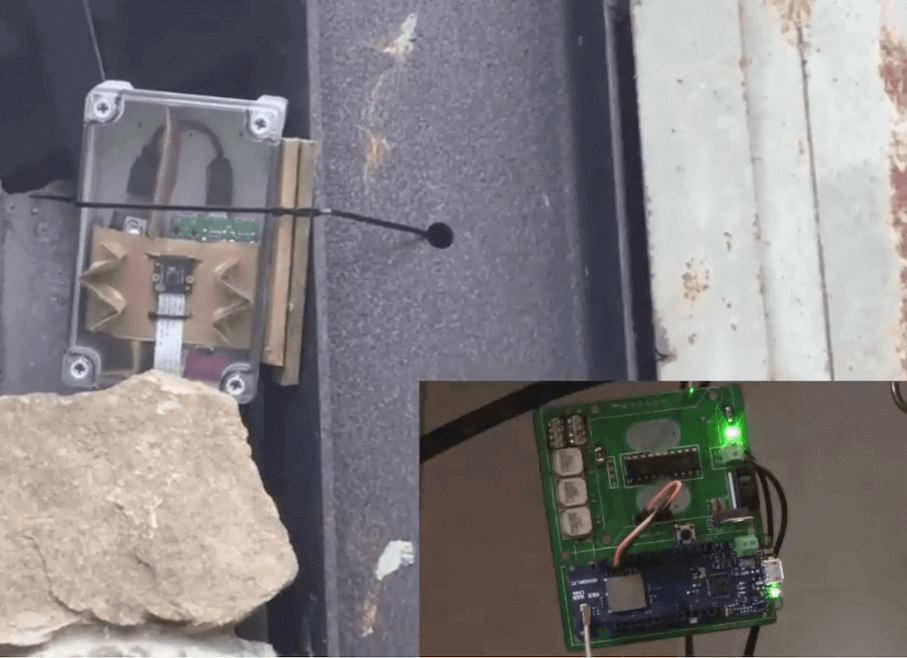
LoRa security camera detects and transmits trespasser data
Arduino Team — July 4th, 2019
Security cameras are a great way to deter theft and vandalism, but what if the camera is out of WiFi range, or otherwise would need long cables to transmit pictures? As explained here, Tegwyn Twmffat has an interesting solution–taking advantage of neural network processing to recognize moving objects, along with a LoRa connection to sound the alarm when there is a potential problem.
Images are captured by a Raspberry Pi and camera, then processed with the help of an Intel Movidius Neural Compute Stick for identification. If it’s something of interest—a human, for example—a relatively small amount of data is transmitted to a MKR WAN 1300 base station, beeping faster and faster as the person approaches.
As seen in the video below, it’s able to properly ignore the ‘test dog,’ while it beeps away when a person approaches!
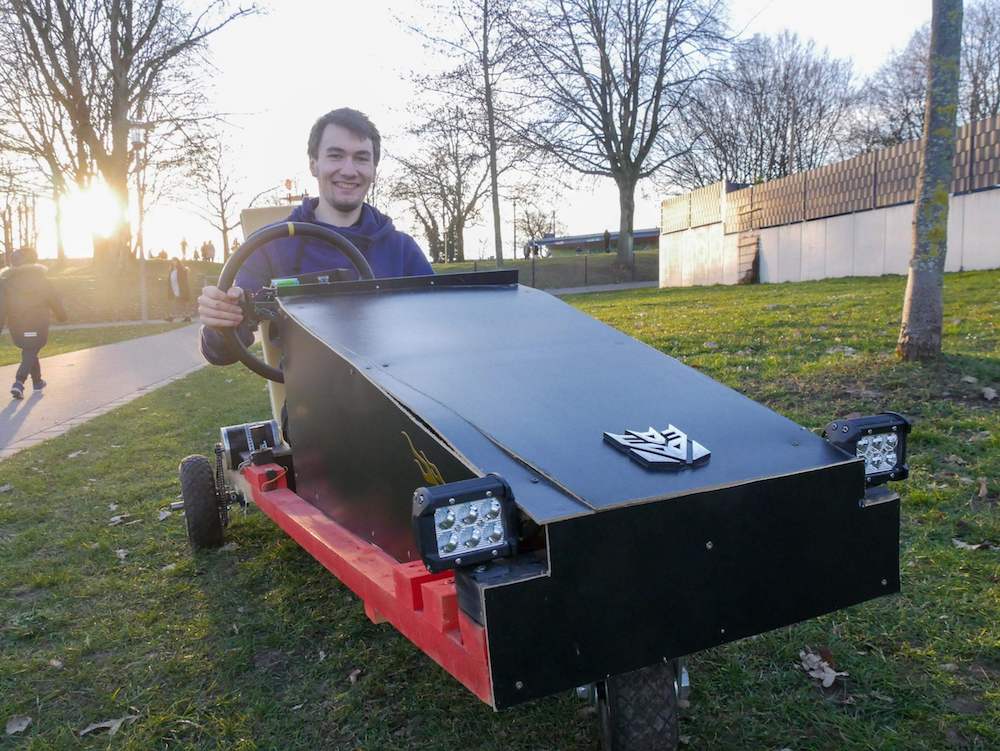
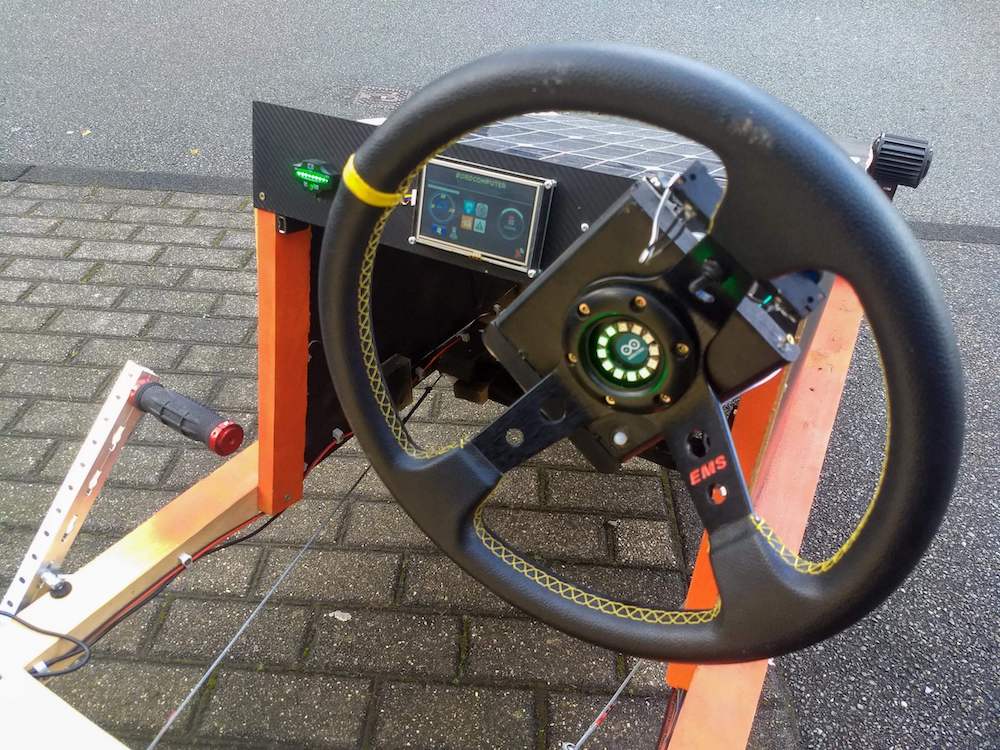
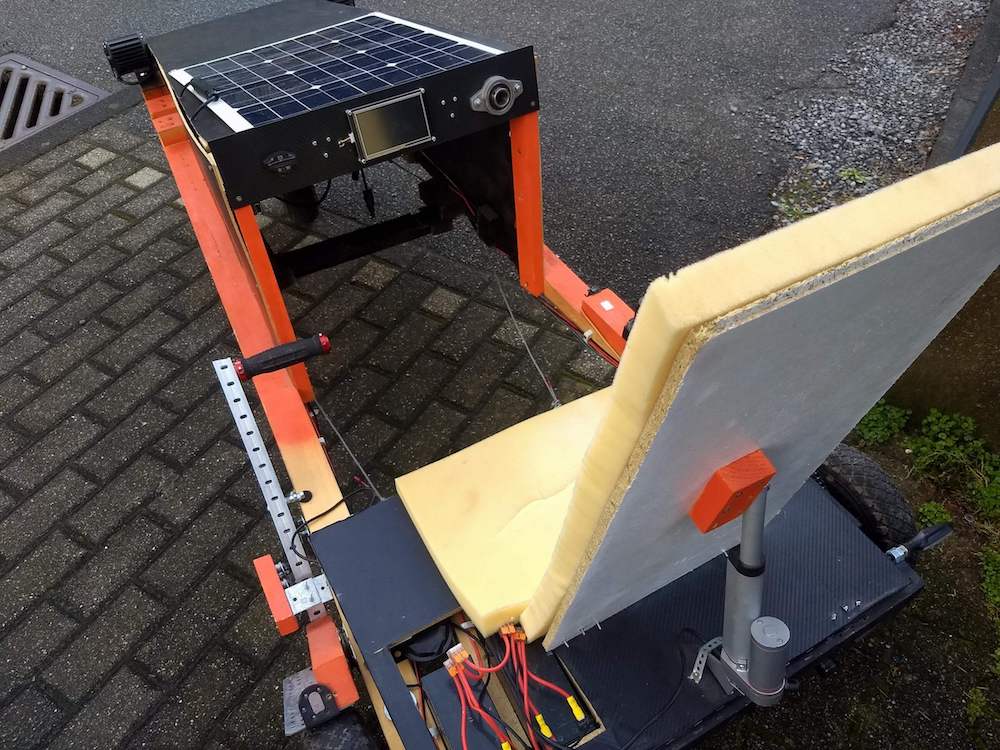
This electric soapbox car can reach a top speed of 35 km/h
Arduino Team — July 2nd, 2019
If Elon Musk was to design a soapbox car, the prototype might look something like this by David Traum.
Traum’s project is powered by a 500W motor which is fed by a pair of 12V batteries and a 40 W solar cell, allowing it to attain a top speed of 35 km/h and a range of 10 to 15km. Although that might not sound like a huge number, it looks pretty fast at the end of the video below!
But that’s not all. The vehicle features a rather unique control system, with front wheel steering actuated by a stepper and cable assembly. An Arduino Mega is the brains of the operation, while user input is via a small touchscreen, a joystick, and even a steering wheel (equipped with an Uno, a 9V battery, radio module, and gyro sensor) that can work wirelessly as needed—perhaps to park remotely, or simply as a gigantic RC car
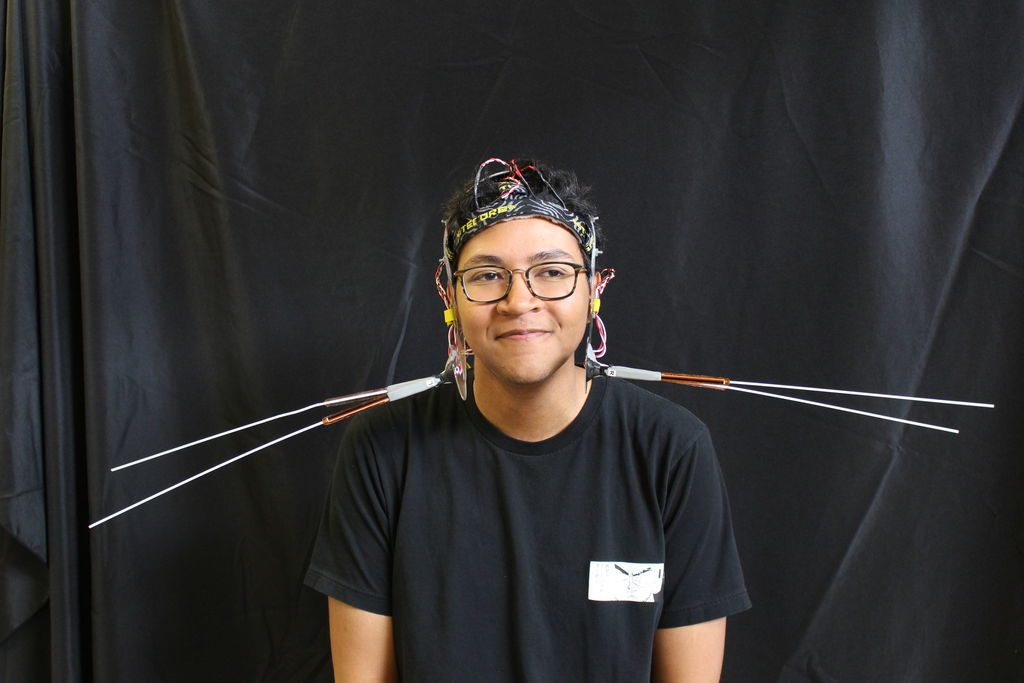
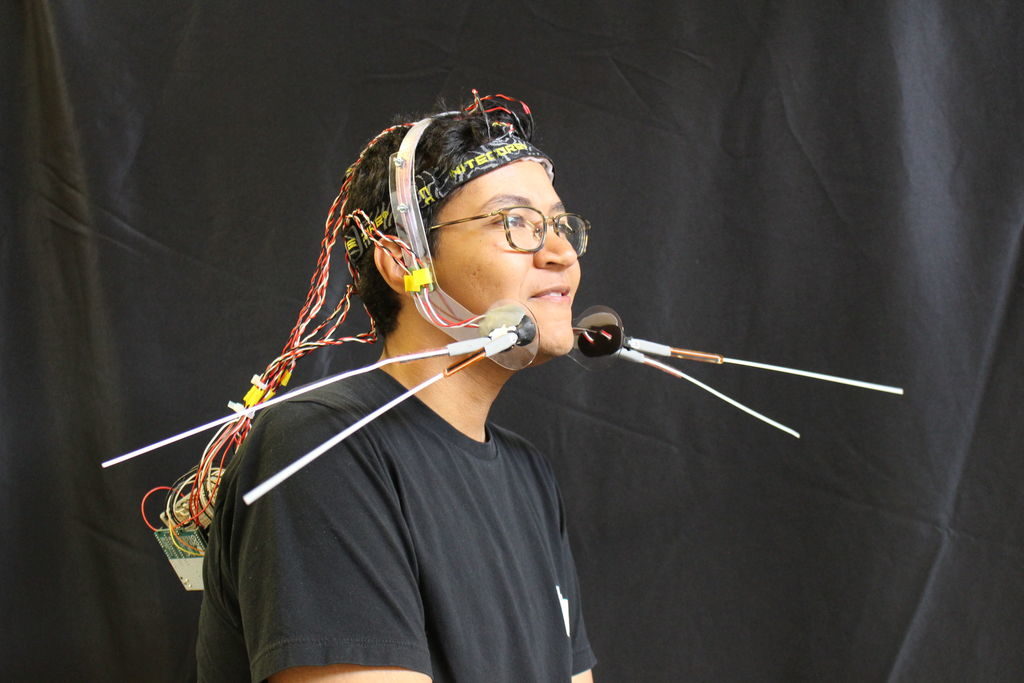
Experience the world like a cat with this whisker-style sensory extension
Arduino Team — July 2nd, 2019
Imagine if you had whiskers. Obviously, this would make you something of an oddity in today’s society. On the other hand, you’d be able to sense nearby objects via the transmission of force through these hair structures.
In order to explore this concept, Chris Hill has created a whisker assembly for sensory augmentation, substituting flex sensors for the stiff hairs that we as humans don’t possess. The sensors—four are used here—vary resistance when bent, furnishing information about their status to the Arduino Uno that controls the wearable device. Forehead-mounted vibratory motors are pulsed via PWM outputs in response, allowing the user to feel what’s going on in the surrounding environment.
If this looks familiar, Hill is quick to credit Nicholas Gonyea’s Whisker Sensory Extension Wearable as the basis for this project. He hopes his take on things improves the original, making it lighter, more cost-effective, and easier to construct.
The purpose of this project was to focus on the creation of novel, computationally-enriched “sensory extensions” that allow for augmented-sensing of the natural world. My major effort with this project was devoted to the fabrication and implementation of sensory augmentations that will extend a sense through sensors and respond with a tactile output for the user. The intent is to enable anyone to fabricate their own sensory extensions, and thusly map intrinsically human/animal senses onto hardware. Effectively extending our senses in new and exciting ways that will lead to a better understanding of how our brain is able to adapt to new external senses.
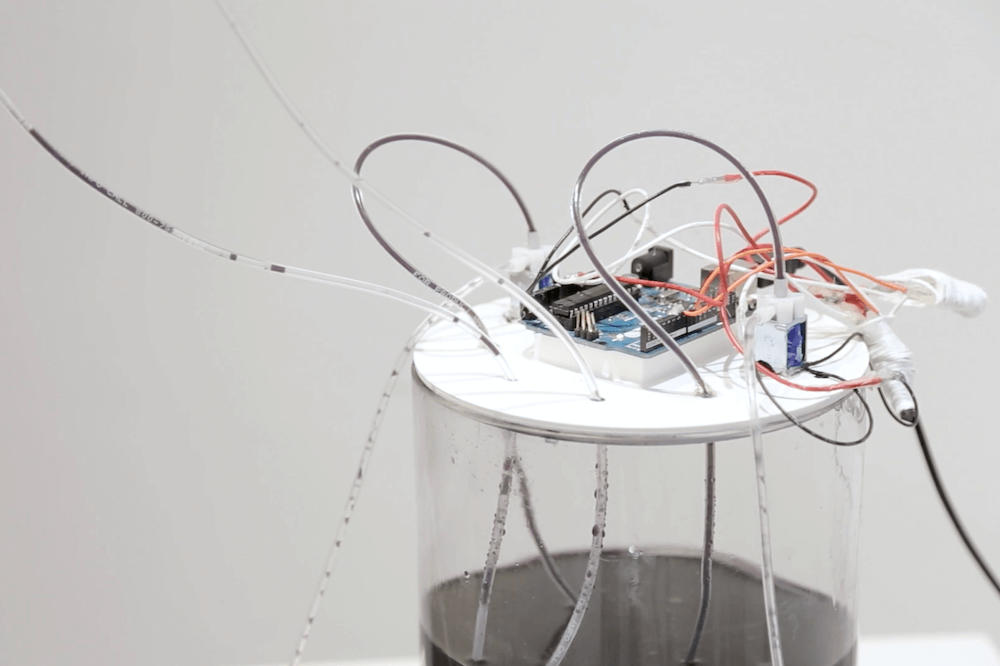
Computer 1.0 explores the relationship between textile and technology
Arduino Team — July 1st, 2019
While you might have never considered the idea, looms—especially the punchcard-driven Jacquard loom, which helped inform both Ada Lovelace and Charles Babbage’s pioneering work—are an important part of computing history. As reported here, Victoria Manganiello and Julian Goldman have created an awe-inspiring ode to this computing heritage in the form of a handwoven tapestry that constantly changes the way it looks, aptly named “Computer 1.0.”
The tapestry, which was recently on display at the Museum of Arts and Design in New York City, stretches nine meters in length and features tubing woven throughout. An Arduino actuates pumps and valves to produce familiar patterns in this tubing with blue-dyed water and air.
These patterns soon become abstract and perhaps more open to interpretation, though with more development it’s noted that images and even smartphone-readable designs could be possible.
Be sure to see the short demo of this incredible installation in the video below!
A handwoven textile activated by computer code, Computer 1.0 explores connections between weaving and technology. For the project, Victoria Manganiello invited designer Julian Goldman to collaborate on designing and programming a pump controlled by Arduino microcomputers to move precise sequences of air and liquid through the approximately 2,000 feet of tubing woven through the cloth. The movement of the air and liquid evokes traditional weaving patterns such as bird’s eye, monk’s cloth, and twill. And the operating system—the computer and the pump—is not kept out of sight in the service of the woven screen and the pixelated patterns that run across it, but rather are an integral part of the work; nothing is hidden.
Manganiello’s textile reflects and expands on the obscured history of weaving and coding, calling attention to the “under-over, under-over” movement of thread becoming cloth that originally inspired the “zero-one-zero-one” of binary code. The jacquard loom of 1801, which used punch cards to program the movement of thread into increasingly complex woven patterns, is a direct, though frequently forgotten, ancestor of modern computers.
Um dir ein optimales Erlebnis zu bieten, verwenden wir Technologien wie Cookies, um Geräteinformationen zu speichern und/oder darauf zuzugreifen. Wenn du diesen Technologien zustimmst, können wir Daten wie das Surfverhalten oder eindeutige IDs auf dieser Website verarbeiten. Wenn du deine Einwillligung nicht erteilst oder zurückziehst, können bestimmte Merkmale und Funktionen beeinträchtigt werden.
Funktional
Immer aktiv
Die technische Speicherung oder der Zugang ist unbedingt erforderlich für den rechtmäßigen Zweck, die Nutzung eines bestimmten Dienstes zu ermöglichen, der vom Teilnehmer oder Nutzer ausdrücklich gewünscht wird, oder für den alleinigen Zweck, die Übertragung einer Nachricht über ein elektronisches Kommunikationsnetz durchzuführen.
Vorlieben
Die technische Speicherung oder der Zugriff ist für den rechtmäßigen Zweck der Speicherung von Präferenzen erforderlich, die nicht vom Abonnenten oder Benutzer angefordert wurden.
Statistiken
Die technische Speicherung oder der Zugriff, der ausschließlich zu statistischen Zwecken erfolgt.Die technische Speicherung oder der Zugriff, der ausschließlich zu anonymen statistischen Zwecken verwendet wird. Ohne eine Vorladung, die freiwillige Zustimmung deines Internetdienstanbieters oder zusätzliche Aufzeichnungen von Dritten können die zu diesem Zweck gespeicherten oder abgerufenen Informationen allein in der Regel nicht dazu verwendet werden, dich zu identifizieren.
Marketing
Die technische Speicherung oder der Zugriff ist erforderlich, um Nutzerprofile zu erstellen, um Werbung zu versenden oder um den Nutzer auf einer Website oder über mehrere Websites hinweg zu ähnlichen Marketingzwecken zu verfolgen.