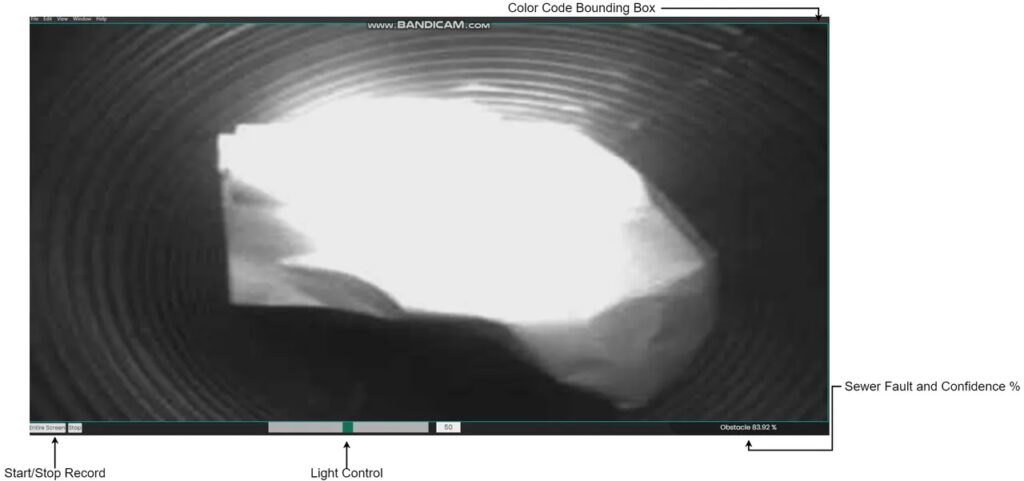
We all interact with the sewer system at multiple points throughout the day, and having it fail can lead to catastrophic results. Every year in the United States alone, an estimated 23,000 to 75,000 sewer pipe failures are reported, which means billions of gallons of untreated and hazardous waste is released into the environment. But rather than having a person constantly inspect the system on location, Huy Mai came up with a way to use computer vision in conjunction with embedded machine learning to automatically detect when a defect has occurred.
The device, which Huy calls TinySewer, is comprised of an Arduino Portena H7 and Portenta Vision Shield – LoRa. This combination allows for data to be streamed wirelessly to a cloud service for later review. Huy designed TinySewer to be a low-cost, add-on module that can be easily integrated into existing robotic systems or sewer inspection tools.
TinySewer also implements a model trained with Edge Impulse that can detect four common types of pipe problems: cracks, root intrusion, obstructions, and displacement. With this feature, a fault in a pipe can be reported to a central IoT hub in nearly real-time.
Finally, the Portena H7 can enter a sleep mode where it saves enough power to run off a single 5V, 2.4A battery for an extended period.
To read more about the TinySewer project, you can visit Huy’s write-up here. A demo of it in action can be seen below.
Arduino Cloud’s dashboards and widgets are some of its most popular features. It’s what turns the Cloud into your ultimate control center for all kinds of projects, from home automation to industrial monitoring.
We’re constantly looking for ways to improve the user experience, and we’ve just rolled out some small, but very important tweaks. Combined with the new historical data download process, your Arduino Cloud experience will now be even smoother.
Changes to Arduino Cloud Widgets
One of the more visible changes is the padding around the widgets. It’s been reduced, particularly within the header.
Previously, if you added a header you often needed to increase the size of the widget to accommodate the space needed for it to be displayed. This could leave a lot of empty space inside the widget itself.
By reducing the size of the heading and removing the historical data and settings buttons, widgets can now be a lot more compact while still displaying all the data, labels and controls. You can see the padding reduction in the image below, and how it creates more space for smaller widgets.
But you’re not losing any functions. The redesign pops the settings button out from the side of the widget when you hover over it during layout editing. And the historical data options have been moved into the dashboard’s settings rather than the individual widget’s (more about that below).
That same location, to the left of the header, was also previously used to notify you of any errors. Now if there’s a problem, the whole widget is disabled and the error notification appears in the center. Hovering over the error icon will give you a tooltip with more info on what’s wrong.
These new layouts are currently just for desktop dashboards. They aren’t visible on mobile or within the IoT Cloud Remote app yet. However, the redesign allows for smaller sizes of widgets, which will become especially valuable as we bring these changes to mobile. Watch this space.
Historical Data Downloads
We’ve revisited the process for downloading historical data. Previously, if you wanted to export your data, you had to do it widget-by-widget. So if you had six widgets, you’d have to go through the download process six times.
Now you can grab all the historical data you want in a single download.
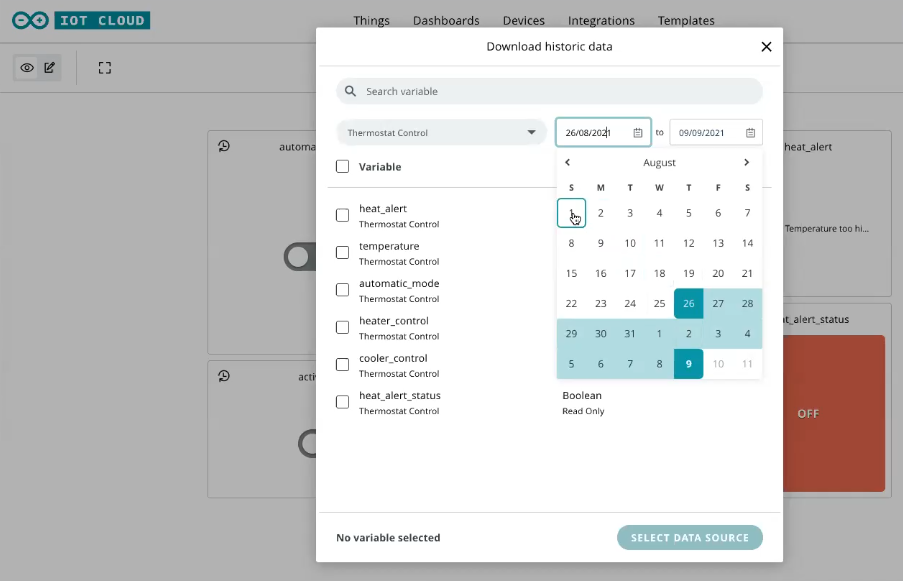
There’s a new option in the dashboard’s setting menu, called “Historical Data”. Clicking that gives you a list of all variables in use. From here you can select all the ones you want to download by selecting the check boxes.
If your dashboard is using multiple Things, you can swap between them from the dropdown at the top. Finally, you’re given the option to specify a date range for the export.
Simply choose the variables and Things you want to export. Set the date range, and click the “Select Data Source” button. You’ll receive an email after a couple of minutes providing you with a link to download your data as individual CSV files, zipped up into a single download.
Remember though; if you’re using the free tier of Arduino Cloud, the date range selector won’t be available. You’ll always just download the last 24 hours worth of data, so don’t worry if the date selector isn’t visible for you.
As always, we’re keen to get your feedback on the changes. Join us on the forums to tell us what you think.
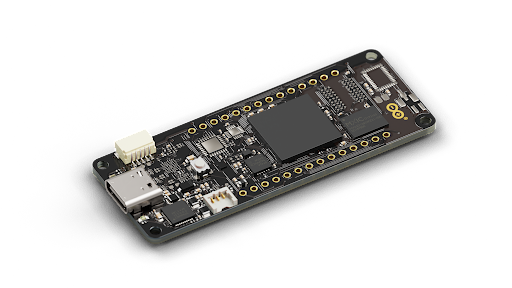
We’re proud to announce the latest addition to our industrial range, the new Portenta H7 Lite. Designed for developers who want the computational power of Arduino Pro’s Portenta H7 flagship, but don’t need the video output, additional security features or connectivity.
The Portenta H7 Lite is a streamlined, tightly targeted solution for AI applications and low-latency control projects. Perfect for everything from high-end industrial machinery to laboratory equipment and mission-critical devices.
The Portenta H7 Lite offers top performance, reliability and versatility. A cost-effective solution when you don’t need all the features of the Portenta H7.
The Portenta H7 Lite is a perfect fit for lots of applications.
Crowded radio environments or any situations where you need to have an Ethernet connection, or you don’t need to connect to the Internet.
Robotics controller systems and other machine operations that don’t require the H7’s high-resolution video interface.
Any projects where security is important, but not critical as the Portenta H7 Lite features one secure element, rather than two.
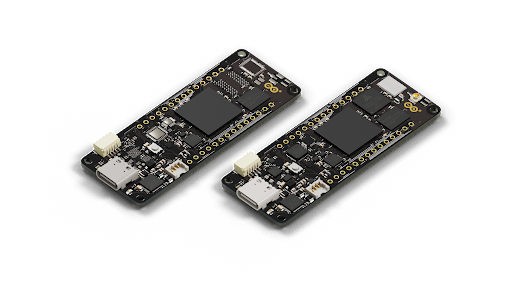
For your next Industry 4.0 IoT project, all you have to do is choose which Portenta board suits your needs best. You’ve got a great new choice, and we have you covered! Maximize the performance and power balance of your smart solutions with Portenta H7 and H7 Lite.
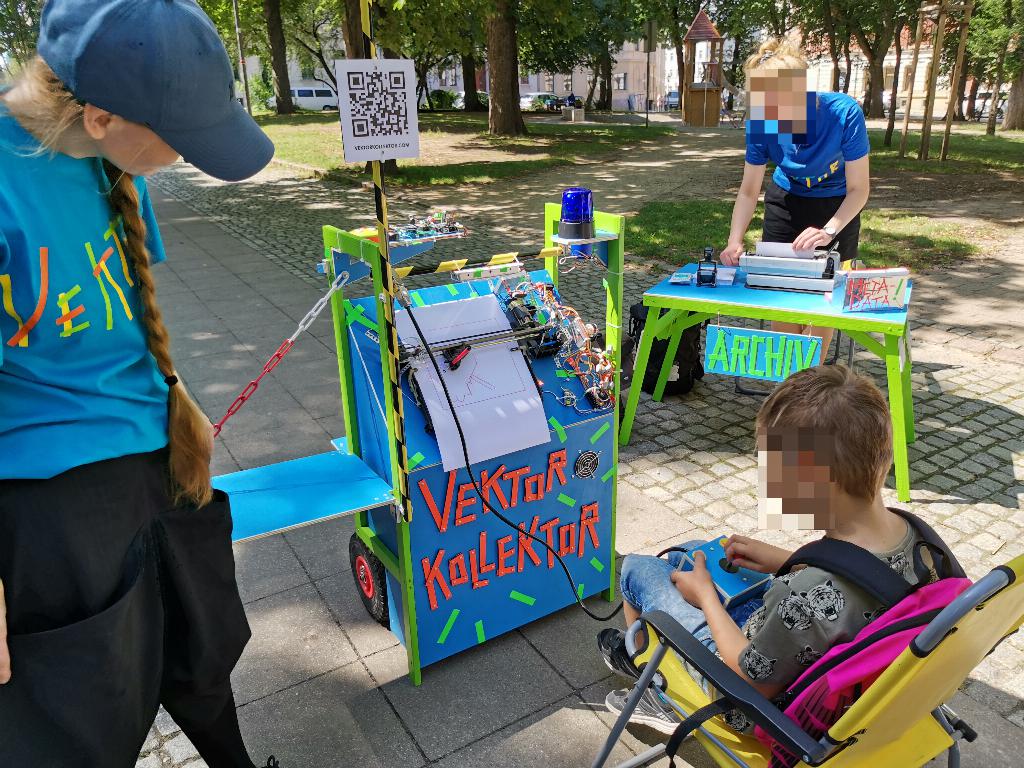
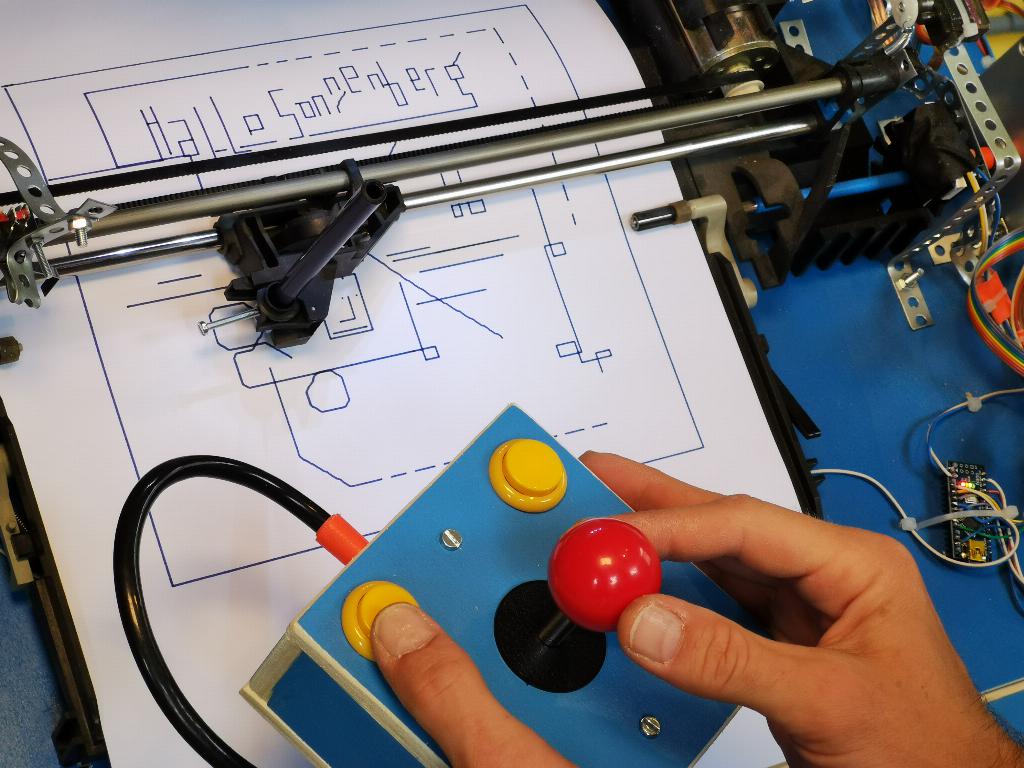
Public art installations are a great way to express your creativity while simultaneously sharing it with others. Niklas Roy, a maker who builds interactive art installations in Berlin, Germany had the idea to create a machine that lets people draw pictures and then share them digitally too, which he calls the VEKTORKOLLEKTOR. Designed in collaboration with Kati Hyyppä, the project consists of two parts: a joystick for operating the device and a large pen plotter to draw on a piece of paper.
The joystick assembly was made with a classic arcade joystick and a pair of arcade pushbutton switches, all placed within a small enclosure. These components are connected to a central Arduino Uno that also has an SD card for saving drawings and a small TFT display that shows a virtual drawing of what’s on the page. The Uno communicates with a secondary Arduino Nano board in order to control the rotations of the two X/Y DC gear motors and thus the position of the drawing utensil. Positional data is gathered from a single optical encoder situated on each axis. Last but not least, a third Arduino and an Adafruit Music Maker Shield were added to round out the experience with chiptune-style music.
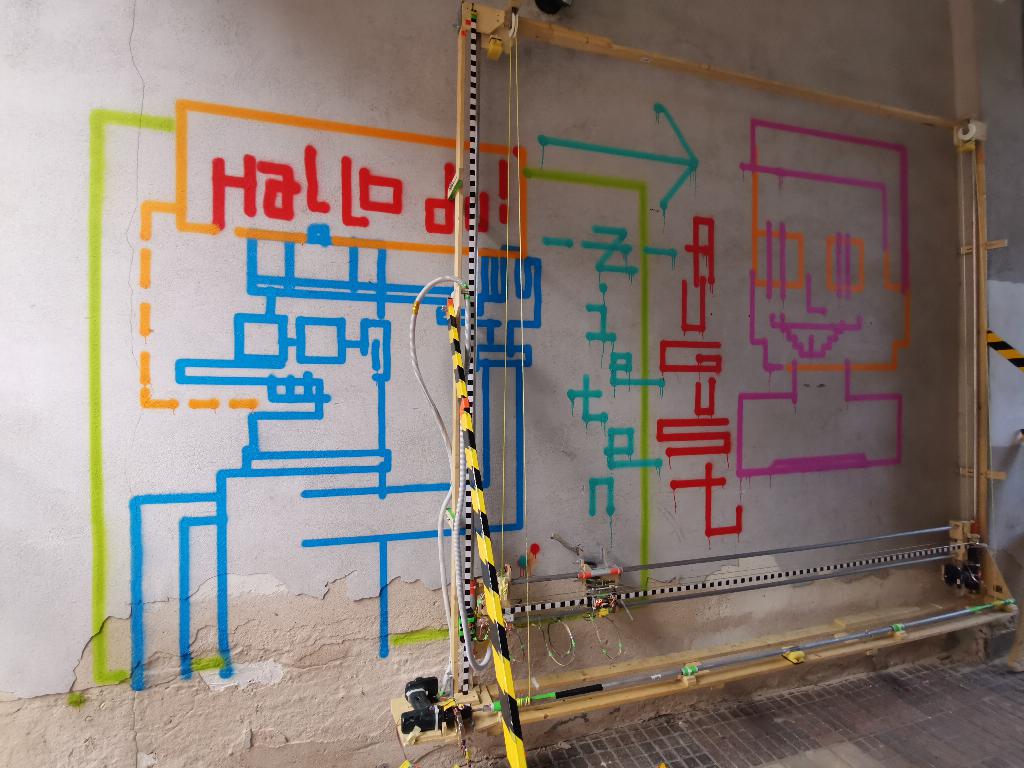
One great aspect to saving what people draw as a series of vectors is that they can be shared digitally and recreated in a variety of formats. Roy was able to get someone to create an Inkscape extension for converting drawings into SVG files, and some were even used to paint murals with an even larger spray can plotter.
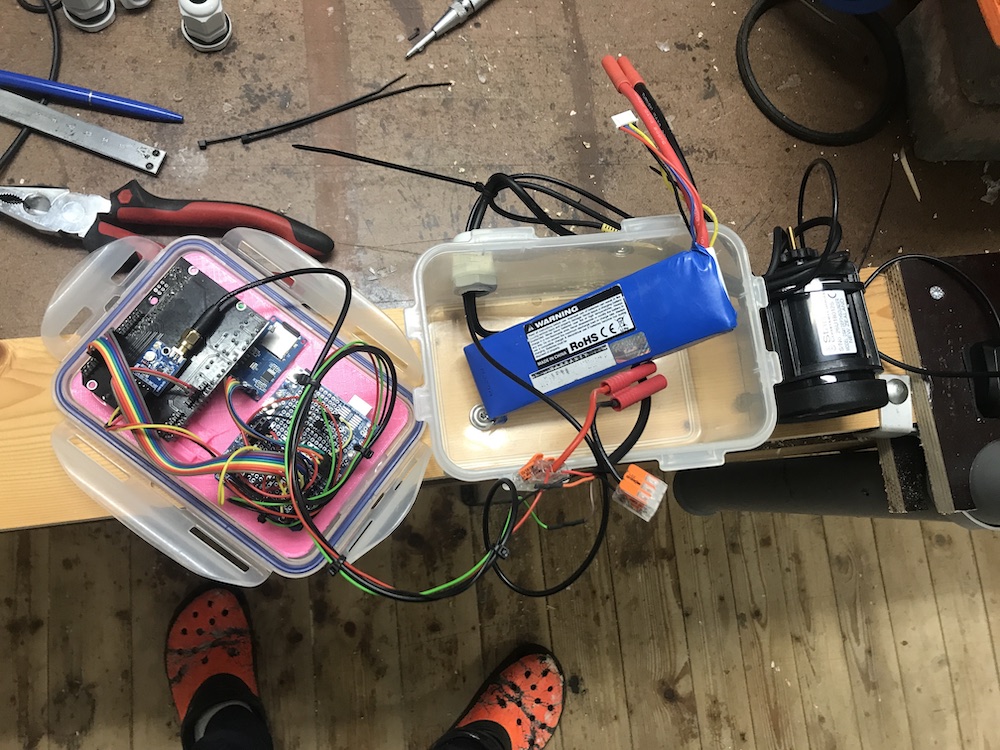
YouTuber Robert Dunn (known as Under Dunn) had just received a large box of loose cylindrical battery cells and therefore wanted to join them together to create a large battery pack. Ordinarily, this is accomplished by utilizing a specialized type of tool called a battery spot welder that is used to tack nickel strips onto the terminals. But Dunn didn’t want to spend the money on a new one, so he built his own DIY version using only an old microwave, an offcut of copper, some wire, and an Arduino Uno with a solid-state relay attached to control the current discharge timings.
Dunn began by extracting the transformer from the microwave and cutting it open to expose the coils within. As a quick refresher, transformers step voltage up or down by using a pair of opposing coils inside of a magnetic field, which also causes the current to increase or decrease in an inversely proportional manner. Because Dunn wanted to maximize the current, he replaced the smaller coil with an even smaller one made from 6-guage wire that could handle the extremely high current.
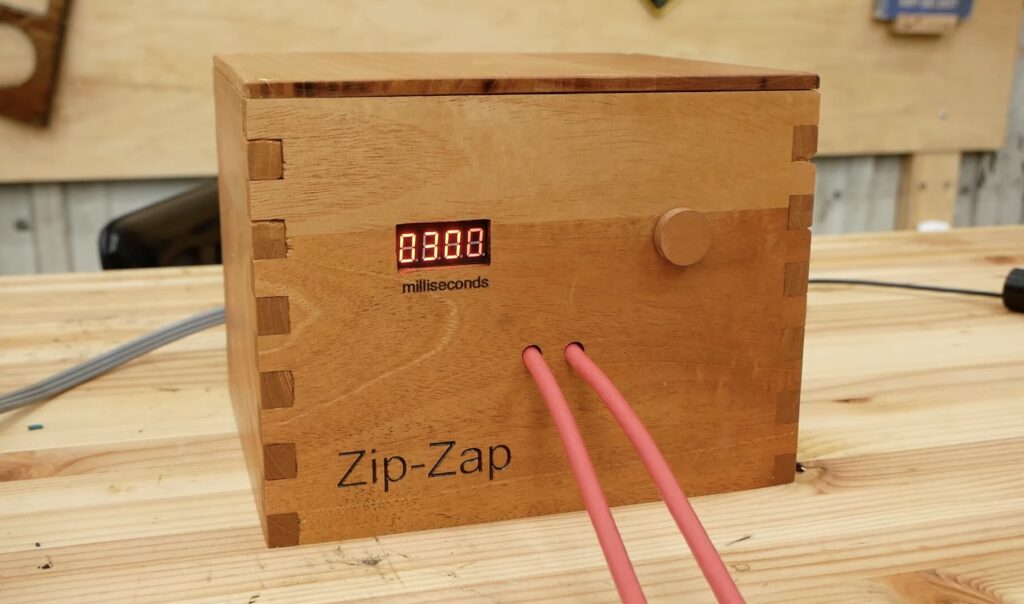
An Arduino was used in conjunction with a solid-state relay module to pulse the current going into the transformer. Its circuit also contained a seven-segment LED module that showed the number of milliseconds the transformer would be on, as well as a red button for activating it. Timing could be adjusted with a rotary potentiometer.
Once everything was wired up and placed into a wooden enclosure, Dunn tested out his DIY battery spot welder by pressing the button, and it worked as expected.
Use the Nano 33 BLE Sense’s IMU and gesture sensor to control a DJI Tello drone
Arduino Team — September 8th, 2021
Piloting a drone with something other than a set of virtual joysticks on a phone screen is exciting due to the endless possibilities. DJI’s Tello can do just this, as it has a simple Python API which allows for basic aspects to be controlled such as taking off, landing, and moving within a horizontal plane. Soham Chatterjee built a system that takes advantage of two sensors within the Arduino Nano 33 BLE Sense’s onboard suite, namely the APDS-9960 and LSM9DS1 IMU.
He started this endeavor by creating two simple programs that ran on the BLE Sense. The first initializes the APDS-9960 to detect gestures, which then sends strings like “detected DOWN gesture” via the USB port to a host machine. The second program checks if the IMU has gone over a certain threshold in a single direction and relays a corresponding string if it has.
A Raspberry Pi runs one of two Python scripts that essentially read the incoming data from the Arduino and converts it into movements. For example, a gesture in the ‘DOWN’ direction lands the Tello drone, whereas tilting the board forwards will move the drone forward 50cm. As an added safety feature, the drone automatically lands after 60 seconds, although the Python script can be modified to prevent this behavior.
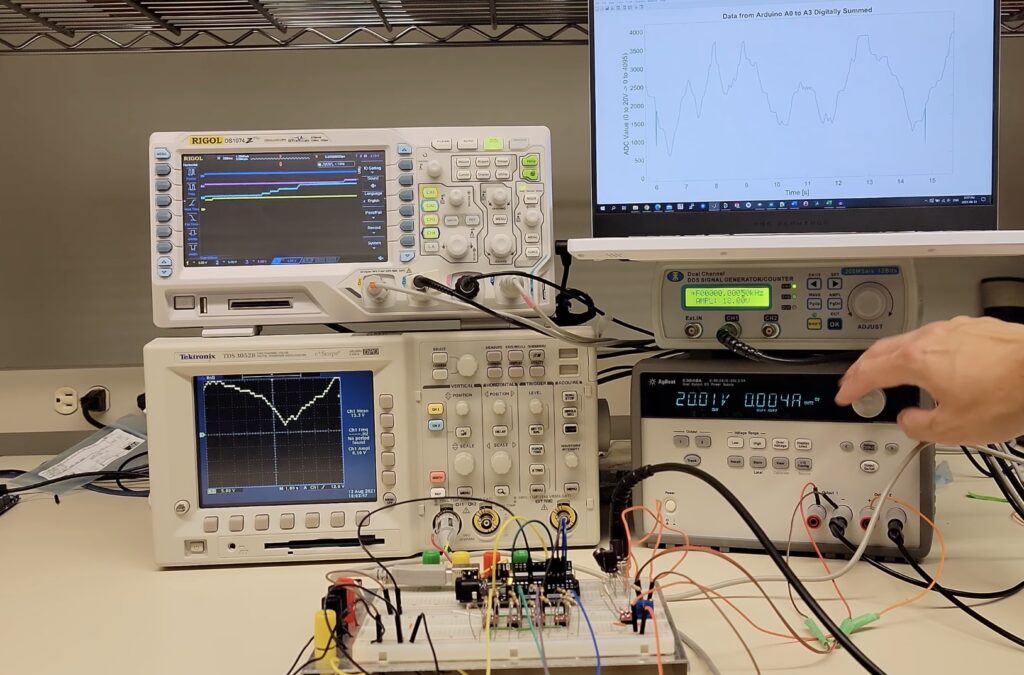
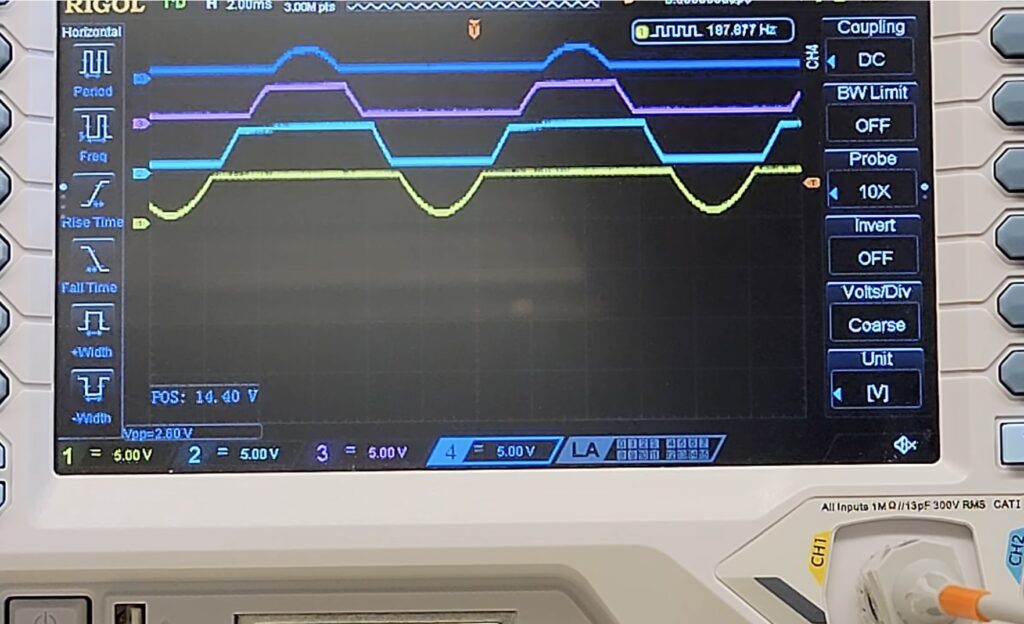
The Arduino Uno is well-known for its 10-bit 5V ADC within its ATmega328p, which means that it takes between 0 and 5V as input and produces a digital value that ranges from 0 to 1023. However, attempting to measure any voltage above 5V will cause some less-than-desirable results, such as creating magic smoke and destroying the IC. To get around this problem, some makers add a voltage divider that divides the incoming voltage by a predetermined factor. This solution reduces the resolution of the ADC, as a single unit of change in the digital value corresponds to a larger change in voltage. To address this, the YouTuber known as Techoyaki came up with a novel solution that can measure the full range of values without decreasing the resolution.
His project employs a series of four limiting rail-to-rail MOSFETs within a “quantizer” circuit to slice the incoming 20V current into discrete “chunks” that each range from zero to five volts. Just before the MOSFETs are four differential op-amps that essentially split the waveform into four layers. After the Arduino has read the values from the four analog input pins, it sums the values to produce the equivalent of a 12-bit ADC, thus leading to values that fall between 0 and 4095.
For more information about the circuitry and how this project was built, you can view Techoyaki’s video below!
Knowing the exact depths that water reaches within a harbor can be vital to navigating around certain hidden obstacles that might cause a boat to become stuck. But rather than using an expensive drone or even satellite to take these measurements, Jan Neumann was able to create a DIY version that is a fraction of the cost.
The system is comprised of an Arduino Uno at its core with a small GPS module for gathering positional data and a NMEA-capable echo sounder. As Neumann’s boat moved around the harbor, the Uno would take a reading of the water’s depth and the boat’s current position every second and log it to an SD card within a CSV file. And because the water’s natural level rises and falls over the course of a few hours due to tidal forces, Neumann used a Wasser&Schiffahrsamt water level sensing module that also takes a reading every second.
With all the data now in a large series of tables, it was passed to a Python script that filled in any missing datapoints and adjusted the water level based on the calibrated value. Finally, a second Python script placed each datapoint into a graph and interpolated between the points to create a smooth map. As seen in the subsequent image, the whole setup was quite effective at showing where the water was shallower or deeper.
You can read more about this project and see its code here on GitHub.
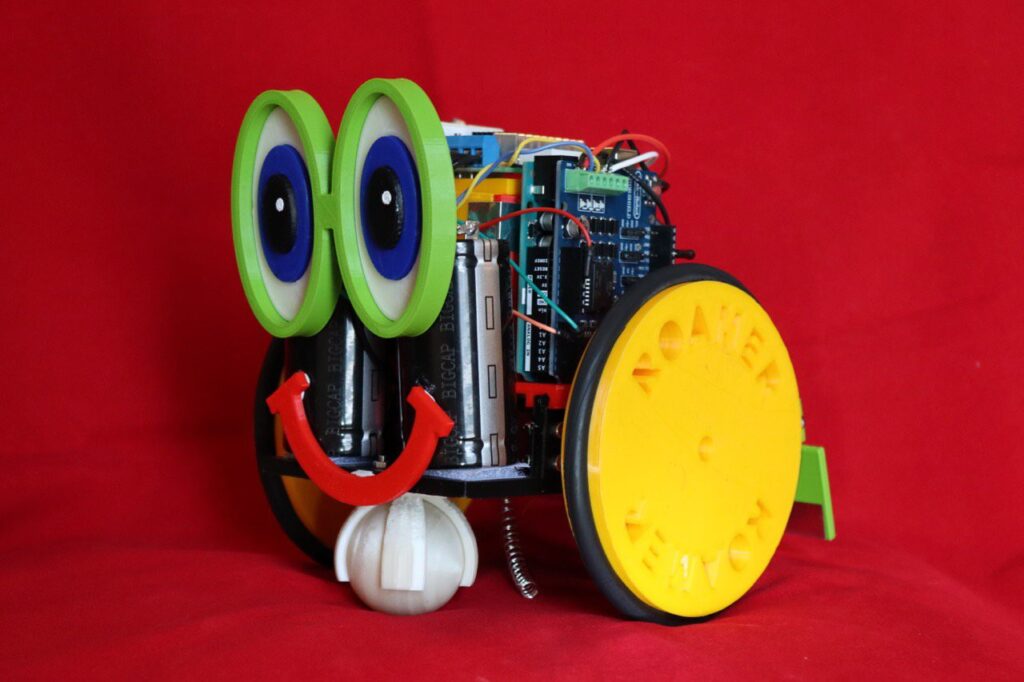
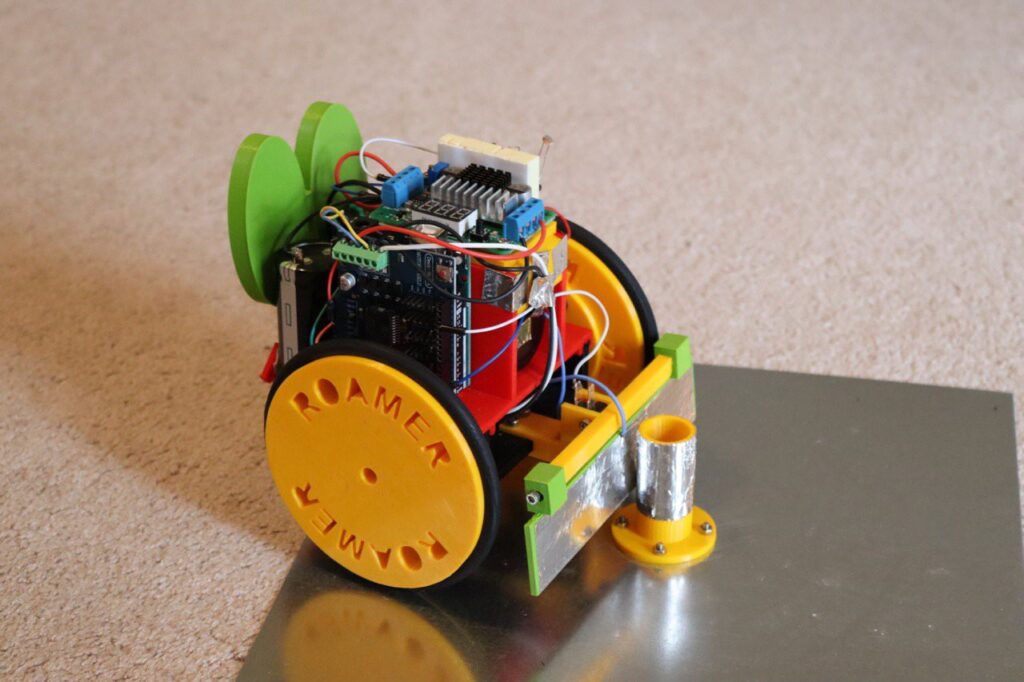
Tiny mobile robots are a blast to use. They are fast, fun, and can even be autonomous. However, they all suffer from a similar issue: batteries, which are notorious for running out of charge quickly when the motors are kept spinning for too long. To address this issue, Mike Rigsby came up with a small robot that has a simple “brain” but has the ability to never run out of power.
Rigsby’s robot, named Roamer, starts off on a charging station that is comprised of a large metal plate on the bottom and a small, energized bump rail. The bot contains a spring under its base that contacts the plate, and its front plate contacts the bumper. Therefore, when the two meet, the circuit is completed, and Roamer can determine if it needs to charge.
Roamer’s onboard Arduino Uno is paired with a motor shield that drives both continuous servo motors to both give forward/backward motion and turn side-to-side. There is also a photoresistor on the top of the robot that is used to sense if the room is dark or light. If it is bright enough, the rover will begin its normal pattern of moving in random directions until it needs to top off its batteries, but a dark room causes it to “sleep” until the light returns.
Roamer is a clever demonstration of how simple materials can be implemented to create a robot that can theoretically never run out of power. You can view this timelapse of it below as well as see how the rover was created here on Hackaday.io.
Over time, people age and naturally tend to lose some or most of their mobility, leading to a need for a wheelchair, walker, or other assistive device. This led hitesh.boghani to submit his project, which he calls the smartChair, to element14’s Design for a Cause 2021 contest. This build features a sort of pseudo-walker that enables a user to transition from a sitting to a standing position with some motorized assistance. Apart from that primary use, Hitesh also wanted to create a “summon” mode that would allow the walker to move on its own to where it’s needed.
As with every other project submitted to the contest, this too makes use of the Arduino Nano 33 IoT to handle both motor control and communication with a client device. In order to lift the walker from a compacted state to an expanded one, Hitesh began by assembling a wooden frame and then placed a brushless DC motor in line with some gearing to increase torque and reduce the speed. Next, an L293D motor driver IC was connected to a breadboard and a Nano 33 IoT for receiving input signals. And finally, a bit of code was written that spins the motor for a certain number of turns depending on the speed and direction requested.
Unfortunately, time ran out to complete the summon feature, so Hitesh plans on improving this project continually to add a camera, a motorized base, and a basic smartphone app for controlling the whole thing. But even in its current state, the smartChair is a great assistive tool for anyone who needs extra help getting up from a sitting position.
There’s a truckload of news from the Arduino Tooling Team today: Arduino CLI 0.19.0 is now available! This release has tons of great enhancements, exciting new features and heaps of bug fixes. Some things required quite a bit of breaking changes but they’re worth the hassle.
The highlights of this release are certainly the addition of pluggable discovery and the internal restructuring of the startup steps of the Arduino CLI. These affected the JSON output of some commands and the gRPC interface functions, which is documented in the upgrading guide.
We’re really excited about the release of the pluggable discovery. This new feature will give platform developers the possibility to support more and more boards (such as the Teensy), and also new ways of uploading to boards, like via WiFi, Bluetooth, SSH, CAN bus and anything that comes to mind! If you’re a platform developer and want to know how to start supporting pluggable discovery take a look at the updated platform specification documentation.
The internal restructuring is also no small thing, it makes the Arduino CLI much more resilient to errors. For example, if the user added an invalid or unreachable package index URL, Arduino CLI would previously be completely unusable. After this change, a warning is shown to notify the user of that failure and other functionality of Arduino CLI is unaffected. And last but not least this change greatly improves other tools as well, in some tests we managed to slice in half the startup time of the Arduino IDE 2.0!
There are some breaking changes that only affect those that use the Arduino CLI code as a Go library. These were the result of improvements to the internal structures that store information about Sketches, and to the support for different languages.
Monitor the pH levels of a hydroponic plant’s water supply with Arduino and tinyML
Arduino Team — September 2nd, 2021
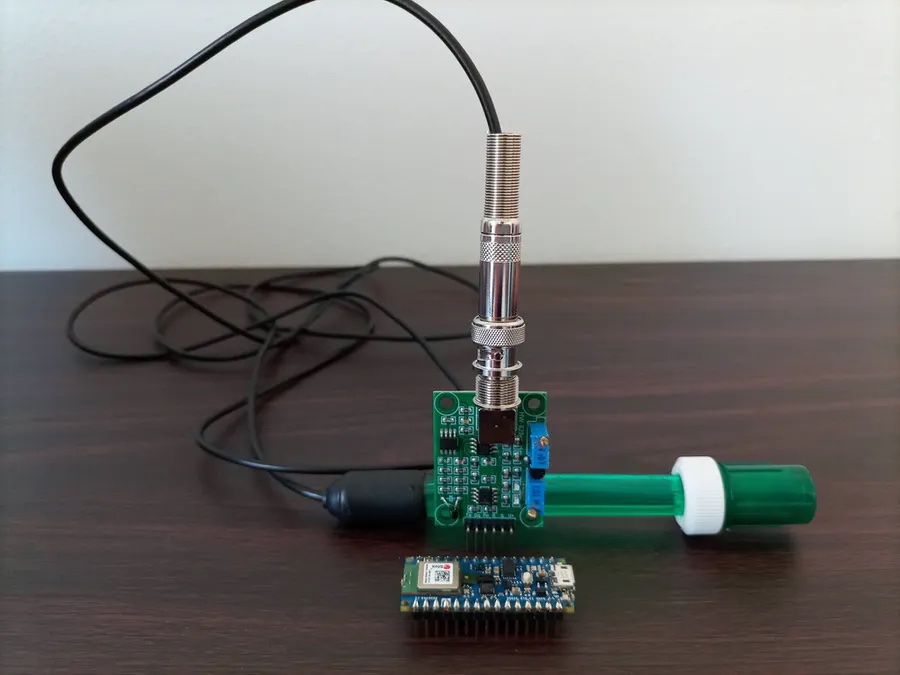
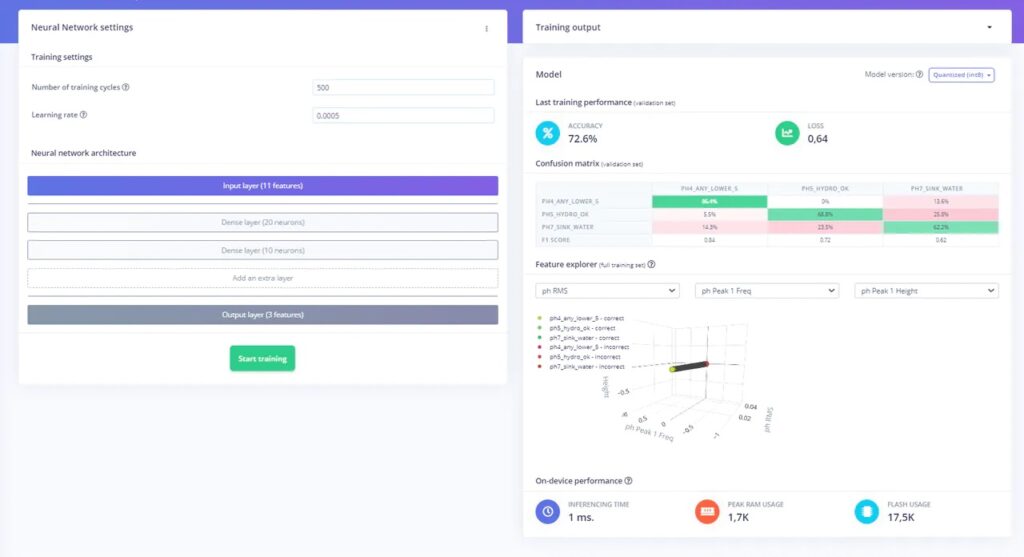
Many plants are notorious for how picky they are about their environmental conditions. Having the wrong temperature, humidity, soil type, and even elevation can produce devastating effects. But none are perhaps as important and overlooked as water/soil pH, which is a measure of how acidic and/or alkaline the growing medium is. In hydroponics, maintaining optimal growing conditions is how high yields can be ensured without becoming too wasteful. Janet N on Hackster had the idea of harnessing the powers of embedded machine learning to let her know when the water had become unacceptable for her plants.
The device uses an Arduino Nano 33 BLE Sense to continuously monitor the pH of the hydroponics water supply with a simple probe. This data was initially loaded into Edge Impulse’s Studio where it was split into features and then sent to both a Keras classification model and an anomaly detection model for training. After she was satisfied with the performance of both, they were deployed back onto the Arduino.
As the system checks the pH of the water, it aggregates the data and places it into a buffer for classification. If the value is higher than 7, the soil is too basic, and a yellow LED is turned on. If the soil is too acidic (below 4), a red LED is activated. And finally, a green LED lights up when the optimal pH of around 5 has been reached.
You can read more about the process of creating this project here on Hackster.io.
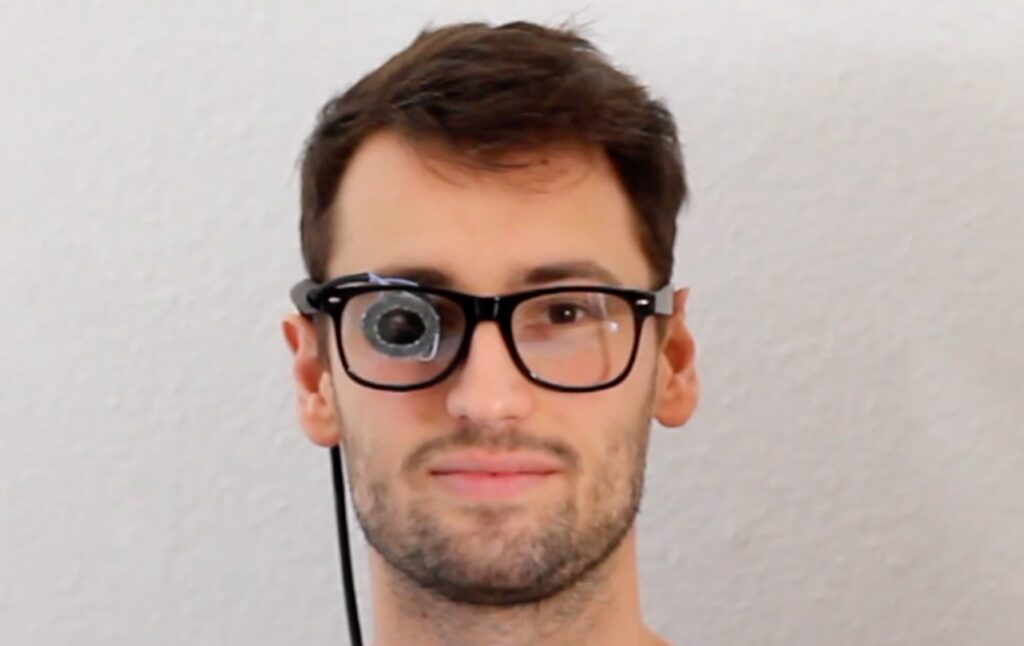
People who suffer from physical disabilities that leave them unable to speak or communicate effectively can end up frustrated or largely ignored. In response to this issue, Hackaday users Malte, Marco, and Tim R wanted to create a small device that can turn small eye movements into simple commands and phrases for easier communication, which they call the “Speak4Me.”
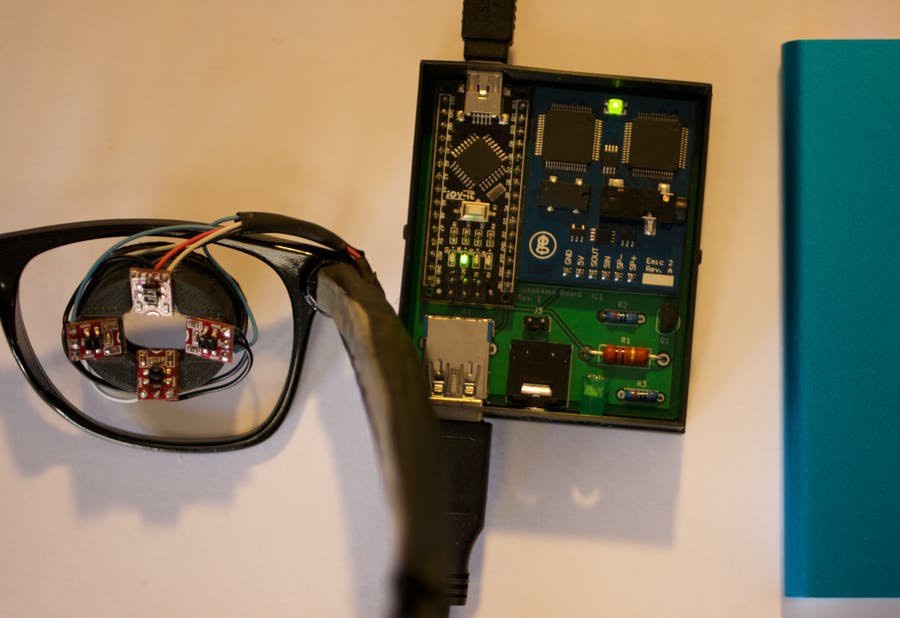
At the most basic level, the Speak4Me consists of an Arduino Nano board that controls a set of four infrared sensors which are pointed at the user’s eye within a single glass lens. Then once every 100 milliseconds, a measurement is taken to determine the location of the pupil and thus the direction being focused on. The word or phrase is chosen by first selecting a profile containing four groups of four elements each, for a total of sixteen possible combinations per profile. As an example, the caretaker profile has elements such as “yes,” “I want to sit,” and even “I need medical treatment.”
After a command has been selected, it is then sent to a Parallax Emic 2 text-to-speech device that takes in the words and produces the corresponding sounds, which are outputted via a 3.5mm audio jack.
With the urgency to prevent environmental degradation, reduce waste and increase profitability, farmers around the globe are increasingly opting for more efficient crop management solutions supported by optimization and controlling technologies derived from the Industrial Internet of Things (IIoT).
Intelligent information and communication technologies (IICT) (machine Learning (ML), AI, IoT, cloud-based analytics, actuators, and sensors) are being implemented to achieve higher control of spatial and temporal variabilities with the aid of satellite remote sensing. The use and application of this set of related technologies are known as “Smart Agriculture.”
In SA, real-time and continuous monitoring of weather, crop growth, plant physical/chemical variables, and other critical environmental factors allow the optimization of yield production, reduction of labor, and improvement of farming products. Practices such as irrigation management, resource management, production, or fertilization operations are being facilitated by integrating IoT systems capable of providing information about multiple crop factors. In this way, while quality and quantity of production are boosted, the negative aspects of unsustainable and costly agriculture practices are also prevented with advanced interconnected actuators and sensors.
Why Smart Agriculture?
The major focus in this relatively new field is crop optimization through higher productivity and significant control over environmental variations. Smart agriculture provides a convenient way to integrate farming management by having in-hand mobile devices that receive data collected from Unmanned Aerial Vehicles (UAV), satellites, or wireless sensors that operate directly at the plant level and are connected, for example, to cloud-based systems.
In general, SA can potentially:
Reduce water consumption,
Implement a better plant nursing process with optimized nutrient levels,
Decrease risk of yield loss,
Assurance of higher revenue,
Better yield quality,
Decrease overall production of waste,
Simplification of labor,
Enhance environmental protection.
From small farming to urban gardening
The IoT can provide solutions for small farmers ranging from resource management to climate adaptability. However, urban gardeners or small producers are also benefiting from innovations brought through the evolution of IoT. Figure 4 shows a typical low budget and high precision system designed to improve irrigation in urban gardens.
The system is relatively simple, but it offers the potential easiness of building open-source solutions without significant technical constraints in different setups where adaptation to environmental conditions is required. Basic electromagnetic sensors, power supply, a water pump, relays, and the irrigation system are hardware interconnected and managed via cloud-based monitoring. A control unit receives the data that the user later accesses via the internet.
Technology democratization can boost the competitiveness of small producers.
Despite the tremendous potential of SA, technical issues are just one aspect of the whole story. The deployment of high-tech solutions that are less costly, accessible, reliable, and durable has not yet reached maximum potential. The limited internet coverage in rural areas, especially in emerging economies, slows down the deployment of SA technologies. It is why the democratization of IICT, including the internet, is not a discussion of privilege. It is crucial to support the sustainable transformation of agriculture in which small farmers and rural communities can also benefit from technological development.
To increase the adaptation of IIoT solutions, Arduino Pro has recently launched ARDUINO EDGE CONTROL (AEC). With its ease to adapt to solar-based power supply, AEC offers the power of AI with state-of-the-art connectivity modems. To learn more about how you can use the Edge Control, check out how to get started.
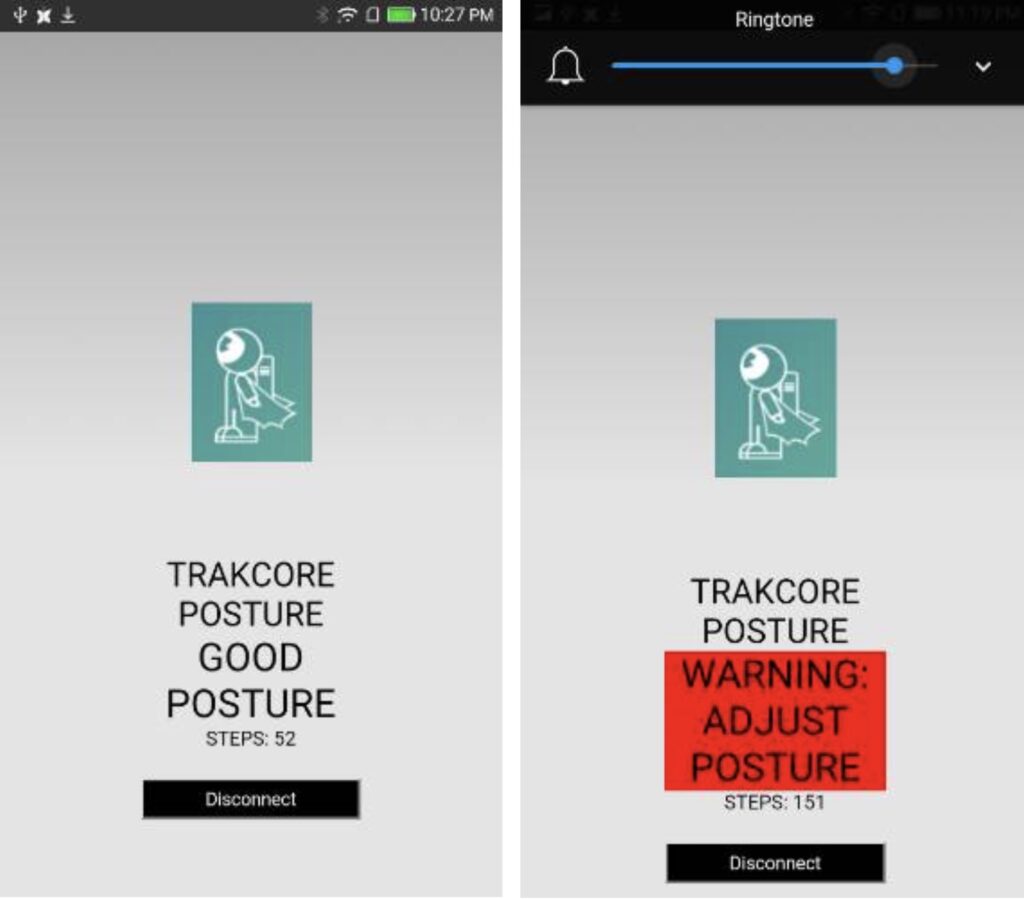
Poor posture is an epidemic for nearly anyone who spends an excessive amount of time sitting, and this can lead to a whole host of problems later in life. Some of these might include back pain, limited range of motion, and muscle tightness. Recognizing that his own posture was lacking, element14 user vlasov01 got to work designing and constructing a small wearable device for element14 Design for a Cause 2021 contest, which could help him alter his posture throughout the day to a more correct one. This project was dubbed the Trakcore, and it uses the sensors on the Arduino Nano 33 IoT to sense how a person is sitting or standing and then sends an alert when it needs adjustment.
Trakcore started with collecting large amounts of data that included positional data for both straight and curved spinal shapes. Next, this dataset was used to train a model within Edge Impulse’s Studio that could infer which position the user is currently in. Once the code to integrate the model with the IMU, vibration motor, LED, and BLE stack was finished, an app was created to receive notifications from the wearable device and display them.
After adjusting some variables within the code and making the wearable ignore posture while the user is walking, the Trakcore was subsequently tested and performed quite well at notifying the wearer when their posture was incorrect.
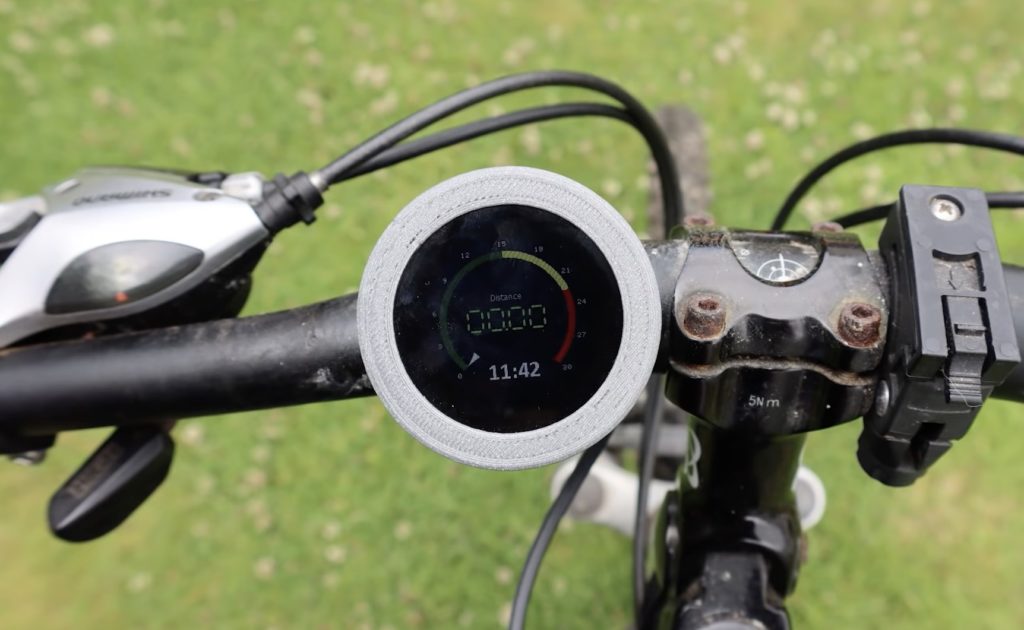
Over on element14, Katie had been wanting to go for a short bike ride after finally getting it fixed. But she encountered a problem: the previously mounted speedometer had lost its display unit, meaning the entire thing was now useless. Rather than simply buying a new one, she had the idea to put together a DIY version that relies on GPS instead of counting wheel rotations to keep track of the current speed.
Component-wise, only a few modules were required to build this device. First was an Arduino Nano 33 IoT that handled communication and power between the screen and GPS module. Next was a GPS3 Click Board, which contains one of Quectel’s L80 GPS modules that provides accurate tracking information in a small form factor. Finally, a small 1.3” circular LCD was chosen due to its pixel density, integrated touch controller, and ease-of-use. Everything was assembled into a custom-designed and 3D-printed housing that fits neatly over the bike’s handlebars and features an area to store a USB battery bank.
With the hardware finished, Katie moved onto the programming. The application starts by initializing the LCD and GPS modules over serial, where it then moves into an infinite loop that checks for new positional data. If there is something to update, the 4D Systems genieArduino display object receives this latest information and updates the screen’s graphics accordingly.
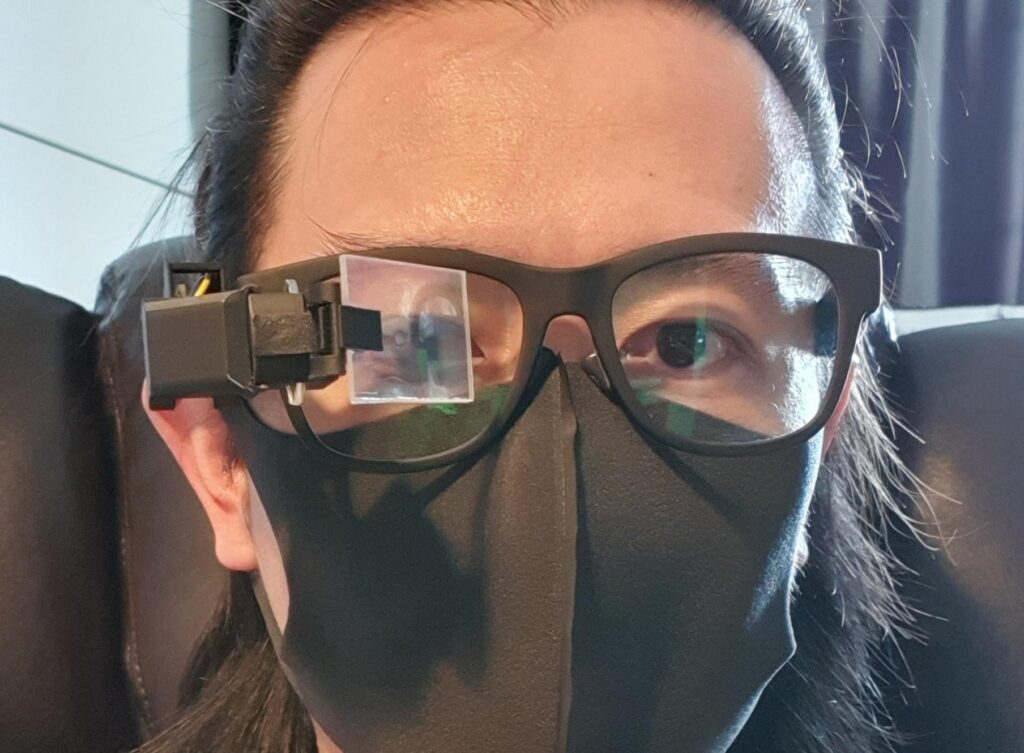
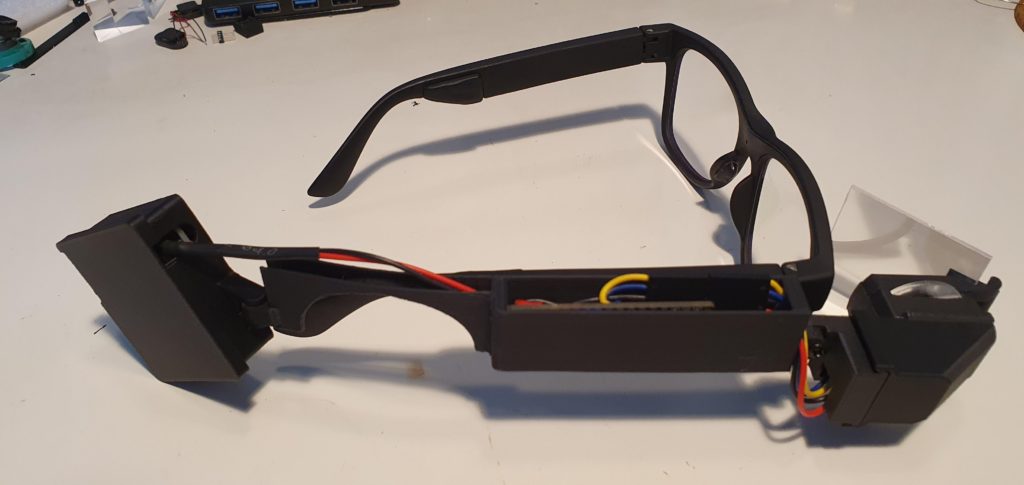
Google rarely enters the hardware world and when they do, they receive a mixed reception. The smart glasses were very controversial when they first launched, due to privacy and fashion concerns. But the idea was a good one: a wearable computer that gave you a heads-up display (HUD) at all times. Unfortunately, even today’s Google Glass models are very expensive. That’s why this Redditor built their own DIY smart glasses using affordable components.
The pair looks a lot like a bulkier version of Google Glass and they perform a similar function. The wearer gets a HUD positioned in front of one eye that displays useful information. In this case, the information comes from a separate device via Bluetooth. The software is still in development, but these glasses could theoretically display any information from a connected smartphone, such as navigation or text messages. The screen is monochrome and has a low resolution, but it is enough for basic graphics and text.
The primary component is an Arduino Nano 33 BLE. That drives a 0.49″ OLED screen through an I2C connection. A lens and mirror project the screen onto a clear phone case lined with HUD film intended for cars. Power comes from a small 450mAh lithium-ion battery. The frame is off-the-shelf, but the enclosure for the electronics is a custom 3D-printed affair. It allows for adjustability, making the screen clear and readable. The software isn’t ready yet, but the STL files are available if you want to build your own DIY smart glasses.
Home monitoring is a big part of home automation, but it’s often overshadowed. Our attention tends to get hijacked by cool projects that perform physical actions. Whether it’s turning the lights on, changing their color, running a robot vacuum cleaner, pulling on the blinds or watering the garden. All these actions are very cool and very visible. Which makes it easy to ignore the background tasks that are the backbone of great home automation.
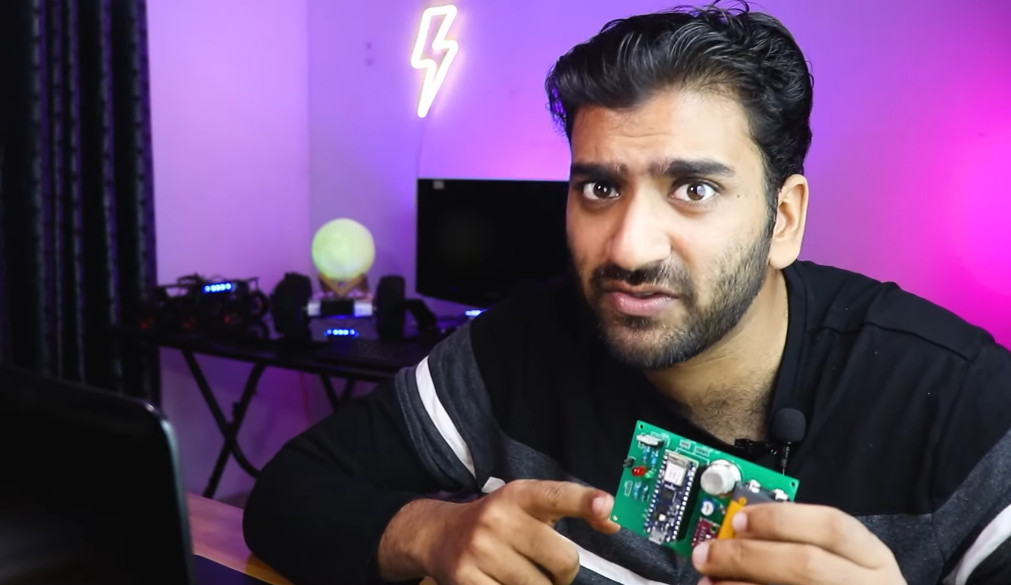
YouTuber and robotics maker RootSaid has been giving this a lot of thought. He’s put together an excellent tutorial on creating a self contained, real-time home monitoring module. It’s built around the excellent Nano RP2040 Connect, and sends everything to Arduino Cloud.
Home Monitoring for You, and Your Family
His objective was to create a compact bundle of sensors to keep an eye on various conditions around the home. This battery powered system can then be positioned anywhere, and monitored from Arduino Cloud. His idea is to install the module in an elderly relative’s home. That way, he can keep an eye on their environment from anywhere.
Of course, this doesn’t have to be used purely as a care system. That’s a great application for his environment monitoring platform, but it’s just as useful for your own home automation system. Too often, sensors (temperature, for example) are physically connected to other automation devices, like Wi-Fi mains switches. But chances are you want to know the temperature over by your sofa. Not down the back of the TV cabinet.
RootSaid to the rescue.
A Compact Home Automation Sensor Module
Let’s take a look at the sensors bundled into this compact package.
He’s got an LDR in there to monitor the light levels. This is perfect for bigger home automation projects, as it can trigger lights all around the house. Even outdoor lighting, if you wanted.
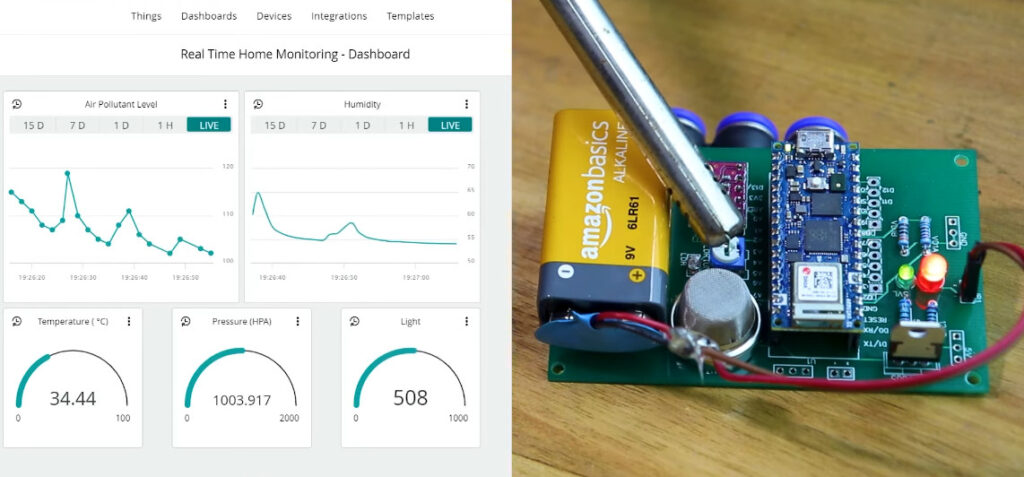
There’s a Bosch BME280 to keep an eye on the environment. This is becoming a popular device among the home automation crowd. It’s small, very low power, cheap, accurate, and gives you temperature, humidity and air pressure data.
Finally we have a gas sensor, which is a really interesting addition. Especially as part of his original brief for monitoring an elderly relative’s environment. It keeps a check on air quality, but being able to get alerts for gas leaks or rising carbon monoxide levels could be life saving.
Home Monitoring in Arduino Cloud, for Free
Finally he takes you through the Arduino Cloud set up, including a monitoring dashboard. Which is more good news, since all this is running from a single Nano RP2040 Connect. That means you’re only adding one Thing (with five variables), so the free tier is a practical option. If you want to begin comparing the data the module collects over time, you can then easily bump up to a subscription for longer data retention options.
Because he’s collecting data through Arduino Cloud, he’s automatically got smartphone access to it, as well. Or, if he wanted to share the data with members of the family or household, it only takes a click.
Although RootSaid is running his module from a 9V battery, there’s nothing to stop you using other power sources. The Nano RP2040 Connect will accept all kinds of voltage inputs. From USB to 12v PSUs, your power options are wide open here.
This is a project that no home automation enthusiast should overlook. It’s small, simple and very easy to build. But it’s also the gateway to creating a great home automation system. If you’re only just getting started, this is the project to begin with. It’s the tiny module where all the important data comes from to make your home truly autonomous. RootSaid’s excellent tutorial also makes it easy to see how you can expand on the project in lots of ways.
We’ve not released a time travel shield for Arduino yet. But when we do, this Eye of Agamotto project will be a perfect fit. So even though it may not bend time yet, it does everything else we’ve seen in Doctor Strange.
Eye of Arduino. Er… Agamotto
Just in case you’re not up to speed with the events of the Marvel universe (or have totally lost track of them), the Eye of Agamotto is a magical device worn by the Sorcerer Supreme. Currently, that’s Doctor Stephen Strange.
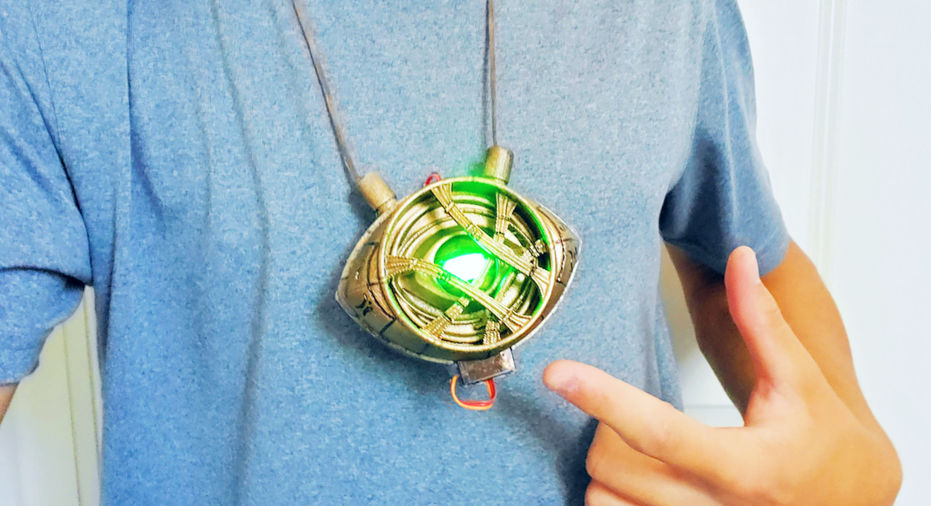
Maker Bradley Campbell is in the running to become the next Sorcerer Supreme. To get himself in the running, he’s built his own Eye of Agamotto using an Arduino Nano Every.
The housing of the prop is mostly 3D printed. It features a working “eye” mechanism, that’s opened and closed by a servo motor and printed, beveled gears. It’s a slick design, that creates the perfect housing for the bright, RGB LED mounted inside. A diffuser then gives it the appropriate infinity stone vibe.
Although his Eye of Agamotto prop is a pretty small piece, and is worn around the neck, all the electronics are built into the medallion itself. It’s a great example of a compact build. A small, low profile Li-Po battery on the back to drive the servo and LED. An equally slim combo of a charging module and DC-to-DC converter keep the lights on, and the power constant.
Like all good prop makers, he doesn’t just show us how to put the electronics together. There are some excellent tips on finishing the 3D printed parts, painting them, and adding texture. The weathering is essential to giving the medallion an ancient gold finish, and bringing the prop to life.
All in all, including spray paint (and excluding the 3D printer), the cost of Bradley’s prop runs to around $150.
Take a look at Bradley’s full build over on Instructables.
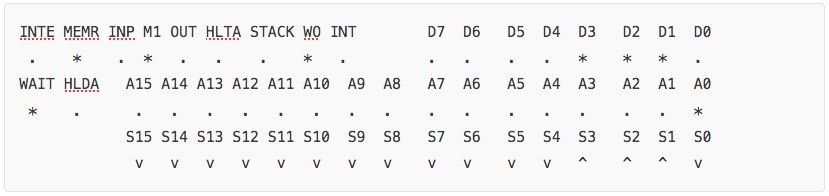
The Altair 8800 is one of the most important machines in computer history and many consider it to be the first personal computer. But not many computer users today would recognize it as such. At release, it couldn’t even output video and users could only interact with the Altair 8800 through a terminal or the front panel. Now you can relive history by emulating an Altair 8800, complete with front panel, on your Arduino Mega.
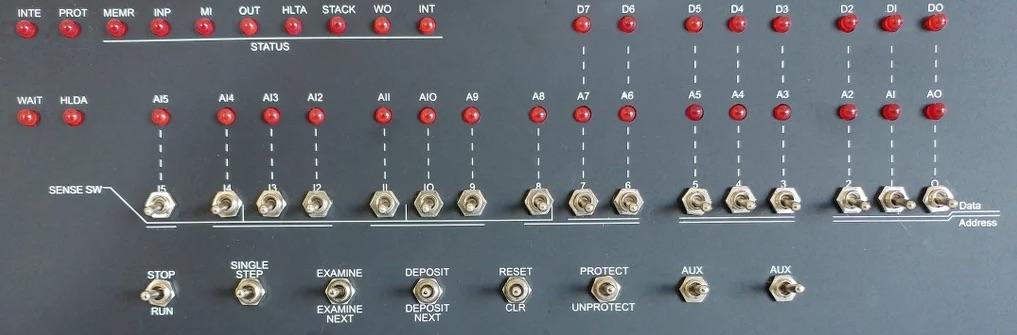
The front panel on the Altair 8800 contained several status lights and toggle switches. Those are cryptic when compared to our modern graphical interfaces, but the Altair 8800’s front panel was integral for working with the machine. Users would load programs and even key in bootloaders using the front panel. The panel would also give you useful debugging information, such as if data was moving from one memory address to another. Interacting with that front panel is a necessity if you want to get the full Altair 8800 experience.
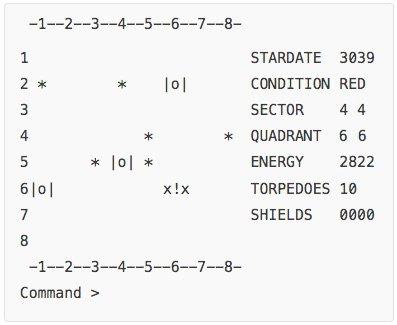
This Instructables tutorial explains how you can do that using just an Arduino Mega and your computer — no other hardware is necessary. After flashing the provided code, the emulator will boot into MITS Altair 4k BASIC, which was Microsoft’s first software and was coded by Bill Gates himself (along with two other programmers). You can communicate with the emulator through the Arduino serial monitor, similar to how a ’70s computer user would have used a terminal. The serial monitor will also display an ASCII representation of the Altair 8800’s front panel that reacts to your actions and programs.
If you’ve ever wanted to experience the Altair 8800 for yourself, this is a great way to do so.
Predicting a lithium-ion battery’s life cycle with tinyML
Arduino Team — August 24th, 2021
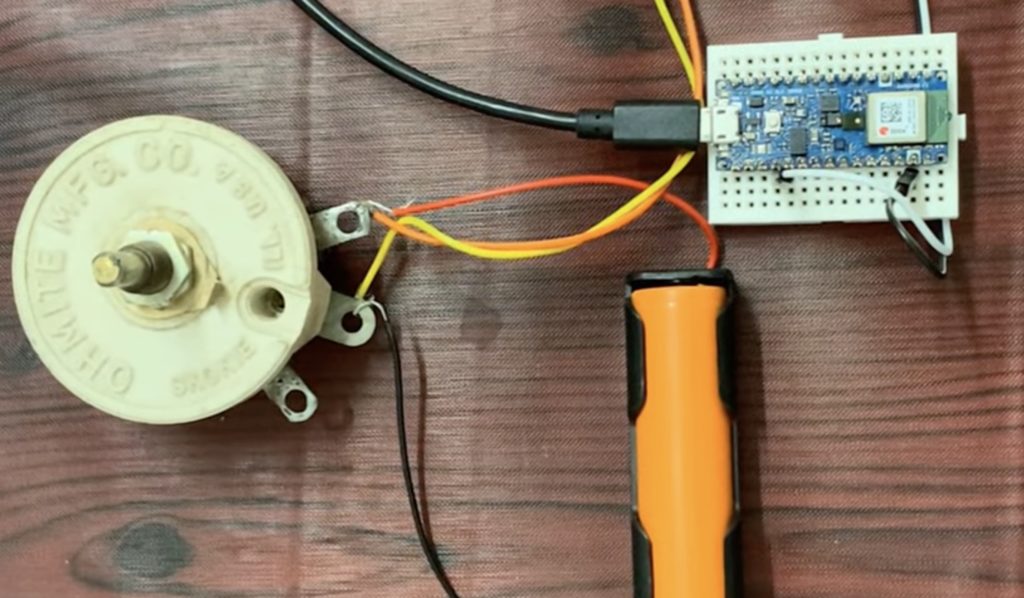
Nothing is perhaps more frustrating than suddenly discovering your favorite battery-powered device has shut down due to a lack of charge, and because almost no one finds joy in calculating how long it will live based on current consumption levels/time used, there must be a better way. This problem is what inspired Manivannan S. to create a small project that can predict when a battery is about to go flat using the “magic” of machine learning and a voltage sensor.
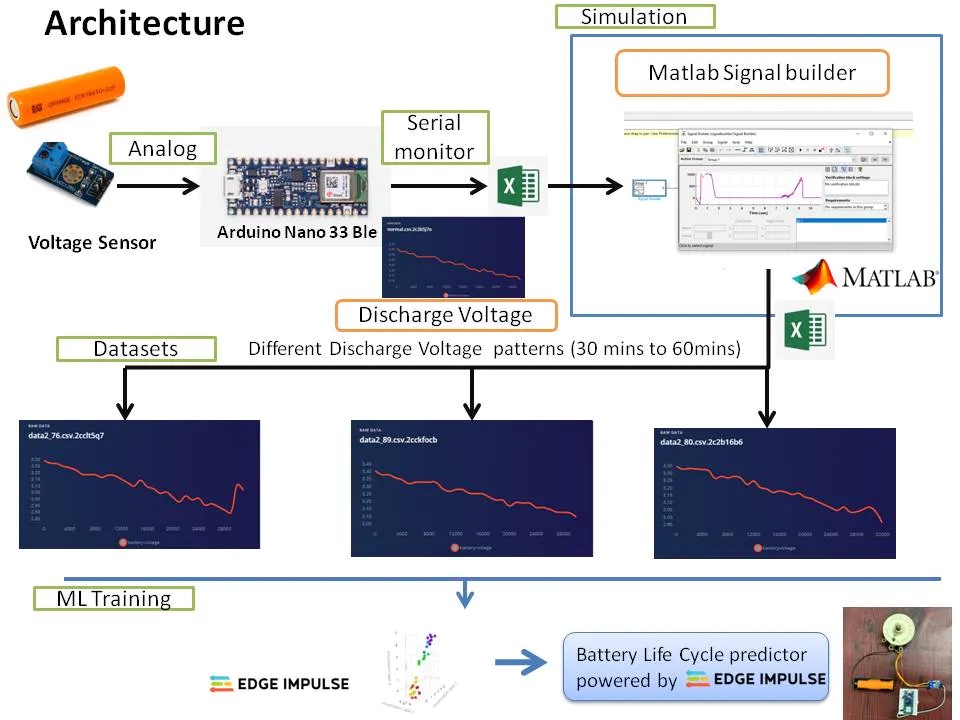
The circuit for the project is quite basic, consisting of an Arduino Nano 33 BLE Sense, a 125 ohm rheostat, a voltage sensing module, and finally the rechargeable 18650 Li-ion cell. The discharge current of the battery was set at 1 ampere with the rheostat, at which time the voltage output was sampled continuously for 30 minutes at a rate of one reading per minute. This data was imported into Edge Impulse’s Studio and used to train a regression model that can predict the estimated voltage and therefore also the capacity remaining.
Once tested, the model proved very successful in determining the battery’s voltage after an hour of use, after which Manivannan went onto explain how this data could be further extrapolated to estimate the complete life cycle. By incorporating machine learning into smart battery technology, power management can become more approachable and increasingly efficient.
Python support for three of the hottest Arduino boards out there is now yours. Through our partnership with OpenMV, the Nano RP2040 Connect, Nano 33 BLE and Nano 33 BLE Sense can now be programmed with the popular MicroPython language. Which means you get OpenMV’s powerful computer vision and machine learning capabilities thrown in.
OpenMV IDE and MicroPython Editor
While you can’t use Python directly with the Arduino IDE, you can use the OpenMV editor, and its version of MicroPython. From the editor, you can install MicroPython and load your scripts directly to the supported Arduino boards.
MicroPython is a great implementation of the full Python programming language, designed to run on microcontrollers. There’s extensive documentation all across the web, which is another huge advantage of learning and using Python for your Arduino projects.
There are so many reasons to get excited about MicroPython for these new Arduino boards. To name a few…
OpenMV’s machine learning and computer vision tools.
Great for computer science education.
Easy for web developers and coders to switch from other platforms to Arduino.
Huge number of MicroPython libraries, tutorials, guides and support online.
Simple to upgrade hardware as project demands increase (eg, upgrade from a Nano RP2040 Connect to a Portenta H7).
There are also lots of Arduino + Python projects that have been posted over the years. Now you can add the Nano devices to those projects and expand on them with their new MicroPython capabilities.
Get Started with Python on Arduino
To help you get cracking, we’ve put together a few guides for each of the supported Arduino boards. The Portanta H7 already supports MicroPython, but we’ve included it below for the sake of completion.
If it’s the first time you’ve used Python on your Arduino board, you’ll need to follow a few steps to get everything working together. Depending on which board you’re using, you might need to update the bootloader to make it compatible with OpenMV. Then you can connect to the board to upload the latest firmware and make it compatible with the editor.
There are guides to take you through the process for each board, and it’s not a complex task. Once completed, your boards will be ready to program them using MicroPython.
These simple tutorials will get you moving quickly.
Furthermore, you can find a few examples of MicroPython scripts you can upload and run on the various boards, too. It’s a great way to test the Python waters with your Arduino boards, and pick up a couple of hints and tips on using the language.
If you’ve got any resources, hints or tips of your own when it comes to learning or using Python, please do share them with the community! We want to hear all about your experiences, and any projects you build using Arduino and Python together.
We’ll keep you updated as we add more documentation and tutorials for MicroPython over on Arduino Docs, so keep an eye out for those.
Um dir ein optimales Erlebnis zu bieten, verwenden wir Technologien wie Cookies, um Geräteinformationen zu speichern und/oder darauf zuzugreifen. Wenn du diesen Technologien zustimmst, können wir Daten wie das Surfverhalten oder eindeutige IDs auf dieser Website verarbeiten. Wenn du deine Einwillligung nicht erteilst oder zurückziehst, können bestimmte Merkmale und Funktionen beeinträchtigt werden.
Funktional
Immer aktiv
Die technische Speicherung oder der Zugang ist unbedingt erforderlich für den rechtmäßigen Zweck, die Nutzung eines bestimmten Dienstes zu ermöglichen, der vom Teilnehmer oder Nutzer ausdrücklich gewünscht wird, oder für den alleinigen Zweck, die Übertragung einer Nachricht über ein elektronisches Kommunikationsnetz durchzuführen.
Vorlieben
Die technische Speicherung oder der Zugriff ist für den rechtmäßigen Zweck der Speicherung von Präferenzen erforderlich, die nicht vom Abonnenten oder Benutzer angefordert wurden.
Statistiken
Die technische Speicherung oder der Zugriff, der ausschließlich zu statistischen Zwecken erfolgt.Die technische Speicherung oder der Zugriff, der ausschließlich zu anonymen statistischen Zwecken verwendet wird. Ohne eine Vorladung, die freiwillige Zustimmung deines Internetdienstanbieters oder zusätzliche Aufzeichnungen von Dritten können die zu diesem Zweck gespeicherten oder abgerufenen Informationen allein in der Regel nicht dazu verwendet werden, dich zu identifizieren.
Marketing
Die technische Speicherung oder der Zugriff ist erforderlich, um Nutzerprofile zu erstellen, um Werbung zu versenden oder um den Nutzer auf einer Website oder über mehrere Websites hinweg zu ähnlichen Marketingzwecken zu verfolgen.