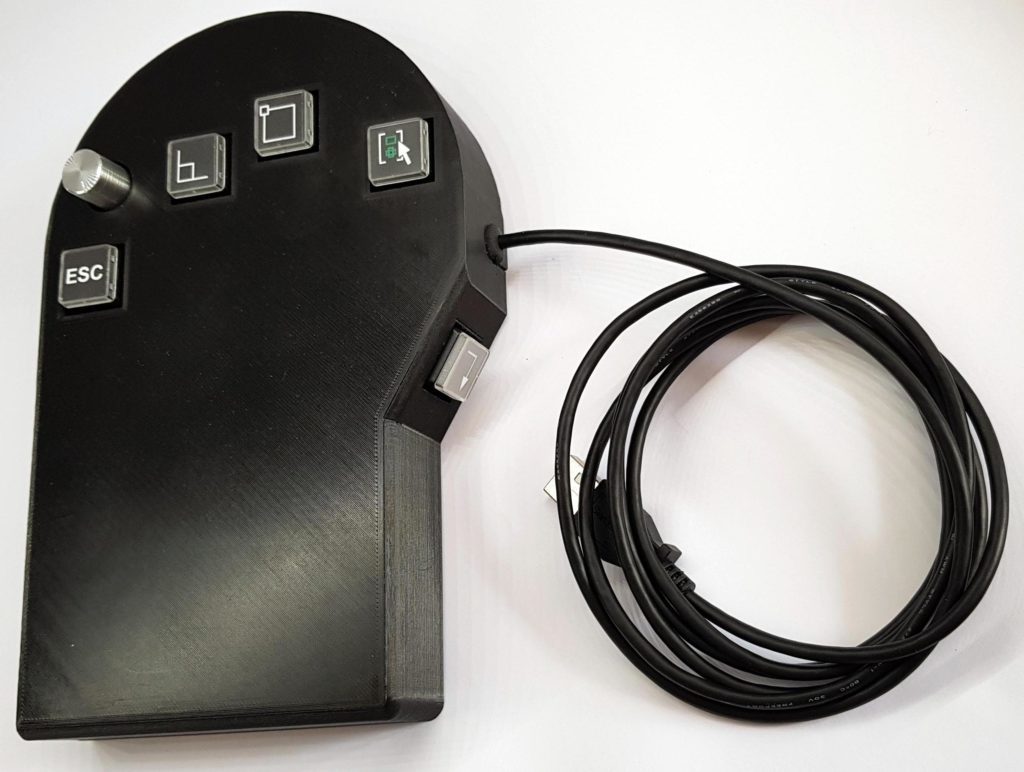
AutoCAD is conventional 2D CAD (drafting) software that still contains many “legacy” features that you won’t find in modern 3D CAD programs. One of those features is the command line, in which users can type short commands to perform various functions or launch tools. For example, typing “line” and pressing Enter will launch the line tool. It can be a pain to enter commands, which is why Wingletang created MacroMitt to increase their AutoCAD productivity.
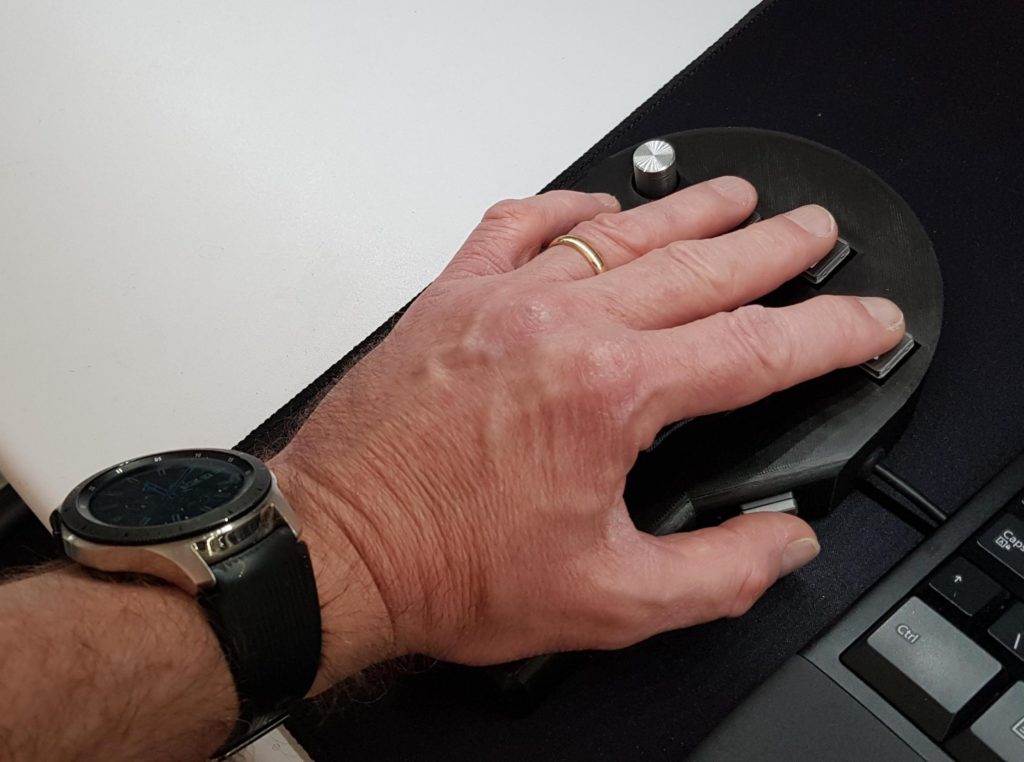
MacroMitt is a simple macro keyboard dedicated to AutoCAD functions. Its buttons are arranged to be comfortable for the user’s left hand, leaving their right hand free to manipulate the mouse. It has six functions: OSNAP (toggles object snapping), ORTHO (toggles orthogonal mouse movement), PICKSTYLE (toggles group/individual object selection), CANCEL (escape key), RETURN (enter key), and volume control. Pressing one of the main buttons will automatically move to activate the command line, enter the appropriate command, and then exit the command line.
An Arduino Micro board controls the MacroMitt’s functions. Wingletang chose the Micro because its ATmega32U4 microcontroller can appear as a USB HID (like a standard keyboard) when plugged into a computer. Other components include Cherry MX-style mechanical key switches and key caps, a rotary encoder, and a stripboard for wiring.
MacroMitt’s enclosure is 3D-printable and MacroMitt published the 3MF files along with the necessary Arduino sketch in their Instructables tutorial. If you work with AutoCAD and want to speed up your workflow, MacroMitt is a configurable system that should help.
With the rapid pace of solar panel installations over the course of the previous decade, there has been an ongoing challenge of trying to improve their efficiency. Apart from the typical silicon crystal photovoltaic cells, there are also more efficient/expensive cells known as concentration photovoltaics (CPV), which rely on a set of mirrors to focus sunlight into a small multijunction cell. Although this technology reduces the size and material requirements, it also requires precise sun tracking for peak performance.
Ruediger Loechenhoff has been able to create a far cheaper solar tracker controller, which relies on an Arduino Uno to drive a set of two motors that position the panel. To achieve this, the Uno was connected to a 9-axis MPU-9250 compass module for internal positioning, a DS3231 real-time clock for accurate timing, and a DIY shading beam sunlight sensor to detect optimal angles. Operating the tracker is also quite simple since the firmware only requires an occasional calibration step after a set number of days.
In terms of safety and reliability, the CPV tracker uses a combination of firmware checks and hardware stops to ensure everything operates normally. For instance, a motor collision causes its current draw to spike which can be quickly cut off from the current detector circuit. Moving too far in one direction will also pull the primary power connector, therefore removing power from the motors.
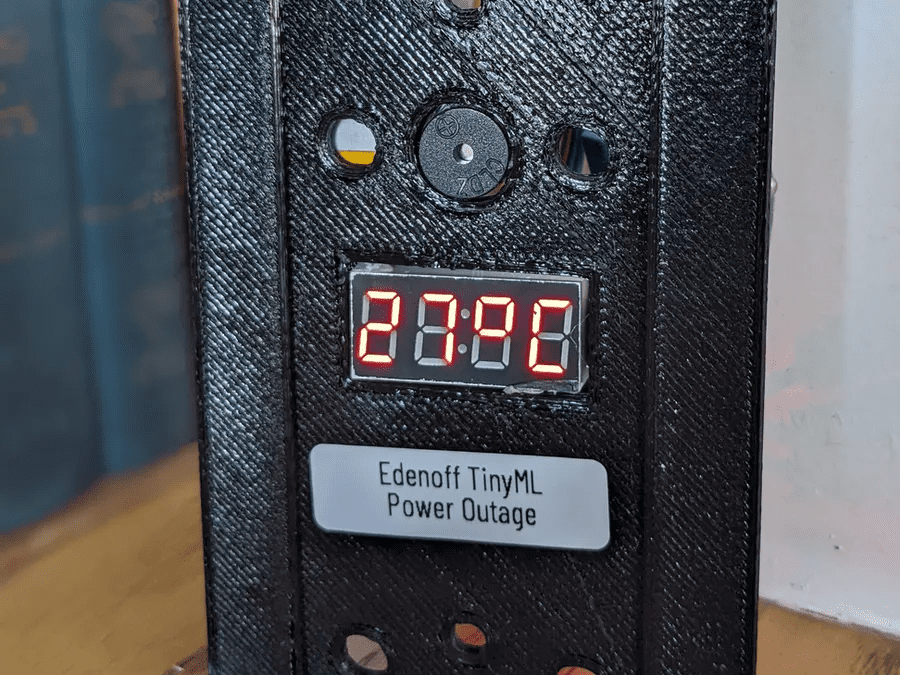
Our reliance on electronic devices and appliances has never been higher, so when the power goes out, it can quickly become an unpleasant and inconvenient situation, especially for those who are unable to prepare in time. To help combat this problem, Roni Bandini has devised a device he calls “EdenOff,” which is placed inside an electrical outlet and utilizes machine learning at the edge to intelligently predict when an outage might occur.
Developed with the use of Edge Impulse, Bandini began by creating a realistic dataset that consisted of three columns that pertain to different aspects of an outlet: its voltage, the ambient temperature, and how long the service has been working correctly. After training a model based on one dataset for regular service and the other for a failure, his model achieved an excellent F-1 score of .96, indicating that the model can forecast when an outage might take place with a high degree of accuracy.
Bandini then deployed this model to a DIY setup by first connecting a Nano 33 BLE Sense with its onboard temperature sensor to an external ZMPT101B voltage sensor. Users can view the device in operation with its seven-segment display and hear the buzzer if a failure is detected. Lastly, the entire package is portable thanks to its LiPo battery and micro-USB charging circuitry.
For more details on this project, you can watch its demonstration video below and view its public project within the Edge Impulse Studio.
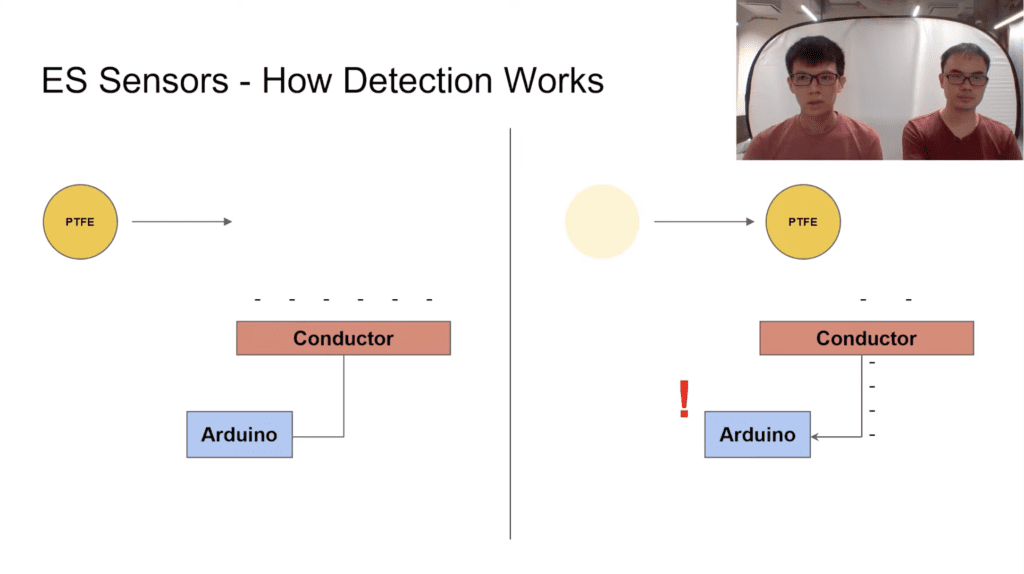
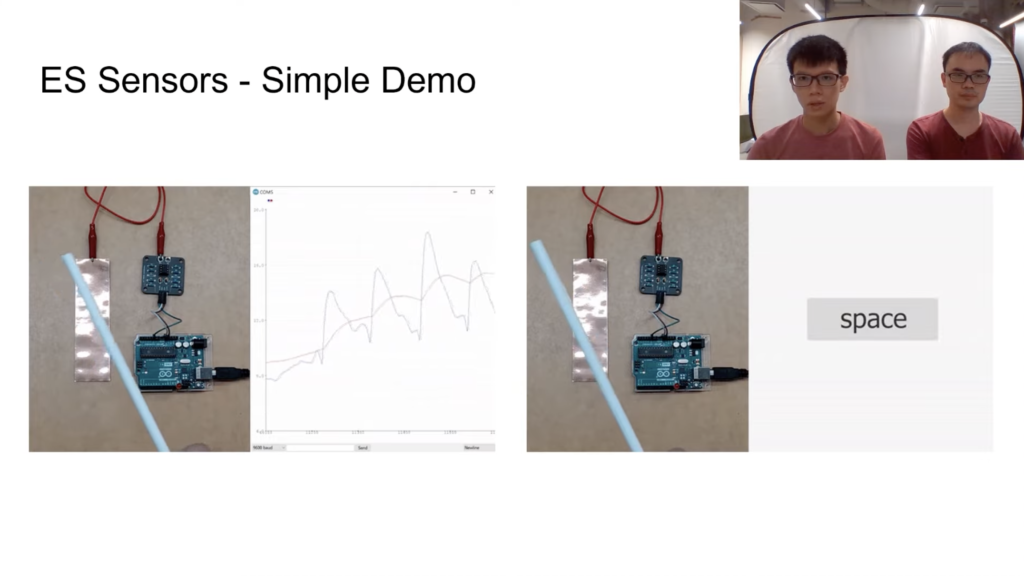
When imagining motion sensors, devices such as accelerometers, infrared detectors, and LiDAR units probably come to mind. But due to the complexity and oftentimes high costs of these parts, researchers Joseph Liew and Keng Wei Ng from the National University of Singapore wanted to create a lower-cost and easier-to-assemble alternative. Their solution, called ESsense, uses the electrostatic properties of objects to sense motion.
At the core of the product, ESsense relies on a pair of materials and an Arduino. The first material is a dielelectric that carries a static charge, whereas the second is a stationary conductive material such as a copper pad. The movement of the former near the surface of the latter causes a current to be induced, which can then be read by the connected microcontroller. Lower humidity levels are greatly preferred since they allow the air to more effectively transfer a charge, but for higher ones, the team created a small PCB-mounted circuit that boosts the signal via an amplifier.
With the basic sensor now working, the final step was to come up with creative ways to implement contactless motion sensors that use ESsense. One creation involved a pair of gates that detect when an object has gone past both detectors. By subtracting the time difference, speed and direction can be determined. They also designed two basic games that take advantage of the direction-sensing capabilities of the device.
For more information about ESsense, you can watch the team’s CHI ’22 presentation below!
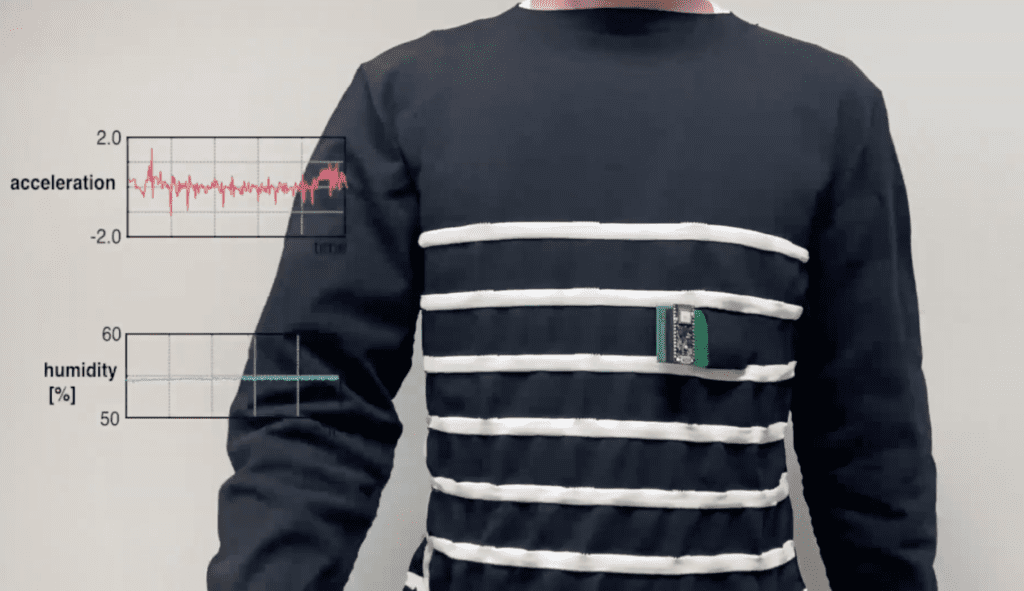
Modern wearable devices have allowed for a wide array of smart technologies to become mobile, including health tracking, receiving notifications, and much more. But due to their small battery size, they often run out of charge within a day or two, thus requiring frequent charging. This problem is what inspired a group of students from the University of Tokyo to create the Meander Coil++ project with the goal of enabling watt-scale wireless power transmission while also remaining safe.
Meander Coil++ differs from other wireless charging solutions in that it consists of a single shirt that has a series of tubes filled with liquid metal running horizontally through it. By applying an electric current, the large coil then creates a magnetic field and can induce current in the device to be charged. Because of this unique design, the researchers were able to achieve an efficiency of 41% for AC-to-AC transfers and a maximum power of 52W.
The coil’s design also relies on a 6.78MHz resonance frequency for power transfer, and this must be maintained no matter how the user is positioned. For this task, an Arduino Nano was combined with a bank of capacitors and relays which toggle on or off based on the values from the current monitoring module.
You can check out the team’s paper here for more details on Meander Coil++ and watch their CHI 22 presentation below, which features application examples such as charging a smartphone, a neck fan, a smartwatch, multiple LEDs, and even a Nano 33 BLE for activity and humidity monitoring.
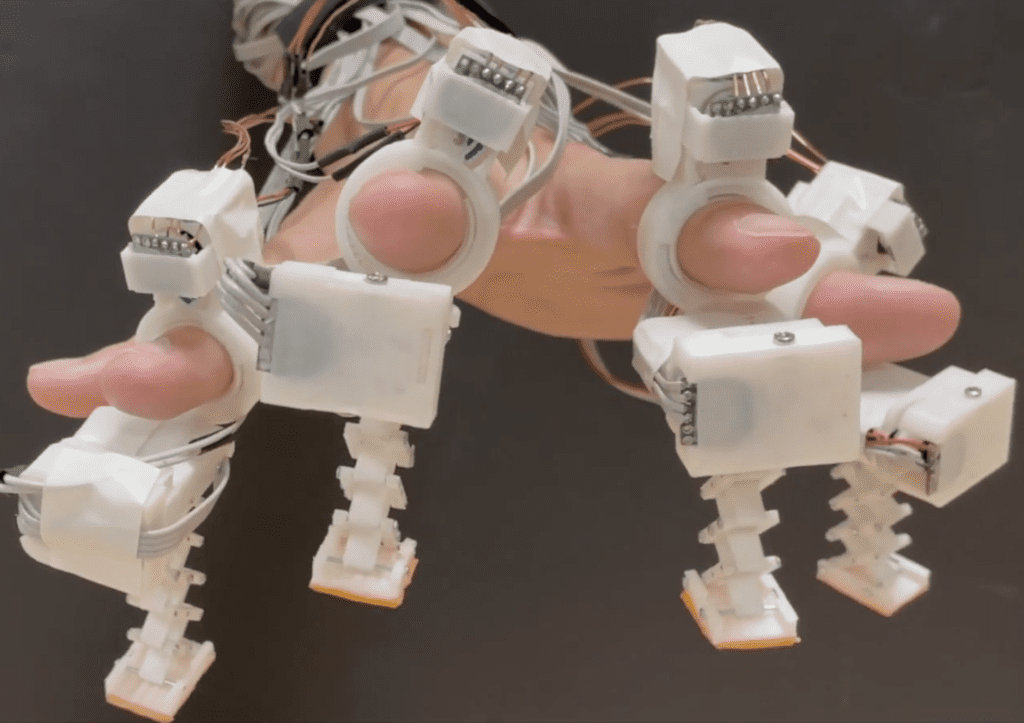
One of virtual reality’s largest unsolved challenges is allowing players to interact with a virtual environment beyond just video and audio. This is why a team of researchers from National Chengchi University in Taiwan came up with the FingerX project as a way to get haptic feedback when touching objects in a real and VR setting simultaneously.
Whereas other ideas revolve around constricting finger motion or using pins to generate rudimentary shapes, FingerX incorporates a single extender module that rests upon each fingertip and extends when certain conditions are met. When touching virtual objects that rest on a flat surface, the shape of the virtual object is intersected by the hand’s position and causes the extenders to mold around the form. Entirely virtual objects can also be held in the player’s hand using this same principle while also being able to fold away the extenders when grasping a physical object.
The device is equipped with a pair of Arduino Mega boards, which control a set of eight motors through four dual motor drivers. Positioning of the ring actuator is accomplished by reading its current rotation from the center with a rotary encoder connected to an interrupt pin. Power for everything comes from a 6V external supply.
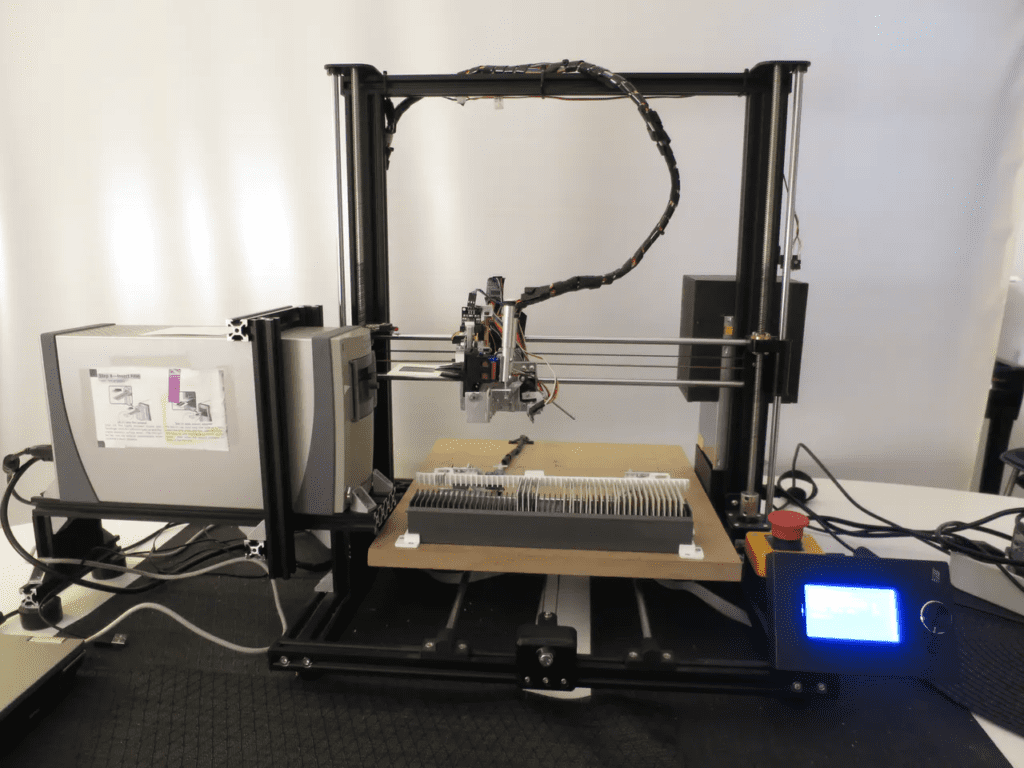
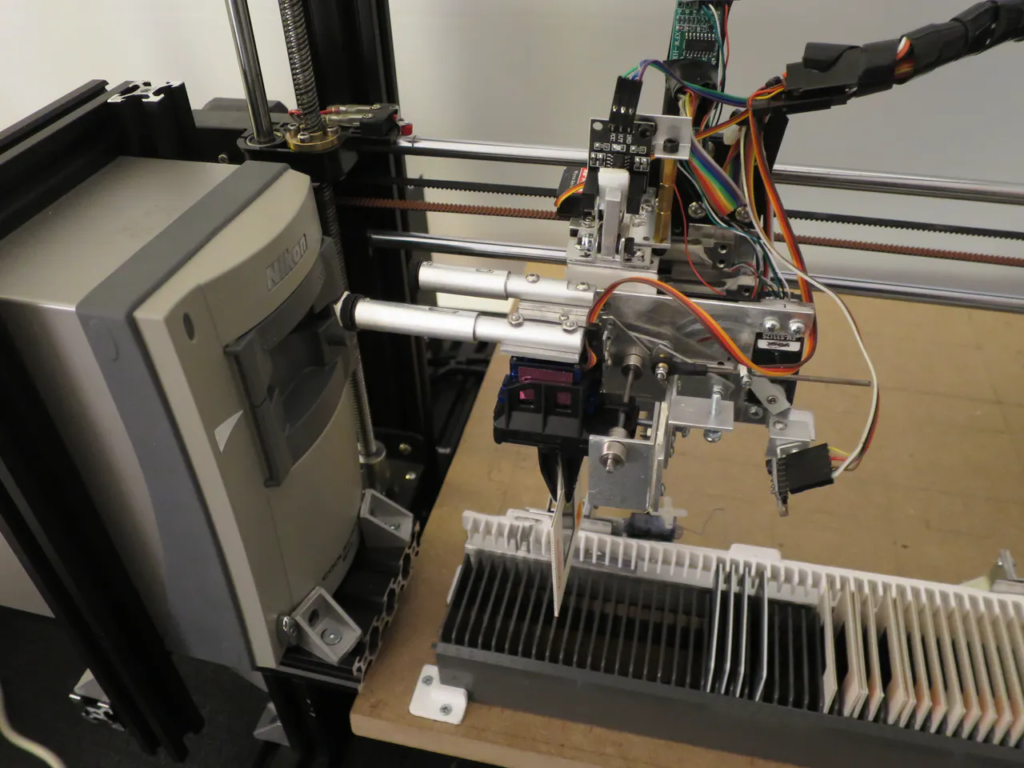
Before the advent of digital cameras, people used film to capture their most cherished memories. And nowadays, there is a rush to convert them into a digital format before they inevitably degrade and become unrecognizable. Film slides in particular have a major drawback in that they are separate, individual pieces of film placed onto small cards which makes scanning them manually a very long and expensive process. In order to digitize his family’s collection of film slides, Hackster.io user Chris was able to create a robot that automates this tedious task.
Most of the robot was made from an old, repurposed Anet A8 Plus 3D printer as Chris kept the existing X and Z axes while replacing the printhead with a custom toolhead. He swapped out the previous control circuitry in the printer for an Arduino Mega 2560 and combined the board with several stepper motor drivers. The gripper module was mounted to the X axis carriage and is responsible for picking up slides from below and moving them into and out of the scanner to the side. Several sensors within the toolhead, including a pair of load cells and a time-of-flight module, assist in ensuring the robot doesn’t collide with the scanner and potentially damage it.
For more details on this project, check out Chris’ write-up here and watch his video below.
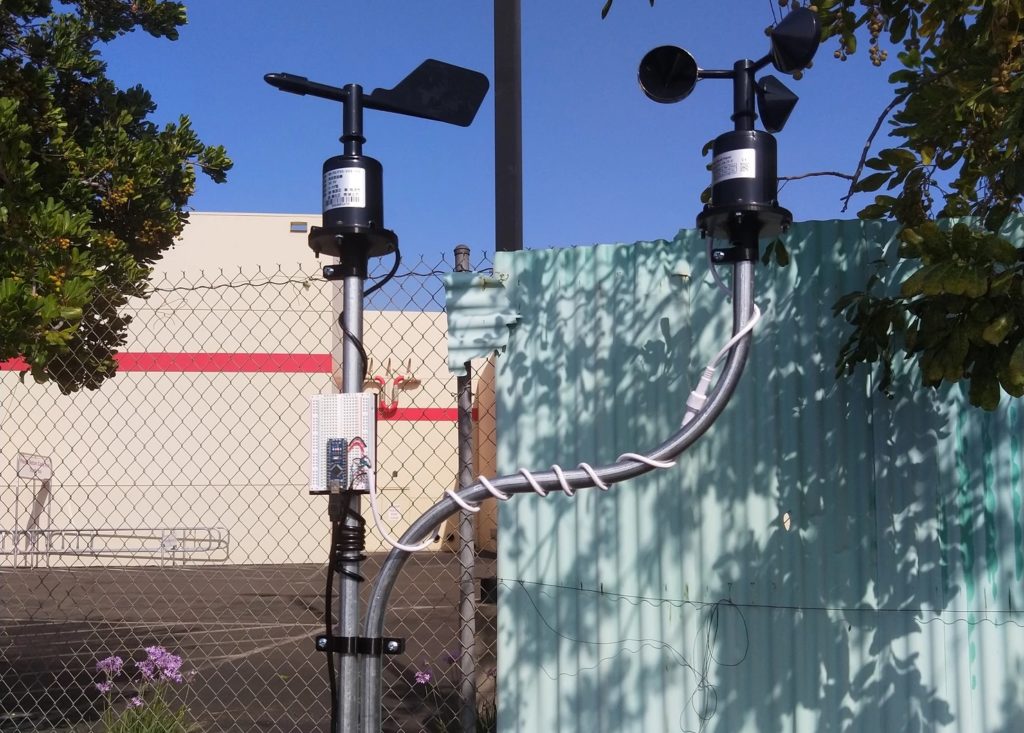
It seems like DIY weather stations are everywhere, and while most can perform the basic functions of measuring temperature, humidity, and air pressure, the majority are still unable to determine wind speed and direction. In response, Austin Allen from Elation Sports Technologies LLC created his own system that uses an anemometer and weathervane to measure the wind.
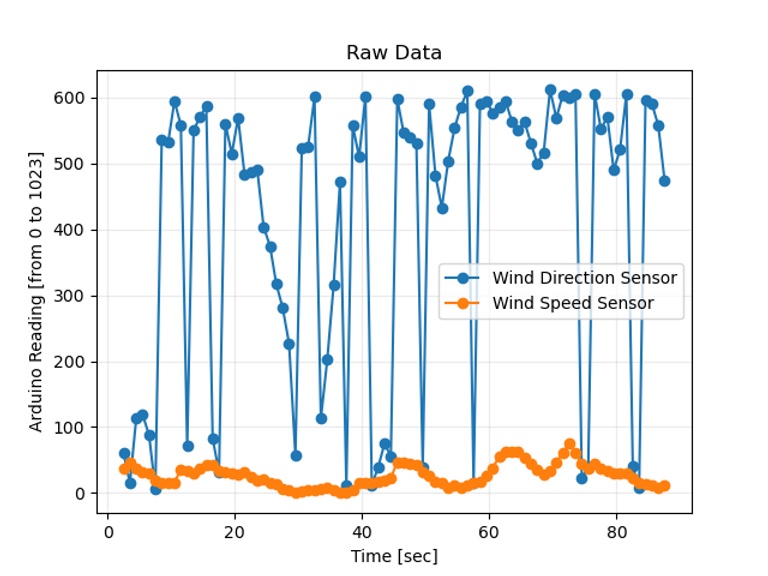
Both the wind direction sensor and wind speed sensor were secured to sections of EMT conduit with 3D-printed mounts. The speed sensor utilizes a series of internal photo interrupters which get blocked by small plastic tabs whenever the disc spins. By reading the resulting analog voltage output, the connected Arduino Nano can map the value to a speed. The directions sensor uses a single Hall effect sensor combined with a polarized magnet in order to determine the orientation of the resulting magnetic field.
Once every 0.8 seconds, the Arduino takes a reading from the two wind sensors and sends that data over USB to a host PC where a Python script collects and writes it to a CSV file. This newly-gathered information can then be converted into actual speed and directional values, which can be plotted with the help of a graphing utility.
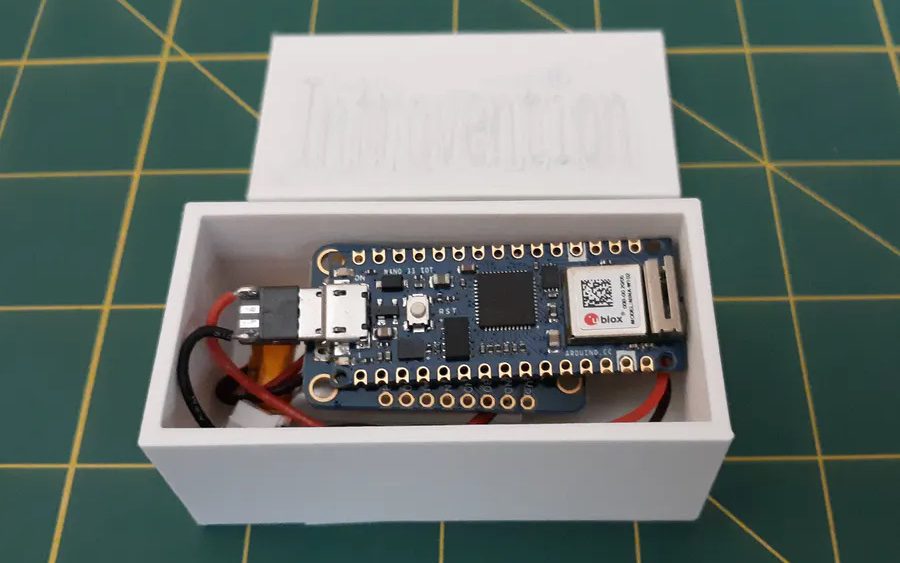
Conditions such as Parkinson’s disease and essential tremors often present themselves as uncontrollable movements or spasms, especially near the hands. By recognizing when these troubling symptoms appear, earlier treatments can be provided and improve the prognosis for the patient compared to later detection. Nick Bild had the idea to create a small wearable band called “Introvention” that could sense when smaller tremors occur in hopes of catching them sooner.
An Arduino Nano 33 IoT was used to both capture the data and send it to a web server since it contains an onboard accelerometer and has WiFi support. At first, Bild collected many samples of typical activities using the Edge Impulse Studio and fed them into a K-means clustering algorithm which detects when a movement is outside of the “normal” range. Once deployed to the Arduino, the edge machine learning model can run entirely on the board without the need for an external service.
If anomalous movements are detected by the model, a web request gets sent to a custom web API running on the Flask framework where it’s then stored in a database. A dashboard shows a chart that plots the number of events over time for easily seeing trends.
To read more about Bild’s project, check out its write-up here on Hackster.io.
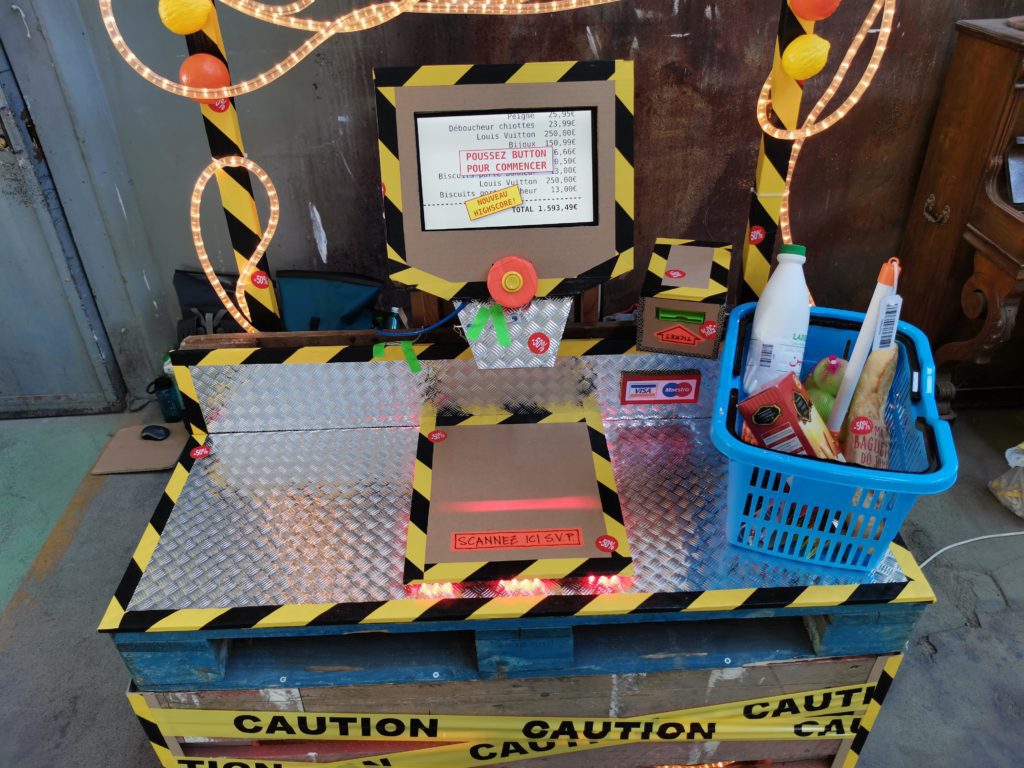
It seems like everyone these days is trying to reduce their grocery bill as much as possible, but Niklas Roy and Kati Hyyppä’s interactive installation, Bonprix, turns the tables by making the goal to spend the most money on whatever items can be scanned within 90 seconds.
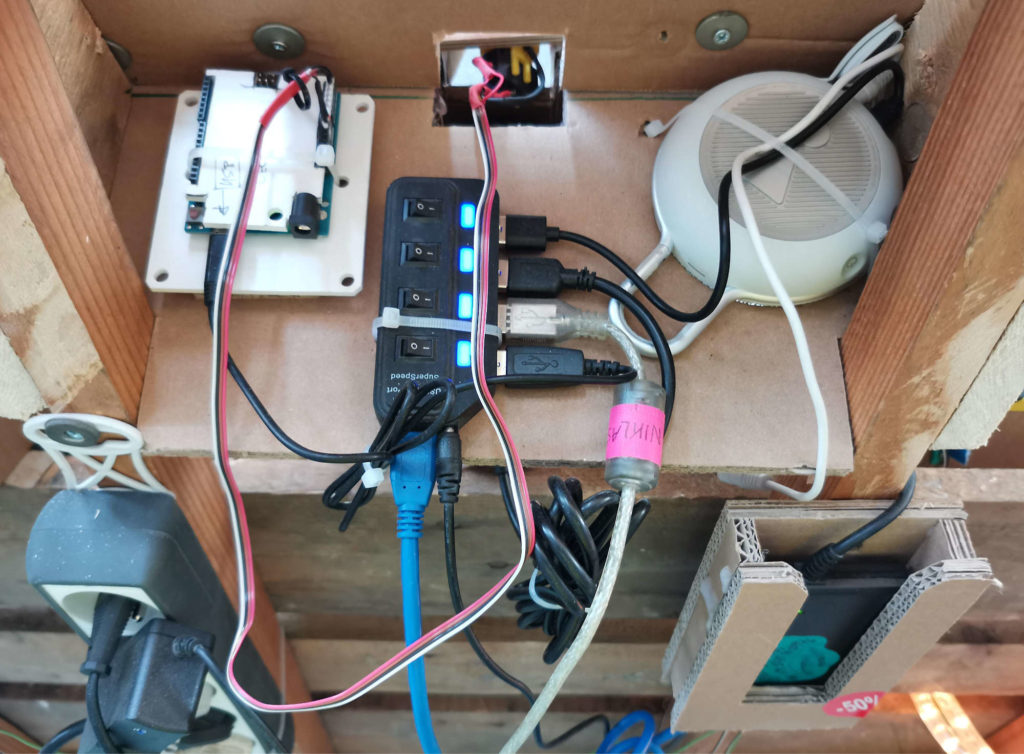
Bonprix is meant to resemble a self-checkout machine that can be found at nearly any supermarket. The base was constructed from reclaimed wooden pallets and topped with a silver checker plate foil for that authentic experience. At the center is where all of the electronics are located, which includes a cheap handheld barcode scanner and an old laptop to show the game.
Players begin by pressing the large start button that gets read by an Arduino Leonardo, which in turn sends the string “StartGame” to the computer over USB. From here, the aim is to scan the item displayed onscreen while avoiding any discounts that might pop up and reduce the overall score. Every successful scan is accompanied by a beep from a Bluetooth speaker and a flash of green from the string of Nano-controlled WS2812B LEDs.
After the time has expired, the game prints out the receipt listing every item scanned along with any discounts and the grand total at the bottom. To see more about Roy’s project, be sure to watch the demo below or read about the process of creating Bonprix here on his blog.
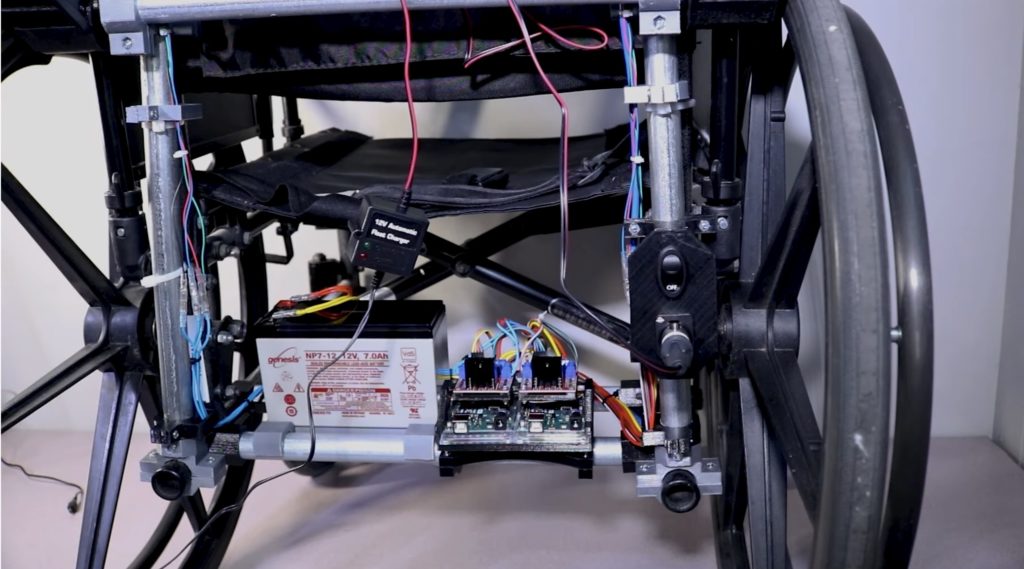
Motorized wheelchairs can be very expensive, and for those who are unable to afford them, getting around the house can become a challenge. This is what inspired Wesley Gardner from element14 Presents to design a series of wheelchair modifications that can improve a person’s mobility.
Gardner began by coming up with a few parts in CAD for the battery mount, an electronics enclosure, and a whole host of clamps for attaching steel tubing to the chair. Next, he added a pair of crossmembers below the wheelchair to secure the 12V lead-acid battery in place. Three more tubes were attached vertically to the back as a way to hold the stepper motors against the wheels which rotate them via friction.
Controlling the stepper motors was done with the aid of two L298N full H-bridge motor drivers, and in turn, they were each connected to a separate Arduino Uno that generates the correct sequence of steps. A single joystick mounted on the wheelchair’s armrest sends signals to both microcontrollers that dictate which direction the wheels should turn. And finally, a basic 12V float charger can be attached using a three-pin XLR connector for easily charging the battery.
To see this project in action and to view more details, check out Gardner’s video below.
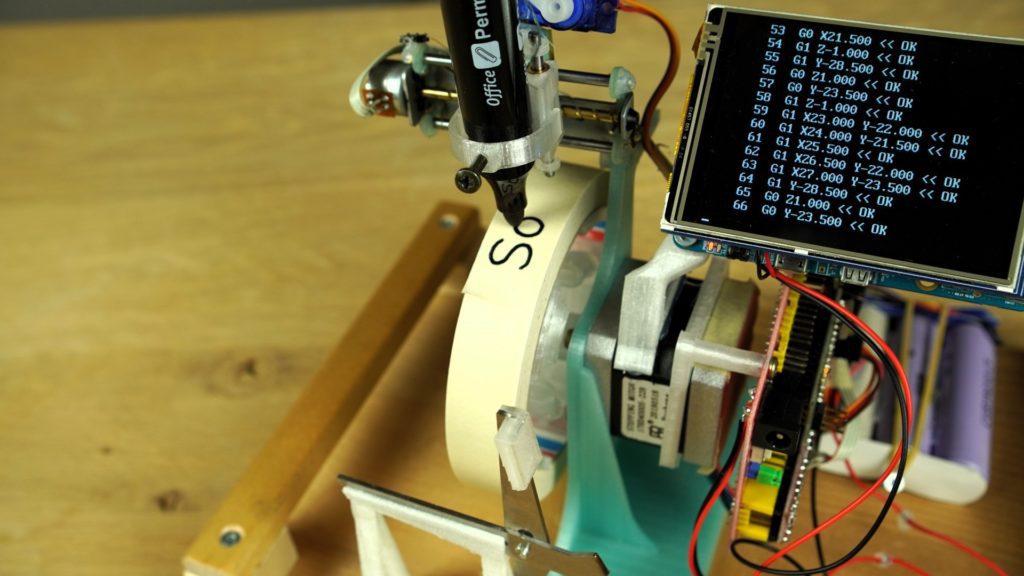
Masking tape makes for a great label as its weak adhesive does not tend to leave visible residue and names can be easily sketched onto its surface, albeit quite slowly. To expedite this process, Hackaday.io user michimartini decided to design and build a machine that writes labels automatically.
The device is essentially a drum plotter, which rotates a cylinder around an axis while moving the writing head back and forth to draw. For the X axis, michi used a basic NEMA17 stepper motor in conjunction with a CNC shield connected to an Arduino Nano. And rather than creating a custom horizontal Y axis from scratch, the machine instead utilizes a repurposed linear assembly extracted from an old DVD drive carriage, while a limit switch assists in homing the toolhead. Finally, a small servo motor holds the writing utensil so that it adequately contacts the masking tape.
To actually print a label, the text is first entered into a specialized program running on an old Odroid-C1 single-board computer, which converts the string to a G-code path that the Grbl-based firmware can understand. After the user has verified everything looks good on the attached 3.2″ LCD screen, the Nano begins to plot the characters.
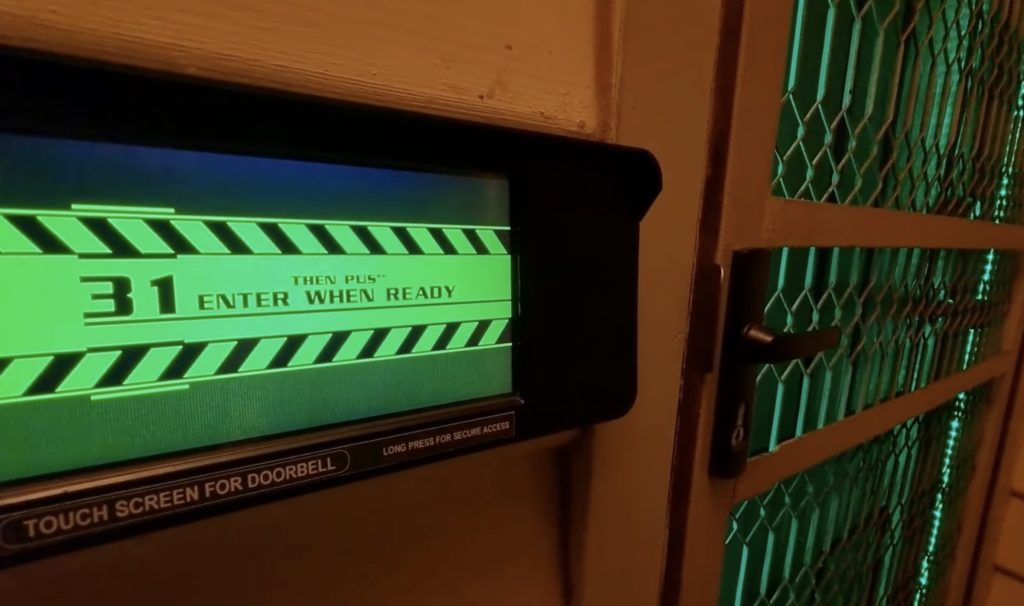
For YouTuber Jroobi, merely walking up to his front door, inserting a key into the lock and turning the handle was too simple, which led him come up with a very unique and high-tech design for a new type of lock. His idea was to combine several different kinds of verification/control mechanisms, including codes, RFID and voice, all into a single package.
The sci-fi-style device he created consists of two Arduino boards: a Nano that handles the physical electronic strike assembly that blocks the door from opening, as well as receiving input from a slightly modified Google Home smart switch for voice operation via the Google Assistant ecosystem. Connected to the Nano is a Due, which is responsible for driving the 7″ touchscreen and everything else within the door controller. The central screen displays smooth animations for entering passcodes and scanning RFID tags, while a string of RGB LEDs just inside the door illuminate depending on if access was granted. Lastly, futuristic-sounding instructions and effects are played with the help of a DFRobot MP3 player module.
For more details about how Jroobi made this project, you can watch the demonstration video below or read his post here on Reddit.
Arduino’s mission has always been to give creators, makers and innovators the tools they need to turn their ideas into real projects. That will never change. What is changing, and at warp speed, is our definition of possible.
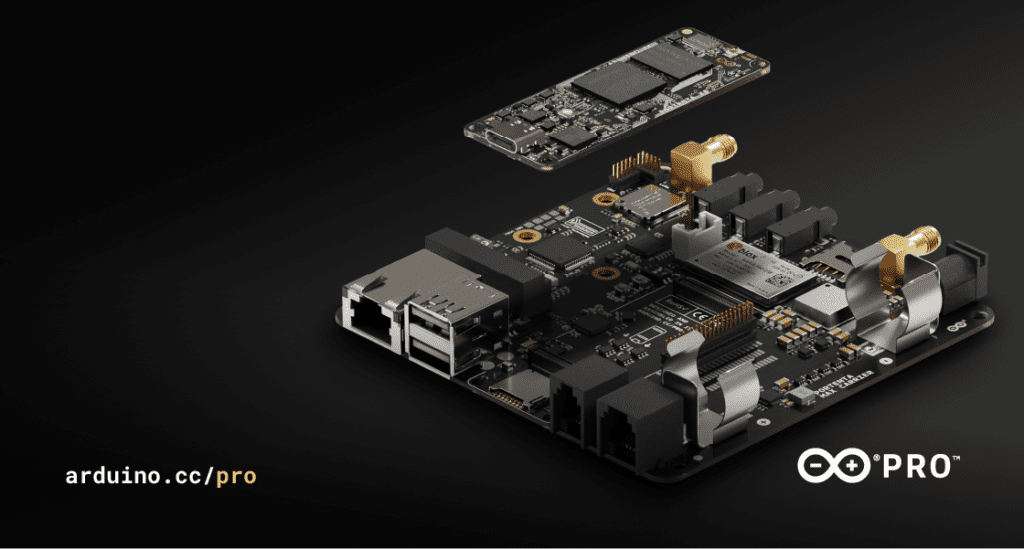
Because every day our accessible, flexible and reliable open-source hardware grows more powerful, and our ecosystem more complete. As you may have heard during Arduino Week, Arduino Pro is launching two new products in the Portenta range: the revolutionary X8 module, which merges Arduino and Linux for the first time, and Max Carrier, which gives you super prototyping powers to make your ideas come to life easier and faster than ever.
Portenta X8 is a plug-and-play, industrial-grade SOM that comes with Linux OS preloaded onboard, making for a hybrid combination of microprocessor and microcontroller with the capability for AI and ML on the edge. It’s basically two products in one, with the power of no less than 9 cores. It features an NXP® i.MX 8M Mini Cortex®-A53 quad-core, up to 1.8GHz per core + 1x Cortex®-M4 up to 400MHz, plus the STM32H747XI dual-core Cortex®-M7 up to 480Mhz +M4 32 bit Arm® MCU up to 240Mhz, and is capable of running device-independent software thanks to its modular container architecture.
With onboard WiFi/Bluetooth® connectivity you can carry out OS/application updates remotely, so the Linux kernel environment is always at top performance levels. Enhanced security is guaranteed by X8’s NXP SE050C2 Crypto element – keeping connections secure at the hardware level with PSA certification. The module has also achieved Arm SystemReady certification and integrated Parsec services, making it one of the first Cassini Products available to you on the market.
It’s everything you need to develop your most ambitious projects for Industry 4.0, smart agriculture, connected buildings and smart cities: check out the full technical specs on the dedicated page and superpower your Linux applications with real-time execution.
If that wasn’t enough, we are also introducing Portenta Max Carrier – which boosts X8 or H7 by adding connectivity options (Fieldbus, LoRa®, Cat-M1 and NB-IoT), industrial connectors such as RS232/422/485, USB, mPCIe – plus three integrated audio jacks, a MicroSD card and more.
You can combine this Arduino Pro carrier with existing Portenta modules to turn them into single-board computers or reference designs for Industry 4.0 – bringing your deployment time virtually down to zero. This allows you to swiftly prototype and develop high-performance projects such as remote control of industrial machinery and equipment, smart digital kiosks that enhance users’ experience, and custom HMI dashboards to control the smart appliances, lights and systems in your home or office remotely.
As excited as we are about these launches, it’s never just about a new product (or two!). It’s about how many new ideas we can spark, the innovation we can fuel, the new opportunities you can create, if you have the right tools.
Portenta X8 is available on the Store and Max Carrier will arrive soon. We can’t wait to see the great innovations you will bring to life.
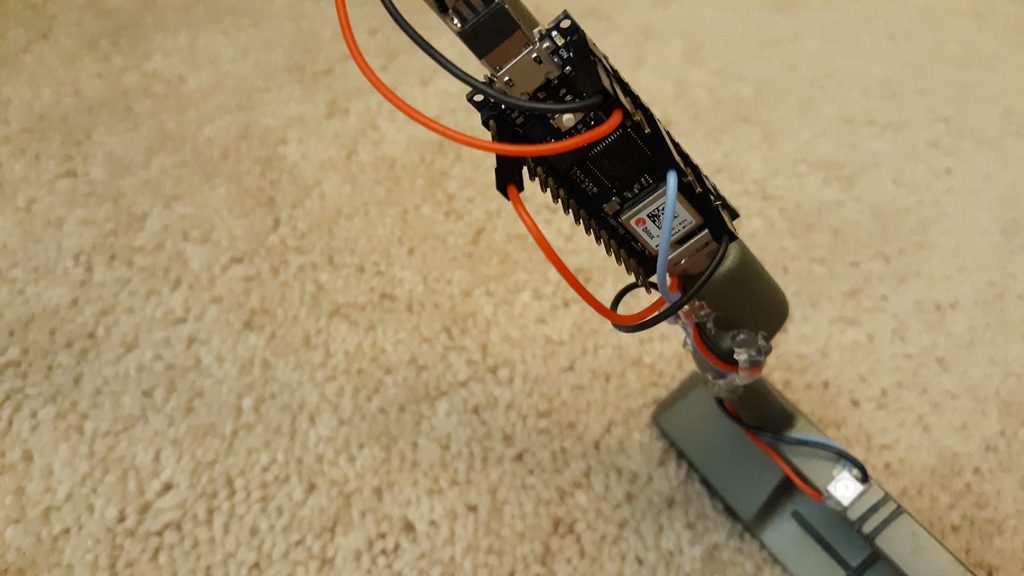
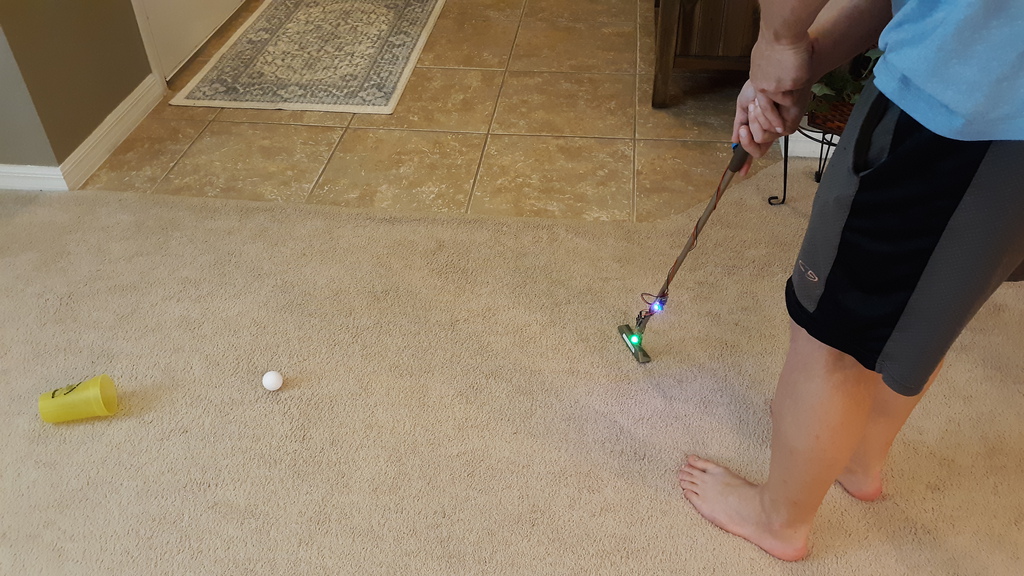
Fancy golfing simulators are excellent for learning the best techniques such as balance and how to hold a club properly. However, their large cost puts them out of the reach of most people, so Nick Bild decided to create a far cheaper alternative that can still be beneficial. His Golf Ace system relies on a specially modified putter that runs a machine learning algorithm to give feedback about the quality of the putt.
When the player is ready to begin using the club, they can press a button, after which the onboard accelerometer of a Nano 33 IoT begins recording the movements of the putter. He trained a K-means clustering anomaly detection algorithm with data from many correct motions in the Edge Impulse Studio, meaning that anything outside of the normal range can be recognized as a poor putt. From here, the model outputs if the recorded motion is close enough to correct, and if so lights up an RGB LED in green. Otherwise, the light turns red to signal poor technique.
In the future, Bild hopes to collect more data from proficient golfers in order to further refine his model and preload it into a club so that others can practice with high-quality putting data. Until then, you can read more about the project in his Hackster write-up.
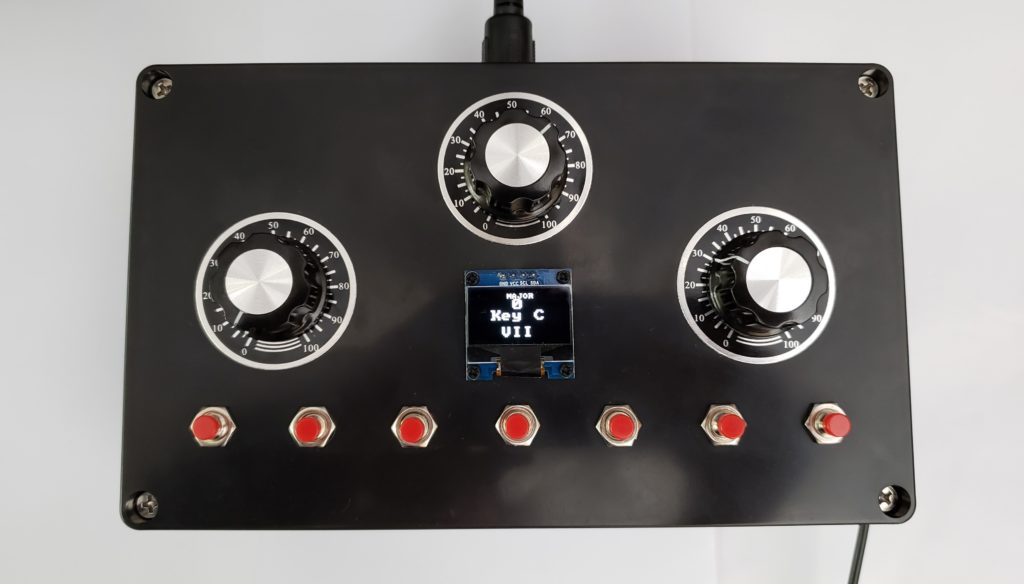
After attempting to learn how to play the piano after some previous experience with guitar and music theory in general, YouTuber EvolutionStoneware encountered a few difficulties when trying to learn the keys on a standard MIDI keyboard. Because of this, she created a DIY MIDI controller called the Root Commander that allows for a single note to be played based on the settings of several inputs.
Within the controller is an Arduino that reads the values from three potentiometers and determines the corresponding scale, key, and octave. Once stored, the firmware chooses the correct string containing either the scale, key, or octave depending on which range the values fall into. For example, setting the scale potentiometer to between 500 and 722 selects the “Dorian” scale. From here, these values are all shown on the integrated I2C OLED display in the center.
Pressing one of the seven buttons at the bottom of the MIDI controller plays a note that is outputted on both the screen and through the five-pin DIN connector at the back, which enables the device to be connected to a host device that in turn translates the data into audio.
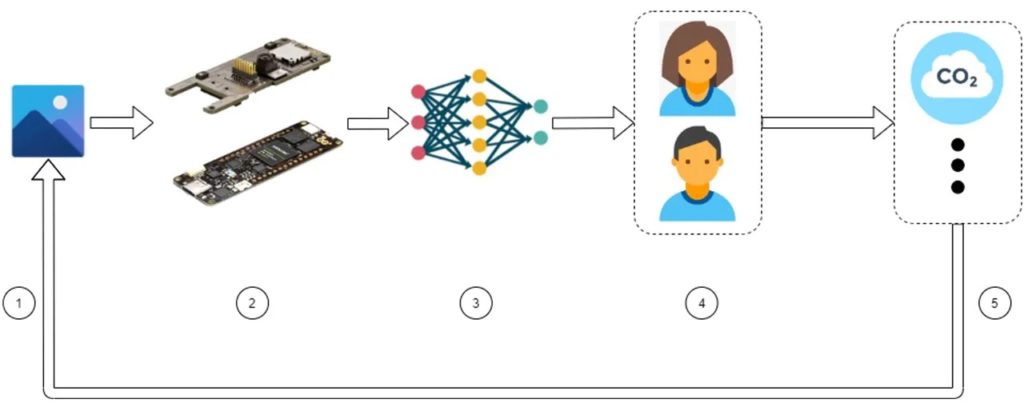
The ongoing COVID-19 pandemic has drawn attention to how clean our indoor environments are, and by measuring the CO2 levels within a room, infection risks can be approximated since more CO2 is correlated with poor ventilation. Software engineer Swapnil Verma had the idea to use computer vision to count the number of occupants within a space and attempt to gauge the concentration of the gas accordingly.
The hardware powering this project is an Arduino Portenta H7 combined with a Vision Shield add-on that allows the board to capture images. From here, Verma used a subset of the PIROPO dataset, which contains recordings of indoor rooms and ran the YOLOv5-based auto labeling utility within Edge Impulse to draw bounding boxes around people. Once labeled, a FOMO model was trained with a respectable F1 score of 91.6%.
Testing the system was done by observing how well the Portenta H7, running the object detection model from Edge Impulse, did at tracking a person moving throughout a room. Even though the model only takes an input of 240x240px image data, it still performed admirably in this task. For the last step of estimating CO2 levels, Verma’s code simply takes the number of people detected in the frame and multiplies it by a constant. For more details, you can read his post here.
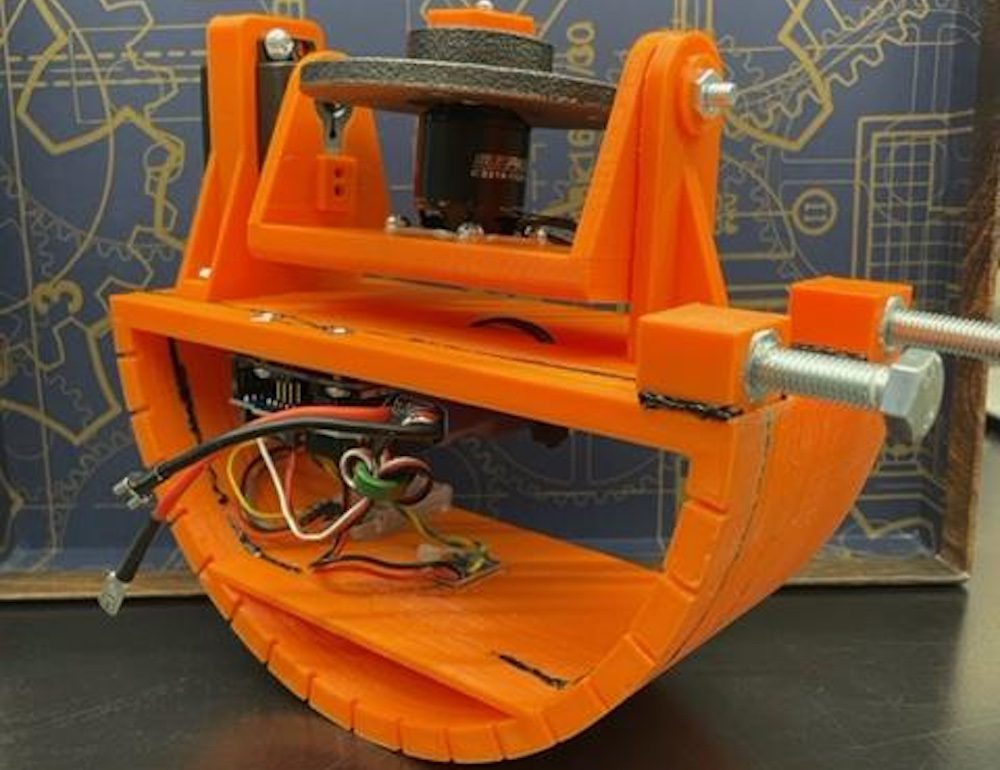
Boats are notorious for their constant swaying back and forth when set adrift on a body of water, leading to sea sickness for those unlucky sufferers and forcing items to be securely stored to prevent them from moving around unintentionally. So, as part of their course in electrical engineering, Kaden Werner and Alex Morin partnered together to create a control system that could effectively eliminate watercraft roll through the use of angular momentum.
Similar to how the International Space Station maintains its orientation, the team’s scaled prototype system relies on a rotating flywheel that generates large amounts of angular momentum in a certain axis. A brushless DC motor and driver are responsible for spinning up the circular mass, while a servo motor on one side rotates the cradle to the desired angle. All of this is done with an Arduino Uno that monitors the boat’s current orientation by taking measurements from an IMU.
If the angle is more than two degrees off-center, the PID loop is updated, which in turn causes the servo to move to a position that can counteract the tilt, as well as spin up the flywheel by outputting a PWM signal to driver.
For more details about how the pair of students came up with their design and built the device, you can view their project here on Instructables.
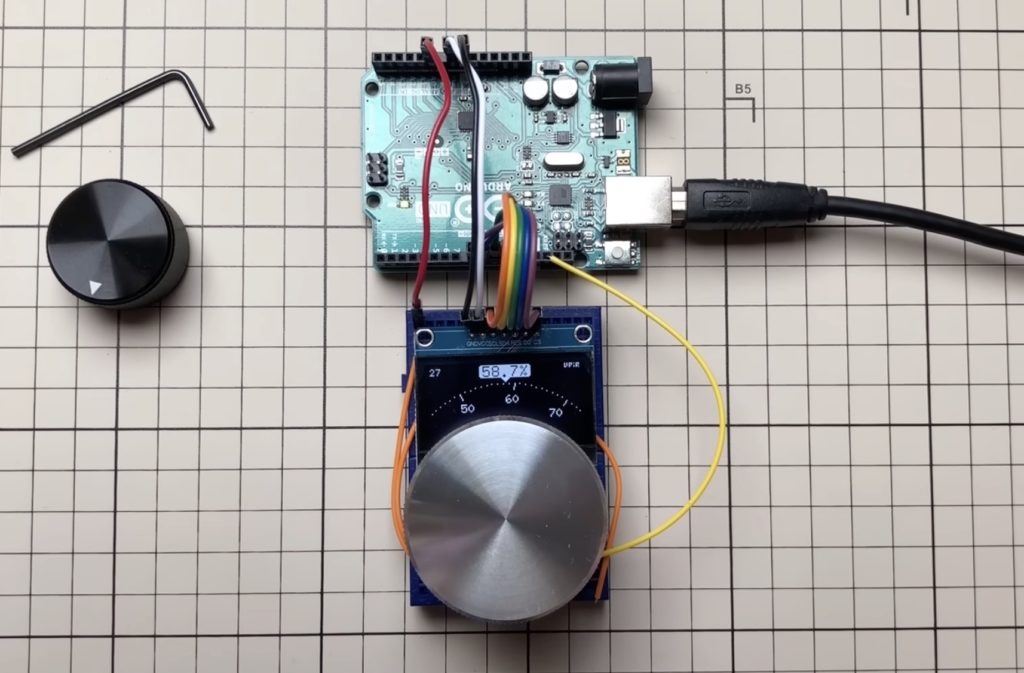
The 128×64 I2C/SPI OLED display is often included in a myriad of projects that need some way to show data, including text, shapes, or basic graphs. YouTuber ‘upir’ was able to take this concept one step further by turning his graphic OLED screen into a virtual circular dial that can respond in real-time to an external potentiometer connected to an Arduino Uno using the U8glib library.
His very thorough video steps through the entire process of creating this setup, as everything from wiring to advanced graphics programming is covered. He started by flashing some demo code that takes continuous readings from a potentiometer via an ADC pin and showing the numeric value as text. After knowing that the values can be read correctly, upir then began work on the dial itself, which works by placing a series of tick marks at predetermined distances from each other. Lastly, value labels were included below every increment of 10 for improved readability.
Originally, the system achieved an average of 10 FPS, but upir wanted to push it even further for maximum performance. Sending new pixel values to the screen caused the pixel calculations to be run multiple times, so by placing the intermediate data into a series of buffers and only drawing pixels once per page instead, a new FPS of 27.53 was achieved — an almost 3x improvement.
To see more about this project, you can watch its video below.
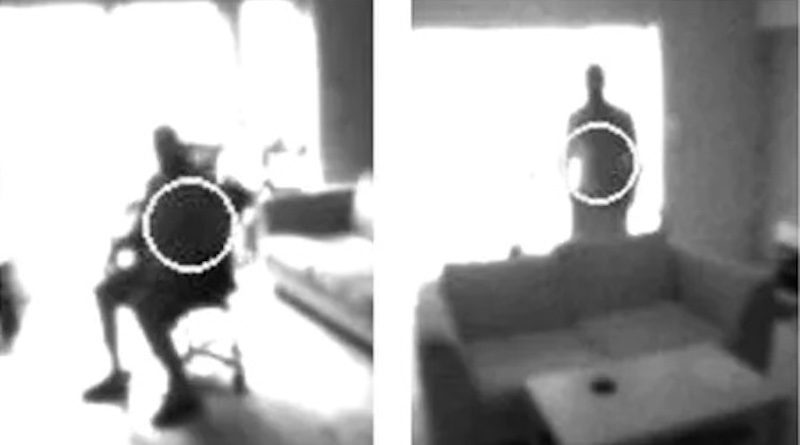
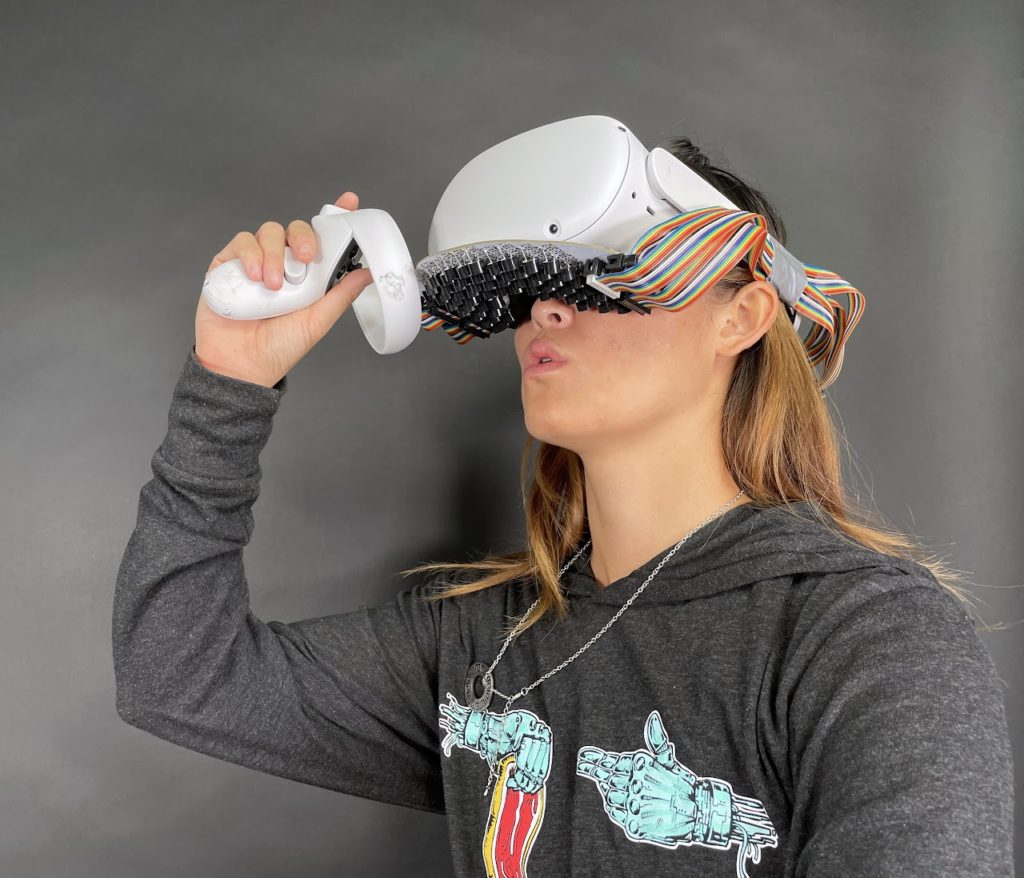
Virtual reality technology is advancing quickly and today’s headsets provide a very immersive visual and auditory experience. But they neglect the other senses. Haptic feedback, via vibration motors in controllers, is the only common technique for imparting a sense of touch. While haptic vests and other experimental devices exist, consumers continue to show that they have little interest in wearing bulky equipment. To enhance feedback in VR, a team from Carnegie Mellon’s Future Interfaces Group built an ultrasonic array that stimulates the user’s mouth.
The mouth may seem like an odd choice, but it is more sensitive to touch than anywhere else aside from hands. It is also close to the eyes, which users are already accustomed to covering with VR goggles. By targeting the mouth, the researchers were able to create high-fidelity feedback from the same headset form factor that VR users already wear. The feedback comes from an array of many ultrasonic transducers that project soundwaves outside the range of human hearing. When those soundwaves reach the lips, teeth, or tongue, they produce a small physical sensation.
The team controlled the ultrasonic transducer array through an Arduino Mega 2560 board. It connects via USB to a laptop running Unity to render the virtual reality world. When something happens within that virtual world, such as the user taking a sip of coffee, Unity tells the Arduino to activate the relevant transducers. It can simulate a range of different sensations by controlling both the frequency of transducers and the pattern in which they activate. The prototype transducer array fits onto the bottom of a standard VR headset and doesn’t cover the user’s mouth, which results in a comfortable experience that consumers might accept.
Image credit: Carnegie Mellon University Future Interfaces Group
Um dir ein optimales Erlebnis zu bieten, verwenden wir Technologien wie Cookies, um Geräteinformationen zu speichern und/oder darauf zuzugreifen. Wenn du diesen Technologien zustimmst, können wir Daten wie das Surfverhalten oder eindeutige IDs auf dieser Website verarbeiten. Wenn du deine Einwillligung nicht erteilst oder zurückziehst, können bestimmte Merkmale und Funktionen beeinträchtigt werden.
Funktional
Immer aktiv
Die technische Speicherung oder der Zugang ist unbedingt erforderlich für den rechtmäßigen Zweck, die Nutzung eines bestimmten Dienstes zu ermöglichen, der vom Teilnehmer oder Nutzer ausdrücklich gewünscht wird, oder für den alleinigen Zweck, die Übertragung einer Nachricht über ein elektronisches Kommunikationsnetz durchzuführen.
Vorlieben
Die technische Speicherung oder der Zugriff ist für den rechtmäßigen Zweck der Speicherung von Präferenzen erforderlich, die nicht vom Abonnenten oder Benutzer angefordert wurden.
Statistiken
Die technische Speicherung oder der Zugriff, der ausschließlich zu statistischen Zwecken erfolgt.Die technische Speicherung oder der Zugriff, der ausschließlich zu anonymen statistischen Zwecken verwendet wird. Ohne eine Vorladung, die freiwillige Zustimmung deines Internetdienstanbieters oder zusätzliche Aufzeichnungen von Dritten können die zu diesem Zweck gespeicherten oder abgerufenen Informationen allein in der Regel nicht dazu verwendet werden, dich zu identifizieren.
Marketing
Die technische Speicherung oder der Zugriff ist erforderlich, um Nutzerprofile zu erstellen, um Werbung zu versenden oder um den Nutzer auf einer Website oder über mehrere Websites hinweg zu ähnlichen Marketingzwecken zu verfolgen.