This is the third time that we’ve selected three outstanding projects in the Arduino Project of the Month competition, highlighting the wide range of our users’ contributions to our growing Project Hub. For April we go from tanks to tunes – because why not? Anything is possible with just a few components, a lot of curiosity, and an amazing community like ours.
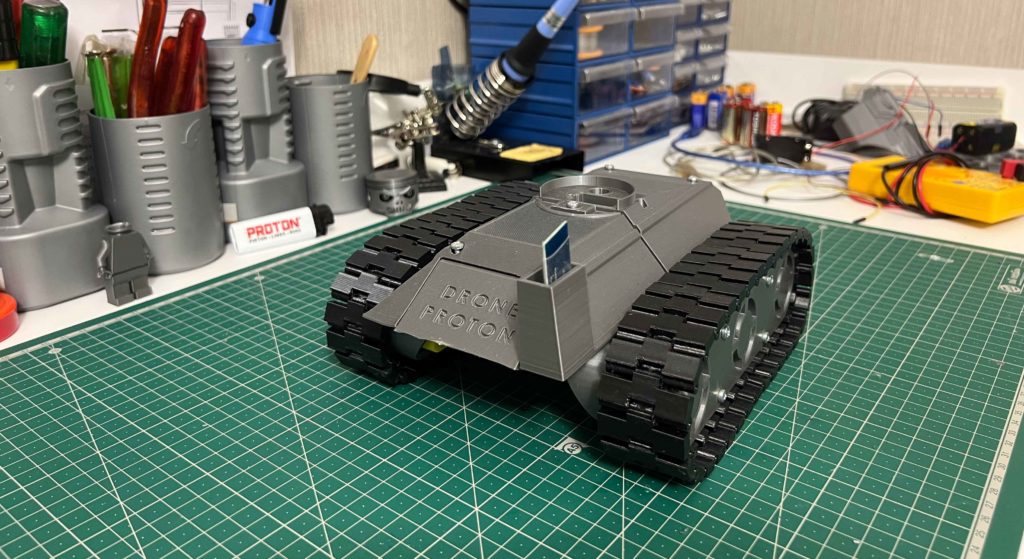
If you’re on a mission to build a remote-controlled tank, this is the project for you! Complete with downloadable code, electronics diagram and 3D models, it even provides easy instructions in video format. Use an Arduino Nano, four DC motors, a motor driver, and Bluetooth® module to fight the good fight of making!
Thanks to this project, you can display your favorite record and listen to it too! Add small hidden speakers and a touch-sensitive button to your vinyl frame, and play MP3 tracks off a DFPlayer SD card. With an Arduino Nano, the Arduino IDE, and clear and simple instructions, you can recreate or customize this project without skipping a beat.
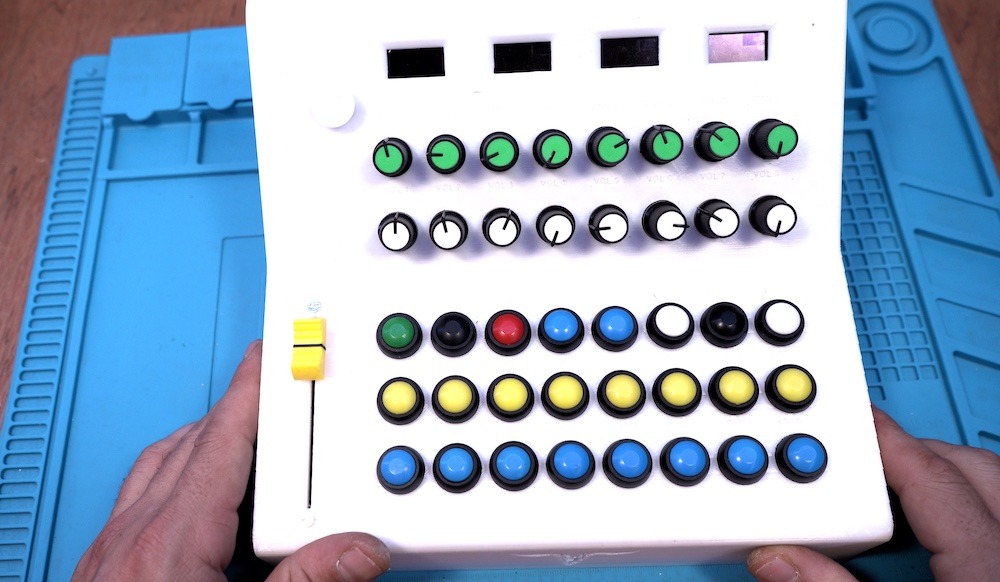
DIYing your own MIDI controller is cheaper than buying one off the shelf and, of course, is hugely satisfying for any music-oriented maker. With this Arduino Due project, it might even be easier than you think! Check out this entry’s in-depth tutorial to make a USB MIDI controller for all the basic parameters of a digital audio workstation (DAW) — volume, pan, mute, solo, rec, play, stop and more — without assigning anything manually.
For your chance to be selected for a $100, $300 or even $500 gift card to spend on the Arduino Store, submit your best project on the Project Hub! We will be awarding three new entries every month, as detailed in the complete terms and conditions. Good luck!
Getting started with physical computing presents a challenge to newcomers, whether due to the cost of acquiring hardware, learning how to manipulate GPIO pins, and being able to easily view what others have done to achieve their results. Norbert Heinz, who runs the site and YouTube channel HomoFaciens, therefore decided to build a system that anyone can control by simply sending an email.
The aptly named “mail2code” project is based around an Arduino Uno Rev3 board, which has been connected to a wide variety of peripherals to help students and hobbyists alike learn different hardware. The setup includes a DC motor attached to a central gear and a faster gear for exploring motors and interrupts, an array of eight LEDs that can act as a binary counter, a die face to explore random numbers, and a stepper motor with an accompanying Hall effect sensor that is used to learn analog signals in response to rotation.
In order to interact with all of this hardware, users are required to submit an email to a mail server hosted on a Raspberry Pi. It, in turn, compiles the C++ code and flashes the Arduino before activating its connected camera and recording what happens next for one minute. Lastly, the code and video clip are uploaded to Heinz’s web server for everyone to view, and an email is also sent to the sender notifying them of their code’s execution.
To view mail2code in more detail, you can watch Heinz’s video below!
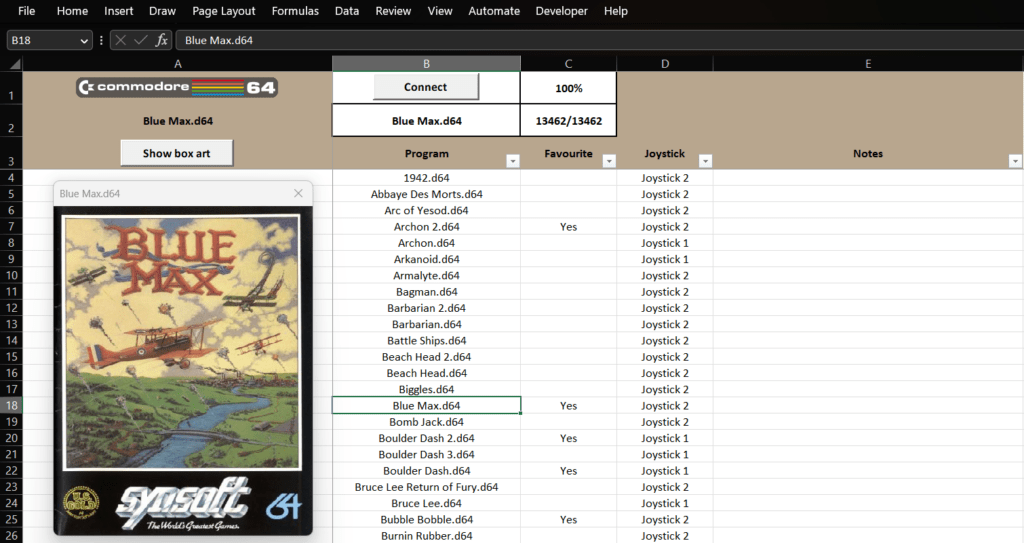
Loading software on a vintage computer, such as a Commodore 64, is a pain. Early eight-bit computers almost never contained any onboard persistent storage, so users had to load software from external media like cassette tapes. To make retro computing far more convenient, RaspberryPioneer developed a method for loading Commodore 64 software from Microsoft Excel.
This workflow starts with a modern computer running Microsoft Excel. RaspberryPioneer created an Excel spreadsheet that acts as a database of Commodore 64 software, linking to the ROMs and containing information such as specific load commands. The spreadsheet integrates Visual Basic for Applications (VBA) programming, so the user can select a software entry and then launch it. Doing so sends that software’s ROM data to the Commodore 64, which loads the software like it came from conventional media.
RaspberryPioneer’s workflow relies on a 5V Arduino board to act as an intermediary between the modern computer and the Commodore 64. The Excel VBA script sends the selected ROM data to the Arduino via a USB serial connection. The Arduino then, in turn, sends the data to the Commodore 64 through a hardware serial connection. That requires a Commodore serial cable, with the standard plug at one end and the other end connected to the Arduino’s pins.
For fans of Harry Potter, Hogwarts Legacy is a dream game. It drops you into the Potterverse where you can become a wizard, casting spells and riding brooms to your heart’s content. It is a very immersive game, but you lose some of that immersion when you realize you’re actually just pushing buttons on a gamepad. That’s why YouTuber ‘That’s So Mo’ built a custom Hogwarts Legacy controller on a replica Nimbus 2000 broom.
The broom itself is the property of Mo’s friend. It is a very expensive prop replica that looks just like the Nimbus 2000 from the films. Mo couldn’t risk any damage to that, so he attached all of the components to a block of packing foam that can slide on and off the broom handle. Those components include an Arduino, an accelerometer, and an ultrasonic distance sensor.
Thanks to its onboard ATmega32U4 microcontroller, the Arduino is configurable to appear as a USB HID gamepad when connected to a PC. The button presses it sends depend on the orientation of the broom stick and the position of the rider’s body. The accelerometer monitors orientation while the ultrasonic sensor checks the distance to the rider’s torso. So if the rider tucks in close to the Nimbus 2000, the in-game avatar will speed up. If the rider leans right, the avatar will turn right.
With this controller, Mo can play like he’s really riding a broom — at least for as long as his friend lets him borrow the Nimbus 2000!
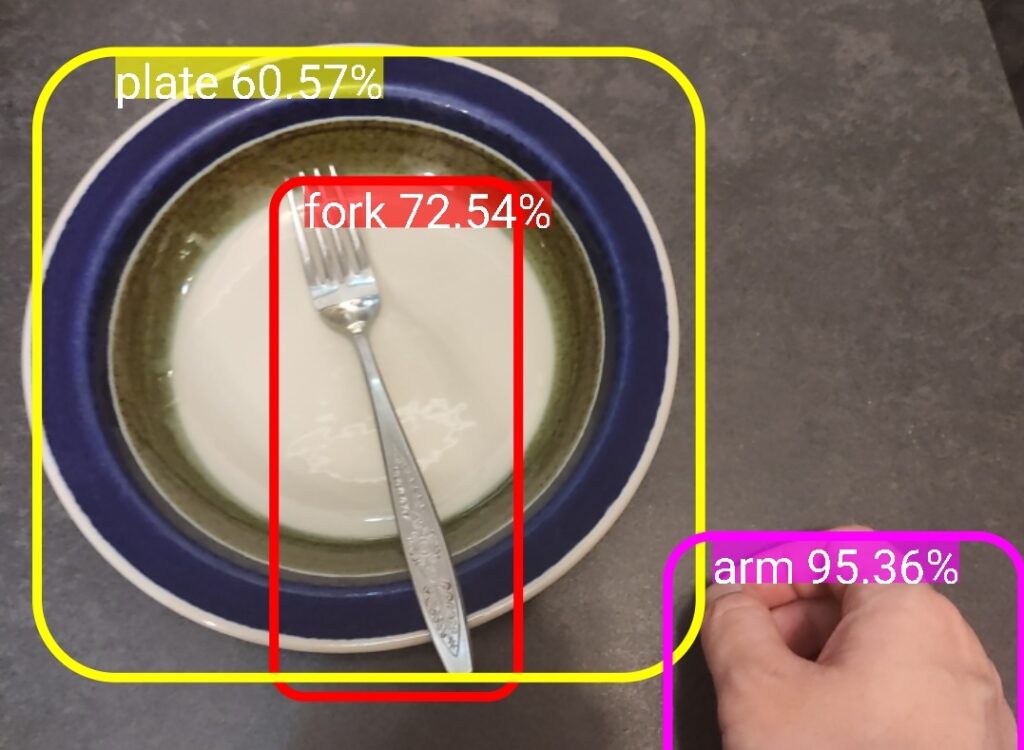
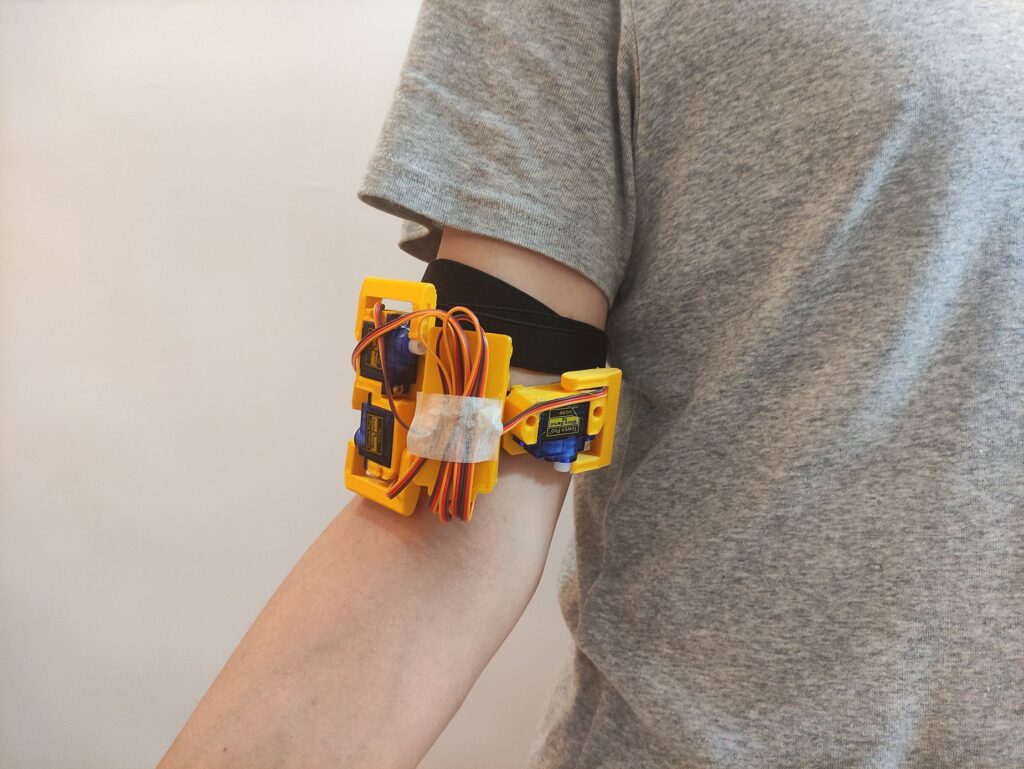
People with visual impairments also enjoy going out to a restaurant for a nice meal, which is why it is common for wait staff to place the salt and pepper shakes in a consistent fashion: salt on the right and pepper on the left. That helps visually impaired diners quickly find the spice they’re looking for and a similar arrangement works for utensils. But what about after the diner sets down a utensil in the middle of a meal? The ForkLocator is an AI system that can help them locate the utensil again.
This is a wearable device meant for people with visual impairments. It uses object recognition and haptic cues to help the user locate their fork. The current prototype, built by Revoxdyna, only works with forks. But it would be possible to expand the system to work with the full range of utensils. Haptic cues come from four servo motors, which prod the user’s arm to indicate the direction in which they should move their hand to find the fork.
The user’s smartphone performs the object recognition and should be worn or positioned in such a way that its camera faces the table. The smartphone app looks for the plate, the fork, and the user’s hand. It then calculates a vector from the hand to the fork and tells an Arduino board to actuate the servo motors corresponding to that direction. Those servos and the Arduino attach to a 3D-printed frame that straps to the user’s upper arm.
A lot more development is necessary before a system like the ForkLocator would be ready for the consumer market, but the accessibility benefits are something to applaud.
The Internet of Things (IoT) has become a ubiquitous term, encompassing a vast array of applications ranging from small-scale embedded systems to complex networked devices. Traditionally, IoT development has been synonymous with programming in languages like C and C++. However, the landscape is rapidly evolving, with modern languages like Python and JavaScript gaining traction in the IoT space for devices running Linux or other OS, and also with MicroPython for lower resources devices.
In an exciting development, we are thrilled to announce the creation of a workflow on the platform that enables users to seamlessly connect their devices based on these languages with the Arduino Cloud, empowering users to harness their full potential in creating IoT solutions.
The new Manual setup workflow
Traditionally, Arduino Cloud allowed the creation of devices based on Arduino or ESP32/ESP8266 hardware, with automatic sketch creation in C/C++ using the Arduino IoT Cloud library. This workflow featured automatic board provisioning and configuration within the platform. However, we have expanded the device creation process to introduce a new workflow, accommodating applications programmed in Python, MicroPython, or JavaScript, and so offering the ability to create a new breed of applications and devices that can be connected to the Arduino Cloud.
This new workflow, known as “Manual Setup for Any Device” provides users with credentials that can be utilized within their Python, MicroPython, or JavaScript applications. This enables users to keep developing and programming their devices using their preferred environment. Integration with the Arduino Cloud can be achieved using libraries developed in any of the supported languages. Comprehensive documentation, along with a wide array of examples, supports users throughout the implementation process.
By offering this flexible workflow, Arduino Cloud acknowledges the diverse requirements and preferences of developers. Whether you prefer the convenience of automatic provisioning or the flexibility of manual configuration, the choice is now in your hands.
What can you actually do?
Python – The choice for AI
Python is a versatile and widely-used programming language that offers significant benefits for IoT device development. Its simplicity, readability, and extensive library ecosystem make it an ideal choice for both beginners and experienced developers. Python’s vast library ecosystem provides access to a wide range of pre-built modules and functions, allowing developers to leverage existing code and accelerate development. Additionally, Python’s active and supportive community offers a wealth of knowledge and resources, making it easier to troubleshoot issues, seek advice, and learn from others’ experiences.
Python is not only a versatile language for IoT device development but also the de facto standard language and environment for AI programming. Its extensive library ecosystem, including popular libraries such as TensorFlow, PyTorch, and scikit-learn, makes Python the language of choice for implementing machine learning and deep learning algorithms. The availability of these libraries, along with Python’s intuitive syntax and flexibility, enables developers to build and deploy sophisticated AI models and integrate them seamlessly into IoT applications. Python’s dominance in the AI landscape further adds to its value for IoT device development, as it allows developers to leverage AI capabilities and unlock advanced functionalities in their IoT solutions.
Learn more about how to connect your Python applications to the IoT Cloud.
Micropython – The power of Python on tiny processors
MicroPython is a popular platform for IoT development due to its simplicity, efficiency, and versatility. It supports various microcontroller platforms, including Arduino, ESP32, and Raspberry Pi Pico, offering cross-platform compatibility. With its familiar Python syntax, MicroPython is easy to learn and use, making rapid prototyping and development accessible. It optimizes memory usage and runtime performance, even on resource-constrained devices. MicroPython benefits from an extensive library ecosystem, enabling quick integration of functionalities and interoperability with other IoT platforms. Its active community provides abundant resources, support, and a vibrant ecosystem for IoT innovation. Overall, MicroPython is a powerful tool for building efficient and feature-rich IoT devices.
Javascript – Event driven applications across multiple platforms
JavaScript has found its place in IoT device development across various platforms. Node.js, a server-side runtime environment, offers JavaScript’s event-driven and non-blocking nature for efficient handling of IoT tasks. Espruino, a JavaScript platform for microcontrollers, enables direct coding on resource-constrained devices. Johnny-Five, a JavaScript robotics and IoT framework, allows control and interaction with hardware platforms using JavaScript. JavaScript’s versatility, reuse of web development skills, and extensive libraries make it an accessible choice for IoT development. Its event-driven nature aligns well with IoT requirements, and the availability of frameworks and community support fosters rapid development and integration with web-based services.
Check this article to learn more about how to connect your Javascript applications to the IoT Cloud.
But what is Arduino Cloud?
Arduino Cloud is a platform that simplifies the process of developing, deploying, and managing IoT devices. It supports various hardware, including Arduino boards, ESP32, and ESP8266 based boards, and makes it easy for makers, IoT enthusiasts, and professionals to build connected projects without coding expertise. What makes Arduino Cloud stand out is its intuitive interface that abstracts complex tasks, making it accessible to all users. With its low-code approach, based on auto generated code, and the extensive collection of examples and templates, Arduino Cloud offers a simple way for users to get started and enables them to put the focus on their application code.
The platform’s IoT Cloud tool allows for easy management and monitoring of connected devices through customizable dashboards, which provide real-time visualisations of the device’s data. Furthermore, the IoT Cloud can be accessed remotely through the mobile app Arduino IoT Cloud Remote, which is available for both Android and iOS devices, allowing users to manage their devices from anywhere.
As the IoT landscape continues to evolve, Arduino Cloud remains at the forefront, embracing the flexibility and power of Python and JavaScript. We invite you to explore this new feature, unlock your creativity, and share your innovative projects with the Arduino community. Publish your projects on the Arduino Project Hub (PH), where like-minded enthusiasts can discover, learn, and collaborate on IoT solutions that push.
Additionally, engaging in community discussions and project sharing is encouraged in the forum, providing a platform for exchanging ideas, seeking advice, and fostering collaboration among fellow IoT enthusiasts. Together, let’s shape the future of IoT and create a vibrant ecosystem of innovation and knowledge-sharing.
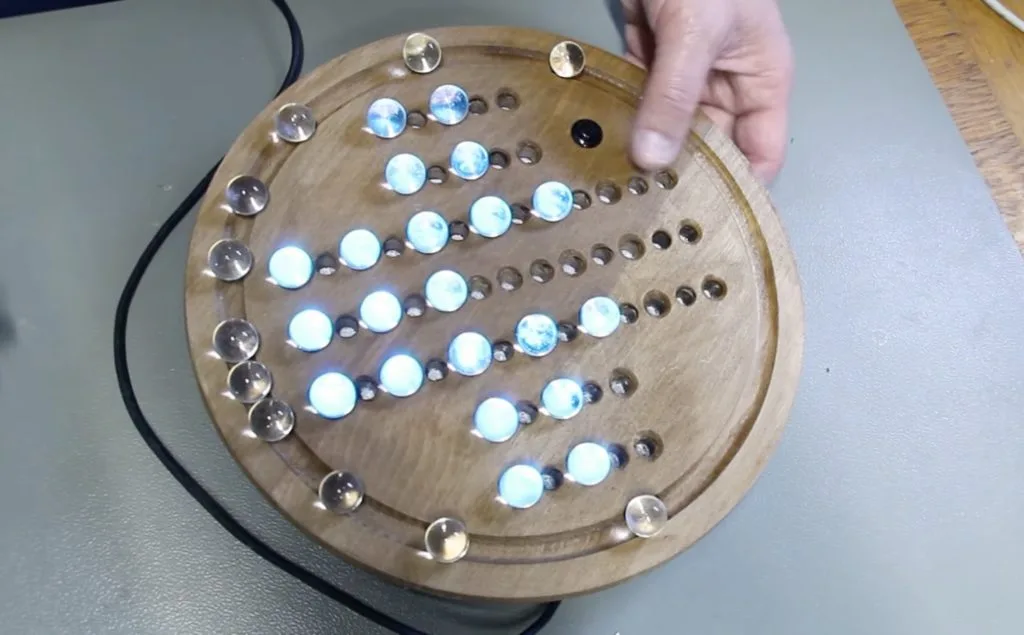
Solitaire is any tabletop game that can be played by just one person, and it can take the form of cards, pegs, memory, and in this case, marbles. As Mark Donners discusses in his element14 Presents video, marble solitaire is made of 33 individual divots and a total of 32 marbles that populate each one except the center with the goal of capturing every marble until the last one lands in the middle. Due to the pattern being somewhat difficult to memorize, Donners constructed a custom board that uses an Arduino Nano and LEDs to light the way.
The board itself was created by first drilling a series of holes into a premade round block of wood before applying a thin layer of paint. Afterwards, he cut a strip of NeoPixel LEDs into three 13-pixel segments and four five-pixel segments before soldering them together in a snaking pattern. The LEDs and an accompanying button were then connected to the Nano, which would be responsible for controlling the board.
Donners programmed his solitaire board by first defining it as an array of LED positions and a list of moves which get illuminated on the NeoPixels below and between the marbles until the game has been solved. Once the player gets the final marble to the center, a small rainbow animation plays with the option of starting over to play again. To see this board in action, be sure to watch Donners’ video below!
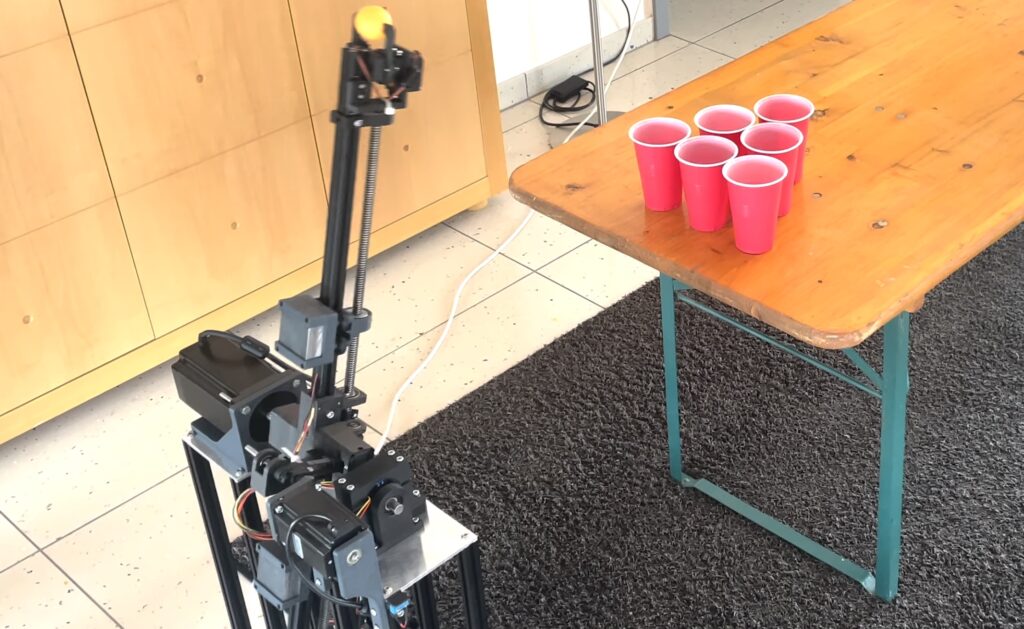
Beer pong is a classic party game involving skill, persistence, and alcohol tolerance. Participating in friendly games of beer pong is a great way to socialize with peers, but what if you aren’t very good at tossing ping pong balls into red Solo cups? In that case, you may want to follow the lead of Niklas Bommersbach to construct a robot that can play beer pong for you.
This robot works a bit like a medieval catapult to launch ping pong balls, but that’s more complicated than it sounds. The target (a cup) is quite small, which means the robot has to be accurate. Like a bullet traveling along a ballistic trajectory, the ping pong ball will experience both gravity and drag from air resistance. The robot has to take those into account, as well as vibrations in the catapult arm that cause oscillations to throw off the throw. Bommersbach had to implement algorithms to take those into account, going so far as to measure the movement with an IMU.
The robot is a combination of aluminum extrusion and 3D-printed parts. An Arduino Uno Rev3 board controls two continuous rotation servo motors that start the arm spinning, then a third stepper opens the gripper to release the ball at the proper time. There is also a vibration-dampening system that uses a complex system of lead screws and gears to move weights up and down the arm to alter the frequency at which the arm structure oscillates, ensuring that those do not interfere with a throw at a specific distance.
There isn’t any computer vision, so Bommersbach has to enter the parameters for each shot. But the result is still impressive and this robot is more consistent than most experienced players.
There are few feelings more satisfying than building your own home office or gaming setup from scratch. Sitting at your workstation knowing that everything is made just the way you like it, in exactly the way you imagined — it’s pretty neat.
Today, it’s easier than ever to craft your own equipment by hand, at home. Tools like Arduino make it possible to build sophisticated, high-tech devices that sometimes work even better than anything you can find in a store.
In this article, we’ll focus on keyboards — specifically, wireless hand-wired keyboards. We’ll show you what they are, what you need to get started, and how Arduino users have tackled the challenge of designing their own.
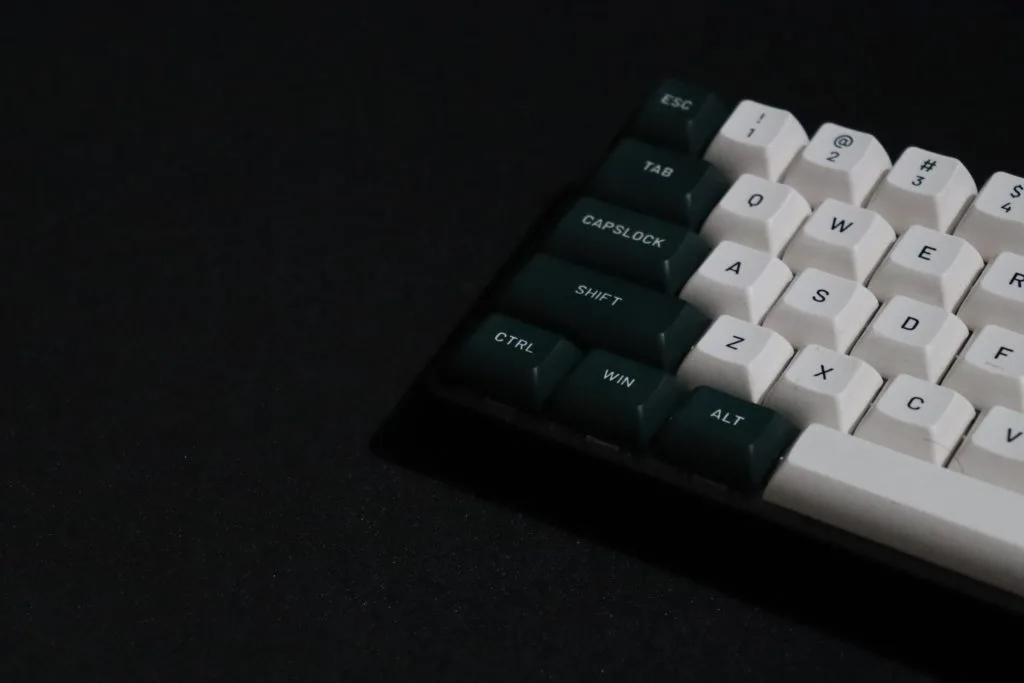
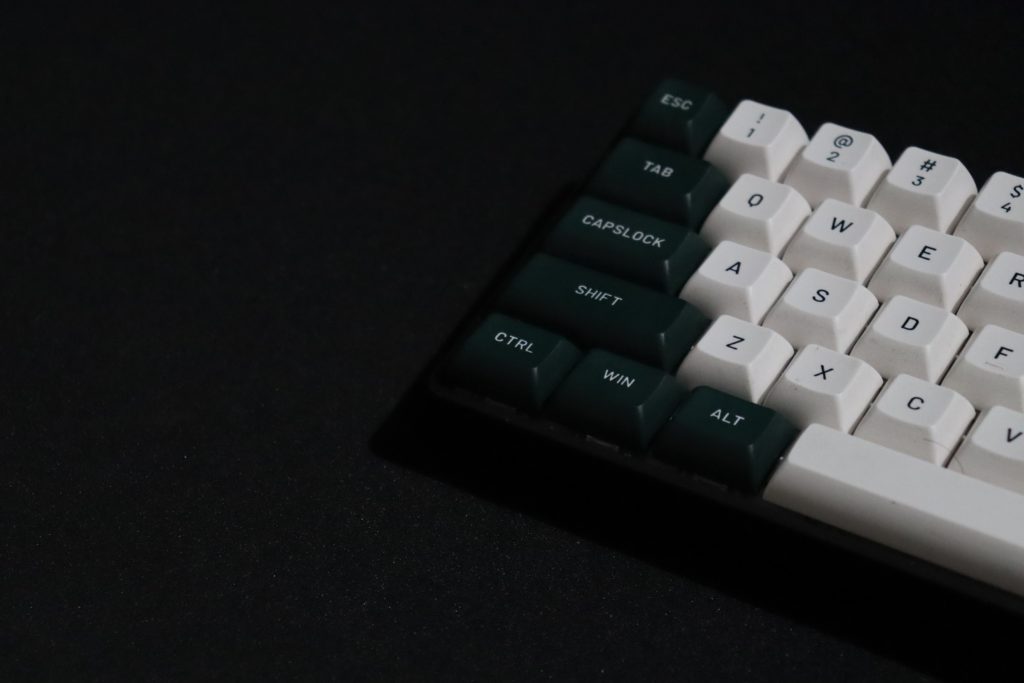
What is a hand-wired keyboard?
Most store-bought keyboards use something called a PCB, or printed circuit board. A PCB is used to connect the different electronic components inside the keyboard to one another.
In a hand-wired keyboard, there is no PCB. Instead, the components are connected by wires, by hand. This way, you have complete control over how your keyboard is designed, allowing you to assemble a keyboard that looks, feels, and works exactly how you want it to.
Why should you make a hand-wired keyboard?
We all know the feeling of using a keyboard that doesn’t feel quite right. And if you work from a desk, spend a lot of time gaming, or just enjoy hammering away at a keyboard for any other reason, having the right setup makes all the difference.
Taking a DIY approach gives you the control and freedom to devise a hand-wired keyboard that is just right for you, your needs, your preferences, and your aesthetic. Not to mention, it’s a ton of fun!
What you need to get started
Building your own hand-wired keyboard doesn’t require a huge amount of resources or materials, and it can be done fairly cheaply with a bit of prior research and preparation. Here are the main components you’ll need:
A switch plate to give the keyboard structure and support your keys
Switches (enough for each keycap)
Solder wire and electrical wire
A 1N4148 diode for each switch
Wire to connect the rows and columns to the controller
Spacers and screws
Solder and a soldering iron kit
Make your own hand-wired keyboards with Arduino
When it comes to building your own keyboard with Arduino, you don’t need to look any further than Joe Scotto. Over the last several months, Scotto has mastered the art of building hand-wired keyboards, amassing an impressive collection of creations, and now he’s sharing his expertise with the world.
Scotto says, “Something about handwriting just hits different, it feels like I actually built the board… if that makes sense.”
On top of sharing his work on Reddit, Scotto also has a YouTube channel where he goes into depth about how to construct hand-wired keyboards, some of the main challenges involved, what you need to get started, and more.
Let’s run through a few tips to be aware of when creating your keyboard, so you can avoid mistakes and get the most out of the experience.
Know what size you want in advance. Keyboards come in a range of sizes and each one has its own pros and cons. For example, gamers tend to prefer smaller keyboards in a 60% of 65% layout, whereas for office use you might want something bigger like a TKL.
Be careful with soldering. Solder can produce dangerous fumes, so make sure you do this part of the process in a well-ventilated area and take precautions.
Don’t worry about making mistakes, embrace them! It’s unlikely that your very first attempt at a hand-wired keyboard will be perfect. That’s fine — it’s an opportunity to tweak, improve, and learn.
Consider adding in some neat extra features like a reset switch. You can also experiment with “split keyboards” where each side is distinct from the other.
A well-made, hand-wired keyboard is an impressive piece of hardware. Don’t forget to post your results online and share with the Arduino community!
Get creative with Arduino
Hand-wired keyboards are just one example of the many things you can make in your very own home using Arduino and a few other components. The Arduino Project Hub is full of other examples and in-depth guides from the community members to inspire and inform your next project.
Visit our home page to learn more about Arduino and find out how to get started with your own projects.
Cycling is a great way to spend time outdoors while simultaneously getting exercise and even as a mode of efficient transportation. And in the last few years due to the recent proliferation of e-bikes on the market and the pandemic, there has been an explosion in the number of people wanting to use bikes on a regular basis. A few people have gone a step further and have taken it upon themselves to create devices that make this experience safer, more convenient, or more fun. For this year’s World Bicycle Day, let’s celebrate these makers and how they were able to creatively embed Arduino products into their designs for a better cycling experience.
Automatic shifter
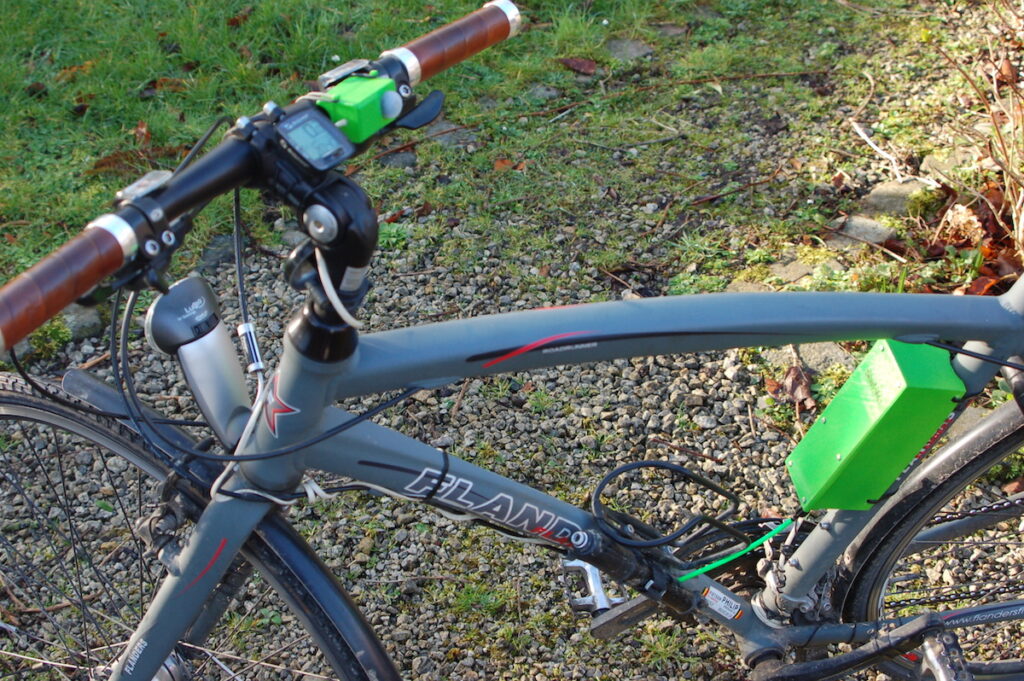
The purpose of a transmission is to convert the rotation of the motor into torque for the wheels, with more being needed at lower speeds for acceleration and less when cruising. Similarly, most bikes also have gearing wherein the rider can downshift to get up a hill or upshift to make larger strides on a straightaway. Jan Oelbrandt’s Shift4Me project eliminates the need to consciously think about this since it uses a magnetic cadence sensor attached to an Arduino Nano which allows it to automatically shift up or down depending on how quickly the pedals are moving.
Similar to how a persistence of vision (POV) display moves rapidly changing pixels through the air to produce the illusion of a larger image, maker Sagarrabanana devised a towable bike trailer that sprays water on the ground using seven individual jets which take the place of the pixels in a POV display. Controlled by an Arduino Nano, the jets’ timing is determined by the bike’s speed in order to precisely deposit even lines of water in a dot-matrix pattern. Text from the user is inputted on a mobile phone and sent to the Nano via an HC-05 Bluetooth® module for printing.
Biking position sensing
Bike computers are great for collecting detailed information on speed, cadence, power output, elevation, and more, but none can say whether the cyclist was sitting or standing for a period of time. This is why Fabio Antonini used an Arduino Nano 33 BLE Sense and Edge Impulse to develop such a device. He started by gathering 20 minutes of him sitting on a plane, sitting while going uphill, jumping on the pedals going uphill, and pushing on a flat sprint, then after training, deployed it to the Nano. In order to tell what is being detected, the built-in RGB LED changes color to notify the user.
An unusual two-wheel steering system
Prolific YouTuber and maker James Bruton is no stranger to unique robots and vehicles, and his take on the bicycle is no different. Unlike a traditional design that has a free front wheel and a locked rear wheel, this e-bike has a hub motor in both wheels that can turn independently thanks to an additional pair of motors. When the rider turns the front wheel, an Arduino Uno reads the encoder value and uses it to spin the rear wheel according to one of three modes: lock, mimic the front, and mirror the front. And although the resulting creating isn’t too practical, it’s a great way to see what’s possible when thinking out of the box.
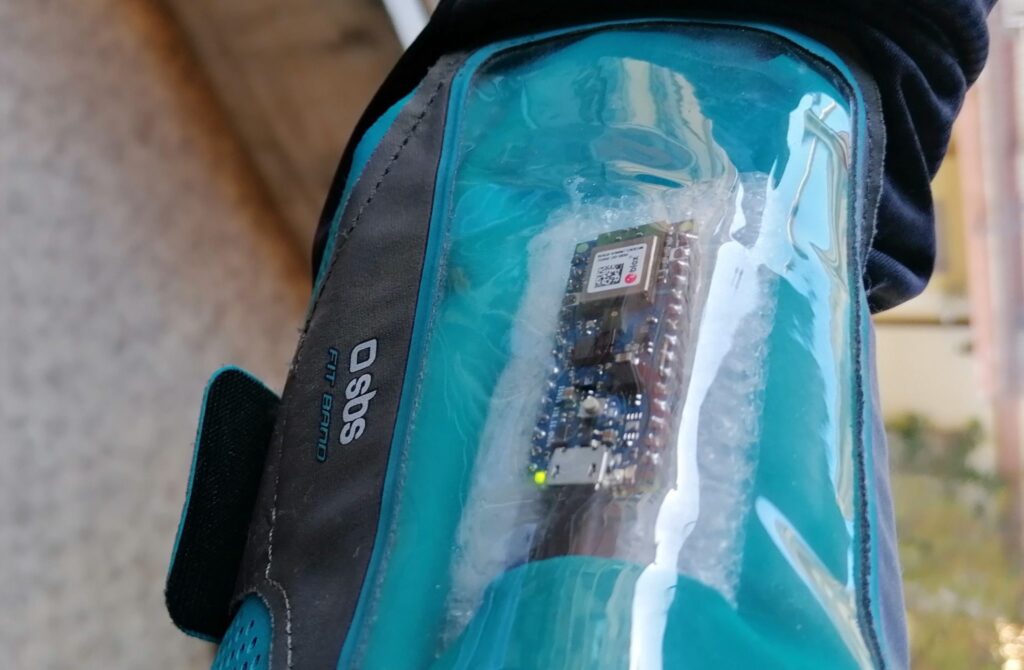
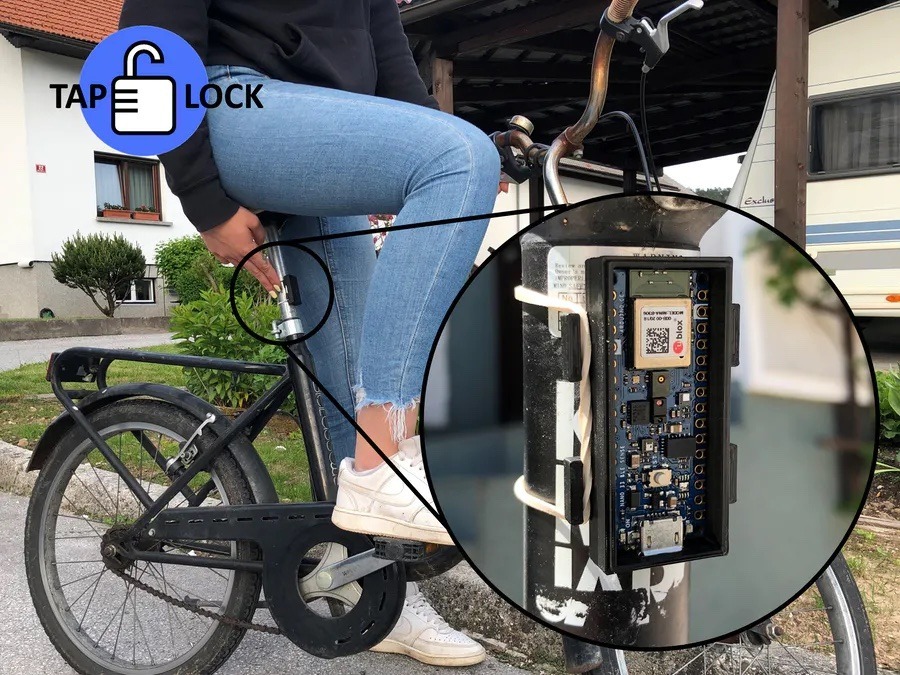
Intelligent lock
Nearly every bike lock in existence is operated by inserting a key into a cylinder and turning it to release the secured frame and/or wheel from a post. While this approach works, it also lacks several useful features such as keyless entry, mobile connectivity, and location tracking. The TapLock project reinvents the lock by relying on either a series of physical taps on the lock’s enclosure in a certain pattern or a paired phone to unlock. Beyond this, the TapLock’s Arduino Nano 33 BLE Sense communicates with the mobile app to store the current location on a map and even remotely lock the bike.
Compact turn signals
In a car, signaling is as easy as pushing a stock up or down to indicate your intention of changing lanes or turning, but for bikes, this role falls to the rider having to move their arm around. Tom Ouwerkerk’s solution was to buld a very compact signal by combing two eight-LED NeoPixel strips and an Arduino Uno to act as the signal. The strips sit on a gliding mechanism which moves either left or right thanks to a servo motor underneath, and it helps to clarify the intended direction of travel even further.
ML-powered adjustable suspension
Higher-end, modern cars are beginning to add automatically adjustable suspension systems to their drivetrains which help to adapt the car to the current terrain, atmospheric conditions, and the driver’s comfort level. Jallson Suryo was able to create his own thanks to an Arduino Nano 33 BLE Sense and a servo motor that turns the bike’s front suspension fork to increase or decrease stiffness. Terrain recognition was accomplished by training an edge ML model on IMU readings and using them to distinguish between idle, smooth, medium, rough, and sprint conditions.
Connecting a stationary bike to a simulator
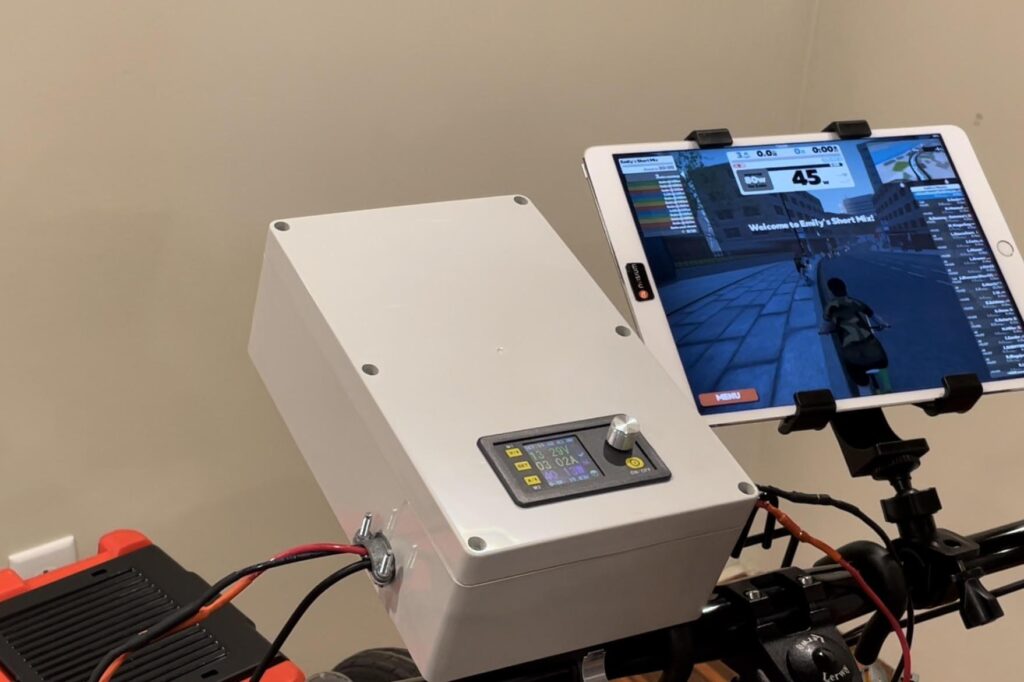
Bicycling simulators are a great way to experience races against others, explore trails, or simply enjoy a pleasant ride no matter what the weather outside is. Zwift is one such software, and two important features are that your actual pedaling speed is matched in-game and the game controls the pedaling difficulty. Gene’s Green Machine was able to integrate his bike with the system by connecting an Arduino Nano 33 IoT board to a DPS5020 charge controller for reading the current wattage and setting the target resistance. All of this information is sent and received by utilizing the Nano’s capabilities.
Similar to the previous project, video game creator Jelle Vermandere wanted to ride his bike indoors along a virtual track. But this time, he took it a step further by not only integrating his bike using an Arduino Uno which determines the wheel speed via a magnetic reed switch, but building the game himself in Unity. He had to construct and animate models for himself, the bike, and the scenery. After adding an AI and ranking system to the game, he was able to successfully race within the virtual environment on a real bike.
Responsive LED system
Motivated by the desire for a more advanced lighting system while on her nighttime bike rides, Natasha (TechnoChic) decided to affix strips of NeoPixel LEDs all over her bike that could react to music in real-time. The LEDs are controlled by an Arduino Nano 33 IoT that is, in turn, connected to her boombox via a 3.5mm audio jack for reading the audio signal. Two additional Nano 33 IoT boards were used for the wheels, along with more NeoPixels and batteries for each.
GPS tracker
Bicycle theft has been rapidly increasing over the last couple of years, which is why being able to recover a stolen bike has become vital. Johan’s bike tracker project contains an Arduino MKR GSM 1400 which reads motion data from an IMU and uses it to determine if the bike has moved when it is not supposed to. Once movement is detected, the board reads GPS data from a MKR GPS Shield and sends it over an LTE data connection in real-time so that the bike can be found.
The majority of mountain bikes lack useful safety features such as integrated lights, turn signals, and speed tracking, which is why Collin Wentzien embarked on his “(not so) electric bike” project. He built a series of features, including automatic brake/turn lights, a headlight, and an electronic horn with the goal of improving safety. Furthermore, his bike also got a bike computer upgrade which contains an Arduino Mega, GPS module, and dual screens for displaying relevant telemetry data.
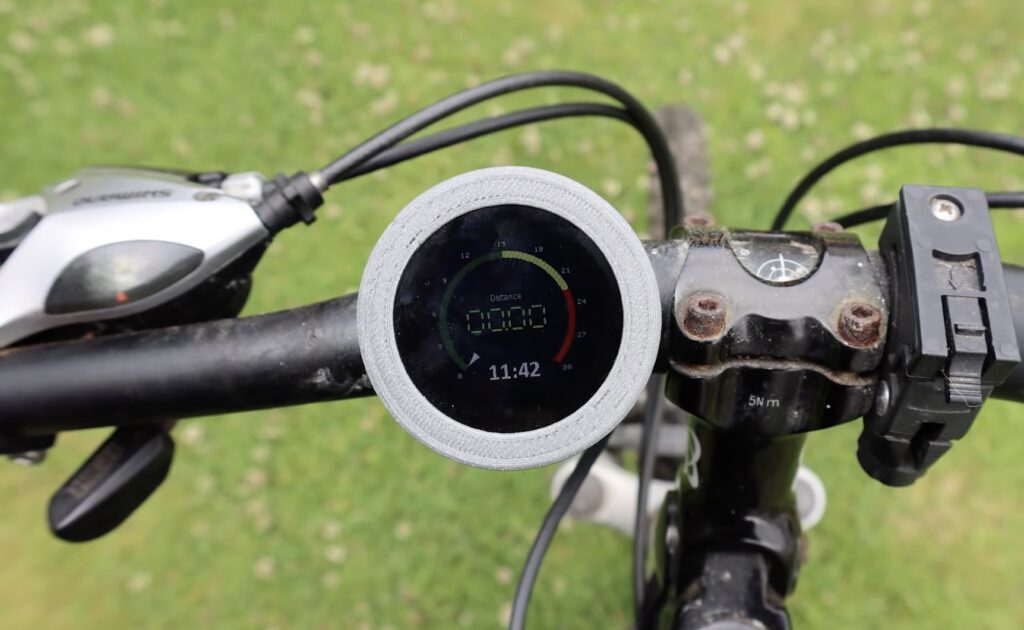
Speedometer display
After losing the display unit for her bike computer, Element14 Presents host Katie wanted to replace it with a DIY version that tracked the current speed via GPS instead of wheel rotations. An Arduino Nano 33 IoT board handled communication between the small 1.3” LCD screen and one of Quectel’s L80 small form-factor GPS modules. On each loop of the program, the time, speed, and distance are all shown on the screen thanks to the 4D Systems genieArduino display library.
This last DIY bicycle computer was made by YouTuber cubicpixelDE, and it integrates an Arduino Nano 33 BLE Sense along with a myriad of bicycle sensors and a heart rate sensor over BLE to display valuable data to the rider. The entire system combines a 1.8” color TFT screen and the Nano 33 BLE Sense into a single, compact unit which fits alongside the handlebar and reads out data to a mobile app wirelessly.
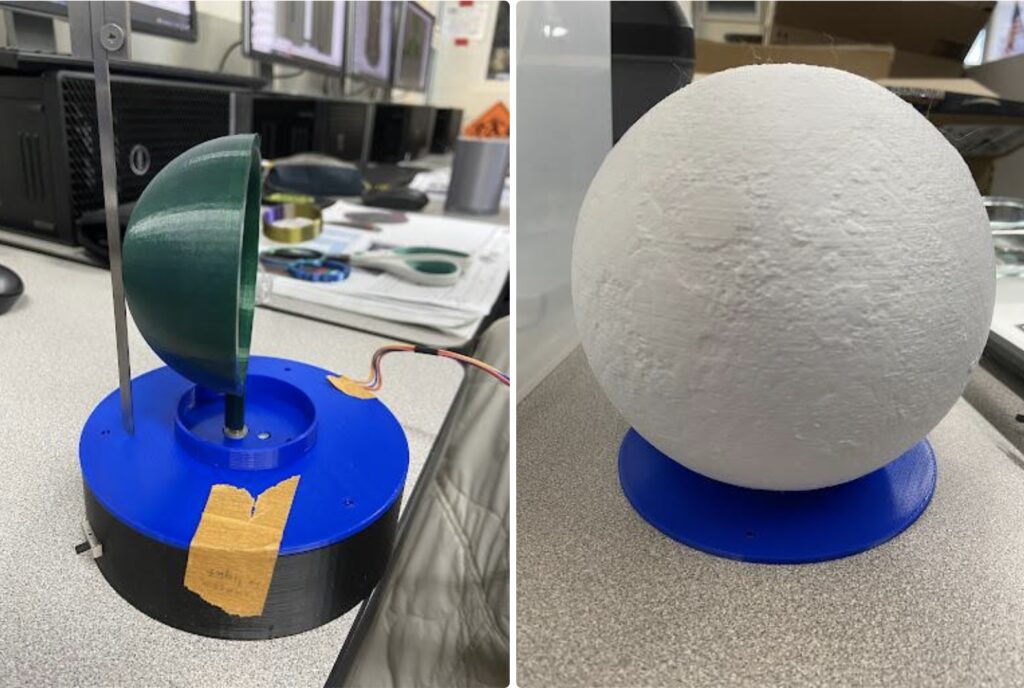
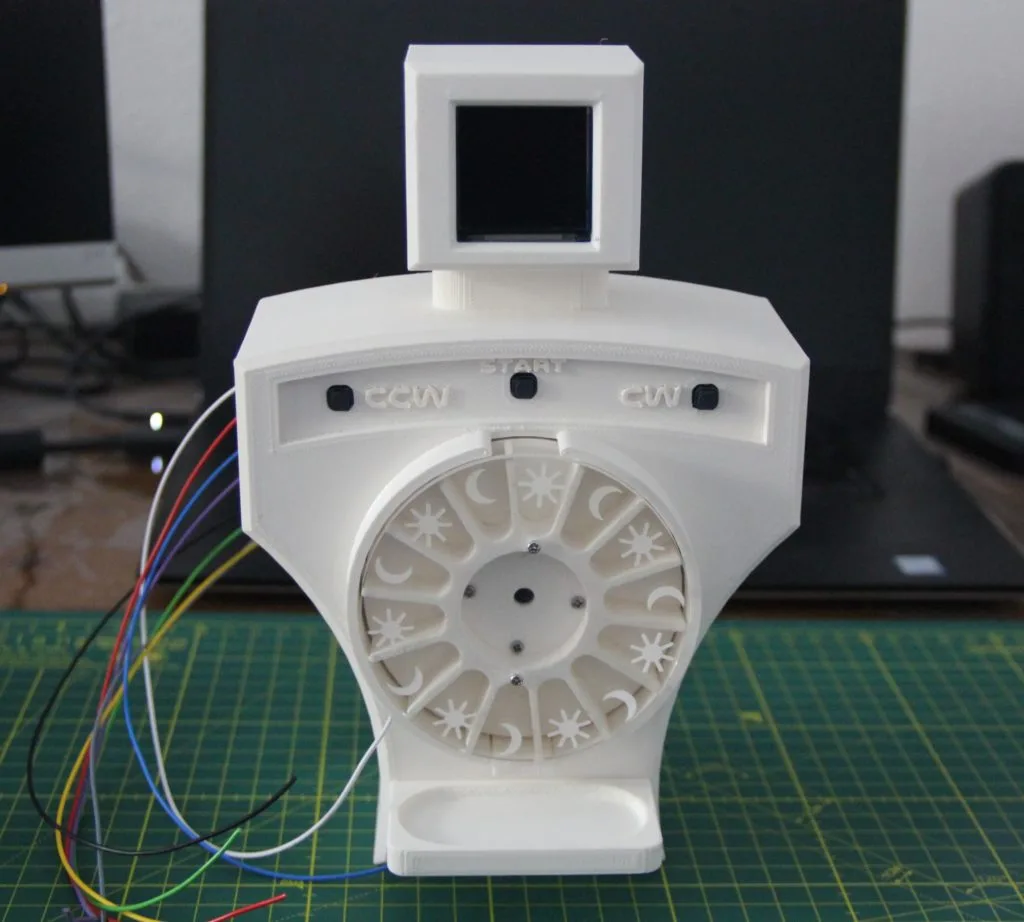
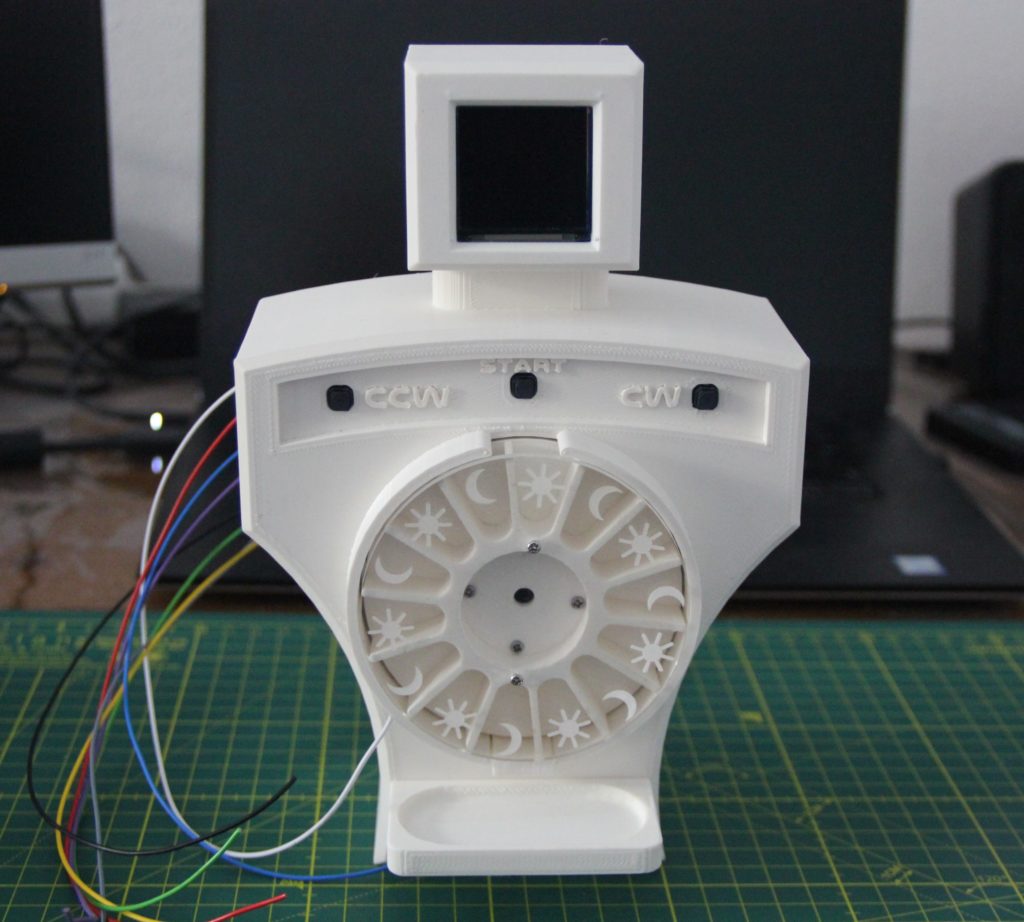
Early astronomers used observations on the moon’s phases to deduce the spherical nature of celestial objects and eventually to develop the heliocentric model that we all know and love today. Astrologers saw deep meaning in the phases of the moon and used that to create an entire mythos. The moon and its phases are important to human history and society, so why not celebrate them with this lovely lamp that showcases them?
At first glance, this looks like the kind of moon lamp that has been very popular in recent years. Such lamps are common 3D printing projects, because it is possible to use real topographic data to create a 3D lithophane that makes the terrain visible. A lithophane is a piece of artwork made using a thin, translucent sheet of varying thickness. When backlit, the thicker areas look darker and the thinner areas look lighter. Like the popular moon lamps, this project starts with a 3D-printed lithophane of the moon. With a light source inside, it looks like an accurate lunar model.
But Payasa and Selina, two high school students in an engineering class, took things a step further by adding an internal rotating shade. That sits between the light source (an LED bulb) and the inner surface of the moon lithophane, creating a shadow that results in an effect similar to the moon going through its phases. An Arduino Nano board controls a small stepper motor that rotates the shade. The user can set the speed of the motor, pushing the moon through its phases as fast as they like.
The recorder is a type of flute that is very popular in elementary schools because the instrument is so simple and inexpensive. If you were born in the last four decades and grew up in a western country, then there is a very good chance that you were required to learn how to play some basic melodies on a recorder. But like all instruments, the recorder is difficult to play well. So Luis Marx built a robotic recorder that could do the tricky parts.
Marx still has to blow into the mouthpiece to play this robotic recorder, but it takes care of the rest. A standard recorder has eight holes: seven finger holes on top and one thumb hole on bottom. The player’s spare thumb and finger help them stabilize the instrument. This contraption uses eight solenoids to close or open the holes according a pre-programmed sequence. It doesn’t appear that Marx integrated MIDI capability, but that would make it much easier to play new songs.
The current implementation has the sequence of notes programmed into an Arduino sketch. That sketch runs on an Arduino Nano board, which controls the solenoids through eight MOSFETs. Power comes from a 650mAh LiPo battery and everything attaches to the recorder via a 3D-printed frame. As you can hear in the video, this works quite well. Foam earplugs on the solenoid rams ensure an airtight seal on the finger holes, resulting in clean sound as long as Marx’s blowing technique is good.
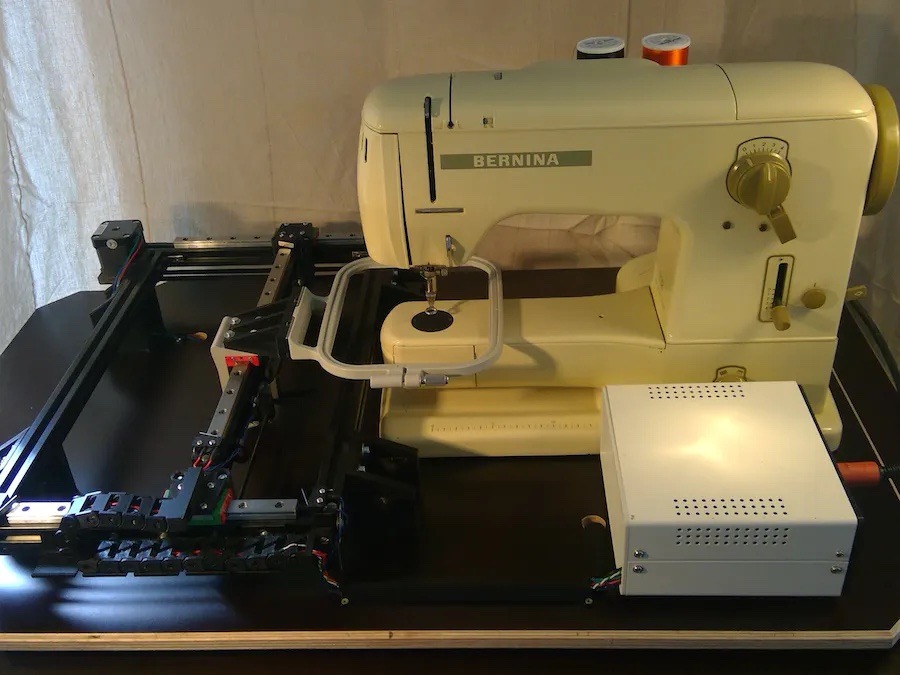
With a CNC (computer numerical control) embroidery machine, you can sew any custom patterns you want: text, logos, or goofy pictures. But commercial CNC embroidery equipment is expensive and consumer versions often leave a lot to be desired, which is why you might want to check out this write-up by SpaceForOne that explains how to upgrade a regular sewing machine for personalized CNC embroidery.
For this to work, the machine needs to be able to move an embroidery hoop in two axes on a plane perpendicular to the sewing needle. To do that, SpaceForOne used hardware similar to what you’d see on a 3D printer. The structure is aluminum extrusion and the axes ride on linear rails. Stepper motors move the axes and an Arduino Uno board controls those using a GRBL-compatible CNC shield that accepts standard G-code created in whatever software the user prefers.
You could simply start the G-code file while running the machine, but it would be really hard to avoid snags or putting lines where travel moves should be. That’s why SpaceForOne also interfaced with the sewing machine. The CNC shield controls the machine’s motor, while an optical sensor monitors the drive shaft speed and a break beam sensor detects when the needle is in the top position. Those let the Arduino control the operation of the sewing machine according to basic G-code commands.
There are many software options, but SpaceForOne used the InkStitch plugin for Inkscape. With that, the user can easily turn text or an image into G-code.
The “Arduino Project of the Month” competition continues to bring out the best in our community! We are happy to highlight inventive projects and creative solutions, as well as the generous users who share everything they’ve learned along the way. So let’s hear it for the three entries selected for the month of March!
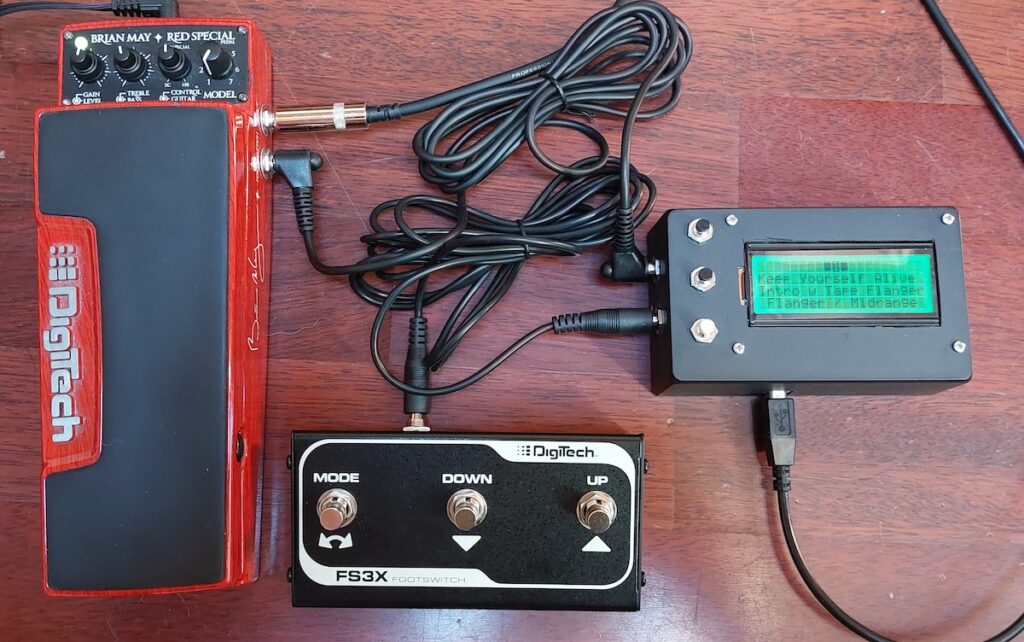
Adding an LCD display and controller to your Brian May pedal makes it easy to select and always know what tone you are on: no more guessing, and no more DIY labels! This project leverages the Arduino Uno Rev3, Arduino IDE 1.8, and minimal additional components to make your life as a musician easier than ever. Rock on!
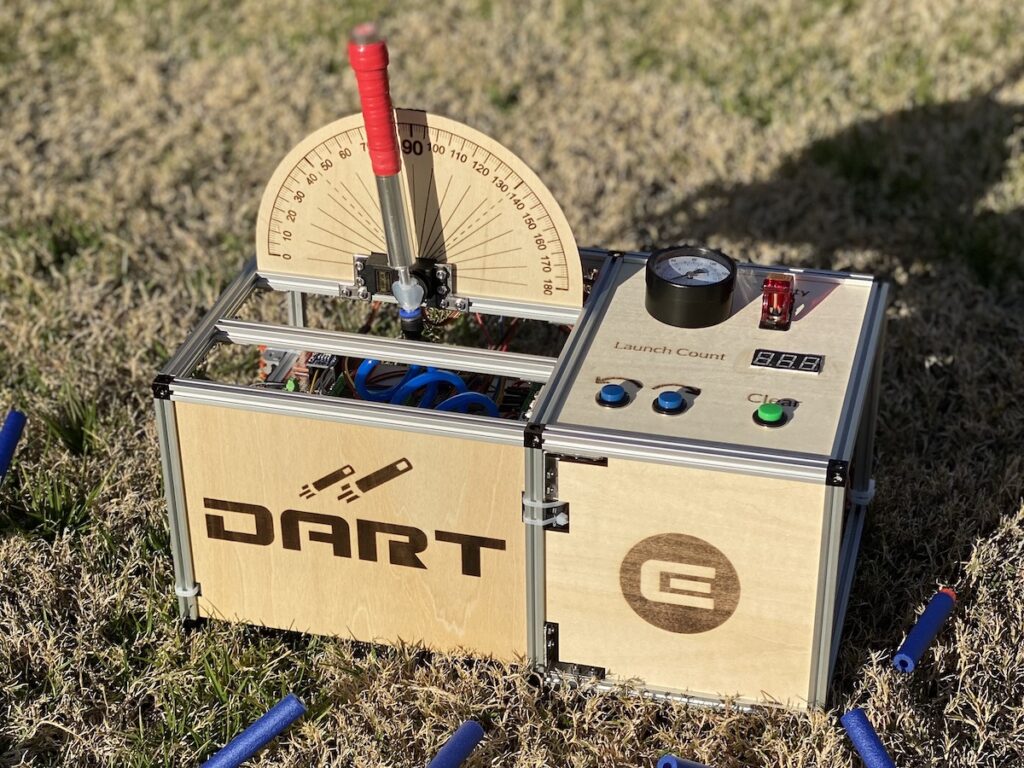
When your son believes you can do anything… you turn to the helpful Arduino community to create, well, anything. In this case, an experimentation station based on the Arduino Nano and coded via Arduino IDE, ready to launch Nerf darts at different angles to observe their effect on trajectories. Adding a physical control panel with buttons and pressure gauge definitely won this dad extra points, and allowed him to learn “way more than we could have imagined going from idea to prototype to final build.”
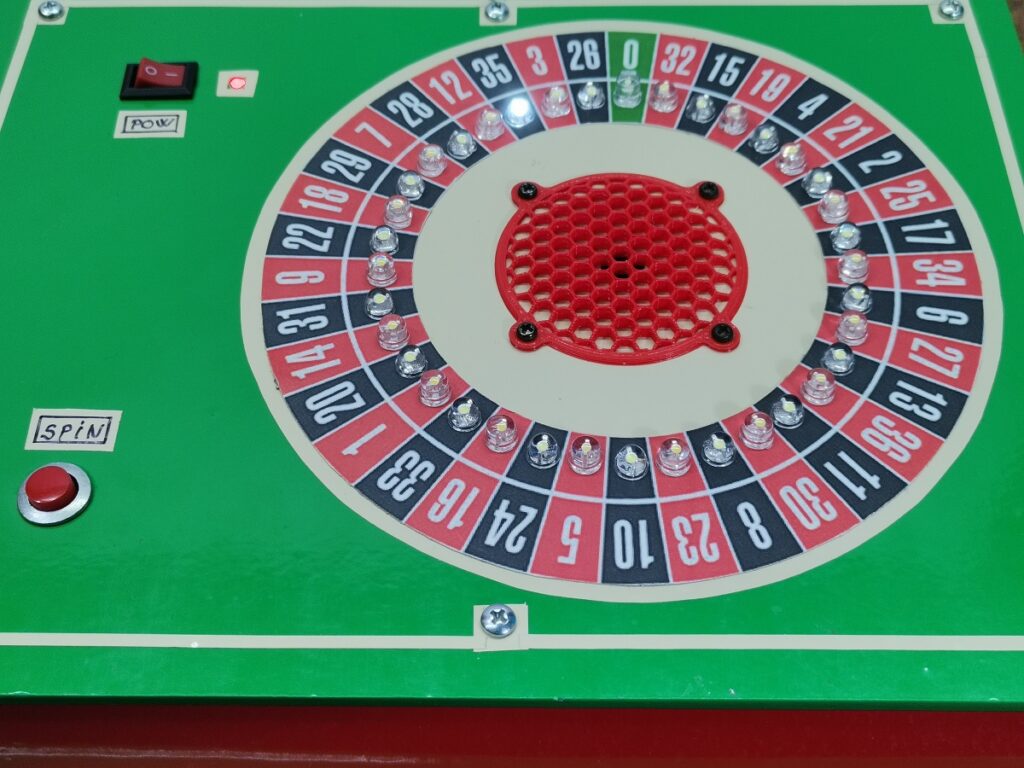
Why gamble when you can have a cool hobby like making? Constructing a roulette with an Arduino Nano and 37 LEDs that simulates the movement of the ball seems like a lot of fun! It’s also a good way to find out more about Charlieplexing (AKA tristate multiplexing) and other interesting techniques that can be useful when working with LEDs — which is one of the reasons why this was our top pick for March.
For your chance to be selected for a $100, $300 or even $500 gift card to spend on the Arduino Store, submit your best project on Project Hub! We will be awarding three new entries every month, as detailed in the complete terms and conditions. Good luck!
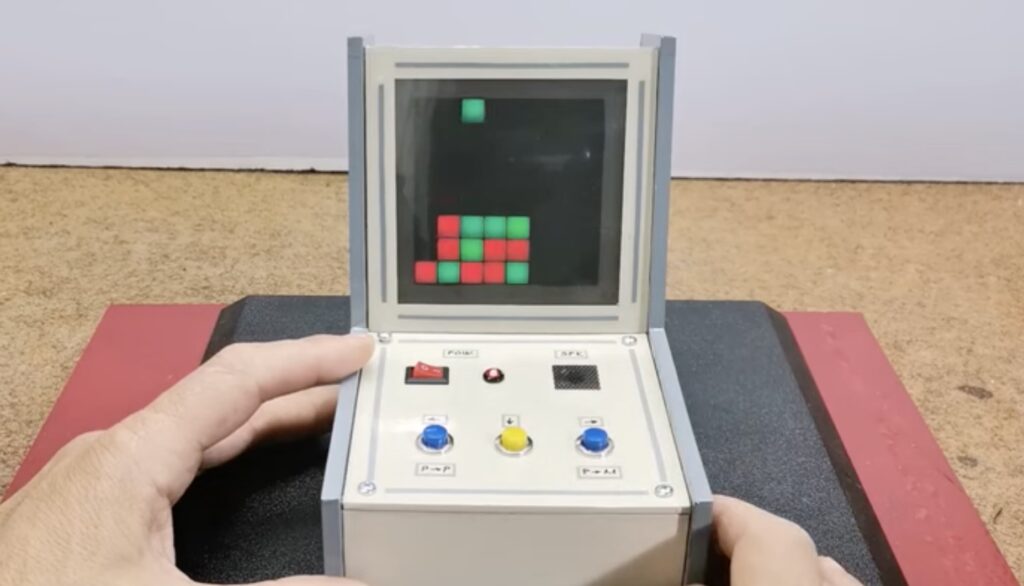
The childhood classic tabletop game of Connect Four entails dropping either a red or yellow disc into one of several columns in a grid with the hope of lining up four in a row. And even though the game has existed digitally for a while now, it is mostly played on LCD screens with fancier graphics and AIs against which the player competes. Wanting to push this paradigm further, Mirko Pavleski built a mini tabletop arcade cabinet that uses an Arduino Nano and an LED matrix instead to run the game.
In order to display the current grid to the player(s), Pavleski purchased an 8×8 WS2812B individually addressable LED matrix that gets powered by the Arduino Nano‘s 5V regulator. Because the game can either be played against another human or an AI opponent, the cabinet contains three buttons for selecting the chip’s drop location and a buzzer to deliver audible feedback when an event occurs. The entire device was constructed from a few 5mm PVC boards lined with colored paper for an old-fashioned aesthetic.
Watching the microcontroller AI opponent play Connect Four in real-time is quite impressive, owing to the relatively small computing resources of the Arduino Nano’s ATmega328 MCU. To see it in action, you can watch Pavleski’s video below or check out his project write-up on Hackster.io.
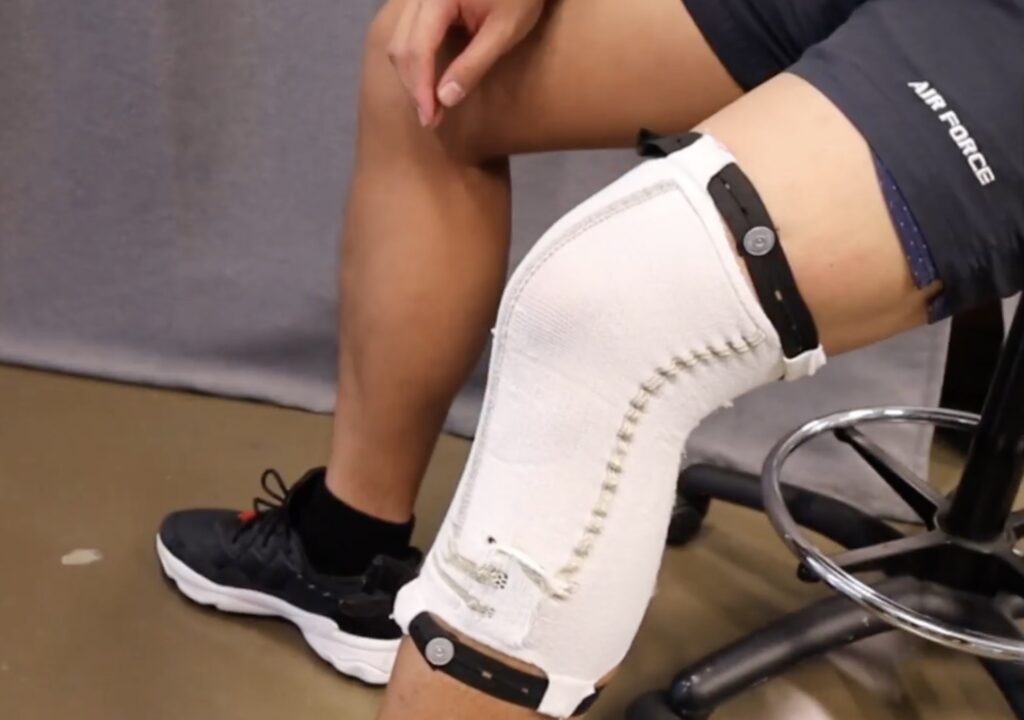
Health tracking is a vital component to recovering after an injury or simply trying to improve one’s own fitness, and although accelerometer-based devices are decent at tracking general activity, they fail to accurately monitor specific areas of the body such as joint movement. This is why a team of researchers from the Singapore University of Technology and Design (SUTD) along with members of SingHealth Polyclinics designed a knitted wearable sensor for use on the knee.
Based on conductive fabric technology, the device utilizes a stitched pattern of conductive threads that change their resistance depending on the extent to which they are stretched. Once added to the garment, the team created a small pocket for storing an Arduino Nano 33 BLE Sense board whose job it is to continuously measure the voltage in the fabric via its ADC and output the results over Bluetooth® Low Energy with a response time of a mere 90 milliseconds.
Through their experiments of making subjects walk, jog, and climb stairs, the researchers were able to compare the electrical signals to actual joint movement in order to correlate the two and calibrate the sensor to translate voltages into degrees of motion. Because of the device having a resolution of just 0.12 degrees, it showed to be a promising candidate as both an effective activity tracker and a comfortable garment that can be worn for extended periods of time.
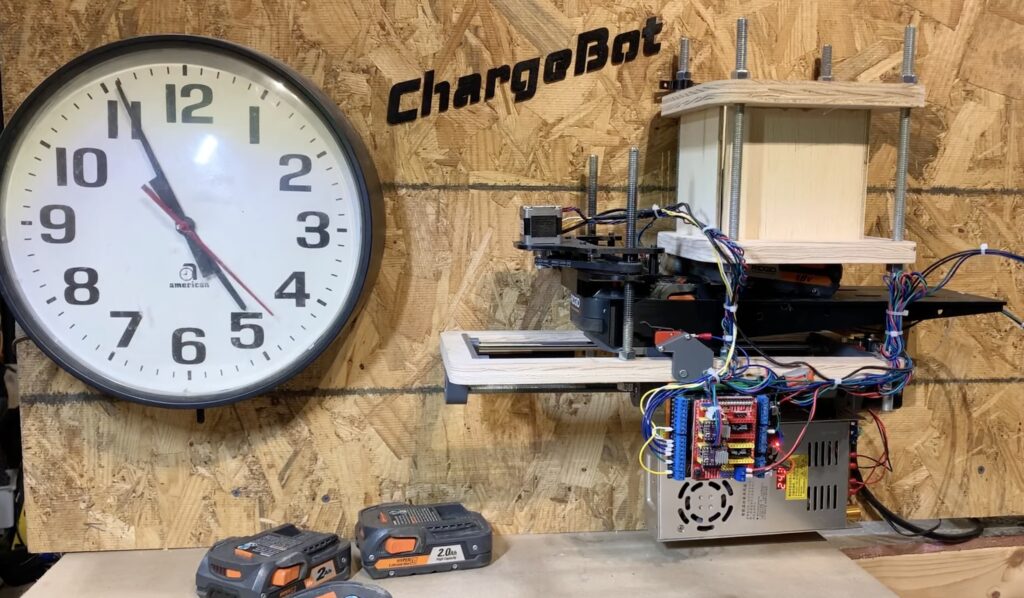
If you’re anything like every other human being on the planet, you have several cordless power tools and their batteries are all dead. You never remember to put the batteries on their chargers until you need the tool for a job on realize that it won’t turn on. Discipline is difficult, so instead Lance of the Sparks and Code YouTube channel built a robot to charge his power tool batteries.
This robot does still require some attention: Lance has to place a stack of batteries into the robot’s hopper to get the process started. But after that, the robot will set each battery in the charger, wait until it is full of juice, move the battery out of the way, then repeat with the next battery. The batteries all have to be identical (or at least share a charger), but it is a good idea to keep all of your cordless power tools within the same ecosystem anyway.
For this to work, the robot needs to know the status of each battery. While the batteries have internal electronics, interfacing with those would have taken some reverse engineering skill. Instead, Lance chose a more practical solution: using a light sensor to determine when a battery’s “charged” status indicator lights up. An Arduino monitors that sensor and also controls the robot’s motors through a CNC shield. There are two motors: one to push the sled that grabs batteries from the hopper and another that lowers the charger down onto the current battery, which is necessary because the batteries vary in height.
Now Lance has a convenient way to charge up all of his power tool batteries — if he can remember to place them in the hopper.
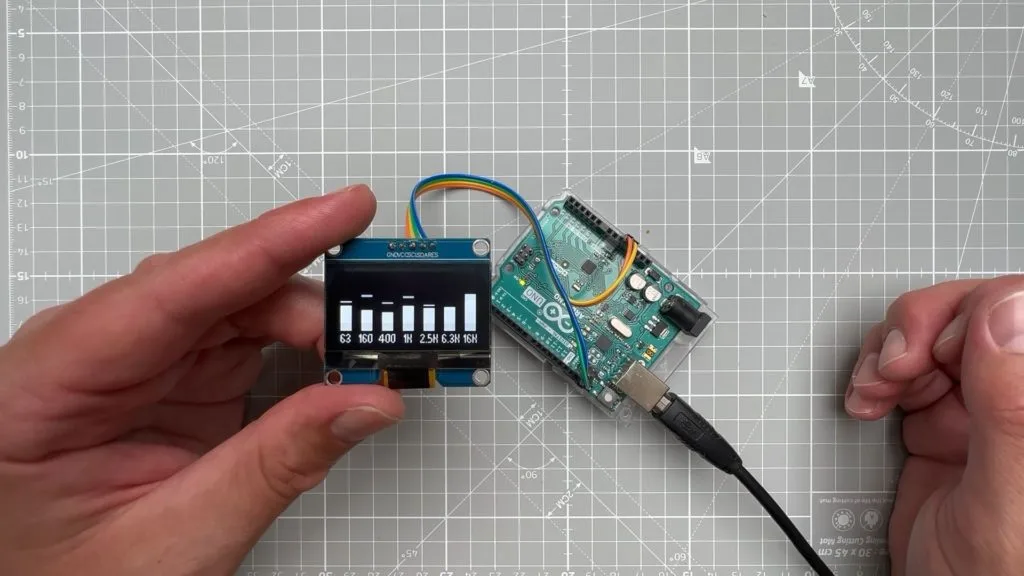
You’ve probably heard that there isn’t any sound in space. That’s because sound is vibration traveling through a medium, like air or wood, and space is a mostly empty vacuum. The frequency of the vibration in a medium is the pitch of the sound and the amplitude is the volume. If you want a way to visualize the frequencies of the sounds around you, Vaclav Krejci (upir on YouTube) designed an Arduino-based audio analyzer that you can build.
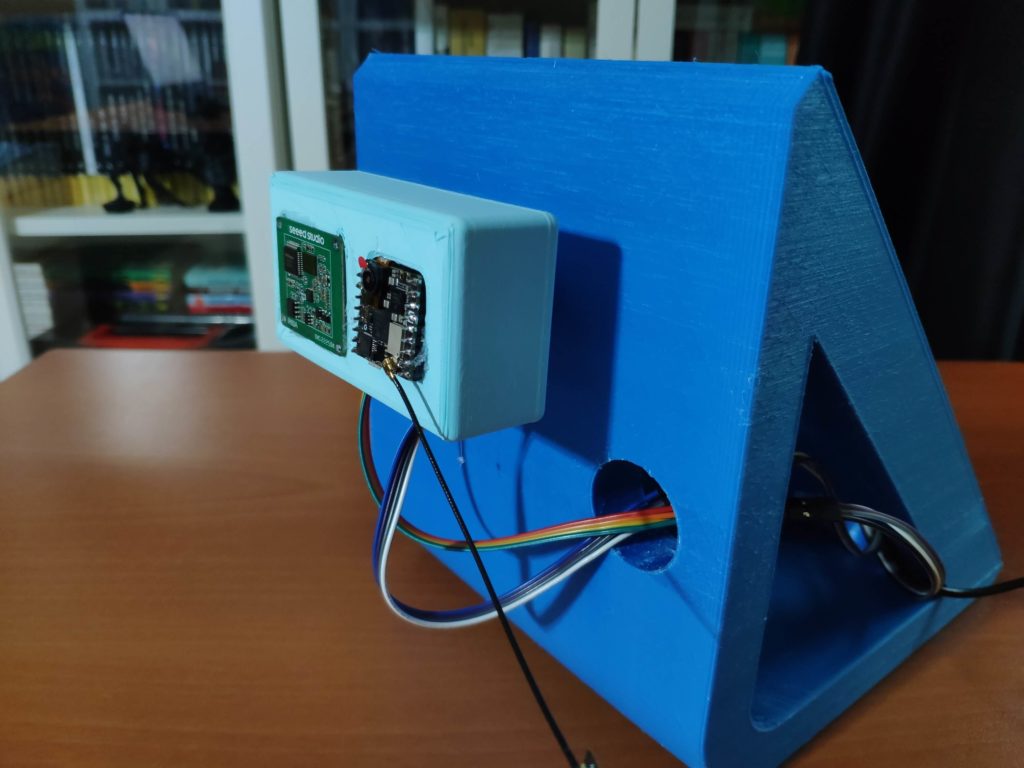
Like the visualizer of the equalizer on an old stereo receiver, this displays the levels of several frequency bands within the audio it monitors. In this case, that audio is the sound around the device collected by an onboard microphone. It shows the levels for seven different frequencies: 63Hz, 160Hz, 400Hz, 1kHz, 2.5kHz, 6.3kHz, and 16kHz. Most devices like this use LEDs to show the levels, but this shows them on a OLED screen instead and that allows for more flexibility.
That OLED screen connects to an Arduino Uno Rev3 board, which uses a pair of DFRobot modules to work with the audio. The first is an analog mic board that performs amplification to boost the audio signal up to something usable. The second is the AudioAnalyzer board that breaks that audio signal down into seven frequencies. Krejci’s code is straightforward and simply displays seven bar graphs corresponding to the amplitude numbers provided by the AudioAnalyzer board.
Use this in space and it should show all zeroes. But use it here on Earth and it will help you analyze the sound around you.
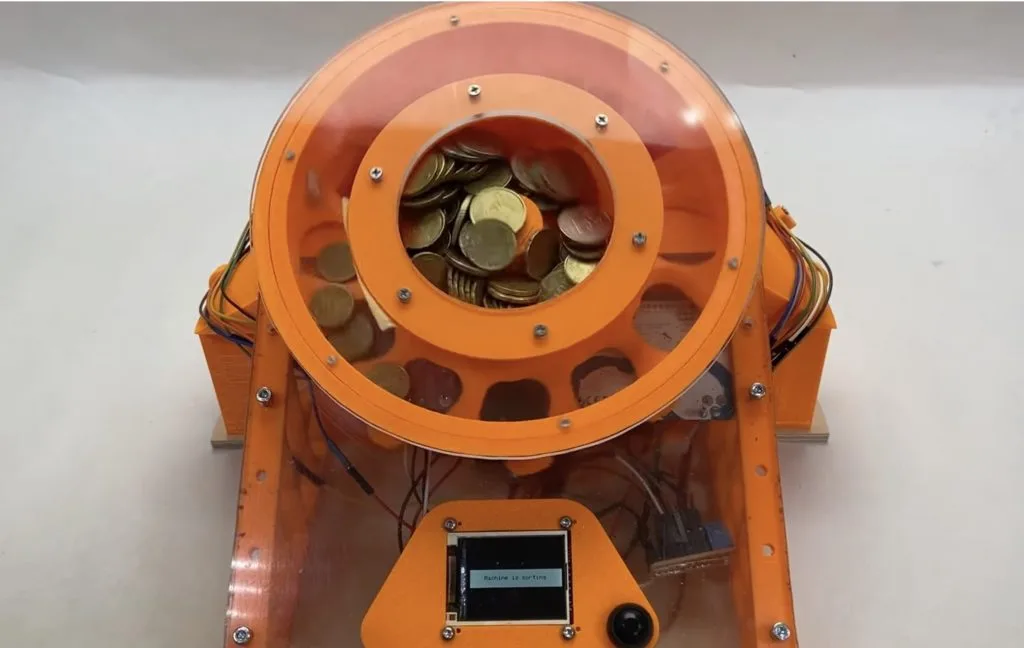
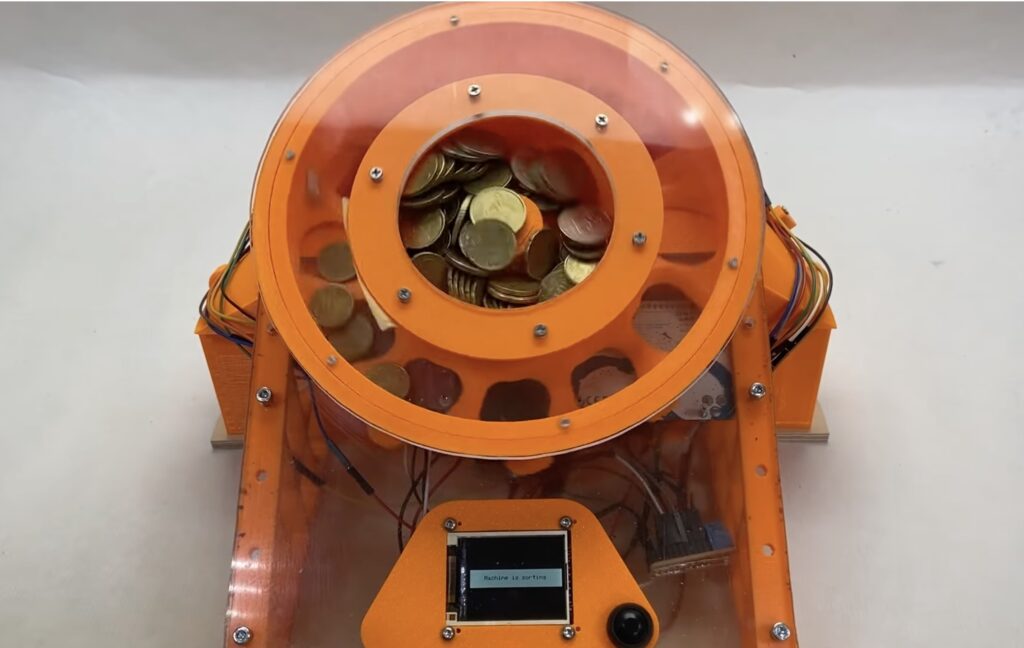
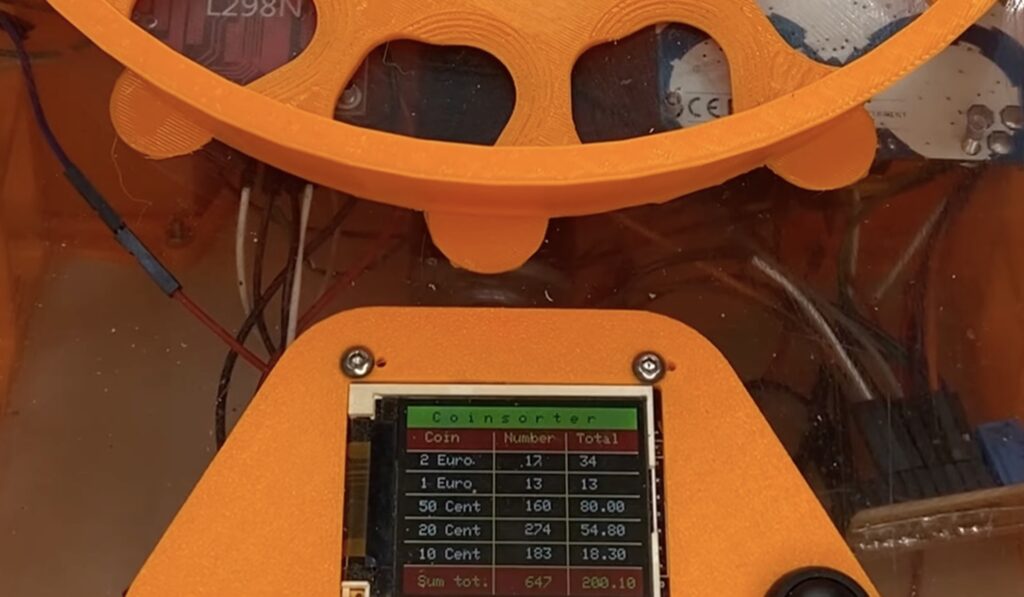
Counting one’s coins by hand can take a very long time, and for those wanting to avoid physically going to the bank or paying a fee at a commercial machine, what options remain? The YouTuber known as Fraens has created a full 3D-printed coin sorter and counter that combines technology with a clever design to accomplish this task automatically.
The bulk of the device is comprised of the drum which has many round slots placed around its inner circumference that coins can travel within. It is set at an angle that matches the stationary underside, and this is necessary because the coins should only fall through when the drum reaches the top half of its cycle. Since each coin denomination is slightly bigger or smaller, the series of rectangular slots have varying sizes to separate the denominations, and every drop is picked up by an infrared distance sensor when it detects a change in light levels caused by the passing coin.
A geared motor is responsible for rotating the drum, and it in turn is powered by an L298N H-bridge driver which is controlled by an Arduino Uno Rev3. The Uno also reads the states of the infrared sensors to count the quantities of each coin and displays the result using an LCD positioned at the front of the device.
To see more about how Fraens’ coin sorter works, you can watch his video below!
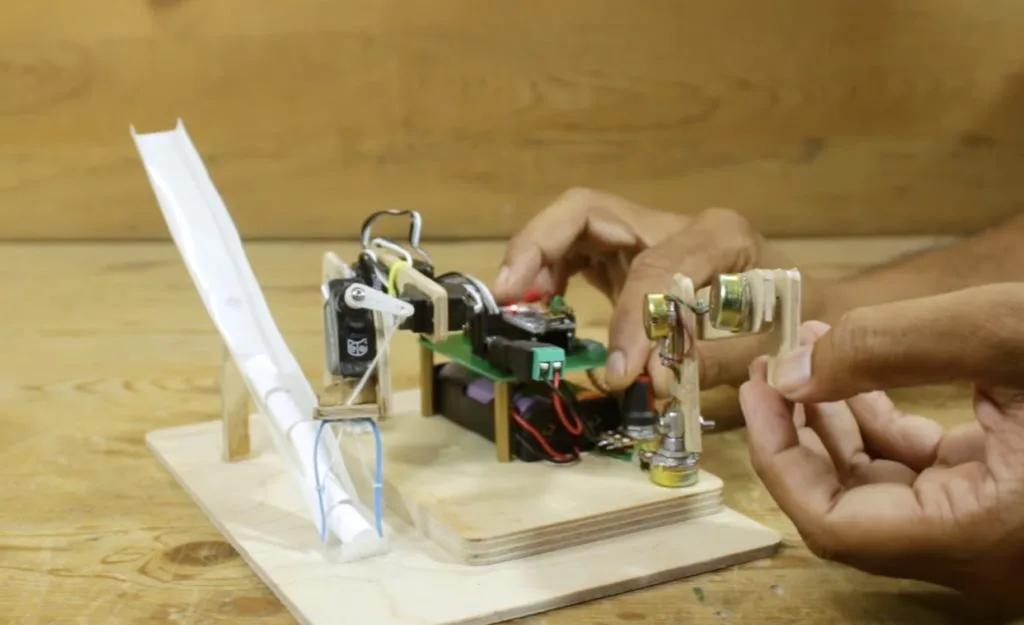
There are many ways to control a robot arm, with the simplest being a sequential list of rotation commands for the motors. But that method is very inefficient when the robot needs to do anything complex in the real world. A more streamlined technique lets the user move the arm as necessary, which sets a “recording” of the movements that the robot can then repeat. We tend to see that in high-end robots, but Mr Innovative built a robot arm with recording capability using very affordable materials.
This uses an input controller that is roughly the same size and shape as the robot arm, so Mr Innovative can manipulate that controller and the arm will mimic the movements like a puppet. The robot arm will also record those movements so it can repeat them later without any direct oversight. The video shows this in action with a demonstration in which the robot picks up small cylindrical objects and places them at the top of chute, where they slide back down for the process to continue indefinitely.
An Arduino Nano board powers the servo motors through a custom driver board to actuate the robot arm. It takes input from the controller, which has rotary potentiometers in the joints where the robot arm has servo motors. Therefore, the values from the potentiometers match the desired angles of the servo motors. The custom driver board has two buttons: one to activate the gripper and one to record to movements. When Mr Innovative holds down the second button, the Arduino will store all the movement commands so that it can repeat them.
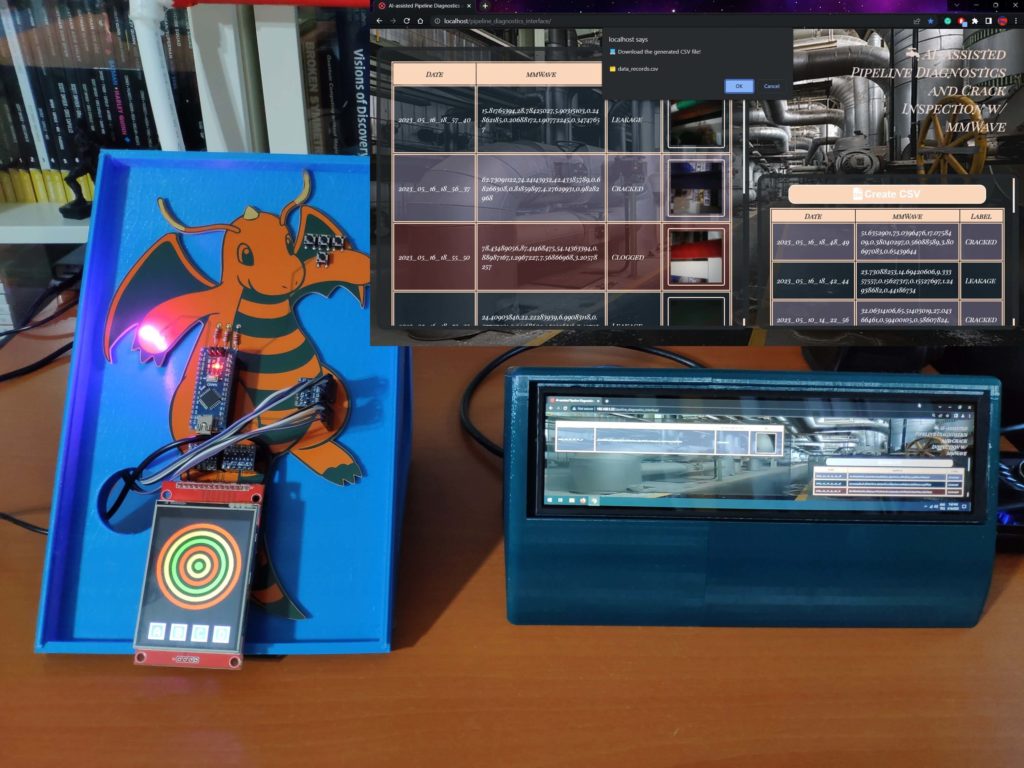
Pipelines are integral to our modern way of life, as they enable the fast transportation of water and energy between central providers and the eventual consumers of that resource. However, the presence of cracks from mechanical or corrosive stress can lead to leaks, and thus waste of product or even potentially dangerous situations. Although methods using thermal cameras or microphones exist, they’re hard to use interchangeably across different pipeline types, which is why Kutluhan Aktar instead went with a combination of mmWave radar and an ML model running on an Arduino Nicla Vision board to detect these issues before they become a real problem.
The project was originally conceived as an arrangement of parts on a breadboard, including a Seeed Studio MR60BHA1 60GHz radar module, an ILI9341 TFT screen, an Arduino Nano for interfacing with the sensor and display, and a Nicla Vision board. From here, Kutluhan designed his own Dragonite-themed PCB, assembled the components, and began collecting training and testing data for a machine learning model by building a small PVC model, introducing various defects, and recording the differences in data from the mmWave sensor. The system is able to do this by measuring the minute variations in vibrations as liquids move around, with increased turbulence often being correlated with defects.
After configuring a time-series impulse, a classification model was trained with the help of Edge Impulse that would use the three labels (cracked, clogged, and leakage) to see if the pipe had any damage. It was then deployed to the Nicla Vision where it achieved an accuracy of 90% on real-world data. With the aid of the screen, operators can tell the result of the classification immediately, as well as send the data to a custom web application.
Many types of medications (such as anti-depressants like SSRIs) can have a very negative effect if they aren’t taken on a regular basis. Even taking them a few hours late can harm a person’s mood and cause physical discomfort. But remembering to take pills at the proper time can be tricky — even setting an alarm isn’t foolproof, because you can turn it off without actually taking a pill. That’s why M. Bindhammer is building a 3D-printed robotic pill dispenser that will tell people if they forget to take their medicine.
M. Bindhammer’s design reflects his own needs: he has to take one pill in the morning and another in the evening. He suffers from bipolar disorder and missing the schedule by even a couple of hours can have consequences. To ensure that he adheres to that schedule, this robot dispenses two pills a day and will demand attention if M. Bindhammer forgets. It has 14 chambers, so M. Bindhammer can load up a full week’s worth of medication at once for convenient long-term use.
While the project isn’t complete yet, M. Bindhammer has finished the mechanical design and worked out most of the circuitry. The 14 chambers sit around a wheel torso turned by a continuous rotation servo motor, with a second servo motor that opens a door underneath the current chamber to allow a pill to drop down. An Arduino Due board with a custom breakout shield — which also integrates a DS3231 precision RTC — controls those servos and monitors a capacitive touch sensor in the base so it knows when the user picks up a pill. The Arduino will be able to provide feedback through an OLED screen face and a speaker connected to a speech synthesis module. When the robot is done, those will let the Arduino display a warning and emit an audio reminder if M. Bindhammer doesn’t take a pill when he should.
Um dir ein optimales Erlebnis zu bieten, verwenden wir Technologien wie Cookies, um Geräteinformationen zu speichern und/oder darauf zuzugreifen. Wenn du diesen Technologien zustimmst, können wir Daten wie das Surfverhalten oder eindeutige IDs auf dieser Website verarbeiten. Wenn du deine Einwillligung nicht erteilst oder zurückziehst, können bestimmte Merkmale und Funktionen beeinträchtigt werden.
Funktional
Immer aktiv
Die technische Speicherung oder der Zugang ist unbedingt erforderlich für den rechtmäßigen Zweck, die Nutzung eines bestimmten Dienstes zu ermöglichen, der vom Teilnehmer oder Nutzer ausdrücklich gewünscht wird, oder für den alleinigen Zweck, die Übertragung einer Nachricht über ein elektronisches Kommunikationsnetz durchzuführen.
Vorlieben
Die technische Speicherung oder der Zugriff ist für den rechtmäßigen Zweck der Speicherung von Präferenzen erforderlich, die nicht vom Abonnenten oder Benutzer angefordert wurden.
Statistiken
Die technische Speicherung oder der Zugriff, der ausschließlich zu statistischen Zwecken erfolgt.Die technische Speicherung oder der Zugriff, der ausschließlich zu anonymen statistischen Zwecken verwendet wird. Ohne eine Vorladung, die freiwillige Zustimmung deines Internetdienstanbieters oder zusätzliche Aufzeichnungen von Dritten können die zu diesem Zweck gespeicherten oder abgerufenen Informationen allein in der Regel nicht dazu verwendet werden, dich zu identifizieren.
Marketing
Die technische Speicherung oder der Zugriff ist erforderlich, um Nutzerprofile zu erstellen, um Werbung zu versenden oder um den Nutzer auf einer Website oder über mehrere Websites hinweg zu ähnlichen Marketingzwecken zu verfolgen.