Schlagwort: Python

  • Join us at the Education Summit at PyCon UK 2018

    Join us at the Education Summit at PyCon UK 2018

    Reading Time: 3 minutes

    PyCon UK 2018 will take place on Saturday 15 September to Wednesday 19 September in the splendid Cardiff City Hall, just a few miles from the Sony Technology Centre where the vast majority of Raspberry Pis is made. We’re pleased to announce that we’re curating this year’s Education Summit at the conference, where we’ll offer opportunities for young people to learn programming skills, and for educators to undertake professional development!

    PyCon UK Education Summit logo

    PyCon UK 2018 is your chance to be welcomed into the wonderful Python community. At the Education Summit, we’ll put on a young coders’ day on the Saturday, and an educators’ day on the Sunday.

    Saturday — young coders’ day

    On Saturday we’ll be running a CoderDojo full of workshops on Raspberry Pi and micro:bits for young people aged 7 to 17. If they wish, participants will get to make a project and present it to the conference on the main stage, and everyone will be given a free micro:bit to take home!

    Kids’ tickets at just £6 will be available here soon.

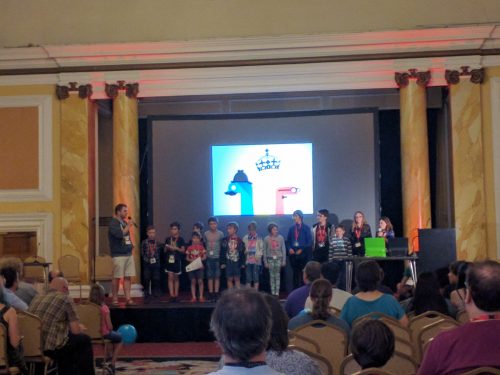
    Kids on a stage at PyCon UK

    Kids presenting their projects to the conference

    Sunday — educators’ day

    PyCon UK has been bringing developers and educators together ever since it first started its education track in 2011. This year’s Sunday will be a day of professional development: we’ll give teachers, educators, parents, and coding club leaders the chance to learn from us and from each other to build their programming, computing, and digital making skills.

    Educator workshop at PyCon UK

    Professional development for educators

    Educators get a special entrance rate for the conference, starting at £48 — get your tickets now. Financial assistance is also available.

    Call for proposals

    We invite you to send in your proposal for a talk and workshop at the Education Summit! We’re looking for:

    • 25-minute talks for the educators’ day
    • 50-minute workshops for either the young coders’ or the educators’ day

    If you have something you’d like to share, such as a professional development session for educators, advice on best practice for teaching programming, a workshop for up-skilling in Python, or a fun physical computing activity for the CoderDojo, then we’d love to hear about it! Please submit your proposal by 15 June.

    After the Education Summit, the conference will continue for two days of talks and a final day of development sprints. Feel free to submit your education-related talk to the main conference too if you want to share it with a wider audience! Check out the PyCon UK 2018 website for more information.

    We’re looking forward to seeing you in September!

    Website: LINK

  • Build a house in Minecraft using Python

    Build a house in Minecraft using Python

    Reading Time: 9 minutes

    In this tutorial from The MagPi issue 68, Steve Martin takes us through the process of house-building in Minecraft Pi. Get your copy of The MagPi in stores now, or download it as a free PDF here.

    Minecraft Pi is provided for free as part of the Raspbian operating system. To start your Minecraft: Pi Edition adventures, try our free tutorial Getting started with Minecraft.

    Minecraft Raspberry Pi

    Writing programs that create things in Minecraft is not only a great way to learn how to code, but it also means that you have a program that you can run again and again to make as many copies of your Minecraft design as you want. You never need to worry about your creation being destroyed by your brother or sister ever again — simply rerun your program and get it back! Whilst it might take a little longer to write the program than to build one house, once it’s finished you can build as many houses as you want.

    Co-ordinates in Minecraft

    Let’s start with a review of the coordinate system that Minecraft uses to know where to place blocks. If you are already familiar with this, you can skip to the next section. Otherwise, read on.

    Minecraft Raspberry Pi Edition

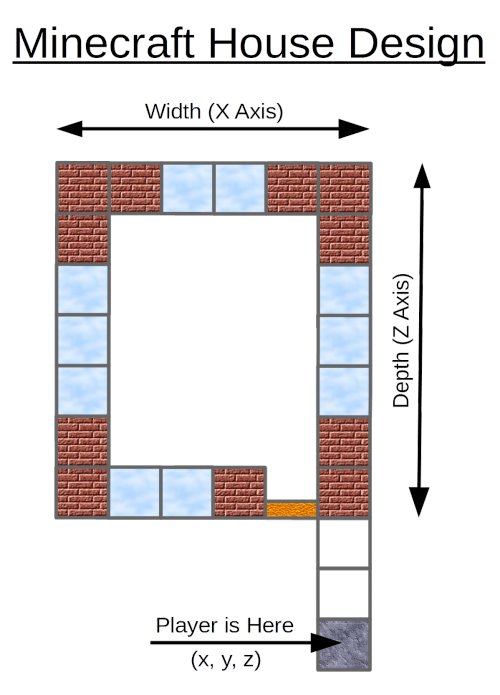
    Plan view of our house design

    Minecraft shows us a three-dimensional (3D) view of the world. Imagine that the room you are in is the Minecraft world and you want to describe your location within that room. You can do so with three numbers, as follows:

    • How far across the room are you? As you move from side to side, you change this number. We can consider this value to be our X coordinate.
    • How high off the ground are you? If you are upstairs, or if you jump, this value increases. We can consider this value to be our Y coordinate.
    • How far into the room are you? As you walk forwards or backwards, you change this number. We can consider this value to be our Z coordinate.

    You might have done graphs in school with X going across the page and Y going up the page. Coordinates in Minecraft are very similar, except that we have an extra value, Z, for our third dimension. Don’t worry if this still seems a little confusing: once we start to build our house, you will see how these three dimensions work in Minecraft.

    Designing our house

    It is a good idea to start with a rough design for our house. This will help us to work out the values for the coordinates when we are adding doors and windows to our house. You don’t have to plan every detail of your house right away. It is always fun to enhance it once you have got the basic design written. The image above shows the plan view of the house design that we will be creating in this tutorial. Note that because this is a plan view, it only shows the X and Z co-ordinates; we can’t see how high anything is. Hopefully, you can imagine the house extending up from the screen.

    We will build our house close to where the Minecraft player is standing. This a good idea when creating something in Minecraft with Python, as it saves us from having to walk around the Minecraft world to try to find our creation.

    Starting our program

    Type in the code as you work through this tutorial. You can use any editor you like; we would suggest either Python 3 (IDLE) or Thonny Python IDE, both of which you can find on the Raspberry Pi menu under Programming. Start by selecting the File menu and creating a new file. Save the file with a name of your choice; it must end with .py so that the Raspberry Pi knows that it is a Python program.

    It is important to enter the code exactly as it is shown in the listing. Pay particular attention to both the spelling and capitalisation (upper- or lower-case letters) used. You may find that when you run your program the first time, it doesn’t work. This is very common and just means there’s a small error somewhere. The error message will give you a clue about where the error is.

    It is good practice to start all of your Python programs with the first line shown in our listing. All other lines that start with a # are comments. These are ignored by Python, but they are a good way to remind us what the program is doing.

    The two lines starting with from tell Python about the Minecraft API; this is a code library that our program will be using to talk to Minecraft. The line starting mc = creates a connection between our Python program and the game. Then we get the player’s location broken down into three variables: x, y, and z.

    Building the shell of our house

    To help us build our house, we define three variables that specify its width, height, and depth. Defining these variables makes it easy for us to change the size of our house later; it also makes the code easier to understand when we are setting the co-ordinates of the Minecraft bricks. For now, we suggest that you use the same values that we have; you can go back and change them once the house is complete and you want to alter its design.

    It’s now time to start placing some bricks. We create the shell of our house with just two lines of code! These lines of code each use the setBlocks command to create a complete block of bricks. This function takes the following arguments:

    setBlocks(x1, y1, z1, x2, y2, z2, block-id, data)

    x1, y1, and z1 are the coordinates of one corner of the block of bricks that we want to create; x1, y1, and z1 are the coordinates of the other corner. The block-id is the type of block that we want to use. Some blocks require another value called data; we will see this being used later, but you can ignore it for now.

    We have to work out the values that we need to use in place of x1, y1, z1, x1, y1, z1 for our walls. Note that what we want is a larger outer block made of bricks and that is filled with a slightly smaller block of air blocks. Yes, in Minecraft even air is actually just another type of block.

    Once you have typed in the two lines that create the shell of your house, you almost ready to run your program. Before doing so, you must have Minecraft running and displaying the contents of your world. Do not have a world loaded with things that you have created, as they may get destroyed by the house that we are building. Go to a clear area in the Minecraft world before running the program. When you run your program, check for any errors in the ‘console’ window and fix them, repeatedly running the code again until you’ve corrected all the errors.

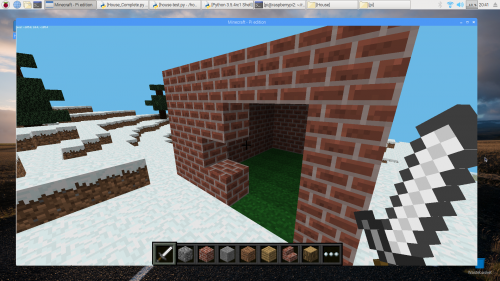
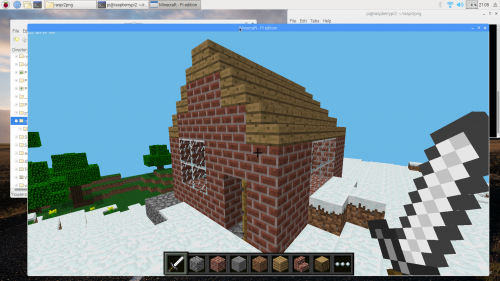
    You should see a block of bricks now, as shown above. You may have to turn the player around in the Minecraft world before you can see your house.

    Adding the floor and door

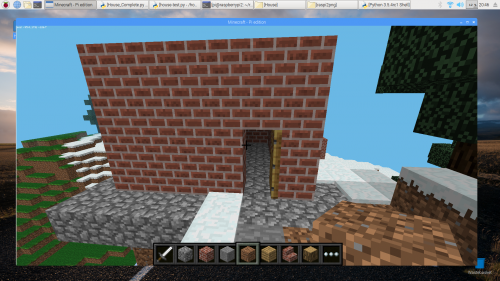
    Now, let’s make our house a bit more interesting! Add the lines for the floor and door. Note that the floor extends beyond the boundary of the wall of the house; can you see how we achieve this?

    Hint: look closely at how we calculate the x and z attributes as compared to when we created the house shell above. Also note that we use a value of y-1 to create the floor below our feet.

    Minecraft doors are two blocks high, so we have to create them in two parts. This is where we have to use the data argument. A value of 0 is used for the lower half of the door, and a value of 8 is used for the upper half (the part with the windows in it). These values will create an open door. If we add 4 to each of these values, a closed door will be created.

    Before you run your program again, move to a new location in Minecraft to build the house away from the previous one. Then run it to check that the floor and door are created; you will need to fix any errors again. Even if your program runs without errors, check that the floor and door are positioned correctly. If they aren’t, then you will need to check the arguments so setBlock and setBlocks are exactly as shown in the listing.

    Adding windows

    Hopefully you will agree that your house is beginning to take shape! Now let’s add some windows. Looking at the plan for our house, we can see that there is a window on each side; see if you can follow along. Add the four lines of code, one for each window.

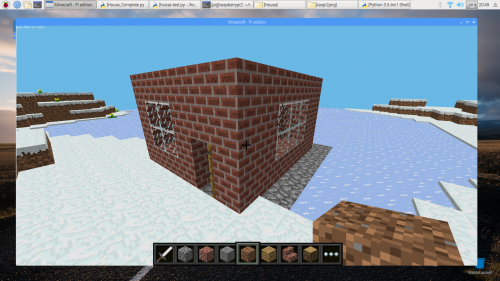
    Now you can move to yet another location and run the program again; you should have a window on each side of the house. Our house is starting to look pretty good!

    Adding a roof

    The final stage is to add a roof to the house. To do this we are going to use wooden stairs. We will do this inside a loop so that if you change the width of your house, more layers are added to the roof. Enter the rest of the code. Be careful with the indentation: I recommend using spaces and avoiding the use of tabs. After the if statement, you need to indent the code even further. Each indentation level needs four spaces, so below the line with if on it, you will need eight spaces.

    Since some of these code lines are lengthy and indented a lot, you may well find that the text wraps around as you reach the right-hand side of your editor window — don’t worry about this. You will have to be careful to get those indents right, however.

    Now move somewhere new in your world and run the complete program. Iron out any last bugs, then admire your house! Does it look how you expect? Can you make it better?

    Customising your house

    Now you can start to customise your house. It is a good idea to use Save As in the menu to save a new version of your program. Then you can keep different designs, or refer back to your previous program if you get to a point where you don’t understand why your new one doesn’t work.

    Consider these changes:

    • Change the size of your house. Are you able also to move the door and windows so they stay in proportion?
    • Change the materials used for the house. An ice house placed in an area of snow would look really cool!
    • Add a back door to your house. Or make the front door a double-width door!

    We hope that you have enjoyed writing this program to build a house. Now you can easily add a house to your Minecraft world whenever you want to by simply running this program.

    Get the complete code for this project here.

    Continue your Minecraft journey

    Minecraft Pi’s programmable interface is an ideal platform for learning Python. If you’d like to try more of our free tutorials, check out:

    You may also enjoy Martin O’Hanlon’s and David Whale’s Adventures in Minecraft, and the Hacking and Making in Minecraft MagPi Essentials guide, which you can download for free or buy in print here.

    Website: LINK
  • Transition from Scratch to Python with FutureLearn

    Transition from Scratch to Python with FutureLearn

    Reading Time: 3 minutes

    With the launch of our first new free online course of 2018 — Scratch to Python: Moving from Block- to Text-based Programming — two weeks away, I thought this would be a great opportunity to introduce you to the ins and outs of the course content so you know what to expect.

    FutureLearn: Moving from Scratch to Python

    Learn how to apply the thinking and programming skills you’ve learnt in Scratch to text-based programming languages like Python.

    Take the plunge into text-based programming

    The idea for this course arose from our conversations with educators who had set up a Code Club in their schools. Most people start a club by teaching Scratch, a block-based programming language, because it allows learners to drag and drop blocks of pre-written code into a window to create a program. The blocks automatically snap together, making it easy to build fun and educational projects that don’t require much troubleshooting. You can do almost anything a beginner could wish for with Scratch, even physical computing to control LEDs, buzzers, buttons, motors, and more!

    Scratch to Python FutureLearn Raspberry Pi

    However, on our face-to-face training programme Picademy, educators told us that they were finding it hard to engage children who had outgrown Scratch and needed a new challenge. It was easy for me to imagine: a young learner, who once felt confident about programming using Scratch, is now confused by the alien, seemingly awkward interface of Python. What used to take them minutes in Scratch now takes them hours to code, and they start to lose interest — not a good result, I’m sure you’ll agree. I wanted to help educators to navigate this period in their learners’ development, and so I’ve written a course that shows you how to take the programming and thinking skills you and your learners have developed in Scratch, and apply them to Python.

    Scratch to Python FutureLearn Raspberry Pi

    Who is the course for?

    Educators from all backgrounds who are working with secondary school-aged learners. It will also be interesting to anyone who has spent time working with Scratch and wants to understand how programming concepts translate between different languages.

    “It was great fun, and I thought that the ideas and resources would be great to use with Year 7 classes.”
    Sue Grey, Classroom Teacher

    What is covered?

    After showing you the similarities and differences of Scratch and Python, and how the skills learned using one can be applied to the other, we will look at turning more complex Scratch scripts into Python programs. Through creating a Mad Libs game and developing a username generator, you will see how programs can be simplified in a text-based language. We will give you our top tips for debugging Python code, and you’ll have the chance to share your ideas for introducing more complex programs to your students.

    Scratch to Python FutureLearn Raspberry Pi

    After that, we will look at different data types in Python and write a script to calculate how old you are in dog years. Finally, you’ll dive deeper into the possibilities of Python by installing and using external Python libraries to perform some amazing tasks.

    By the end of the course, you’ll be able to:

    • Transfer programming and thinking skills from Scratch to Python
    • Use fundamental Python programming skills
    • Identify errors in your Python code based on error messages, and debug your scripts
    • Produce tools to support students’ transition from block-based to text-based programming
    • Understand the power of text-based programming and what you can create with it

    Where can I sign up?

    The free four-week course starts on 12 March 2018, and you can sign up now on FutureLearn. While you’re there, be sure to check out our other free courses, such as Prepare to Run a Code Club, Teaching Physical Computing with a Raspberry Pi and Python, and our second new course Build a Makerspace for Young People — more information on it will follow in tomorrow’s blog post.

    Website: LINK
  • Rosie the Countdown champion

    Rosie the Countdown champion

    Reading Time: 3 minutes

    Beating the contestants at Countdown: is it cheating if you happen to know every word in the English dictionary?

    Rosie plays Countdown

    Allow your robots to join in the fun this Christmas with a round of Channel 4’s Countdown. https://www.rosietheredrobot.com/2017/12/tea-minus-30.html

    Rosie the Red Robot

    First, a little bit of backstory. Challenged by his eldest daughter to build a robot, technology-loving Alan got to work building Rosie.

    I became (unusually) determined. I wanted to show her what can be done… and the how can be learnt later. After all, there is nothing more exciting and encouraging than seeing technology come alive. Move. Groove. Quite literally.

    Originally, Rosie had a Raspberry Pi 3 brain controlling ultrasonic sensors and motors via Python. From there, she has evolved into something much grander, and Alan has documented her upgrades on the Rosie the Red Robot blog. Using GPS trackers and a Raspberry Pi camera module, she became Rosie Patrol, a rolling, walking, interactive bot; then, with further upgrades, the Tea Minus 30 project came to be. Which brings us back to Countdown.

    T(ea) minus 30

    In case it hasn’t been a big part of your life up until now, Countdown is one of the longest running televisions shows in history, and occupies a special place in British culture. Contestants take turns to fill a board with nine randomly selected vowels and consonants, before battling the Countdown clock to find the longest word they can in the space of 30 seconds.

    The Countdown Clock

    I’ve had quite a few requests to show just the Countdown clock for use in school activities/own games etc., so here it is! Enjoy! It’s a brand new version too, using the 2010 Office package.

    There’s a numbers round involving arithmetic, too – but for now, we’re going to focus on letters and words, because that’s where Rosie’s skills shine.

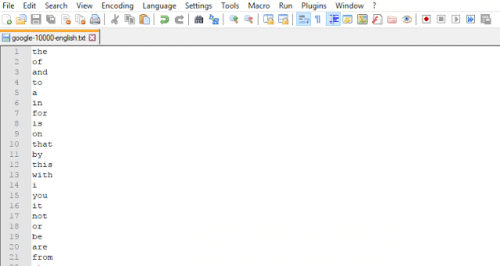
    Using an online resource, Alan created a dataset of the ten thousand most common English words.

    Rosie the Red Robot Raspberry Pi

    Many words, listed in order of common-ness. Alan wrote a Python script to order them alphabetically and by length

    Next, Alan wrote a Python script to select nine letters at random, then search the word list to find all the words that could be spelled using only these letters. He used the randint function to select letters from a pre-loaded alphabet, and introduced a requirement to include at least two vowels among the nine letters.

    Rosie the Red Robot Raspberry Pi

    Words that match the available letters are displayed on the screen.

    Rosie the Red Robot Raspberry Pi

    Putting it all together

    With the basic game-play working, it was time to bring the project to life. For this, Alan used Rosie’s camera module, along with optical character recognition (OCR) and text-to-speech capabilities.

    Rosie the Red Robot Raspberry Pi

    Alan writes, “Here’s a very amateurish drawing to brainstorm our idea. Let’s call it a design as it makes it sound like we know what we’re doing.”

    Alan’s script has Rosie take a photo of the TV screen during the Countdown letters round, then perform OCR using the Google Cloud Vision API to detect the nine letters contestants have to work with. Next, Rosie runs Alan’s code to check the letters against the ten-thousand-word dataset, converts text to speech with Python gTTS, and finally speaks her highest-scoring word via omxplayer.

    You can follow the adventures of Rosie the Red Robot on her blog, or follow her on Twitter. And if you’d like to build your own Rosie, Alan has provided code and tutorials for his projects too. Thanks, Alan!

    Website: LINK
  • Digital making for new parents

    Digital making for new parents

    Reading Time: 4 minutes

    Solving problems that are meaningful to us is at the core of our approach to teaching and learning about technology here at the Raspberry Pi Foundation. Over the last eight months, I’ve noticed that the types of digital making projects that motivate and engage me have changed (can’t think why). Always looking for ways to save money and automate my life and the lives of my loved ones, I’ve been thinking a lot about how digital making projects could be the new best friend of any new parent.

    A baby, oblivious to the amount its parents have spent on stuff they never knew existed last year.
    Image: sweet baby by MRef photography / CC BY-ND 2.0

    Baby Monitor

    I never knew how much equipment one small child needs until very recently. I also had no idea of the range of technology that is on offer to support you as a new parent to ensure the perfect environment outside of the womb. Baby monitors are at the top of this list. There are lots of Raspberry Pi baby monitor projects with a range of sensing functionality already in existence, and we’ve blogged about some of them before. They’re a great example of how an understanding of technology can open up a range of solutions that won’t break the bank. I’m looking forward to using all the capabilities of the Raspberry Pi to keep an eye on baby.

    Baby name generator

    Another surprising discovery was just how difficult it is to name a human being. Surprising because I can give a name to an inanimate object in less than three seconds, and come up with nicknames for colleagues in less than a day. My own offspring, though, and I draw a blank. The only solution: write a Python program to randomly generate names based on some parameters!

    import names
    from time import sleep
    from guizero import App, ButtonGroup, Text, PushButton, TextBox
    
    def get_name():
 boyname = names.get_first_name(gender='male')
 girlname = names.get_first_name(gender='female')
 othername = names.get_first_name()
    
 if babygender.get() == "male":
 name.set(str(boyname)+" "+str(babylastname.get()))
 elif babygender.get() == "female":
 name.set(str(girlname)+" "+str(babylastname.get()))
 else:
 name.set(str(othername)+" "+str(babylastname.get()))
    
    app = App("Baby name generator")
    surname_label = Text(app, "What is your surname?")
    babylastname = TextBox(app, width=50)
    babygender = ButtonGroup(app, options=[["boy", "male"], ["girl", "female"], ["all", "all"]], selected="male", horizontal=True)
    intro = Text(app, "Your baby name could be")
    name = Text(app, "")
    button = PushButton(app, get_name, text="Generate me a name")
    
    app.display()

    Thanks to the names and GUIZero Python libraries, it is super simple to create, resolving any possible parent-to-be naming disputes in mere minutes.

    Food, Poo, or Love?

    I love data. Not just in Star Trek, but also more generally. Collecting and analysing data to understand my sleep patterns, my eating habits, how much exercise I do, and how much time I spend watching YouTube videos consumes much of my time. So of course I want to know lots about the little person we’ve made, long before he can use language to tell us himself.

    I’m told that most newborns’ needs are quite simple: they want food, they want to be changed, or they just want some cuddles. I’m certain it’s more complicated than this, but it’s a good starting point for a data set, so stick with me here. I also wondered whether there might be a correlation between the amplitude of the cry and the type of need the baby has. A bit of an imprecise indicator, maybe, but fun to start to think about.

    This build’s success is mostly thanks to Pimoroni’s Rainbow HAT, which, conveniently, has three capacitive touch buttons to record the newborn’s need, four fourteen-segment displays to display the words “FOOD”, “POO”, and “LOVE” when a button is pressed, and seven multicoloured LEDs to indicate the ferociousness of the baby’s cry in glorious technicolour. With the addition of a microphone, the ‘Food, Poo, Love Machine’ was born. Here it is in action:

    Food Poo Love – Raspberry Pi Baby Monitor Project

    Food Poo Love – The Raspberry Pi baby monitor project that allows you to track data on your new born baby.

    Automatic Baby mobile

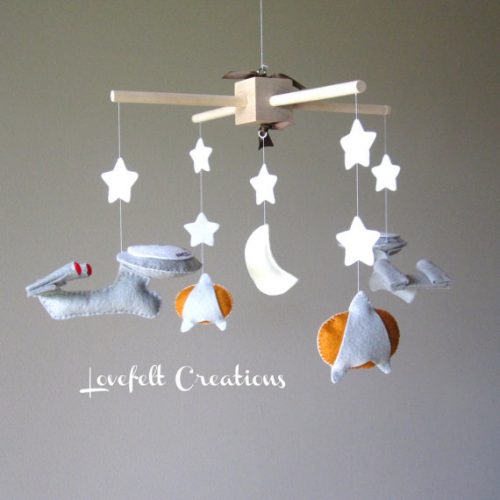
    Another project that I’ve not had time to hack on, but that I think would be really awesome, is to automate a baby cot mobile. Imagine this one moving to the Star Trek theme music:

    Image courtesy of Gisele Blaker Designs (check out her cool shop!)

    Pretty awesome.

    If you’ve got any more ideas for baby projects, do let me know. I’ll have a few months of nothing to do… right?

    Website: LINK
  • piwheels: making “pip install” fast

    piwheels: making “pip install” fast

    Reading Time: 6 minutes

    TL;DR pip install numpy used to take ages, and now it’s super fast thanks to piwheels.

    The Python Package Index (PyPI) is a package repository for Python modules. Members of the Python community publish software and libraries in it as an easy method of distribution. If you’ve ever used pip install, PyPI is the service that hosts the software you installed. You may have noticed that some installations can take a long time on the Raspberry Pi. That usually happens when modules have been implemented in C and require compilation.

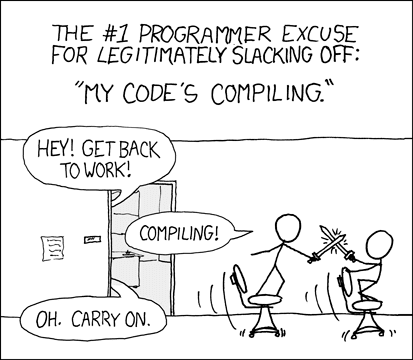
    XKCD comic of two people sword-fighting on office chairs while their code is compiling

    No more slacking off! pip install numpy takes just a few seconds now \o/

    Wheels for Python packages

    A general solution to this problem exists: Python wheels are a standard for distributing pre-built versions of packages, saving users from having to build from source. However, when C code is compiled, it’s compiled for a particular architecture, so package maintainers usually publish wheels for 32-bit and 64-bit Windows, macOS, and Linux. Although Raspberry Pi runs Linux, its architecture is ARM, so Linux wheels are not compatible.

    A comic of snakes biting their own tails to roll down a sand dune like wheels

    What Python wheels are not

    Pip works by browsing PyPI for a wheel matching the user’s architecture — and if it doesn’t find one, it falls back to the source distribution (usually a tarball or zip of the source code). Then the user has to build it themselves, which can take a long time, or may require certain dependencies. And if pip can’t find a source distribution, the installation fails.

    Developing piwheels

    In order to solve this problem, I decided to build wheels of every package on PyPI. I wrote some tooling for automating the process and used a postgres database to monitor the status of builds and log the output. Using a Pi 3 in my living room, I attempted to build wheels of the latest version of all 100 000 packages on PyPI and to host them on a web server on the Pi. This took a total of ten days, and my proof-of-concept seemed to show that it generally worked and was likely to be useful! You could install packages directly from the server, and installations were really fast.

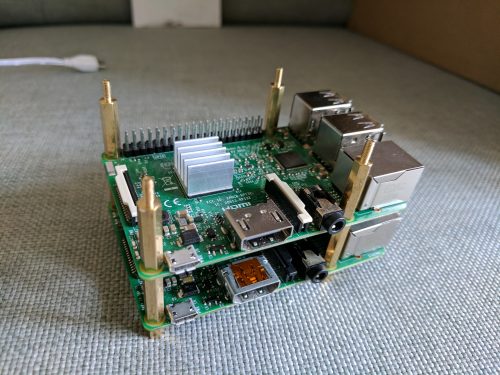
    A Raspberry Pi 3 sitting atop a Pi 2 on cloth

    This Pi 3 was the piwheels beta server, sitting atop my SSH gateway Pi 2 at home

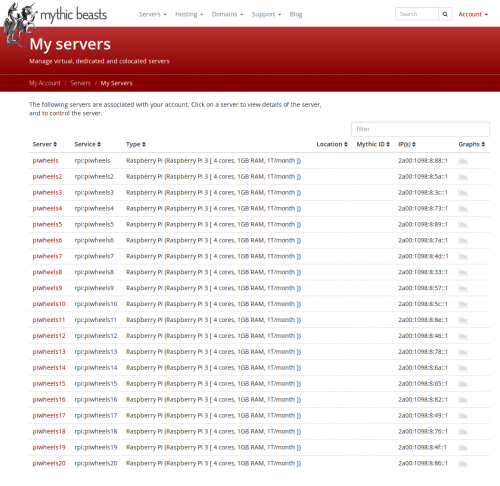
    I proceeded to plan for version 2, which would attempt to build every version of every package — about 750 000 versions in total. I estimated this would take 75 days for one Pi, but I intended to scale it up to use multiple Pis. Our web hosts Mythic Beasts provide dedicated Pi 3 hosting, so I fired up 20 of them to share the load. With some help from Dave Jones, who created an efficient queuing system for the builders, we were able make this run like clockwork. In under two weeks, it was complete! Read ALL about the first build run drama on my blog.

    A list of the mythic beasts cloud Pis

    ALL the cloud Pis

    Improving piwheels

    We analysed the failures, made some tweaks, installed some key dependencies, and ran the build again to raise our success rate from 76% to 83%. We also rebuilt packages for Python 3.5 (the new default in Raspbian Stretch). The wheels we build are tagged ‘armv7l’, but because our Raspbian image is compatible with all Pi models, they’re really ARMv6, so they’re compatible with Pi 3, Pi 2, Pi 1 and Pi Zero. This means the ‘armv6l’-tagged wheels we provide are really just the ARMv7 wheels renamed.

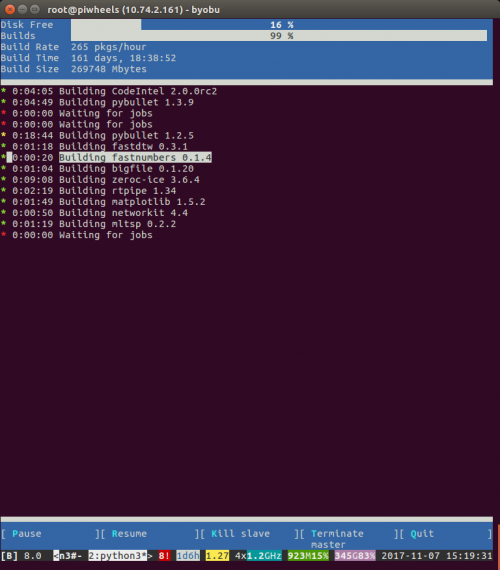
    The piwheels monitor interface created by Dave Jones

    The wonderful piwheels monitor interface created by Dave

    Now, you might be thinking “Why didn’t you just cross-compile?” I really wanted to have full compatibility, and building natively on Pis seemed to be the best way to achieve that. I had easy access to the Pis, and it really didn’t take all that long. Plus, you know, I wanted to eat my own dog food.

    You might also be thinking “Why don’t you just apt install python3-numpy?” It’s true that some Python packages are distributed via the Raspbian/Debian archives too. However, if you’re in a virtual environment, or you need a more recent version than the one packaged for Debian, you need pip.

    How it works

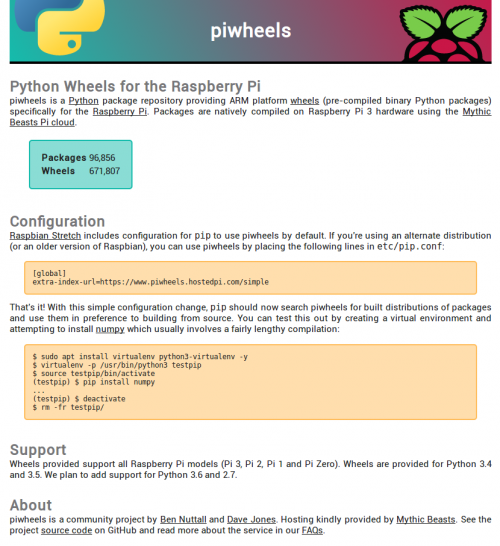
    Now that the piwheels package repository is running as a service, hosted on a Pi 3 in the Mythic Beasts data centre in London. The pip package in Raspbian Stretch is configured to use piwheels as an additional index, so it falls back to PyPI if we’re missing a package. Just run sudo apt upgrade to get the configuration change. You’ll find that pip installs are much faster now! If you want to use piwheels on Raspbian Jessie, that’s possible too — find the instructions in our FAQs. And now, every time you pip install something, your files come from a web server running on a Raspberry Pi (that capable little machine)!

    Try it for yourself in a virtual environment:

    sudo apt install virtualenv python3-virtualenv -y
    virtualenv -p /usr/bin/python3 testpip
    source testpip/bin/activate
    pip install numpy

    This takes about 20 minutes on a Pi 3, 2.5 hours on a Pi 1, or just a few seconds on either if you use piwheels.

    If you’re interested to see the details, try pip install numpy -v for verbose output. You’ll see that pip discovers two indexes to search:

    2 location(s) to search for versions of numpy:
 * https://pypi.python.org/simple/numpy/
 * https://www.piwheels.hostedpi.com/simple/numpy/

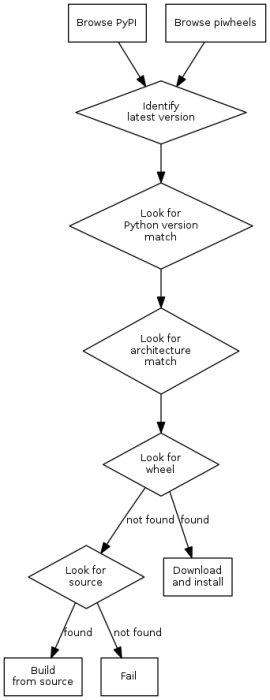
    Then it searches both indexes for available files. From this list of files, it determines the latest version available. Next it looks for a Python version and architecture match, and then opts for a wheel over a source distribution. If a new package or version is released, piwheels will automatically pick it up and add it to the build queue.

    A flowchart of how piwheels works

    How piwheels works

    For the users unfamiliar with virtual environments I should mention that doing this isn’t a requirement — just an easy way of testing installations in a sandbox. Most pip usage will require sudo pip3 install {package}, which installs at a system level.

    If you come across any issues with any packages from piwheels, please let us know in a GitHub issue.

    Taking piwheels further

    We currently provide over 670 000 wheels for more than 96 000 packages, all compiled natively on Raspberry Pi hardware. Moreover, we’ll keep building new packages as they are released.

    Note that, at present, we have built wheels for Python 3.4 and 3.5 — we’re planning to add support for Python 3.6 and 2.7. The fact that piwheels is currently missing Python 2 wheels does not affect users: until we rebuild for Python 2, PyPI will be used as normal, it’ll just take longer than installing a Python 3 package for which we have a wheel. But remember, Python 2 end-of-life is less than three years away!

    Many thanks to Dave Jones for his contributions to the project, and to Mythic Beasts for providing the excellent hosted Pi service.

    Screenshot of the mythic beasts Raspberry Pi 3 server service website

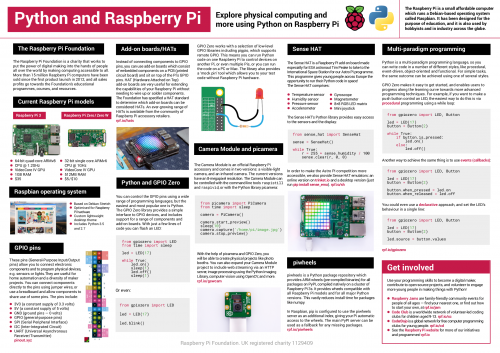
    Related/unrelated, check out my poster from the PyCon UK poster session:

    A poster about Python and Raspberry Pi

    Click to download the PDF!

    Website: LINK
  • Simple Computer Gesture Control with Arduino and Python

    Simple Computer Gesture Control with Arduino and Python

    Reading Time: < 1 minute

    Simple Computer Gesture Control with Arduino and Python

    Arduino TeamNovember 6th, 2017

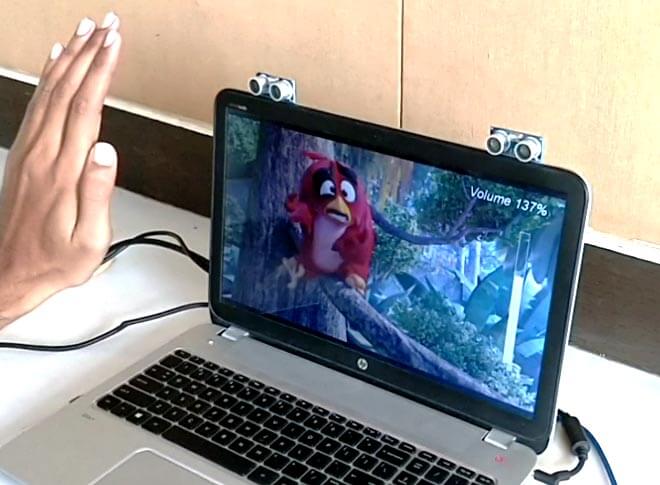
    As outlined in this Circuit Digest write-up, with the right hardware, you can now control your computer using hand gestures. While interesting, this kind of technology can be a little expensive. But if you’d like to augment your notebook or laptop via simple gesture capabilities without breaking the bank, B. Aswinth Raj has your answer in the form of an Arduino Uno and two ultrasonic sensors.

    His system places the two sensors at the top of a screen, which are read by the Uno. This data is then passed on to a Python program running on the host computer that allows for actions such as play/pause, fast-forward, and volume control while watching videos.

    Given the nature of the setup, there’s no reason why more sensors or programming couldn’t be added for further control, perhaps as shortcut “keys” for your favorite design software package! You can read more about the project here, and see a demo of it below.


    Website: LINK