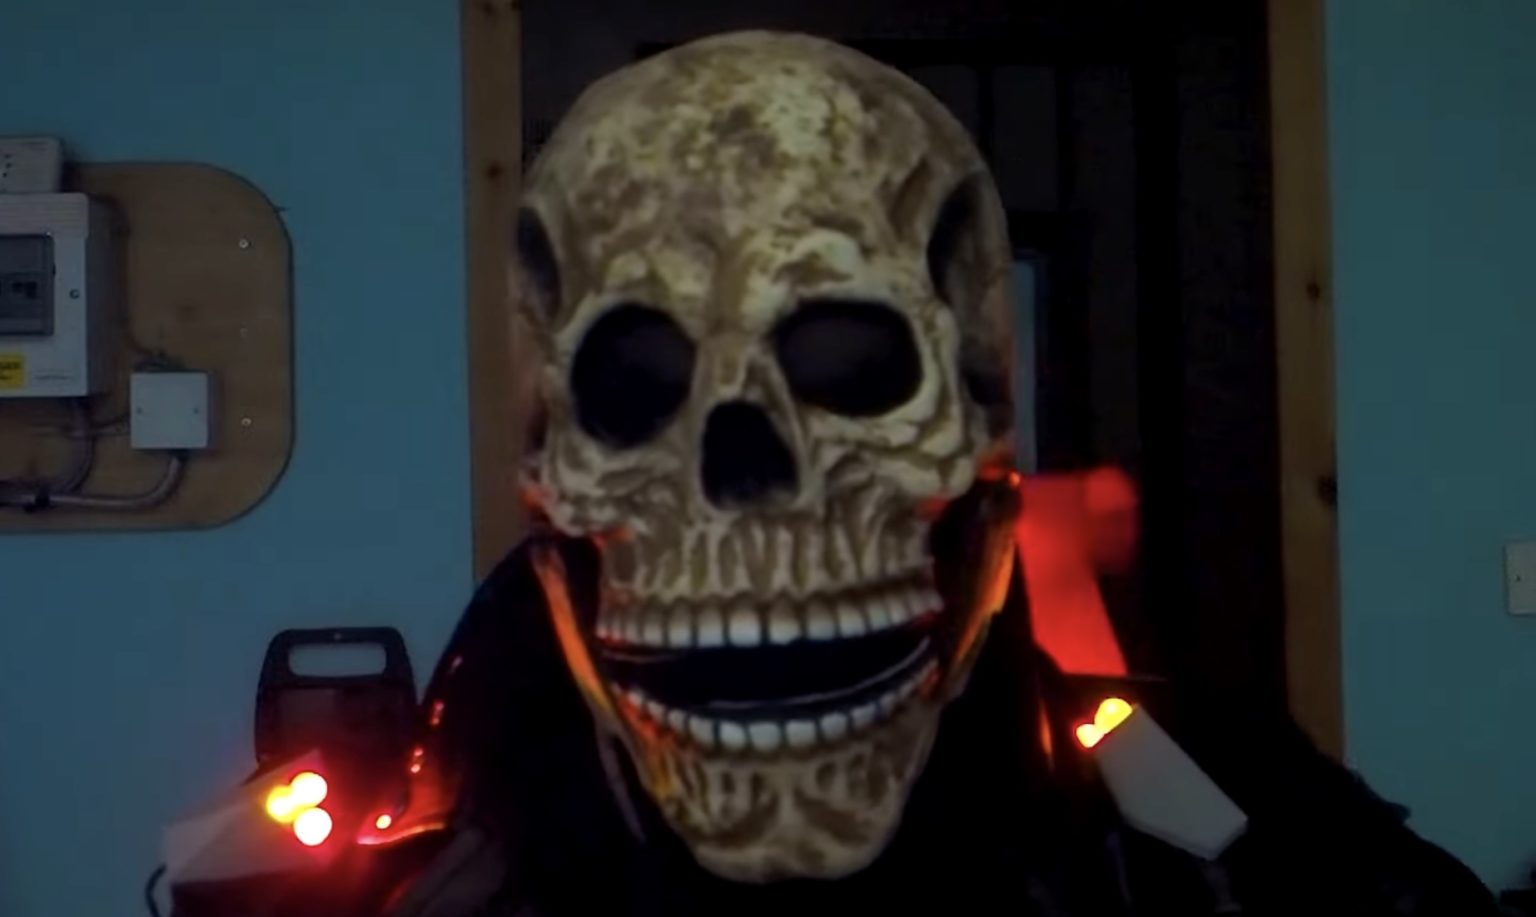
Long before Nicolas Cage ever portrayed the character on the silver screen, Ghost Rider appealed to an edgier subsect of Marvelâs audience. We wonât do a deep dive into the character(s) and their Faustian deals, but suffice it to say that Ghost Rider is a human man who turns into a flaming skeleton that rides a motorcycle. Where that lands on the cool to cringe scale depends on the particular appearance, but Andyâs Halloween costume recreation of Ghost Rider is definitely cool.
Andyâs costume includes a skeleton mask and the appropriate biker-style leather jacket, but really comes to life thanks to the added effects. Those include LED lighting and billowing flames. Andy can activate those using a small handheld remote control. When he does, the LEDs illuminate pieces of red cloth that flap in a wind created by big blower fans. Those mimic the look of flames shooting out from the jacket.
An Arduino Nano 33 BLE board controls the LEDs (a total of four red and two yellow), as well as the two blower fan motors through a TB6612FNG-based DC motor driver. Those blower fans use a lot of power, so this requires a large LiPo battery that sits in a backpack. The remote contains a second Nano 33 BLE powered by a small LiPo battery in a 3D-printed enclosure. The two Arduino boards communicate via BLE (Bluetooth Low Energy) and the remote controlâs Arduino uses its onboard accelerometer to respond to motion controls.
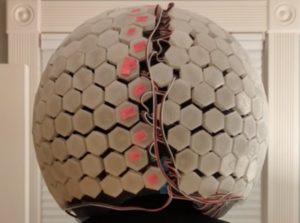
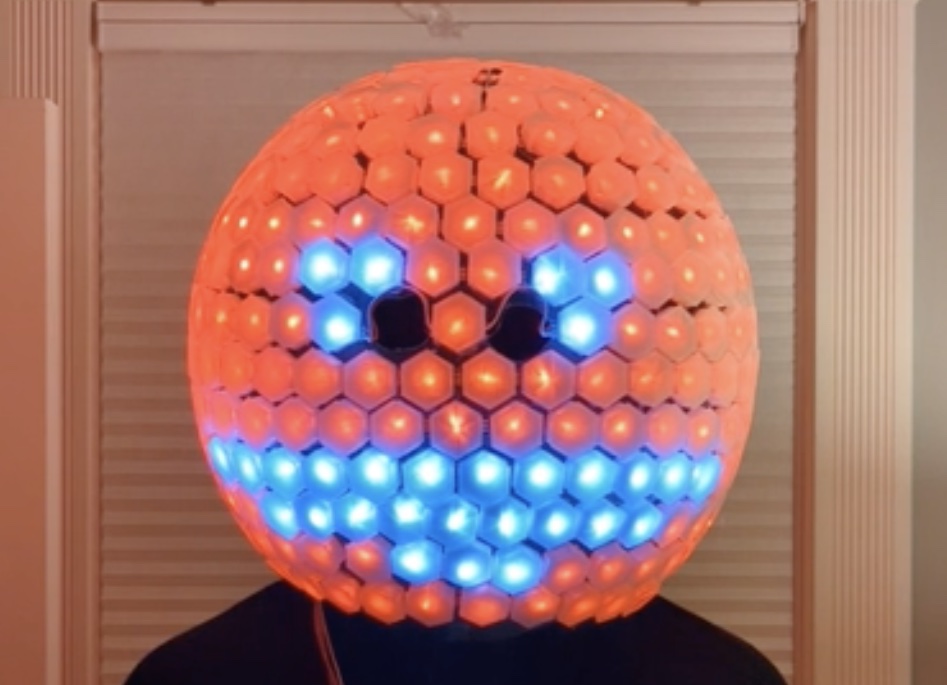
Some Halloween costumes are creepy, others are racy, and a few, like this one, are just plain cool. LEDs have been common since the 1960s, but they can still stand out when done well. As it turns out, one way to achieve that is by arranging 378 of them around a big globe and wearing that globe on your head like Redditor HGRDOG14 did for Halloween this year.
Every one of those 378 LEDs got a 3D-printed hexagonal cap to diffuse the light. An Arduino Nano controls all of the LEDs as a single strip with one data pin, though power comes from three separate battery packs that are necessary to handle the current at full brightness. A 16-button keypad lets HGRDOG14 switch between different animations and effects created using the FastLED library. 13 of those buttons correspond to different effects, while buttons 15 and 16 adjust the LED brightness (button 14 is unused).
When turned on and running animations, this Globe Head is quite a thing. HGRDOG14 omitted two hexagons on the front for eye holes and there is a seam on the back, but otherwise it is an unbroken sphere of blinky LED goodness. Itâs great for Halloween, but is also perfect for EDM concerts the rest of the year. You can see it in action here.
Inspired by a remote-controlled Radio Flyer tricycle in which Kermit pedaled around at Maker Faire New York 2018, Donald Bell wanted to create his own version that could bring similar magic to people who interact with it. It began with the same Radio Flyer tricycle as in the original video, except this one was modified a bit differently.
An overarching goal that Bell wanted to achieve was keeping the tricycle as stock as possible, which meant placing all of the electronics underneath the rear axle. Movement is provided by a single DC motor just below one of the wheels that connects via a timing belt for added safety. Meanwhile, the trike is able to steer thanks to a 24V high-torque servo motor that rotates to push a rod back and forth, thus turning the front fork to either side. Controlling all of these parts is an Arduino Uno that receives information from an RC receiver module.
Rather than using a more complicated electronic speed controller (ESC) or a fancy RC receiver, Bell instead opted for a basic one which generates a PWM signal on several of its output pins that changes based on the transmitterâs joystick position. Once the code had been loaded onto the Arduino and a battery connected, he finally added his partially homemade puppet that both grips the handlebars and pushes the front pedals on the wheel.
More details about this project can be found on Instructables and seen in the video below!
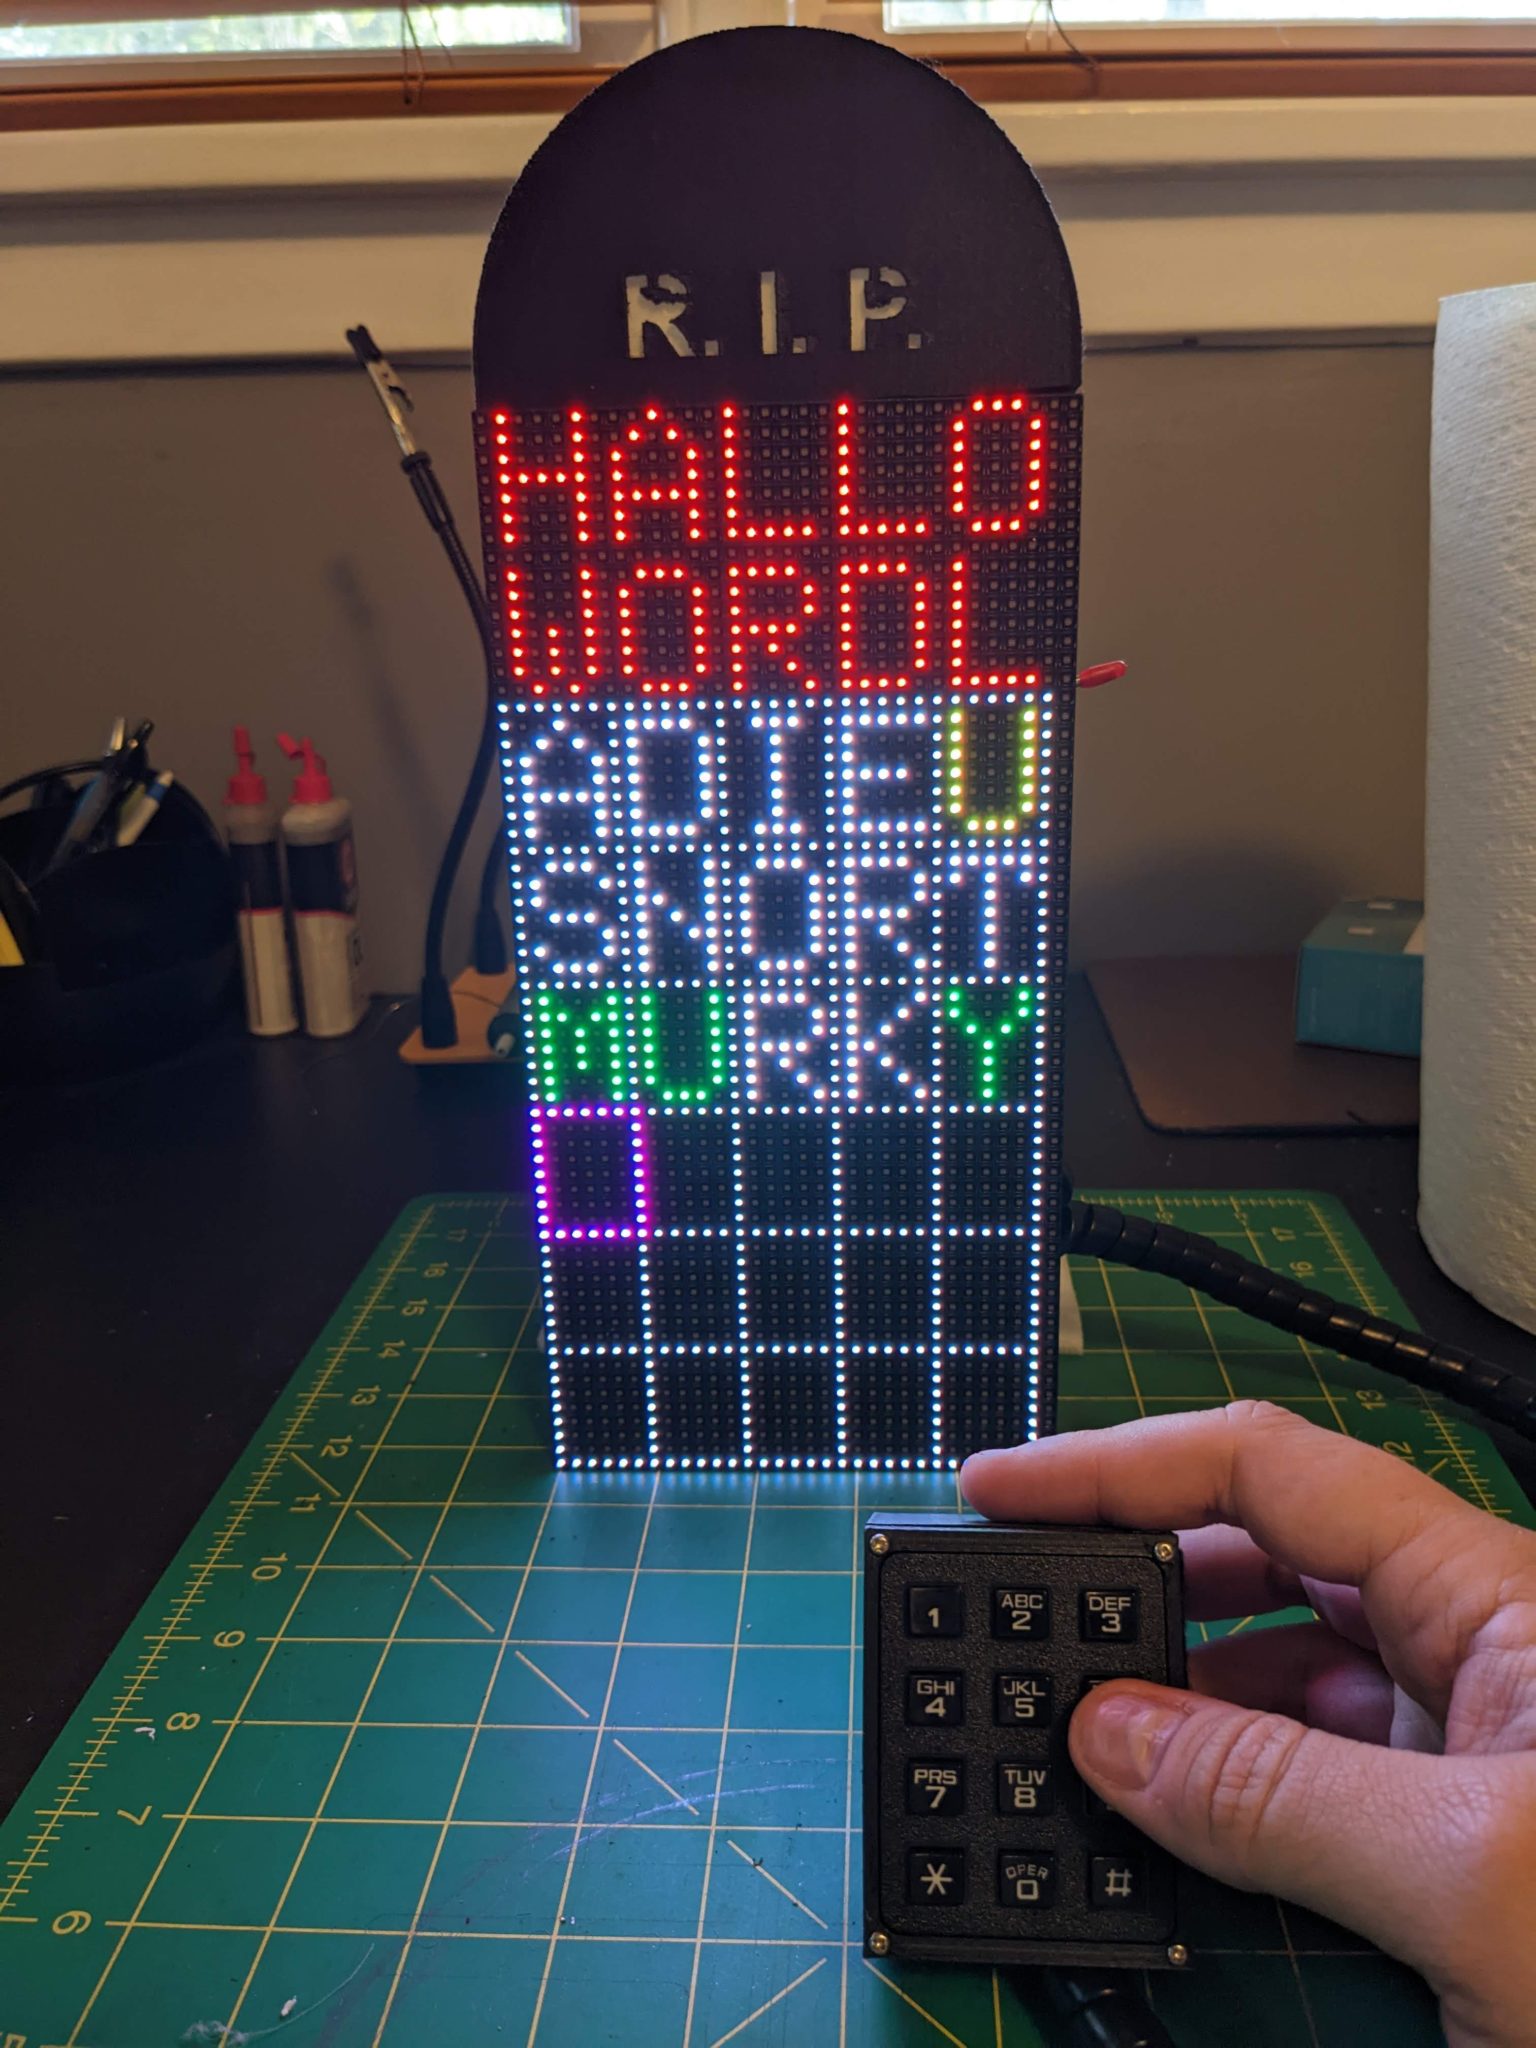
Youâre probably already familiar with the game Wordle â it was a hit in 2021 and then took the world by storm when The New York Times purchased it in 2022. The gameplay is simple to understand, but still challenging. Players have to identify a word through trial and error by making guesses to identify matching letters and letter positions. Chesâ Halloween costume called âHallo Wordlâ lets passersby play a physical version of the game.
Hallo Wordlâs gameplay is similar to standard Wordle, except that the words are all spooky. Those can include words like âghostâ or âfoggy.â There doesnât seem to be any dictionary checking, so players can enter a string of characters that isnât a real world. But that isnât a big deal when this mostly acts as an icebreaker for Halloween parties. Players can enter their guesses using a small 12-button keypad through T9-style typing (though there is no predictive text). That might stop gen-z from playing Hallo Wordl, but it provides a much more compact and affordable interface than a full keyboard.
The game board displays on two 32×32 RGB LED matrix panels from Adafruit. An Arduino Mega 2560 controls the matrices using Adafruitâs GFX, Matrix Panel, and BusIO libraries. To generate a seed for randomly selecting a word, the Arduino polls one of the analog pins that doesnât have anything connected and is therefore âfloating.â Power comes from a 2200mAh 3s LiPo battery pack, which is good for around four hours of use. The components fit inside of a tombstone-shaped, 3D-printed enclosure that Ches can wear on his chest.Â
Ches already tried Hallo Wordl at a pre-Halloween event and reports that it was a success.
The new Andor TV show, set in the Star Wars universe prior to the events of Rogue One, is already a hit and a big part of that is thanks to the B2EMO droid. Like many of the other droids in the Star Wars franchise, B2EMO manages to be very expressive despite being cold, hard steel. It conveys emotions and expressions through complex movement, which James Bruton recreated when he built his B2EMO-inspired droid.
B2EMO looks like a conventional rover robot, but it is quite flexible. It can drive in any direction thanks to its omnidirectional wheels and also tilts, leans, and stretches, which makes it seem more like a beloved pet than a soulless robot. The Andor production team actually built a functional B2EMO for filming. Bruton put his own unique spin on the design to create a B2EMO replica that is affordable enough for a hobbyist to tackle.
An Arduino Mega 2560 board controls all of the robotâs motors and servos. It receives commands through an nRF24L01 radio transceiver module with signals coming from Brutonâs universal robot remote. Most of the robotâs structure is a combination of aluminum extrusion and 3D-printed parts. Four omniwheels driven by DC motors let it move in any direction, while several servo-actuated joints (and even an interesting rack-and-pinion linear expansion system) impart the complex movement. With those, it can lean in any direction and also expand its own wheel base.
As it stands, this robot moves like B2EMO but doesnât look much like it. In follow-up videos, Bruton plans to work on the aesthetics and will hopefully end up with something very similar to the onscreen Andor droid.
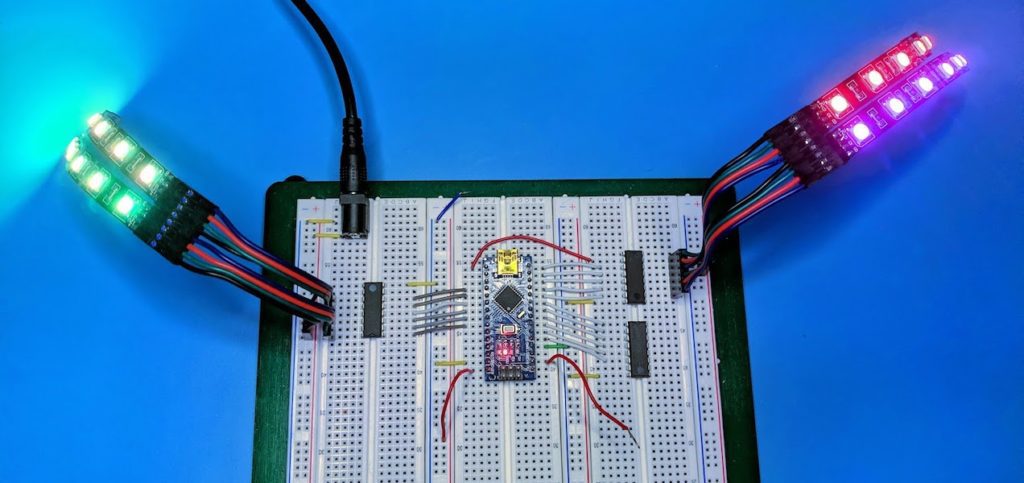
If youâre used to working with individually addressable RGB LEDs, then that title probably has you scratching your head â controlling six NeoPixel strips is easy with an Arduino, since each strip only needs a single I/O pin for data. But we arenât talking about individually addressable LEDs; weâre talking about conventional common-anode RGB LED strips and Trevor Makes recently uploaded a video demonstrating how to control six of them with one Arduino Nano.
A common-anode RGB LED has four leads: one anode, and one cathode for each color. The anode always connects to the positive side of the circuit and connecting each cathode to the negative side of the circuit allows current to flow through that specific LED. A common-anode RGB LED strip expands on this concept, with all of the cathodes chained together by color channel. The operation is the same: connecting a color channel cathode to the negative side of the circuit causes all of the LEDs to light up in that color.
The Arduino Nano has 20 available digital I/O pins and Trevor needed two of them for a serial connection. That left 18 pins, which is enough for the three cathodes for each of the six RGB LED strips. If all he wanted to do was set each strip to a single full-brightness color, then this would be straightforward. But what if he wants something more complex, such as brightness adjustment of each channel to achieve more granular color mixing?
If the 18 pins were all analog, one could adjust the voltage for each color channel of each strip to adjust the brightness. But these are digital pins, which can only be on (HIGH) or off (LOW). Fortunately, there is a cheat: pulse-width modulation (PWM). This modulates power to a pin and when that happens fast enough, it effectively lowers the perceived brightness of LEDs. But the ATmega328P microcontroller used on the Nano can only produce six independent PWM signals â not enough to control all 18 cathodes.
Trevor explains how he got around that limitation by implementing timer-based hardware interrupts. This is an unusual and clever use of interrupts and it lets the user control the individual brightness of every color channel of every LED strip. Trevor discusses the technique in detail in his video, and also has example code and schematics available on GitHub.
Let’s face it — mornings can be tough. Even the earliest risers and the most enthusiastic morning larks sometimes struggle to drag themselves out of bed and attack the day. The good news is that automation can always save things.
By using home automation wisely, you can save time in the morning, cut out tedious tasks, and start the day on the best possible note. In this article, we’ll look at why automation works so well in the morning and share some morning projects from the Arduino community.
Morning is the best time for automation
Home automation has a ton of benefits at all times of the day, but it’s especially useful in the morning. That’s because the first few minutes and hours of the day are usually where we need to save time the most.
Automation helps save precious seconds off your AM routine by helping you rise earlier, save time on important morning tasks, and manage your time better. As a result, you get less stress and more time to focus on enjoying the start of the day.
Now, let’s take a look at some projects from the Arduino community that members built to improve their own mornings.
Morning automation examples from the Arduino community
Alarm clock
Arduino member galoebn had had enough of struggling with slow, difficult mornings. To solve the problem, they made an alarm clock that really worked.
The clock uses a motion sensor, so it notices if you get back into bed after hitting the snooze button. If so, the alarm will go off again, but if you stay out of bed for a certain period of time, the alarm won’t sound anymore.
Best of all, this project is fairly easy to construct at home with just a few components including a clock module, a motion sensor, a buzzer, a small button and an Arduino.
Coffee machine
In the morning, there are few things better than a steaming cup of coffee to get the day started. However, coffee takes time to brew, and there’s no feeling more frustrating than realizing you don’t have enough time to prepare your morning cup of Joe.
Arduino member Thomas sxt was so tired of this feeling that he decided to build his own automatic coffee machine to take care of this part of the morning routine, ensuring a hot cup of coffee was waiting for him every morning.
The machine works via an app, allowing you to choose your coffee size, and can even be controlled by voice.
Curtain control
Throwing your curtains wide open is a great way to start the day. Our bodies are programmed to respond to natural light in the morning, and it helps us wake up naturally and get energised for the day ahead. Of course, climbing out of bed to open the curtains is less fun.
Arduino member JayV decided to solve the problem by designing curtains that automatically open in the morning and close in the evening according to your pre-set instructions. The project also comes with a manual override, just in case you want to take a mid-day nap.
Your curtains need to be the right design to work (JayV’s old curtains had a simple looping rope) but it should work with most models.
LUMOS: Smart lamp for better sleep
Smart lighting isn’t just about creating a more comfortable home environment, it can also give us great control over our daily routines and even improve our health.
Unfortunately, in today’s world, we are surrounded by sources of blue light. It bombards us from our TVs, smartphones, and laptops, and this blue light causes our bodies to produce more cortisol which makes it more difficult to fall asleep. More than 20% of the world population is sleep deprived, and this is very likely linked to the fact that many people spend huge portions of their day around unnatural blue light sources.
To tackle this problem in his own home, Arduino community member Jonty came up with the LUMOS smart lamp. The lamp mimics the natural light of the sun as it passes overhead each day, generating bright blue light in the morning and warmer amber light (which has been shown to encourage melatonin production and get us ready for sleep) in the evening.
This lamp even pairs with WiFi and uses machine learning to adjust the light to match your sleep schedule.
Have better mornings (and evenings) with Arduino
Arduino makes it possible to gain greater control over your environment and optimize your daily routine to be as healthy and productive as possible. The ideas shared in this article are just the start — with the right set of components and some basic knowledge there’s almost no limit to what you can do with home automation.
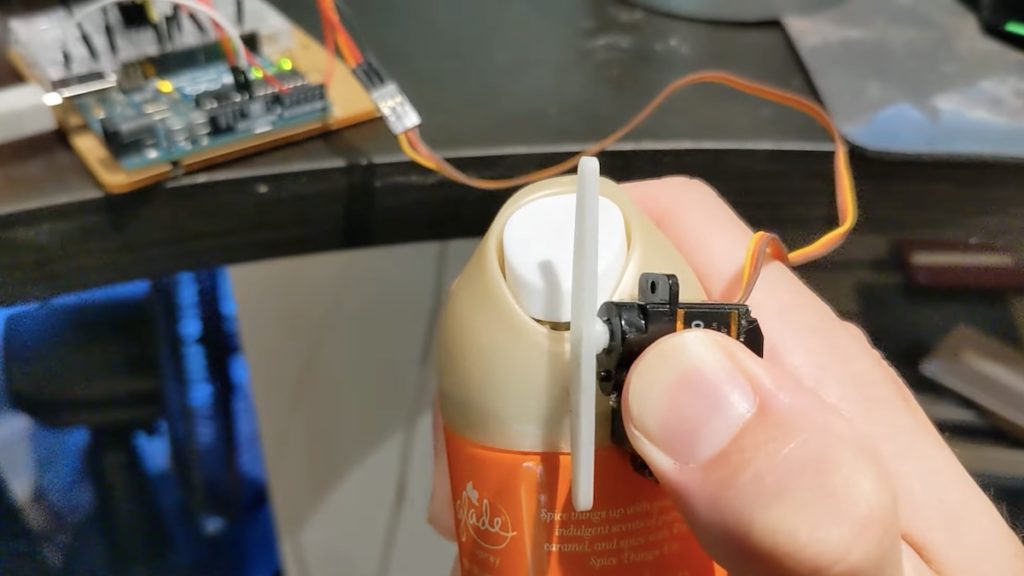
Halloween is just a week away and that means two things: jack-o’-lanterns decorating front stoops around the world and the sudden proliferation of pumpkin spice-based products. Pumpkin spice isn’t a spice made from pumpkin, but rather a spice used in pumpkin pies. As we all know, farmers harvest pumpkin spice from pumpkin farts. That inspired The Man Cave YouTube channel to build this jack-o’-lantern that toots pumpkin spice whenever someone gets close.
The Man Cave wasn’t able to acquire a real farting pumpkin (Starbucks keeps those under lock and key), so they were forced to build an artificial recreation that expels Febreze pumpkin spice-scented air freshener. They started by carving a jack-o’-lantern from a mundane, non-flatulent pumpkin. That got a face with an expression that conveys the general sentiment of “sorry about my delightfully aromatic gas.”
The jack-o’-lantern’s eyes are just the right size to allow an ultrasonic sensor to peek through, which is how it detects the presence of a person. An Arduino Uno board monitors the ultrasonic sensor and activates a small servo motor when it sees movement. The servo arm pushes down on the Febreze canister’s button, causing a cloud of pumpkin spice-scented gas to emit from the jack-o’-lantern’s rear.
Most of your Arduino projects will require inputs and buttons are always the obvious choice. But most of the buttons and switches on the market meant for low-voltage DC projects are quite delicate. That makes them unsuitable for applications that need to withstand heavy-handed use. YouTuber Alistair Aitchison of Playful Technology designs interactive puzzles for escape rooms and knows a thing or two about building robust interfaces. He came up with an interesting technique that you can steal, which repurposes plumbing valves as analog inputs.
Plumbing valves like the kind shown in the video contain either knobs or levers that gradually open interior gates to increase water flow. Like a variable resistor, they allow for many “values” (water flow rates) between LOW and HIGH (closed and open). One could measure the water flow rate through a valve connected to the type to get a value, but that is complicated and messy. Alistair’s method is far more elegant: measure light intensity through the valve.
This setup is very simple: place an LED at one end of the valve and a photoresistor at the other end, with the openings sealed to prevent the intrusion of ambient light. The intensity of the light that reaches the photoresistor increases as the valve opens. By measuring the resistance of the photoresistor with your Arduino’s analog pin, you get a value proportional to the valve’s openness. If you only need a basic on/off switch, you can set a threshold value somewhere in that range.How you choose to use these plumbing valve inputs is up to you, but they have many applications — even outside of escape rooms. They would work for everything from stereo volume control to very cool smart light dimmers, so your imagination is the only limit.
The world’s collective waste plastics don’t always stay in landfills. They often break down into microplastics that fill our oceans, then end up in our air, water supply, and food. According to an Orb Media study, 83% of the tested water samples from metropolitan areas all over the globe contained plastic fibers. One way to reduce microplastics before they end up in our bodies is to collect them where they float in lakes and oceans. For the Natural Robotics Contest, student Eleanor Mackintosh designed this robo-fish that filters microplastics like a whale eating krill.
Mackintosh created the robo-fish concept and then the Natural Robotics Contest team turned it into a real robot. This robot, called “Gillbert” (we see you, Eleanor) is now an open source project and anyone can build it for themselves using the 3D-printable files published on GrabCAD. Gillbert contains mesh filters that collect plastic particles as water flows through its mouth and out of its gills. It swims through the water like a real fish by swinging its tail for propulsion and using its fins to steer.
An Arduino Nano 33 IoT board controls Gillbert’s motors and monitors the sensors, which include a LSM6DS3 IMU (inertial measurement unit), a turbidity sensor, and a light/color sensor. The Arduino receives commands through WiFi via a tethered receiver that floats on the surface. The operator pilots Gillbert using a Microsoft Xbox One controller and power comes from a 5000mAh USB battery bank.
The Natural Robotics Contest team tested Gillbert in a lake in Guildford, England with good results. While the robo-fish lacks the instruments to analyze microplastics, it can collect them and bring them back to researchers for study. On its own, Gillbert (or even a fleet of Gillberts) can’t collect enough microplastic to make a real-world difference. But the research that it enables could be very beneficial.
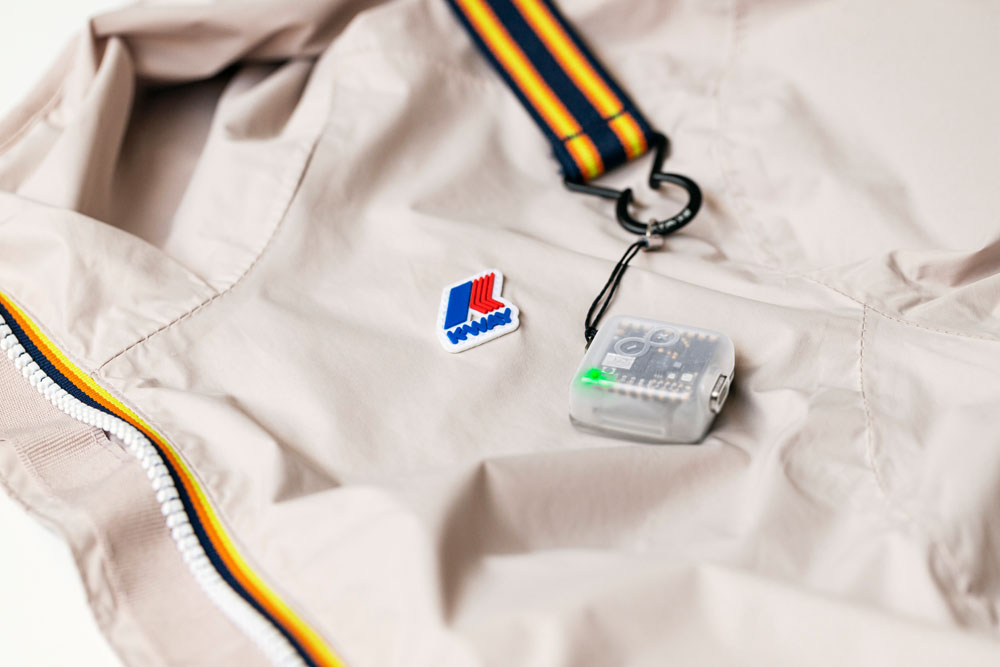
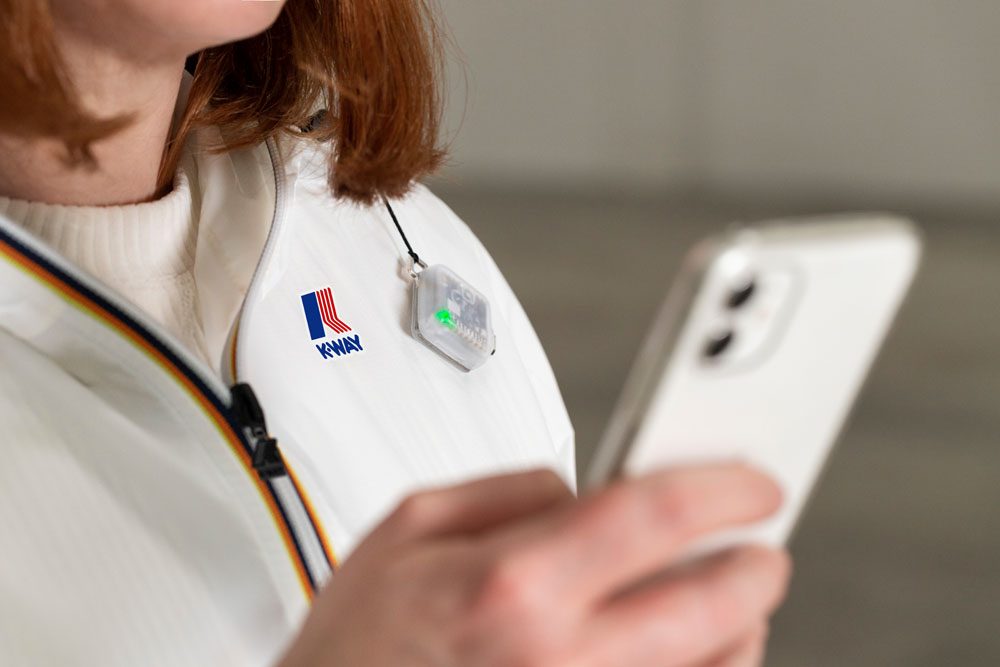
Imagine what could happen if you could put your hands on the most iconic rain jacket, paired with a Nicla Sense, and redefine the idea of sensing the surroundings.
Whether you are a professional developer or a beginner, this is your opportunity to stand out. Simply send us your pitch and we’ll select the best ideas to be brought to life with the support of Arduino and Edge Impulse.
Humidity, acceleration, pressure, temperature, CO2 levels, and air quality are just some of the ingredients that you can use to build your personalizedArduino x K-Way experience.
In addition, we can’t wait to see how you will decide to leverage these sensors in combination with the Edge Impulse ML development platform to add AI directly to the jacket.
So, are you up for this challenge?
To participate and receive the tools: share your idea through a video or a PDF and be part of this incredible project. The best ideas will receive the Nicla Sense ME and a K-Way jacket to create the project,, starting the competition on November 24th. The full terms & conditions can be found here.
Curious about what we did?
Attached to the zipper of the K-Way jacket, the Nicla Sense ME recognizes in real-time whenever the air you’re breathing is polluted, can indicate changing weather conditions, and it communicates with you through a LED on the board or even a smartphone app.
Now is your turn: if your proposal is accepted, we’ll provide the jacket and the technology (over $200 in value), you write the next story. Go have fun!
Are we going to see you in Nuremberg? SPS – smart production solutions, the smart and digital automation fair, is the perfect opportunity to get to know Arduino Pro’s growing catalog of industrial-grade hardware and software solutions. Meet the experts at Booth 5-129 to ask us anything and check out live demos showing our components in action: from best-sellers to recent releases, we look forward to presenting all the features and benefits you can leverage to become the innovator in your industry and scale up your projects with us.
“Our ecosystem is designed to accelerate innovation by dramatically lowering the access barriers and avoiding any gap along the way from prototype to series. We grow it with flexibility and modularity in mind, so professional users can reduce complexity and time to market, while increasing ROI with secure IoT and AI applications that their own internal teams can develop and implement from beginning to end, avoiding vendor lock-in.” – Adriano Chinello, Arduino Pro Business Unit Leader
Need an extra nudge to join us? We’ll be unveiling an entirely new product in line with the fair’s “Bringing Automation to Life” theme, dedicated to all the developers focused on industrial applications that are already part of our community… and the many more we hope to inspire!
To be the first to hear more about Arduino Pro’s new launch during the event, view our exhibitor page and visit us at SPS in Nuremberg, Booth 5-129 at NürnbergMesse, from November 8th to 10th.
In the first season of Stranger Things, a character uses a string of Christmas lights to communicate with a missing loved one. The missing person in question can flash particular lights next to letters painted on a bedsheet to spell out messages. The Christmas lights and bedsheets have become a part of pop culture and because the show is creepy, Redditor BishSaidWut’s recreation is the perfect Halloween decoration.
Unlike most of the similar decorations that you can buy online that either blink randomly or spell out pre-programmed messages, BishSaidWut’s Christmas lights can spell out any message that they text to a specific phone number. That phone number connects to the Twilio service, which parses SMS messages and makes the text available through an API. An ESP8266 board connects to that API and processes incoming messages. If the message is within an acceptable length and doesn’t contain profanity, the ESP8266 passes on the text to an Arduino Uno board.
The Arduino controls the actual Christmas lights. It buffers text strings that it receives from the ESP8266 and begins animating a new message as soon as the last one finishes. The Christmas lights are all individually addressable RGB LEDs, so the Arduino simply illuminates the LED next to each letter in the proper sequence. BishSaidWut set this up for SMS control so that they could display new messages whenever they like and they’re even considering posting the phone number so others can send their own messages while BishSaidWut streams the results.
The quality of the air we breathe has a direct impact on our health. Poor air quality can cause a variety of health problems, including respiratory infections, headaches, and fatigue. It can also aggravate existing conditions such as asthma and allergies. That’s why it’s so important to monitor the air quality in your office and take steps to improve it if necessary.
Furthermore, the number of people in an office can have a significant impact on air quality. The more people there are, the greater the chance of contaminants being emitted into the air. This is why environmental monitoring is so important in corporate offices; it helps to ensure that the air quality is safe for all workers.
The last few years added to this challenge yet another layer: The COVID-19 pandemic has forced many businesses to re-evaluate their workplace safety protocols. One of the most important considerations is air quality. Poor air quality can lead to a variety of health problems, including respiratory infections.
Environmental monitoring in buildings refers to the security and privacy practices used to protect workers and office buildings from airborne contaminants. This includes collecting data on air quality, temperature, humidity, and other environmental factors. This data is then used to assess the risk of exposure to hazardous materials and take steps to mitigate or eliminate those risks.
Our solution
To address the challenge, we will devise an environmental monitoring system based on sensor nodes that monitor each room and send the collected data to a gateway that can either display it locally or push it toward a cloud solution where further computation can be done. Either at the gateway level or in the cloud, alerts can be set based on certain thresholds considered relevant.
Air quality monitoring
For monitoring the environmental conditions we have chosen the Arduino Nicla Sense ME, which is designed to easily analyze motion and the surrounding environment – hence the “M” and “E” in the name. It measures rotation, acceleration, pressure, humidity, temperature, air quality, and CO2 levels by introducing completely new Bosch Sensortec sensors on the market.
The sensor we are most interested in on the Nicla Sense ME is the BME688, the first gas sensor with artificial intelligence (AI) and integrated high-linearity and high-accuracy pressure, humidity, and temperature sensors. It is housed in a robust yet compact 3.0 x 3.0 x 0.9 mm³ package and specially developed for mobile and connected applications where size and low power consumption are critical requirements. The gas sensor can detect volatile organic compounds (VOCs), volatile sulfur compounds (VSCs), and other gasses such as carbon monoxide and hydrogen in the part per billion (ppb) range.
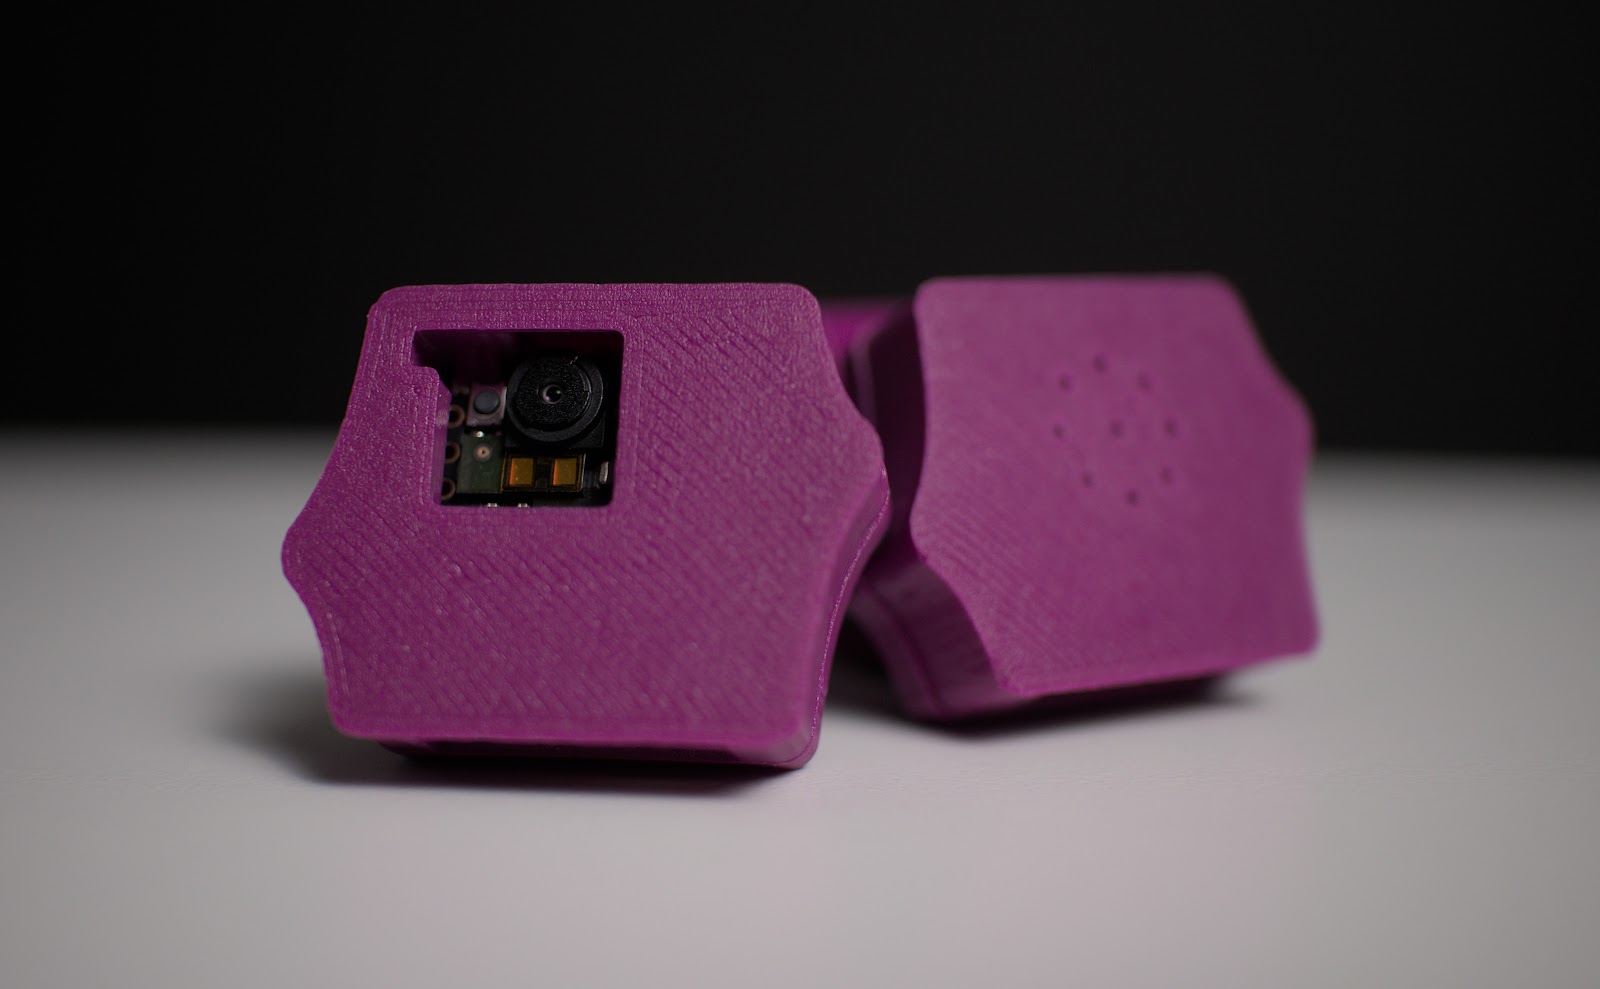
For monitoring the number of people in each room we have chosen the Arduino Nicla Vision, which combines a powerful STM32H747AII6 dual Arm Cortex-M7/M4 processor with a 2MP color camera that supports tinyML, as well as a smart six-axis motion sensor, integrated microphone, and distance sensor.
One thing that must be addressed when using cameras is privacy concerns and for good reasons! In our case, the cameras are used to execute an edge model to evaluate the number of persons in the view and no actual video stream or pictures are leaving the camera. Only the actual number makes it both safe and efficient.
For this purpose, we have chosen the Edge Impulse platform where we can easily train and deploy a model that will allow us to detect the number of persons in the view of the camera. After the deployment, no further need of internet connectivity is needed for the camera and only the number of persons will be relayed to the gateway.
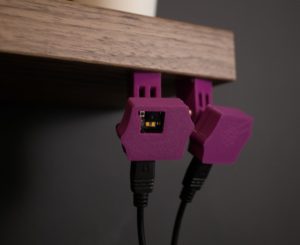
Both the Nicla Vision and Nicla Sense ME have the same size and PCB format, with the main difference being that one features a camera and the other one an array of sensors. For each, we have created a 3D-printed enclosure to accommodate mounting and fulfilling their primary functions easily.
Edge computing
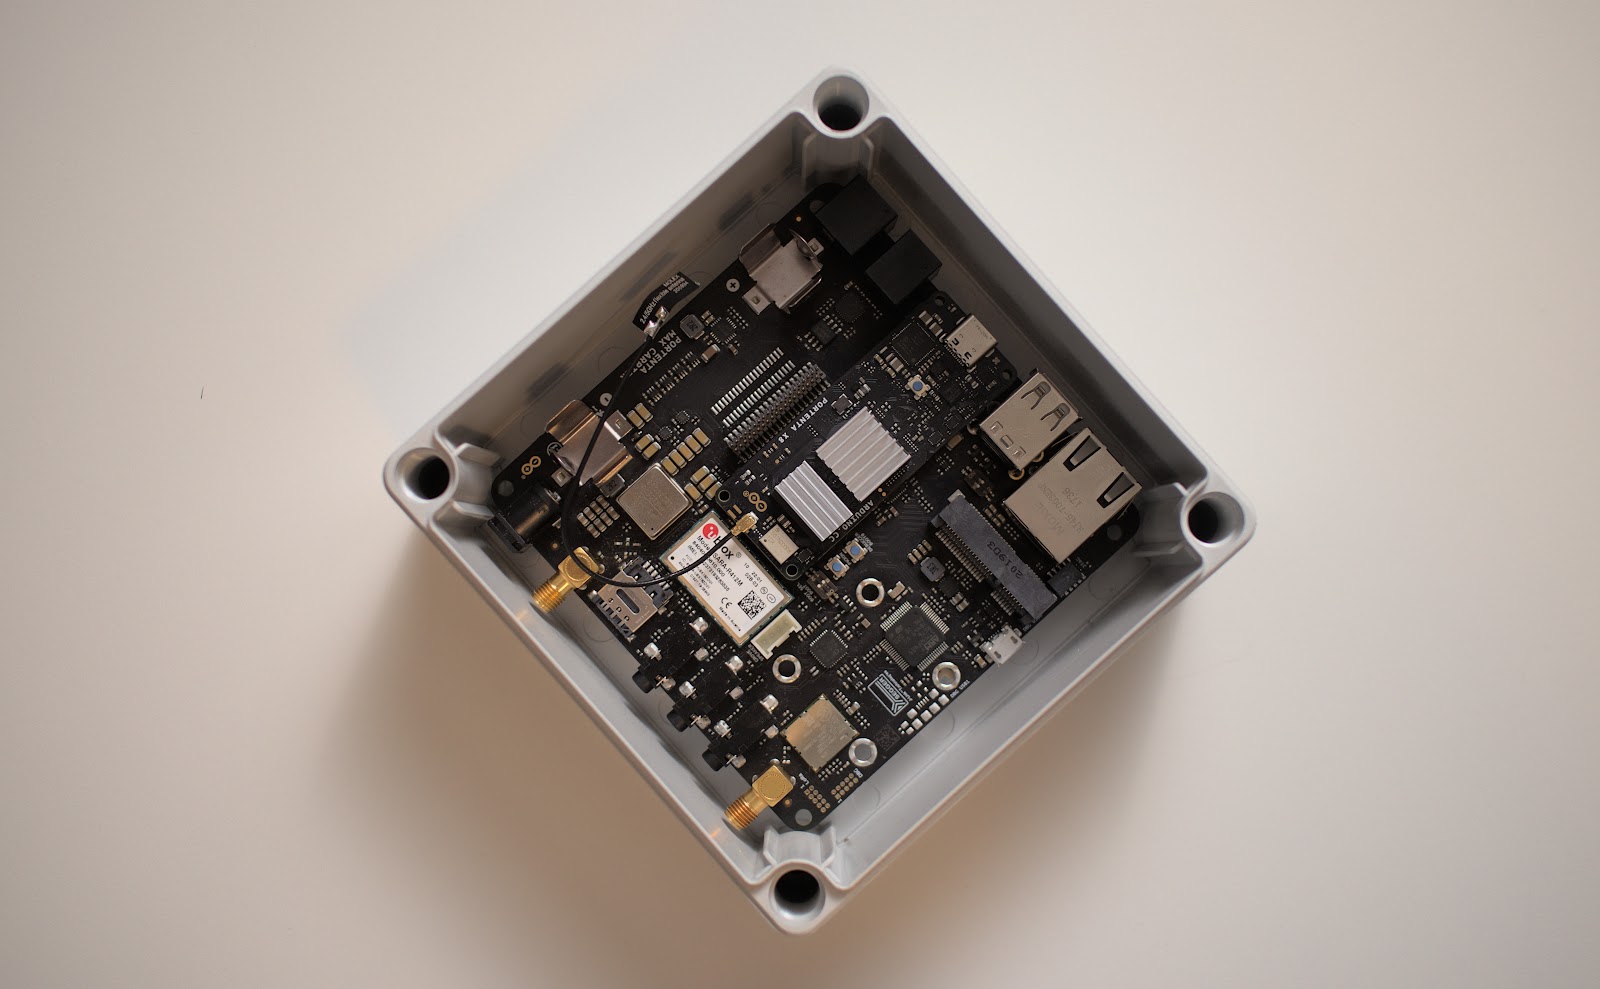
For the gateway we have chosen the Portenta X8, which is a powerful, industrial-grade SOM with Linux OS preloaded onboard, capable of running device-independent software thanks to its modular container architecture. It features an NXP i.MX 8M Mini Cortex-A53 quad-core, up to 1.8GHz per core + 1x Cortex-M4 up to 400MHz, plus the STMicroelectronics STM32H747 dual-core Cortex-M7 up to 480Mhz and M4 32-bit Arm MCU up to 240MHz.
Since space is not an issue when designing building management issues, we have chosen the Portenta Max Carrier,to host and power the Portenta X8 while enhancing its connectivity options and providing it with easy-to-mount options and power supply plugs. We hosted the devices inside an easy to mount on a wall enclosure according to the overall size of the hardware.
The Portenta X8 can gather via BLE the data from quite a few sensor nodes as long as they are in range and not blocked by heavy walls or structures in between and either store the data locally for displaying it via the local server stack or relay it further to the cloud.
IoT Cloud solution
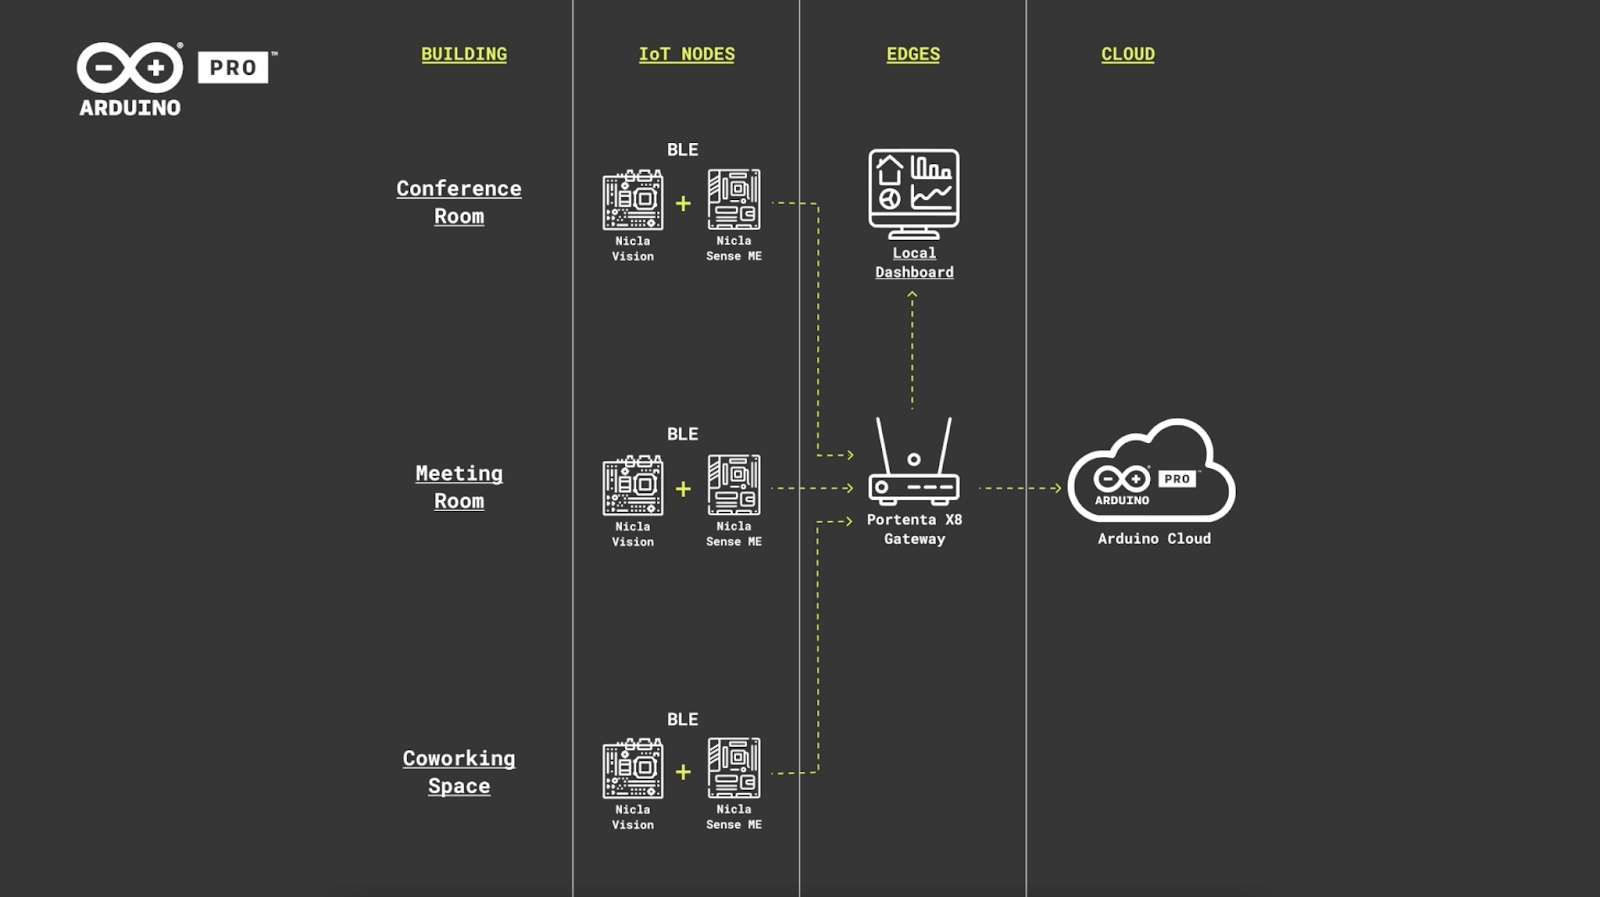
Although the Portenta X8 board is capable of storing data locally, there may be times when it is also desirable to send data to the cloud. This can be accomplished by forwarding data from the InfluxDB database on the Portenta X8 board to the Arduino IoT Cloud via MQTT. The arduino-iot-js NPM module makes it easy to set up this connection, and the steps to do so are not covered in this tutorial. For illustrative purposes, however, the diagram below offers a brief overview of our proposed architecture for one potential deployment scenario in a building with multiple rooms.
Solving it with Arduino Pro
Now let’s explore how we could put all of this together and what we would need for deployment both in terms of hardware and software stack. The Arduino Pro ecosystem is the latest generation of Arduino solutions bringing users the simplicity of integration and scalable, secure, professionally supported services.
Hardware requirements
Arduino Nicla Vision
Arduino Nicla Sense Me
Arduino Portenta X8
Enclosures
Software requirements
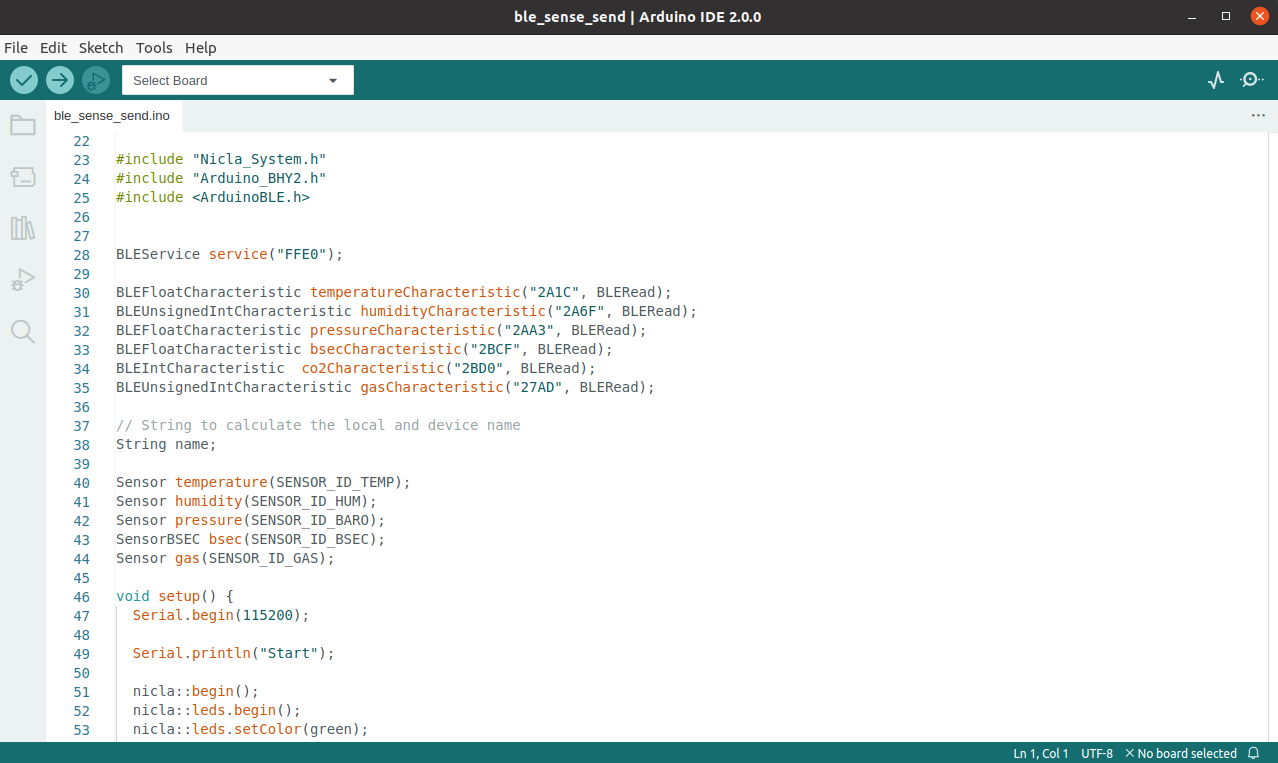
Arduino IDE
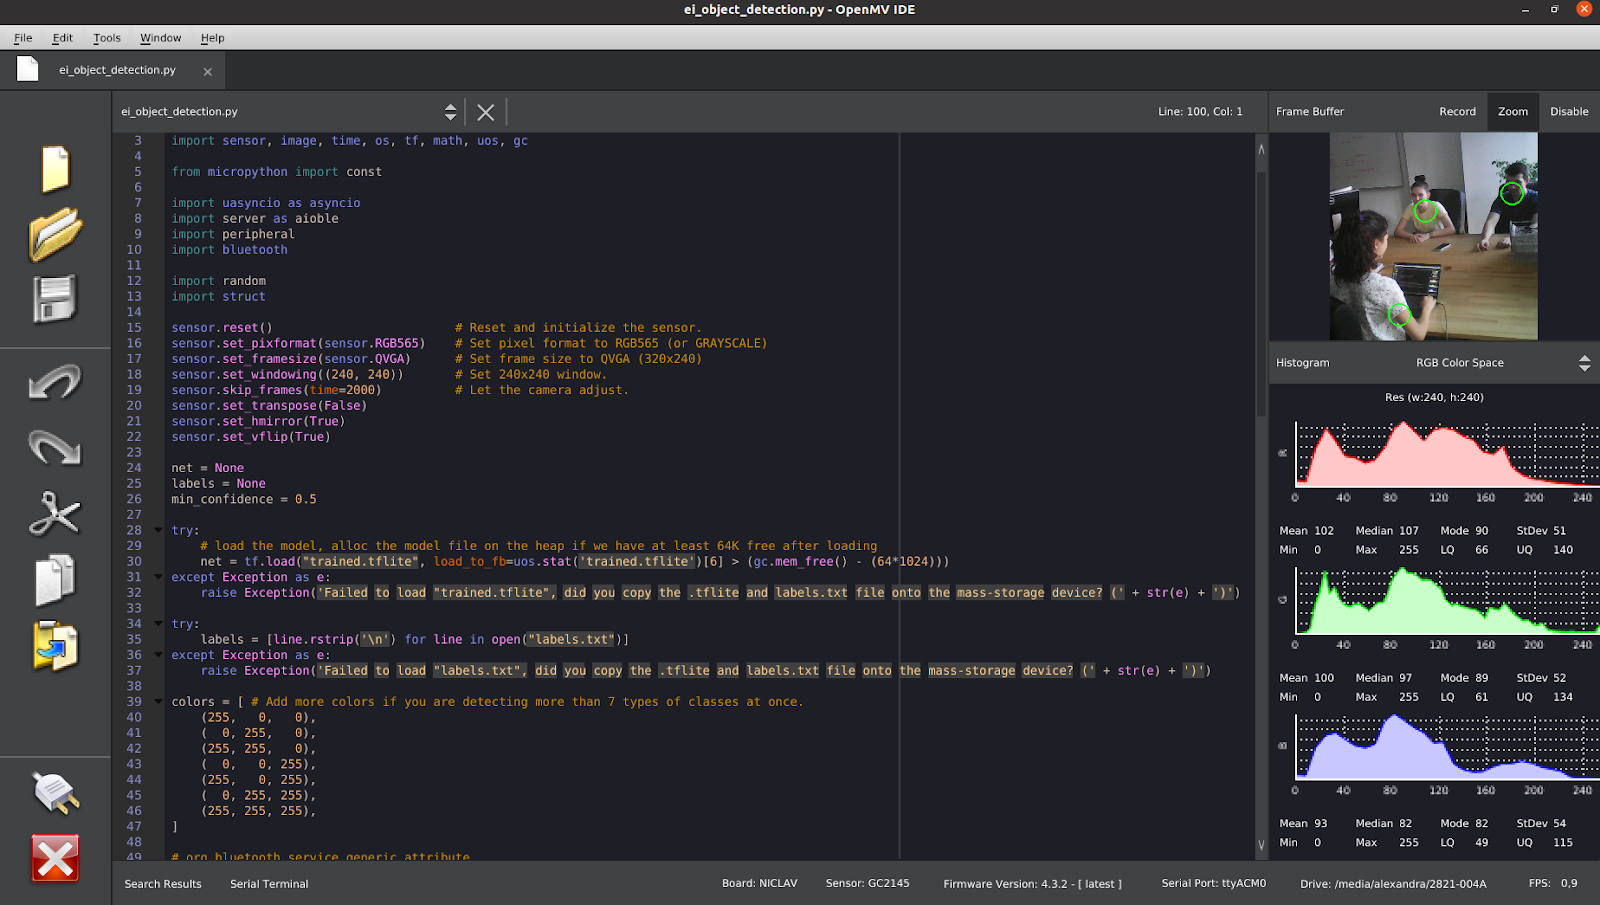
OpenMV IDE
Edge Impulse account
The Nicla Vision has been programmed in Python since the Edge Impulse model was created/tested using the OpenMV IDE and thus we have also sent the data over BLE using the Python library.
The Nicla Sense ME has been programmed in C/C++ using the Arduino IDE since reading the sensors and sending their data over the BLE can be done faster via the C/C++ programming language since the code is already compiled and we do not need any heavy computing like when dealing with video on the Nicla Vision.
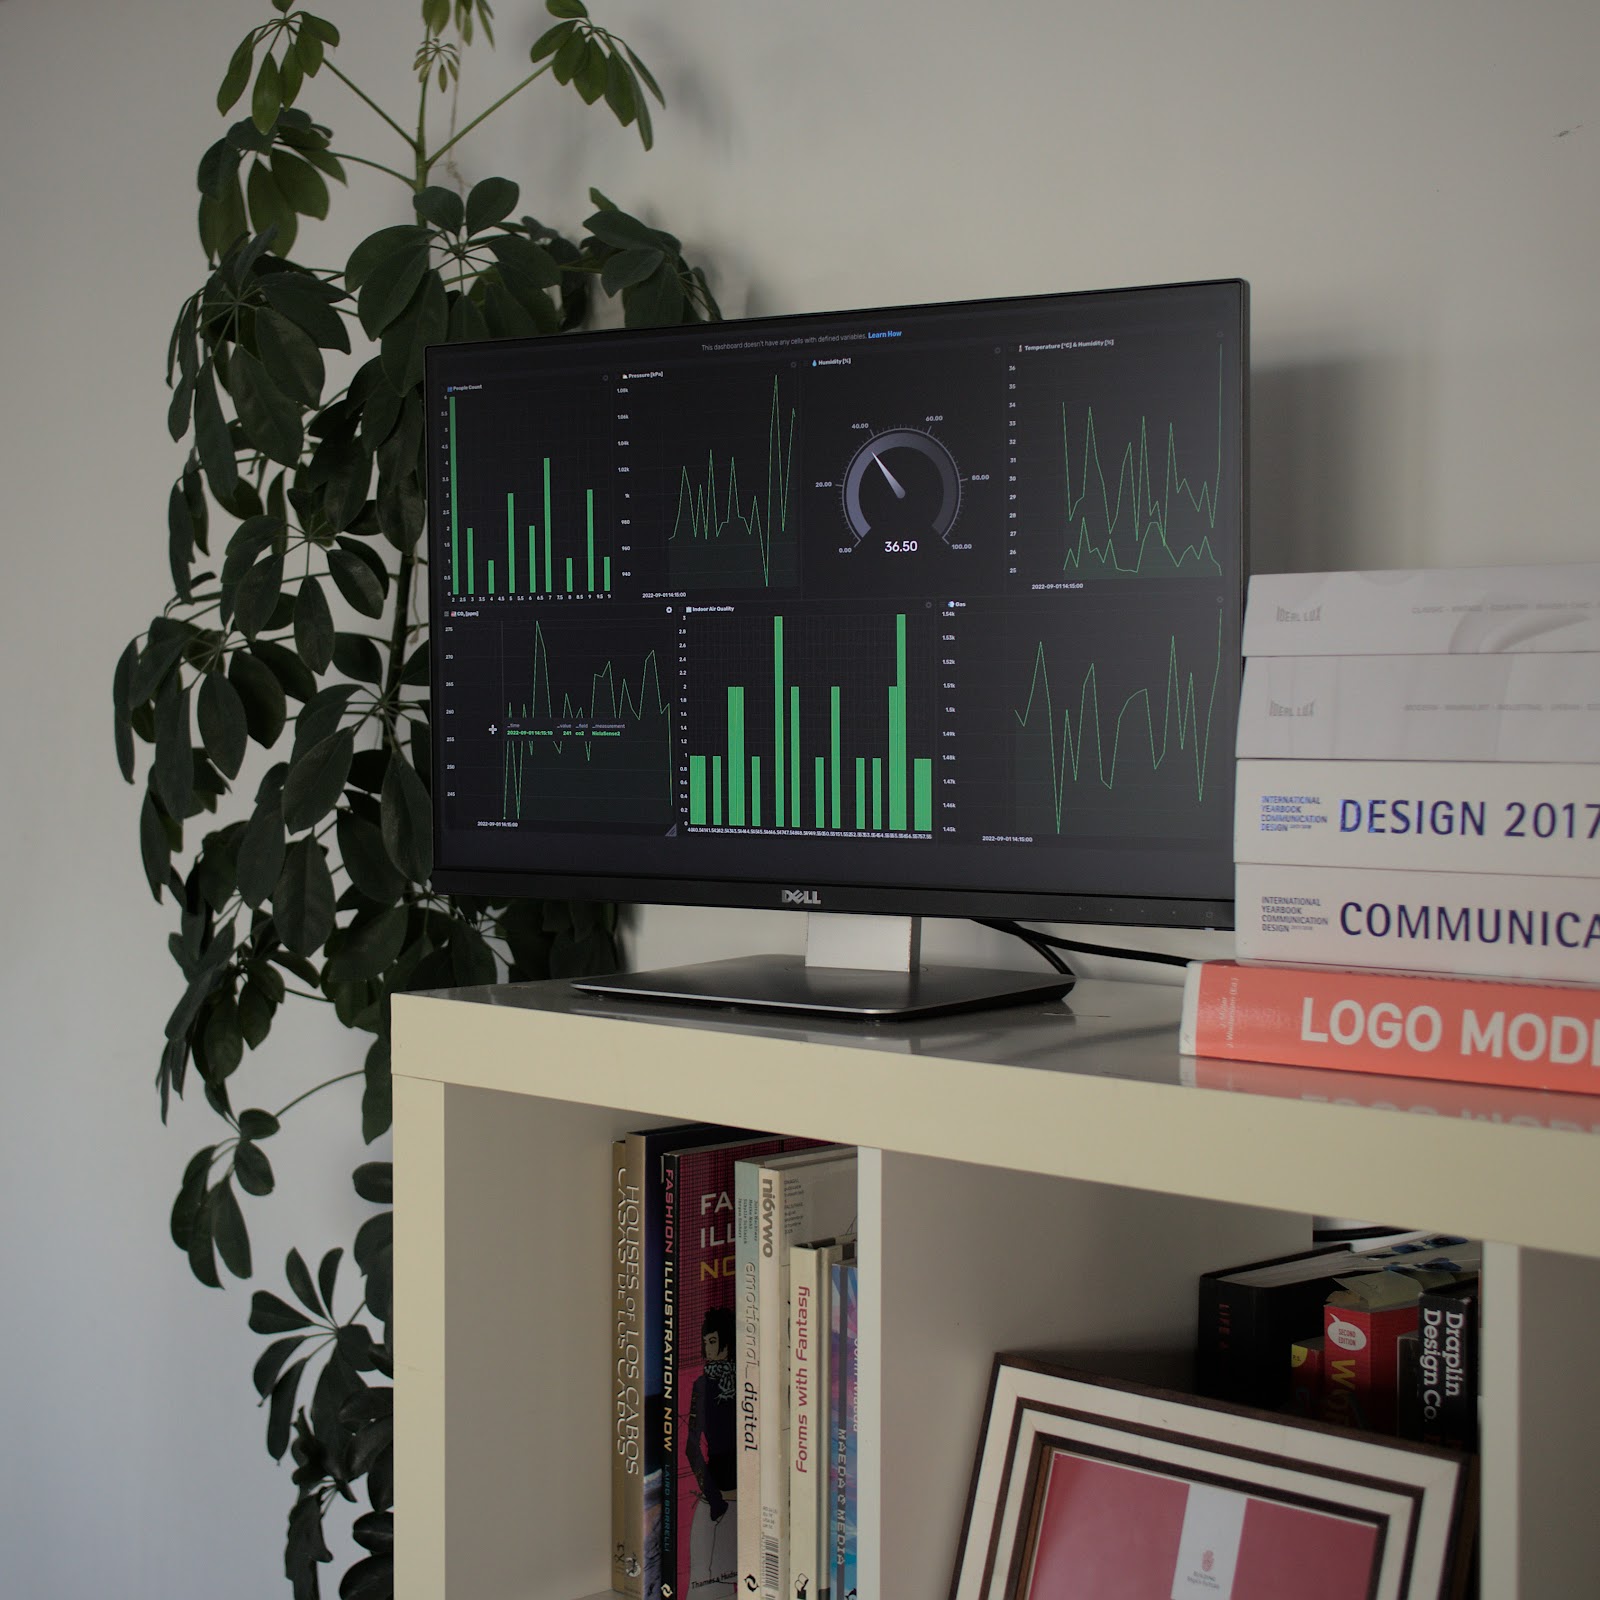
The Portenta X8 with its Linux OS preloaded onboard is fully capable of running Docker and thus containers with a vast array of functionalities. In our case, we found it most useful to use a time series database to store the data and display it locally. There is a pre-built container including InfluxDB, Grafana, and Node-Red that can be easily deployed to achieve this task.
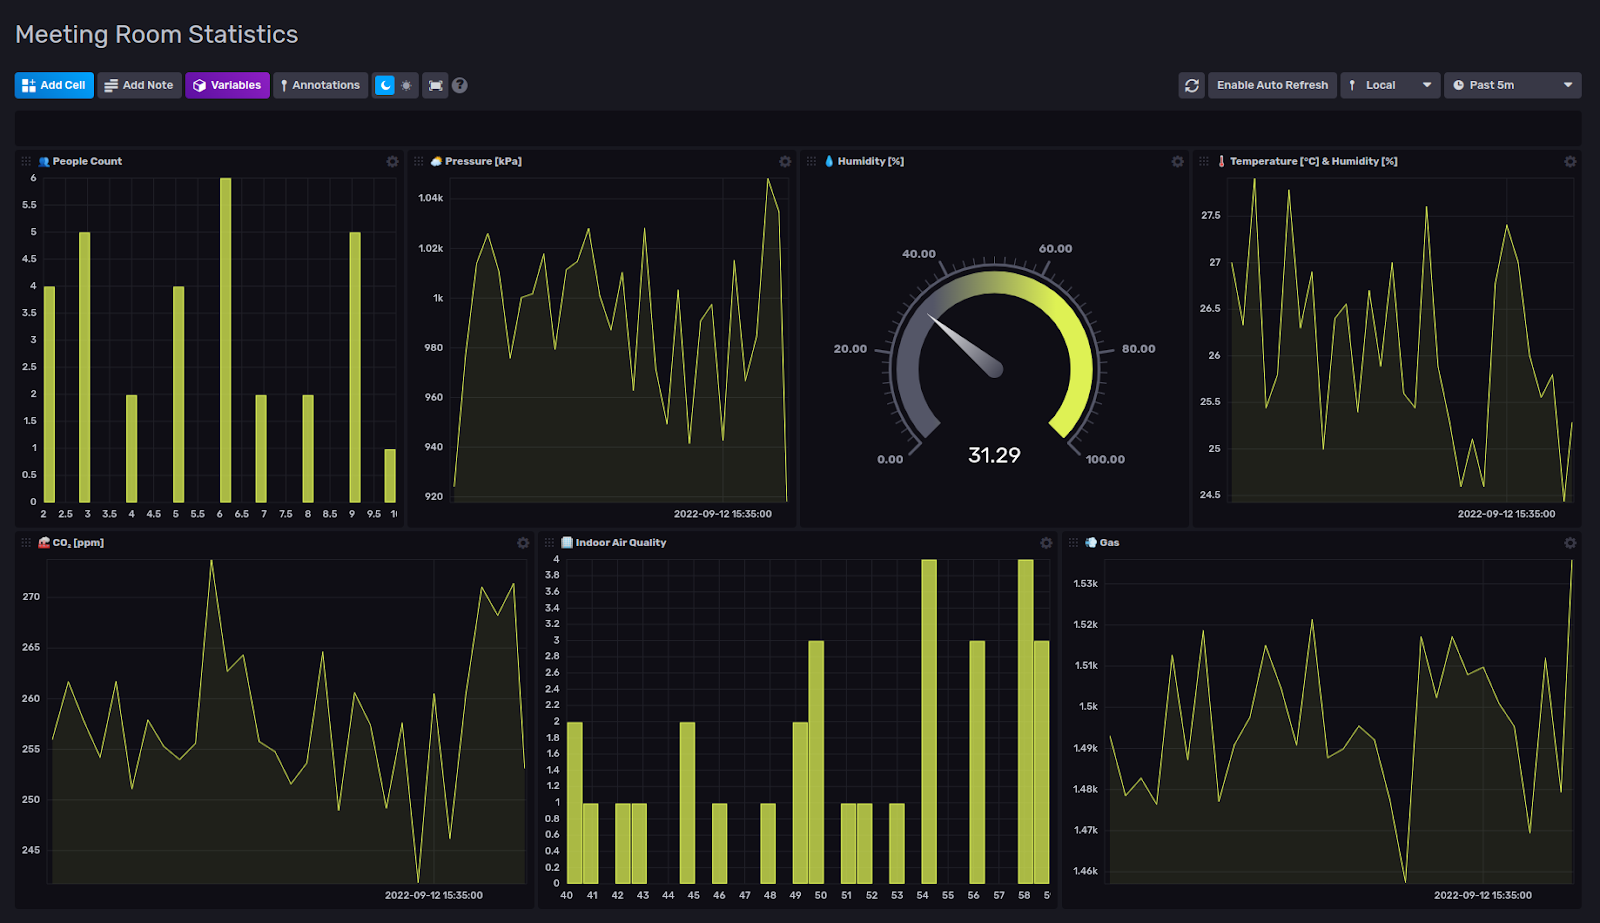
Here is a screenshot from a dashboard created directly in InfluxDB showcasing data received from the sensor nodes:
The dashboard can be visualized by accessing the InfluxDB interface on the Portenta X8 IP on port 8086 in a browser on another computer connected to the same WiFi network (for example, http://192.168.1.199:8086/).
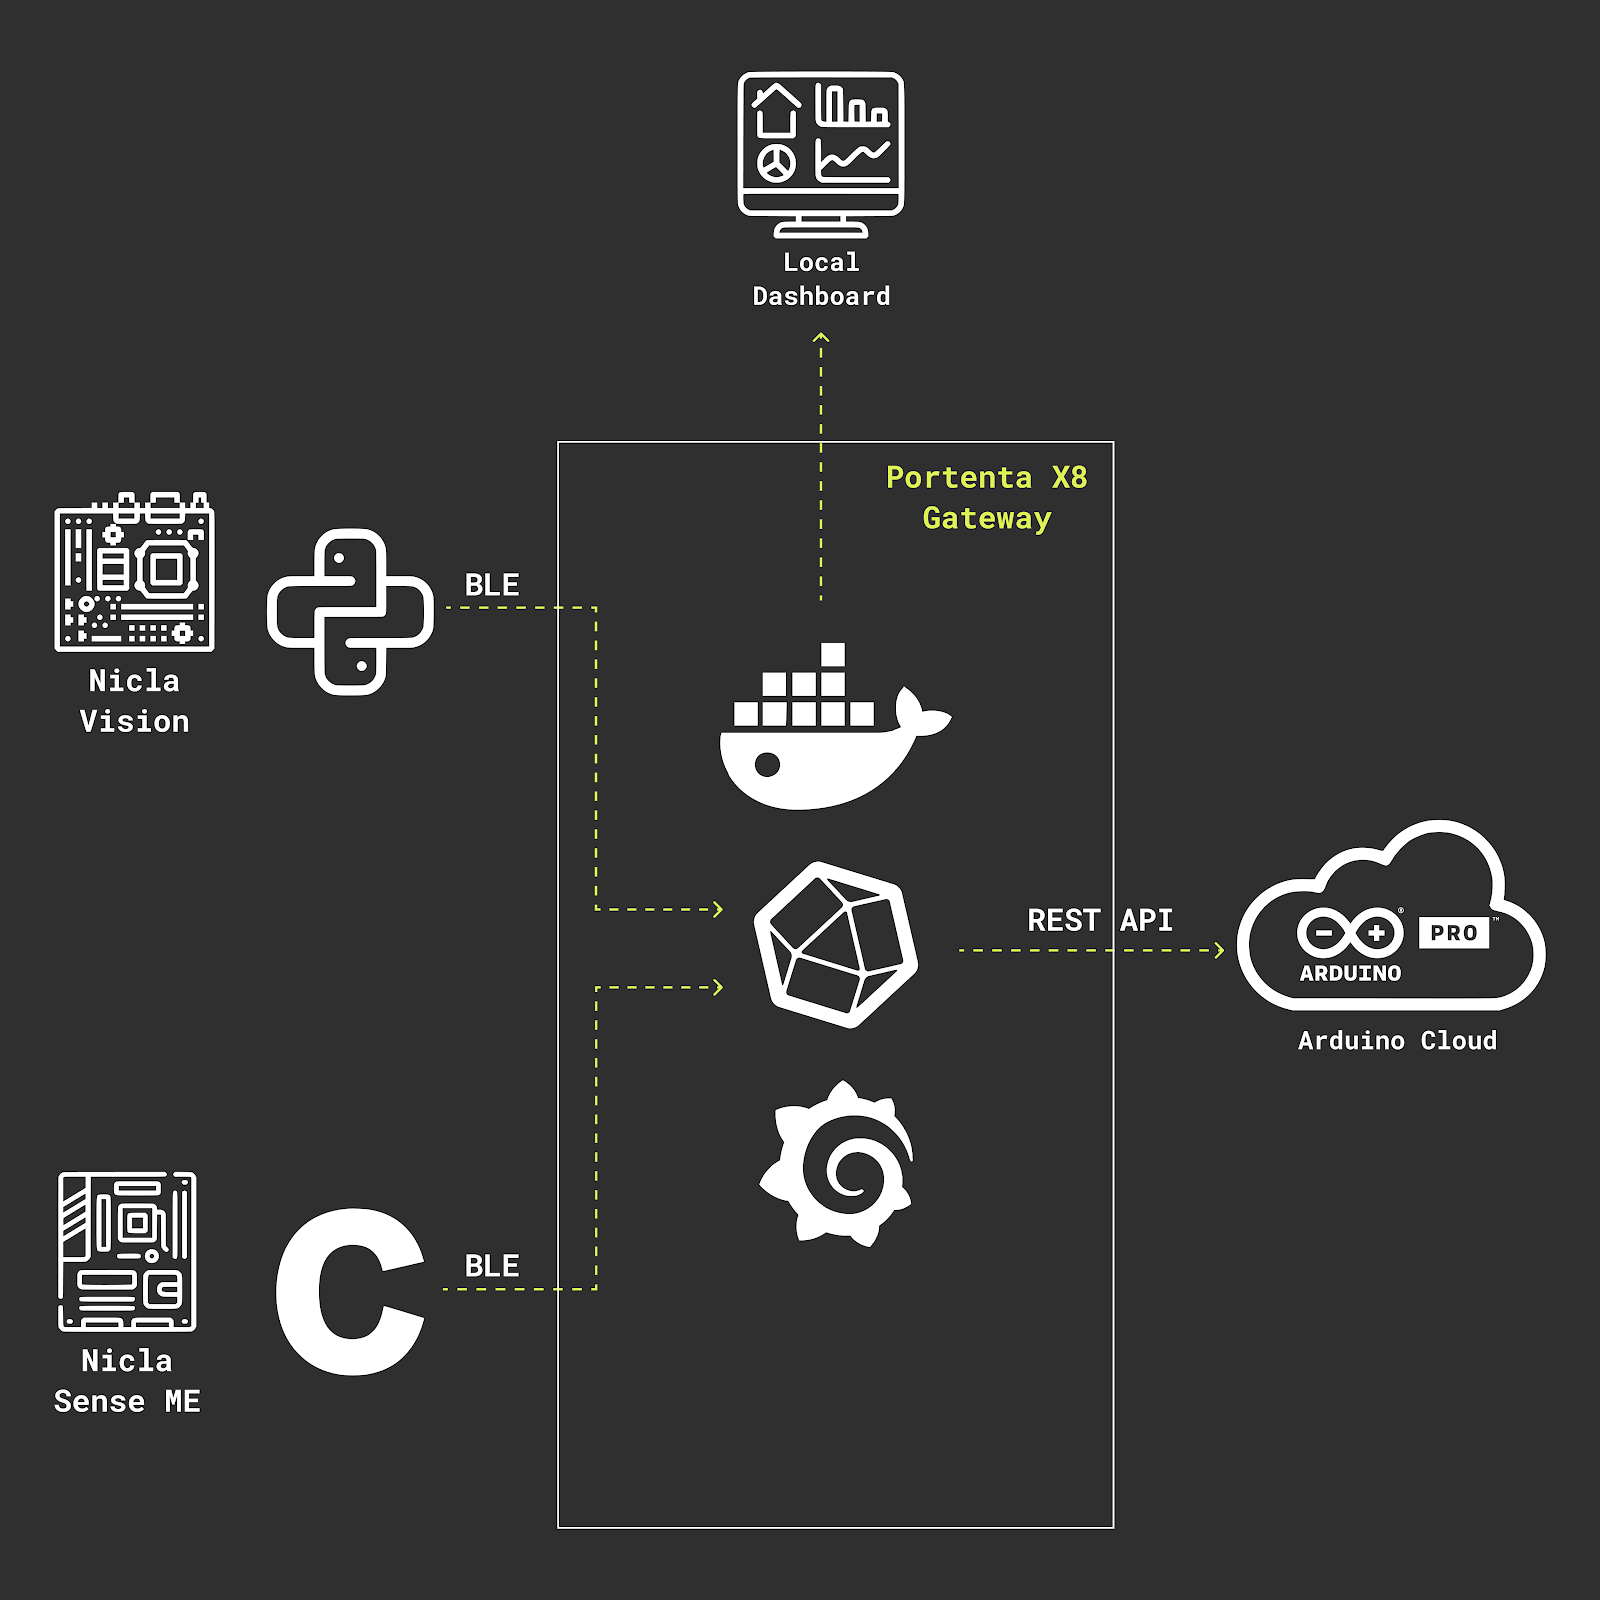
Here is an overview of the software stack and how a minimum deployment with one of each hardware module communicates to fulfill the proposed solution:
Conclusion
Environmental monitoring is essential for corporate offices in order to ensure the safety and health of workers. The correlation between the number of people in an office and air quality means that more people can lead to more contaminants in the air. Additionally, data latency can be a challenge when it comes to environmental monitoring. This is why it is important to have systems in place that can collect data quickly and efficiently and make this data available to decision-makers in a timely manner.
There are many benefits to using this solution. First, it enables building managers to monitor the environmental conditions in each room and take steps to mitigate any risks. Second, it provides a system for collecting data on occupancy, air quality, temperature, humidity, and other environmental factors. This data can be used to assess the risk of exposure to hazardous materials and take steps to mitigate or eliminate those risks. Finally, our solution is easy to use and can be installed in any office building.
Workshops get dirty and dusty, especially if you do woodworking. Not only is sawdust annoying, it is also bad for your respiratory system. Dust collection is very important, but outfitting a large shop can quickly become complicated. If you have a big workshop and need to improve your dust collection, then Brumberjack_Woodworks has a design and tutorial for a centralized smart dust collection system that you should check out.
This whole system starts with a heavy duty dust collector, which is essentially a huge vacuum cleaner. The exact model isn’t that important, so long as it can handle the workload. Luckily, the key part of this system design is valve-based direction. By only opening the valves you need, you can reduce the necessary capacity of the dust collector.
Brumberjack_Woodworks created his own 3D-printable ball valves for this system. Each of the ball valves is massive, so they can handle a lot of air flow and dust. They have large 35KG servo motors for actuation. The ball valves simply mount inline with the dust collection tubes running to each machine. By opening and closing the valves, shop workers can control the covered areas. Importantly, the PVC pipes need internal grounding to keep static arcs from igniting sawdust in the air.
An Arduino controls the operation of the servo valve actuators. Power for the servos comes from large external power supplies, as Arduino boards cannot output the necessary current to operate these heavy duty servos. Simple push buttons connected to the board tell it to open the specific valves, so a button can be mounted next to each tool for easy access.
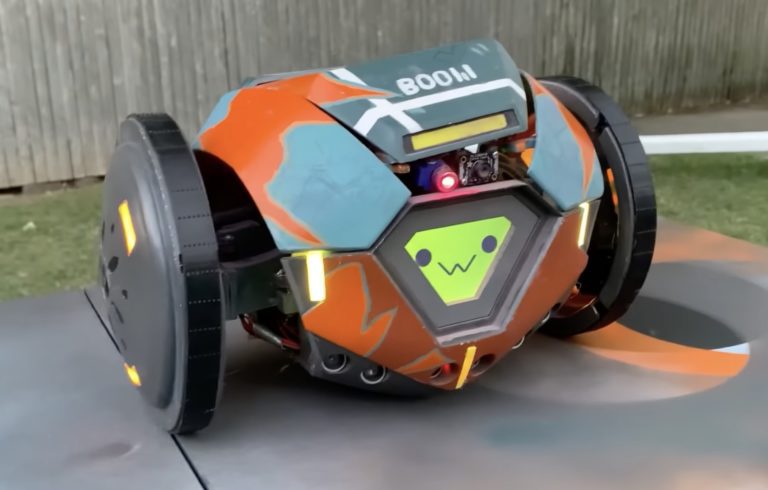
Valorant is a free-to-play 5v5 first-person shooter game. As in most shooters, players want to avoid getting shot. One way they can prevent incoming fire is to use Boom Bot, which is a little robot that will drive forward and chase enemies before exploding — while the player stays safely hidden out of sight. While he probably won’t be getting into any gunfights, Danny Lum built his own functional replica of the Boom Bot.
Boom Bot’s behavior in the game is quite simple. When deployed, it will drive straight forward until it either collides with a wall or detects an opponent. If it runs into a wall, it turns like a Roomba. If it sees a target, it will begin chasing them. Lum was able to recreate that functionality in a conventional two-wheel-drive rover robot. The robot was designed in Solidworks CAD to match in the in-game Boom Bot and then 3D-printed.
An Arduino Nano board controls the two drive motors that rotate special irregular wheels to give the robot wobbly movement like in the game. It also responds to information from two sets of sensors. A trio of ultrasonic sensors handle obstacle detection and tell the robot which way to rotate. An OpenMV face detection camera finds humans so the Boom Bot replica can chase them. An LCD screen gives Boom Bot an emotive face and a servo-actuated hatch on top pops open during targeting.
The final touch was a pneumatic powder puffer system that replaces the in-game explosion.
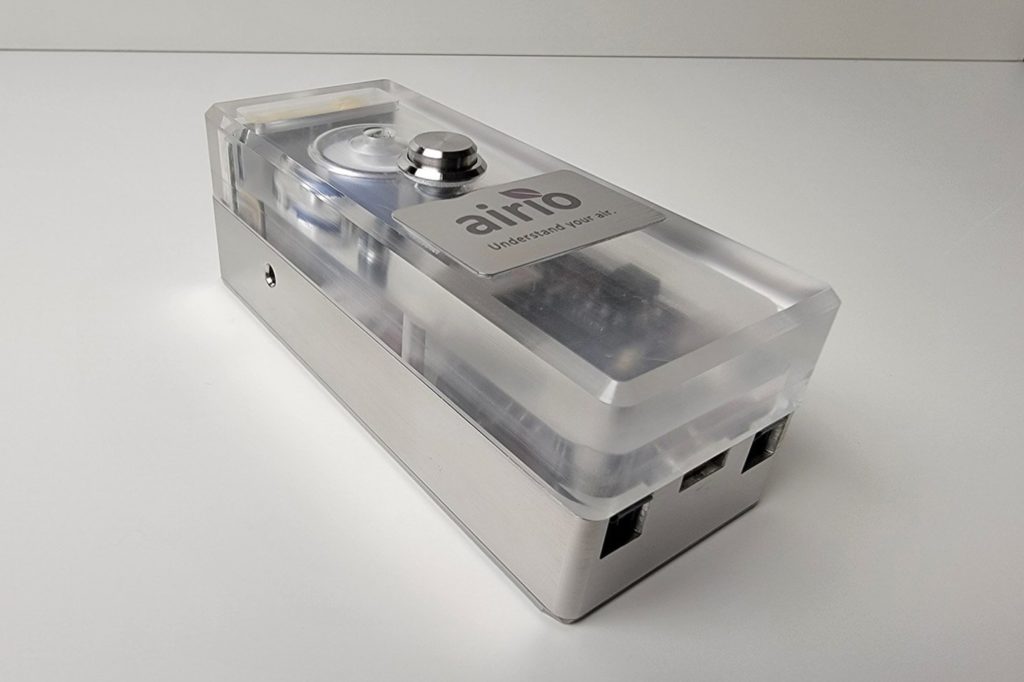
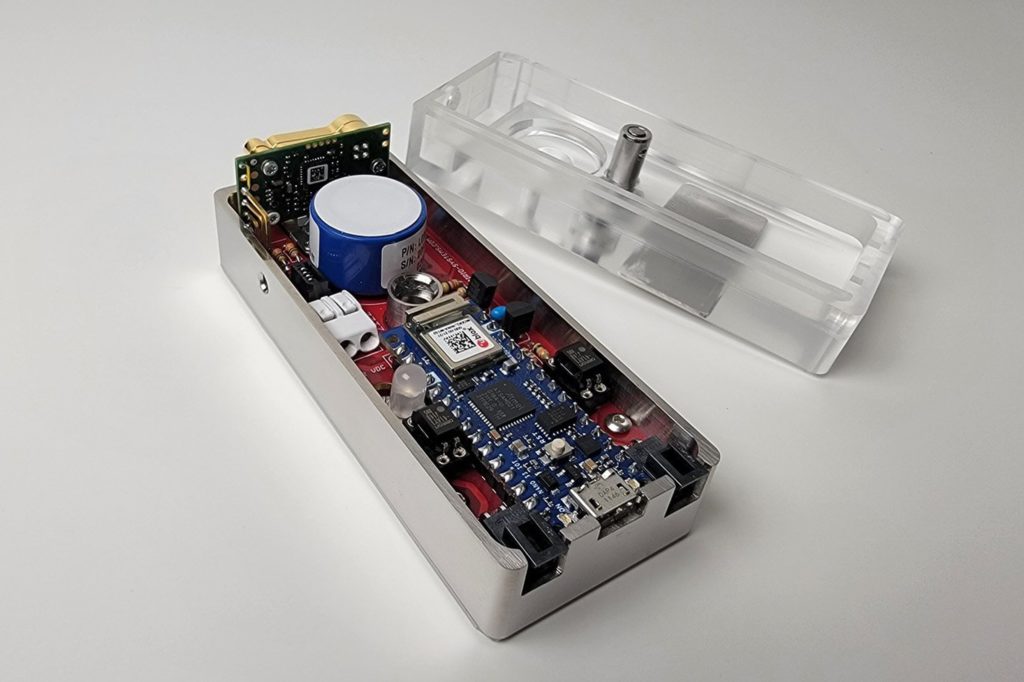
The environments we reside in can have massive effects on our health, as poor air quality, crowded spaces, or uncomfortable temperatures can all lead to certain illnesses. Of these metrics, Tindie seller AppliedSBC has focused on air quality since too much CO2 or too little oxygen quickly impact health with sometimes grave consequences.
AppliedSBC’s Airio gas monitoring platform, with the Airio Explorer 1 being the first product in the series, utilizes a Nano 33 IoT board to control several different sensors. The primary one is a gas sensor, which can measure concentrations of carbon dioxide and oxygen gases with relative accuracy. In addition to these datapoints, there is a secondary temperature and relative humidity sensing module that can provide even more information about the surrounding air. The kit supports continuous monitoring, which logs data to either a microSD card (up to four years of data) or to a live web portal once every second.
With these sensors, an LED indicator, and a programmable alarm for alerting users to hazardous air quality, the Airio Explorer 1 is a fast way to deploy a portable gas monitoring device. AppliedSBC recommends using it at home, in greenhouses, or even in laboratories where maintaining certain environmental conditions can be important.
Whether it’s a home, an office, a school, a restaurant, or something else, it’s always important to keep your indoor environment safe, clean, and pleasant to be inside.
It’s also a good idea to keep track of the air quality and conditions around you, not just for safety but also to ensure your systems are all working correctly and to avoid any wastage and inefficiencies.
Accurately monitoring your buildings can seem like a big challenge, but it’s actually very achievable with the right tools, and in fact, doesn’t require a whole lot of technology and expertise to get started. In this article, we’ll look at why it’s so essential to monitor your buildings and how anyone can build their own systems for doing so.
What is building automation and why is it important?
Building automation refers to the combination of processes that allow automatic centralized control over many of a building’s systems. This includes heating, lighting, ventilation, and much more — all controlled through one central system.
Here’s why building automation is so useful:
It makes the environment more comfortable and pleasant for occupants
More efficient operation and less wastage of resources
Lower energy costs
Utilities and equipment last longer
An Example: Indoor Air Quality and Garbage Monitoring System
Arduino community member Guillermo Perez Guillen helped design and build his own indoor air quality and garbage monitoring system with the help of Arduino’s tools and a series of other materials.
The project used IOTA — an open-source distributed accounting technology built to securely exchange information and value within the Internet of Things. It’s designed in a way that ensures no commissions, low latency, and better scalability.
Using this framework, Guillermo built 3 systems to monitor the air and garbage of his building in Mexico City.
2 indoor air quality monitoring systems
Using the Arduino UNO board and a number of different sensors, Guillermo created 2 systems aimed at monitoring the air quality inside the building.
The first system measured the temperature in both Celcius and Fahrenheit along with Relative Humidity Percentage. The second system also measured these factors, along with the concentrations of LPG gas in ppm and CO gas in ppm.
Garbage monitoring system
In addition to air quality, Guillermo also built a system to monitor how much garbage was in the building’s trashcans at any given time, measured as a percentage of the trashcan’s capacity. This made it easier to track when the trashcans were full and needed to be changed, avoiding unpleasant overspilling and confusion.
The data collected from all 3 systems was sent to IOTA via the Arduino UNO and Raspberry Pi boards using Masked Authenticated Messaging (MAM).
A better environment for everyone
By keeping track of air quality and garbage in this way, it’s possible to run a much more efficient, clean, and pleasant environment in a building. The same project could be replicated fairly easily in most offices, apartment buildings, schools, and even individual homes.
Smart buildings allow us to harness the power of technology and data to maintain a better environment to live and work in. With Arduino’s products, these tools are now much more widely available, and easy to learn and start taking advantage of.
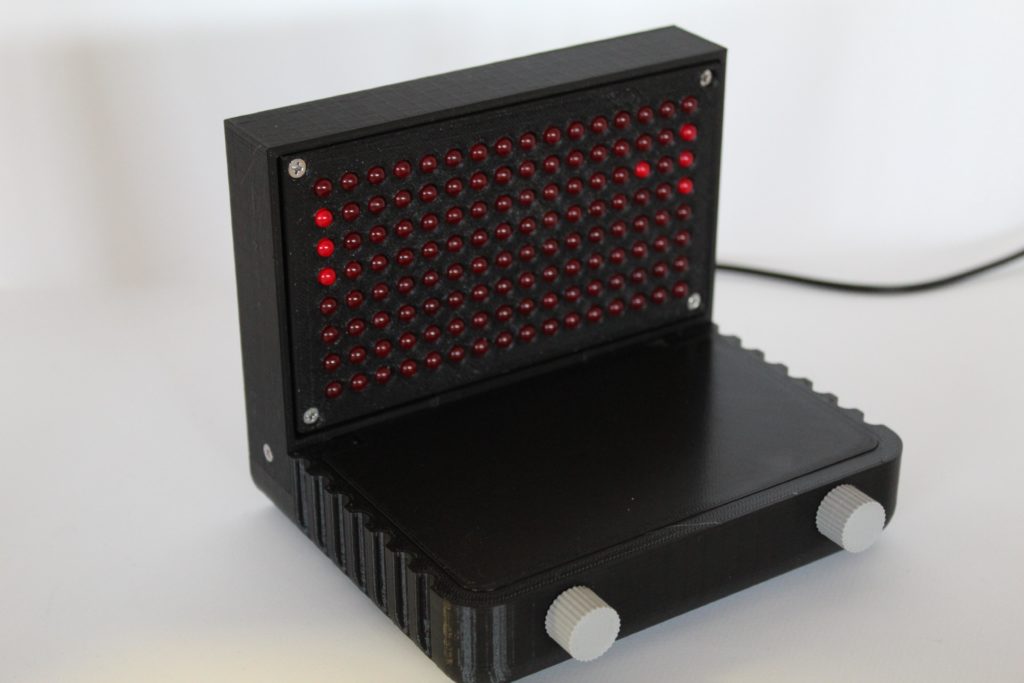
Tennis for Two is one of the very first video games in history. It eventually inspired Atari’s Pong, which itself spawned many derivatives. Tennis for Two outputted vector graphics to an oscilloscope and had an elevation view of the “tennis court,” complete with gravity. Pong had pixel-based raster graphics with a simpler top-view. That worked better at low resolutions and with more basic physics algorithms, which is why exposedwire chose it for this LED Pong project.
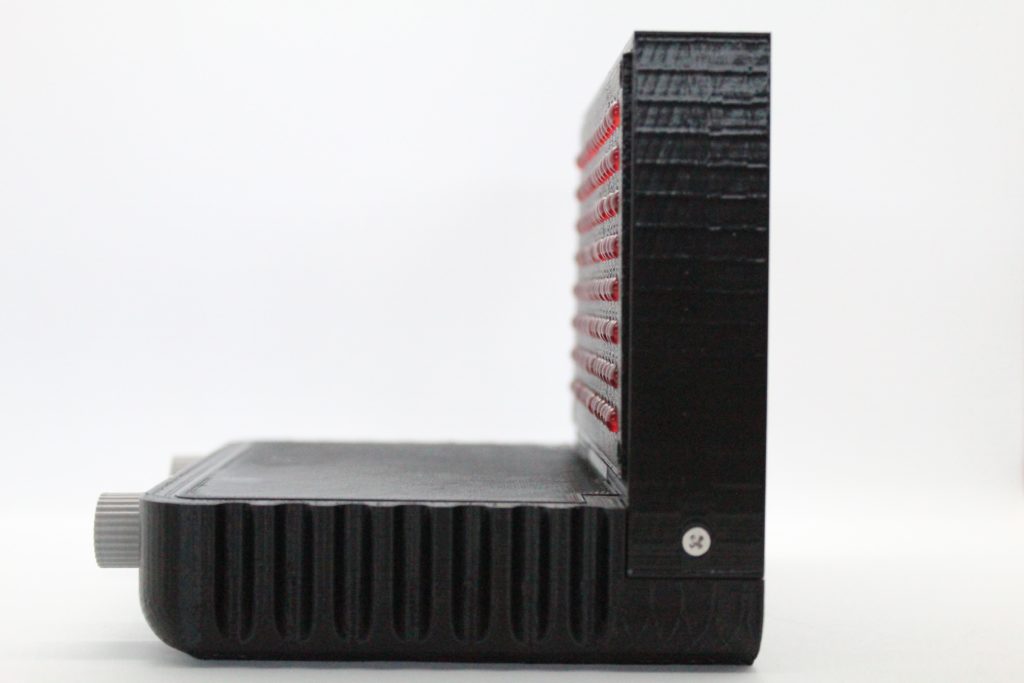
This electronic game plays like the Atari Pong game, but with an LED matrix game screen instead of raster graphics. There are only two controls: a pair of rotary encoders to control the two player paddles. Those sit in a simple and attractive 3D-printed enclosure. However, there isn’t any scoreboard. That means that players must track the score themselves.
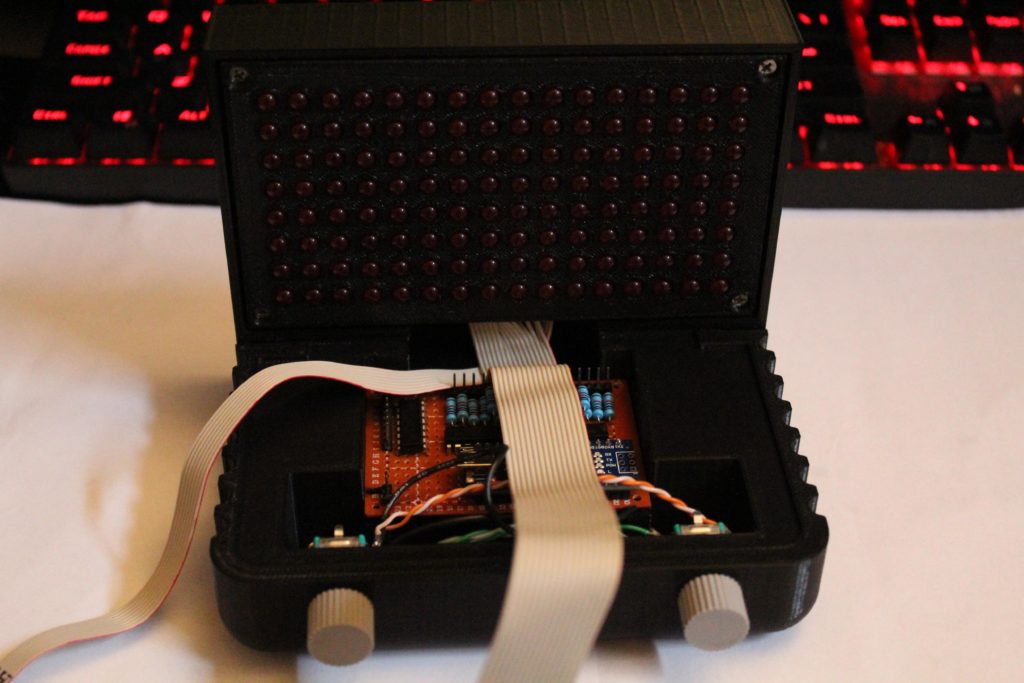
An Arduino Nano board controls the 16×8 grid of LEDs. That is a total of 128, which is far more than the number of I/O pins available on the Nano (22). A matrix setup reduces the number of required pins down to a minimum of 23 for 128 LEDs, though adhering to the 16×8 grid structure simplifies wiring and requires 24 pins. That’s still more than is available on a Nano, so this project uses three shift registers: one for the eight positive rows and two for the 16 negative columns.
With that hardware, programming the game logic in a sketch was a matter of moving the ball according to a simple algorithm and tracking the LED states in a two-dimensional array. Very few video games are coded this way today, but this is a great demonstration of early techniques that were common for less-powerful hardware.
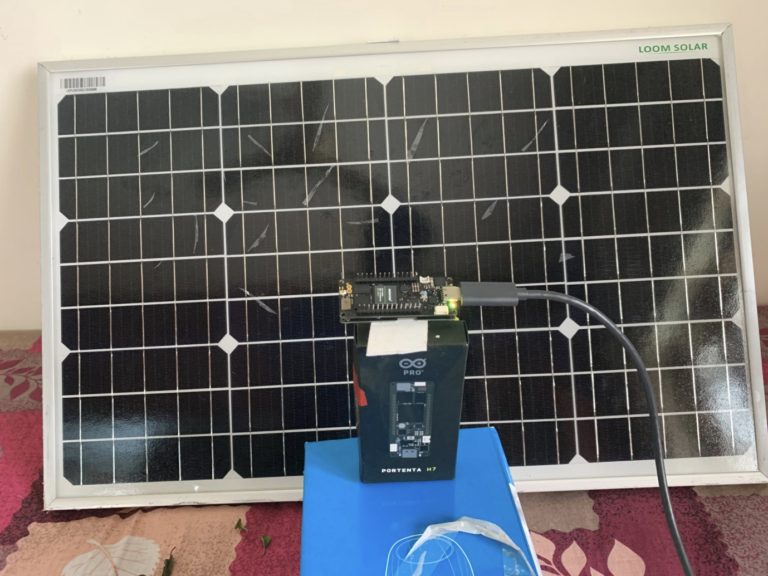
Large solar panel installations are vital for our future of energy production without the massive carbon dioxide emissions we currently produce. However, microscopic fractures, hot spots, and other defects on the surface can expand over time, thus leading to reductions in output and even failures if left undetected. Manivannan Sivan’s solution for tackling this issue revolves around using computer vision and machine learning to find small defects at the surface before automatically reporting the information.
Sivan compiled his dataset by first gathering images of solar panels that have visible cracks using an Arduino Portenta H7 and Vision Shield and then drawing bounding boxes around each one. From here, he trained a MobileNetV2 model with the addition of Edge Impulse’s recent FOMO object detection algorithm for better performance. He was able to improve the model’s accuracy even further by augmenting the dataset with images taken at different camera angles and lighting conditions in order to prevent mistaking the white boundary lines for cracks.
After testing and deploying the model from the Edge Impulse Studio to his Portenta H7 board, it was able to successfully find cracks in a solar panel’s surface around 80% of the time. In the future, Sivan might add other features that take advantage of the onboard connectivity to communicate with outside services for faster response times. You can read more about the project here.
Getting started with a new device management platform is a drag. You have to get familiar with the terminology and the environment. You have to create new devices, dashboards, widgets, and read a lot of documentation and that’s usually very time consuming, even if the platform is very easy to use.
Furthermore, it is even more tedious if the platform is targeted to manage physical devices. You need to have some devices close at hand, you need to learn how to code your hello world or getting started examples and subsequent programming. Even if the platform is very intuitive, this is something that usually pulls users back.
At the end of the day, what users want to have is a straightforward way to evaluate what they can achieve with the platform, the performance, the look and feel and the global interaction experience.
What is the Arduino Cloud?
The Arduino Cloud enables makers, IoT enthusiasts, and professionals to build easily connected projects based on a wide range of Arduino, ESP32, and ESP8266 boards.
Following Arduino’s vision, it has been carefully designed to provide the most user-friendly and intuitive experience, abstracting the complex tasks that create barriers for users who are not familiar with coding. The result is an integrated platform where users can develop, deploy, manage, and monitor their connected devices.
Development and firmware deployment can be done with the online web editor where a large number of templates and projects can help you get started easily. Over-the-air (OTA) firmware updates are additionally available for Arduino boards.
Managing and monitoring the devices and connected sensors is done with the IoT Cloud. The platform allows the creation of devices, things, and variables that can be managed through rich and customizable dashboards that help users visualize their device’s status and data. They are accessible remotely via a native mobile app and users’ web space and integration with third-party platforms like Alexa or IFTTT is possible.
The Arduino Cloud platform is very intuitive and well documented, with tons of examples, tutorials, and projects. But, sometimes, users don’t find the time to go through that documentation and they would like to have a more straightforward path to evaluate its features.
Why not use your phone as your initial device?
If we think about a way to get started with any new platform, what can be easier than using the tool that we use more extensively and handy: our mobile phone?
Arduino Cloud has a feature called phone device that does precisely that. The goal is to provide the users with a tool that allows them to have a quick out-of-the-box experience with the IoT Cloud without the need of using a Cloud-compatible board.
By installing the Arduino IoT Remote App (available for Android and iOS), you’ll automatically see your phone as a usable device in the IoT Cloud, with a number of variables automatically created and associated with it. Those variable Thing 2 Things are associated with some of the sensors in your phone such as accelerometer, GPS, microphone, compass or barometer. A dashboard is also automatically created so that all those variables can be monitored.
With this feature, there is a straightforward and simple path for those newbies who may want to know what they can do with the platform even without owning a compatible device. But it also enables makers, who may want to use their phone sensors to activate certain actions on their other things, to build more advanced use cases with Thing 2 Thing communication (for example, when my phone is near my office, turn on my AC).
How do I get started?
Getting started is as simple as installing the Arduino IoT Remote app or updating it to the latest version, if you had it already installed.
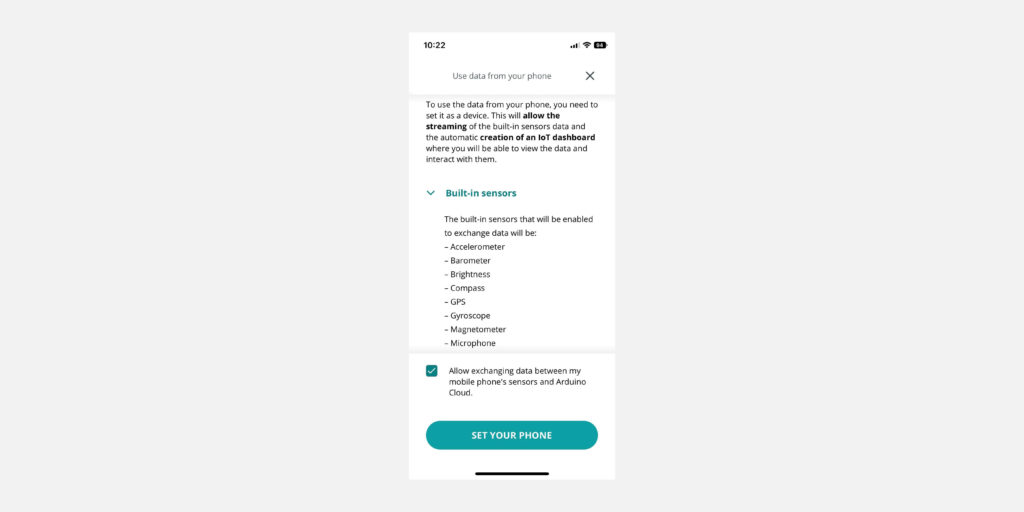
The first step is to open the app, and select “Use data from your phone” from the main menu. Then the wizard will start, asking to allow data exchange between the phone and the Arduino Cloud.
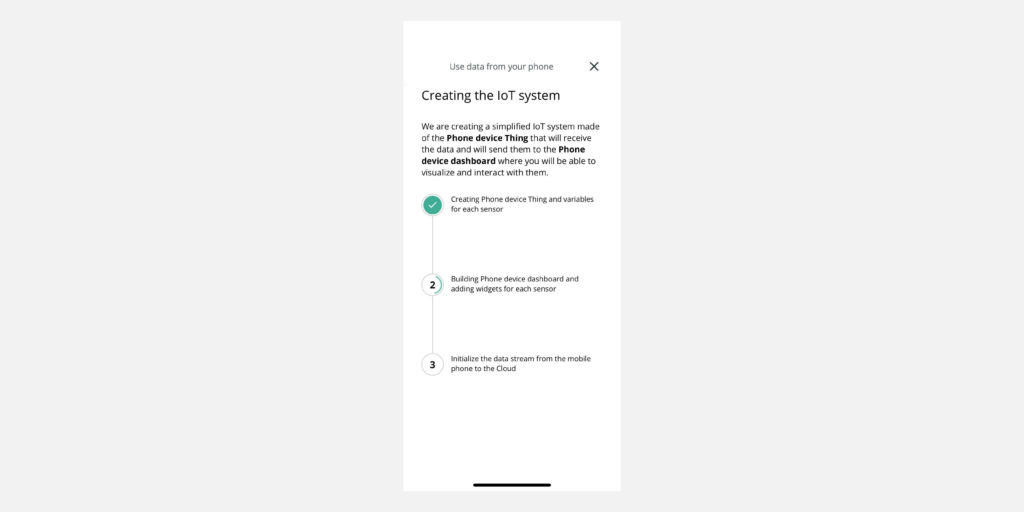
After tapping on “Set your phone,” the creation of the related device, thing, and dashboard will take place. During the creation of such resources, permission for using the phone location, camera, and microphone will be asked.
At the end of the process, you will see the created dashboard, with the live data coming from your phone sensors.
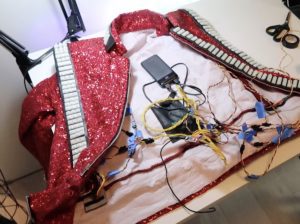
Michael Jackon’s Thriller music video was arguably the best known of his entire career. It contains many horror themes, a delightful and memorable choreographed dance, and an iconic red jacket designed by Deborah Nadoolman. The video’s horror references make it a Halloween favorite, which is why Louise Katzovitz’s LED-lit reimagining of the Thriller jacket is appropriate for the season.
Katzovitz created this jacket for a Michael Jackson impersonator to use during his performances. It isn’t a replica of Nadoolman’s original design, but rather a homage to a special light-up version that Jackson wore on tour. Even if they aren’t familiar with that special version, it is similar enough to the one in the video that audiences instantly recognize it for what it is.
It would have been easiest to start with a commercial replica of the jacket, but Katzovitz instead sewed the entire jacket from scratch from a bomber jacket template. That alone is impressive, but the LED setup pushes this project into the stratosphere. An Arduino Nano board controls several strips of WS2812B individually addressable RGB LEDs. 3D-printed “gems” hide the LEDs and diffuse their light. The strips mount to vinyl cut on a Cricut craft machine, yielding long panels that Katzovitz could attach to the jacket with sewn-on velcro strips. Power comes from a 5V battery bank that is small enough to tuck into an interior pocket.
The result looks fantastic and puts Jackon’s real jacket to shame. Katzovitz even made a tiny version for her dog, making it the baddest boi on the block.
Um dir ein optimales Erlebnis zu bieten, verwenden wir Technologien wie Cookies, um Geräteinformationen zu speichern und/oder darauf zuzugreifen. Wenn du diesen Technologien zustimmst, können wir Daten wie das Surfverhalten oder eindeutige IDs auf dieser Website verarbeiten. Wenn du deine Einwillligung nicht erteilst oder zurückziehst, können bestimmte Merkmale und Funktionen beeinträchtigt werden.
Funktional
Immer aktiv
Die technische Speicherung oder der Zugang ist unbedingt erforderlich für den rechtmäßigen Zweck, die Nutzung eines bestimmten Dienstes zu ermöglichen, der vom Teilnehmer oder Nutzer ausdrücklich gewünscht wird, oder für den alleinigen Zweck, die Übertragung einer Nachricht über ein elektronisches Kommunikationsnetz durchzuführen.
Vorlieben
Die technische Speicherung oder der Zugriff ist für den rechtmäßigen Zweck der Speicherung von Präferenzen erforderlich, die nicht vom Abonnenten oder Benutzer angefordert wurden.
Statistiken
Die technische Speicherung oder der Zugriff, der ausschließlich zu statistischen Zwecken erfolgt.Die technische Speicherung oder der Zugriff, der ausschließlich zu anonymen statistischen Zwecken verwendet wird. Ohne eine Vorladung, die freiwillige Zustimmung deines Internetdienstanbieters oder zusätzliche Aufzeichnungen von Dritten können die zu diesem Zweck gespeicherten oder abgerufenen Informationen allein in der Regel nicht dazu verwendet werden, dich zu identifizieren.
Marketing
Die technische Speicherung oder der Zugriff ist erforderlich, um Nutzerprofile zu erstellen, um Werbung zu versenden oder um den Nutzer auf einer Website oder über mehrere Websites hinweg zu ähnlichen Marketingzwecken zu verfolgen.