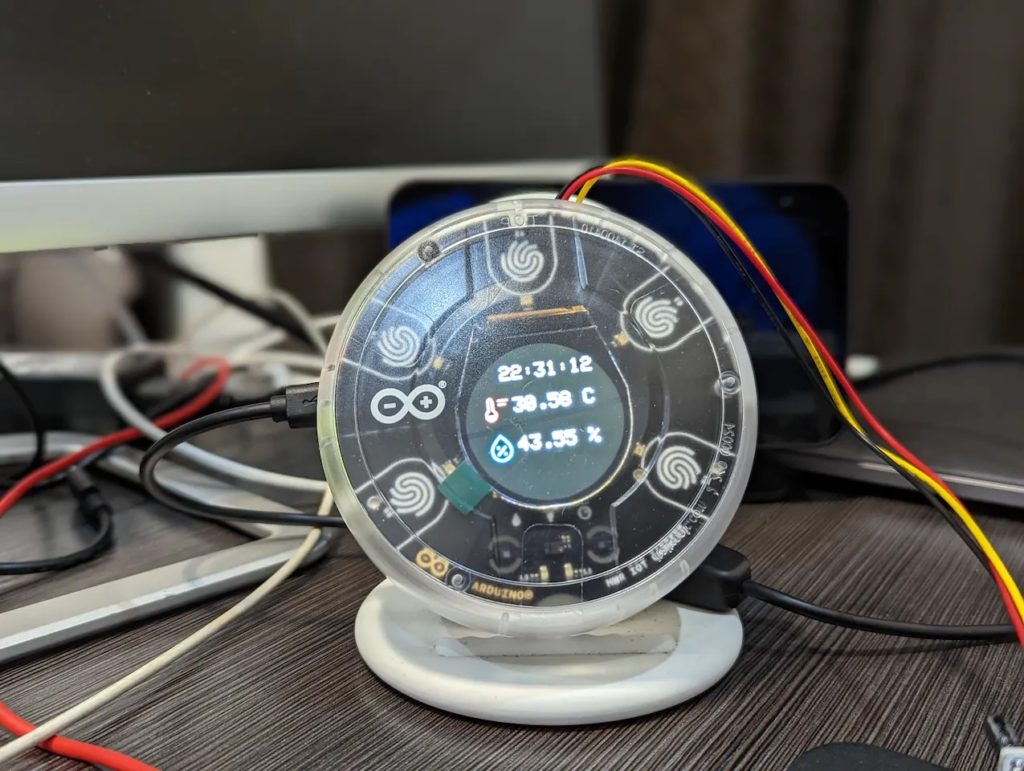
Robert John likes to keep a constant eye on the current temperature and humidity of his room, as even small fluctuations can lead to uncomfortable conditions. And although he can remotely turn the air conditioning on or off, he still needed a way to track these values throughout the day and log them for future reference.
To create this smart device, Robert used an Arduino Oplà IoT Kit, as it contains a MKR WiFi 1010, a MKR IoT Carrier with a built-in screen and capacitive buttons, and a PIR sensor for detecting motion. Once connected together, he then configured a new dashboard in the Arduino IoT Cloud with two variables for the temperature and humidity, which are updated once every minute by the MKR WiFi 1010.
In addition to these values being shown in virtual gauges, the dashboard tracks them in a set of two graphs for up to 15 days. The carrier board also displays the current time, temperature, and humidity on its screen for convenient viewing which turns off automatically to save power when no one is nearby.
To see more about this project and how it was built, you can read John’s write-up here.
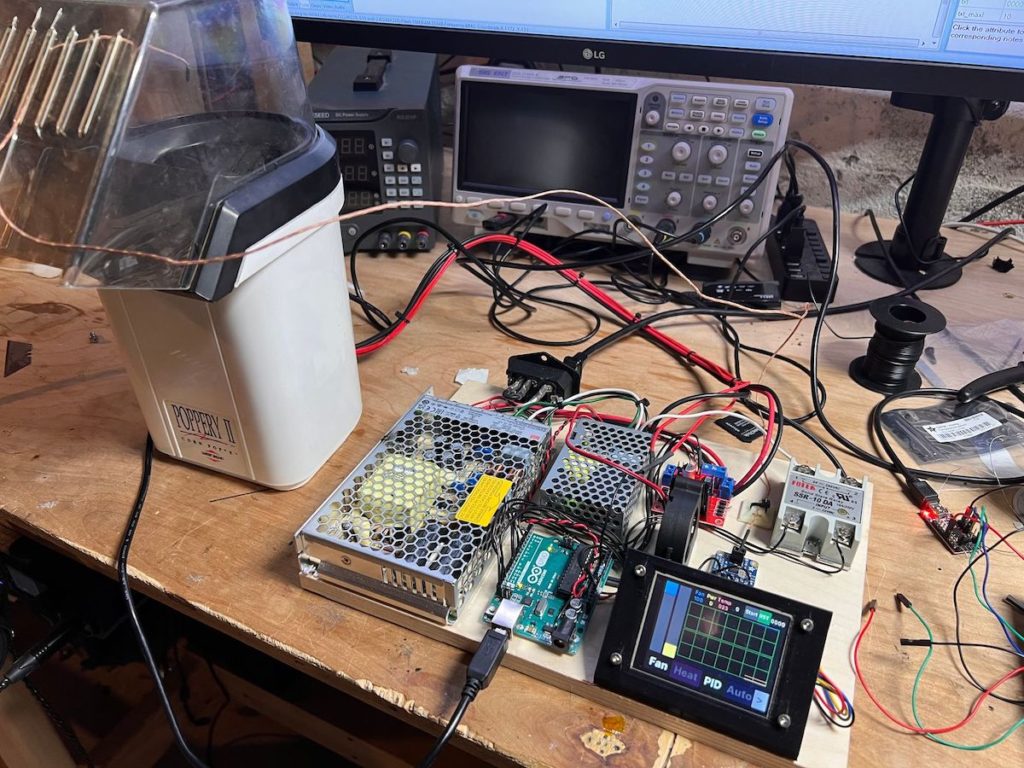
Green (unroasted) coffee beans cost about half as much as their roasted counterparts. By purchasing green coffee beans, you can save quite a bit of money in the long term. Roasting your own coffee beans also gives you much greater control over the flavor profile and caffeine content of your coffee (caffeine content is a debatable topic, but light roasts seem to have more caffeine due to overall density). But buying a coffee roasting machine can drain your savings, which is why you might want to follow Eric Sorensen’s lead and build your own coffee roaster.
Roasting coffee beans is not a complex process. In theory, you could roast your wake-up beans in any old oven. But dedicated machines can roast the beans with more consistency to avoid burned or under-roasted individuals. Those machines are very similar to the air poppers used for popping popcorn. They contain a heating element and a motor that spins a fan and agitates the beans. But coffee bean roasting machines add precision temperature control, which increases their price dramatically. By adding your own temperature control to a cheap air popper, you can save a lot of money and still get great results.
This project calls for a few components in addition to the air popper itself (which you can probably get for free at a thrift store). Those parts include an Arduino Uno board, a Nextion touchscreen LCD panel, an L298N motor driver, an Adafruit MCP9600 thermocouple breakout board, and a relay.
The Arduino controls the heating element through the relay with PID control, which means that it modulates power to retain a specified temperature. It monitors the temperature with the thermocouple through the breakout board. The motor driver controls the air popper’s fan, which blows air through the beans and helps to agitate them during roasting. The touchscreen provides an interface to select roasting temperature and time. The firmware written by Sorensen also supports roasting profiles, so you can easily select from preset parameters once you figure out which roasting settings work well.
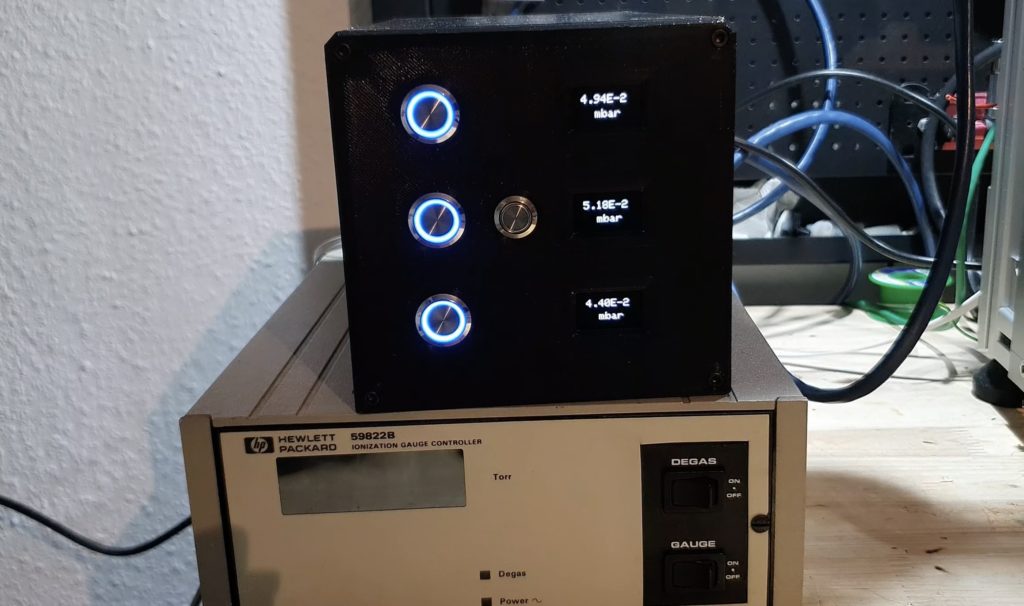
Measuring vacuum works in the same way as measuring any other gas pressure, because a perfect vacuum is unachievable and so it is a measure of how close to zero the air pressure inside a container becomes. But typical pressure gauges aren’t meant to measure pressures below ambient atmospheric pressure (vacuums). That requires special sensors and Advanced Tinkering built his own vacuum gauge controller to handle them.
The vacuum sensors that Advanced Tinkering purchased were designed for use with a proprietary controller that costs thousands of dollars. The sensors don’t just send an analog signal corresponding to pressure level (which would be very easy to read), but also status information. Even with that added complexity, the proprietary controller is very expensive for what it is. Advanced Tinkering correctly assumed that he could replicate its functionality with affordable off-the-shelf hardware. The communication protocols for his sensors are well-defined in published documents, which made them much easier to work with.
Advanced Tinkering used an Arduino Nano board for this project. It does need to read analog signals from each of the three sensors, so he paired the Arduino with an ADC (analog-to-digital) module and a multiplexer. Each vacuum sensor also received its own dedicated control button and OLED screen, the latter of which displays status messages and the pressure reading from each sensor in millibars. The buttons let Advanced Tinkering activate each sensor. All of those components went inside a tidy 3D-printed enclosure that matches the aesthetic of instruments like these. In total, this project cost Advanced Tinkering only about 5% of what he would have spent on the commercial vacuum gauge controller.
Light painting is a photography trick that exploits a camera’s shutter. To ensure proper exposure in different lighting conditions, cameras have variable shutter speeds. If the subject is well-lit, then the shutter may only remain open for ten or so milliseconds. But if the subject is very dark, then a photographer may choose to leave the shutter open for minutes. Anything bright that moves in the frame will leave “painted” streaks. This project takes advantage of light painting to visualize magnetic fields.
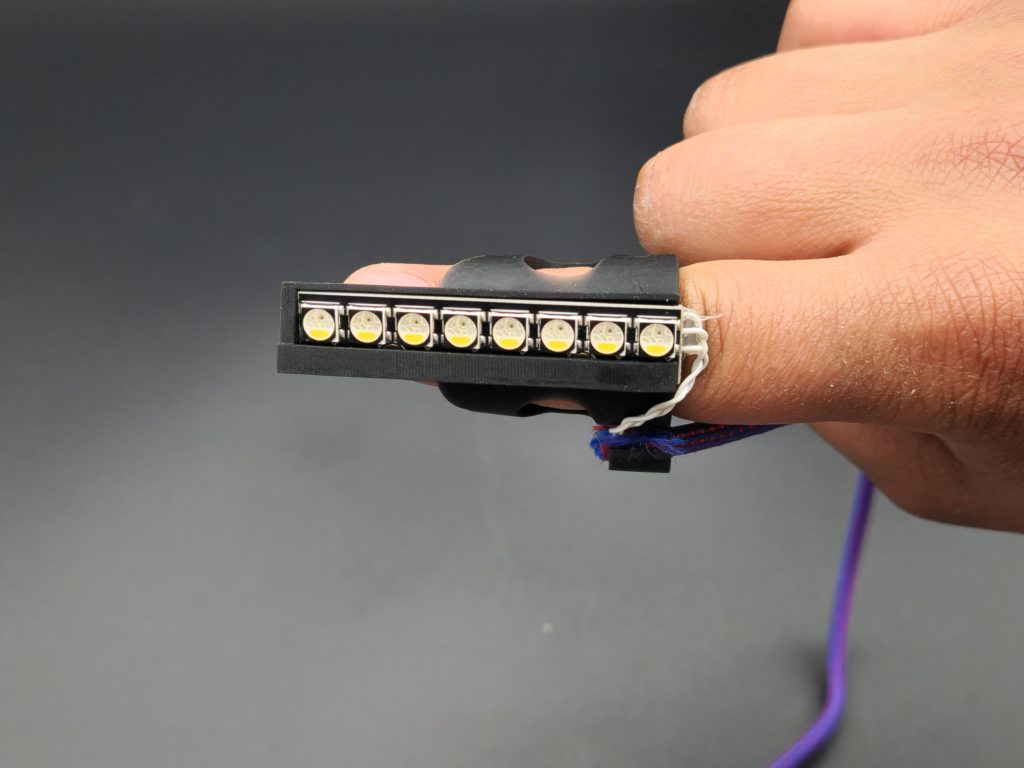
Because exposure (both for film cameras and digital cameras) relies on brightness, anything dark that moves in a long exposure photo will be barely visible. But anything bright (LEDs, in this case) will be very visible. For this project, Chris Hill wears an LED array on their fingertip. When they capture a long exposure photo, their hand is dark and almost invisible. But the LEDs, which illuminate in response to the presence of magnetic fields, are bright and show up clearly in the picture. The result is a light painting of magnetic fields that would otherwise be invisible to the human eye.
The LEDs (an Adafruit NeoPixel Stick) and ultrahigh sensitivity analog sensor (to detect the strength of magnetic fields) are worn on the finger, but the rest of the electronic components reside in a 3D-printed enclosure that straps to the forearm. That enclosure contains an Arduino Nano 33 BLE board, an Adafruit MiniBoost 5V power module, and a 2500mAh LiPo battery. The Arduino monitors the strength of the magnetic fields detected by the sensor and then activates a proportional number of LEDs on the NeoPixel Stick. In the light-painted photo, this presents as a series of overlaid bar graphs that depict the magnetic field strength in their positions.
Until the proliferation of digital photography, film slides were a common way to share photos. After a nice vacation in the ‘70s, you might take your film rolls for development and would have the option to receive a set of slides. You could then gather all of your friends in your living room, pop those slides into a projector carousel, and force everyone to look at unfocused pictures of palm trees projected onto the wall. If you still have a collection of slides (or inherited your parents’ collection), this video from Scott Lawrence demonstrates one method for converting them to digital photos.
This approach might seem rudimentary, but it is quite effective. If you look at it from a high level, it is essentially just snapping photos of the slides with a modern DSLR camera. But those cameras are capable of capturing very high-quality pictures and this process is easy to automate. The key to that automation is the use of a vintage slide carousel. They are affordable and easy to control with a microcontroller, which makes them perfect for this application.
In this case, Lawrence used an Arduino Leonardo board. It controls two things: the slide carousel and the camera’s shutter. The user interface, made with a six-digit seven-segment display and a rotary encoder, lets the operator setup the number of slides to capture, the pause between slides, backlight brightness, and so on. When activated, the controller tells the carousel to load a slide, triggers the camera’s shutter, and then repeats with the next slide. Each slide only takes a few seconds to load and capture, which means this can digitize more than a thousand slides per hour.
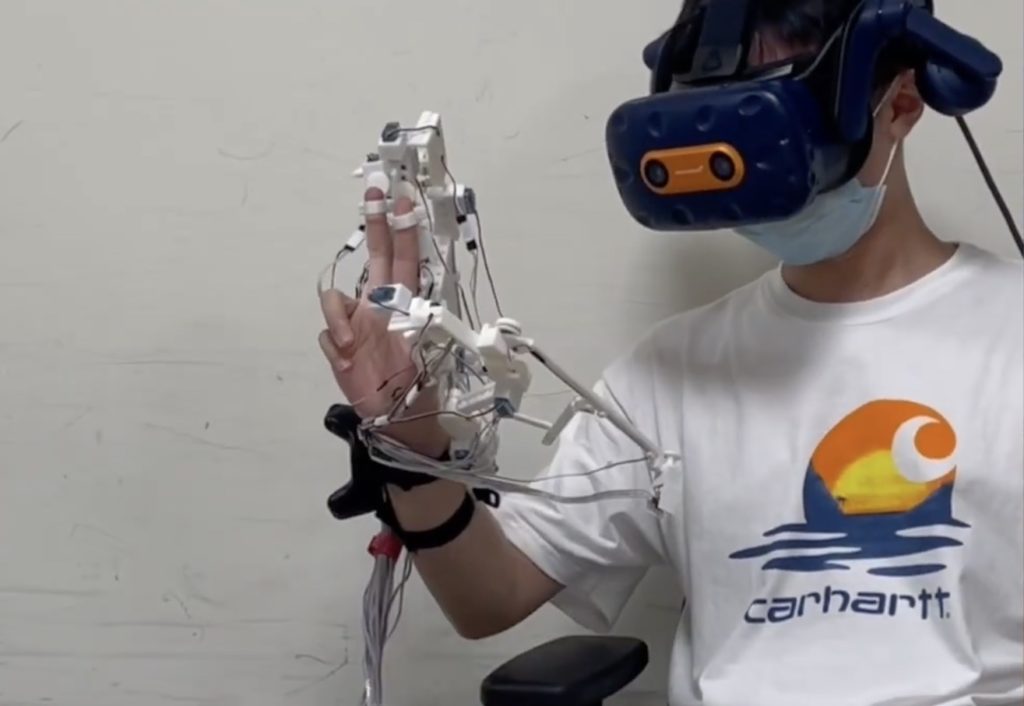
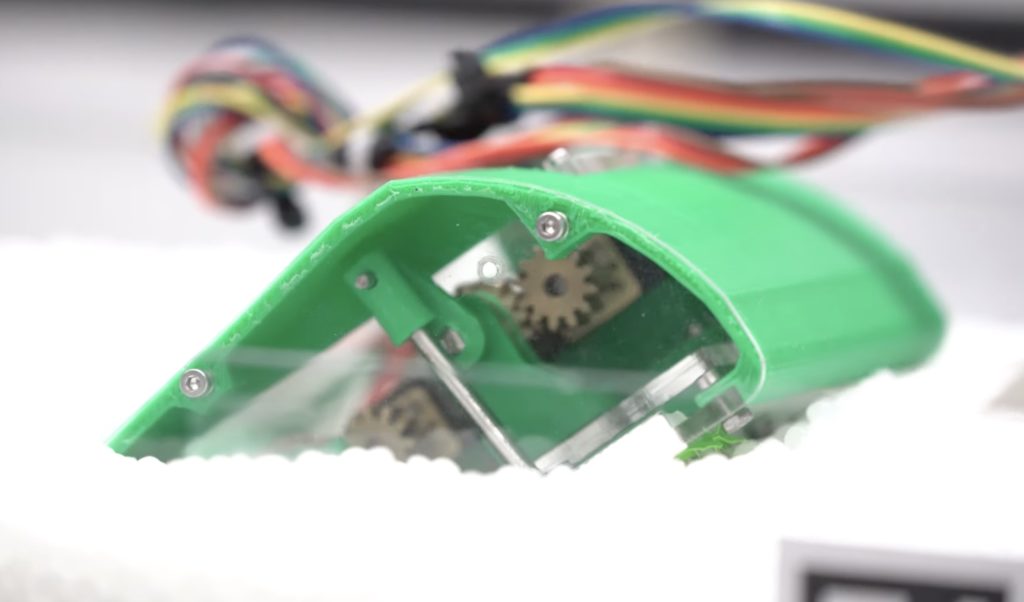
We’re currently seeing something of a technological blitzkrieg as corporations and engineers attempt to solve the problem of tactility in virtual reality (VR). Modern VR headsets provide quite realistic visual and auditory immersion, but that immersion falls apart when users find themselves unable to physically interact with virtual objects. Developed by a team of National Chengchi University researchers, ELAXO is an Arduino-controlled exoskeleton glove that enables complex force feedback for VR applications.
ELAXO looks unwieldy — it is like an exoskeleton glove made up of 3D-printed struts and joints. In the demonstrated setup, ELAXO mounts to the user’s wrist and has force feedback structures attached to their thumb and first two fingers. Each finger receives four servo motors, four small DC motors, and one larger DC motor. Those motors attach to joints to create on-demand physical resistance to movement.
For two fingers and a thumb, ELAXO requires a total of 12 servos, 12 small DC motors, and three large DC motors. Each finger also needs an infrared (IR) sensor, for a total of three. In addition, the large DC motors contain encoders that use two wires each. Controlling those takes a lot of I/O pins, which is why the ELAXO team chose an Arduino Mega board for their prototype. It controls the motors through eight dual TB6612FNG drivers.
The Arduino powers the motors according to what happens in the VR world. For example, if a user tries to touch a stationary object, the motors on that finger might get full power to keep the joints from bending and to provide a feeling of solid resistance. Other actions, like rotating a knob, result in less resistance. By gaining granular control over the resistance of each joint, ELAXO can produce convincing force feedback.
A large number of diseases involve coughing as one of their primary symptoms, but none are quite as concerning as chronic obstructive pulmonary disease (COPD), which causes airflow blockages and other breathing problems in those afflicted by it. Consistently monitoring the frequency and intensity of coughing is vital for tracking how well the disease is being treated, yet current solutions are impractical outside of a hospital setting.
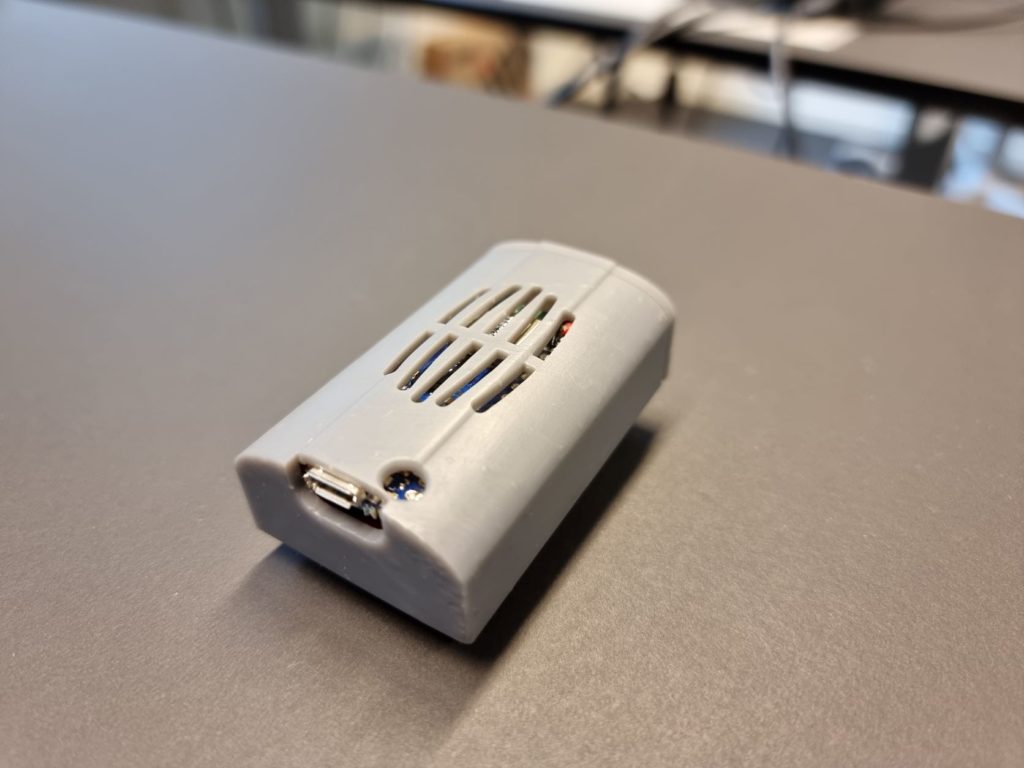
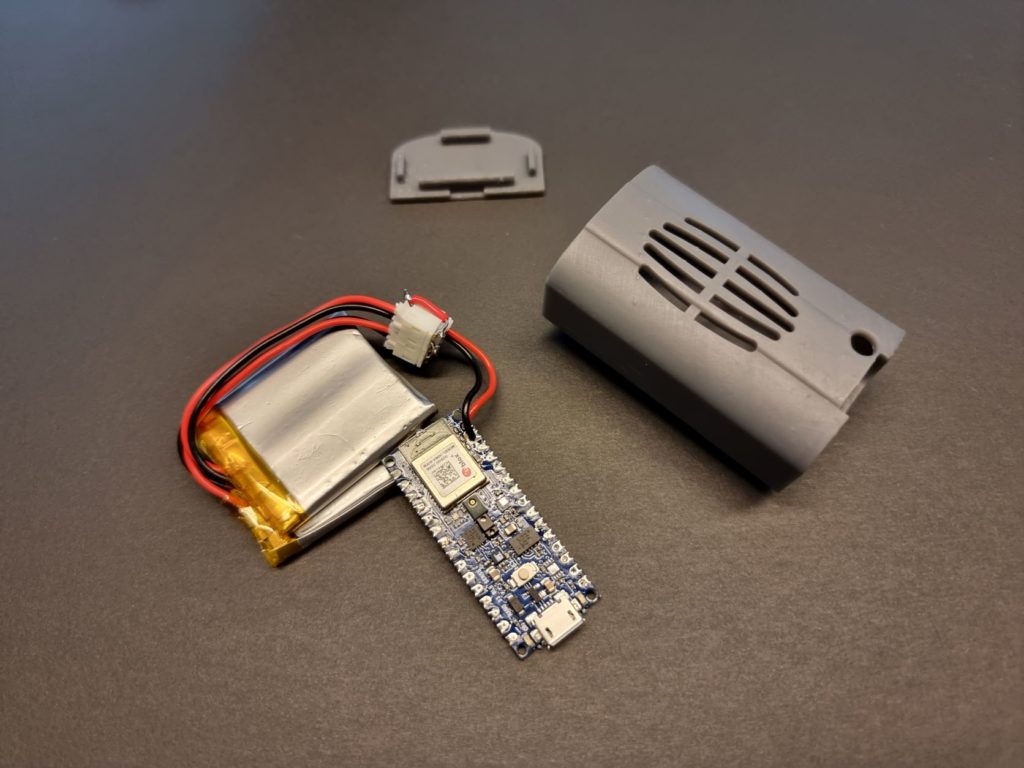
Eivind Holt had the idea to use an Arduino Nano 33 BLE Sense running a custom tinyML model to automatically classify sounds as either a cough or non-cough and report them to a cloud service. Once a total of 647 audio samples had been collected, Eivind trained a Keras neural networking using Edge Impulse that could correctly identify the sound about 99% of the time. The program he wrote for the Nano creates a custom BLE service with a single cough counting characteristic that is incremented for each detection.
Getting the number of coughs from the local device to the cloud for later analysis and display was accomplished by using the nRF Android app to receive BLE data and transmit it to the nRF Cloud. Meanwhile, a pair of 500mAh batteries were connected and everything was placed into a 3D-printed case that could easily sit near a person’s neck.
Everybody loves a good BBQ. Getting your family and friends together on a long summer day and evening, cooking delicious food and having a great time as smoke drifts through the air — it’s the perfect weekend activity.
BBQs can also be stressful, however. Anyone who has ever tried to host one will know the challenges of managing multiple meats at once, trying to avoid any overcooking (or undercooking) disasters, and keeping track of all that equipment.
Automation can help run your BBQ much more smoothly, minimizing any mishaps and making sure everyone has the best experience possible. In this article, we’ll look at how home automation can improve the BBQ experience and share some examples from Arduino’s Project Hub.
How home automation improves BBQs
Keep track of different items. Automation makes it easier to manage multiple meats and other food items at the same time, notifying you when something is ready so you don’t get overwhelmed by tasks and neglect any of your cooking.
Stay on top of temperature by measuring each piece of food and ensuring it’s at the perfect point.
Create a more welcoming outdoor area with things like automated lighting, heaters, and even a smart garden.
Easy cleanup with robots and other tools to leave your grill and other tools sparkling clean.
Arduino community member Duncan Barbee knew that the most flavorful way to grill is to use charcoal to heat your smokers. While propane and electric smokers give you better temperature control, they lose that unique and delicious charcoal flavor.
But charcoal heaters present many challenges. You need to constantly stay on top of the temperature, adjusting the vents on a regular basis to make sure everything is just right as the charcoal level changes in the smoker.
Barbee wanted to build a project that gave him the best of both worlds — the tasty charcoal flavor with the ease and convenience of an electric or propane smoker. He developed a controller that monitors the temperature in the smoker and automatically adjusts the airflow to the charcoal to maintain the correct temperature at all times, allowing him to sit back and relax as the perfect charcoal-based BBQ unfolds.
Robert Korn had already created a sous vide controller using Arduino and a handful of other components, with great success. He chose to apply the same model to a smoker and devised the Smokerduino, which ensures perfectly cooked meat every time with minimal effort from the chef.
Roger Theriault and his wife enjoy making cheese and yogurt at home, but this is a long process involving a thermometer and lots of waiting around. To cut some steps out, he built his own smart thermometer to monitor the temperature of the food and beep when a specific temperature was reached and it was time for the next step.
However, when the device stopped working, Theriault decided to upgrade it instead of simply fixing it. The new iteration of the thermometer uses Alexa devices too, enabling him to easily monitor and control everything cooking in the kitchen or outside in the smoker.
The way it works is fairly straightforward — just give Alexa an instruction and it will find the recipe and instruct the given device to start from step one of that recipe. It also draws on the data from the recipe to monitor the temperature and make any notifications or adjustments needed.
Better BBQs with Arduino
Monitoring and controlling cooking is one of the most useful and rewarding use cases for home automation. Arduino’s products make it possible to assemble detailed and advanced projects to take your BBQs to the next level.
Check out the project hub for some more inspiration or visit the home page to learn more about how Arduino works.
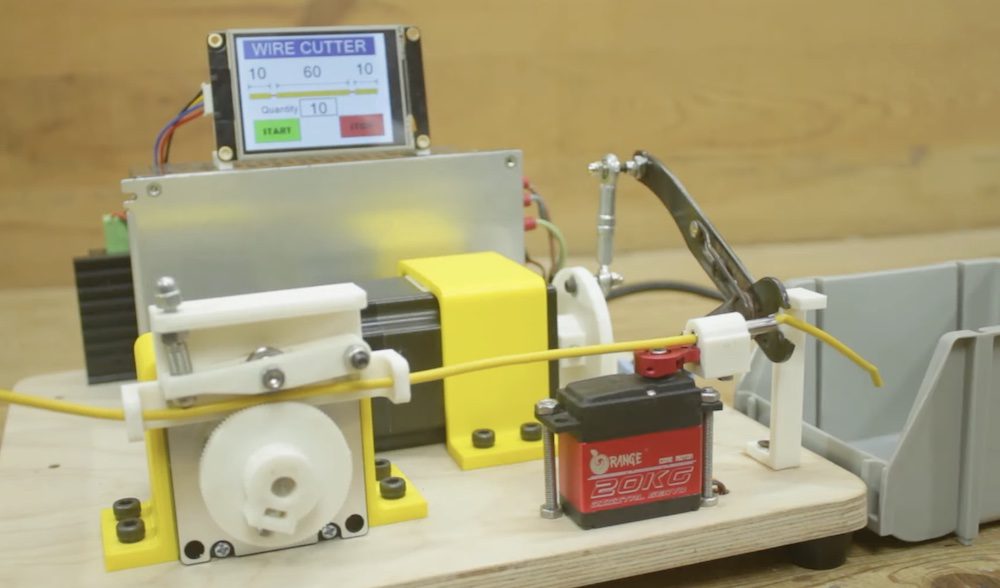
If you only need a couple of wires, it isn’t a big deal to just cut them and strip them yourself. But if you need dozens or even hundreds of wires, that becomes a very laborious task. That’s especially true if those wires need to be a precise length, which is ideal for clean wiring jobs. This machine built by Mr Innovative automatically cuts and strips wires in just a second to make such jobs much easier.
Before someone calls us out: no, this machine doesn’t fully strip the wires. It just precuts the ends so that the user can quickly pull off the insulation. But it is still doing all the hard work and is very useful. Just load up a spool of wire, feed it into the machine, set the wire length and stripped lengths, and sit back. The machine will cut through the insulation at one end, dispense the desired length of wire, cut through the insulation at the other end, and then cut that piece of wire off so it lands in a collection bucket.
If you’ve seen some of Mr Innovative’s other machines, then this will look very familiar to you. The frame is a combination of wood and 3D-printed parts. Stepper motors feed the wire and actuate the wire cutters, while a hobby servo motor directs the wire closer or further from the wire cutter blades to perform either a full cut or a cut through just the insulation. An Arduino Nano board controls the motors through drivers on a custom PCB. A Nextion touchscreen LCD panel provides the user interface for entering cut parameters.
Recently, one of Instructables user mikerobertgodfrey’s friends adopted a senior dog who experiences frequent separation anxiety, thus causing him to panic when left on his own. As an attempt to help, Mike decided to build an Internet-connected wireless treat dispenser that would accompany a pet camera for remote training.
The device was constructed by first taking various rectangular pieces of plywood an assembling them around a central hub to create a fan-like object with a total of eight compartments for treats. This component was then sandwiched between a solid wooden base and a covering plate of clear acrylic to prevent treats from falling out. Lastly, Mike attached a servo at the back in order to rotate the dispensing mechanism and also embedded an Arduino Nano RP2040 Connect board into the base.
In terms of wiring, the setup turned out quite simple, as the servo was connected to power pins and a digital pin on the RP2040. All of the “magic” happens in the Arduino IoT Cloud, where Mike configured a dashboard with inputs for dispensing a treat, manually setting the servo position, and even toggling an RGB light. Once the virtual “drop treat” button is pressed, the servo rotates a predetermined amount to drop a morsel below. Meanwhile, a counter keeps track in real-time of how many are left.
To see this project in action, you can watch its build video below and read the project’s full write-up here on Instructables.
At Arduino we like to experiment with new technologies to figure out if we can use them to improve the tools we make for our users. We’ve recently been experimenting with the Python language as a possible extension for our programming platforms, considering how it has become the number one language for many types of users. Specifically we’re looking at MicroPython, the version of Python that runs on microcontrollers. We’ve created a partnership with OpenMV, which ported their computer vision oriented virtual machine to some of our products and enabled us to do incredible stuff with the Nicla Vision (for example).
Expanding on this initial experience we were lucky enough to partner with the creator of MicroPython, Damien George, to port the official the virtual machine to a number of Arduino products. You can find our code here. We’re sure you’ll going to love it!
Thanks to one of our developers (Ubi de Feo) we were able to test MicroPython on a class of students and we’ve learned a lot from that experience. In particular, we noticed that it’s hard to find a very simple cross platform MicroPython IDE that would be as easy to use as the original Arduino IDE.
Luckily we came across the work of Murilo Polese, who developed a simple tool we were able to adapt and use for teaching. The results have been so good that we decided to collaborate with him to produce a tool we can share with the community.
We’re very excited to announce the new Arduino Lab for MicroPython, a simple, cross-platform IDE for MicroPython that supports any board with a serial REPL interface so it can also work with non-Arduino boards.
This is not an official product yet, it’s an experimental tool — but we wanted people to play with it so we created a new website “Arduino Labs,” where we’ll post experimental tools for people to try out and give us feedback. It’s not guaranteed that they will become fully released products. In the meantime, enjoy them and try them out!
You can find Arduino Lab for MicroPython at labs.arduino.cc.
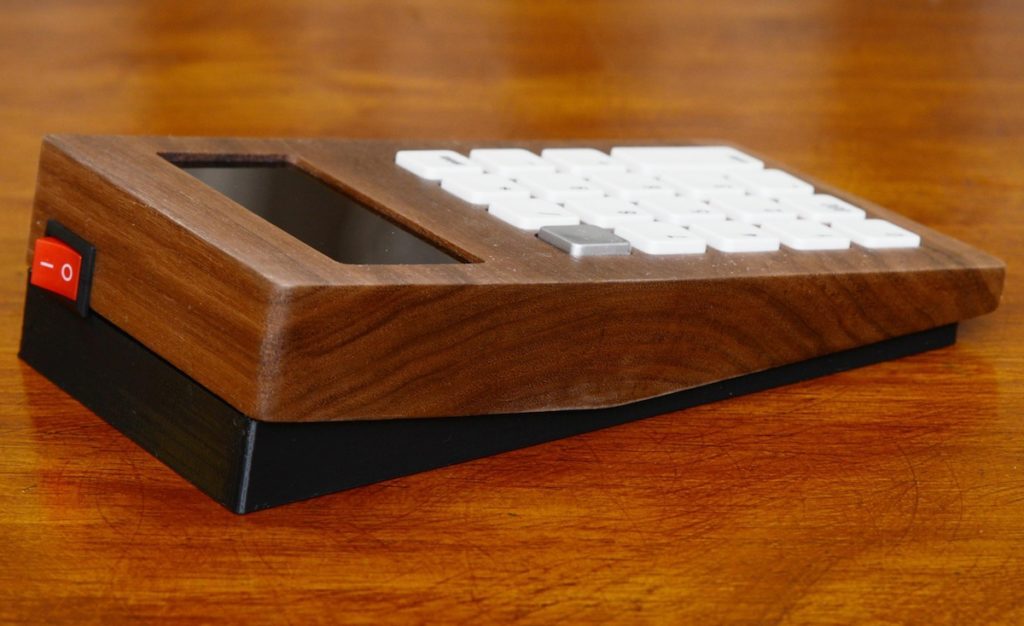
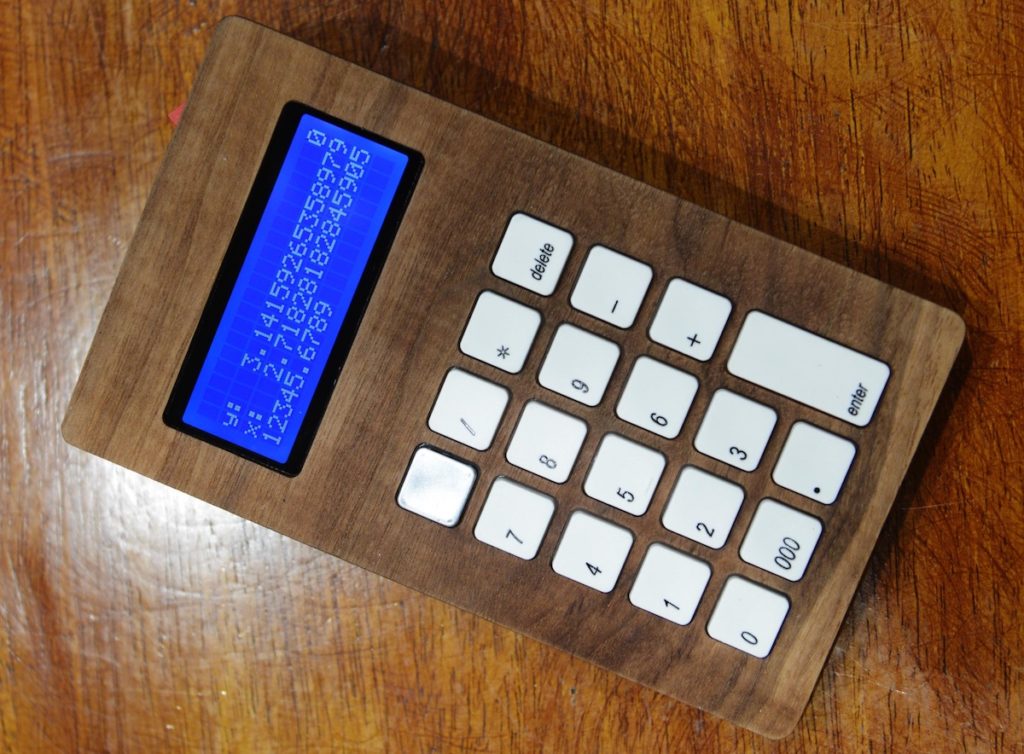
RPN (Reverse Polish notation) is a method for writing or entering mathematical calculations wherein operators come after operands. For instance, to calculate the product of 3 and 4, you would type: 3, enter, 4, enter, multiplication. This is unfamiliar to most of us, but was common for Hewlett-Packard’s early digital calculators and is still used in some programming languages, like Forth. Some people prefer RPN calculators and this one, called Woody, is the most beautiful of the bunch.
Woody is a fairly simple RPN calculator, which was its entire purpose. Most of the RPN calculators available are complicated scientific or graphing calculators. Shiura wanted basic calculator functionality, but with RPN. It is also gorgeous. The enclosure is a solid chunk of walnut wood, which was milled on a CNC router. Other than a large power switch on the back, the only features are 19 keys and a dot-matrix style LCD screen.
An Arduino Nano board reads the key presses, does the math, and outputs the results to the LCD display. The keypad came from a small numeric keyboard, which Shiura hacked to monitor the keyboard matrix directly. The Arduino connects to the screen via I2C. Power comes from a pair of AA batteries through a DC-to-DC converter. The result is a stunning calculator with all of the benefits of RPN.
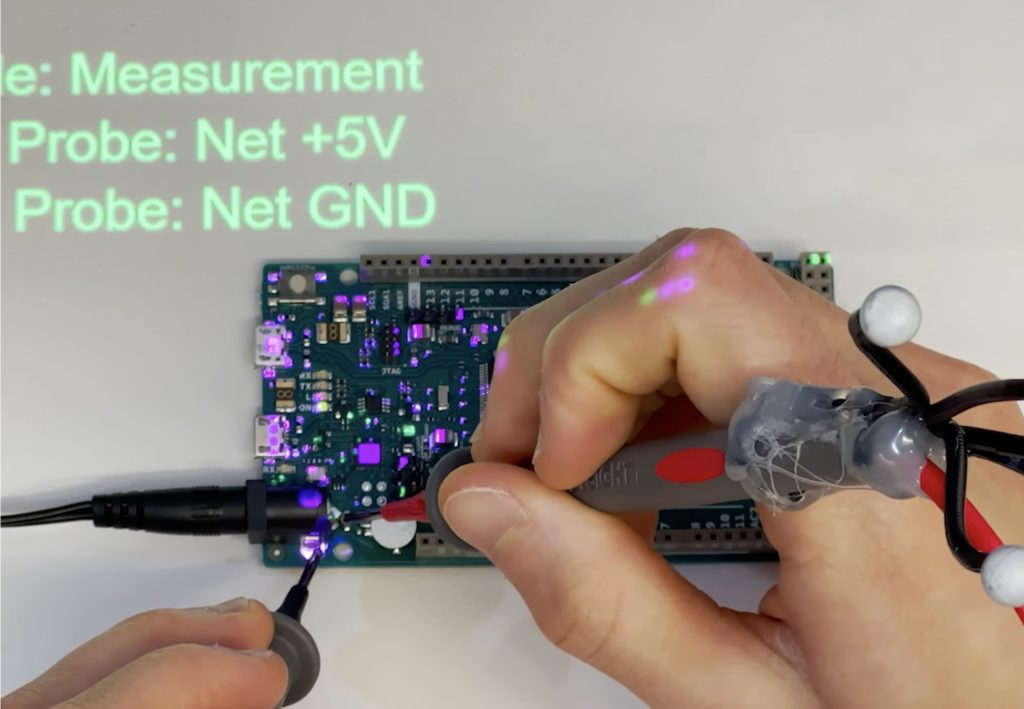
Imagine if you could identify a component and its schematic label by simply touching that component on your PCB. Imagine if you selected a pin in KiCAD and it started glowing on your real, physical PCB so you can find it easily. Imagine if you could see through your PCB’s solder mask to view the traces underneath. All of those things—and much more — are possible with this Augmented Reality Debugging Workbench (ARDW) system.
ARDW pairs tracking camera computer vision with projection mapping for fantastic augmented reality examination of PCBs. Touch a component with the special probes and ARDW will project the component’s name and label onto the table next to your board. Select a component or a component’s pin in KicAD and ARDW will project a highlighted overlay on the physical board showing you where it is. ARDW can even guide you through automated debugging by highlighting probe points and checking your measurements as you take them.
The team that developed ARDW demonstrated the system using Arduino Uno and Arduino Due boards, which were ideal choices because they’re open source and schematics are readily available. But ARDW can work with any PCB for which the user possesses design files.
It works with a plugin for KiCAD, which is open source PCB design software popular in the maker community and industry. Through KiCAD, ARDW gains access to the PCB layout and the schematics. It matches those up with the physical board sitting on the workbench and then projects graphics according to the selection and the board’s location. ARDW is extremely useful for all kinds of development, debugging, and quality control tasks.
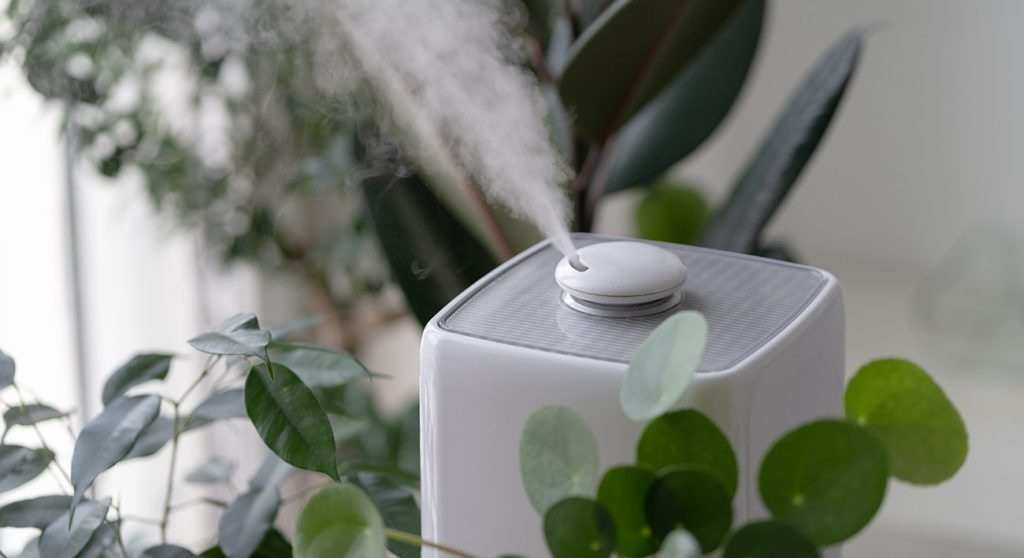
Keeping the air in your home in the right condition is incredibly important. Your home is your safe haven from the outside world, a place where you can control your environment and enjoy the comfort and peace of a secure space.
Humidifiers are an excellent way to keep the atmosphere of your home in exactly the right balance for your health and enjoyment. Traditional humidifiers work well, but automated humidifiers can work even better.
In this article, we’ll look at why humidifiers are so useful and how you can use home automation to create your own smart home humidifiers.
Why home humidification is important
Stay moisturized. Humidifiers keep the air in your home sufficiently full of moisture, which helps counteract the effects of artificial heating systems. This prevents dry skin — especially on the lips and hands — as a result of dry indoor air.
Keep your sinuses in good condition. Dry air, over time, can cause your sinuses to become irritated. It’s a feeling most people are aware of and can result in discomfort, headaches, and even nosebleeds. A good humidifier helps avoid this, ensuring your sinuses are lubricated and healthy at all times.
Make it easier to recover from illness. The right humidifier can ease the path to recovery from illnesses like the flu or a cold by helping your sinuses recover.
Minimise snoring. A noisy bed partner, over many months, can be the source of much stress and frustration. Snoring is a complex issue that can be difficult to solve, but a good humidifier can often ease the problem significantly by providing enough moisture to keep the throat and nose clear.
Living in Boston, Arduino user chenwei19940207 found that the air was so dry, especially in the evening, that a solution was needed. As a result, they decided to develop their own humidifier to turn on and off automatically, ensuring a consistent level of humidity in the air all year round and all day long.
Healthy air has three components — be fresh, clean, and the right humidity. The third factor is important because humans use evaporative cooling (sweating) to rid our bodies of excess heat. This is why humans can be comfortable and safe within a fairly wide range of humidity — between 30 to 70 percent at a push.
But we still struggle at lower levels of humidity. It can result in great discomfort, trouble breathing, and aggravated allergies, and anything below 20% humidity is especially difficult. As a result, it’s best to keep our homes at the right level of humidity.
Recognizing this, Arduino member Md. Khairul Alam developed a project to keep the home sufficiently humidified year round. His device senses the temperature and humidity in your home, checks if it is in the ideal humidity range, and turns on the humidifier to ensure you stay in the right zone.
Arduino “having11” Guy developed this project to regulate the humidity of their home. It involves attaching a dht11 temperature and humidity sensor to an Arduino, letting you modify your humidifier in a way that allows you to automatically turn the device on whenever the humidity in your home drops below a set level, for example 30%.
You also have the ability to set a “cooling down” period, avoiding the humidifier becoming overheated.
NOTE: It’s worth noting that this project uses high voltage and amperage, and doing any of these steps incorrectly could result in serious injury or even death. So be careful and don’t attempt this without any prior experience or skill!
Build a healthier smart home with Arduino
With Arduino, controlling the humidity of your home is just the beginning. Our Project Hub is filled with examples of home automation projects, using all kinds of technology to make their homes smarter, safer, and easier to live in.
Check out our site to find out more uses for Arduino and how you can get started with your own home automation projects.
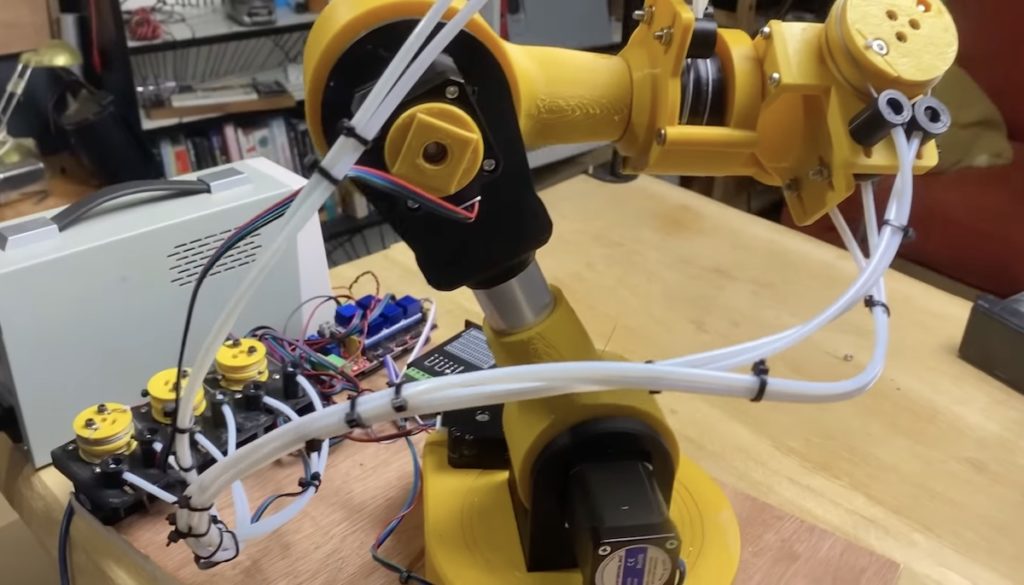
To give an electric car more range, you need a bigger battery pack. But that adds weight, so you need bigger motors and more battery capacity to compensate. This creates a vicious cycle and robot arms are susceptible to a similar problem. A robot arm needs to lift its own weight in addition to whatever it picks up. Bigger motors to increase the payload capacity also increase weight, thereby decreasing the payload capacity. This video from RoTechnic describes how to sidestep that cycle with remote motors.
RoTechnic’s robot arm has six degrees of freedom (DoF): a rotating base, a shoulder joint, an elbow joint, a rotating wrist joint, a tilting wrist joint, and a rotating end effector. If the robot were a conventional design, all of those joints (except the first two) would require a motor that adds levered weight to lift. The weight of those motors would subtract from the amount that the arm could otherwise lift. But three of this robot’s motors sit on the table nearby so that it doesn’t need to lift them.
RoTechnic used an Arduino Mega 2560 board to control those motors. Most of the robot’s other parts were 3D-printed. Some of the motors, like for base rotation and the shoulder joint, remain in the conventional location. But three of the motors actuate their joints via fishing lines fed through Bowden tubes. The motors have spools and when those rotate they loosen one line while tightening the other. Each joint has a similar spool, so the fishing lines turn them. The only limitation is that a joint can’t rotate indefinitely, but one can mitigate that by looping the fishing line around each spool many times to provide an equivalent number of revolutions.
This technique has been in use in the robotics industry for longer than computer control and isn’t groundbreaking. But RoTechnic’s build demonstrates how easy it is for hobbyists to integrate the technique into their robot designs.
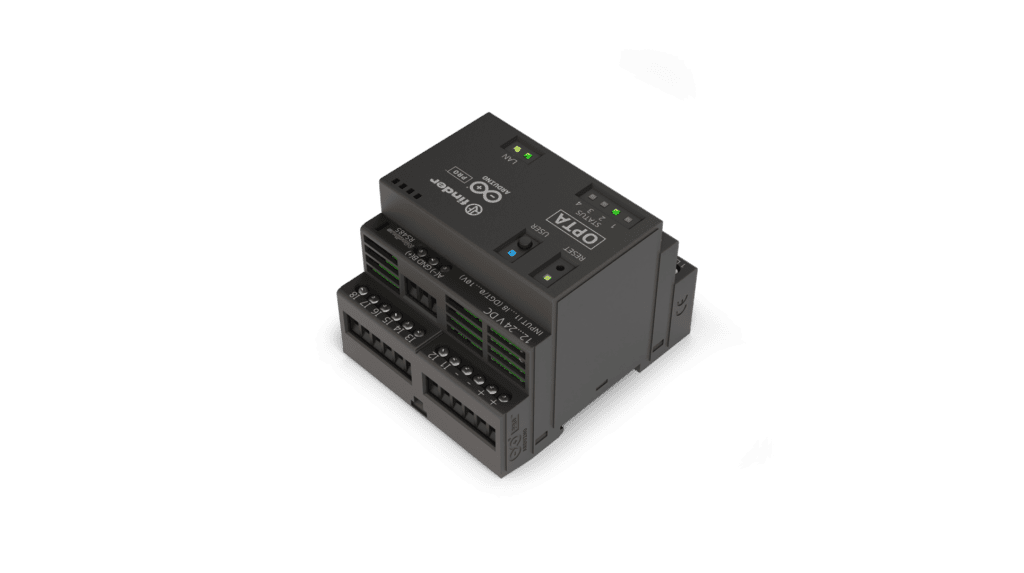
We can finally tell you all about the new product we had announced for SPS! Today, we are excited to expand the Arduino Pro range with Opta, our first micro PLC with Industrial IoT capabilities.
We designed it specifically with PLC engineers in mind: supporting standard languages including LD (Ladder Logic Diagram) and FBD (Function Block Diagram), it allows professional users to scale up industrial and building automation projects leveraging our signature open-source, easy-to-use, anti-vendor-lock-in approach.
We partnered with none other than Finder — a leader in the field of mission-critical electromechanical and electronic components with 65+ years of excellence and expertise to its name — to create the most durable, reliable, secure and high-performance component possible, while still maintaining our signature flexibility and ease of deployment in production.
Through its onboard connectivity and machine learning capabilities, Opta opens up new opportunities for industrial automation within everyone’s reach: design, iterate and implement increasingly ambitious ideas for higher-quality manufacturing, increased efficiency, better productivity and profitability. If you agree with us that innovation is here to help us face every possible challenge, we look forward to seeing the solutions you create to work better with Opta!
Here is a taste of its tech specs:
High-performance computing. Its powerful STM32H747XI dual-core Cortex®-M7 +M4 MCU enables users to perform real-time operations and implement predictive maintenance capabilities.
Secure and durable by design. Opta supports OTA firmware updates and ensures data security from the hardware to the Cloud through M2M communication, thanks to the onboard secure element and X.509 Standard compliance.
Faster turnaround. Get to work quickly with Arduino’s ease of use, flexibility and extensive sketches, tutorials and software libraries.
Three configurations to suit any user’s needs. Opta is available in three variants with incremental features: Opta Lite with onboard Ethernet and USB-C programming ports, Opta RS485 which also adds RS485 half duplex connectivity interface, and Opta WiFi, the most versatile option, featuring also Wi-Fi/Bluetooth® Low Energy connectivity.
Ready to opt in to industrial automation? Whether you are interested in real-time control, monitoring or predictive maintenance applications, find out more about Opta on our website’s dedicated page.
As a part of his business, element14 Presents’ Clem Mayer sells physical goods online and has people retrieve them near his house. But for the times he is not able to be home, Mayer was inspired by his post office’s pickup lockboxes to create his own version that could be accessed with just a code at any time.
Because this parcel container would be outside and exposed to the elements, Mayer went with a sturdy electronics cabinet that is IP66 rated and made entirely from metal. Initially, he was thinking of a system that would require users to scan a QR code on the box, go to a website, and then enter the code to gain access. However, the complex nature and network connectivity led him towards a much simpler solution instead- just enter the digits on a physical keypad. This way, a single code could be set in the Arduino Leonardo’s EEPROM and then compared each time a total of six digits are selected.
The PCB Clem designed contains a header for the Arduino, a 4×4 grid of tactile pushbutton switches, six LEDs at the top to signal which digit is active, and a relay for unlocking the box. The mechanism itself is an off-the-shelf latch housing a solenoid that unlocks whenever power is applied from the 12V power source. For more information about this project, you can watch the build video below or check out Mayer’s post here in the element14 community.
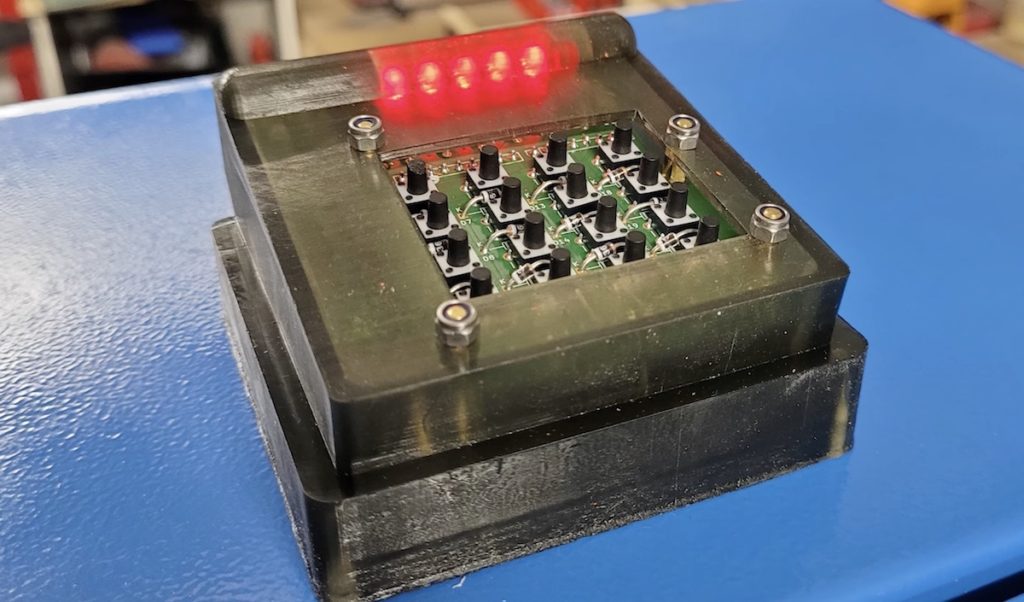
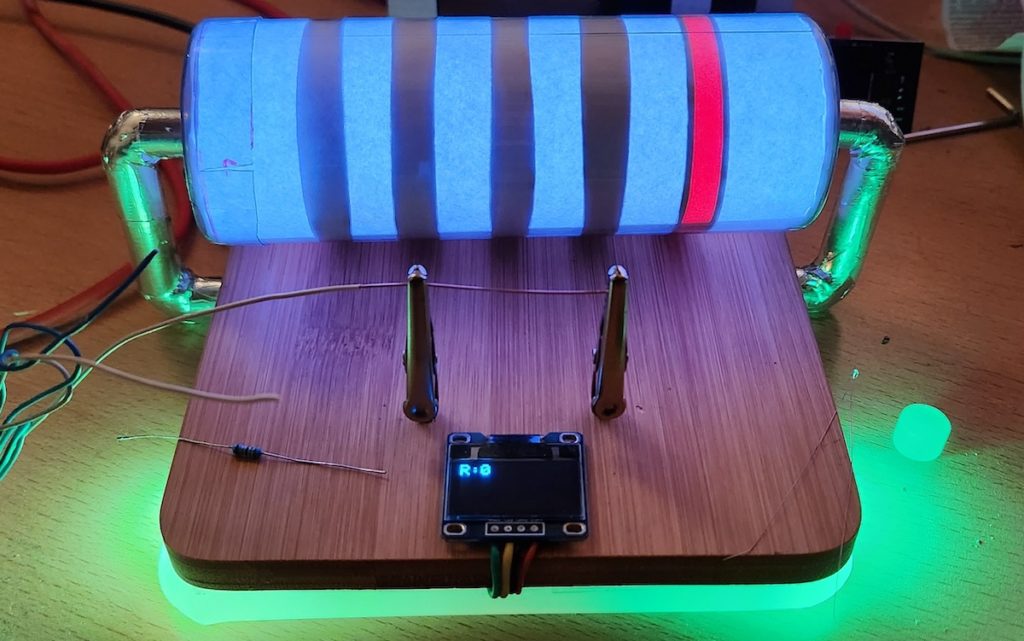
Resistor color codes are great, because they make it easy to identify a resistor’s value by referencing a simple chart (or memorizing that chart). But resistors are also very small and their color bands are hard for many of us to see clearly. Instead of buying a magnifying glass, J built the Great Resistor lamp that reproduces a resistor’s color code at a much larger scale.
To display a resistor’s value, one must first find that value. To measure the resistance of unknown resistors, J used an Arduino Nano and a 16-bit ADC (analog-to-digital converter) to measure the input and output voltages of a voltage divider circuit. One of the resistors in that circuit has a known value, while the second is the unknown resistor being tested. The three known values let the Arduino calculate the unknown value, which is the resistance of the tested resistor.
The Great Resistor then displays the resistor value in two ways. First, it shows the numerical value on a small 0.96” monochrome OLED screen. Second, it illuminates NeoPixel RGB LEDs in a tube to match the resistor’s color bands. Each color band section sits between foam dividers to isolate the colors. The Arduino determines the colors by looking at the first three digits of the resistance, which correspond to the first three bands. The fourth band is the multiplier. The fifth band specifies the tolerance of the resistor, though it isn’t clear how the Great Resistor determines that tolerance or if J always sets it to red (a loose tolerance).
Revolutionary new technologies tend to require small, incremental developments. For example, physicist Julius Edgar Lilienfeld filed a patent for a transistor way back in 1925. But it wasn’t possible to actually build transistors until semiconductor production caught up in 1947 — something that took decades of “boring” materials research. Such research may seem trivial, but often turns out to be important to the bigger picture. That is likely the case with this burrowing mole crab robot, called EMBUR, built by UC Berkeley engineers.
This Arduino Due-controlled robot can burrow into loose substrates like a mole crab in sand. In the wild, mole crabs can bury their bodies in sand within a few seconds. That is surprisingly hard to replicate, as wriggling robots tend to just push themselves up on top of the sand. The key to this robot’s burrowing ability is a special set of flexible legs. The Arduino spins motors that rotate a reciprocating mechanism to actuate legs covered in fabric. When the legs push forward into the substrate, the fabric folds to decrease resistance. Then when the legs move back, the fabric unfurls and creates resistance for propulsion.
It may seem like a novelty, but this practical development actually has wide-ranging and important applications. Robots that can burrow through the ground have many uses, from subterranean data collection to space exploration. Asteroids, for instance, are often made of loose gravel-like rock held together by gravity. If a robot could dig its way through such asteroids, it could analyze the composition and determine if the material is suitable for mining. Here on Earth, a burrowing robot would be useful in agriculture, construction, and many scientific fields.
The first Arduino UNO was launched back in 2005, with a clear purpose to allow everyone who had an idea to make it possible through a simple and open interface.
Many years have passed, technology has evolved, but we never forgot that initial thrill that came from opening up countless possibilities to so many makers.
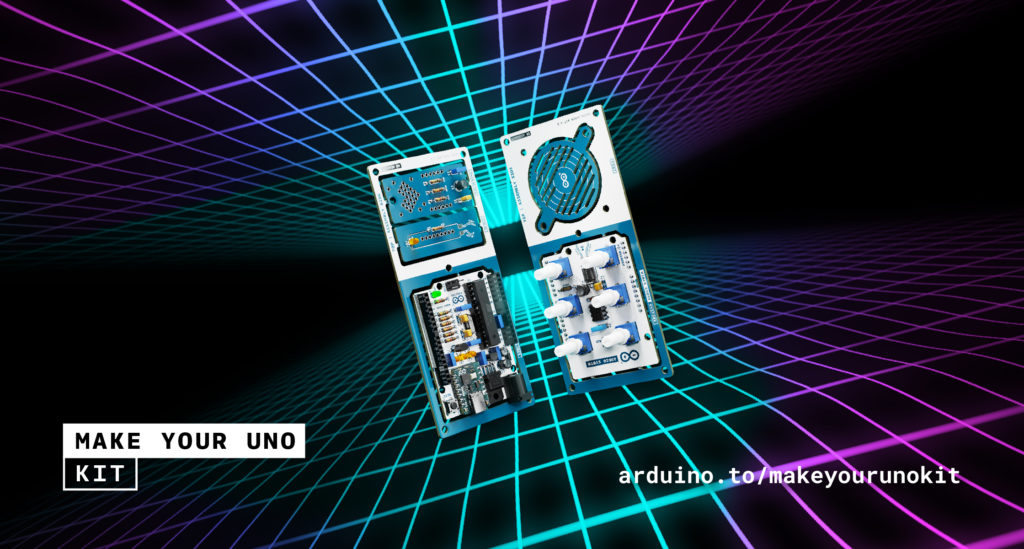
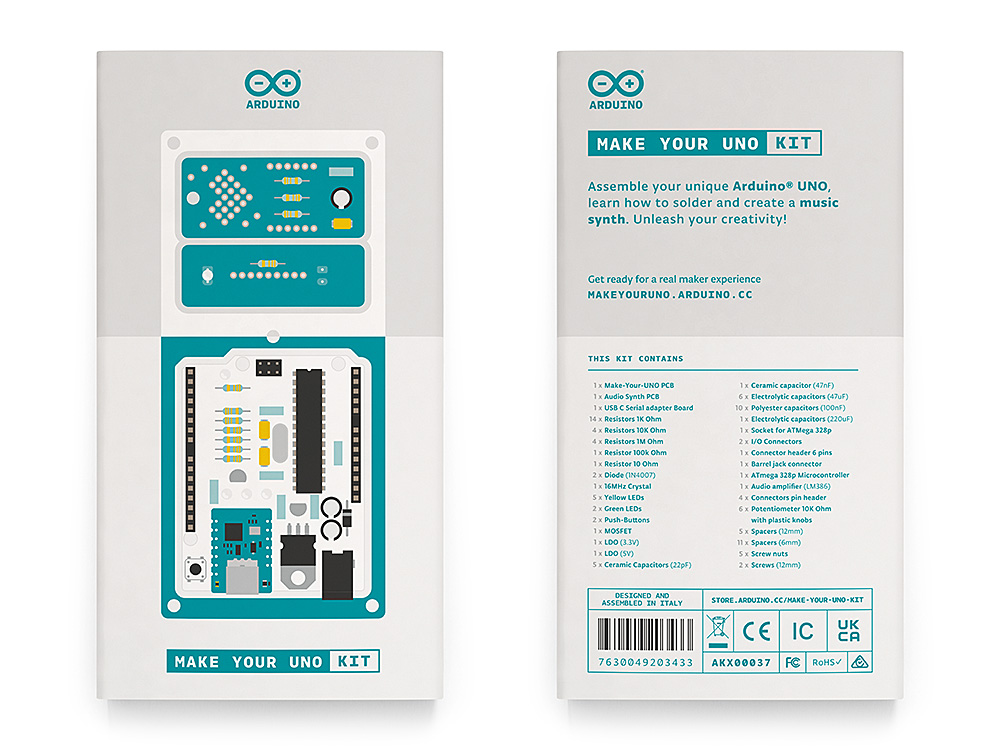
The Arduino Make Your UNO Kit is the natural extension of a story that will shape the makers of tomorrow, a step in the past to move forward in a brilliant future.
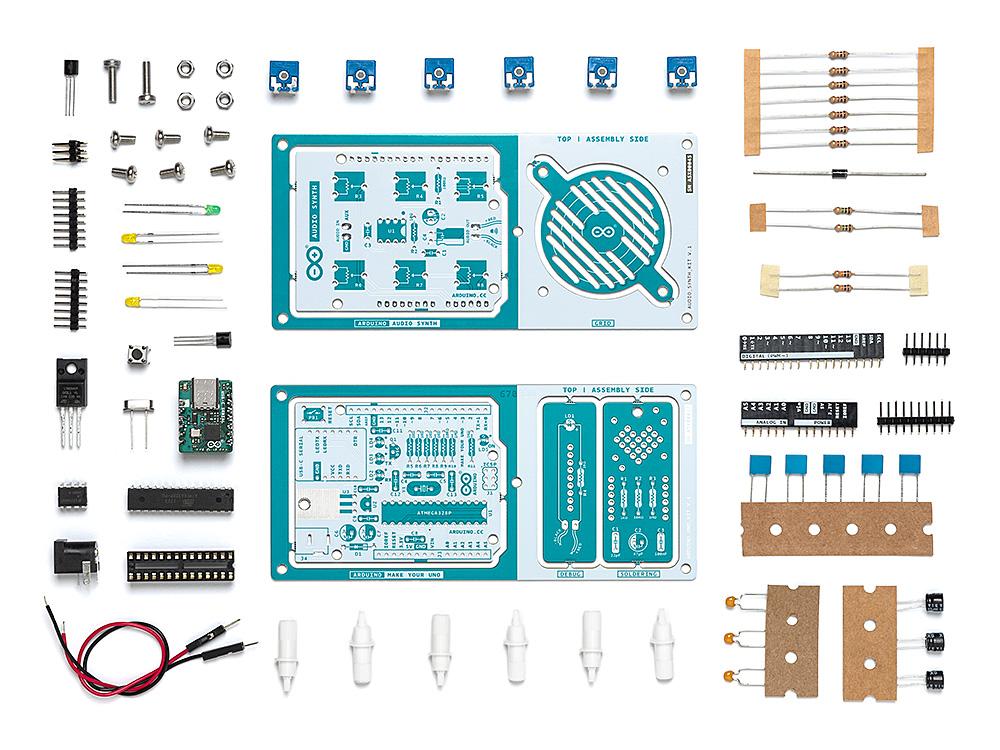
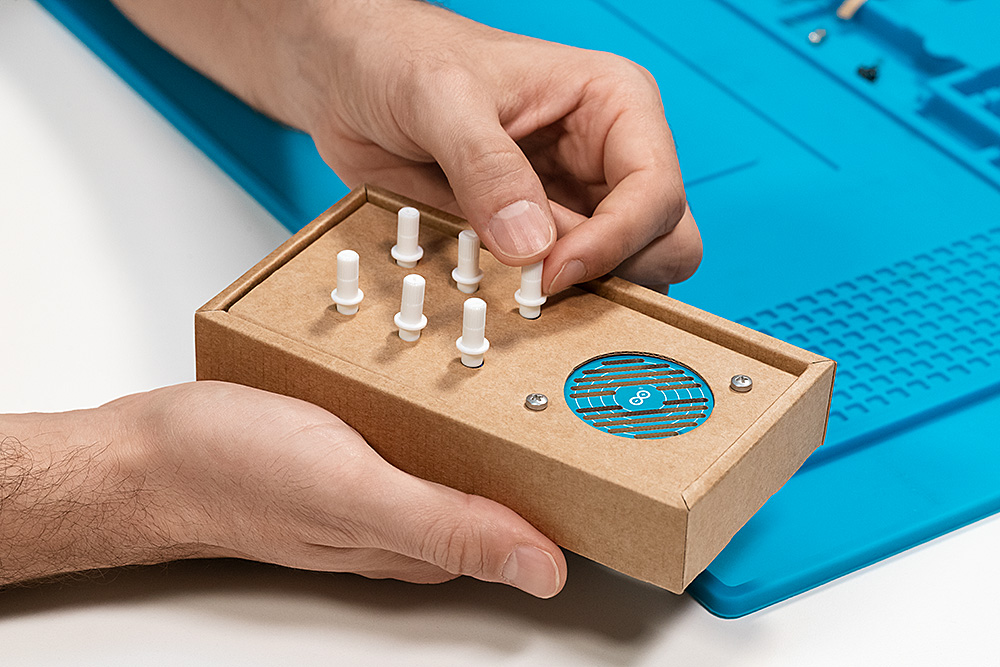
The Arduino Make Your UNO Kit is a 3×1 experience in which the user learns the basics of electronics, gets familiar with soldering, and finally builds a synth with the included shield and upcycled packaging.
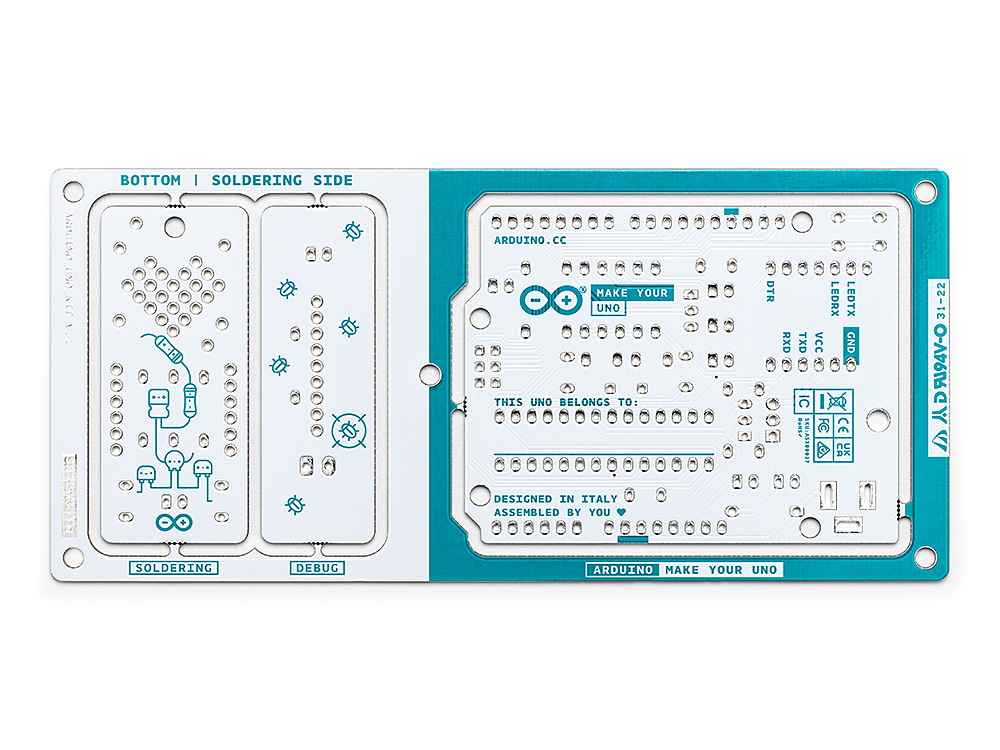
The Arduino Make Your UNO Kit experience is unique: you’ll be able to build an Arduino UNO from scratch, assembling every component, and familiarizing yourself with circuits and electronics.
A complete online guide with a 3D viewer makes it easy and fun to follow, even for an absolute beginner. Never soldered before? No worries, a practice PCB is included to test and improve your soldering skills! There’s a debugger to check your board functions properly once it’s been assembled.
There’s even a white space on the back of the board to show who it belongs to, adding to the truly personalized experience!
After the learning, comes the fun part — the unique nature of Arduino Make Your UNO Kit is not just from the assembly. At the end of the process, you’ll have in your hands a full functioning synthesizer to create tunes to your own individual beat.
The Arduino Make Your UNO Kit is also the very first of a series of more sustainable production: the packaging comes in FSC certified paper, and converts into the container for the synth. Plus, even the practice solder board can be readily used as a keychain to minimize waste.
Whether you are a beginner, a passionate maker, or a curious musician, the Arduino Make Your UNO Kit is the perfect gift for a 100% fun guaranteed experience (treating yourself is allowed)!
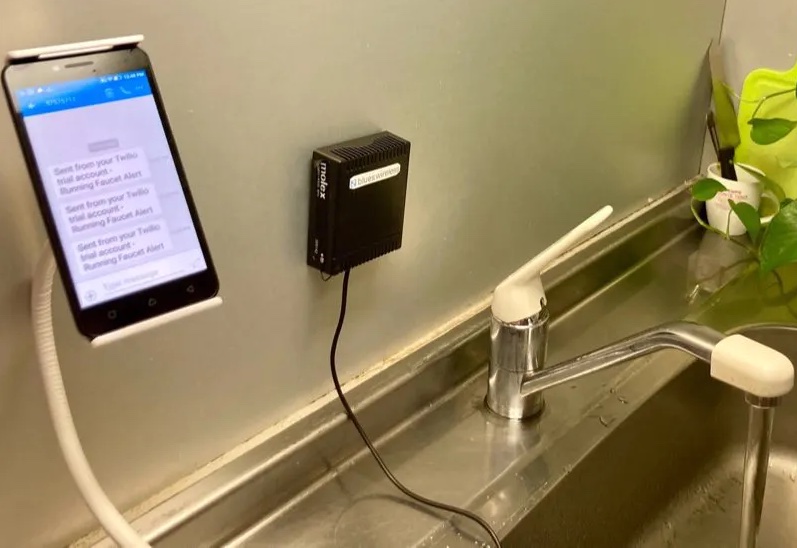
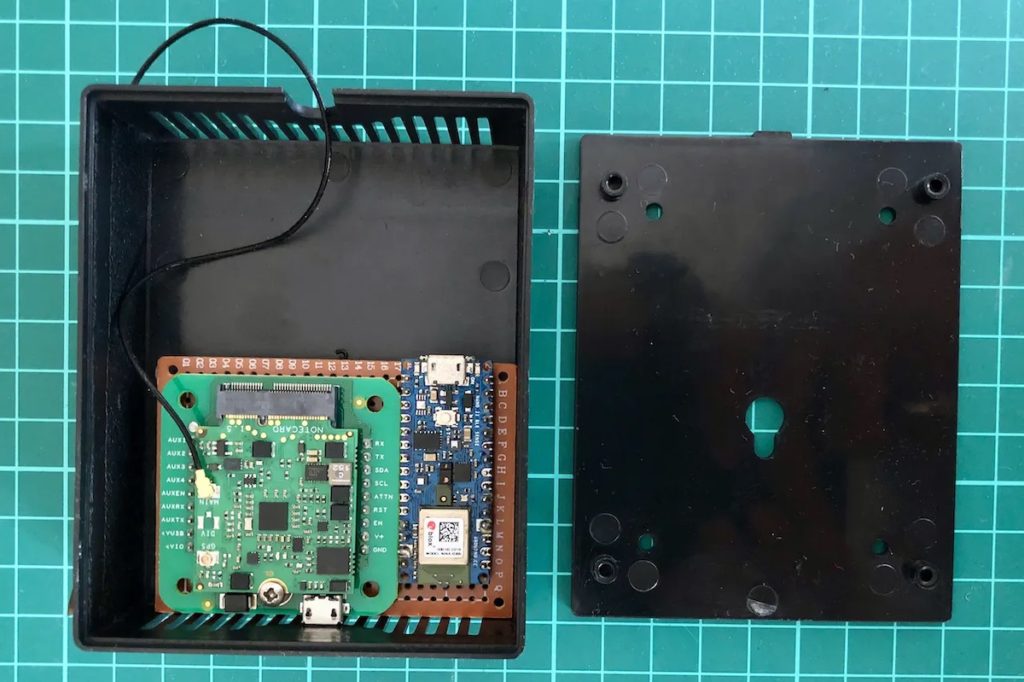
As the frequency and intensity of droughts around the world continues to increase, being able to reduce our water usage is vital for maintaining already strained freshwater resources. And according to the EPA, leaving a faucet running, whether intentionally or by accident for just five minutes can consume over ten gallons of water. However, Naveen has leveraged the power of machine learning to build a device that can automatically detect running faucets and send alerts over a cellular network in response.
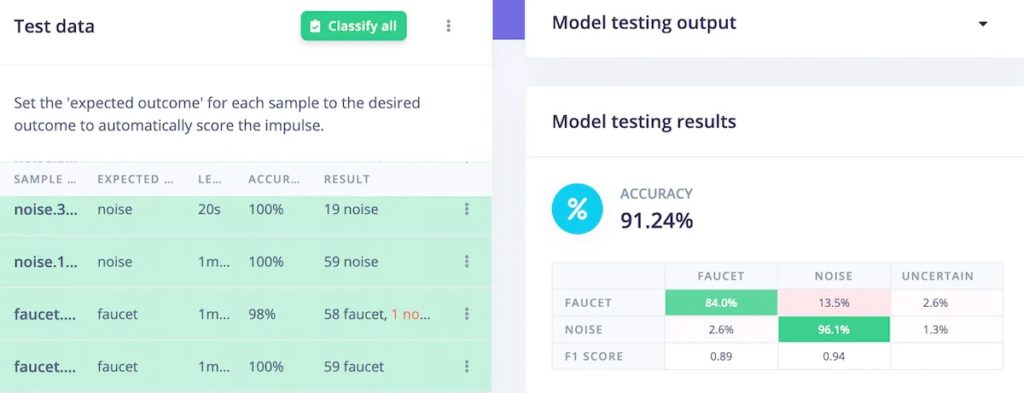
The hardware for this project is primarily centered around a Blues Wireless Notecard for cellular connectivity, a Blues Wireless Notecarrier-B as its breakout board, and a machine learning-capable microcontroller in the form of an Arduino Nano 33 BLE Sense. Beyond merely having a 32-bit Arm Cortex-M4 processor and 1MB of flash storage, its built-in microphone can be used to easily capture audio data. In this project, Naveen uploaded a dataset containing 15 minutes of either faucet noises or background noise into the Edge Impulse Studio before training a 1D convolutional neural network, which achieved an accuracy of 99.2%.
From here, a new Twilio route was created that allows the Blues Wireless Notecard to generate SMS messages by sending an API request. Now whenever a faucet has been classified as running for too long, the Nano 33 BLE Sense can transmit a simple command over I2C to the Notecard and alert the recipient.
A beautiful, lush garden is a wonderful thing. Not only does it look good year-round and impress the neighbours, but itâs also a great place to spend time in the summer months and entertain guests.
However, a good garden is not an easy thing to maintain. It takes many hours of hard work and toil to create a beautiful garden in the first place, and then many more hours to keep it that way. If you take a vacation or have a few busy weeks, things can start to go wrong fast.
The good news here is that home automation can save the day. With the right tools, you can build a smart garden that cares for itself in many ways and is more efficient, convenient, and even more impressive.
In this article, weâll take a look at why a smart garden is the best kind of garden, and some of the smart features you could consider building into your own outdoor space.
How home automation helps with gardening
It saves time and stress. Smart gardening tools allow you to automate a lot of your gardening work, from mowing the lawn to watering the flowers, so you can spend more time enjoying your garden and less time worrying about it.
Itâs more efficient. With the right combination of smart gardening tools, you can optimize energy use in your garden, saving water, power, and money.
Your garden will grow better. Smart gardening devices know how to optimize your garden, ensuring your plants have just the right balance of nutrients, light, water, and more to grow in the perfect way.
Features of a smart garden
Now letâs take a look at some of the top smart gardening devices and how they work to transform your little patch of nature into the perfect self-nurturing paradise.
Smart sprinklers
Watering the garden is one of those monotonous tasks that brings very little joy but is impossible to avoid. Well, not anymore! Smart sprinklers can take care of this tedious task, working according to a pre-set schedule or even based on sensors that measure the dryness of the soil. Smart sprinklers even know when to conserve water, saving you money on bills.
Smart lawn mowers
There can be a certain satisfaction in trimming the lawn, but most of the time itâs a chore. Fortunately, mowing the lawn is one of those gardening tasks that are particularly easy to automate, and smart lawn mowers can easily take care of it.
Smart lighting
The right lighting can make the difference between a welcoming, ambient outdoor space and a dark patch of grass. As well as making your garden more hospitable to you and your guests, lighting is also useful for security reasons and for helping plants grow.
Smart lighting can take your garden lighting up another notch. It can decide when to turn on based on a pre-determined schedule or by detecting light levels, and it can even adjust lighting levels to suit the environment. Smart lights can detect movement for security, and can measure natural light levels and switch on to provide your plants with the light they need.
Smart indoor plant care
Not all gardens are outdoors. More and more people, especially in cities, are tending to their own indoor gardens. There are many benefits to this â plants in the home have been shown to improve mood, boost focus, and even help you heal faster.
Home automation devices can make sure your indoor garden is healthy and cared for even when youâre not around by automating watering and feeding, managing light levels, and keeping track of your plantsâ health via sensors.
Smart soil and plant sensors
Many smart garden tools simply automate tasks we can already do ourselves. But what about things we canât do, at least not without specialist equipment? One example is measuring the levels of moisture and the balance of nutrients in your soil. Smart garden tools are able to do this, along with monitoring other conditions like temperature and light levels.
By keeping track of this data, your smart garden can ensure your plants have the perfect environment to grow, allowing you to make changes and adjustments in response to changes in conditions. You can learn about the perfect time to water your plants, the exact nutrients your soil needs most, and much more. Itâs a data-driven approach to gardening.
Weather sensors
The weather can be an unpredictable thing, but itâs one of the most important factors when it comes to growing and managing a healthy garden. Keeping track of the weather is now easier than ever with the right smart garden solutions, which can monitor things like rain, temperature, humidity, and more.
This information allows you to better understand your garden and learn what types of plants thrive best there, as well as make adjustments to help your current plants adapt and grow more successfully.
Grow a smart garden with Arduino
Arduinoâs Project Hub is full of examples of people who have used automation to build their own, DIY garden projects. Arduino is built to be simple, user-friendly, and effective â helping you take control of your home automation.
Um dir ein optimales Erlebnis zu bieten, verwenden wir Technologien wie Cookies, um Geräteinformationen zu speichern und/oder darauf zuzugreifen. Wenn du diesen Technologien zustimmst, können wir Daten wie das Surfverhalten oder eindeutige IDs auf dieser Website verarbeiten. Wenn du deine Einwillligung nicht erteilst oder zurückziehst, können bestimmte Merkmale und Funktionen beeinträchtigt werden.
Funktional
Immer aktiv
Die technische Speicherung oder der Zugang ist unbedingt erforderlich für den rechtmäßigen Zweck, die Nutzung eines bestimmten Dienstes zu ermöglichen, der vom Teilnehmer oder Nutzer ausdrücklich gewünscht wird, oder für den alleinigen Zweck, die Übertragung einer Nachricht über ein elektronisches Kommunikationsnetz durchzuführen.
Vorlieben
Die technische Speicherung oder der Zugriff ist für den rechtmäßigen Zweck der Speicherung von Präferenzen erforderlich, die nicht vom Abonnenten oder Benutzer angefordert wurden.
Statistiken
Die technische Speicherung oder der Zugriff, der ausschließlich zu statistischen Zwecken erfolgt.Die technische Speicherung oder der Zugriff, der ausschließlich zu anonymen statistischen Zwecken verwendet wird. Ohne eine Vorladung, die freiwillige Zustimmung deines Internetdienstanbieters oder zusätzliche Aufzeichnungen von Dritten können die zu diesem Zweck gespeicherten oder abgerufenen Informationen allein in der Regel nicht dazu verwendet werden, dich zu identifizieren.
Marketing
Die technische Speicherung oder der Zugriff ist erforderlich, um Nutzerprofile zu erstellen, um Werbung zu versenden oder um den Nutzer auf einer Website oder über mehrere Websites hinweg zu ähnlichen Marketingzwecken zu verfolgen.