Schlagwort: Midi

  • Turning a desk mat into a MIDI drum kit

    Turning a desk mat into a MIDI drum kit

    Reading Time: 2 minutes

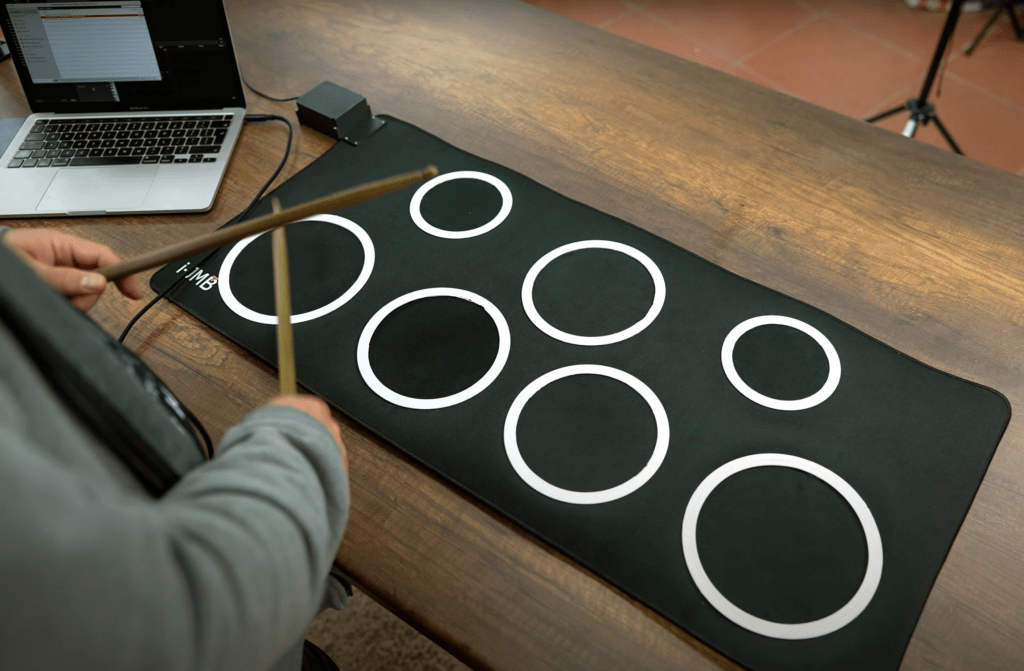
    Playing drums is a lot of fun, but drum sets are very big and very loud. They also aren’t cheap. Those factors keep them from being an option for many people who would otherwise be interested. Conventional electronic drum sets are much quieter and a bit more compact, but they still take up a fair amount of space and come with hefty price tags. That’s why Cybercraftics designed this DIY drum set mat that solves all of those problems.

    This is an electronic drum set in the form of a flexible desk mat. It is affordable to build and can be tucked away in a closet or cupboard when not in use. It doesn’t have the same layout as a real drum set, but it can still help new drummers learn fundamentals like paradiddles. Those require a lot of practice to ingrain the motions into muscle memory and this mat makes it possible to run through the rudiments just about anywhere without loud noises disturbing anyone.

    Cybercraftics designed this drum mat to work like a standard MIDI (Musical Instrument Digital Interface) input device, but with piezoelectric sensors instead of buttons. Those produce a signal when struck. They are analog signals and there are seven sensors, so this project uses an Arduino Leonardo board that has enough analog input pins. The Leonardo also has a Microchip ATmega32U4 microcontroller, which means it is configurable as a USB HID — handy for interfacing with whatever MIDI software you may want to use.

    On the physical side, this is just two desk mats cut and glued together, which circular pieces covering the piezoelectric sensors. A small 3D-printed enclosure protects the Arduino.

    [youtube https://www.youtube.com/watch?v=3wSPyhD2FfM?feature=oembed&w=500&h=281]

    If you’ve ever wanted to get into drumming, this may the opportunity you’ve been waiting for.

    The post Turning a desk mat into a MIDI drum kit appeared first on Arduino Blog.

    Website: LINK

  • Reliving elementary school with a robotic recorder

    Reliving elementary school with a robotic recorder

    Reading Time: 2 minutes

    The recorder is a type of flute that is very popular in elementary schools because the instrument is so simple and inexpensive. If you were born in the last four decades and grew up in a western country, then there is a very good chance that you were required to learn how to play some basic melodies on a recorder. But like all instruments, the recorder is difficult to play well. So Luis Marx built a robotic recorder that could do the tricky parts.

    Marx still has to blow into the mouthpiece to play this robotic recorder, but it takes care of the rest. A standard recorder has eight holes: seven finger holes on top and one thumb hole on bottom. The player’s spare thumb and finger help them stabilize the instrument. This contraption uses eight solenoids to close or open the holes according a pre-programmed sequence. It doesn’t appear that Marx integrated MIDI capability, but that would make it much easier to play new songs.

    The current implementation has the sequence of notes programmed into an Arduino sketch. That sketch runs on an Arduino Nano board, which controls the solenoids through eight MOSFETs. Power comes from a 650mAh LiPo battery and everything attaches to the recorder via a 3D-printed frame. As you can hear in the video, this works quite well. Foam earplugs on the solenoid rams ensure an airtight seal on the finger holes, resulting in clean sound as long as Marx’s blowing technique is good.

    [youtube https://www.youtube.com/watch?v=-AKAh1zPo5k?feature=oembed&w=500&h=281]

    The post Reliving elementary school with a robotic recorder appeared first on Arduino Blog.

    Website: LINK

  • Old RC transmitter becomes new MIDI controller

    Old RC transmitter becomes new MIDI controller

    Reading Time: 2 minutes

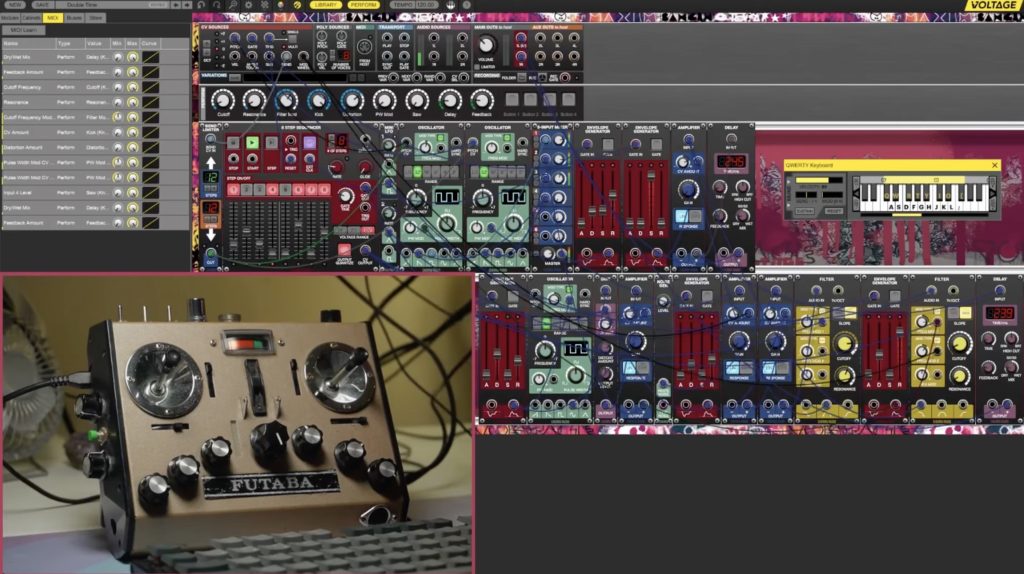
    If you’re going to produce electronic music on a PC, you need some sort of input tool. That can be your keyboard and mouse, but most producers prefer to use a dedicated MIDI (Musical Instrument Digital Interface) controller. That will provide a more intuitive and efficient experience. Instead of buying something new, HYPRREAL turned a ’70s Futaba RC transmitter into a MIDI controller.

    RC transmitters, like the vintage Futaba model used for this project, are controllers for RC vehicles like planes and cars. While cheap toy RC vehicles tend to come with dedicated transmitters, high-end vehicles work with universal transmitters like this one. They’re of a higher quality and can be used with all the vehicles in a hobbyist’s collection. Being an older model, this unit was quite simple. It only had two potentiometer joysticks and a few sliders. To expand its capability, HYPRREAL added several additional potentiometers.

    An Arduino board monitors all of the potentiometers via multiplexers. It runs a MIDI controller library, so it can send MIDI messages to a computer connected through a USB cable. As far as the computer is concerned, the connected device is just a standard MIDI controller. That means that it will work with any MIDI software and HYPRREAL only had to configure the different controls within that software. The result is a useful MIDI controller in a very attractive retro package.

    [youtube https://www.youtube.com/watch?v=dityCHaksus?feature=oembed&w=500&h=281]

    The post Old RC transmitter becomes new MIDI controller appeared first on Arduino Blog.

    Website: LINK

  • Zen sand garden in a suitcase doubles as MIDI controller

    Zen sand garden in a suitcase doubles as MIDI controller

    Reading Time: 3 minutes

    At the shallow end of the pool, a MIDI (musical instrument digital interface) controller can be as simple as a handful of buttons that correspond to different notes. But even as one wades into the deep end of the pool, MIDI controllers tend to still look like hunks of plastic with some knobs and keys. Redditor Gilou_ wanted something that felt more organic (actually, “inorganic” if we want to be technical) and so they built this unusual MIDI controller that looks like a Japanese-style sand garden in a suitcase.

    If you stumbled across this device without any context, you would assume that is exactly what it is: some kind of portable sand garden. Opening the top of the suitcase reveals a handful of dark stones resting in a bed of sand. Traditional rakes and scoops hang in straps on the lid of the suitcase. But underneath the sand there are a few electronic components that turn the sound garden into a functional instrument. A piezoelectric pickup, like the kind you’d see on some acoustic-electric guitars, in the sand translates the vibrations of sand raking and sifting into an audio signal that feeds into a computer’s sound card.

    The sound from the piezoelectric pickup might be interesting to a foley artist, but it wouldn’t be very musical on its own. To make this a useful electronic instrument, Gilou_ added an Arduino Micro board as a MIDI controller. The dark stones are knobs that sit on potentiometers, which lets the musician adjust the sound of the sand as it plays through the computer. Each potentiometer controls a different effect, such as reverb or delay, that dramatically alters the sound of the sand. Instead of something that sounds like a lapel mic rubbing on a shirt, the musician can create ambient music that is quite pleasant to hear.

    Boards:Micro
    Categories:ArduinoMIDI

    Website: LINK

  • Auto Xylophone features hand-wound solenoids

    Auto Xylophone features hand-wound solenoids

    Reading Time: 2 minutes

    Arduino TeamSeptember 15th, 2022

    A xylophone is, in addition to being one of only two known English words that start with the letter X, an instrument that most of us haven’t touched since we were toddlers. But xylophones produce a very pleasing sound and their construction is about as simple as an instrument gets. That makes them perfect for DIY projects by those of us who aren’t master craftsmen, and is likely why Rachad El Moutaouaffiq chose the instrument for this Auto Xylophone project.

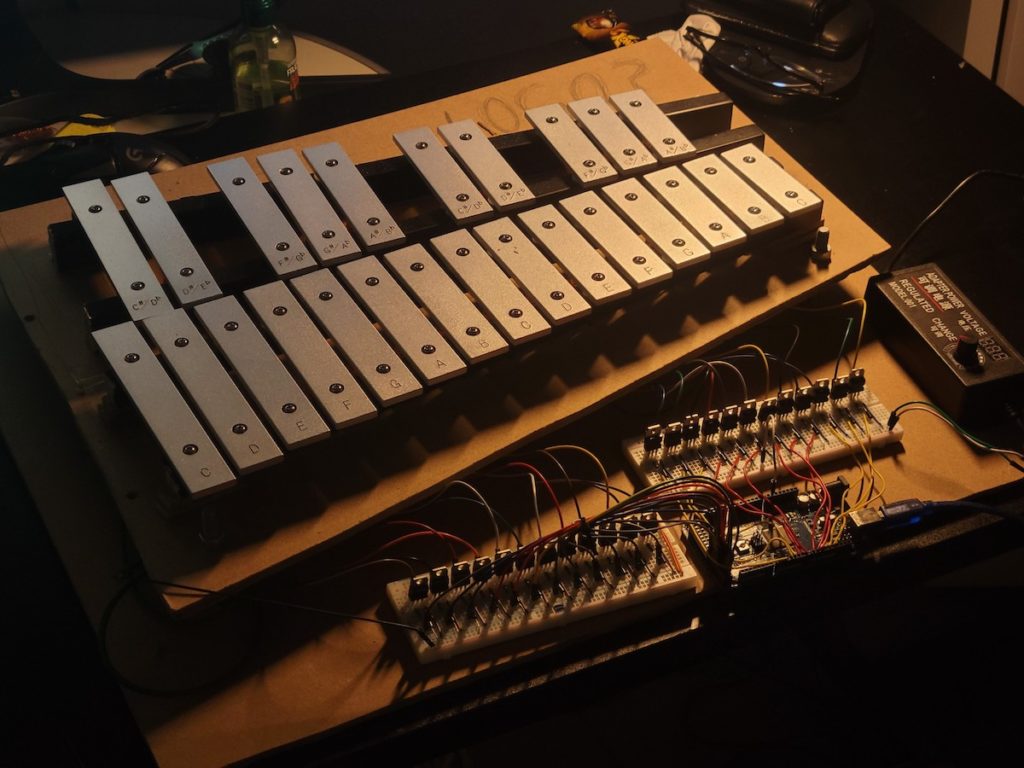
    As the name implies, this is a xylophone that plays itself. Not only does that let it create beautiful melodies that few of us are capable of hammering out with our clumsy human hands, it can actually exceed the ability of even an accomplished xylophonist. It can strike up to four bars simultaneously, allowing for richer and more complex music than a person could play with only two hands. It works with standard MIDI files and therefore can play a huge range of existing MIDI music or anything new that a musician creates in real time or through other means—such as AI generation that El Moutaouaffiq plans to experiment with. 

    Of course, an Arduino is the key to the Auto Xylophone’s operation. Instead of traditional hammers or mallets, every bar is struck by its own solenoid that drives a small nail. Solenoids rely on electromagnets and El Moutaouaffiq wound all of their coils by hand. Hairless MIDI transfers MIDI signals over serial to an Arduino Mega 2560 board that activates the solenoids through TIP-120 NPN transistors. Those transistors are necessary because the current needed to drive the solenoid electromagnets is too high for the Arduino I/O pins. Power comes from a benchtop power supply and El Moutaouaffiq constructed the xylophone’s frame using MDF.

    At this time, the Auto Xylophone only plays premade MIDI files, but we’re excited to see what kind of AI music generation El Moutaouaffiq comes up with. 

    [youtube https://www.youtube.com/watch?v=kZ-72ajURT8?start=8&feature=oembed&w=500&h=281]

    Website: LINK

  • Convert an old telephone into a MIDI instrument

    Convert an old telephone into a MIDI instrument

    Reading Time: 2 minutes

    Arduino TeamSeptember 1st, 2022

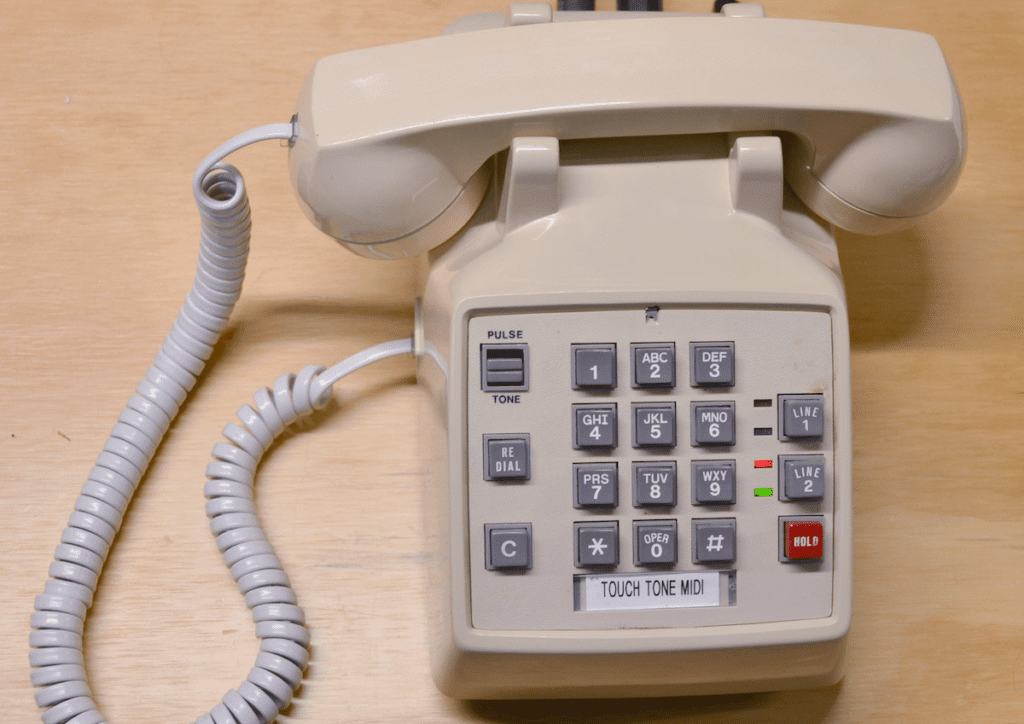
    MIDI (Musical Instrument Digital Interface) is a fantastic standard because it is versatile enough to encompass almost all instruments, but simple enough to work with using low-power digital hardware. A typical MIDI message contains three bytes. The first is a status byte that describes the action (like “note on”) and the channel to use, the second byte contains the note to play, and the third byte defines the velocity. Because a single switch can act as a trigger to send a MIDI message, one can turn an old touch tone telephone into a MIDI instrument.

    The phone used in this project and most others like it have numeric keypads set up in the same way as keyboards, with a matrix reducing the number of I/O pins needed on a connected microcontroller. Multiply the number or rows in the matrix by the number of columns to get the maximum number of keys. This particular keypad had a combined row/column total of 11, which means it could support up to 30 unique keys. But only 12 of those are connected, so the tutorial includes instructions on how to identify the key that each row/column combo triggers. Once you know that information, you can connect the row and column wires to the I/O pins of an Arduino.

    The provided Arduino sketch will handle pretty much everything else after you assign the pin numbers, but it is still worth understanding how it works. First, it loops through all of the necessary rows and columns to determine the states of every button. From there, it sends the assigned MIDI message through a MIDI jack connected to the Arduino through three wires. You can assign pre-made messages to specific keys, or you can get creative and create special algorithms that alter the messages based on key combos or sequences. Connect any MIDI output device to the MIDI jack to synthesize or sample the notes, or connect it to a computer to record MIDI sequences.

    [youtube https://www.youtube.com/watch?v=j8ts9fuTH4o?feature=oembed&w=500&h=281]

    As a bonus, this tutorial even explains how to convert the handset into a functional microphone that you can amplify, so you can have vocals to accompany your MIDI music.

    Website: LINK

  • The Root Commander is a homemade MIDI controller that ensures you never play the wrong note

    The Root Commander is a homemade MIDI controller that ensures you never play the wrong note

    Reading Time: 2 minutes

    Arduino TeamMay 8th, 2022

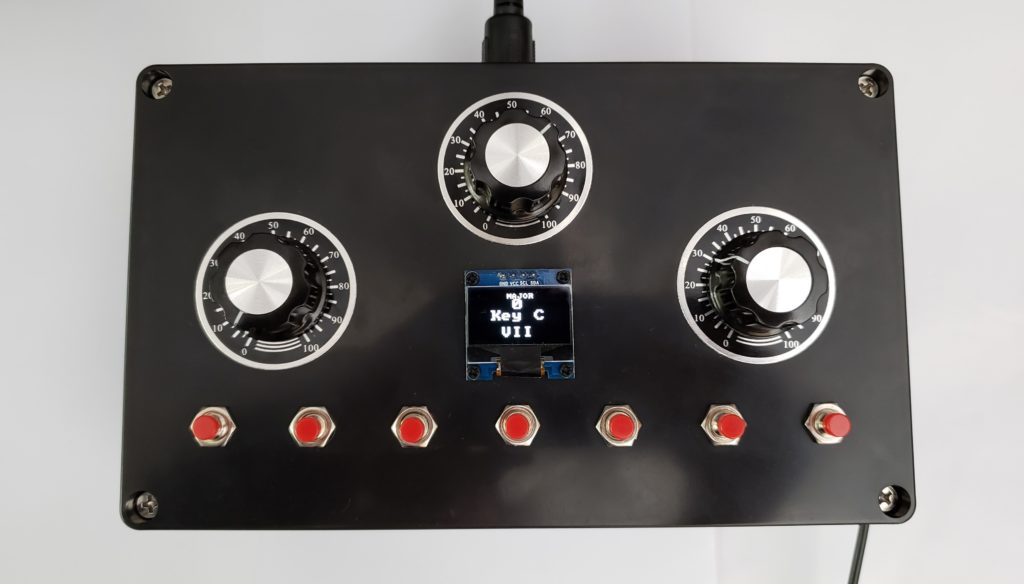
    After attempting to learn how to play the piano after some previous experience with guitar and music theory in general, YouTuber EvolutionStoneware encountered a few difficulties when trying to learn the keys on a standard MIDI keyboard. Because of this, she created a DIY MIDI controller called the Root Commander that allows for a single note to be played based on the settings of several inputs.

    Within the controller is an Arduino that reads the values from three potentiometers and determines the corresponding scale, key, and octave. Once stored, the firmware chooses the correct string containing either the scale, key, or octave depending on which range the values fall into. For example, setting the scale potentiometer to between 500 and 722 selects the “Dorian” scale. From here, these values are all shown on the integrated I2C OLED display in the center.

    Pressing one of the seven buttons at the bottom of the MIDI controller plays a note that is outputted on both the screen and through the five-pin DIN connector at the back, which enables the device to be connected to a host device that in turn translates the data into audio.

    [youtube https://www.youtube.com/watch?v=vF-8TOUuaHY?start=161&feature=oembed&w=500&h=281]

    For more details on how the Root Commander was designed and built, you can read about it here on EvolutionStoneware’s blog.

    Website: LINK

  • Making music with a Nano 33 IoT-based MIDI keyboard

    Making music with a Nano 33 IoT-based MIDI keyboard

    Reading Time: 2 minutes

    Arduino TeamDecember 21st, 2021

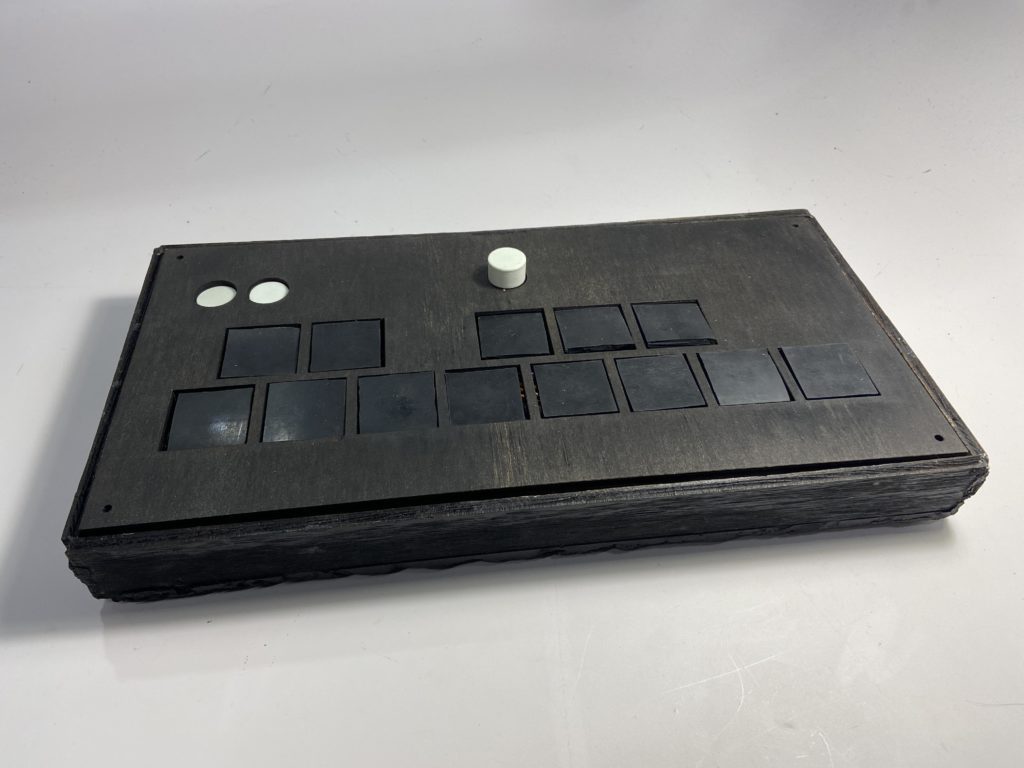
    As part of an assigned project in his class, Peter Ashmore and a partner were tasked with making some kind of interactive object, so they decided to go with a MIDI keyboard due to their shared enjoyment of music production. Modeled somewhat after the typical Launchpad, the team’s system incorporated a set of 13 buttons spanning one octave, as well as two buttons for controlling the current octave and a knob that regulates the volume. 

    The team went with an Arduino Nano 33 IoT as the brains of the operation and wired up the 15 push buttons in a pull-down configuration. After they had finished soldering each component to pieces of perfboard, each element was then assembled into a custom-built chassis that was laser cut from plywood and coated in black spray paint. 

    To enable the Nano 33 IoT to communicate with Ableton running on the host machine, the team loaded both the Hairless MIDI and loopMIDI programs onto their machine, which create a virtual bridge between the USB connection of the Nano and Ableton. Once tested, the final version of the program was loaded that checks the state of each button and either plays a note or adjusts the octave accordingly. 

    You can see this project in action below, or you can read more about it here on Instructables.

    Website: LINK

  • Light Deck is a MIDI Lightroom controller

    Light Deck is a MIDI Lightroom controller

    Reading Time: 2 minutes

    Arduino TeamOctober 21st, 2021

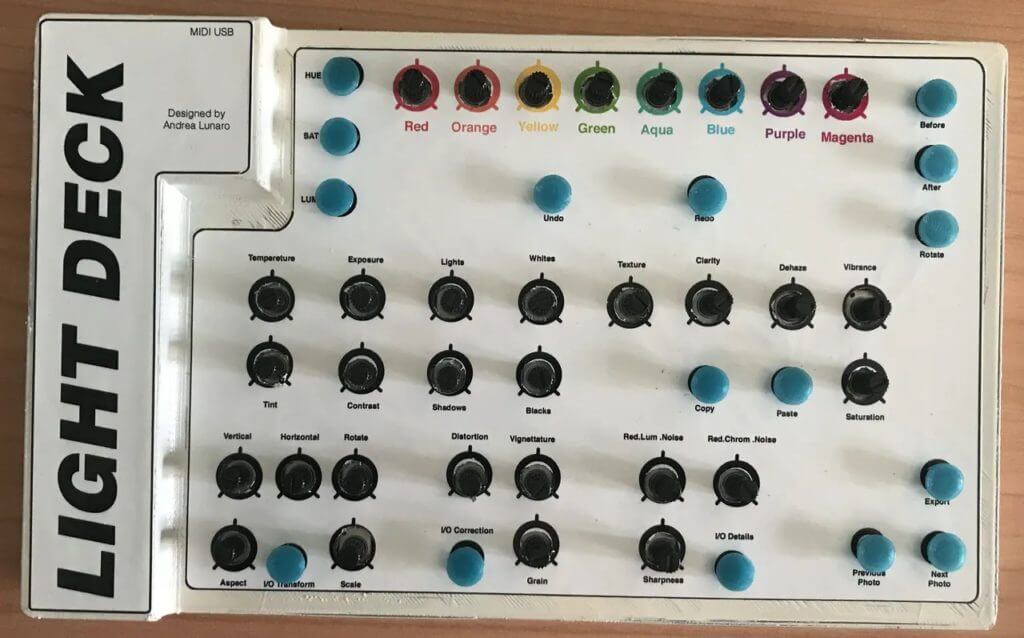
    Using Adobe Lightroom can be a tedious process, especially for those who don’t have their keyboards set up with a hundred macro shortcuts. Andrea Lunaro wanted to make this process easier by constructing a large, physical bank of buttons and potentiometers that can be used to perform a whole host of functions within Lightroom. It can output commands to copy/paste, set HSL values, do basic transformations, and navigate around the software in general, all over the MIDI protocol. 

    This device — called the Light Deck — is powered by a single Arduino Micro, which is connected to several 16-channel 74HC4067 multiplexer ICs that handle both the input and output with the bank of rotary potentiometers and buttons. Data is outputted via USB to the host computer running Lightroom where it is then converted to Lightroom commands with the help of the MISI2Lr plug-in. 

    Both the PCB and enclosure were custom-designed and assembled, with the enclosure being fully 3D-printed along with its accompanying button/potentiometer covers. As seen in this demonstration video, the Light Deck works really well at providing users with a pleasant analog interface for fine-tuning various image parameters. 

    For more information about this project, you can check out Lunaro’s write-up on Hackster.io and design files on GitHub.

    Website: LINK

  • Use an Arduino touchscreen to draw the waveforms that you’d like your synth to produce

    Use an Arduino touchscreen to draw the waveforms that you’d like your synth to produce

    Reading Time: 2 minutes

    Use an Arduino touchscreen to draw the waveforms that you’d like your synth to produce

    Arduino TeamAugust 16th, 2021

    Ordinarily, producing complex waveforms on microcontrollers requires precise adjustments within code in order to work, and this can become quite tedious. Additionally, having to wire up physical inputs such as potentiometers for quick tuning adds a lot of sprawl to a project. This is partially what inspired Kevin, who runs the DIY Electromusic website, to construct a small, Arduino-based device that allows users to sketch the waveform they want outputted via PWM.

    The main components of this project are the ILI9488 TFT shield that fits onto an Arduino Uno, along with an amplifier/speaker and an optional output filtering circuit to clean up the audio. Kevin’s unit takes in a MIDI note on the Uno’s RX pin and passes it through a wavetable function that applies the currently displayed waveform on the screen to the note being requested.

    Kevin also made a slight modification to the previously mentioned project by replacing the wavetable with a series of five sliders that correspond to various parameters for a MIDI granular synthesizer. His analog version had five large potentiometers that plugged into the analog input pins on an Uno, but this newer version greatly cleaned things up and gives more room for experimentation.

    To read more about these innovative audio control projects, you can view them on Kevin’s website here and see a quick demo below.

    [youtube https://www.youtube.com/watch?v=AbL5x0P905Y?feature=oembed&w=500&h=281]

    Website: LINK

  • Stryde is an Arduino Nano Every-powered MIDI preset loader

    Stryde is an Arduino Nano Every-powered MIDI preset loader

    Reading Time: 2 minutes

    Arduino TeamMay 23rd, 2021

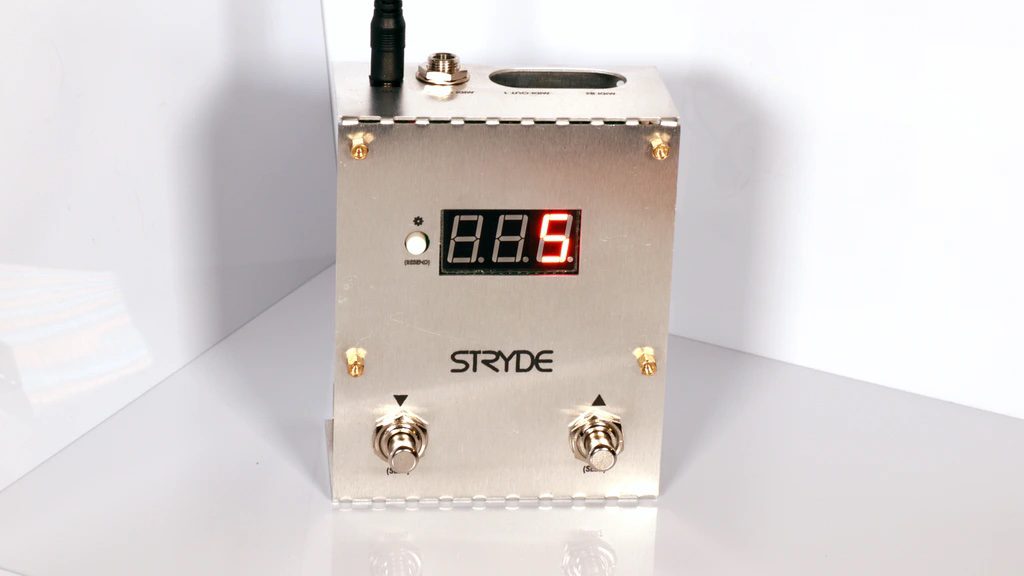
    MIDI-controlled instruments are awesome, as custom sounds can be loaded and dynamically changed while you play. However, accessing these effects often requires an external controller that can get expensive and complicated. That is why music enthusiast Joe King created the Stryde, which is a fully integrated MIDI preset loader within a small enclosure. Stryde uses an Arduino Nano Every at its core to store presets, display information, and select effects.

    As seen in King’s video below, the Nano Every has room for up to 128 total presets that can be scroll through with the help of a pair of buttons. There is also the ability to use a MIDI pedal as an input to switch which presets are currently active. The back of the Stryde contains a single port for MIDI IN and two ports for MIDI OUT with DIN connectors. Even though the device has plenty of connectivity, the best feature is probably the fact that it is open source, therefore letting users completely rewrite the firmware if they want. 

    To learn more about or back the Stryde for yourself, check out its Kickstarter campaign.

    [youtube https://www.youtube.com/watch?v=qS3BdUcAOvU?feature=oembed&w=500&h=281]

    Website: LINK

  • Convert an old cassette player into a synthesizer

    Convert an old cassette player into a synthesizer

    Reading Time: < 1 minute

    Convert an old cassette player into a synthesizer

    Arduino TeamSeptember 22nd, 2020

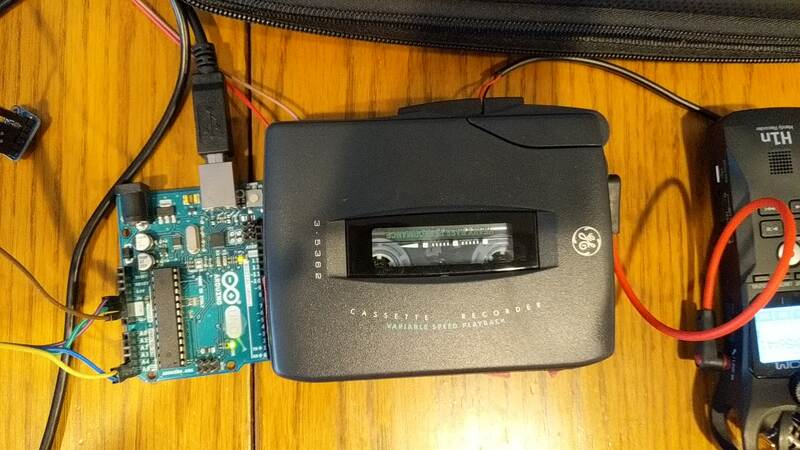
    Cassettes (if you remember those) are normally used to play back music and other audio, but what about using an old Walkman-style tape player as the instrument itself? That’s exactly what this project by Zack Scholl allows you to do, varying the playback speed to modify pitch output.

    It’s a very simple setup, requiring one to hook up wires that enable an Arduino Uno and MCP4725 DAC to adjust the speed using a voltage input. A drone sound is recorded on the tape, which may also involve some hacking depending on your equipment.

    [youtube https://www.youtube.com/watch?v=LdBik_Zlwy0?feature=oembed&w=500&h=281]

    The Walkman then emits this recorded sound, which the Arduino — here using a keyboard and computer browser-based MIDI interface — modulates by increasing or decreasing the playback speed.

    Website: LINK

  • Arduino barrel piano plays encoded sheet music

    Arduino barrel piano plays encoded sheet music

    Reading Time: < 1 minute

    Arduino barrel piano plays encoded sheet music

    Arduino TeamJune 17th, 2020

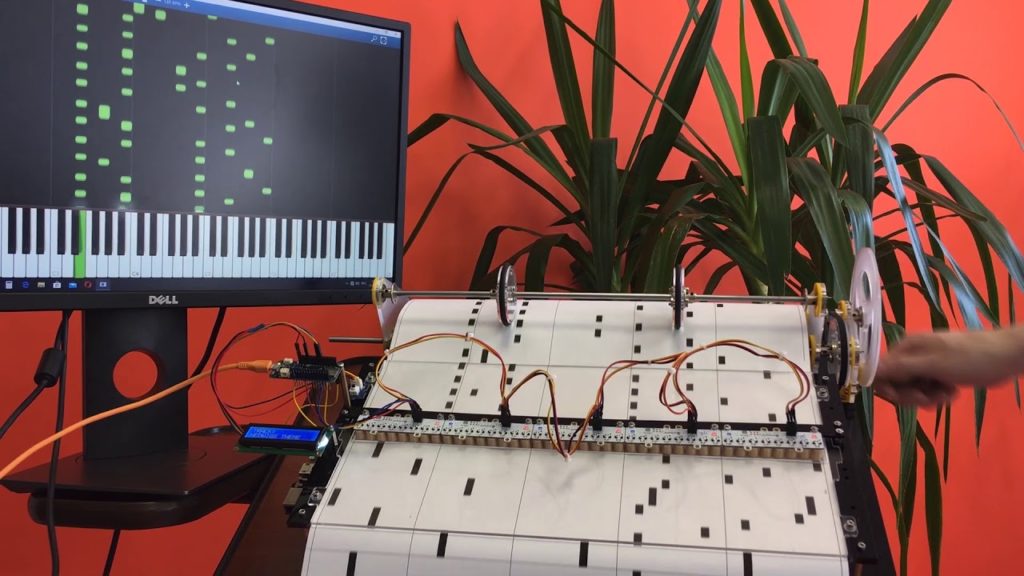
    Max Danilin created an automatic barrel piano that outputs MIDI signals, not through an SD card or internal memory, but by reading sheet music encoded on paper as black dots and dashes.

    The sheet is pulled under an array of 40 optocouplers using a hand crank — or even power drill — providing musical info to the device’s controlling MKR Zero board. These inputs are translated into USB MIDI, which can then be passed along to any synthesizer for a wide range of audio output.

    The electronics and paper feed mechanism are put together in an elegantly simple way, and it appears to work quite well in the video below. In fact, it can even be played while mobile via casters on the bottom of its stand!

    [youtube https://www.youtube.com/watch?v=-rObmt3vAhc?feature=oembed&w=500&h=281]

    Website: LINK

  • This maker turned an antique typewriter into a MIDI drum machine

    This maker turned an antique typewriter into a MIDI drum machine

    Reading Time: < 1 minute

    This maker turned an antique typewriter into a MIDI drum machine

    Arduino TeamApril 23rd, 2020

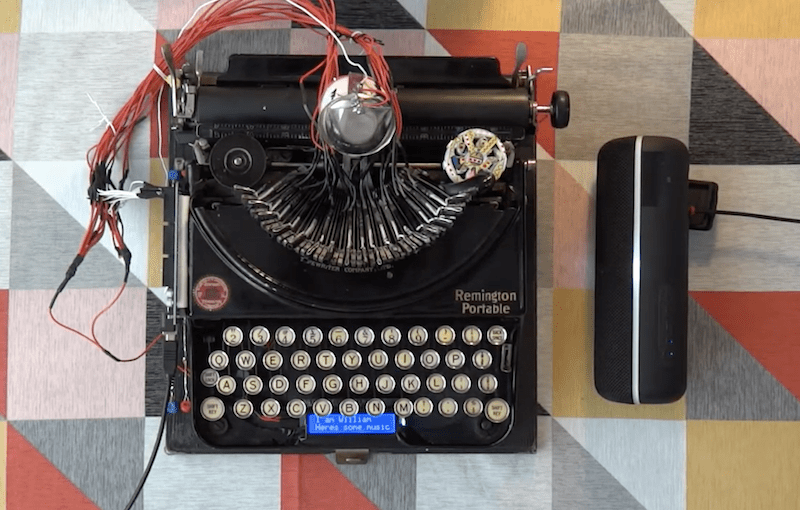
    Vintage typewriters are truly amazing pieces of technology, but unlike modern keyboards, they are decidedly one-purpose machines. William Sun Petrus, however, had other ideas for his 1920s-era Remington Portable typewriter, augmenting hammers with wires as inputs to an Arduino Mega.

    Input signals are produced when each key strikes a metallic “live plate” in the center, completing a circuit. This info is passed along as MIDI signals to a computer running Ableton digital audio software, allowing him to create the excellent beat seen in the video below. 

    Typewriter code is available on GitHub, where you’ll certainly notice the lines from Green Eggs and Ham that are output on an LCD screen at the base of the almost 100-year-old device.

    [youtube https://www.youtube.com/watch?v=zbZ-oUly3QQ?feature=oembed&w=500&h=281]

    Website: LINK

  • The ZT-2020 is a portable SunVox synth

    The ZT-2020 is a portable SunVox synth

    Reading Time: < 1 minute

    The ZT-2020 is a portable SunVox synth

    Arduino TeamFebruary 11th, 2020

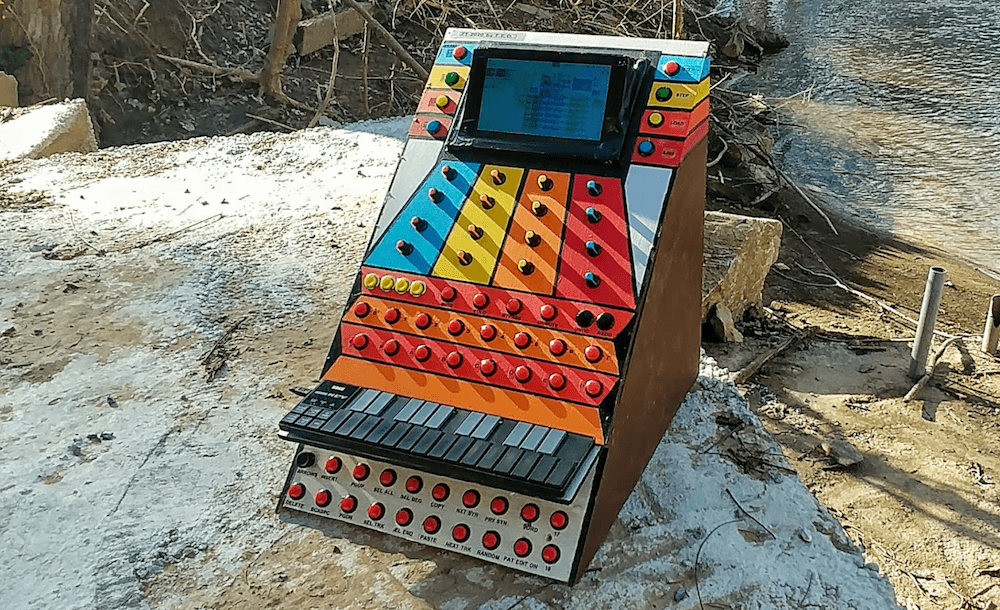
    SunVox synth software allows you to create electronic music on a wide variety of platforms. Now, with his ZT-2020 project — which resembles a miniature arcade game — YouTuber “fascinating earthbound objects” has a dedicated input scheme.

    This cabinet prominently features a wide array of buttons, a directional input from a PlayStation controller, and 16 potentiometer knobs. There’s also a screen on top for video output. 

    Inside a Raspberry Pi runs SunVox, while most of the buttons and all of the input knobs are connected to an Arduino Mega. The Mega plays the role of MIDI controller as well, passing digital music info along to produce beautiful electronic music!

    [youtube https://www.youtube.com/watch?v=7rnk2qte4-I?feature=oembed&w=500&h=281]

    Website: LINK

  • The Synthfonio is a guitar-shaped MIDI instrument

    The Synthfonio is a guitar-shaped MIDI instrument

    Reading Time: 2 minutes

    The Synthfonio is a guitar-shaped MIDI instrument

    Arduino TeamJanuary 30th, 2020

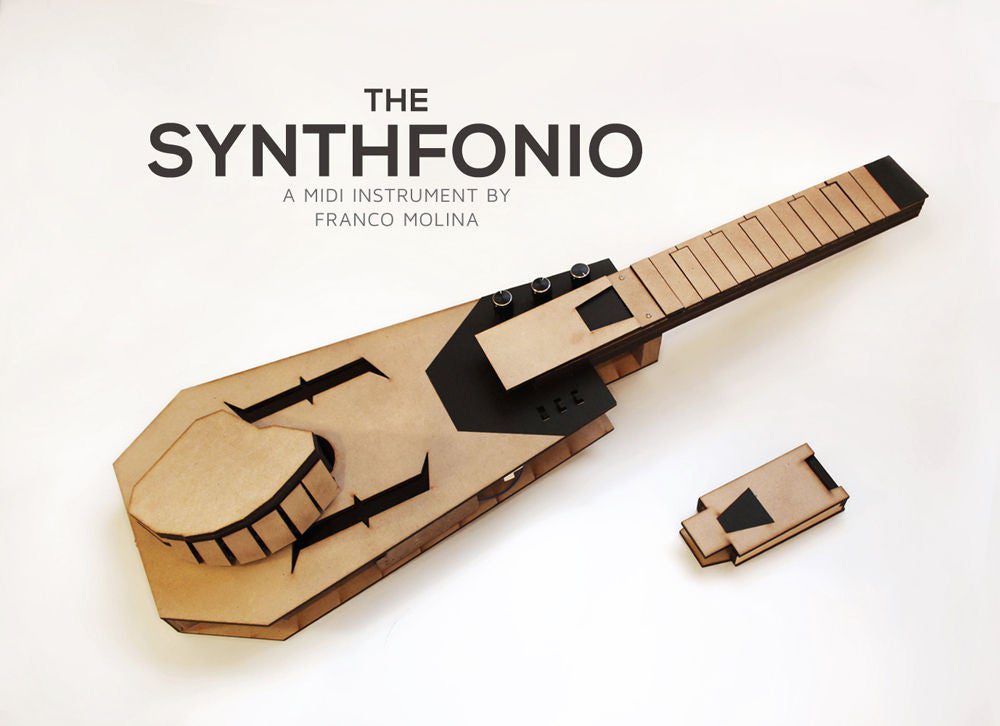
    Learning to play an an instrument well takes a lot of time, which many people don’t have. To address this, Franco Molina — who enjoys MIDI controllers and writing music, but describes himself as being terrible at playing the keyboard — created the Synthfonio.

    Molina’s DIY device is vaguely reminiscent of a guitar, with a series of keys on the neck that indicate the chords and key signatures, and another set roughly positioned where you’d strum a guitar to play the notes.

    [youtube https://www.youtube.com/watch?v=nHLOiu6qr9E?feature=oembed&w=500&h=281]

    The Synthfonio is assembled from laser-cut MDF sections, and utilizes a MKR WiFi 1010 to take care of I/O and MIDI functions. A second microcontroller in the form of an ATmega328 on a breadboard is used to produce actual synth sounds, though most Arduinos would be suitable either function.

    [youtube https://www.youtube.com/watch?v=ebnr9OELv9g?feature=oembed&w=500&h=281]

    The Synthfonio features 2 sets of keys, one to define chords and key signatures, and another one to actually play the notes. Whatever chord is pressed in the instruments neck keys, will define the pitch of the keys on the instrument handle. Similar to a guitar, violin, and other string instruments; with the added advance that the Synthfonio is a smart device that can deduce the chords being played from a single set of notes. This way, for example, the musician can use the handle keys to play chords, melodies, and arpeggios in the key of A, just by pressing the A key on the neck. In the same way, pressing the A key on the neck in conjunction with the C key (minor third of A) will activate an A minor tonality for the handle keys.

    This can allow any player to execute a 4-chord melody, accompaniment, or even improvisation; with no more than one or two fingers in position.

    Website: LINK

  • Playing The Doors with a door (and a Raspberry Pi)

    Playing The Doors with a door (and a Raspberry Pi)

    Reading Time: 2 minutes

    Floyd Steinberg is back with more synthy Raspberry Pi musical magic, this time turning a door into a MIDI controller.

    I played The Doors on a door – using a Raspberry PI DIY midi controller and a Yamaha EX5

    You see that door? You secretly want that to be a MIDI controller? Here’s how to do it, and how to play a cover version of “Break On Through” by The Doors on a door 😉 Link to source code and the DIY kit below.

    If you don’t live in a home with squeaky doors — living room door, I’m looking at you — you probably never think about the musical potential of mundane household objects.

    Unless you’re these two, I guess:

    When Mama Isn’t Home / When Mom Isn’t Home ORIGINAL (the Oven Kid) Timmy Trumpet – Freaks

    We thought this was hilarious. Hope you enjoy! This video has over 60 million views worldwide! Social Media: @jessconte To use this video in a commercial player, advertising or in broadcasts, please email [email protected]

    If the sound of a slammed oven door isn’t involved in your ditty of choice, you may instead want to add some electronics to that sweet, sweet harmony maker, just like Floyd.

    Trusting in the melodic possibilities of incorporating a Raspberry Pi 3B+ and various sensory components into a humble door, Floyd created The Doors Door, a musical door that plays… well, I’m sure you can guess.

    If you want to build your own, you can practice some sophisticated ‘copy and paste’ programming after downloading the code. And for links to all the kit you need, check out the description of the video over on YouTube. While you’re there, be sure to give the video a like, and subscribe to Floyd’s channel.

    And now, to get you pumped for the weekend, here’s Jim:

    The Doors – Break On Through HQ (1967)

    recorded fall 1966 – lyrics: You know the day destroys the night Night divides the day Tried to run Tried to hide Break on through to the other side Break on through to the other side Break on through to the other side, yeah We chased our pleasures here Dug our treasures there But can you still recall The time we cried Break on through to the other side Break on through to the other side Yeah!

    Website: LINK

  • theMIDInator is a marvelous MIDI controller

    theMIDInator is a marvelous MIDI controller

    Reading Time: 2 minutes

    theMIDInator is a marvelous MIDI controller

    Arduino TeamDecember 9th, 2019

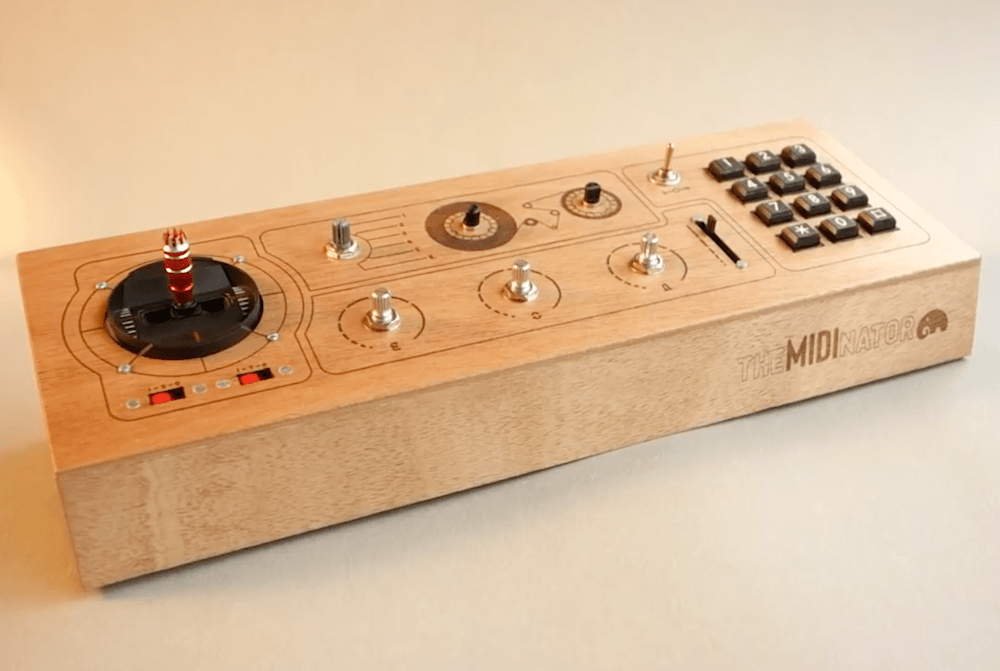
    While you may know on some level that an Arduino can help you make music, you probably haven’t seen as good an implementation as this MIDI controller by Switch & Lever. 

    The device features a numeric pad for note input, which can also be used as a drum pad, and a variety of knobs and even a joystick for modifying the beats. Controls are housed inside a beautiful laser-cut, glued, and finished wooden enclosure.

    An Arduino Mega (with its 54 digital IO and 16 analog pins) is used to accommodate the inputs, and data is passed on to a digital audio workstation, or DAW, to produce actual sound. 

    Code and circuit diagrams are available here if you want to build one, though your setup can be customized however you like!

    [youtube https://www.youtube.com/watch?v=JZ5yPdoPooU?feature=oembed&w=500&h=281]

    Website: LINK

  • Zany MIDI guitar made from barcode scanner and Arduino

    Zany MIDI guitar made from barcode scanner and Arduino

    Reading Time: < 1 minute

    Zany MIDI guitar made from barcode scanner and Arduino

    Arduino TeamSeptember 23rd, 2019

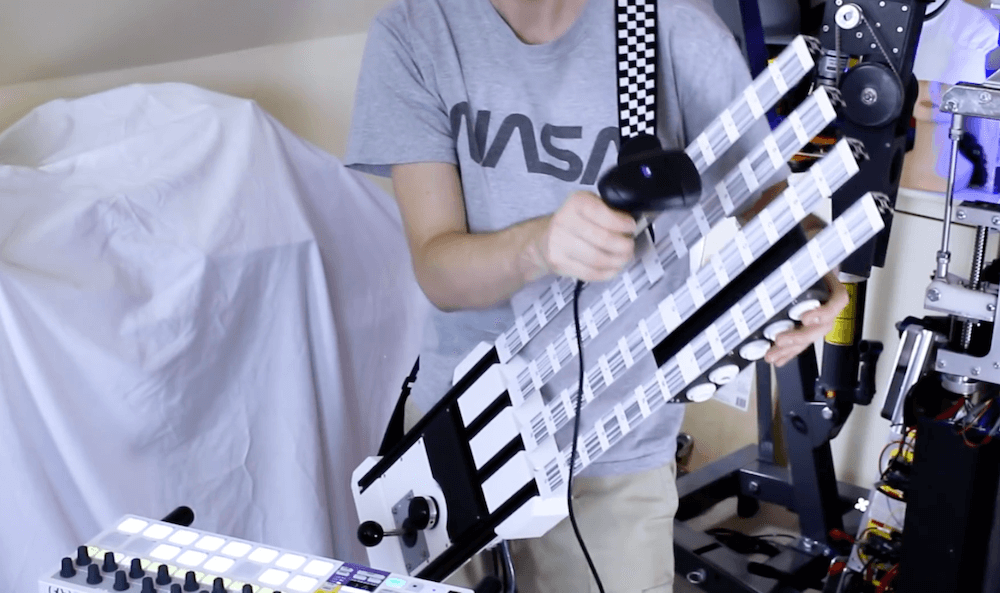
    You’ve seen barcode scanners register the price for your groceries, and likely in many other applications, but did you ever consider if one could be made into an instrument? Well we now know the answer, thanks to this MIDI guitar by James Bruton.

    Bruton’s amazing device presents a matrix of barcodes arranged on the instrument’s four necks, allowing him to select the note to be played with a scanner gun.

    The scanned code then triggers a note that’s piped to an output device via an Arduino Mega and MIDI shield. A joystick, spinner, and arcade buttons are also available for functions such as note cutoff, changing the octave, and pitch bends.

    [youtube https://www.youtube.com/watch?v=OctazO-VxBw?feature=oembed&w=500&h=281]

    Website: LINK

  • Horizontal laser harp is like none you’ve ever seen before

    Horizontal laser harp is like none you’ve ever seen before

    Reading Time: 2 minutes

    Horizontal laser harp is like none you’ve ever seen before

    Arduino TeamAugust 19th, 2019

    Apparently not content with a traditional laser harp, Jonathan Bumstead set out to take things in a different direction. What he came up with is a device whose laser strings are arranged horizontally, and loop though its boxy structure for an amazing audiovisual effect. 

    The aptly named Upright Laser Harp is divided up into six rows, which each contain two laser/photoresistor pairs for an instrument total of 12 notes. Each laser is reflected once before hitting its photoresistor to wrap the entire structure in light, and values are sensed by an Arduino Mega as note inputs. Sounds are then generated by an Adafruit Music Maker Shield, and different MIDI instruments are selected with a rotary switch and a stepper-based electromechanical display system. 

    Laser harps are musical devices with laser beam “strings.” When the beam is blocked, a note is played by the instrument. Usually laser harps have the beams travel vertically in the shape of a fan or vertical lines. 

    In this project, I built a laser harp with stacked laser beams that propagate horizontally. The beams reflect off mirrors to form square shaped beam paths. Instead of a MIDI output like my previous laser harp, this device has built-in MIDI player so the output is an audio signal. This means the device does not have to be connected to a computer or MIDI player (e.g. keyboard) to play sound. Both built-in speakers and audio output jack are available for playing music.

    Be sure to check out the mini-concert and build details in the video below!

    [youtube https://www.youtube.com/watch?v=_1oTBekbUT4?feature=oembed&w=500&h=281]

    Website: LINK

  • Toy piano converted into a self-playing instrument

    Toy piano converted into a self-playing instrument

    Reading Time: < 1 minute

    Toy piano converted into a self-playing instrument

    Arduino TeamAugust 14th, 2019

    Upon obtaining a small toy piano, Måns Jonasson went to work “Arduinoizing” it with 30 solenoids to hammer out tunes. 

    A MIDI shield is used to pipe commands from a computer to the Arduino Mega that’s used for control, and after experimenting with discreet wiring and electronics for each of the solenoids, he switched to motor shields as outlined here to simplify the setup. This, along with a new version of the solenoid holders he designed, cleaned up the build nicely, allowing it to play a plinky version of the Super Mario Bros. theme song.

    Be sure to check out the Mario themed auto-concert in the video below, plus a video outline of its construction, below. 

    [youtube https://www.youtube.com/watch?v=Avnidj0R3Yg?feature=oembed&w=500&h=281]

    Website: LINK

  • A 3D-printed, Arduino Due-based MIDI jammer keyboard

    A 3D-printed, Arduino Due-based MIDI jammer keyboard

    Reading Time: 2 minutes

    A 3D-printed, Arduino Due-based MIDI jammer keyboard

    Arduino TeamJuly 11th, 2019

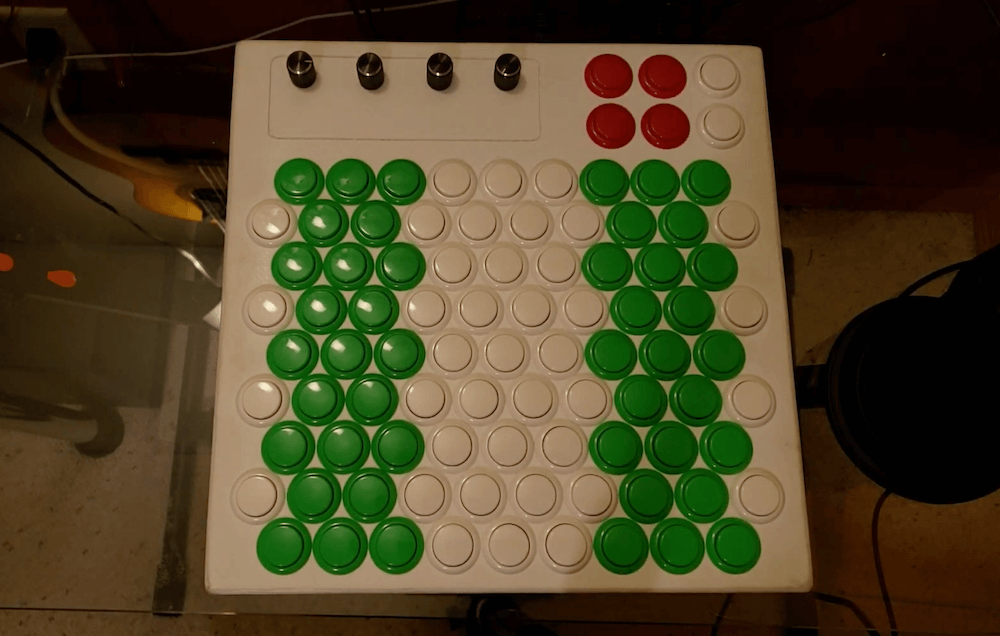
    Michael Koopman wanted to learn piano. However, after finding this pursuit frustrating, he instead decided to assemble his own 3D-printed MIDI jammer keyboard, inspired by the AXiS-49 interface pad. 

    His instrument is controlled via an Arduino Due, with 85 buttons arranged in a diagonal pattern. This allows for whole steps on the horizontal axis, fourths on one diagonal, fifths on the other diagonal, and octaves on the vertical axis. 

    This configuration enables the device to be used in a variety of ways, and features an additional six buttons and four potentiometers to vary playing style, along with ¼ inch jacks for auxiliary inputs. 

    As seen in the video below, while Koopman had a hard time with the piano, apparently that wasn’t case with his MIDI keyboard, as he’s able to play it beautifully—even using two at a time around 8:15!

    [youtube https://www.youtube.com/watch?v=g4b2hHh-M-Y?feature=oembed&w=500&h=281]

    Website: LINK