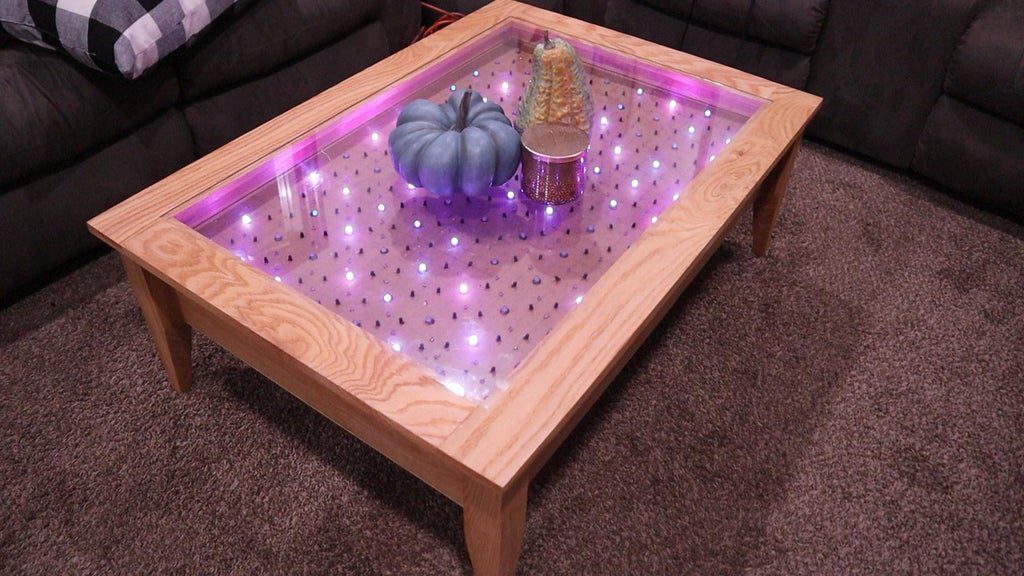
The YouTube team “Ty and Gig Builds” recently decided to make their coffee table a little more interesting, adding a chain of 96 addressable LEDs underneath its clear surface. This would have been neat enough by itself, but their project doesn’t just stop there and instead embeds 154 IR emitters and 154 IR receivers, allowing it to react to what’s on top. Beyond that, it’s able to display animations without using the sensors for a mesmerizing effect.
The setup, as you might imagine, required a lot of wiring along with custom shift register and multiplexer boards to accommodate its vast I/O needs. These discrete I/O are eventually funneled down to an Arduino Mega for control, creating a one-of-a-kind table that should make for a great conversation piece while holding coffee and other knickknacks.
Learning Greek with an arcade-style vocabulary reviewer
Arduino Team — September 24th, 2020
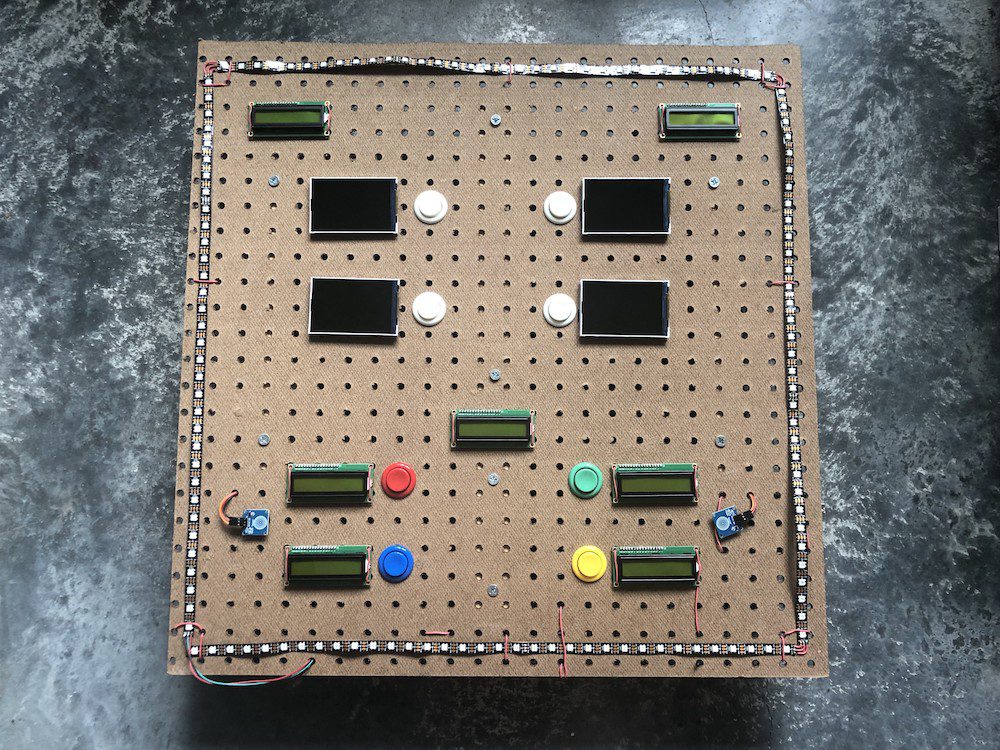
Learning a new language is always a challenge, but can also be extremely rewarding. To help with this task — specifically learning Greek — Angeliki Beyko created an arcade-style review machine. Her device cleverly uses a sheet of pegboard to hold the electronics, including seven LCD screens to indicate category, level, and the actual Greek word being reviewed.
Possible answers are shown as pictures on four TFT displays, driven by four separate Arduino Uno boards that pull up pictures stored on SD cards. An Arduino Mega provides overall control for the interactive panel.
While ambitious, and a definite learning process, there’s currently some memory limitations and an issue with the screens not working when actually mounted. So as of now, it’s something of a work-in-progress, but Beyko is planning to complete the build with version two. More details are available in the project write-up and code can be found on GitHub.
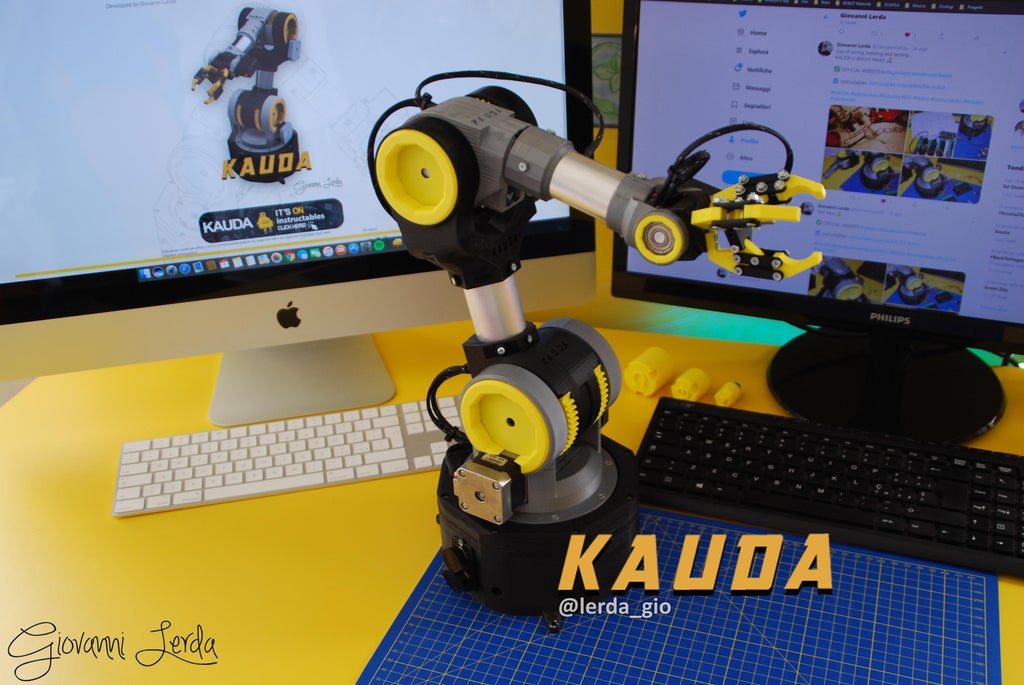
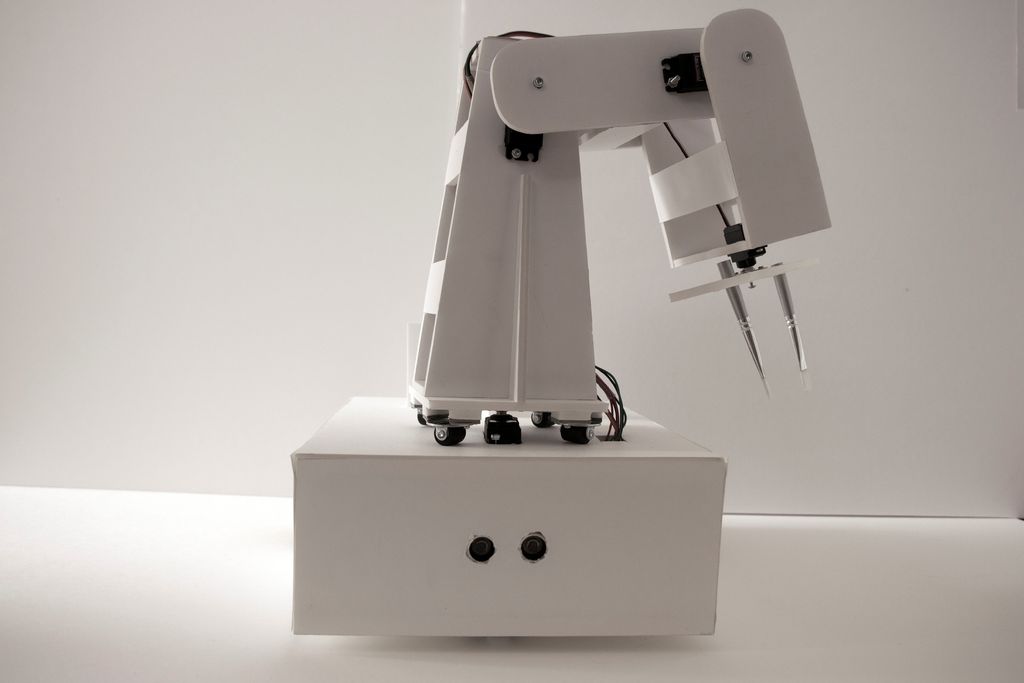
Would you like your own industrial robot arm, but don’t have tens of thousands of dollars to spend? You could instead build Giovanni Lerda’s KAUDA, a five-axis device that uses under 800g of PLA, an Arduino Mega, and other off-the-shelf parts.
KAUDA utilizes servos to actuate the two wrist joints, along with a NEMA 17 motor for the elbow. A single stepper rotates the base in the horizontal direction, while dual steppers provide lifting force at this joint.
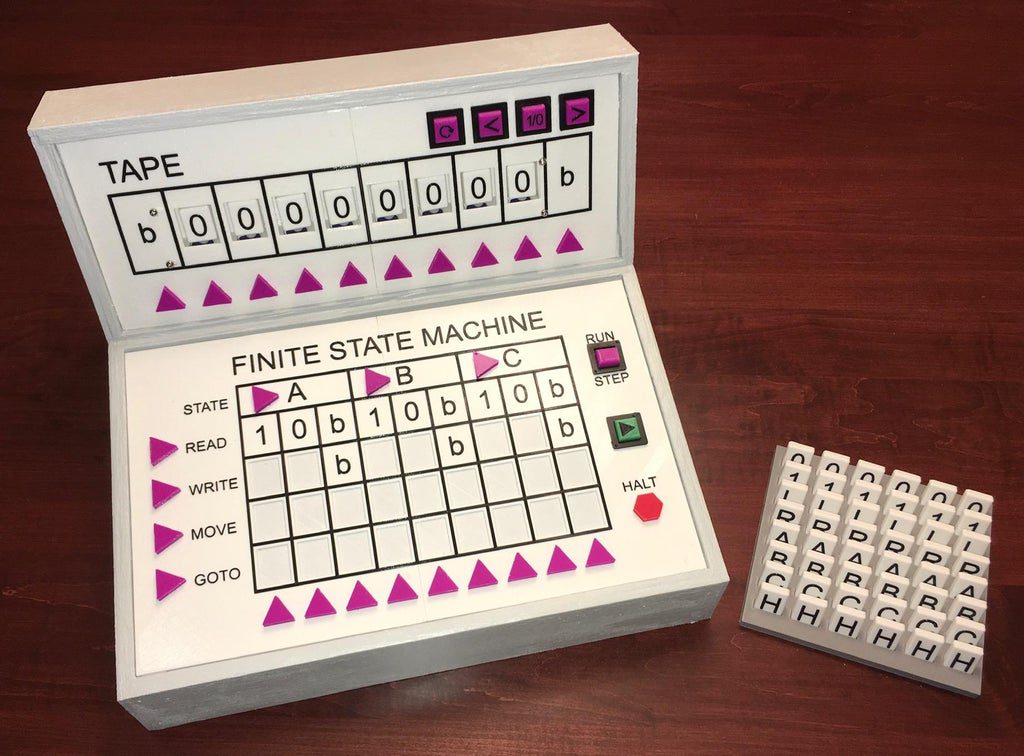
According to Michael Gardi, although you can find numerous stunning Turing machine implementations on the Internet, their complexity tends to detract from the simplicity of what a Turing machine actually does. In order to easily show how they work, he decided to create a demonstrator with the actual calculations handled by an Arduino Mega.
The console, dubbed TMD-1, displays a “tape” state on the top of the device using eight servo-controlled flip tiles that write 1s or 0s, while a series of lighted arrows indicate the program’s position. On the bottom surface, users can program instructions with magnetic tiles, and read the current machine state via LEDs.
The BallCuber is a robotic device capable of solving a 4x4x4 Rubik’s cube
Arduino Team — August 24th, 2020
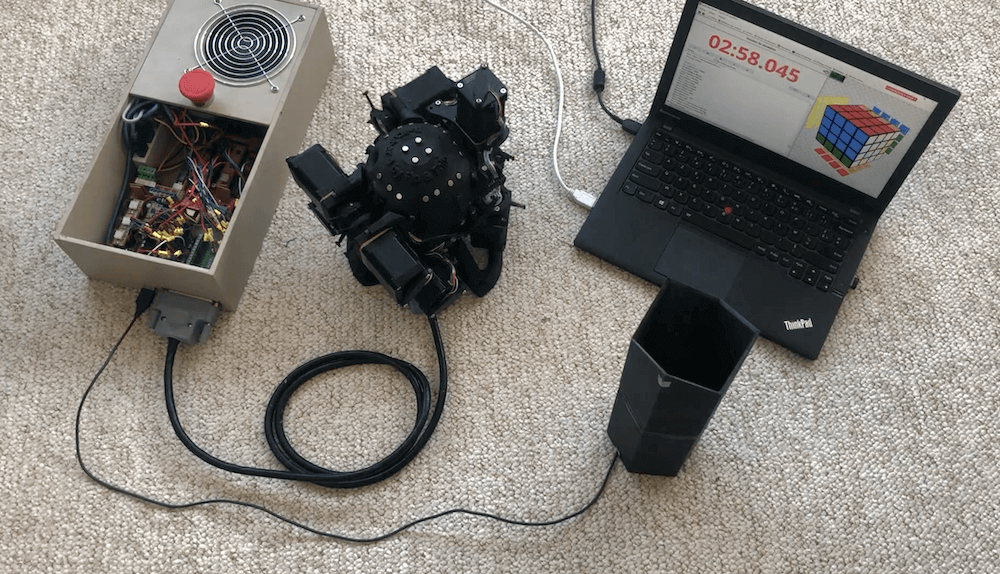
Rubik’s cubes are traditionally 3x3x3, and have been solved by robotic systems in a variety of different ways. But what about a 4x4x4 variant? Such a device presents expanded solving challenges, which creators Thibault and Florent were able to address with their BallCuber contraption.
The BallCuber utilizes an independent camera unit to obtain the cube’s initial state, after which it’s placed in a spherical solving chamber ringed by nine NEMA 17 stepper motors.
Software running on a PC processes the scanned pattern and an algorithm works out the movements needed to complete the puzzle. Two Arduino Mega boards, each with a RAMPS 1.4 shield, and stepper drivers rotate the cube in the proper sequence.
The device can solve the colorful toy in around three minutes and 20 seconds, but Thibault and Florent hope to eventually rework it to beat the world record of 1:18! More details can be found on their page here.
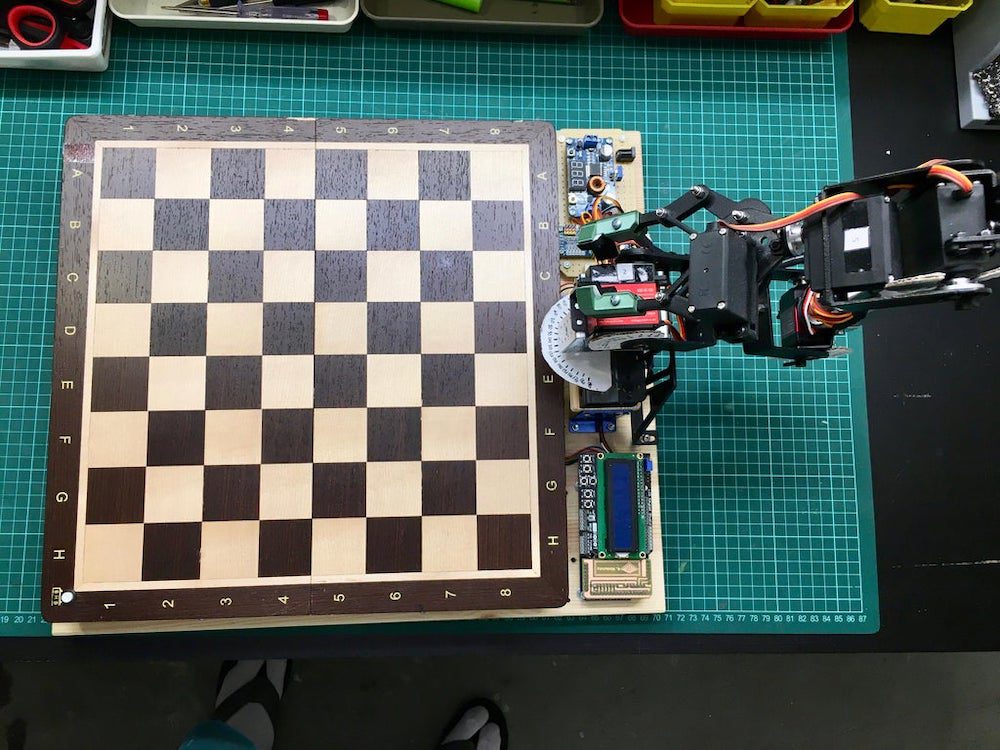
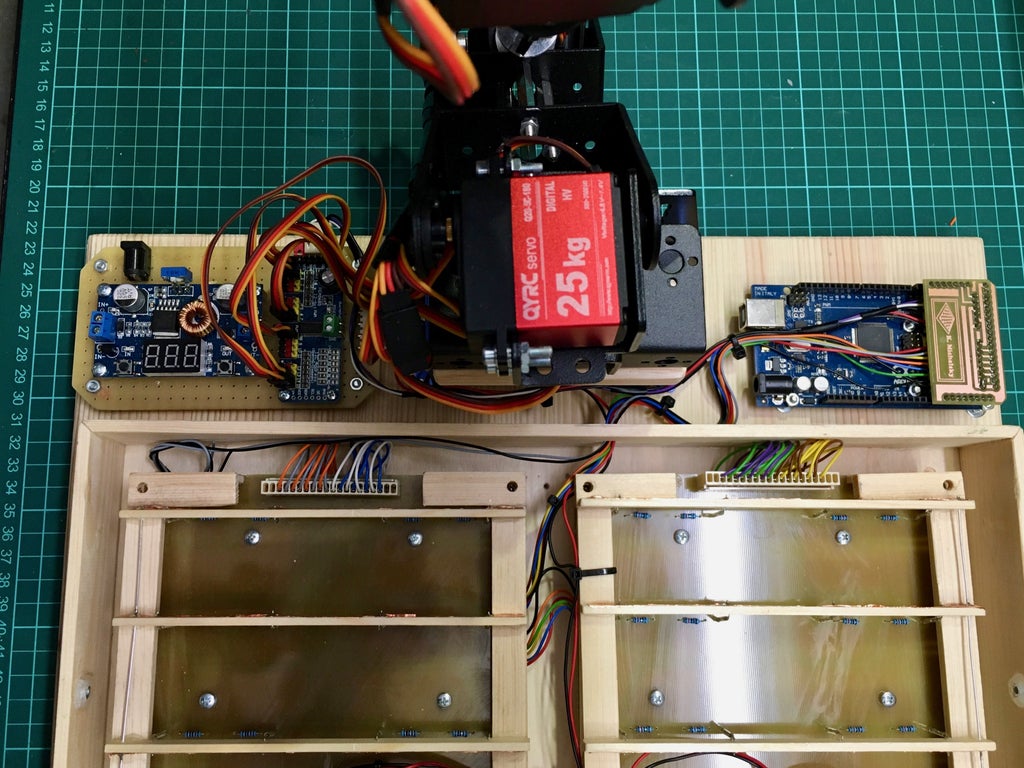
Arduino-controlled robot arm is ready to play you in a game of chess
Arduino Team — August 15th, 2020
If you’re tired of playing chess on a screen, then perhaps you could create a robotic opponent like Instructables user Michalsky. The augmented board runs micro-Max source code, enabling chess logic to be executed on an Arduino Mega with room for control functions for a 6DOF robotic arm.
The setup uses magnetic pieces, allowing it to pick up human moves via an array of 64 reed switches underneath, along with a couple shift registers. The Mega powers the robot arm accordingly, lifting the appropriate piece and placing it on the correct square.
You can get a look at the project, with gameplay demonstration, in Michalsky’s video below.
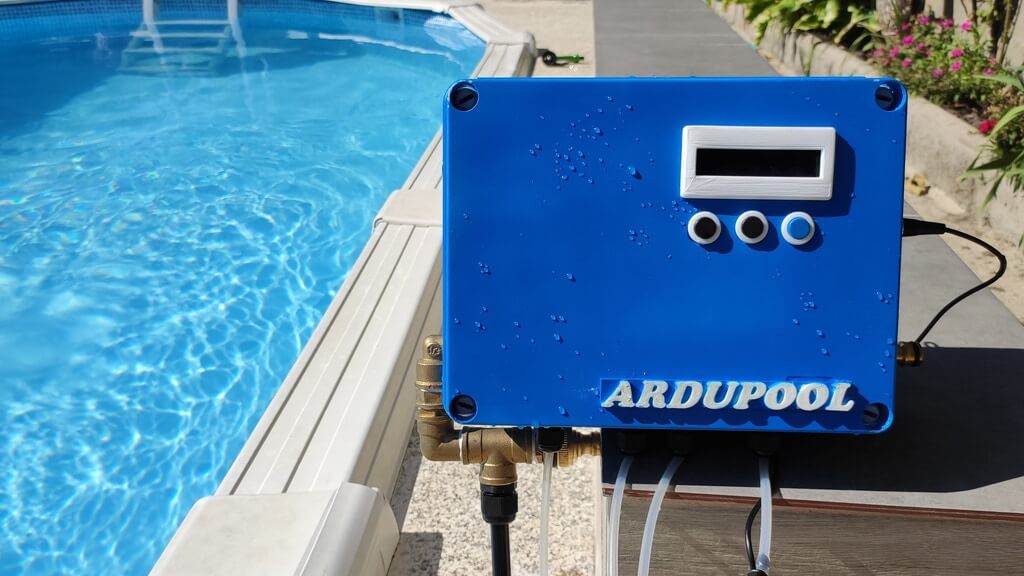
Having a pool can be a great way to relax during the summer, but keeping the water crystal clear and safe to swim in can be a challenge. To help, engineer Diego Gomez has developed the Arduino Mega-powered ARDUPOOL, which is now crowdfunding on Kickstarter.
This modular, open source device is capable of controlling up to four peristaltic pumps for dosing chlorine and other chemicals, as well as the filtration system. Programming is done via a simple LCD screen on the front, along with three buttons.
Depending on the setup, ARDUPOOL can either run the pool on a schedule, or be automated based on pH and chlorine sensors. Further functionality for lighting and app control is also in the works. Reward pledge levels vary from €149 (~$176 USD) for a Basic Kit to €399 (~$468 USD) for an assembled ARDUPOOL Super.
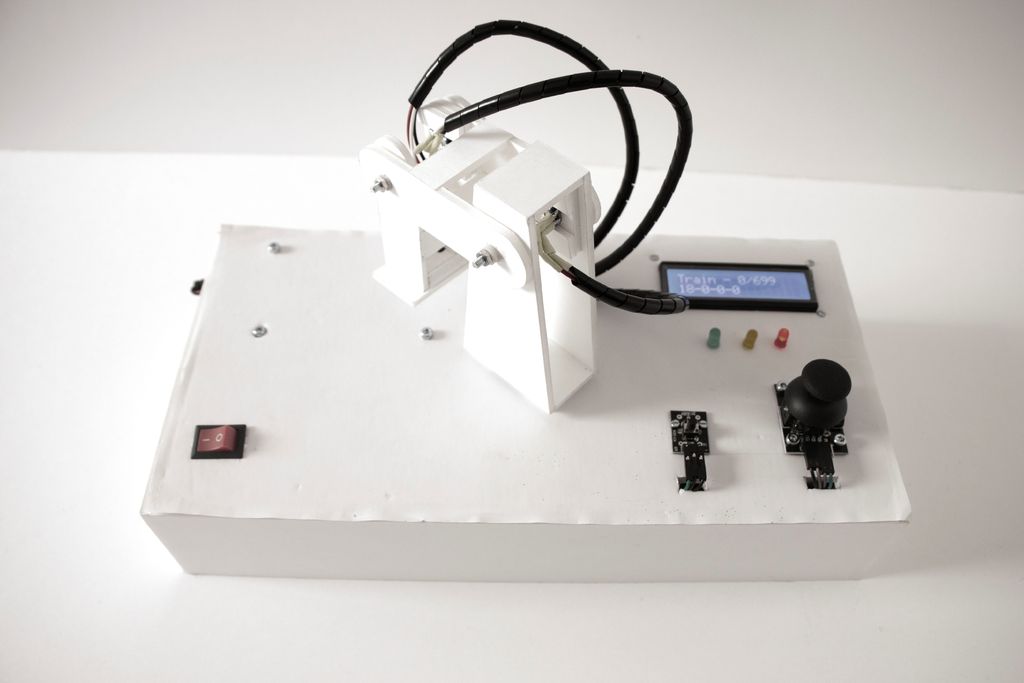
The Physical Twin travels on a three-wheeled chassis and mounts a four-axis arm with a brush. An operator controls the arm to dip the brush into an onboard paint container, and can then manipulate it for application.
The controller consists of a joystick for movement as well as a mini version of the arm. Four potentiometers measure arm input angles, which are duplicated on four corresponding servos on the robot. A pair of Arduino Mega boards are used for the setup — one on the mobile robot and another in the remote unit.
You can see the device in action in the videos below, showing off direct operation and the ability to play back prerecorded movements.
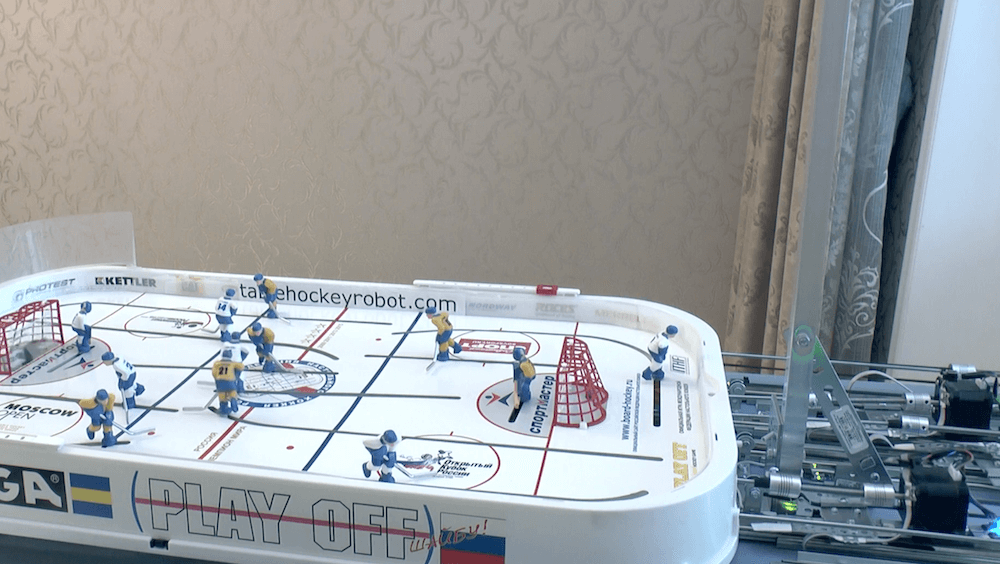
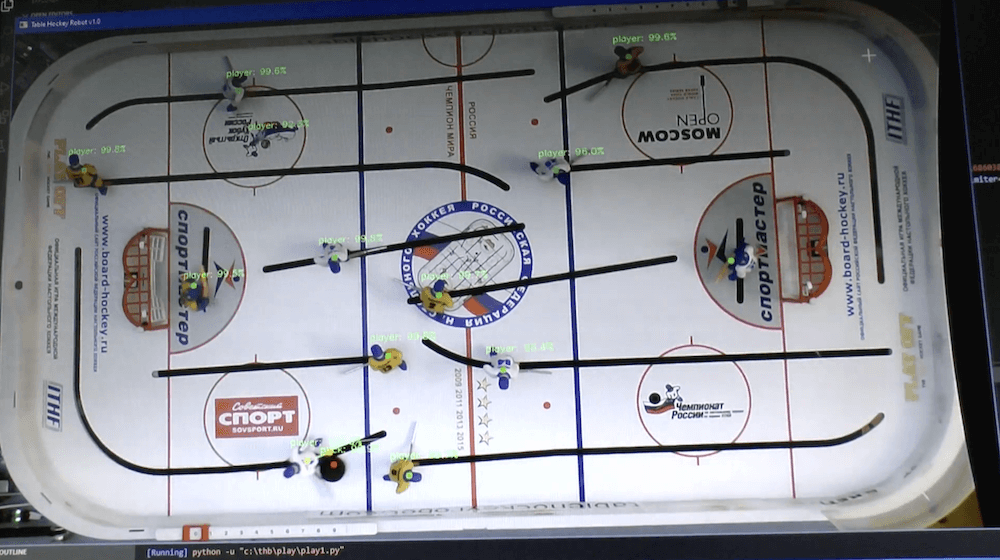
This puck-slapping robot will beat you in table hockey
Arduino Team — July 3rd, 2020
Mechanical table hockey games, where players are moved back and forth and swing their sticks with a series of knobs, can be a lot of fun; however, could one be automated? As Andrew Khorkin’s robotic build demonstrates, the answer is a definite yes — using an Arduino Mega and a dozen stepper motors to score goals on a human opponent.
The project utilizes an overhead webcam to track the position of the players and puck on the rink, with a computer used for object detection and gameplay. Each player is moved with two steppers, one of which pushes the control rod in and out, while the other twists the player to take shots.
Training the game took six months of work, which really shows in the impressive gameplay seen below.
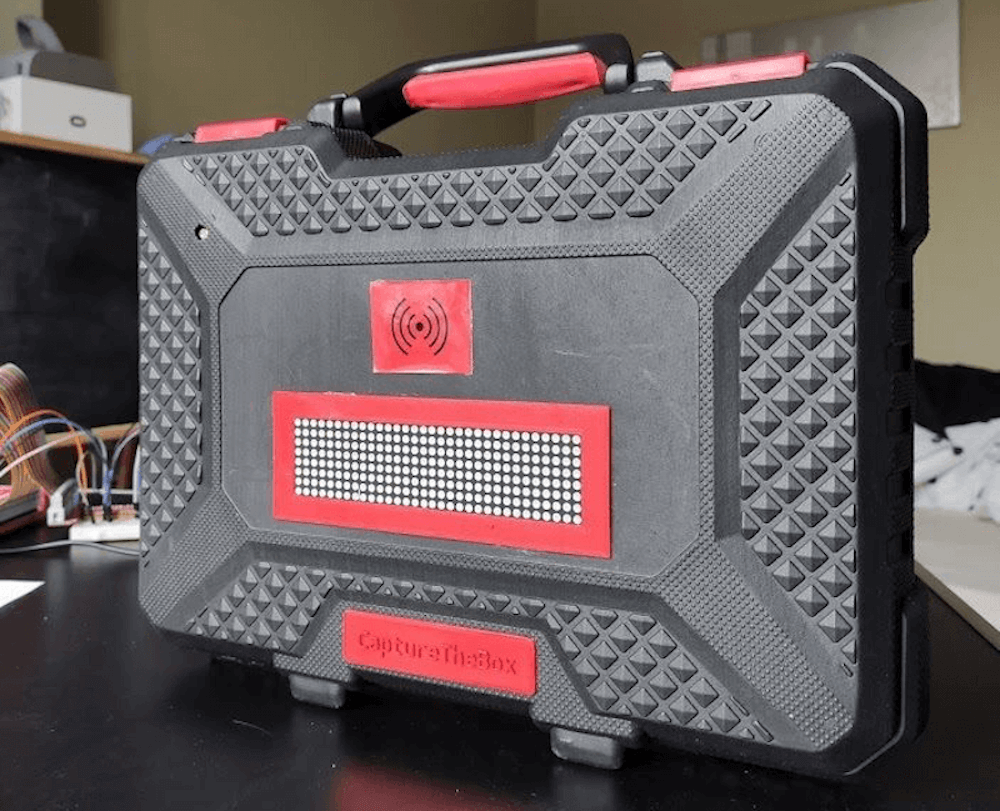
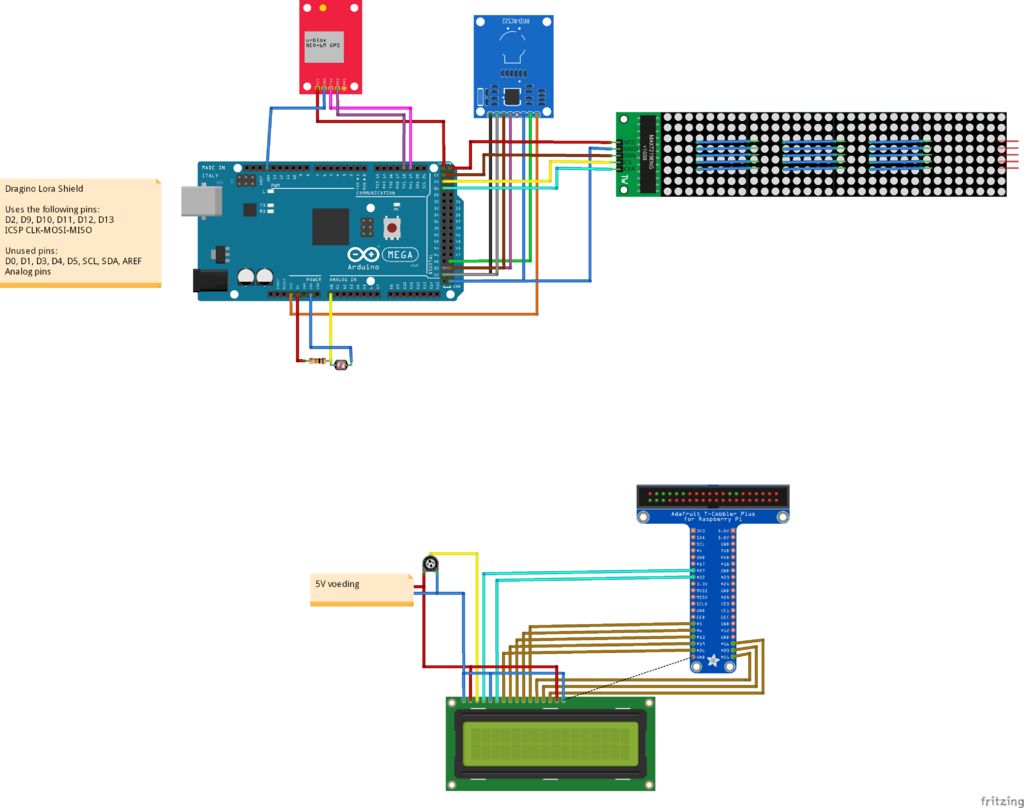
Capture the flag can be fun, but Karel Bousson has put a new spin on the game that allows you to compete against neighbors over who can keep a single item — a modified tool case — in their possession the longest.
The box contains an Arduino Mega that interfaces with an RFID reader to enable the current owner to scan in, plus a GPS module for location data. Additionally, an LDR sensor can be incorporated to set the brightness of an LED matrix on the outside.
Data passed along to a Raspberry Pi for time of possession tracking via LoRa with The Things Network. This also runs a server that shows game info to others playing, meaning that you’ll have to be very careful to keep it around!
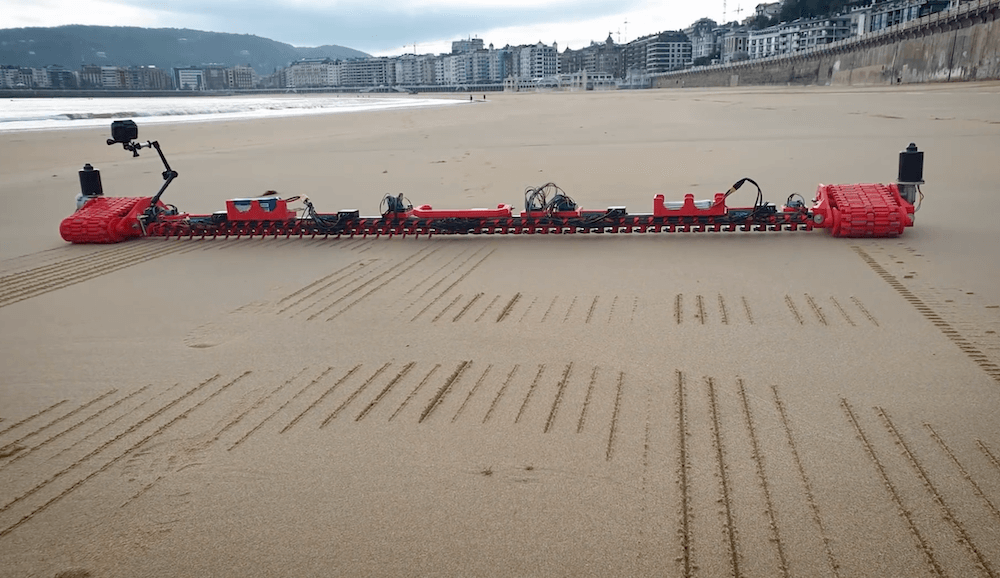
This Arduino-controlled robot leaves messages in the sand
Arduino Team — June 22nd, 2020
Ivan Miranda has come up with a novel method for drawing messages in the sand, using a tread assembly that prints as it travels along the beach.
The robot uses a length of square tubing to connect a pair of half tanks, with 50 SG90 micro servos spaced out on the bottom. As it pulls itself, the motors are controlled with a total of three Arduino Mega boards, intermittently extending into the sand. This creates lines that combine to form individual letters.
You can see the build process in the video below, including his initial trial at around the 11:00 mark. This is actually Miranda’s second attempt at a “beach drawer,” and his first version, which uses a much different technique is seen here.
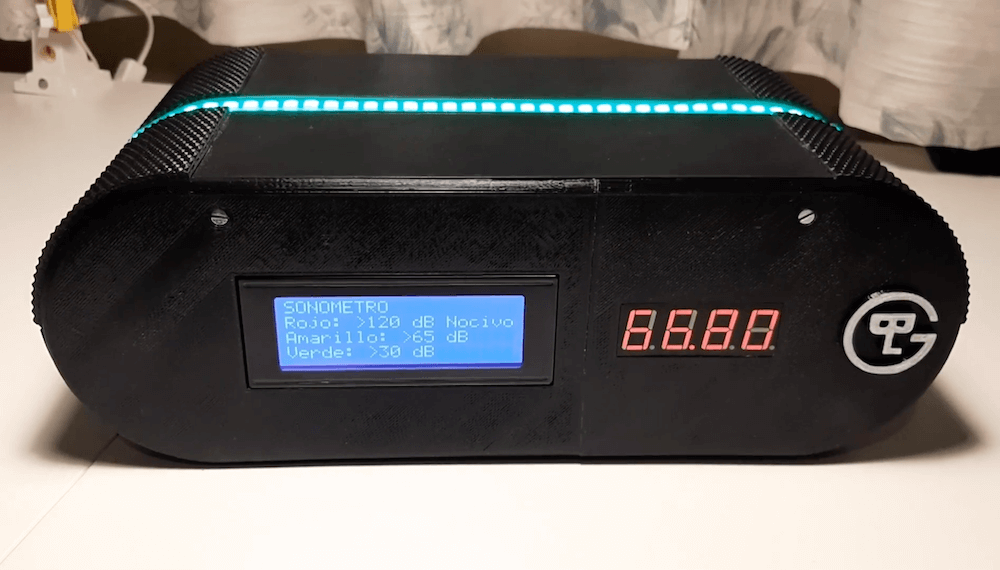
Visualize noise pollution with an Arduino sound meter
Arduino Team — June 16th, 2020
In our day-to-day lives we encounter a wide variety of ambient sounds, and in order to highlight noise pollution, Lucía Garbo decided to make an elegant meter.
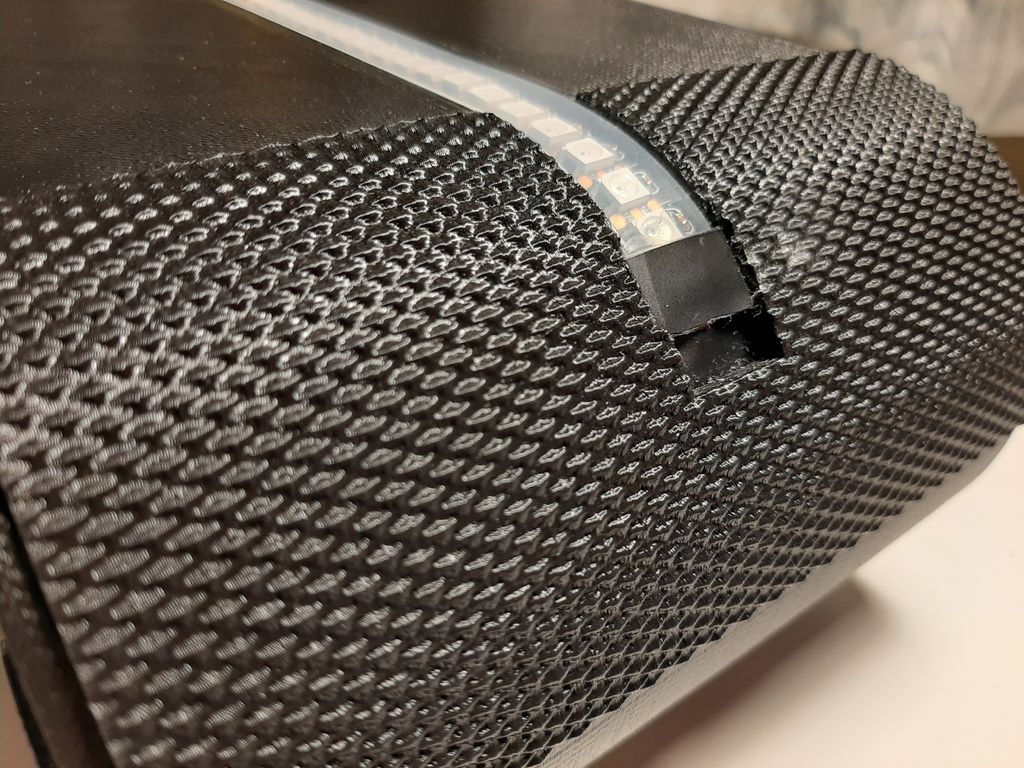
The device features an outer shell designed in Fusion 360 and 3D-printed, concealing an Arduino Mega, a SparkFun Sound Detector, and associated circuitry inside. Components are neatly connected via a perfboard, which should allow easy modification later.
An LED strip on top shows red, yellow, and green for different thresholds, and an LCD screen and 7-segment display take up the front. Data is also logged for further analysis by an onboard microSD card reader.
The build, which was actually a school project, took a full year to complete — and came out awesome!
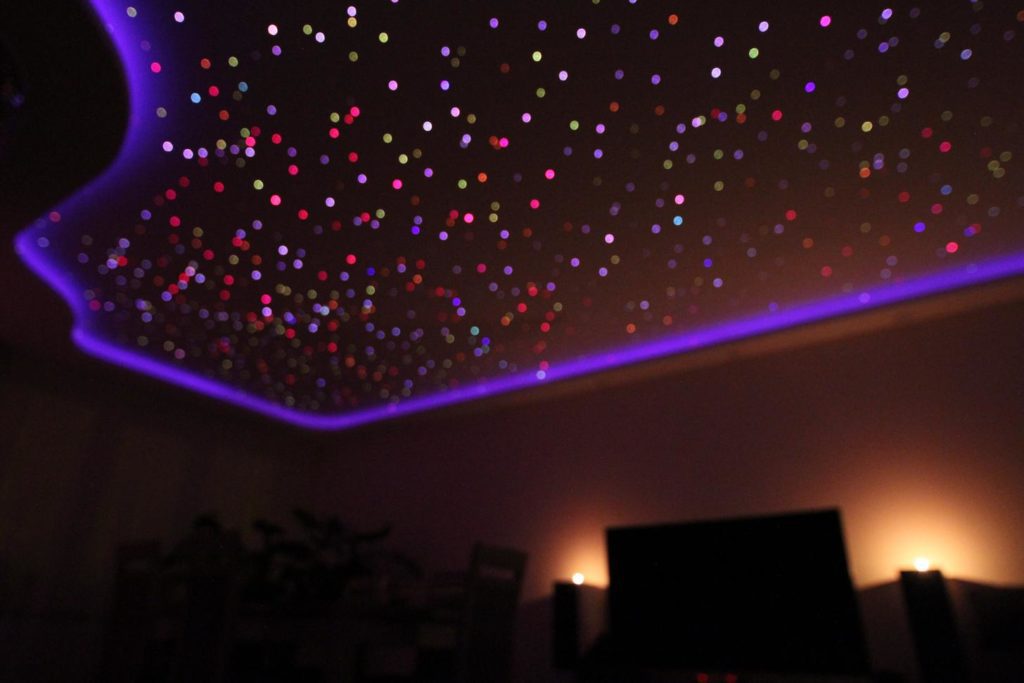
Have you ever looked up at your ceiling and wondered how to make it a bit more interesting? Well, creator Centas has and decided to bring a piece of the galaxy into his room using a fiber optic star display.
The installation is powered by an Arduino Mega, and features approximately 1,200 points of light along with sound-reactive LED strips around the perimeter.
User interface is handled by a second Arduino and a pair of nRF24L01 transceivers, while PCA9685 boards are implemented to control LED brightness levels. The system can even pulse with music, thanks to an MSQ7EQ chip.
You can see it in action in the video below and find more images over on Imgur. Note that the constellation lines were added in video production for clarity.
This article was written by César Garcia, researcher at La Hora Maker.
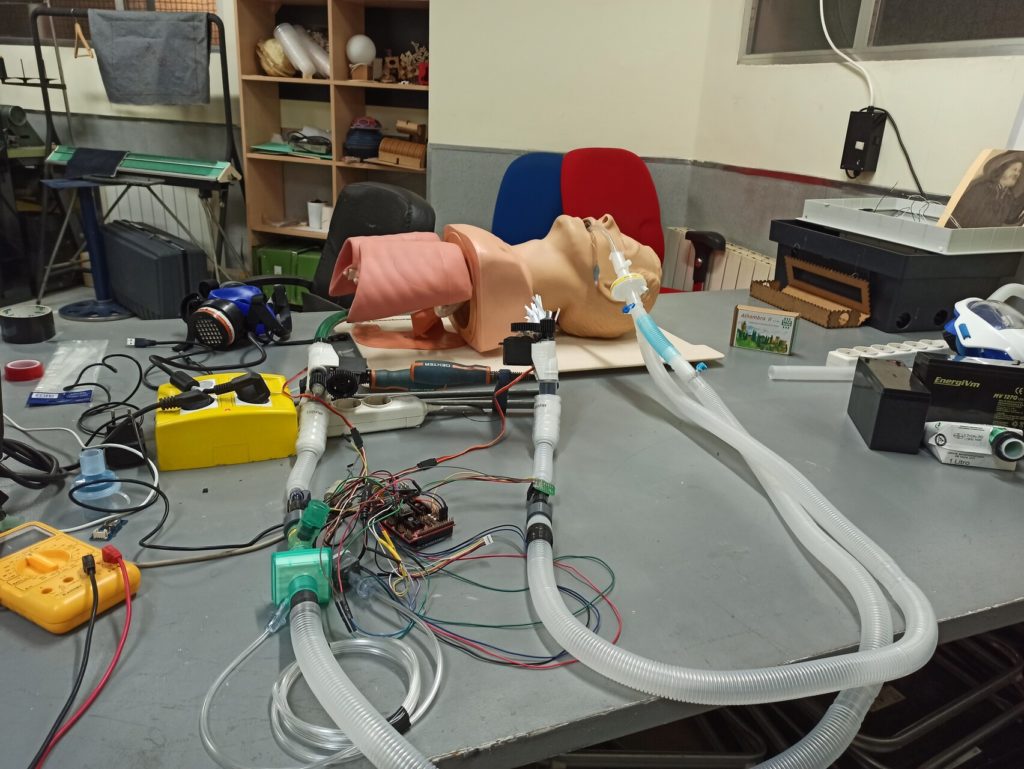
This week, we will be exploring the Apollo Ventilator in detail! This project emerged at Makespace Madrid two months ago. It was a response to the first news about the expected lack of ventilators in Spain because of COVID-19.
Several members of the space decided to explore this problem. They joined Telegram groups and started participating in the coronavirus maker forum. In this group, they stumbled upon an initial design shared by a doctor, that would serve as a starting point for the ventilator project.
Credits: Apollo Ventilator (Photo by Apollo Ventilator Team)
To advance the project, a small but active group would join daily at “Makespace Virtual.” This virtual space used open-source video conferencing software Jitsi. Each one of the eight core members would contribute with their expertise in design, engineering, coding, etc. Due to the confinement measures in place, access to the space was quite limited. Everyone decided to work from home and a single person would merge all advances at the make space physically. A few weeks later doctors from La Paz Hospital in Madrid got in touch with the Apollo team, looking for ways to work together on the ventilator.
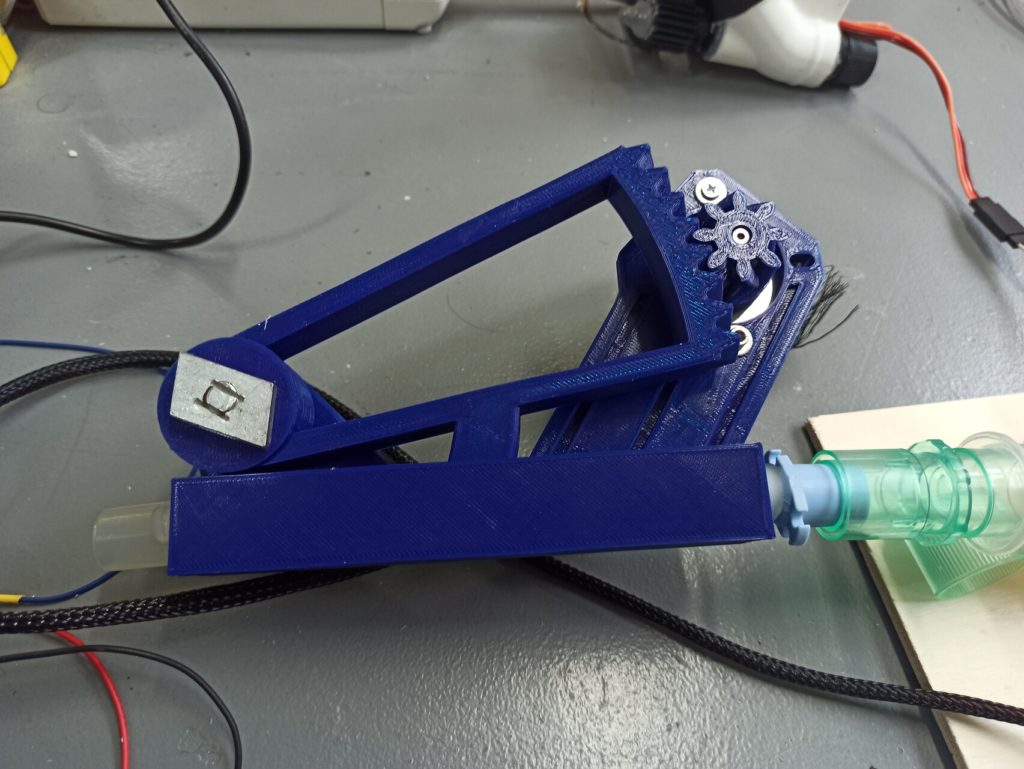
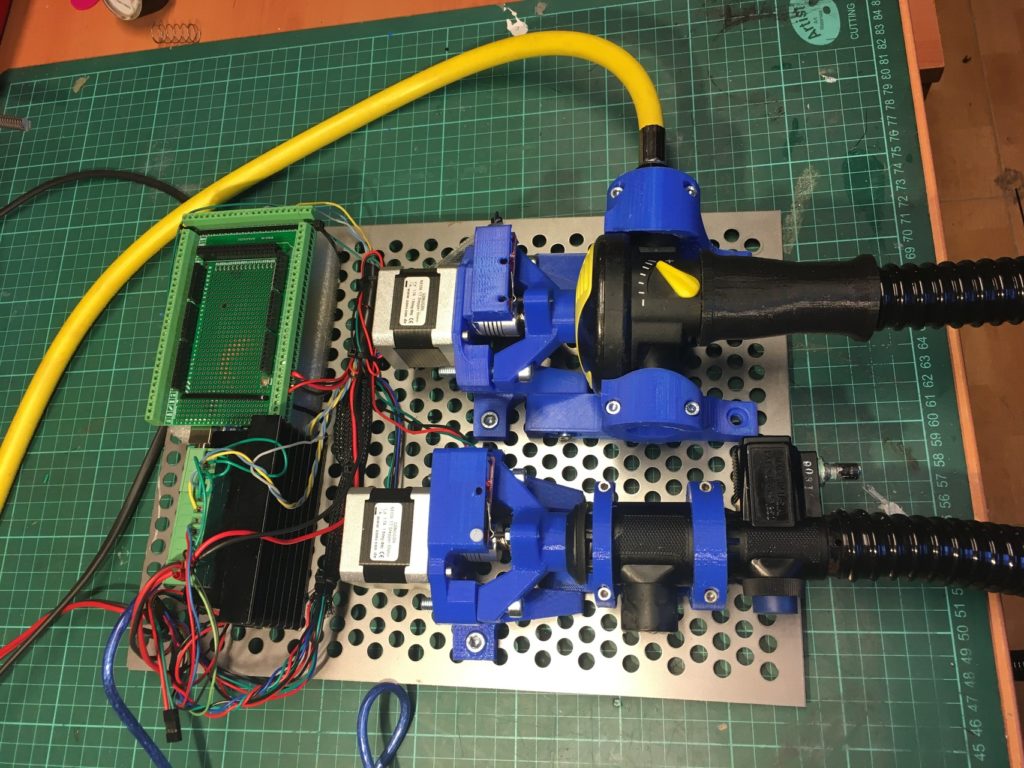
One of the hardest challenges to overcome was the lack of medical materials. The global demand has disrupted supply chains everywhere! The team had to improvise with the means at their disposal. To regulate the flow of gases, they created a 3D-printed pinch, that would collapse a medical-grade silicone tube in the input. This mechanism is controlled using the same electronics used in 3D printers: an Arduino Mega 2560 board with a RAMPS shield!
Credits: 3D-printed valve pinch (Photo by Apollo Ventilator Team)
In respect of sensors, they decided to go for certified versions that could be sterilized in an autoclave. They looked everywhere without success. A few days later, they got support from a large electronics supplier to provide them an equivalent model suited for children or adults up to 80 kg.
They decided to work on a shared repository to coordinate all the distributed efforts. This attracted new members and talents, doubling in size and sparking new lines of development. The Apollo Ventilator is an open-source project, meaning that new people can learn and create together new features.
Based on their expertise sourcing components, they wanted Apollo to be flexible. Most other certified ventilators are too specific. But they want to become “the Marlin for ventilators!” Marlin is one of the most used firmware in the world to control 3D printers. This software can manage all kinds of boards and adapt to different configurations easily.
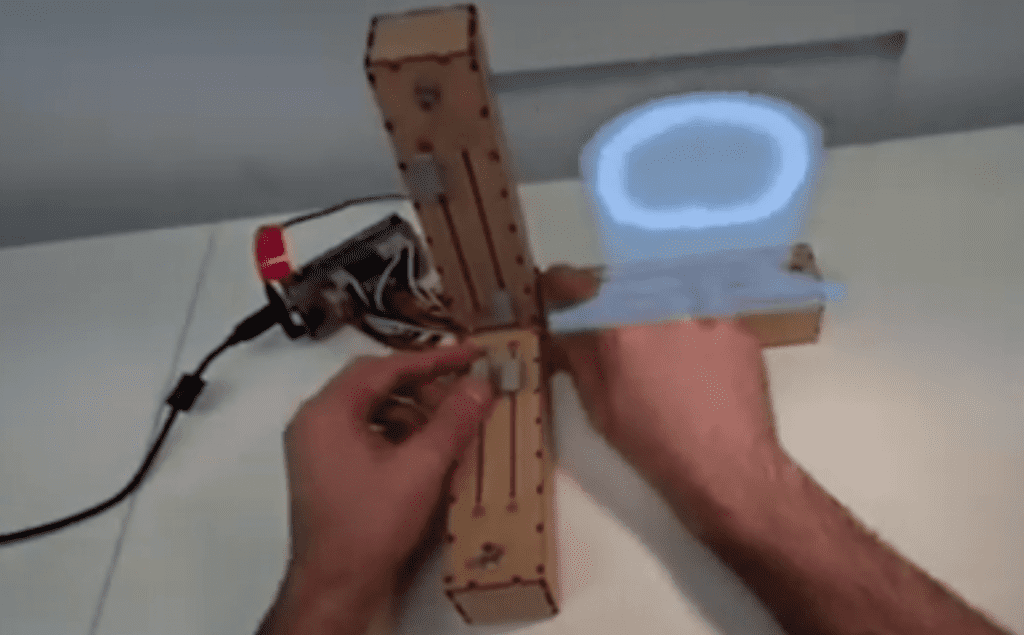
In the case of the Apollo Ventilator, the initial setup runs on a single Arduino Mega board. It uses the attached computer as the display. Current code can be configured to use a secondary Arduino board connected by serial port as a display too. As for the interface, there are several alternatives using GTK and QT. It’s also possible to send this data using MQTT, so data from many ventilators can be centralized. Other alternative builds used even regular snorkeling pieces! The Apollo Ventilator aspires to serve as the basis for several new projects and initiatives where off the shelf solutions are not available. Another potential outcome would be low-cost ventilators for veterinary practice or education.
Credits: Apollo Ventilator made out of snorkeling equipment (Photo by Apollo Ventilator Team)
The Apollo Ventilator is currently under development. They plan to expand the tests on lung simulators right now. Next steps would involve working with hospitals and veterinary schools. They will tackle these phases once the medical services are less overwhelmed.
The Apollo Ventilator takes its name from the famous Apollo missions to the moon. They managed to overcome all obstacles to take us where humanity had not been before. This project shares the same goals in regards to open-source ventilators. They are trying to overcome one of the biggest contemporary challenges, the COVID-19 pandemic.
To learn more about the Apollo Ventilator, you can check out its repository. At this link you can also find an interview (in Spanish) to Javi, Apollo Ventilator’s project leader.
If you’d like to know more about Makespace Madrid, visit their website.
Arduino staff and Arduino community are strongly committed to support projects aimed at fighting and lessening the impact of COVID-19. Arduino products are essential for both R&D and manufacturing purposes related to the global response to Covid-19, in building digital medical devices and manufacturing processes for medical equipment and PPE. However, all prototypes and projects aimed to fight COVID-19 using Arduino open-source electronics and digital fabrication do not create any liability to Arduino (company, community and Arduino staff members). Neither Arduino nor Arduino board, staff members and community will be responsible in any form and to any extent for losses or damages of whatever nature (direct, indirect, consequential, or other) which may arise related to Arduino prototypes, Arduino electronic equipment for critical medical devices, research operations, forum and blog discussions and in general Covid-19 Arduino-based pilot and non pilot projects, independently of the Arduino control on progress or involvement in the research, development, manufacturing and in general implementation phases.
Embodied Axes is an Arduino-powered controller for 3D imagery and data visualizations in AR
Arduino Team — May 25th, 2020
Researchers across several universities have developed a controller that provides tangible interaction for 3D augmented reality data spaces.
The device is comprised of three orthogonal arms, embodying X, Y, and Z axes which extend from a central point. These form an interactive space for 3D objects, with linear potentiometers and a rotary button on each axis as a user interface.
At the heart of it all is an Arduino Mega, which takes in data from the sliders to section a model. This enables users to peer inside of a representation with an AR headset, “slicing off” anything that gets in the way by defining a maximum and minimum view plane. The sliders are each motorized to allow them to move together and to provide force feedback.
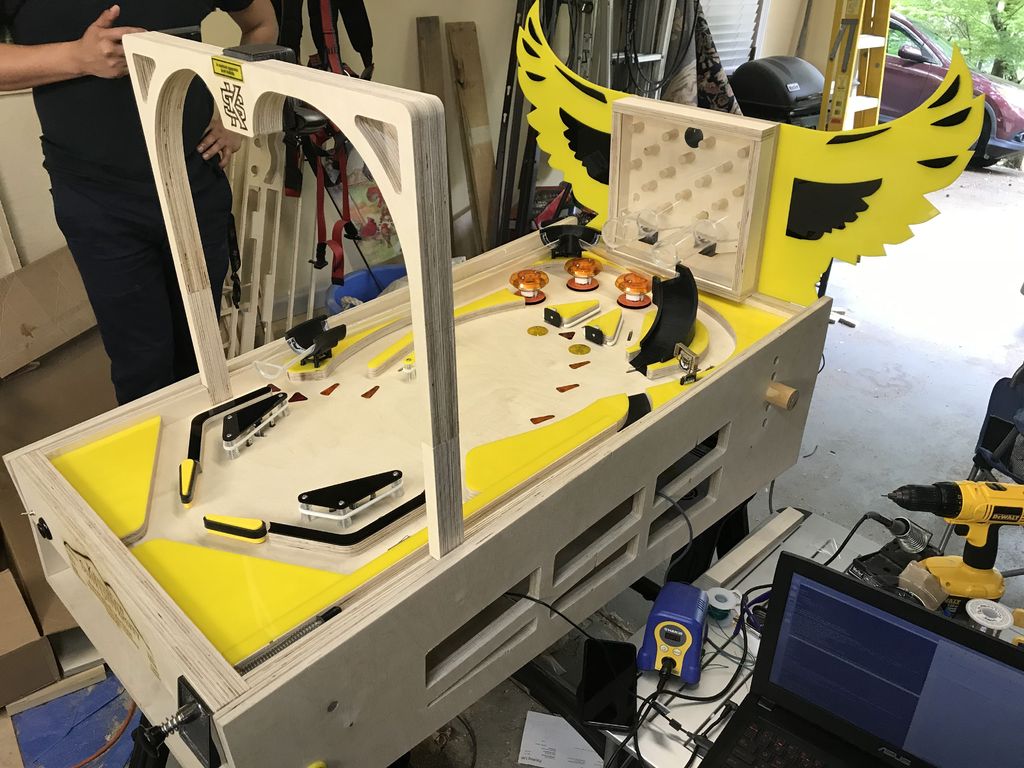
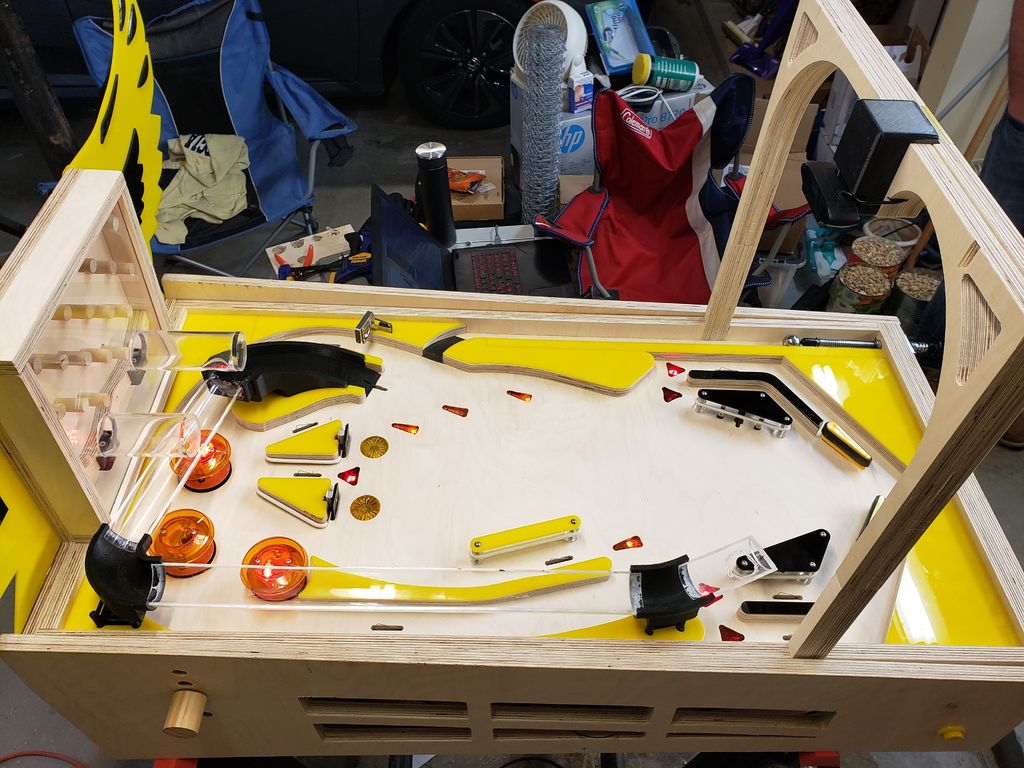
As an enviable senior design project at Kennesaw State University, students Tyler Gragg, Kevin Kamperman, Cody Meier, and Omar Salazar Lima created their own autonomous pinball machine.
As seen in the videos below, the table is not only nicely finished with an interesting playfield, but works quite well without human interaction.
The machine’s IO system is actuated using an Arduino Mega, with higher-level controls handled by a computer running the Robot Operating System. While the game can be enjoyed manually, for automatic operation an overhead camera tracks the moving ball and calculates its position. When within tunable “flip zones,” the correct flipper is triggered, (hopefully) flinging the ball forward for more points and mayhem!
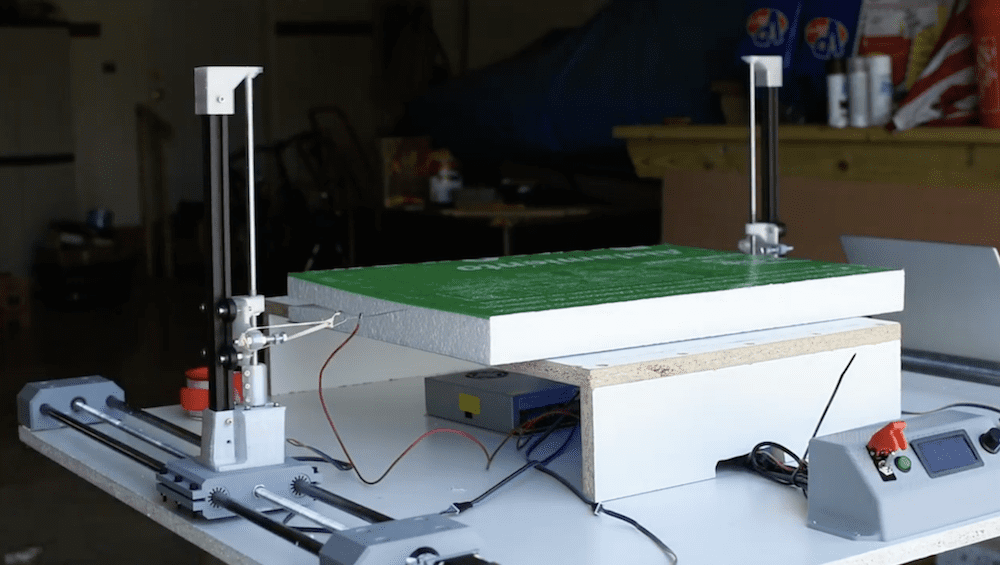
When working with Styrofoam, a conventional CNC machine like a router or laser cutter just won’t do. However, as shown in Michael Rechtin’s excellent video below, a hot wire can carve foam like butter, creating custom wings for RC aircraft or whatever else you can dream up.
Rechtin’s build uses a double gantry system to pull the wire in a horizontal and vertical directions. As each is mechanically independent of the other, they can move in tandem, or in a skewed orientation for cutting across both the horizontal and vertical planes.
Control is via an Arduino Mega running Grbl, with a RAMPS 1.4 shield.
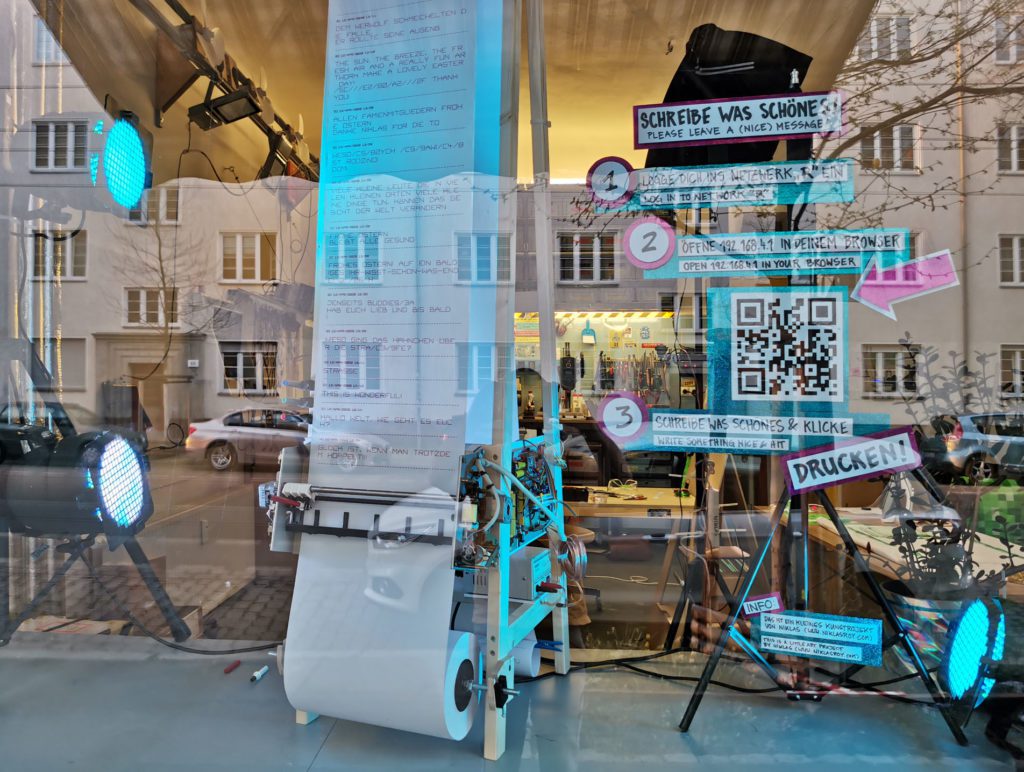
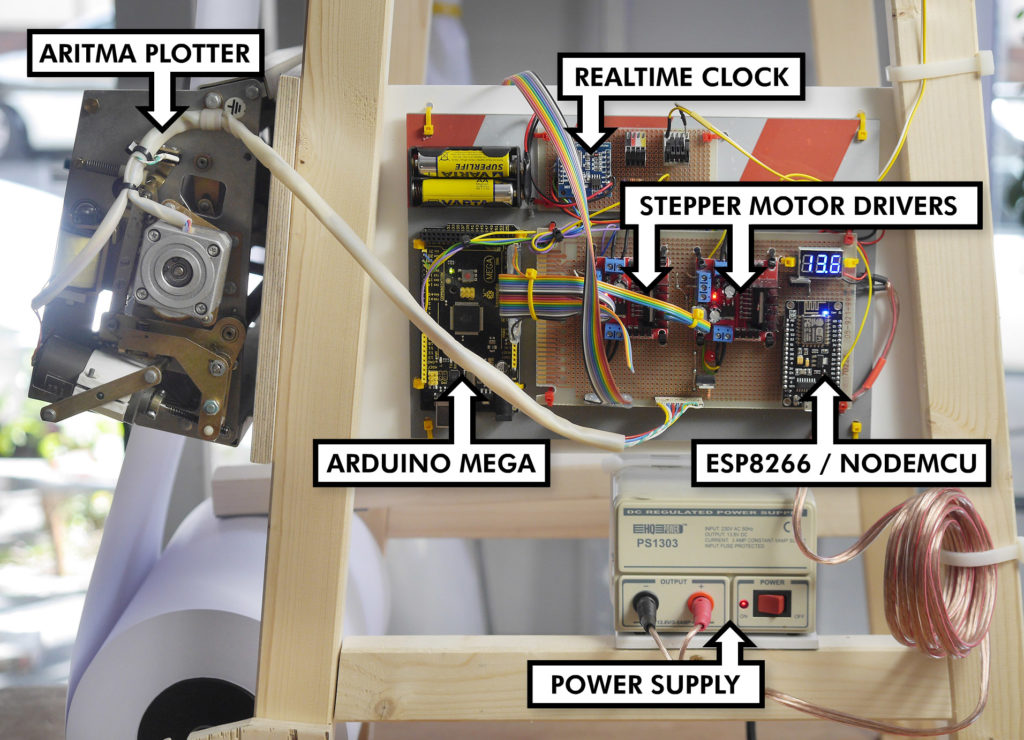
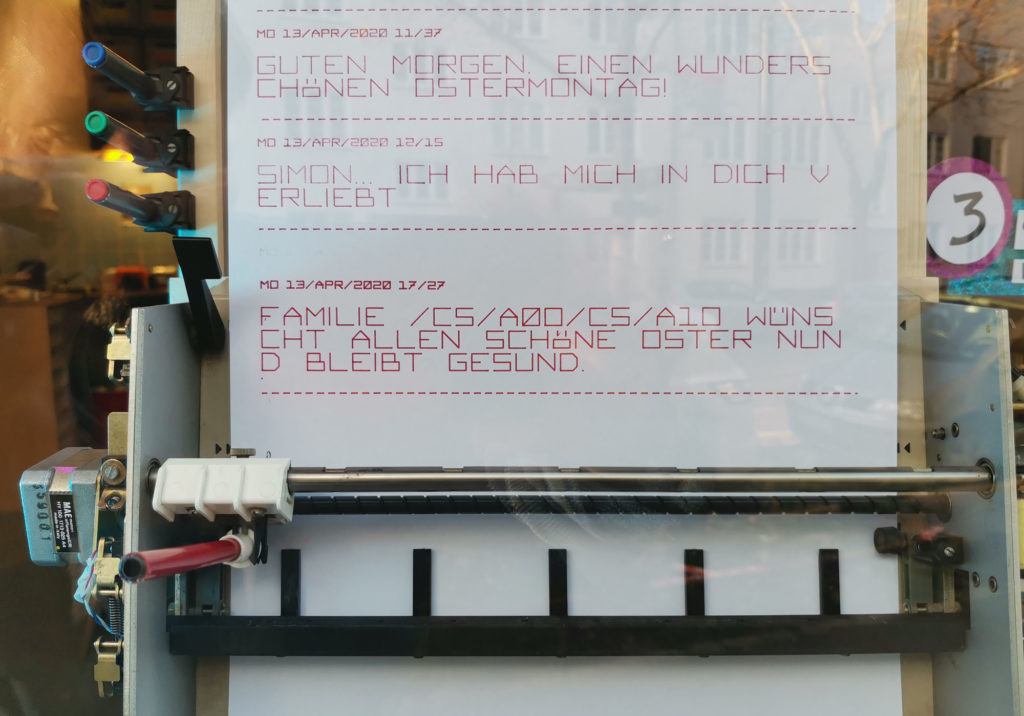
Please Leave A Message is an interactive plotter that spreads positivity
Arduino Team — May 11th, 2020
As Niklas Roy puts it, “Currently, times are weird.” It’s hard to argue with his sentiment and in order to add a bit more positivity to the world, or at least the area near his Berlin workshop, he created an interactive pen plotter for his window.
The idea is that while he didn’t know exactly what to say, Roy’s project — aptly named “Please Leave a Message” — allows passersby to create their own uplifting comments for other pedestrians to see over WiFi.
The device repurposes the mechanical bits of an old but solidly built Aritma Colorgraf plotter, which is now controlled by an Arduino Mega and new driver hardware. People log into the installation’s simply web server through a separate ESP8266 module, which sends text to be printed to the Mega via a serial connection. There’s even an RTC that notes the precise time and date of when each message was written.
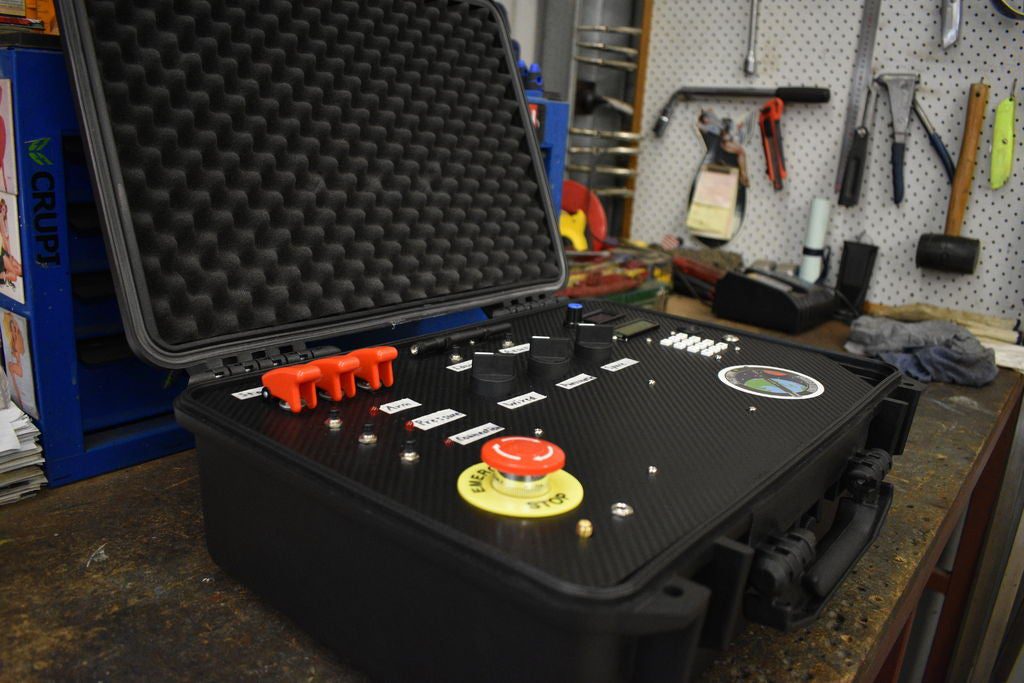
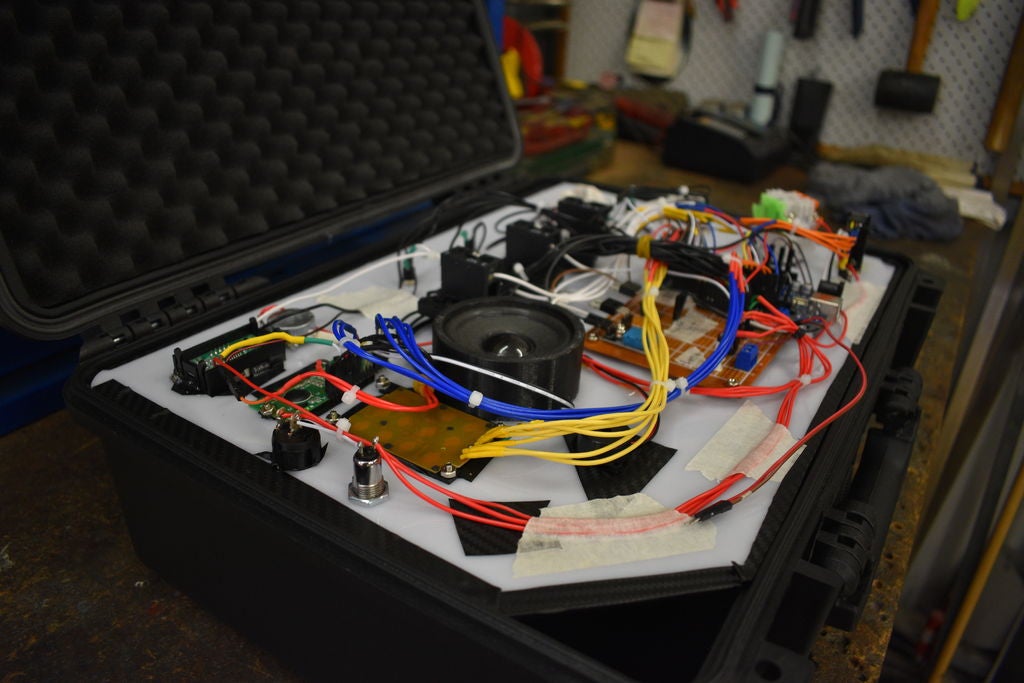
An amazingly overkill model rocket launch controller
Arduino Team — April 28th, 2020
Eddy Robinson has spent the last six months building a model rocket complete with a thrust vector control system for stabilization, along with a correspondingly epic launch console. His “overkill controller” is packed inside a rugged case and flips open to reveal an array of buttons, switches, and displays.
Controls include an arm key as well as an emergency stop button in case things go awry. There’s also an assortment of toggle switches, buttons, a 16×2 LCD display for feedback, a DHT11 sensor to ensure ideal conditions, and more.
The actual launch signal is sent wirelessly via an nRF24L01 transceiver, and there are plans to add a manual wired backup in the future. All of this is handled by an Arduino Mega, hidden below the user interface panel.
This maker turned an antique typewriter into a MIDI drum machine
Arduino Team — April 23rd, 2020
Vintage typewriters are truly amazing pieces of technology, but unlike modern keyboards, they are decidedly one-purpose machines. William Sun Petrus, however, had other ideas for his 1920s-era Remington Portable typewriter, augmenting hammers with wires as inputs to an Arduino Mega.
Input signals are produced when each key strikes a metallic “live plate” in the center, completing a circuit. This info is passed along as MIDI signals to a computer running Ableton digital audio software, allowing him to create the excellent beat seen in the video below.
Typewriter code is available on GitHub, where you’ll certainly notice the lines from Green Eggs and Ham that are output on an LCD screen at the base of the almost 100-year-old device.
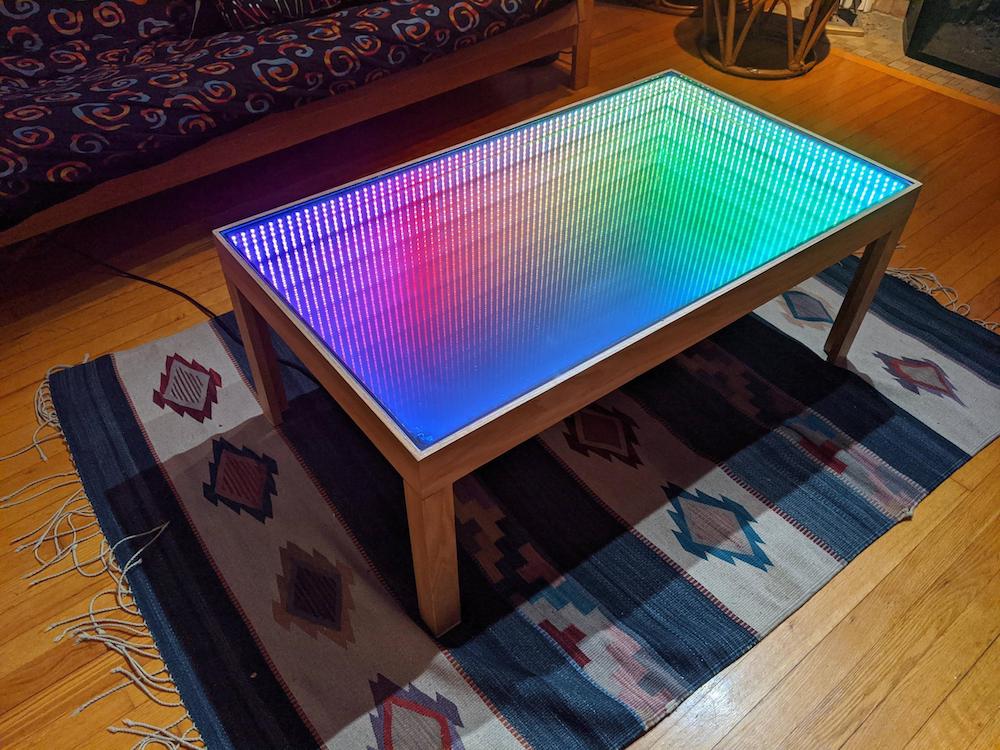
This infinity mirror coffee table puts other living room furniture to shame
Arduino Team — April 13th, 2020
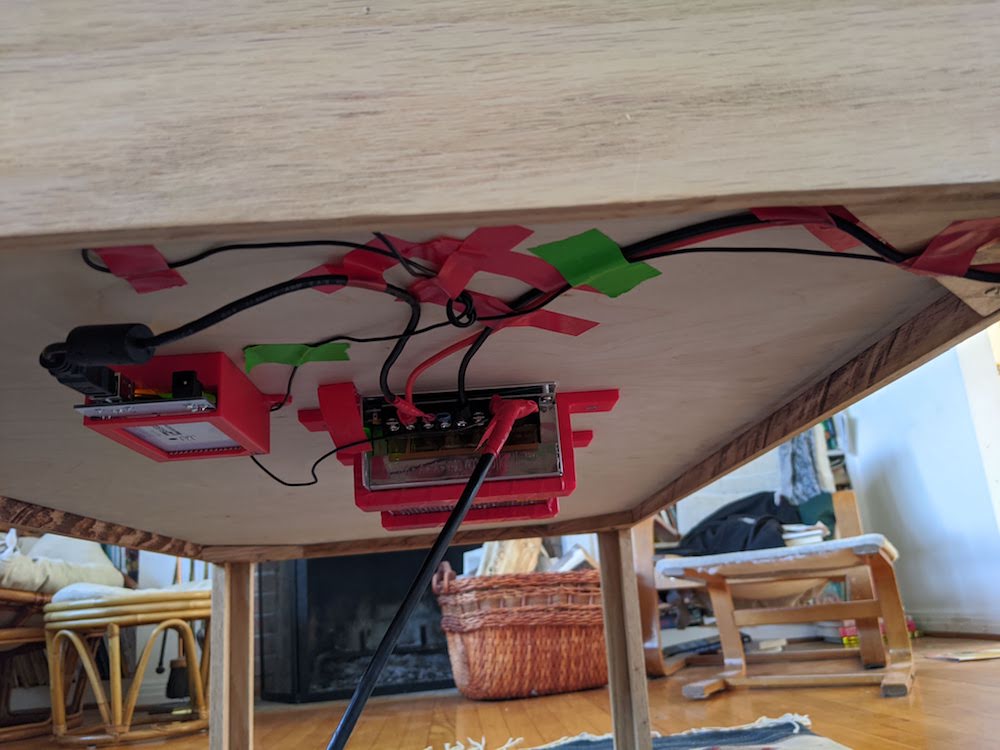
Coffee tables generally sit between a couch and TV, providing a convenient place to set your cup, snack, or magazine. As proven by Redditor Procupine however, with the addition of an Arduino Mega and a “mere” 600 LEDs, this piece of furniture can be truly mesmerizing.
The woodworking portion of the project is made out of oak, while two mirrored surfaces are arranged on either side of three strips of WS2812B LEDs. Each strip is powered individually via a 5V adapter and the Arduino is used to create luminescent patterns that appear to bounce to infinity.
An LED rainbow effect along with a few more patterns — including a Matrix mode — are on display here.
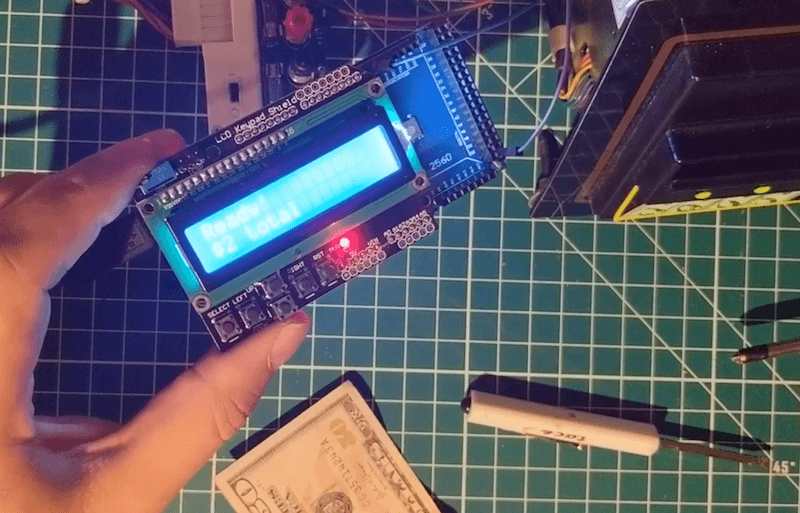
Interfacing an old arcade cash reader with an Arduino
Arduino Team — April 2nd, 2020
After picking up a free arcade machine, YouTuber “Another Maker” has naturally been considering what to do with it. One of the more interesting components included is the 1/5/10/20 U.S. dollar bill acceptor, which he outlines in the video below.
The cash reader is powered by a 12V supply, and “emulates” quarter inputs to the machine by sending multiple signals for each bill. Meaning, a dollar would be output as four quarters, five times that for a five dollar bill, and so on. This functionality is shown at the end of the clip on an Arduino Mega with an LCD keypad shield. The machine also has a 5V input, which can activated by an Arduino to make it flash LEDs and reject all bills when “business is closed.”
Um dir ein optimales Erlebnis zu bieten, verwenden wir Technologien wie Cookies, um Geräteinformationen zu speichern und/oder darauf zuzugreifen. Wenn du diesen Technologien zustimmst, können wir Daten wie das Surfverhalten oder eindeutige IDs auf dieser Website verarbeiten. Wenn du deine Einwillligung nicht erteilst oder zurückziehst, können bestimmte Merkmale und Funktionen beeinträchtigt werden.
Funktional
Immer aktiv
Die technische Speicherung oder der Zugang ist unbedingt erforderlich für den rechtmäßigen Zweck, die Nutzung eines bestimmten Dienstes zu ermöglichen, der vom Teilnehmer oder Nutzer ausdrücklich gewünscht wird, oder für den alleinigen Zweck, die Übertragung einer Nachricht über ein elektronisches Kommunikationsnetz durchzuführen.
Vorlieben
Die technische Speicherung oder der Zugriff ist für den rechtmäßigen Zweck der Speicherung von Präferenzen erforderlich, die nicht vom Abonnenten oder Benutzer angefordert wurden.
Statistiken
Die technische Speicherung oder der Zugriff, der ausschließlich zu statistischen Zwecken erfolgt.Die technische Speicherung oder der Zugriff, der ausschließlich zu anonymen statistischen Zwecken verwendet wird. Ohne eine Vorladung, die freiwillige Zustimmung deines Internetdienstanbieters oder zusätzliche Aufzeichnungen von Dritten können die zu diesem Zweck gespeicherten oder abgerufenen Informationen allein in der Regel nicht dazu verwendet werden, dich zu identifizieren.
Marketing
Die technische Speicherung oder der Zugriff ist erforderlich, um Nutzerprofile zu erstellen, um Werbung zu versenden oder um den Nutzer auf einer Website oder über mehrere Websites hinweg zu ähnlichen Marketingzwecken zu verfolgen.