Schlagwort: mega

  • Weaving just got a lot better thanks to this Arduino-controlled Jacquard loom

    Weaving just got a lot better thanks to this Arduino-controlled Jacquard loom

    Reading Time: 2 minutes

    Arduino TeamJune 5th, 2021

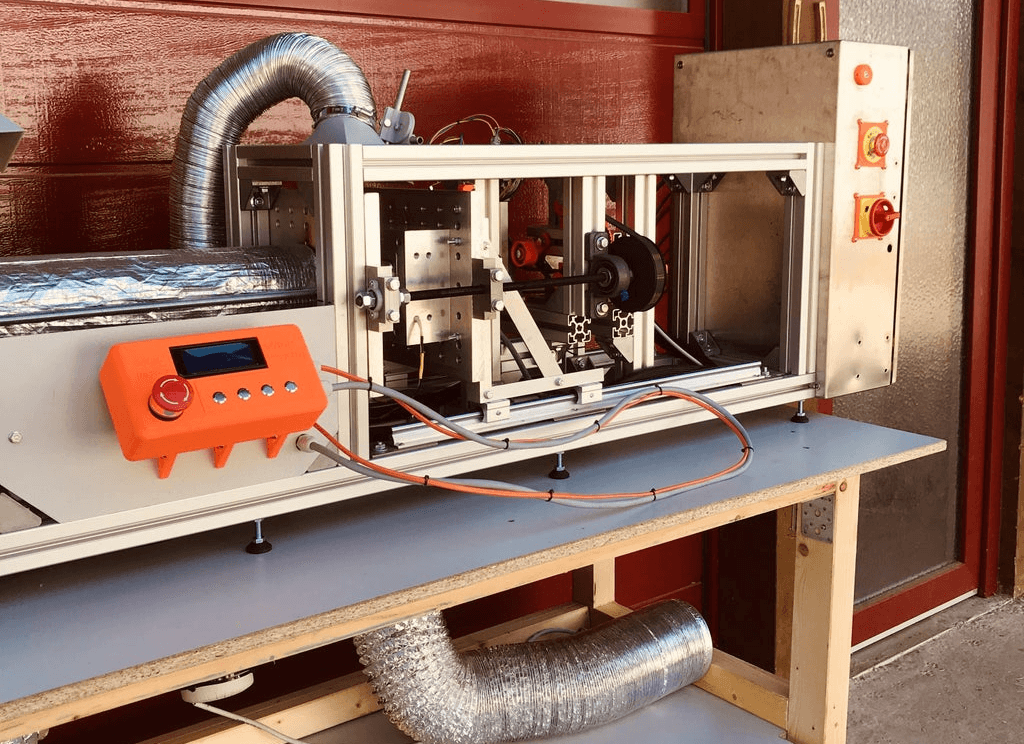
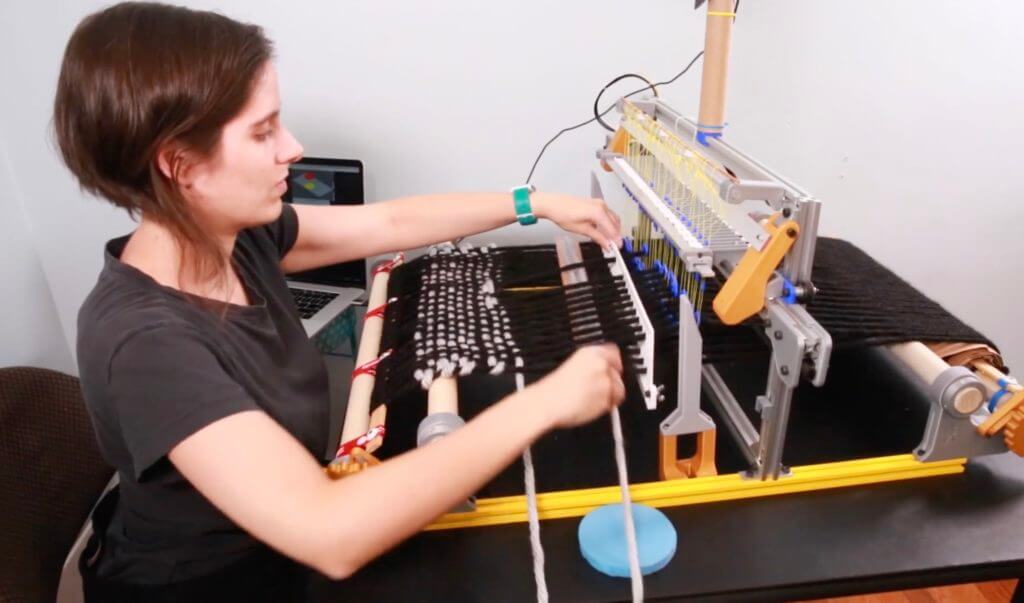
    Jacquard looms revolutionized the weaving process by independently controlling each heddle’s position. That made it possible to weave complex patterns. But modern Jacquard looms are very expensive, because they require a solenoid or other means of actuation for each and every heddle. Lea Albaugh and her team at Carnegie Mellon University found an affordable way to build a Jacquard loom from 3D printer parts — including an Arduino-based controller.

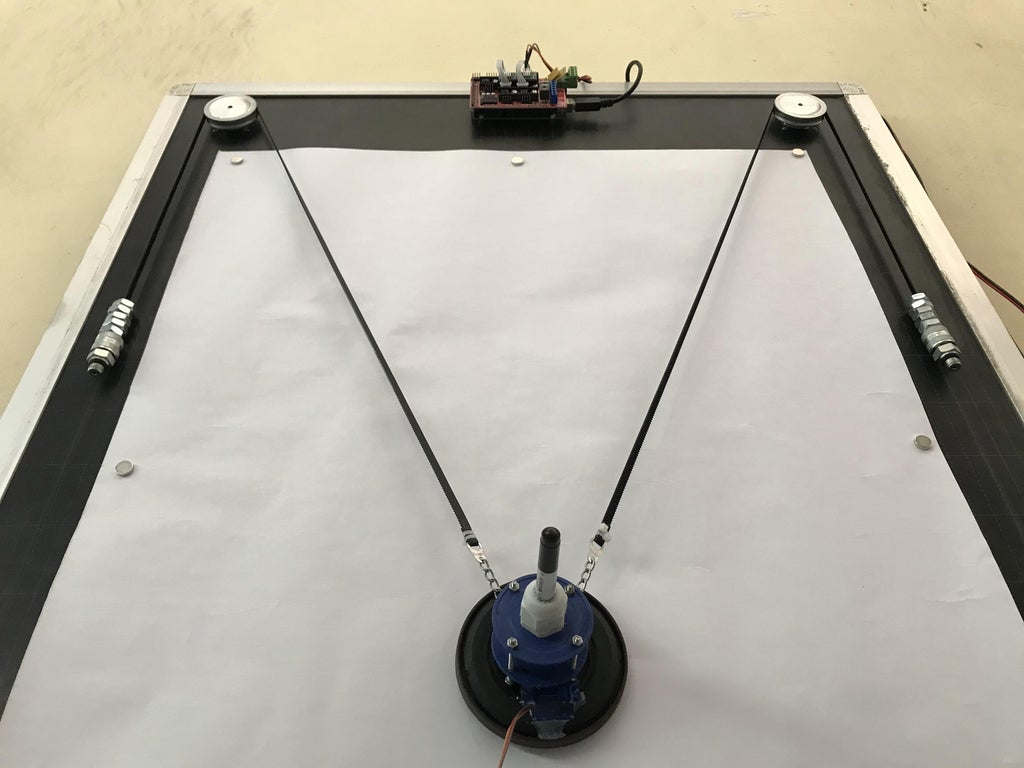
    The key development for this Jacquard loom was a special bistable switch for each heddle. Those switches keep their heddles in the position in which they were last set. That makes it possible to set the heddle positions sequentially, instead of simultaneously with a multitude of solenoids. All of the heddle positions can be set by a single solenoid, which slides back and forth across the loom. This keeps costs down and makes it possible to build a Jacquard loom for about $200 using common 3D printer components.

    The frame of this loom was built using aluminum extrusion and 3D-printed brackets. The linear rails and stepper motors are the same type that you would find in a 3D printer. The controller, a RAMPS 1.4 shield on an Arduino Mega board, is also typically used for 3D printing. The Arduino receives G-code commands from a connected computer, which monitors the loom through a commodity webcam running OpenCV computer vision software. While the loom still requires hand weaving, the automated heddle positioning allows for the quick and accurate production of complex patterns by hobbyists at home.

    [youtube https://www.youtube.com/watch?v=DIBcBHc5His?feature=oembed&w=500&h=281]

    Website: LINK

  • This DIY shuttle mission control box looks like a blast!

    This DIY shuttle mission control box looks like a blast!

    Reading Time: 2 minutes

    Arduino TeamMay 13th, 2021

    Becoming an astronaut is probably one of the top careers on any child’s list, but it’s not all that practical, especially when they’re still seven years old. That’s why Gordon Callison wanted to create a virtual shuttle mission control game that simulates a space shuttle launch with tons of different features for his kid to use. 

    The project he made is composed of many different panels that compose a box with three main surfaces that display/control various aspects of the shuttle’s journey. These include pre-flight checks on the right, launching the shuttle in the middle, and telemetry displays on the right. The whole thing fits neatly into a briefcase, but don’t let that relatively small size mislead you- it’s packed with plenty of LEDs and buttons. To control all of these, Gordon went with an Arduino Mega, along with a couple of shift registers for toggling a bank of 32 LEDs on and off. Sound effects can also be played through an Uno and Adafruit Sound Board whenever the shuttle takes off or is done orbiting. 

    This system is a great showcase of what is possible by just using a bunch of simpler components, and Callison plans on expanding it even more with a possible fourth panel to show mock interior data. More details on the mission control box can be found over on Instructables.

    Website: LINK

  • This haptic device lets you feel the hair of virtual reality animals

    This haptic device lets you feel the hair of virtual reality animals

    Reading Time: 2 minutes

    Arduino TeamMay 12th, 2021

    When it comes to virtual reality, the challenge isn’t displaying convincing visuals — VR headset manufacturers have already figured that out. The real challenge is how to tickle our other senses, like smell, taste, and especially touch. To give people the ability to feel the fur of animals in VR, engineers have built this strange haptic device, called HairTouch, equipped with adjustable hair.

    HairTouch, which is controlled by an Arduino Mega board, serves a very specific purpose: to let VR users feel hair or fibers of varying lengths. That is an absurdly narrow goal and this device definitely won’t ever make it to market, but that doesn’t make it any less interesting. If you’ve ever wanted to feel the difference between a virtual tabby cat and a virtual Maine Coon, this is the haptic feedback gadget that you’ve been looking for.

    Using a series of servo motors, HairTouch adjusts the bristles of a brush. It can control how far those bristles protrude, which is also related to their rigidity. It also adjusts the angle of the bristles, so the user can differentiate the feel of a Pomeranian from a Collie. Those adjustments correspond to the VR object that the user is currently touching. The engineers designed HairTouch to attach to VR controllers, so, at least theoretically, it can work with existing VR systems.

    [youtube https://www.youtube.com/watch?v=Ud44WUzDN8o?feature=oembed&w=500&h=281]

    Website: LINK

  • Spinning gyroscope “boat” stabilization

    Spinning gyroscope “boat” stabilization

    Reading Time: < 1 minute

    Spinning gyroscope “boat” stabilization

    Arduino TeamMay 6th, 2021

    When you use a “gyroscope” in Arduino and robotics projects, generally this means a small IMU that leverages several methods of sensing to tell how a device is moving. However, physical gyroscopes are able to employ a spinning disk stay upright mechanically. Could one be combined with advanced electronics to stabilize a robot or other craft?

    James Bruton answers this question in the video below, going from a “bare” gyroscope, to an unpowered gimbal, and finally to a simulated boat. This utilizes a powered gimbal for stabilization that’s tilted in one axis by a DYNAMIXEL servo. Angle is measured using an Arduino Pro Mini along with an MPU-6050 IMU, and the gyroscope is controlled by an Arduino Mega.

    You can check out the progression of this fun experiment in the video below, and find code/CAD info on GitHub.

    [youtube https://www.youtube.com/watch?v=UVJx8T8wTQA?feature=oembed&w=500&h=281]

    Website: LINK

  • This arm-mounted contraption provides guidance in VR

    This arm-mounted contraption provides guidance in VR

    Reading Time: 2 minutes

    Arduino TeamMay 6th, 2021

    Virtual reality (VR) technology has improved dramatically in recent years and there are now a number of VR headsets on the market that provide high-quality visual immersion. But VR systems still struggle to stimulate our other senses. When you can’t feel the virtual objects that you can see, the immersion falls apart. That’s why an international team of researchers has developed GuideBand, which is an arm-mounted contraption that physically guides players within VR.

    This device looks a bit like an external fixation apparatus for securing broken bones. It straps onto the user’s arm and has three motors controlled by an Arduino Mega via TB6612FNG motor drivers. The first motor moves the device’s gantry radially around the user’s arm. The second motor adjusts the angle of attack, offset perpendicularly from the forearm. The third motor acts as a winch and pulls a cable attached to a strap on the user’s arm.

    The unique layout of GuideBand lets it impart the feeling of pulling onto the user’s forearm, like a parent tugging their child through a grocery store. That guidance could correspond directly to action in the virtual world, such as an NPC (Non-Player Character) pulling the player out of the way of danger. Or it can provide more subtle direction, like a game tutorial demonstrating how the player should move to interact with a virtual object.

    As with many other VR haptic feedback systems, GuideBand is highly experimental and we don’t expect to see it on the market anytime soon. But it is still an interesting solution to a specific problem with virtual reality.

    [youtube https://www.youtube.com/watch?v=E_Jcn2iDzl0?feature=oembed&w=500&h=281]

    You can read the team’s published paper here.

    Website: LINK

  • The Hacksmith team made a Mandalorian jetpack using Arduino

    The Hacksmith team made a Mandalorian jetpack using Arduino

    Reading Time: 2 minutes

    Arduino TeamMay 4th, 2021

    Almost all of us have thought “That thing looks pretty cool, I wish I could build one of my one” while watching a movie or TV show. In the latest Hacksmith video, the team set out to do just that – construct a jetpack that looks nearly identical to the one seen in The Mandalorian

    The team began by cutting out several pieces of stainless steel with their CNC plasma cutter and then added some precise bends to form the shell. Because jetpack technology has not progressed enough to where people can fly with sleek packs, they had to settle with producing a couple of bright flames. This was accomplished by using the same techniques as their flamethrower build, as a propane tank provides fuel whose flow is regulated by a solenoid connected to an Arduino Mega with a custom PCB shield on top. 

    The nozzles themselves can be actuated on a gimbal mechanism through a set of two servo motors that rotate in the X and Y axes. After adding a weathered look to the surface and placing the electronics into the jetpack, it was time to test it. The pack attaches to a harness via a set of bolts and wing nuts, and as seen in their YouTube below, the results are quite close to the show. For more information, be sure to read the Hacksmith’s write-up over on Maker.io

    It goes without saying, but please do not try to recreate this at home.

    [youtube https://www.youtube.com/watch?v=Zhz5pnZxjzk?feature=oembed&w=500&h=281]

    Website: LINK

  • Arduino-controlled Rubik’s cube chandelier solves itself

    Arduino-controlled Rubik’s cube chandelier solves itself

    Reading Time: 2 minutes

    Arduino-controlled Rubik’s cube chandelier solves itself

    Arduino TeamApril 25th, 2021

    Rubik’s cubes have been mystifying and frustrating people for more than 40 years now. According to Forbes, 450 million Rubik’s cubes had been sold by 2020. But based on our very scientific estimates, only a small fraction of those have been solved. To avoid that difficulty, Stuart Gorman gave his Rubik’s cube chandelier the ability to unscramble itself.

    This large 3D-printed chandelier looks exactly like the iconic cube, except that each section is lit by LEDs instead of covered with a sticker. Those are WS2812B individually-addressable RGB LEDs controlled by an Arduino Mega board. People usually choose the Mega when they need a lot of I/O pins, but in this case Gorman picked the Mega because it has lots of RAM to work with. That RAM is necessary for handling the complexity of the Arduino code that the lamp is running.

    The lamp has a few different LED effects modes, which are selectable through a smartphone app that connects to the Arduino via a Bluetooth module. Static colors can be set to each face or it can flash random colors. But the exciting modes replicate traditional Rubik’s cube play. The first starts with a solved cube and then endlessly rotates random faces, like most people do when they attempt to solve a Rubik’s cube. The second mode will actually solve the cube, which it does by playing the first mode in reverse. This chandelier looks fantastic and is a lot of fun to watch in action.

    [youtube https://www.youtube.com/watch?v=wnBRsU6DJKY?feature=oembed&w=500&h=281]

    Website: LINK

  • Bringing Snake to your coffee table

    Bringing Snake to your coffee table

    Reading Time: 2 minutes

    Arduino TeamApril 21st, 2021

    Snake is a classic game — more a genre of games — that dates all the way back to 1976 with the release of the Blockade arcade game. Many consoles and devices have received variations of Snake, putting it in the same league as Tetris and block breakers. Now Ty and Gig Builds have used an Arduino to construct a giant coffee table version of the game.

    One of the reasons that so many variations of Snake exist is because it runs well on very low-resolution screens. That also made it perfect for this project, since an LED matrix makes for a great low-res display. Ty and Gig originally built that matrix for an interactive coffee table project and they were able to repurpose it for this game.

    WS2811 individually-addressable RGB LEDs form that matrix. They shine through holes drilled into a sheet of plywood mounted underneath the coffee table glass. An Arduino Mega controls those LEDs, but any Arduino board would work for the job. The only other hardware components are a 5V power supply and an analog joystick module.

    The joystick is comprised of two potentiometers, so the Arduino simply checks those to determine which direction to move. Programming was a small challenge, because the 1D array of LEDs had to be translated to the 2D display. With that figured out, programming the game was straightforward. Players direct the LED snake to collect as many apples as possible without colliding with itself, like they have done for the past four decades.

    [youtube https://www.youtube.com/watch?v=FBeBU8TXGh0?feature=oembed&w=500&h=281]

    Website: LINK

  • Building a better battery analyzer with Arduino

    Building a better battery analyzer with Arduino

    Reading Time: 2 minutes

    Arduino TeamApril 19th, 2021

    Your favorite device has just run out of juice, so you quickly take off the cover and reach into that old stash of alkaline batteries you have lying around. After trying countless combinations, you still cannot be sure they’re working properly, as each one has been slightly used. If only there were a way to know.

    In comes a maker named Moragor with his take on a battery analyzer. The one he built doesn’t just measure the voltage for a certain type of battery. Instead, users can select from three different types (alkaline, NiMh, or Li-on), along with the current from a sleek OLED display. Then, values get read, shown, and also logged to an SD card for more advanced analysis. The entire device is based on a custom PCB that acts as a shield for an Arduino Mega.

    Moragor might have gone a bit overboard, however, as he eventually got around to testing 25 different types of alkaline batteries! After measuring four batteries from each brand with discharge rates of 100mA and then 500mA, he was able to create this neat little chart that shows the energy loss from high current consumption. As seen below, there were a couple of standouts that lost nearly 60% of their energy at 500mA vs 100mA.

    You can check out Moragor‘s write-up for more information on exactly what components were used and how it was made, plus all the detailed battery analysis one could hope for.

    Website: LINK

  • Camera assistant takes shots of your workbench from above

    Camera assistant takes shots of your workbench from above

    Reading Time: < 1 minute

    Arduino TeamApril 6th, 2021

    “Have you ever wished you had an extra pair of hands in the workshop to handle the camera, while you were concentrating on your project?” KronBjron has, which led them to create an automated overhead camera assistant to help document instructional videos.

    The device hangs a camera overhead and uses a trio of stepper motors to pan, tilt, and slide it around for extra interesting shots. It’s all controlled by an Arduino Mega and RAMPS 1.4 board, with user interface implemented via the serial monitor. Users can set up to 10 keyframe positions, and the camera rig will move from one point to another while it captures what’s going on below.

    The assistant is made out of readily-available components, along with a structure that can either be 3D-printed or CNC’ed. However you construct it, this build looks like just the thing to take your videos to the next level!

    [youtube https://www.youtube.com/watch?v=SyXI5doVyrQ?feature=oembed&w=500&h=281]

    Website: LINK

  • Spacecase is an escape room in a suitcase

    Spacecase is an escape room in a suitcase

    Reading Time: 2 minutes

    Spacecase is an escape room in a suitcase

    Arduino TeamMarch 11th, 2021

    Escape rooms can be a lot of fun, though with today’s conditions, you may instead be staying at home. As seen in the video below, the Spacecase gives you the best of both worlds as an entirely portable escape “room” in a box.

    The Spacecase consists of only a hard suitcase, along with a NASA tote bag. Each of these contain different elements that allow you to “repair your spaceship and escape before you and your crew run out of oxygen.”

    Inside the bag is an emergency power module, which must be opened to reveal the key to the suitcase, and plugged in to power it. Hidden within the suitcase is about 20 puzzles that are solved interactively via the Arduino Mega-based electronics under the control panel.

    The build features voice feedback, as well as a variety of knobs, LEDs, switches, and more, providing what looks like a fun and challenging puzzle to get your spaceship off the ground!

    [youtube https://www.youtube.com/watch?v=MaIkZp6OjG4?feature=oembed&w=500&h=281]

    Website: LINK

  • Zach Frew’s Liquid Lite Brite creates low-res art out of liquid dye

    Zach Frew’s Liquid Lite Brite creates low-res art out of liquid dye

    Reading Time: 2 minutes

    Zach Frew’s Liquid Lite Brite creates low-res art out of liquid dye

    Arduino TeamMarch 4th, 2021

    As a child, chances are you came across a Lite-Brite at some point. The toy consisted of a light box with small plastic pegs that fit into a panel and lit up to form a picture. Drawing inspiration from that, mechatronics engineer Zach Frew thought “it would be cool to make a robot that consumes a digital image and outputs a watercolor painting.” What he came up with as a “first step along that path” is a homemade liquid handling workstation to dispense and mix a CMYK dye solution in a 384-well microplate “canvas.”

    Liquid distribution is calculated with the help of a Python script that takes a 24×16 pixel image as input and assigns each pixel an RGB value. The “printing” is handled by the common RepRap configuration of an Arduino Mega and a RAMPS 1.4 shield, plus a PCA9685 expander chip. The X, Y, and Z axes move via stepper motors and rails, while color mixing is accomplished using five servo-actuated valves. A stepper-driven peristaltic pump is employed for liquid placement, producing low-resolution yet no less beautiful art.

    You can read more about the aptly named Liquid Lite Brite in Frew’s blog post.

    Website: LINK

  • A pushbutton control panel for your Zoom calls

    A pushbutton control panel for your Zoom calls

    Reading Time: 2 minutes

    A pushbutton control panel for your Zoom calls

    Arduino TeamFebruary 5th, 2021

    Today with most people working from home using teleconferencing applications, a custom control panel for such interactions could come in handy. This inspired professor Elena Long to design her own Zoom interface around on an Arduino, a 3D-printed enclosure, and a series of pushbuttons that allow for custom printed icons.

    Long’s device features 12 main buttons — five momentary, seven latching. These are wired to light up via LEDs. There’s also large red mushroom button on the end provides a final latching input, which is perfect for aborting calls with a flourish.

    Whereas many would assume the console is powered by either a Leonardo or Micro, Long’s unit is actually based on a Mega set up with the HoodLoader2 bootloader that enables it to act as a virtual keyboard.

    Those wishing to recreate the project for their desk can find more details on Long’s GitHub.

    Website: LINK

  • The Ohmmeter 2.0 displays resistor band colors

    The Ohmmeter 2.0 displays resistor band colors

    Reading Time: 2 minutes

    The Ohmmeter 2.0 displays resistor band colors

    Arduino TeamFebruary 2nd, 2021

    Bands on through-hole resistors conveniently indicate their value at a glance. On the other hand, you have to actually know the code to interpret this meaning. Alternatively, you could use the Ohmmeter 2.0 — developed by Miguel Alejandro Ramírez Anaya and José Miguel Galeas Merchán from the University of Málaga in Spain.

    Their Arduino Mega-powered device has three modes. First, it enables you to enter resistor value with a keypad and then displays the corresponding resistor colors on a large resistor model via RGB LEDs inside. You can also input the color values directly using the keypad along with a small OLED screen. Last but not least, the Ohmmeter 2.0 can even measure a component’s resistance through a pair of terminals, replicating color values on the 3D model.

    You can find more details on the students’ Ohmmeter 2.0 here and see it in action below.

    [youtube https://www.youtube.com/watch?v=E7b-xu1qVF8?feature=oembed&w=500&h=281]

    Website: LINK

  • FISHBOT reels in fish under smartphone control

    FISHBOT reels in fish under smartphone control

    Reading Time: 2 minutes

    FISHBOT reels in fish under smartphone control

    Arduino TeamJanuary 8th, 2021

    As reported by Hackaday, fishing is generally considered to be a fun and relaxing activity, but it isn’t accessible for those without a certain amount of strength and dexterity. To help more people to be able to enjoy this sport, Ozgur Ozcan has been working on what he calls the “FISHBOT.”

    This auto-fishing device is controlled by an Arduino Mega, along with an IBT_2 PWM driver to actuate a 400 watt DC motor for reeling duties. An HM-10 Bluetooth module enables smartphone connectivity, opening up the possibility for fingertip activation, or even via the internal gyroscope.

    The setup also features a load cell, which could be used to release the line when it’s in danger of being snapped, or to weigh the fish automatically when landed.

    [youtube https://www.youtube.com/watch?v=1R5VHj9uxLM?feature=oembed&w=500&h=281]

    [youtube https://www.youtube.com/watch?v=6MHhMajOO0E?feature=oembed&w=500&h=281]

    Website: LINK

  • This sensor-based tic-tac-toe game looks like some touchless fun!

    This sensor-based tic-tac-toe game looks like some touchless fun!

    Reading Time: 2 minutes

    This sensor-based tic-tac-toe game looks like some touchless fun!

    Arduino TeamJanuary 6th, 2021

    Tic-tac-toe is normally played with a pen and paper, or perhaps with a physical marker, but maker “techiesms” has put a new spin on this classic pastime.

    His build, as seen here, takes the form of a wooden box that mounts onto the wall with nine square sections arranged in a grid pattern. Players take turns, activating a square by moving their hand near an IR proximity sensor inside each one. 

    The squares then light up green or red depending on the player, and when a line is made, the system beeps and blinks on and off to signify a winner. Everything is controlled via an Arduino Mega, along with a custom PCB for wiring.

    More details on the game and its construction can be found in techiesms’ post here.

    [youtube https://www.youtube.com/watch?v=HkF3P_8tI9k?feature=oembed&w=500&h=281]

    Website: LINK

  • Unused blackboard becomes vertical plotter

    Unused blackboard becomes vertical plotter

    Reading Time: < 1 minute

    Unused blackboard becomes vertical plotter

    Arduino TeamDecember 29th, 2020

    Vertical pen plotters, which work by suspending a drawing device between two variable lengths of cable, can be a lot of fun. When his kids stopped using a 780x1200mm blackboard, ‘tuenhidiy’ had the perfect surface on which to create his own!

    The project uses a pair of NEMA 17 motors to dictate the lengths of timing belt that suspend the drawing instrument, with counterweights help keep it in position. An Arduino Mega running Makelangelo firmware controls the device, using a RAMPS 1.4 board and two A4988 stepper drivers.

    It’s a nice clean build, which looks fairly straightforward to reproduce. Results, as seen in the videos below, are quite impressive!

    [youtube https://www.youtube.com/watch?v=YTYxPt15hTQ?feature=oembed&w=500&h=281]

    [youtube https://www.youtube.com/watch?v=w_8iHQgj6ss?feature=oembed&w=500&h=281]

    Website: LINK

  • Control your holiday lights with a tap of a Disney MagicBand

    Control your holiday lights with a tap of a Disney MagicBand

    Reading Time: 2 minutes

    If you enjoy all things Disney and would love to bring some of its park magic into your home, then look no further than Dominick Civitano’s recent project.

    Because of travel limitations due to the pandemic, Civitano decided to create a replica of a MagicBand reader that uses an NFC card reader module to recognize a programmed MagicBand, which triggers a ring of LEDs, audio output, and a relay for Christmas lighting. This setup could likely be applied to other devices, opening up its possibilities into January and beyond.

    Electronics for the build — including an Arduino Mega that runs the show — are hidden inside of a 3D-printed, property-themed enclosure that resembles those found outside of any Disney theme park. This would potentially preserve a sense of wonder at the device, and diffuses the LEDs nicely.

    More details on the Civitano’s work can be found on GitHub!

    [youtube https://www.youtube.com/watch?v=WFyDRV0GOis?feature=oembed&w=500&h=281]

    [youtube https://www.youtube.com/watch?v=G5IX_6UYfng?feature=oembed&w=500&h=375]

    [youtube https://www.youtube.com/watch?v=N-M03rtk2xM?feature=oembed&w=500&h=281]

    [youtube https://www.youtube.com/watch?v=xcsDWAmd3SA?feature=oembed&w=500&h=281]

    Boards:Mega
    Categories:Arduino

    Website: LINK

  • Creating a continuum tentacle-like robot with Arduino

    Creating a continuum tentacle-like robot with Arduino

    Reading Time: < 1 minute

    Creating a continuum tentacle-like robot with Arduino

    Arduino TeamNovember 30th, 2020

    Continuum robots — which look like a tentacle or perhaps an elephant’s trunk — use a series of linkage sections and internal tendons to move both horizontally and vertically. While they may seem quite exotic, in the video below element14 Presents’ DJ Harrigan breaks down how he built one with an Arduino Mega and a fairly simple list of parts.

    The robotic mechanism hangs down from a support structure, with universal joints allowing each section to bend, but not twist, with respect to the next one. These 10 sections are pulled in different directions using two servos and Kevlar cord, with user interface provided by two potentiometers. A third pot actuates another motor attached to the tentacle, acting as a gripper for tools, or whatever else Harrigan needs at the time!

    [youtube https://www.youtube.com/watch?v=XRw1mcIFzkE?feature=oembed&w=500&h=281]

    Website: LINK

  • Homemade recycling rig turns plastic waste into new products

    Homemade recycling rig turns plastic waste into new products

    Reading Time: 2 minutes

    Homemade recycling rig turns plastic waste into new products

    Arduino TeamNovember 24th, 2020

    While that plastic cup, bag, dish, or other item may have served its purpose, more than likely it could be formed into something new. With this in mind, the SOTOP-Recycling team of Manuel Maeder, Benjamin Krause, and Nadina Maeder developed an automated injection molding machine that can be built at home and is small enough to allow you to run your own recycling operation!

    The “Smart Injector” receives shredded pieces of plastic in a small hopper, then transports them down an extrusion pipe where heat is applied. This material is clamped together via a pair of stepper motors, with screws and timing belts implemented to apply sufficient pressure. Everything is controlled by an Arduino Mega.

    As shown in the video, the plastic waste is converted into phone covers in just minutes, though other things could also be made depending on the form tooling used.

    [youtube https://www.youtube.com/watch?v=Eq9IbetsLB4?feature=oembed&w=500&h=281]

    Website: LINK

  • Skee-ball-like indoor golf game gets an automatic scoring system

    Skee-ball-like indoor golf game gets an automatic scoring system

    Reading Time: 2 minutes

    Skee-ball-like indoor golf game gets an automatic scoring system

    Arduino TeamNovember 10th, 2020

    After making an indoor Executive Par 3 golf game with a ramp and cups like a skee-ball machine, creator “gcal1979” decided to add an automatic scoring system to the rig.

    What he came up with uses infrared break beam sensors for each of the three holes, feeding info to an Arduino Mega. Stats are shown on an electronic scoreboard behind the play area, with a seven-segment display for the hole number, as well as two four-digit units for player scores.

    Individual LEDs tell what kind of shot was detected (e.g. bogey or hole-in-one), if there are one or two players, and if a new game is in progress. A three-button control console starts new games, switches between one and two player mode, and even lets you indicate whether there’s been an undetected out-of-bounds double bogey shot!

    Website: LINK

  • The GPRino is a $300 ground penetrating radar

    The GPRino is a $300 ground penetrating radar

    Reading Time: 2 minutes

    The GPRino is a $300 ground penetrating radar

    Arduino TeamNovember 9th, 2020

    Ground penetrating radar systems, which can be used to sense the density of objects under the Earth, are normally seen as a fairly exotic piece of equipment. Naturally, such devices cost thousands of dollars. Mirel Paun’s “GPRino” prototype, though, aims to accomplish this viewing task for the comparatively paltry sum of $300.

    The GPRino uses antipodal Vivaldi antennas to see into the ground, under control of an Arduino Mega. Onboard visualization is handled by an LCD shield, and collected data can also be transmitted to a PC for further analysis.

    More information homemade GPR can be found in Paun’s project write-up. You can see a demo of it scanning in the first video below, while a quick clip of its wheel switch (a simple cam setup) is shown in the second.

    [youtube https://www.youtube.com/watch?v=nFR2I9GdFXM?feature=oembed&w=500&h=281]

    [youtube https://www.youtube.com/watch?v=V5B5Lwu-gq4?feature=oembed&w=500&h=281]

    Website: LINK