Schlagwort: mega
-

Star Wars-themed Mastermind with an Arduino Mega
Reading Time: 3 minutesStar Wars-themed Mastermind with an Arduino Mega Arduino Team — May 28th, 2019 Mastermind is a game where one player attempts to guess a secret combination of colored pegs. It normally requires a second player to act as the judge, giving hints in the form of secondary pegs as to whether the…
-

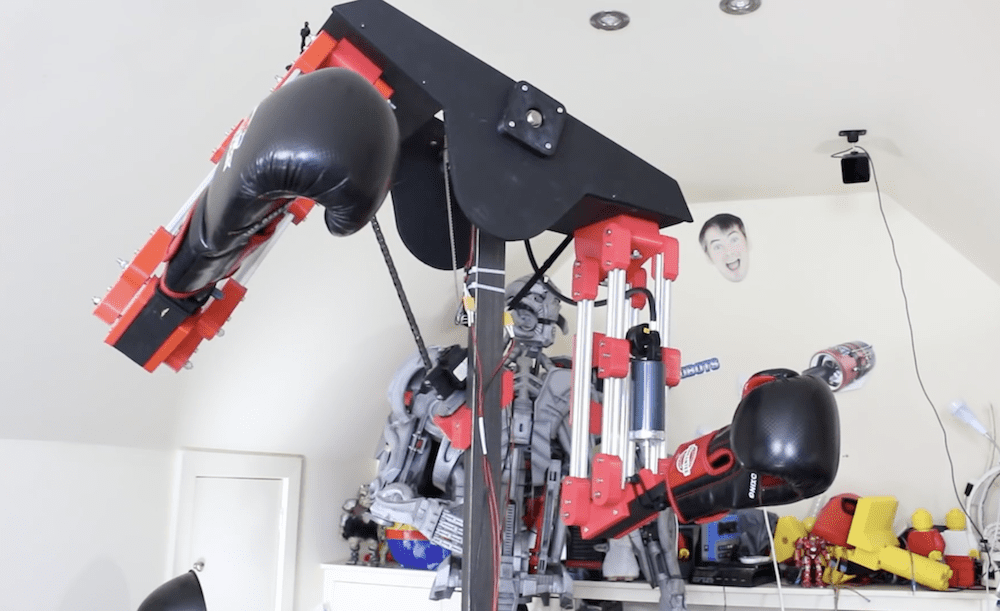
VR boxing robot actually punches back
Reading Time: 2 minutesVR boxing robot actually punches back Arduino Team — May 15th, 2019 VR environments are meant to be immersive, but if you’ve ever thought what was missing is being actually pummeled by robotic fists, then James Bruton’s newest project could be just the thing. Bruton recently teamed up with students from Portsmouth…
-

This drink machine pours, slices, and dispenses mint!
Reading Time: 2 minutesThis drink machine pours, slices, and dispenses mint! Arduino Team — April 18th, 2019 Automated cocktail machines can be fun projects, but this device by CamdenS5 takes things to a whole new level. Not only can it pour liquids from multiple bottles, but it chops limes, dispenses sugar and mint, and even…
-

The Blade is a dual Game Boy chiptune keytar
Reading Time: 2 minutesThe Blade is a dual Game Boy chiptune keytar Arduino Team — April 16th, 2019 Keytars may have had their moment of popularity in the 1980s, but instruments of the day can’t hold a candle to “The Blade” by makers Sam Wray, Siddharth Vadgama, and Greig Stewart. The musical device feeds signals…
-

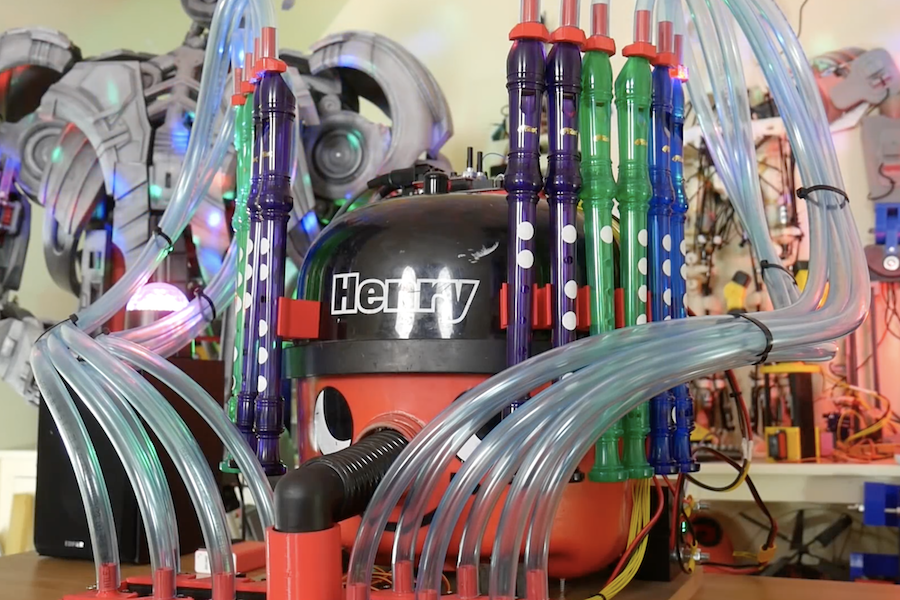
Vacuum cleaner turned into unique MIDI instrument
Reading Time: 2 minutesVacuum cleaner turned into unique MIDI instrument Arduino Team — April 9th, 2019 When you see a vacuum cleaner, most people see a useful implement to keep their carpets clean. James Bruton, however, envisioned another use—as a musical instrument. His new project, which made its appearance this year on April Fools’ Day,…
-

Listen to the best of the ‘holdies’ with this Arduino-enabled desk phone
Reading Time: 2 minutesListen to the best of the ‘holdies’ with this Arduino-enabled desk phone Arduino Team — March 30th, 2019 If you’ve ever thought that your life needs a little more hold music in it, then this Greatest Holdies phone from FuzzyWobble could be just the thing. The heavily modified device uses the shell…
-

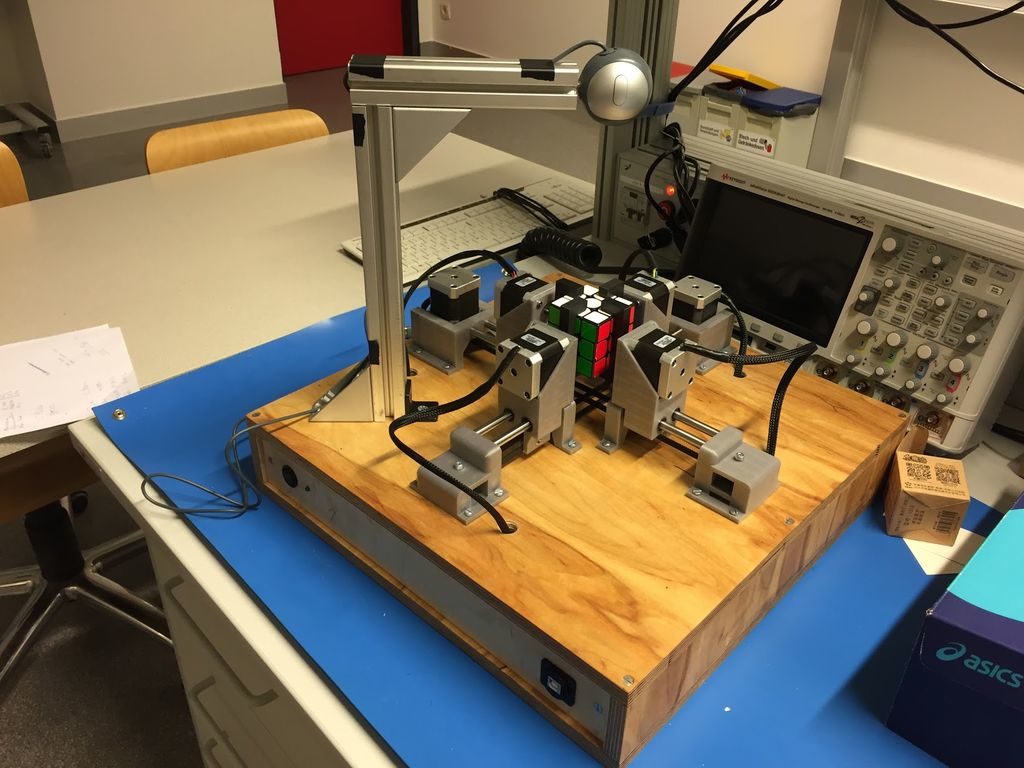
Q-Bot is an Arduino Mega-driven Rubik’s Cube solver
Reading Time: < 1 minuteQ-Bot is an Arduino Mega-driven Rubik’s Cube solver Arduino Team — March 14th, 2019 Rubik’s Cubes seem to have been most popular in the 1980s, but never really went away. As such, if you have one lying around your house unsolved, why not ‘simply’ construct a machine to do this for…
-
The world’s smallest forklift?
Reading Time: < 1 minuteThe world’s smallest forklift? Arduino Team — March 6th, 2019 Remote control cars are interesting, but as Leon van den Beukel shows in the video below, an RC forklift can be even more challenging and fun to create. His project was constructed using a variety of hand and automated techniques, resulting…
-

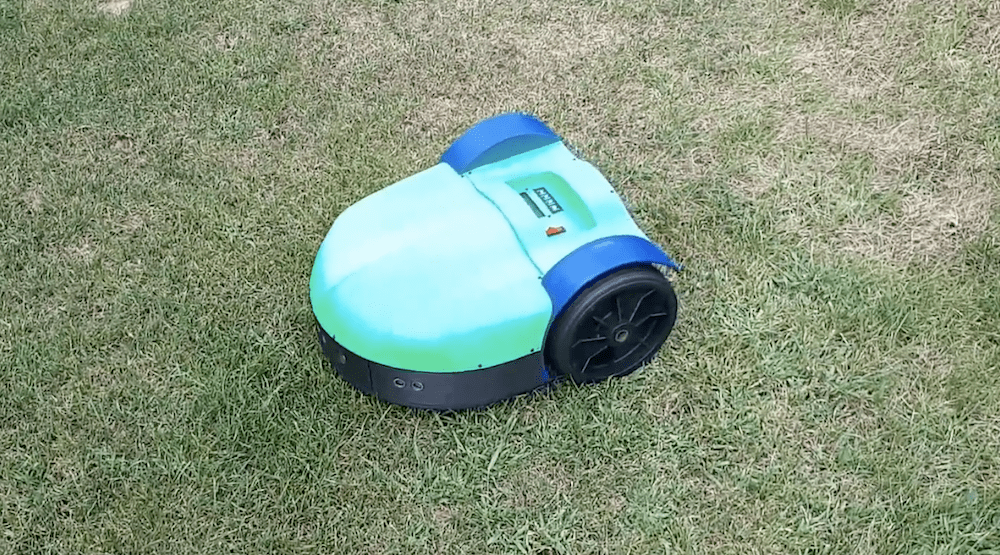
Robotic lawnmower uses multi-Arduino control
Reading Time: 2 minutesRobotic lawnmower uses multi-Arduino control Arduino Team — February 21st, 2019 Do you enjoy mowing your lawn? No? Well now you can ‘simply’ print a robot to do it for you, based on German mechanical engineer Philip Read’s design. His Roomba-esque device uses a pair of gearmotors for movement, an array of…
-

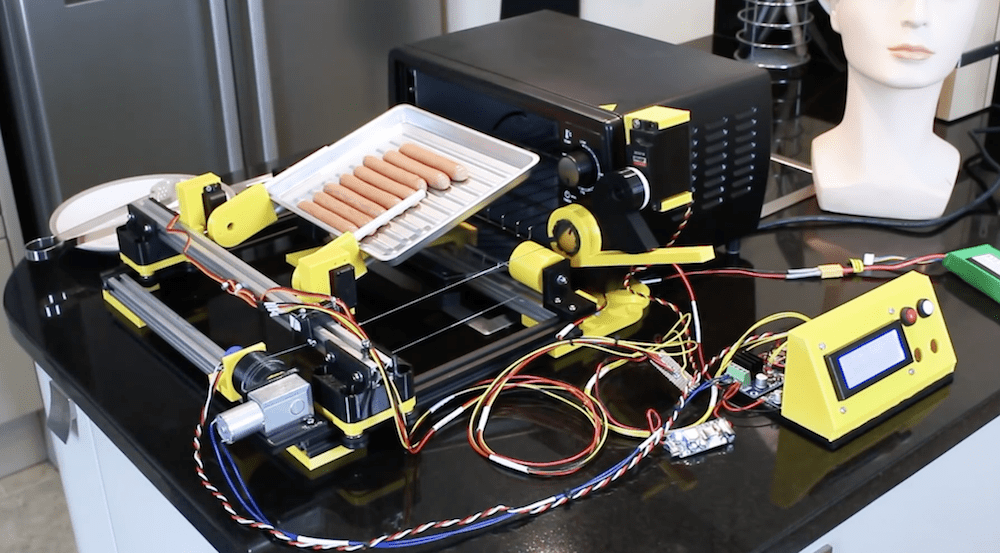
Controlling a toaster oven robot with Arduino
Reading Time: 2 minutesControlling a toaster oven robot with Arduino Arduino Team — February 15th, 2019 As seen in our earlier post, James Bruton has been working on a breakfast-making robot, and has now moved from boiling eggs to making toast… or apparently hot dogs/sausages as shown in the video’s demo. What he’s come up…
-

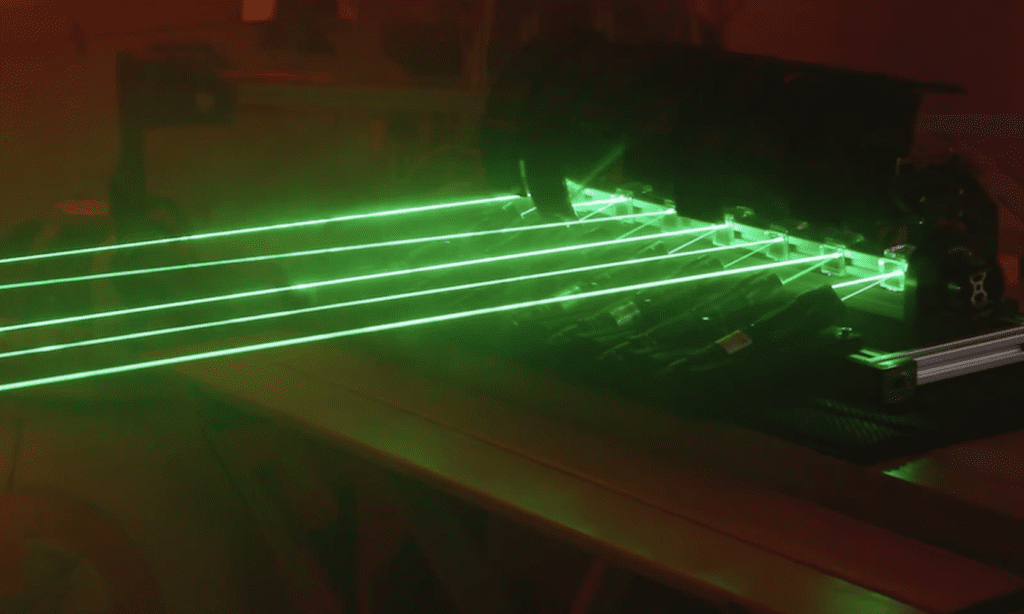
Visualize tunes with James Bruton’s laser projector graphic EQ display
Reading Time: 2 minutesVisualize tunes with James Bruton’s laser projector graphic EQ display Arduino Team — February 7th, 2019 If you’d like to visualize your music, VU meters make an excellent tool. While they are generally built into audio equipment, maker James Bruton had the idea to construct his own using lasers. His setup features…
-

“Rare Candy” played on even more rare electronic instrument
Reading Time: 2 minutes“Rare Candy” played on even more rare electronic instrument Arduino Team — February 5th, 2019 According to musician/maker Ruben Dax, “Few things make him happier than being able to create things that create things.” As seen in the video below, what he’s created is a very strange cylindrical instrument with an array…
-
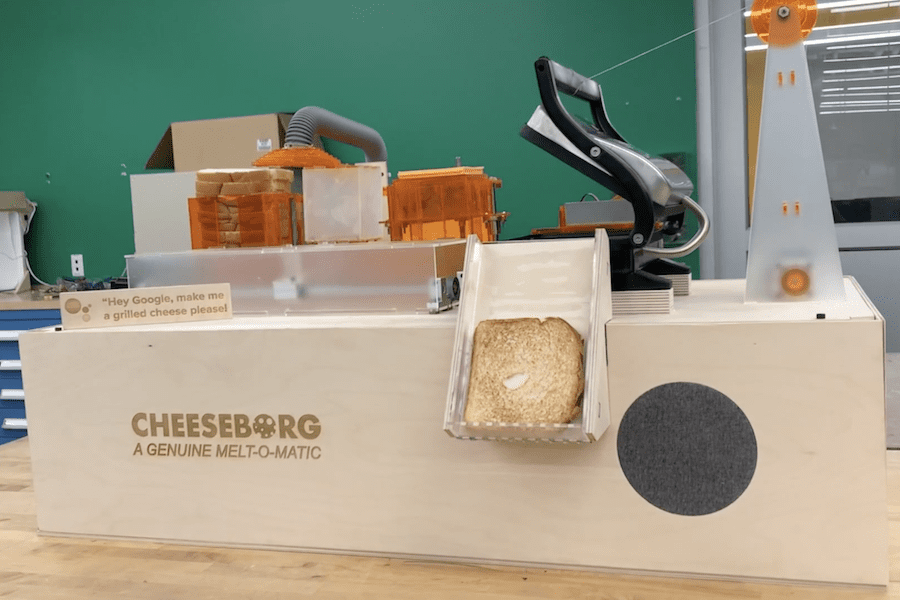
Cheeseborg is a voice-controlled robot that makes grilled cheese sandwiches
Reading Time: 2 minutesDo you like grilled cheese? Would you rather not make it yourself? If so, then the Cheeseborg by Taylor Tabb, Mitchell Riek, and Evan Hill could be the perfect device for you! This assembly line-like robot first stacks bread-cheese-bread using a vacuum gripper, and passes the unheated sandwich onto the grill via…
-
Augment your tongue’s senses with the Cthulhu Shield
Reading Time: 2 minutesAugment your tongue’s senses with the Cthulhu Shield Arduino Team — January 31st, 2019 Whether one of your senses is weak or non-existent, or you would simply like a way to augment your perception and control options, the Cthulhu Shield can be applied in either situation. The device takes the form of…
-

An RFID-powered seating chart for your wedding
Reading Time: 3 minutesSeating charts at weddings and other formal events are usually handled by small cards at each table, but Gabrielle Martinfortier had other plans. For her big event, she along with help from her now-husband and friends constructed a seating arrangement on a 3’ x 4’ wood canvas, equipped with a 7” TFT…
-
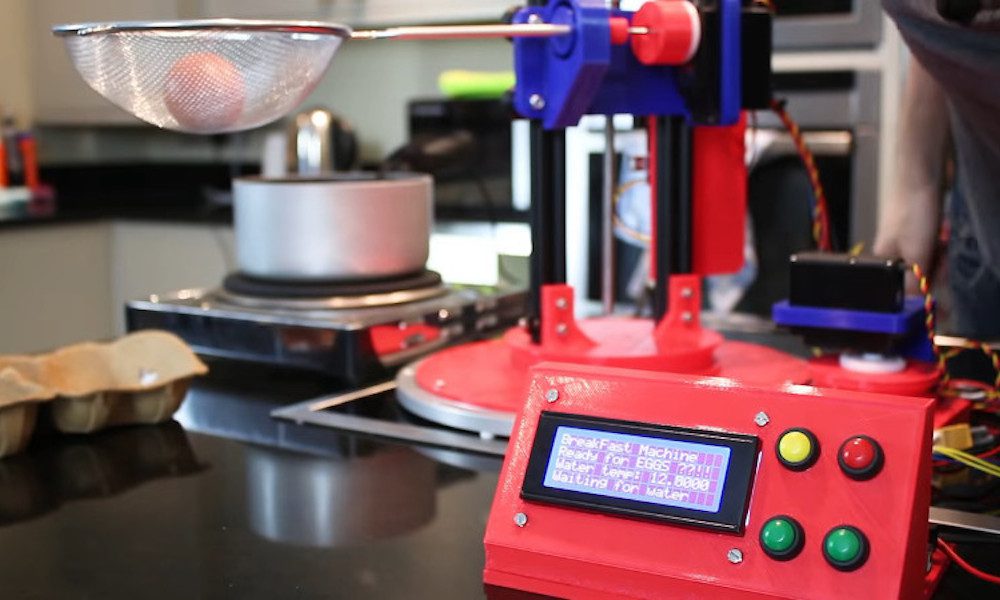
This robot is eggsactly what you need to cook breakfast
Reading Time: < 1 minuteThis robot is eggsactly what you need to cook breakfast Arduino Team — January 17th, 2019 Normally, boiling an egg involves heating water in a saucepan, then dropping an egg inside to be properly heated. James Bruton, however, now has a bit of help in the form of his breakfast-making robot. …
-

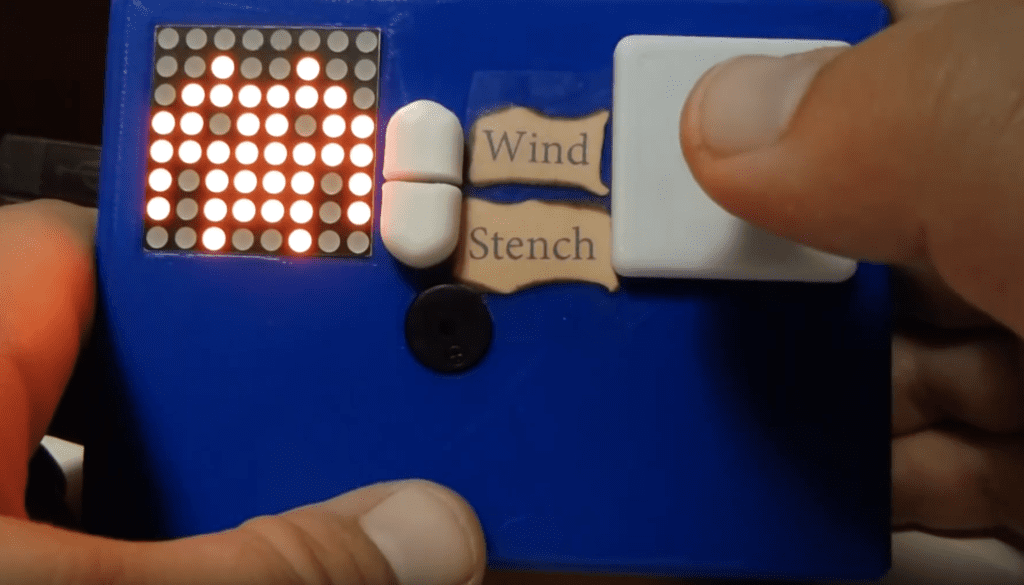
Hunt the Wumpus comes to Arduino!
Reading Time: 2 minutesHunt the Wumpus comes to Arduino! Arduino Team — January 15th, 2019 Hunt the Wumpus is a text-based survival/horror game developed in 1973. As such, it’s perhaps due for an update, and Benjamin C. Faure was able to do so using an Arduino Mega to run a graphical version on an 8×8…
-
High school play gets a simulated sports scoreboard
Reading Time: 2 minutesHigh school play gets a simulated sports scoreboard Arduino Team — January 2nd, 2019 Maker “DJ’s Fantasi” is the technical director at his local high school’s theater arts program, and when the director of their winter production of Disney’s High School Musical requested a scoreboard prop, he excitedly set to work. The…
-

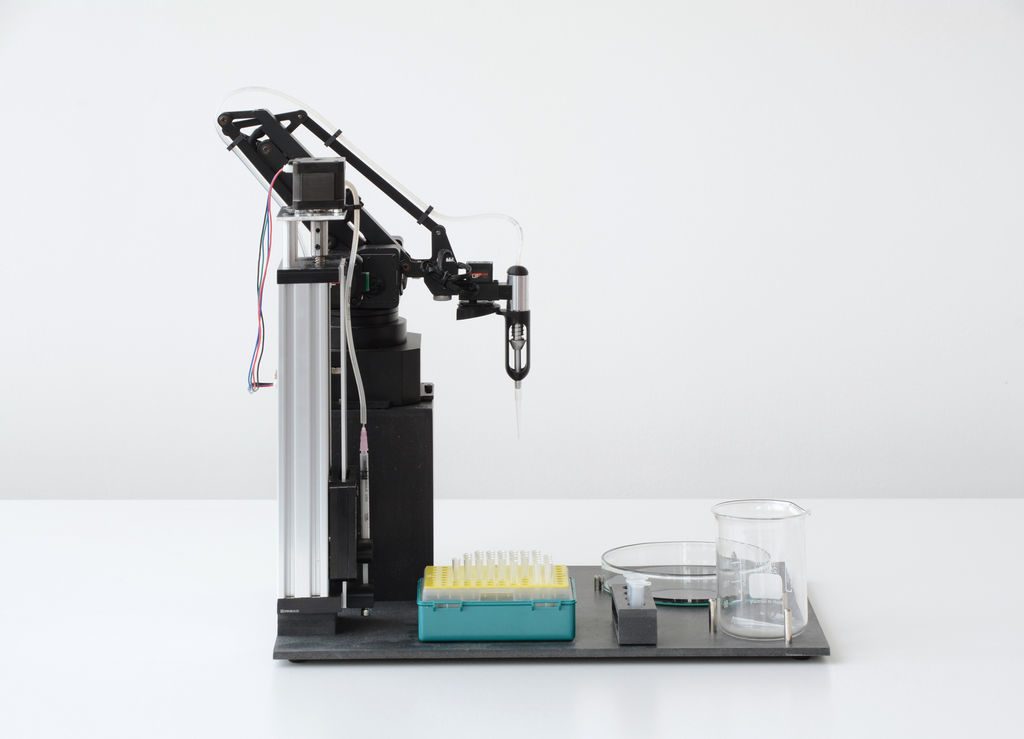
OpenLH robot automates biological exploration
Reading Time: 2 minutesOpenLH robot automates biological exploration Arduino Team — December 20th, 2018 If you’d like an easy way to accomplish repetitive biological experiments, the OpenLH presents a great option for automating these tasks. The heart of the system is the Arduino Mega-controlled uArm Swift Pro robot, which is equipped with a custom end effector…
-

Arduino Mega is the brains of this ant-like hexapod
Reading Time: 2 minutesArduino Mega is the brains of this ant-like hexapod Arduino Team — December 13th, 2018 Six-legged robots are nothing new, but if you’d like inspiration for your own, it would be hard to beat this 22 servo-driven, 3D-printed hexapod from Dejan at How To Mechatronics. The ant-inspired device features three metal geared…
-

Teenager automates his family’s holiday lights with an Arduino Mega
Reading Time: 2 minutesTeenager automates his family’s holiday lights with an Arduino Mega Arduino Team — December 5th, 2018 As first reported by the Des Moines Register, this year 14-year-old Josiah Davenport decided to animate 3,500 Christmas lights on his family’s home with the help of an Arduino Mega. The lighting pattern is synchronized with…
-
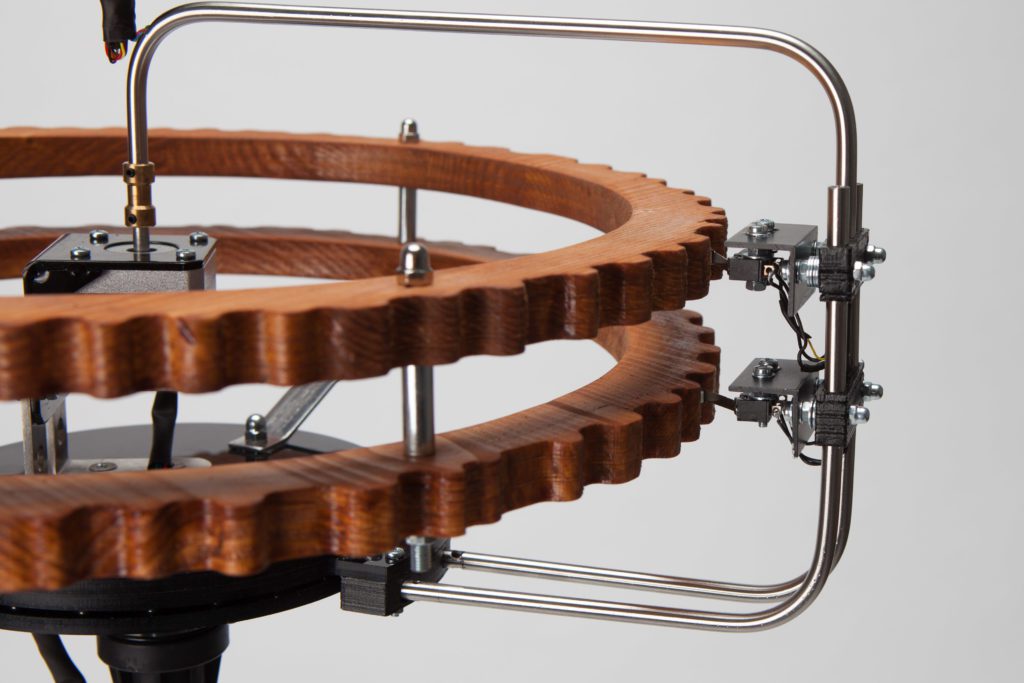
Bit clicks away to illustrate complex interrelationships
Reading Time: 3 minutesBit clicks away to illustrate complex interrelationships Arduino Team — November 29th, 2018 Aseen here, Bit by Jonghong Park at the University of the Arts Bremen is a beautiful visualization of how everything is linked together using the Markov chain principle. This installation uses an Arduino Mega for control, rotating arms that hold a pair…