Schlagwort: mega
-

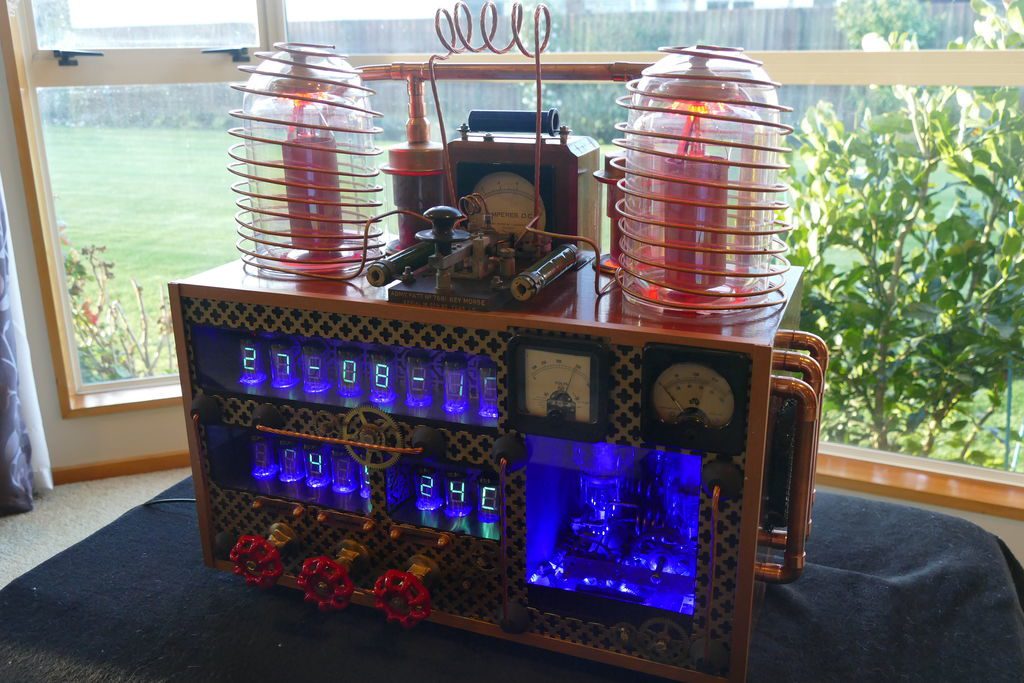
Steampunk radio and clock display with dual Arduino Mega control
Reading Time: 2 minutesIf you want to create your own steampunk/mad scientist entertainment center, it would be hard to top this radio/clock setup by Christine Thompson. Her device displays the time and date on eight VFD tubes, arranged on top of another eight that show the radio frequency and volume, along with the ambient temperature…
-

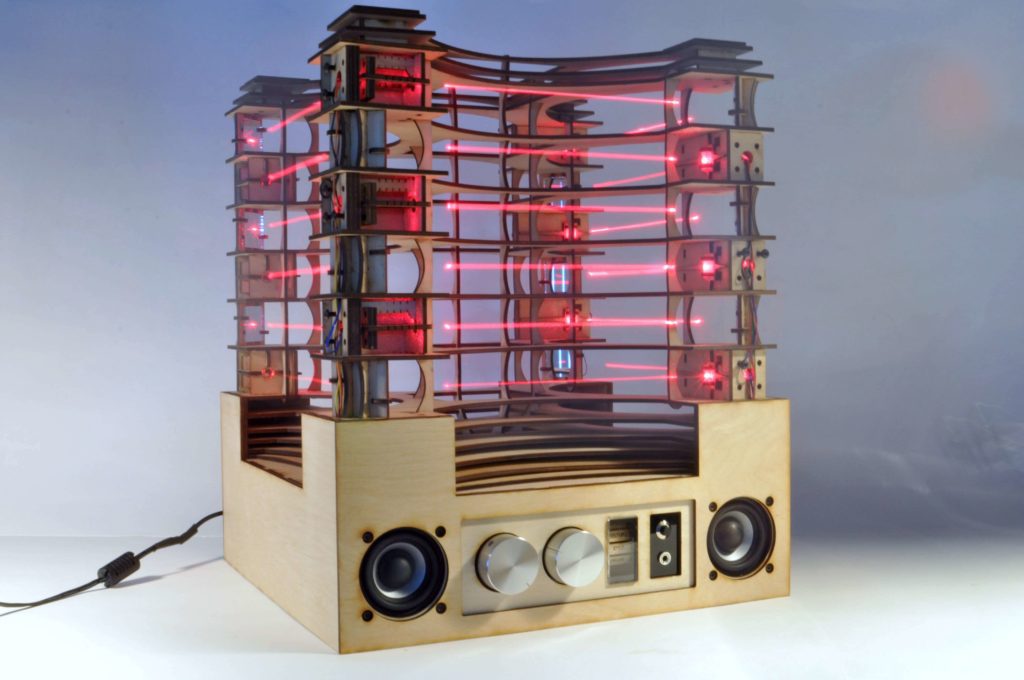
Horizontal laser harp is like none you’ve ever seen before
Reading Time: 2 minutesHorizontal laser harp is like none you’ve ever seen before Arduino Team — August 19th, 2019 Apparently not content with a traditional laser harp, Jonathan Bumstead set out to take things in a different direction. What he came up with is a device whose laser strings are arranged horizontally, and loop though…
-

LED matrix made touch sensitive with infrared control
Reading Time: < 1 minuteLED matrix made touch sensitive with infrared control Arduino Team — August 19th, 2019 If you’d like to integrate touch functionality to your LED project, then tuenhidiy may have just the thing for you. The setup uses 16 pairs of IR emitter and receivers arranged down the length of a bi-color…
-

Toy piano converted into a self-playing instrument
Reading Time: < 1 minuteToy piano converted into a self-playing instrument Arduino Team — August 14th, 2019 Upon obtaining a small toy piano, Måns Jonasson went to work “Arduinoizing” it with 30 solenoids to hammer out tunes. A MIDI shield is used to pipe commands from a computer to the Arduino Mega that’s used for…
-

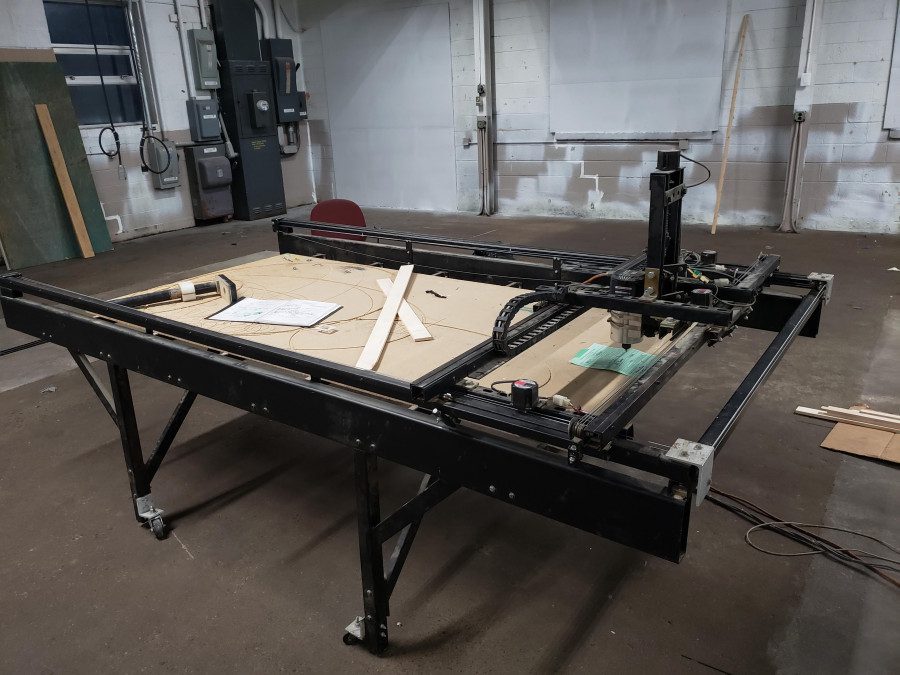
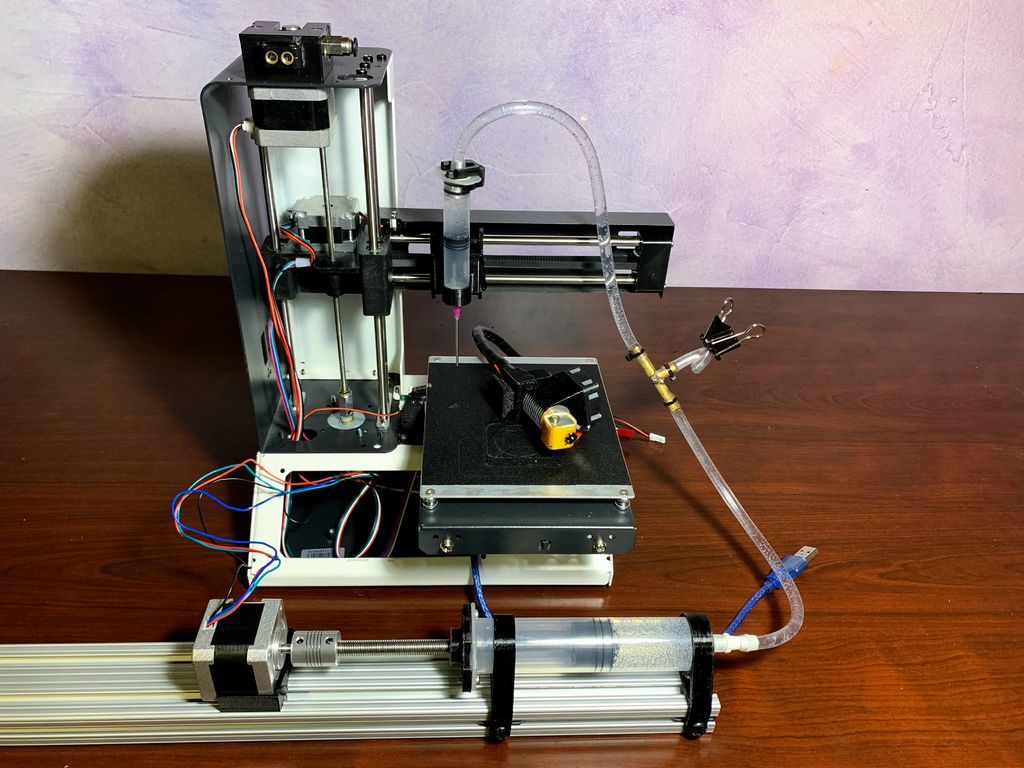
Reviving an old CNC router with Arduino
Reading Time: 2 minutesReviving an old CNC router with Arduino Arduino Team — August 12th, 2019 Makerspace i3Detroit was the recent recipient of a free yet non-functioning CNC router. While out of commission when received, the device’s mechanical components and motors appeared to be in operational condition, plus it had a large work surface. The…
-

Track made baskets with this Arduino/smartphone setup
Reading Time: 2 minutesTrack made baskets with this Arduino/smartphone setup Arduino Team — August 6th, 2019 Marcelo Ávila de Oliveira likes to practice basketball, and while most of us would be content to shoot and hopefully improve, he actually tracks his workouts. While figuring out the number of made baskets, misses, times, etc. is useful, it’s…
-
If Then Paint is a six-axis CNC painting machine
Reading Time: 2 minutesIf Then Paint is a six-axis CNC painting machine Arduino Team — July 29th, 2019 It’s easy to see that painting takes a lot of skill, but few really understand how much skill is involved like John Opsahl, who created the “If Then Paint” CNC canvas painting machine. In order to produce the…
-

Zeus is a humanoid that can hold a conversation
Reading Time: 2 minutesZeus is a humanoid that can hold a conversation Arduino Team — July 23rd, 2019 As seen in the videos below, Zeus is a metallic humanoid robot capable of moving its head and arms around, featuring a pair of hand grippers that should be quite useful when the time comes. For now,…
-

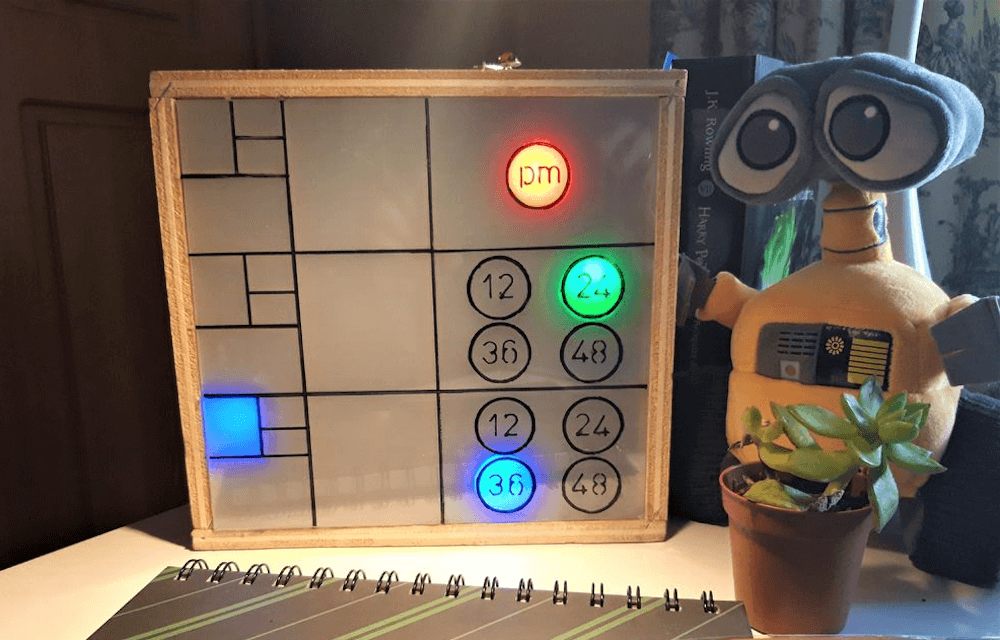
A fun Fibonacci clock for math fans
Reading Time: 2 minutesA fun Fibonacci clock for math fans Arduino Team — July 11th, 2019 In the early 1200s, Fibonacci introduced a series of numbers that now bear his name, starting with 0, then 1, and continuing on as the sum of the two preceding numbers. This gives values of 0, 1, 1, 2,…
-

This machine creates images using Skittles as pixels
Reading Time: 2 minutesThis machine creates images using Skittles as pixels Arduino Team — July 9th, 2019 Skittles candies come in various vibrant colors. While they may be a tasty treat, JohnO3 had another idea: to create an amazing automated display for the little circles. His device, dubbed the “Skittle Pixel8r,” uses an Arduino Mega…
-

Store and replay this robot’s movements from your phone
Reading Time: 2 minutesStore and replay this robot’s movements from your phone Arduino Team — July 8th, 2019 Robotic arms can be interesting, as are robots that roll around—especially on a semi-exotic Mecanum wheel setup. Dejan Nedelkovski’s latest How To Mechatronics build, however, combines both into one package. This project actually starts out in a…
-

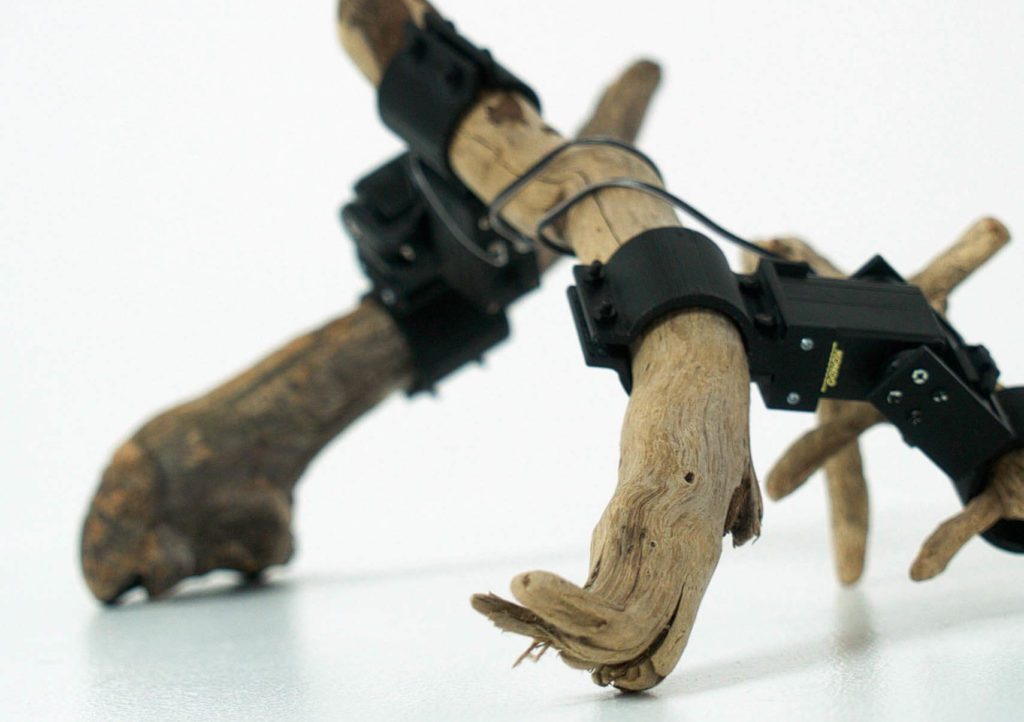
Random sticks made to walk under Arduino control
Reading Time: 2 minutesRandom sticks made to walk under Arduino control Arduino Team — July 5th, 2019 What if you were to neglect a robot’s mechanical design entirely and instead construct it out of unusual materials like random sticks? Researchers from the University of Tokyo and Preferred Networks have done just that. To accomplish this…
-

This electric soapbox car can reach a top speed of 35 km/h
Reading Time: 2 minutesThis electric soapbox car can reach a top speed of 35 km/h Arduino Team — July 2nd, 2019 If Elon Musk was to design a soapbox car, the prototype might look something like this by David Traum. Traum’s project is powered by a 500W motor which is fed by a pair of…
-

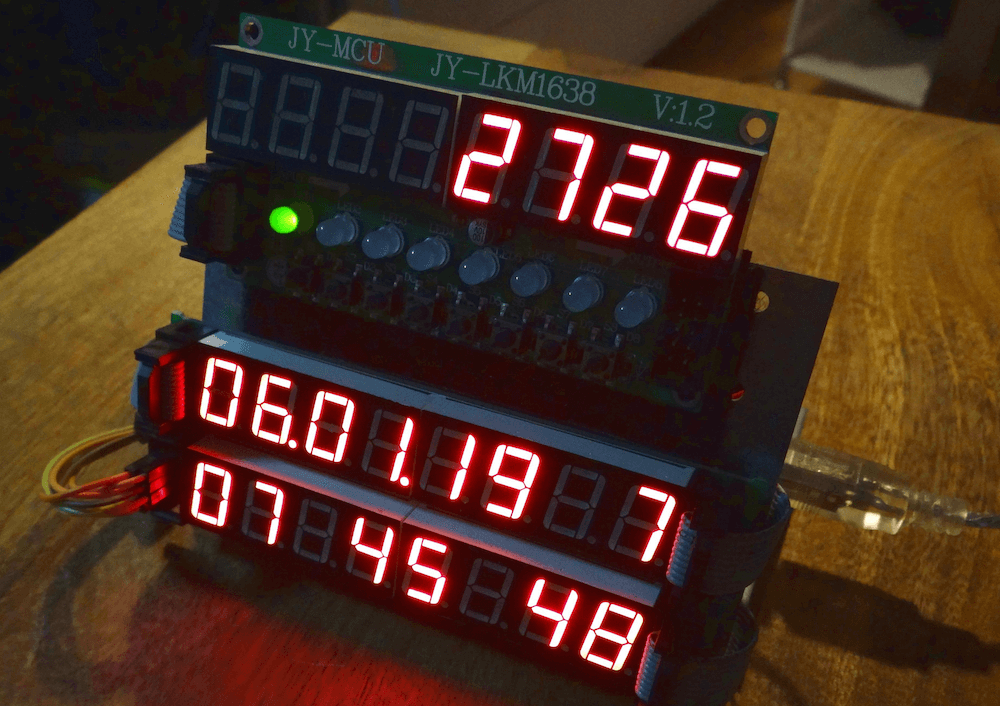
Intuitive Arduino clock has seven alarms and three LED displays
Reading Time: 2 minutesIntuitive Arduino clock has seven alarms and three LED displays Arduino Team — June 19th, 2019 Alarm clocks of old—and certainly many of those today—require several button pushes to set things up properly. Maker Michael Wessel, however, decided to implement his own take on a more intuitive clock, creating a device that…
-

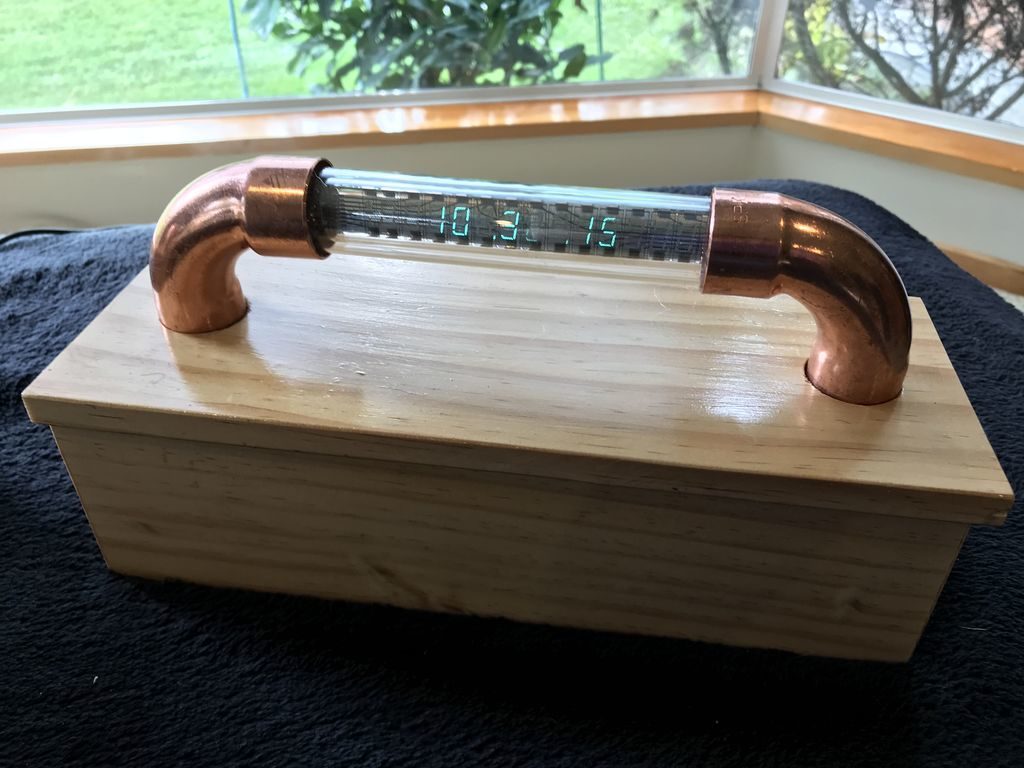
Wake up to this unique VFD alarm clock!
Reading Time: < 1 minuteWake up to this unique VFD alarm clock! Arduino Team — June 11th, 2019 If you’re a fan of novel timepieces, then you’ll want to check out Christine Thompson’s VFD Alarm Clock. The device features a USSR-manufactured IV-27V 7-segment tube, capable of displaying 13 numbers or letters via a 24V supply,…
-
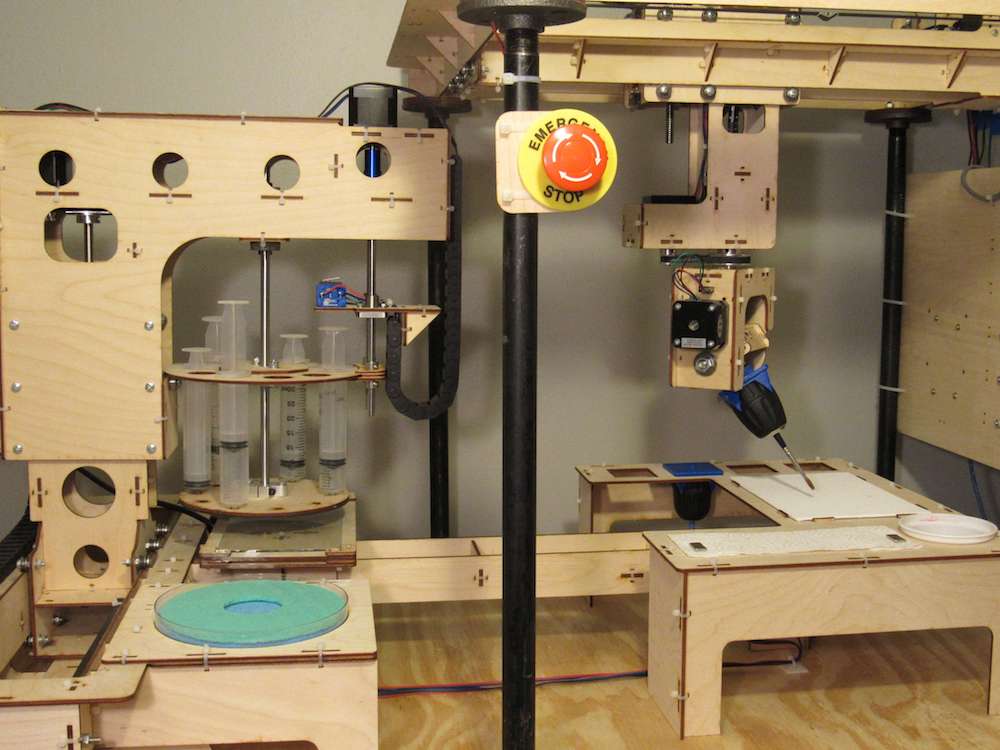
3D printer converted into a cheap bioprinting rig
Reading Time: 2 minutes3D printer converted into a cheap bioprinting rig Arduino Team — June 11th, 2019 While most 3D printers deposit melted plastic in carefully controlled positions to build up a physical model, a similar process called “bioprinting” can be accomplished with biological materials. Commercial bioprinters can cost tens of thousands of dollars or…
-

Hoverboard motors turned into an RC skater
Reading Time: < 1 minuteHoverboard motors turned into an RC skater Arduino Team — June 10th, 2019 While the hoverboard craze has faded somewhat, the good news is that this means their powerful wheel motors can easily be found on online auction sites. Lukas Kaul took advantage of this component’s availability and created his own…
-

Smart grip system helps cricketers improve their technique
Reading Time: 2 minutesSmart grip system helps cricketers improve their technique Arduino Team — June 5th, 2019 When batting in cricket, applying the proper amount of force with both hands is critical; however, as a coach, it’s difficult to judge just how much is actually used. To assist with player improvement, researchers at the University…
-
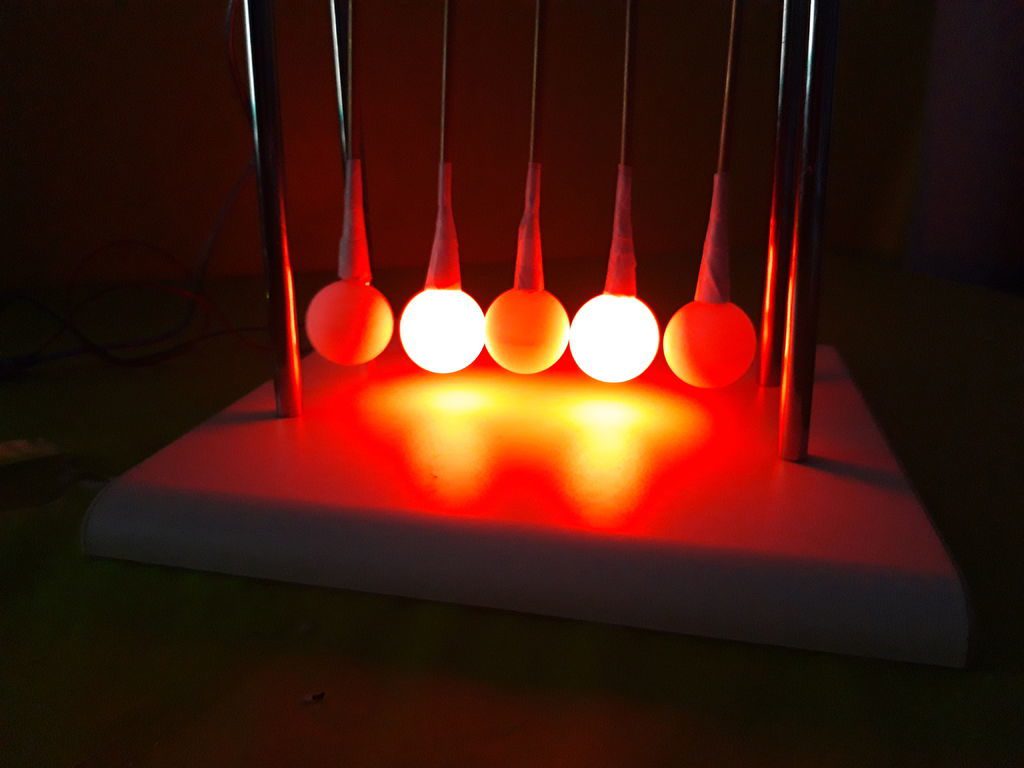
A light-up Newton’s cradle for your desk
Reading Time: < 1 minuteA light-up Newton’s cradle for your desk Arduino Team — June 3rd, 2019 Newton’s cradles consist of a series of suspended spherical masses, and are normally started by pulling one ball back. The outer balls then click back and forth for an interesting distraction. To make things even more interesting, “TecnoProfesor”…
-

Augmented office chair provides hands-free drone control
Reading Time: 2 minutesAugmented office chair provides hands-free drone control Arduino Team — May 29th, 2019 Multi-rotor drones are normally controlled using handheld devices, but what if you wanted to instead operate them with your whole body? Flight Chair, developed by researchers at Simon Fraser University in Canada, allows you to do just that, and…
-

RC wheelbarrow racing with James Bruton, Ivan Miranda, and Tom Stanton
Reading Time: 2 minutesRC wheelbarrow racing with James Bruton, Ivan Miranda, and Tom Stanton Arduino Team — May 28th, 2019 We’ve seen Arduino boards used in a wide variety of situations, but this may be the first time one has been implemented to control an RC wheelbarrow. In the video below, YouTubers James Bruton, Tom…