Schlagwort: Community

  • The Raspberry Pi PiServer tool

    The Raspberry Pi PiServer tool

    Reading Time: 7 minutes

    As Simon mentioned in his recent blog post about Raspbian Stretch, we have developed a new piece of software called PiServer. Use this tool to easily set up a network of client Raspberry Pis connected to a single x86-based server via Ethernet. With PiServer, you don’t need SD cards, you can control all clients via the server, and you can add and configure user accounts — it’s ideal for the classroom, your home, or an industrial setting.
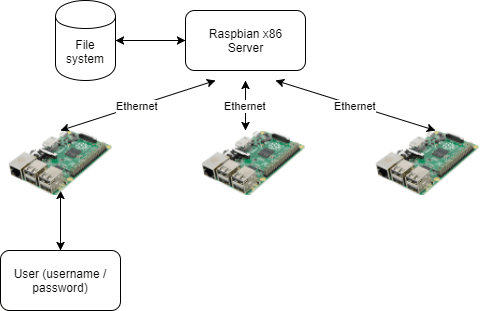
    PiServer diagram

    Client? Server?

    Before I go into more detail, let me quickly explain some terms.

    • Server — the server is the computer that provides the file system, boot files, and password authentication to the client(s)
    • Client — a client is a computer that retrieves boot files from the server over the network, and then uses a file system the server has shared. More than one client can connect to a server, but all clients use the same file system.
    • User – a user is a user name/password combination that allows someone to log into a client to access the file system on the server. Any user can log into any client with their credentials, and will always see the same server and share the same file system. Users do not have sudo capability on a client, meaning they cannot make significant changes to the file system and software.

    I see no SD cards

    Last year we described how the Raspberry Pi 3 Model B can be booted without an SD card over an Ethernet network from another computer (the server). This is called network booting or PXE (pronounced ‘pixie’) booting.

    Why would you want to do this?

    • A client computer (the Raspberry Pi) doesn’t need any permanent storage (an SD card) to boot.
    • You can network a large number of clients to one server, and all clients are exactly the same. If you log into one of the clients, you will see the same file system as if you logged into any other client.
    • The server can be run on an x86 system, which means you get to take advantage of the performance, network, and disk speed on the server.

    Sounds great, right? Of course, for the less technical, creating such a network is very difficult. For example, there’s setting up all the required DHCP and TFTP servers, and making sure they behave nicely with the rest of the network. If you get this wrong, you can break your entire network.

    PiServer to the rescue

    To make network booting easy, I thought it would be nice to develop an application which did everything for you. Let me introduce: PiServer!

    PiServer has the following functionalities:

    • It automatically detects Raspberry Pis trying to network boot, so you don’t have to work out their Ethernet addresses.
    • It sets up a DHCP server — the thing inside the router that gives all network devices an IP address — either in proxy mode or in full IP mode. No matter the mode, the DHCP server will only reply to the Raspberry Pis you have specified, which is important for network safety.
    • It creates user names and passwords for the server. This is great for a classroom full of Pis: just set up all the users beforehand, and everyone gets to log in with their passwords and keep all their work in a central place. Moreover, users cannot change the software, so educators have control over which programs their learners can use.
    • It uses a slightly altered Raspbian build which allows separation of temporary spaces, doesn’t have the default ‘pi’ user, and has LDAP enabled for log-in.

    What can I do with PiServer?

    Serve a whole classroom of Pis

    In a classroom, PiServer allows all files for lessons or projects to be stored on a central x86-based computer. Each user can have their own account, and any files they create are also stored on the server. Moreover, the networked Pis doesn’t need to be connected to the internet. The teacher has centralised control over all Pis, and all Pis are user-agnostic, meaning there’s no need to match a person with a computer or an SD card.

    Build a home server

    PiServer could be used in the home to serve file systems for all Raspberry Pis around the house — either a single common Raspbian file system for all Pis or a different operating system for each. Hopefully, our extensive OS suppliers will provide suitable build files in future.

    Use it as a controller for networked Pis

    In an industrial scenario, it is possible to use PiServer to develop a network of Raspberry Pis (maybe even using Power over Ethernet (PoE)) such that the control software for each Pi is stored remotely on a server. This enables easy remote control and provisioning of the Pis from a central repository.

    How to use PiServer

    The client machines

    So that you can use a Pi as a client, you need to enable network booting on it. Power it up using an SD card with a Raspbian Lite image, and open a terminal window. Type in

    echo program_usb_boot_mode=1 | sudo tee -a /boot/config.txt

    and press Return. This adds the line program_usb_boot_mode=1 to the end of the config.txt file in /boot. Now power the Pi down and remove the SD card. The next time you connect the Pi to a power source, you will be able to network boot it.

    The server machine

    As a server, you will need an x86 computer on which you can install x86 Debian Stretch. Refer to Simon’s blog post for additional information on this. It is possible to use a Raspberry Pi to serve to the client Pis, but the file system will be slower, especially at boot time.

    Make sure your server has a good amount of disk space available for the file system — in general, we recommend at least 16Gb SD cards for Raspberry Pis. The whole client file system is stored locally on the server, so the disk space requirement is fairly significant.

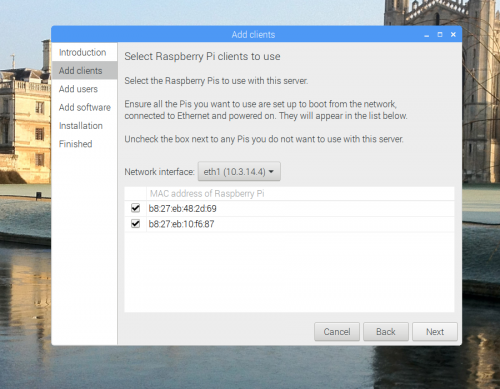
    Next, start PiServer by clicking on the start icon and then clicking Preferences > PiServer. This will open a graphical user interface — the wizard — that will walk you through setting up your network. Skip the introduction screen, and you should see a screen looking like this:
    PiServer GUI screenshot

    If you’ve enabled network booting on the client Pis and they are connected to a power source, their MAC addresses will automatically appear in the table shown above. When you have added all your Pis, click Next.

    PiServer GUI screenshot

    On the Add users screen, you can set up users on your server. These are pairs of user names and passwords that will be valid for logging into the client Raspberry Pis. Don’t worry, you can add more users at any point. Click Next again when you’re done.
    PiServer GUI screenshot

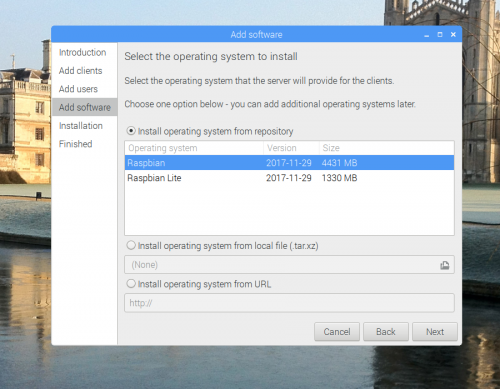
    The Add software screen allows you to select the operating system you want to run on the attached Pis. (You’ll have the option to assign an operating system to each client individually in the setting after the wizard has finished its job.) There are some automatically populated operating systems, such as Raspbian and Raspbian Lite. Hopefully, we’ll add more in due course. You can also provide your own operating system from a local file, or install it from a URL. For further information about how these operating system images are created, have a look at the scripts in /var/lib/piserver/scripts.

    Once you’re done, click Next again. The wizard will then install the necessary components and the operating systems you’ve chosen. This will take a little time, so grab a coffee (or decaffeinated drink of your choice).

    When the installation process is finished, PiServer is up and running — all you need to do is reboot the Pis to get them to run from the server.

    Shooting troubles

    If you have trouble getting clients connected to your network, there are a fewthings you can do to debug:

    1. If some clients are connecting but others are not, check whether you’ve enabled the network booting mode on the Pis that give you issues. To do that, plug an Ethernet cable into the Pi (with the SD card removed) — the LEDs on the Pi and connector should turn on. If that doesn’t happen, you’ll need to follow the instructions above to boot the Pi and edit its /boot/config.txt file.
    2. If you can’t connect to any clients, check whether your network is suitable: format an SD card, and copy bootcode.bin from /boot on a standard Raspbian image onto it. Plug the card into a client Pi, and check whether it appears as a new MAC address in the PiServer GUI. If it does, then the problem is a known issue, and you can head to our forums to ask for advice about it (the network booting code has a couple of problems which we’re already aware of). For a temporary fix, you can clone the SD card on which bootcode.bin is stored for all your clients.

    If neither of these things fix your problem, our forums are the place to find help — there’s a host of people there who’ve got PiServer working. If you’re sure you have identified a problem that hasn’t been addressed on the forums, or if you have a request for a functionality, then please add it to the GitHub issues.

    Website: LINK

  • Could you write for Hello World magazine?

    Could you write for Hello World magazine?

    Reading Time: 3 minutes

    Thinking about New Year’s resolutions? Ditch the gym and tone up your author muscles instead, by writing an article for Hello World magazine. We’ll help you, you’ll expand your knowledge of a topic you care about, and you’ll be contributing something of real value to the computing education community.

    Join our pool of Hello World writers in 2018

    The computing and digital making magazine for educators

    Hello World is our free computing magazine for educators, published in partnership with Computing At School and kindly supported by BT. We launched at the Bett Show in January 2017, and over the past twelve months, we’ve grown to a readership of 15000 subscribers. You can get your own free copy here.

    Our work is sustained by wonderful educational content from around the world in every issue. We’re hugely grateful to our current pool of authors – keep it up, veterans of 2017! – and we want to provide opportunities for new voices in the community to join them. You might be a classroom teacher sharing your scheme of work, a volunteer reflecting on running an after-school club, an industry professional sharing your STEM expertise, or an academic providing insights into new research – we’d love contributions from all kinds of people in all sorts of roles.

    Your article doesn’t have to be finished and complete: if you send us an outline, we will work with you to develop it into a full piece.

    Like my desk, but tidier

    Five reasons to write for Hello World

    Here are five reasons why writing for Hello World is a great way to start 2018:

    1. You’ll learn something new

    Researching an article is one of the best ways to broaden your knowledge about something that interests you.

    2. You’ll think more clearly

    Notes in hand, you sit at your desk and wonder how to craft all this information into a coherent piece of writing. It’s a situation we’re all familiar with. Writing an article makes you examine and clarify what you really think about a subject.

    Share your expertise and make more interesting projects along the way

    3. You’ll make cool projects

    Testing a project for a Hello World resource is a perfect opportunity to build something amazing that’s hitherto been locked away inside your brain.

    4. You’ll be doing something that matters

    Sharing your knowledge and experience in Hello World helps others to teach and learn computing. It helps bring the power of digital making to more and more educators and learners.

    5. You’ll share with an open and supportive community

    The computing education community is full of people who lend their experience to help colleagues. Contributing to Hello World is a great way to take an active part in this supportive community, and you’ll be adding to a body of free, open source learning resources that are available for everyone to use, adapt, and share. It’s also a tremendous platform to broadcast your work: the digital version alone of Hello World has been downloaded over 50000 times.

    Yes! What do I do next?

    Feeling inspired? Email our editorial team with your idea.

    Issue 4 of Hello World is out this month! Subscribe for free today to have it delivered to your inbox or your home.

    Website: LINK

  • Thank you for my new Raspberry Pi, Santa! What next?

    Thank you for my new Raspberry Pi, Santa! What next?

    Reading Time: 4 minutes

    Note: the Pi Towers team have peeled away from their desks to spend time with their families over the festive season, and this blog will be quiet for a while as a result. We’ll be back in the New Year with a bushel of amazing projects, awesome resources, and much merriment and fun times. Happy holidays to all!

    Now back to the matter at hand. Your brand new Christmas Raspberry Pi.

    Your new Raspberry Pi

    Did you wake up this morning to find a new Raspberry Pi under the tree? Congratulations, and welcome to the Raspberry Pi community! You’re one of us now, and we’re happy to have you on board.

    But what if you’ve never seen a Raspberry Pi before? What are you supposed to do with it? What’s all the fuss about, and why does your new computer look so naked?

    Setting up your Raspberry Pi

    Are you comfy? Good. Then let us begin.

    Download our free operating system

    First of all, you need to make sure you have an operating system on your micro SD card: we suggest Raspbian, the Raspberry Pi Foundation’s official supported operating system. If your Pi is part of a starter kit, you might find that it comes with a micro SD card that already has Raspbian preinstalled. If not, you can download Raspbian for free from our website.

    An easy way to get Raspbian onto your SD card is to use a free tool called Etcher. Watch The MagPi’s Lucy Hattersley show you what you need to do. You can also use NOOBS to install Raspbian on your SD card, and our Getting Started guide explains how to do that.

    Plug it in and turn it on

    Your new Raspberry Pi 3 comes with four USB ports and an HDMI port. These allow you to plug in a keyboard, a mouse, and a television or monitor. If you have a Raspberry Pi Zero, you may need adapters to connect your devices to its micro USB and micro HDMI ports. Both the Raspberry Pi 3 and the Raspberry Pi Zero W have onboard wireless LAN, so you can connect to your home network, and you can also plug an Ethernet cable into the Pi 3.

    Make sure to plug the power cable in last. There’s no ‘on’ switch, so your Pi will turn on as soon as you connect the power. Raspberry Pi uses a micro USB power supply, so you can use a phone charger if you didn’t receive one as part of a kit.

    Learn with our free projects

    If you’ve never used a Raspberry Pi before, or you’re new to the world of coding, the best place to start is our projects site. It’s packed with free projects that will guide you through the basics of coding and digital making. You can create projects right on your screen using Scratch and Python, connect a speaker to make music with Sonic Pi, and upgrade your skills to physical making using items from around your house.

    Here’s James to show you how to build a whoopee cushion using a Raspberry Pi, paper plates, tin foil and a sponge:

    Whoopee cushion PRANK with a Raspberry Pi: HOW-TO

    Explore the world of Raspberry Pi physical computing with our free FutureLearn courses: http://rpf.io/futurelearn Free make your own Whoopi Cushion resource: http://rpf.io/whoopi For more information on Raspberry Pi and the charitable work of the Raspberry Pi Foundation, including Code Club and CoderDojo, visit http://rpf.io Our resources are free to use in schools, clubs, at home and at events.

    Diving deeper

    You’ve plundered our projects, you’ve successfully rigged every chair in the house to make rude noises, and now you want to dive deeper into digital making. Good! While you’re digesting your Christmas dinner, take a moment to skim through the Raspberry Pi blog for inspiration. You’ll find projects from across our worldwide community, with everything from home automation projects and retrofit upgrades, to robots, gaming systems, and cameras.

    You’ll also find bucketloads of ideas in The MagPi magazine, the official monthly Raspberry Pi publication, available in both print and digital format. You can download every issue for free. If you subscribe, you’ll get a Raspberry Pi Zero W to add to your new collection. HackSpace magazine is another fantastic place to turn for Raspberry Pi projects, along with other maker projects and tutorials.

    And, of course, simply typing “Raspberry Pi projects” into your preferred search engine will find thousands of ideas. Sites like Hackster, Hackaday, Instructables, Pimoroni, and Adafruit all have plenty of fab Raspberry Pi tutorials that they’ve devised themselves and that community members like you have created.

    And finally

    If you make something marvellous with your new Raspberry Pi – and we know you will – don’t forget to share it with us! Our Twitter, Facebook, Instagram and Google+ accounts are brimming with chatter, projects, and events. And our forums are a great place to visit if you have questions about your Raspberry Pi or if you need some help.

    It’s good to get together with like-minded folks, so check out the growing Raspberry Jam movement. Raspberry Jams are community-run events where makers and enthusiasts can meet other makers, show off their projects, and join in with workshops and discussions. Find your nearest Jam here.

    Have a great festive holiday and welcome to the community. We’ll see you in 2018!

    Website: LINK

  • Digital making for new parents

    Digital making for new parents

    Reading Time: 4 minutes

    Solving problems that are meaningful to us is at the core of our approach to teaching and learning about technology here at the Raspberry Pi Foundation. Over the last eight months, I’ve noticed that the types of digital making projects that motivate and engage me have changed (can’t think why). Always looking for ways to save money and automate my life and the lives of my loved ones, I’ve been thinking a lot about how digital making projects could be the new best friend of any new parent.

    A baby, oblivious to the amount its parents have spent on stuff they never knew existed last year.
    Image: sweet baby by MRef photography / CC BY-ND 2.0

    Baby Monitor

    I never knew how much equipment one small child needs until very recently. I also had no idea of the range of technology that is on offer to support you as a new parent to ensure the perfect environment outside of the womb. Baby monitors are at the top of this list. There are lots of Raspberry Pi baby monitor projects with a range of sensing functionality already in existence, and we’ve blogged about some of them before. They’re a great example of how an understanding of technology can open up a range of solutions that won’t break the bank. I’m looking forward to using all the capabilities of the Raspberry Pi to keep an eye on baby.

    Baby name generator

    Another surprising discovery was just how difficult it is to name a human being. Surprising because I can give a name to an inanimate object in less than three seconds, and come up with nicknames for colleagues in less than a day. My own offspring, though, and I draw a blank. The only solution: write a Python program to randomly generate names based on some parameters!

    import names
    from time import sleep
    from guizero import App, ButtonGroup, Text, PushButton, TextBox
    
    def get_name():
 boyname = names.get_first_name(gender='male')
 girlname = names.get_first_name(gender='female')
 othername = names.get_first_name()
    
 if babygender.get() == "male":
 name.set(str(boyname)+" "+str(babylastname.get()))
 elif babygender.get() == "female":
 name.set(str(girlname)+" "+str(babylastname.get()))
 else:
 name.set(str(othername)+" "+str(babylastname.get()))
    
    app = App("Baby name generator")
    surname_label = Text(app, "What is your surname?")
    babylastname = TextBox(app, width=50)
    babygender = ButtonGroup(app, options=[["boy", "male"], ["girl", "female"], ["all", "all"]], selected="male", horizontal=True)
    intro = Text(app, "Your baby name could be")
    name = Text(app, "")
    button = PushButton(app, get_name, text="Generate me a name")
    
    app.display()

    Thanks to the names and GUIZero Python libraries, it is super simple to create, resolving any possible parent-to-be naming disputes in mere minutes.

    Food, Poo, or Love?

    I love data. Not just in Star Trek, but also more generally. Collecting and analysing data to understand my sleep patterns, my eating habits, how much exercise I do, and how much time I spend watching YouTube videos consumes much of my time. So of course I want to know lots about the little person we’ve made, long before he can use language to tell us himself.

    I’m told that most newborns’ needs are quite simple: they want food, they want to be changed, or they just want some cuddles. I’m certain it’s more complicated than this, but it’s a good starting point for a data set, so stick with me here. I also wondered whether there might be a correlation between the amplitude of the cry and the type of need the baby has. A bit of an imprecise indicator, maybe, but fun to start to think about.

    This build’s success is mostly thanks to Pimoroni’s Rainbow HAT, which, conveniently, has three capacitive touch buttons to record the newborn’s need, four fourteen-segment displays to display the words “FOOD”, “POO”, and “LOVE” when a button is pressed, and seven multicoloured LEDs to indicate the ferociousness of the baby’s cry in glorious technicolour. With the addition of a microphone, the ‘Food, Poo, Love Machine’ was born. Here it is in action:

    Food Poo Love – Raspberry Pi Baby Monitor Project

    Food Poo Love – The Raspberry Pi baby monitor project that allows you to track data on your new born baby.

    Automatic Baby mobile

    Another project that I’ve not had time to hack on, but that I think would be really awesome, is to automate a baby cot mobile. Imagine this one moving to the Star Trek theme music:

    Image courtesy of Gisele Blaker Designs (check out her cool shop!)

    Pretty awesome.

    If you’ve got any more ideas for baby projects, do let me know. I’ll have a few months of nothing to do… right?

    Website: LINK

  • Even more sports: two NFL games are coming to Twitch!

    Even more sports: two NFL games are coming to Twitch!

    Reading Time: 2 minutes
    We’re teaming up with Prime Video to air two upcoming NFL football games on Twitch, no Prime membership required.

    It’s a sportsball double-header today on Twitch! If you can’t wait to spam Twitch chat during NBA G-League basketball, you can get started a day early with Thursday Night Football.

    We’re teaming up with Prime Video to air two upcoming NFL football games on Twitch, no Prime membership required.

    Watching the game on Twitch is like hanging out on the world’s biggest couch. Chat is right there with you for every touchdown, every turnover, every questionable call, and every great one. Last week’s broadcast featured a game that came down to the wire, and the fans were out in force. Who other than Twitch Chat could come up with pure poetry like this:

    SPAM THIS CHEESE TO HELP DREW BREES

    Basically it’s kind of like esports… just without the ‘e’.

    Want to see what happens when the Twitch community gets ahold of analog sports?

    Here’s how to tune in:

    Thursday, December 14th

    Channel: twitch.tv/primevideo

    First up, the Denver Broncos take on the Indianapolis Colts in Thursday Night Football. Coverage starts at 7:30 pm Eastern time, and kickoff is at 8:25.

    After the game, stick around for a sneak peek at Jean-Claude Van Johnson, a new Prime Original that asks the question: 
    “What if Jean-Claude Van Damme — yes, THAT Jean-Claude Van Damme — was, in fact, a secret agent?”

    Prime users can start binge watching Season 1 on Friday, but anyone with an Amazon account can check out the first episode this Thursday on Twitch after Thursday Night Football.

    Get reminders for this game on the event page.

    Website: LINK

  • Cities: Skylines — Greenest Cities Challenge!

    Cities: Skylines — Greenest Cities Challenge!

    Reading Time: < 1 minute

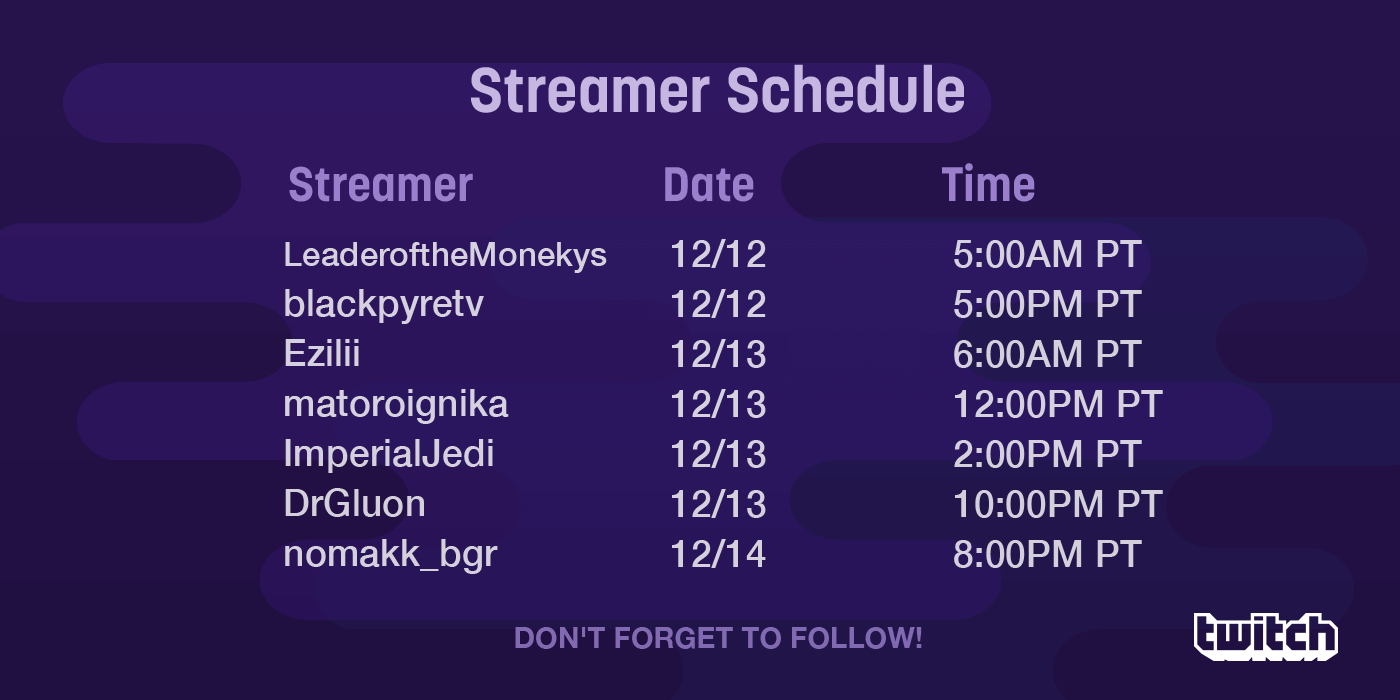
    Can you build the most eco friendly city in Cities: Skylines? Join Ezilii, DrGluon, blackpyretv, and others as they all compete for bragging rights of being the Greenest City Builder and Mayor on Twitch!

    Each participant can use any map they prefer but will need to follow these specific rules:

    • No Sandboxing (Unlimited money)
    • No transit capacity altering mods (TM:PE is ok)
    • No pollution or city services altering mod or assets except to remove the Visual Effects

    A handy pre-approved mod collection can be found here: http://bit.ly/green-mods

    Would you like to try this challenge alongside the main competing builders to earn bragging rights? Then share a highlight or upload a video of your green city to Twitch and share on Twitter with the hashtag #GreenCitiesChallenge by December 22! The winner will get a groovy panel graphic proclaiming they are the Greenest City Builder in the Cities: Skylines community on Twitch!

    Check out the schedule below to see when each participant will be streaming and come cheer them on!

    Website: LINK

  • Pioneers winners: only you can save us

    Pioneers winners: only you can save us

    Reading Time: 4 minutes

    She asked for help, and you came to her aid. Pioneers, the winners of the Only you can save us challenge have been picked!

    Can you see me? Only YOU can save us!

    I need your help. This is a call out for those between 11- and 16-years-old in the UK and Republic of Ireland. Something has gone very, very wrong and only you can save us. I’ve collected together as much information for you as I can. You’ll find it at http://www.raspberrypi.org/pioneers.

    The challenge

    In August we intercepted an emergency communication from a lonesome survivor. She seemed to be in quite a bit of trouble, and asked all you young people aged 11 to 16 to come up with something to help tackle the oncoming crisis, using whatever technology you had to hand. You had ten weeks to work in teams of two to five with an adult mentor to fulfil your mission.

    The judges

    We received your world-saving ideas, and our savvy survivor pulled together a ragtag bunch of apocalyptic experts to help us judge which ones would be the winning entries.

    Dr Shini Somara is an advocate for STEM education and a mechanical engineer. She was host of The Health Show and has appeared in documentaries for the BBC, PBS Digital, and Sky. You can check out her work hosting Crash Course Physics on YouTube.

    Prof Lewis Dartnell is an astrobiologist and author of the book The Knowledge: How to Rebuild Our World From Scratch.

    Emma Stephenson has a background in aeronautical engineering and currently works in the Shell Foundation’s Access to Energy and Sustainable Mobility portfolio.

    Currently sifting through the entries with the other judges of #makeyourideas with @raspberrypifoundation @_raspberrypi_

    151 Likes, 3 Comments – Shini Somara (@drshinisomara) on Instagram: “Currently sifting through the entries with the other judges of #makeyourideas with…”

    The winners

    Our survivor is currently putting your entries to good use repairing, rebuilding, and defending her base. Our judges chose the following projects as outstanding examples of world-saving digital making.

    Theme winner: Computatron

    Raspberry Pioneers 2017 – Nerfus Dislikus Killer Robot

    This is our entry to the pioneers ‘Only you can save us’ competition. Our team name is Computatrum. Hope you enjoy!

    Are you facing an unknown enemy whose only weakness is Nerf bullets? Then this is the robot for you! We loved the especially apocalyptic feel of the Computatron’s cleverly hacked and repurposed elements. The team even used an old floppy disc mechanism to help fire their bullets!

    Technically brilliant: Robot Apocalypse Committee

    Pioneers Apocalypse 2017 – RationalPi

    Thousands of lines of code… Many sheets of acrylic… A camera, touchscreen and fingerprint scanner… This is our entry into the Raspberry Pi Pioneers2017 ‘Only YOU can Save Us’ theme. When zombies or other survivors break into your base, you want a secure way of storing your crackers.

    The Robot Apocalypse Committee is back, and this time they’ve brought cheese! The crew designed a cheese- and cracker-dispensing machine complete with face and fingerprint recognition to ensure those rations last until the next supply drop.

    Best explanation: Pi Chasers

    Tala – Raspberry Pi Pioneers Project

    Hi! We are PiChasers and we entered the Raspberry Pi Pionners challenge last time when the theme was “Make it Outdoors!” but now we’ve been faced with another theme “Apocolypse”. We spent a while thinking of an original thing that would help in an apocolypse and decided upon a ‘text-only phone’ which uses local radio communication rather than cellular.

    This text-based communication device encased in a tupperware container could be a lifesaver in a crisis! And luckily, the Pi Chasers produced an excellent video and amazing GitHub repo, ensuring that any and all survivors will be able to build their own in the safety of their base.

    Most inspiring journey: Three Musketeers

    Pioneers Entry – The Apocalypse

    Pioneers Entry Team Name: The Three Musketeers Team Participants: James, Zach and Tom

    We all know that zombies are terrible at geometry, and the Three Musketeers used this fact to their advantage when building their zombie security system. We were impressed to see the team working together to overcome the roadblocks they faced along the way.

    We appreciate what you’re trying to do: Zombie Trolls

    Zombie In The Middle

    Uploaded by CDA Bodgers on 2017-12-01.

    Playing piggy in the middle with zombies sure is a unique way of saving humankind from total extinction! We loved this project idea, and although the Zombie Trolls had a little trouble with their motors, we’re sure with a little more tinkering this zombie-fooling contraption could save us all.

    Most awesome

    Our judges also wanted to give a special commendation to the following teams for their equally awesome apocalypse-averting ideas:

    • PiRates, for their multifaceted zombie-proofing defence system and the high production value of their video
    • Byte them Pis, for their beautiful zombie-detecting doormat
    • Unatecxon, for their impressive bunker security system
    • Team Crompton, for their pressure-activated door system
    • Team Ernest, for their adventures in LEGO

    The prizes

    All our winning teams have secured exclusive digital maker boxes. These are jam-packed with tantalising tech to satisfy all tinkering needs, including:

    Our theme winners have also secured themselves a place at Coolest Projects 2018 in Dublin, Ireland!

    Thank you to everyone who got involved in this round of Pioneers. Look out for your awesome submission swag arriving in the mail!

    Website: LINK

  • Château Showdown: Let the Deathmatch Begin!

    Château Showdown: Let the Deathmatch Begin!

    Reading Time: 2 minutes

    Ah, there you are. Let’s take a trip near Annecy in southeastern France with Anthony_Kongphan, CDNThe3rd, DizzyKitten, Elspeth and LIRIK. Starting on December 13th through December 17th, watch as each streamer fends for themselves playing Free-For-All Deathmatch mode in Overwatch.

    How does it work?

    Each streamer will compete individually in an effort to rack up as many points as possible within a two-hour time period.

    1st place in Free-For-All game — 15 points
    2nd place in Free-For-All game — 10 points
    3rd place in Free-For-All game — 5 points
    Play of the Game — 10 points

    In addition to these points, streamers can earn additional points with their communities’ help. Yep, you have control over who wins! Just tweet using the hashtag #ChateauShowdown accompanied by your favorite streamers name. Example: #ChateauShowdownCDNTHE3RD

    What’s in it for me?

    A total of 350 digital copies of Overwatch (70 per broadcast) will be given away while each streamer is competing. Tune in to each streamer’s channel for more information!

    WHERE: Châteaushowdown.com
    WHEN: December 13th — 17th

    CDNThe3rd — Wednesday, 12/13, at 10:00am PT
    DizzyKitten — Thursday, 12/14, at 10:00am PT
    LIRIK — Friday, 12/15, at 10:00am PT
    Anthony_Kongphan — Saturday, 12/16, at 5:00pm PT
    Elspeth — Sunday, 12/17, at 10:00am PT

    For live broadcasts, schedules, leaderboards and more, visit Châteaushowdown.com!

    Website: LINK

  • CoderDojo: 2000 Dojos ever

    CoderDojo: 2000 Dojos ever

    Reading Time: 3 minutes

    Every day of the week, we verify new Dojos all around the world, and each Dojo is championed by passionate volunteers. Last week, a huge milestone for the CoderDojo community went by relatively unnoticed: in the history of the movement, more than 2000 Dojos have now been verified!

    CoderDojo banner — 2000 Dojos

    2000 Dojos

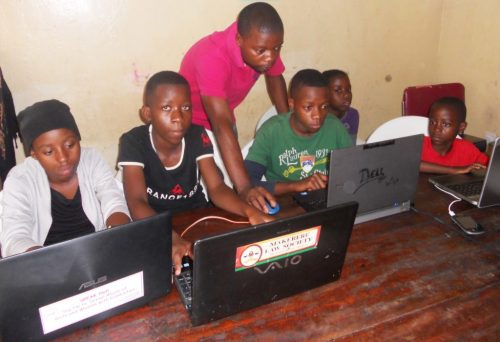
    This is a phenomenal achievement for a movement that’s just six years old and powered by volunteers. Presently, there are more than 1650 active Dojos running weekly, fortnightly, or monthly, and all of them are free for participants — for example, the Dojos run by Joel Bayubasire in Kampala, Uganda:

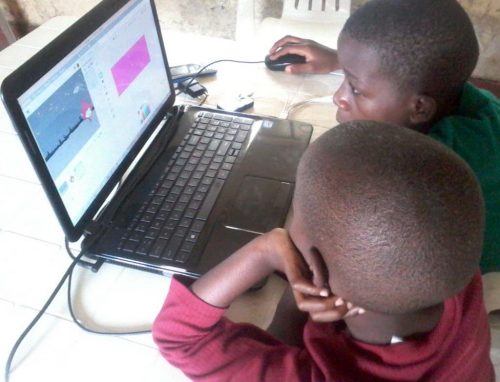
    Joel Bayubasire with Ninjas at his Ugandan Dojo — 2000 Dojos

    Empowering refugee children

    This week, Joel set up his second Dojo and verified it on our global map. Joel is a Congolese refugee living in Kampala, Uganda, where he is currently completing his PhD in Economics at Madison International Institute and Business School.

    Joel understands first-hand the challenges faced by refugees who were forced to leave their country due to war or conflict. Uganda is currently hosting more than 1.2 million refugees, 60% of which are children (World Bank, 2017). As refugees, children are only allowed to attend local schools until the age of 12. This results in lower educational attainment, which will likely affect their future employment prospects.

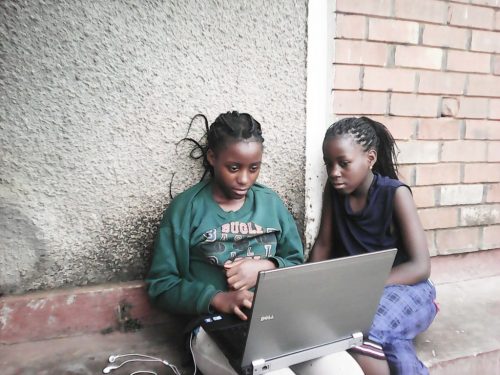
    Two girls at a laptop. Joel Bayubasire CoderDojo — 2000 Dojos

    Joel has the motivation to overcome these challenges, because he understands the power of education. Therefore, he initiated a number of community-based activities to provide educational opportunities for refugee children. As part of this, he founded his first Dojo earlier in the year, with the aim of giving these children a chance to compete in today’s global knowledge-based economy.

    Two boys at a laptop. Joel Bayubasire CoderDojo — 2000 Dojos

    Aware that securing volunteer mentors would be a challenge, Joel trained eight young people from the community to become youth mentors to their peers. He explains:

    I believe that the mastery of computer coding allows talented young people to thrive professionally and enables them to not only be consumers but creators of the interconnected world of today!

    Based on the success of Joel’s first Dojo, he has now expanded the CoderDojo initiative in his community; his plan is to provide computer science training for more than 300 refugee youths in Kampala by 2019. If you’d like to learn more about Joel’s efforts, head to this website.

    Join the movement

    If you are interested in creating opportunities for the young people in your community, then join the growing CoderDojo movement — you can volunteer to start a Dojo or to support an existing one today!

    Website: LINK

  • December Cosplay Showcase!

    December Cosplay Showcase!

    Reading Time: 2 minutes

    Prep some hot chocolate, tea, or other warm beverage of choice and get ready to watch some more amazing cosplay fabrication! This month we have Karacorvus, TheJediManda, and KellyDanielle here to show you what projects they’re working on, and even dish out some tips and how-tos for cosplay newbies!

    Karacorvus as Pharah

    Karacorvus

    Karacorvus was inspired to start cosplaying after being inspired by elaborate armor builds and wanting to create something similar. Her all time favorite build was Phara from Overwatch, mainly due to her complete female badassery. Currently she’s working on Aranea Highwind from Final Fantasy XV. Her dog is also known to try and steal the show, so make sure to tune in for creativity, science, and doggo time!

    TheJediManda as Queen Amidala

    TheJediManda

    Having studied costume design in college, getting into cosplay was a natural fit for JediManda. After dressing so many actors in her costumes, she finally wanted to be the one to wear them instead! She’s currently working on her own original design of a gown worn by Anastasia from the 1997 film. You can also tune in to her streams for Star Wars theory discussions as well as painting sessions!

    KellyDanielle as Aloy

    KellyDanielle

    KellyDanielle always enjoyed making and dressing up in costumes, but her love of cosplay all began after she was invited to a charity event and dressed up as Elsa. Harley Quinn is one of her favorite costumes, and she’s currently working on another favorite: Aloy from Horizon Zero Dawn. Kelly not only streams cosplay, but you can also see her play RPGs and enjoy a community full of positivity.

    The full schedule for all of the front page streams is below:

    Would you like your channel to be featured as part of the Cosplay Showcase? You can apply by going to fill out this form!

    Website: LINK

  • Stretch for PCs and Macs, and a Raspbian update

    Stretch for PCs and Macs, and a Raspbian update

    Reading Time: 6 minutes

    Today, we are launching the first Debian Stretch release of the Raspberry Pi Desktop for PCs and Macs, and we’re also releasing the latest version of Raspbian Stretch for your Pi.

    Raspberry Pi Desktop Stretch splash screen

    For PCs and Macs

    When we released our custom desktop environment on Debian for PCs and Macs last year, we were slightly taken aback by how popular it turned out to be. We really only created it as a result of one of those “Wouldn’t it be cool if…” conversations we sometimes have in the office, so we were delighted by the Pi community’s reaction.

    Seeing how keen people were on the x86 version, we decided that we were going to try to keep releasing it alongside Raspbian, with the ultimate aim being to make simultaneous releases of both. This proved to be tricky, particularly with the move from the Jessie version of Debian to the Stretch version this year. However, we have now finished the job of porting all the custom code in Raspbian Stretch to Debian, and so the first Debian Stretch release of the Raspberry Pi Desktop for your PC or Mac is available from today.

    The new Stretch releases

    As with the Jessie release, you can either run this as a live image from a DVD, USB stick, or SD card or install it as the native operating system on the hard drive of an old laptop or desktop computer. Please note that installing this software will erase anything else on the hard drive — do not install this over a machine running Windows or macOS that you still need to use for its original purpose! It is, however, safe to boot a live image on such a machine, since your hard drive will not be touched by this.

    We’re also pleased to announce that we are releasing the latest version of Raspbian Stretch for your Pi today. The Pi and PC versions are largely identical: as before, there are a few applications (such as Mathematica) which are exclusive to the Pi, but the user interface, desktop, and most applications will be exactly the same.

    For Raspbian, this new release is mostly bug fixes and tweaks over the previous Stretch release, but there are one or two changes you might notice.

    File manager

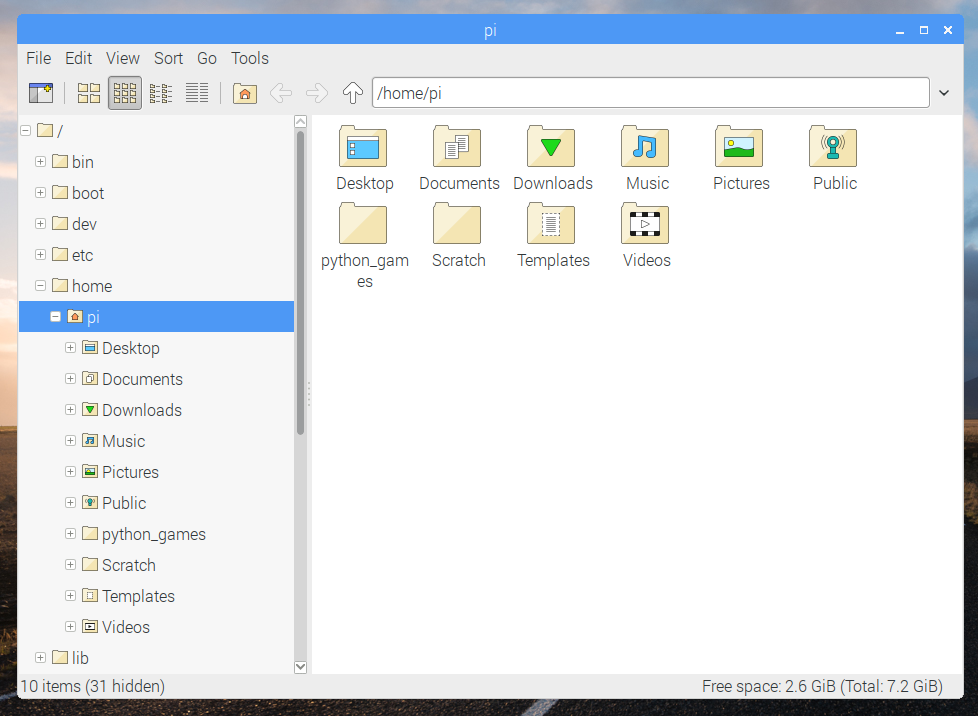
    The file manager included as part of the LXDE desktop (on which our desktop is based) is a program called PCManFM, and it’s very feature-rich; there’s not much you can’t do in it. However, having used it for a few years, we felt that it was perhaps more complex than it needed to be — the sheer number of menu options and choices made some common operations more awkward than they needed to be. So to try to make file management easier, we have implemented a cut-down mode for the file manager.

    Raspberry Pi Desktop Stretch - file manager

    Most of the changes are to do with the menus. We’ve removed a lot of options that most people are unlikely to change, and moved some other options into the Preferences screen rather than the menus. The two most common settings people tend to change — how icons are displayed and sorted — are now options on the toolbar and in a top-level menu rather than hidden away in submenus.

    The sidebar now only shows a single hierarchical view of the file system, and we’ve tidied the toolbar and updated the icons to make them match our house style. We’ve removed the option for a tabbed interface, and we’ve stomped a few bugs as well.

    One final change was to make it possible to rename a file just by clicking on its icon to highlight it, and then clicking on its name. This is the way renaming works on both Windows and macOS, and it’s always seemed slightly awkward that Unix desktop environments tend not to support it.

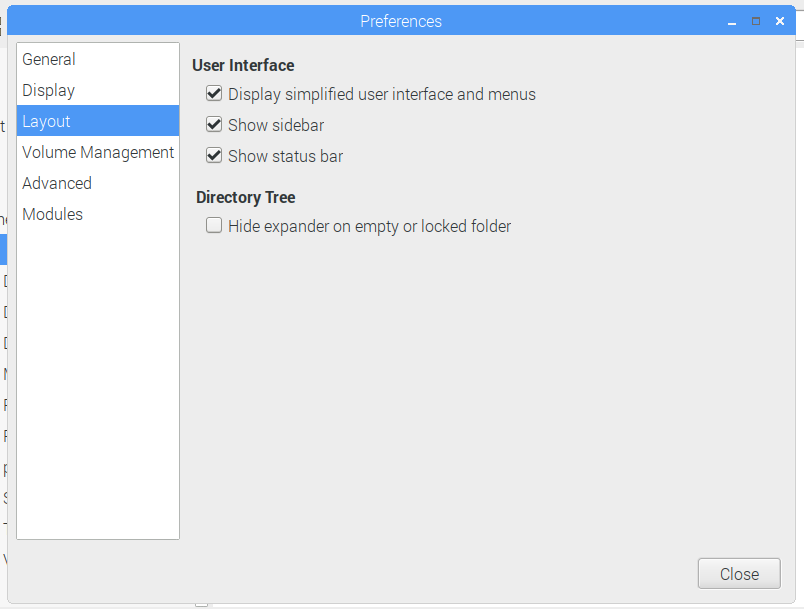
    As with most of the other changes we’ve made to the desktop over the last few years, the intention is to make it simpler to use, and to ease the transition from non-Unix environments. But if you really don’t like what we’ve done and long for the old file manager, just untick the box for Display simplified user interface and menus in the Layout page of Preferences, and everything will be back the way it was!

    Raspberry Pi Desktop Stretch - preferences GUI

    Battery indicator for laptops

    One important feature missing from the previous release was an indication of the amount of battery life. Eben runs our desktop on his Mac, and he was becoming slightly irritated by having to keep rebooting into macOS just to check whether his battery was about to die — so fixing this was a priority!

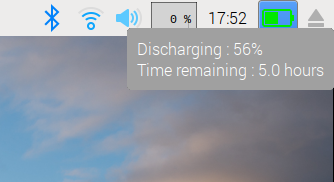
    We’ve added a battery status icon to the taskbar; this shows current percentage charge, along with whether the battery is charging, discharging, or connected to the mains. When you hover over the icon with the mouse pointer, a tooltip with more details appears, including the time remaining if the battery can provide this information.

    Raspberry Pi Desktop Stretch - battery indicator

    While this battery monitor is mainly intended for the PC version, it also supports the first-generation pi-top — to see it, you’ll only need to make sure that I2C is enabled in Configuration. A future release will support the new second-generation pi-top.

    New PC applications

    We have included a couple of new applications in the PC version. One is called PiServer — this allows you to set up an operating system, such as Raspbian, on the PC which can then be shared by a number of Pi clients networked to it. It is intended to make it easy for classrooms to have multiple Pis all running exactly the same software, and for the teacher to have control over how the software is installed and used. PiServer is quite a clever piece of software, and it’ll be covered in more detail in another blog post in December.

    We’ve also added an application which allows you to easily use the GPIO pins of a Pi Zero connected via USB to a PC in applications using Scratch or Python. This makes it possible to run the same physical computing projects on the PC as you do on a Pi! Again, we’ll tell you more in a separate blog post this month.

    Both of these applications are included as standard on the PC image, but not on the Raspbian image. You can run them on a Pi if you want — both can be installed from apt.

    How to get the new versions

    New images for both Raspbian and Debian versions are available from the Downloads page.

    It is possible to update existing installations of both Raspbian and Debian versions. For Raspbian, this is easy: just open a terminal window and enter

    sudo apt-get update
    sudo apt-get dist-upgrade

    Updating Raspbian on your Raspberry Pi

    How to update to the latest version of Raspbian on your Raspberry Pi. Download Raspbian here: More information on the latest version of Raspbian: Buy a Raspberry Pi:

    It is slightly more complex for the PC version, as the previous release was based around Debian Jessie. You will need to edit the files /etc/apt/sources.list and /etc/apt/sources.list.d/raspi.list, using sudo to do so. In both files, change every occurrence of the word “jessie” to “stretch”. When that’s done, do the following:

    sudo apt-get update 
    sudo dpkg --force-depends -r libwebkitgtk-3.0-common
    sudo apt-get -f install
    sudo apt-get dist-upgrade
    sudo apt-get install python3-thonny
    sudo apt-get install sonic-pi=2.10.0~repack-rpt1+2
    sudo apt-get install piserver
    sudo apt-get install usbbootgui
    

    At several points during the upgrade process, you will be asked if you want to keep the current version of a configuration file or to install the package maintainer’s version. In every case, keep the existing version, which is the default option. The update may take an hour or so, depending on your network connection.

    As with all software updates, there is the possibility that something may go wrong during the process, which could lead to your operating system becoming corrupted. Therefore, we always recommend making a backup first.

    Enjoy the new versions, and do let us know any feedback you have in the comments or on the forums!

    Website: LINK

  • Our brand-new Christmas resources

    Our brand-new Christmas resources

    Reading Time: 3 minutes

    It’s never too early for Christmas-themed resources — especially when you want to make the most of them in your school, Code Club or CoderDojo! So here’s the ever-wonderful Laura Sach with an introduction of our newest festive projects.

    A cartoon of people singing Christmas carols - Raspberry Pi Christmas Resources

    In the immortal words of Noddy Holder: “it’s Christmaaaaaaasssss!” Well, maybe it isn’t quite Christmas yet, but since the shops have been playing Mariah Carey on a loop since the last pumpkin lantern hit the bargain bin, you’re hopefully well prepared.

    To get you in the mood with some festive fun, we’ve put together a selection of seasonal free resources for you. Each project has a difficulty level in line with our Digital Making Curriculum, so you can check which might suit you best. Why not try them out at your local Raspberry Jam, CoderDojo, or Code Club, at school, or even on a cold day at home with a big mug of hot chocolate?

    Jazzy jumpers

    A cartoon of someone remembering pairs of jumper designs - Raspberry Pi Christmas Resources

    Jazzy jumpers (Creator level): as a child in the eighties, you’d always get an embarrassing and probably badly sized jazzy jumper at Christmas from some distant relative. Thank goodness the trend has gone hipster and dreadful jumpers are now cool!

    This resource shows you how to build a memory game in Scratch where you must remember the colour and picture of a jazzy jumper before recreating it. How many jumpers can you successfully recall in a row?

    Sense HAT advent calendar

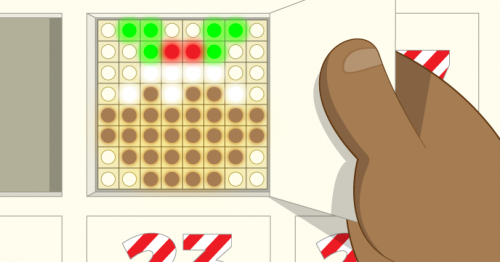
    A cartoon Sense HAT lit up in the design of a Christmas pudding - Raspberry Pi Christmas Resources

    Sense HAT advent calendar (Builder level): put the lovely lights on your Sense HAT to festive use by creating an advent calendar you can open day by day. However, there’s strictly no cheating with this calendar — we teach you how to use Python to detect the current date and prevent would-be premature peekers!

    Press the Enter key to open today’s door:

    (Note: no chocolate will be dispensed from your Raspberry Pi. Sorry about that.)

    Code a carol

    A cartoon of people singing Christmas carols - Raspberry Pi Christmas Resources

    Code a carol (Developer level): Have you ever noticed how much repetition there is in carols and other songs? This resource teaches you how to break down the Twelve days of Christmas tune into its component parts and code it up in Sonic Pi the lazy way: get the computer to do all the repetition for you!

    No musical knowledge required — just follow our lead, and you’ll have yourself a rocking doorbell tune in no time!

    Naughty and nice

    A cartoon of Santa judging people by their tweets - Raspberry Pi Christmas Resources

    Naughty and nice (Maker level): Have you been naughty or nice? Find out by using sentiment analysis on your tweets to see what sort of things you’ve been talking about throughout the year. For added fun, why not use your program on the Twitter account of your sibling/spouse/arch nemesis and report their level of naughtiness to Santa with an @ mention?

    raspberry_pi is 65.5 percent NICE, with an accuracy of 0.9046692607003891

    It’s Christmaaaaaasssss

    With the festive season just around the corner, it’s time to get started on your Christmas projects! Whether you’re planning to run your Christmas lights via a phone app, install a home assistant inside an Elf on a Shelf, or work through our Christmas resources, we would like to see what you make. So do share your festive builds with us on social media, or by posting links in the comments.

    Website: LINK

  • Prepare to run a Code Club on FutureLearn

    Prepare to run a Code Club on FutureLearn

    Reading Time: 2 minutes

    Prepare to run a Code Club with our newest free online course, available now on FutureLearn!

    FutureLearn: Prepare to Run a Code Club

    Ready to launch! Our free FutureLearn course ‘Prepare to Run a Code Club’ starts next week and you can sign up now: https://www.futurelearn.com/courses/code-club

    Code Club

    As of today, more than 10000 Code Clubs run in 130 countries, delivering free coding opportunities to approximately 150000 children across the globe.

    A child absorbed in a task at a Code Club

    As an organisation, Code Club provides free learning resources and training materials to supports the ever-growing and truly inspiring community of volunteers and educators who set up and run Code Clubs.

    FutureLearn

    Today we’re launching our latest free online course on FutureLearn, dedicated to training and supporting new Code Club volunteers. It will give you practical guidance on all things Code Club, as well as a taste of beginner programming!

    Split over three weeks and running for 3–4 hours in total, the course provides hands-on advice and tips on everything you need to know to run a successful, fun, and educational club.

    “Week 1 kicks off with advice on how to prepare to start a Code Club, for example which hardware and software are needed. Week 2 focusses on how to deliver Code Club sessions, with practical tips on helping young people learn and an easy taster coding project to try out. In the final week, the course looks at interesting ideas to enrich and extend club sessions.”
    — Sarah Sherman-Chase, Code Club Participation Manager

    The course is available wherever you live, and it is completely free — sign up now!

    If you’re already a volunteer, the course will be a great refresher, and a chance to share your insights with newcomers. Moreover, it is also useful for parents and guardians who wish to learn more about Code Club.

    Your next step

    Interested in learning more? You can start the course today by visiting FutureLearn. And to find out more about Code Clubs in your country, visit Code Club UK or Code Club International.

    Code Club partners from across the globe gathered together for a group photo at the International Meetup

    We love hearing your Code Club stories! If you’re a volunteer, are in the process of setting up a club, or are inspired to learn more, share your story in the comments below or via social media, making sure to tag @CodeClub and @CodeClubWorld.

    You might also be interested in our other free courses on the FutureLearn platform, including Teaching Physical Computing with Raspberry Pi and Python and Teaching Programming in Primary Schools.

    Website: LINK

  • Physical computing blocks at Maker Faire New York

    Physical computing blocks at Maker Faire New York

    Reading Time: 2 minutes

    At events like Maker Faire New York, we love offering visitors the chance to try out easy, inviting, and hands-on activities, so we teamed up with maker Ben Light to create interactive physical computing blocks.

    Raspberry Blocks FINAL

    In response to the need for hands-on, easy and inviting activities at events such as Maker Faire New York, we teamed up with maker Ben Light to create our interactive physical computing blocks.

    Getting hands-on experience at events

    At the Raspberry Pi Foundation, we often have the opportunity to engage with families and young people at events such as Maker Faires and STEAM festivals. When we set up a booth, it’s really important to us that we provide an educational, fun experience for everyone who visits us. But there are a few reasons why this can be a challenge.

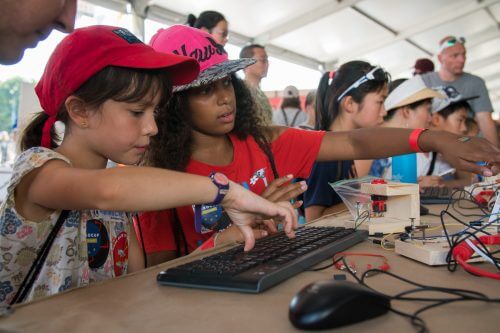
    Girls use the physical computing blocks at Maker Faire New York

    For one, you have a broad audience of people with differing levels of experience with computers. Moreover, some people want to take the time to learn a lot, others just want to try something quick and move on. And on top of that, the environment is often loud, crowded, and chaotic…in a good way!

    Creating our physical computing blocks

    We were up against these challenges when we set out to create a new physical computing experience for our World Maker Faire New York booth. Our goal was to give people the opportunity to try a little bit of circuit making and a little bit of coding — and they should be able to get hands-on with the activity right away.

    Inspired by Exploratorium’s Tinkering Studio, we sketched out physical computing blocks which let visitors use the Raspberry Pi’s GPIO pins without needing to work with tiny components or needing to understand how a breadboard works. We turned the sketches over to our friend Ben Light in New York City, and he brought the project to life.

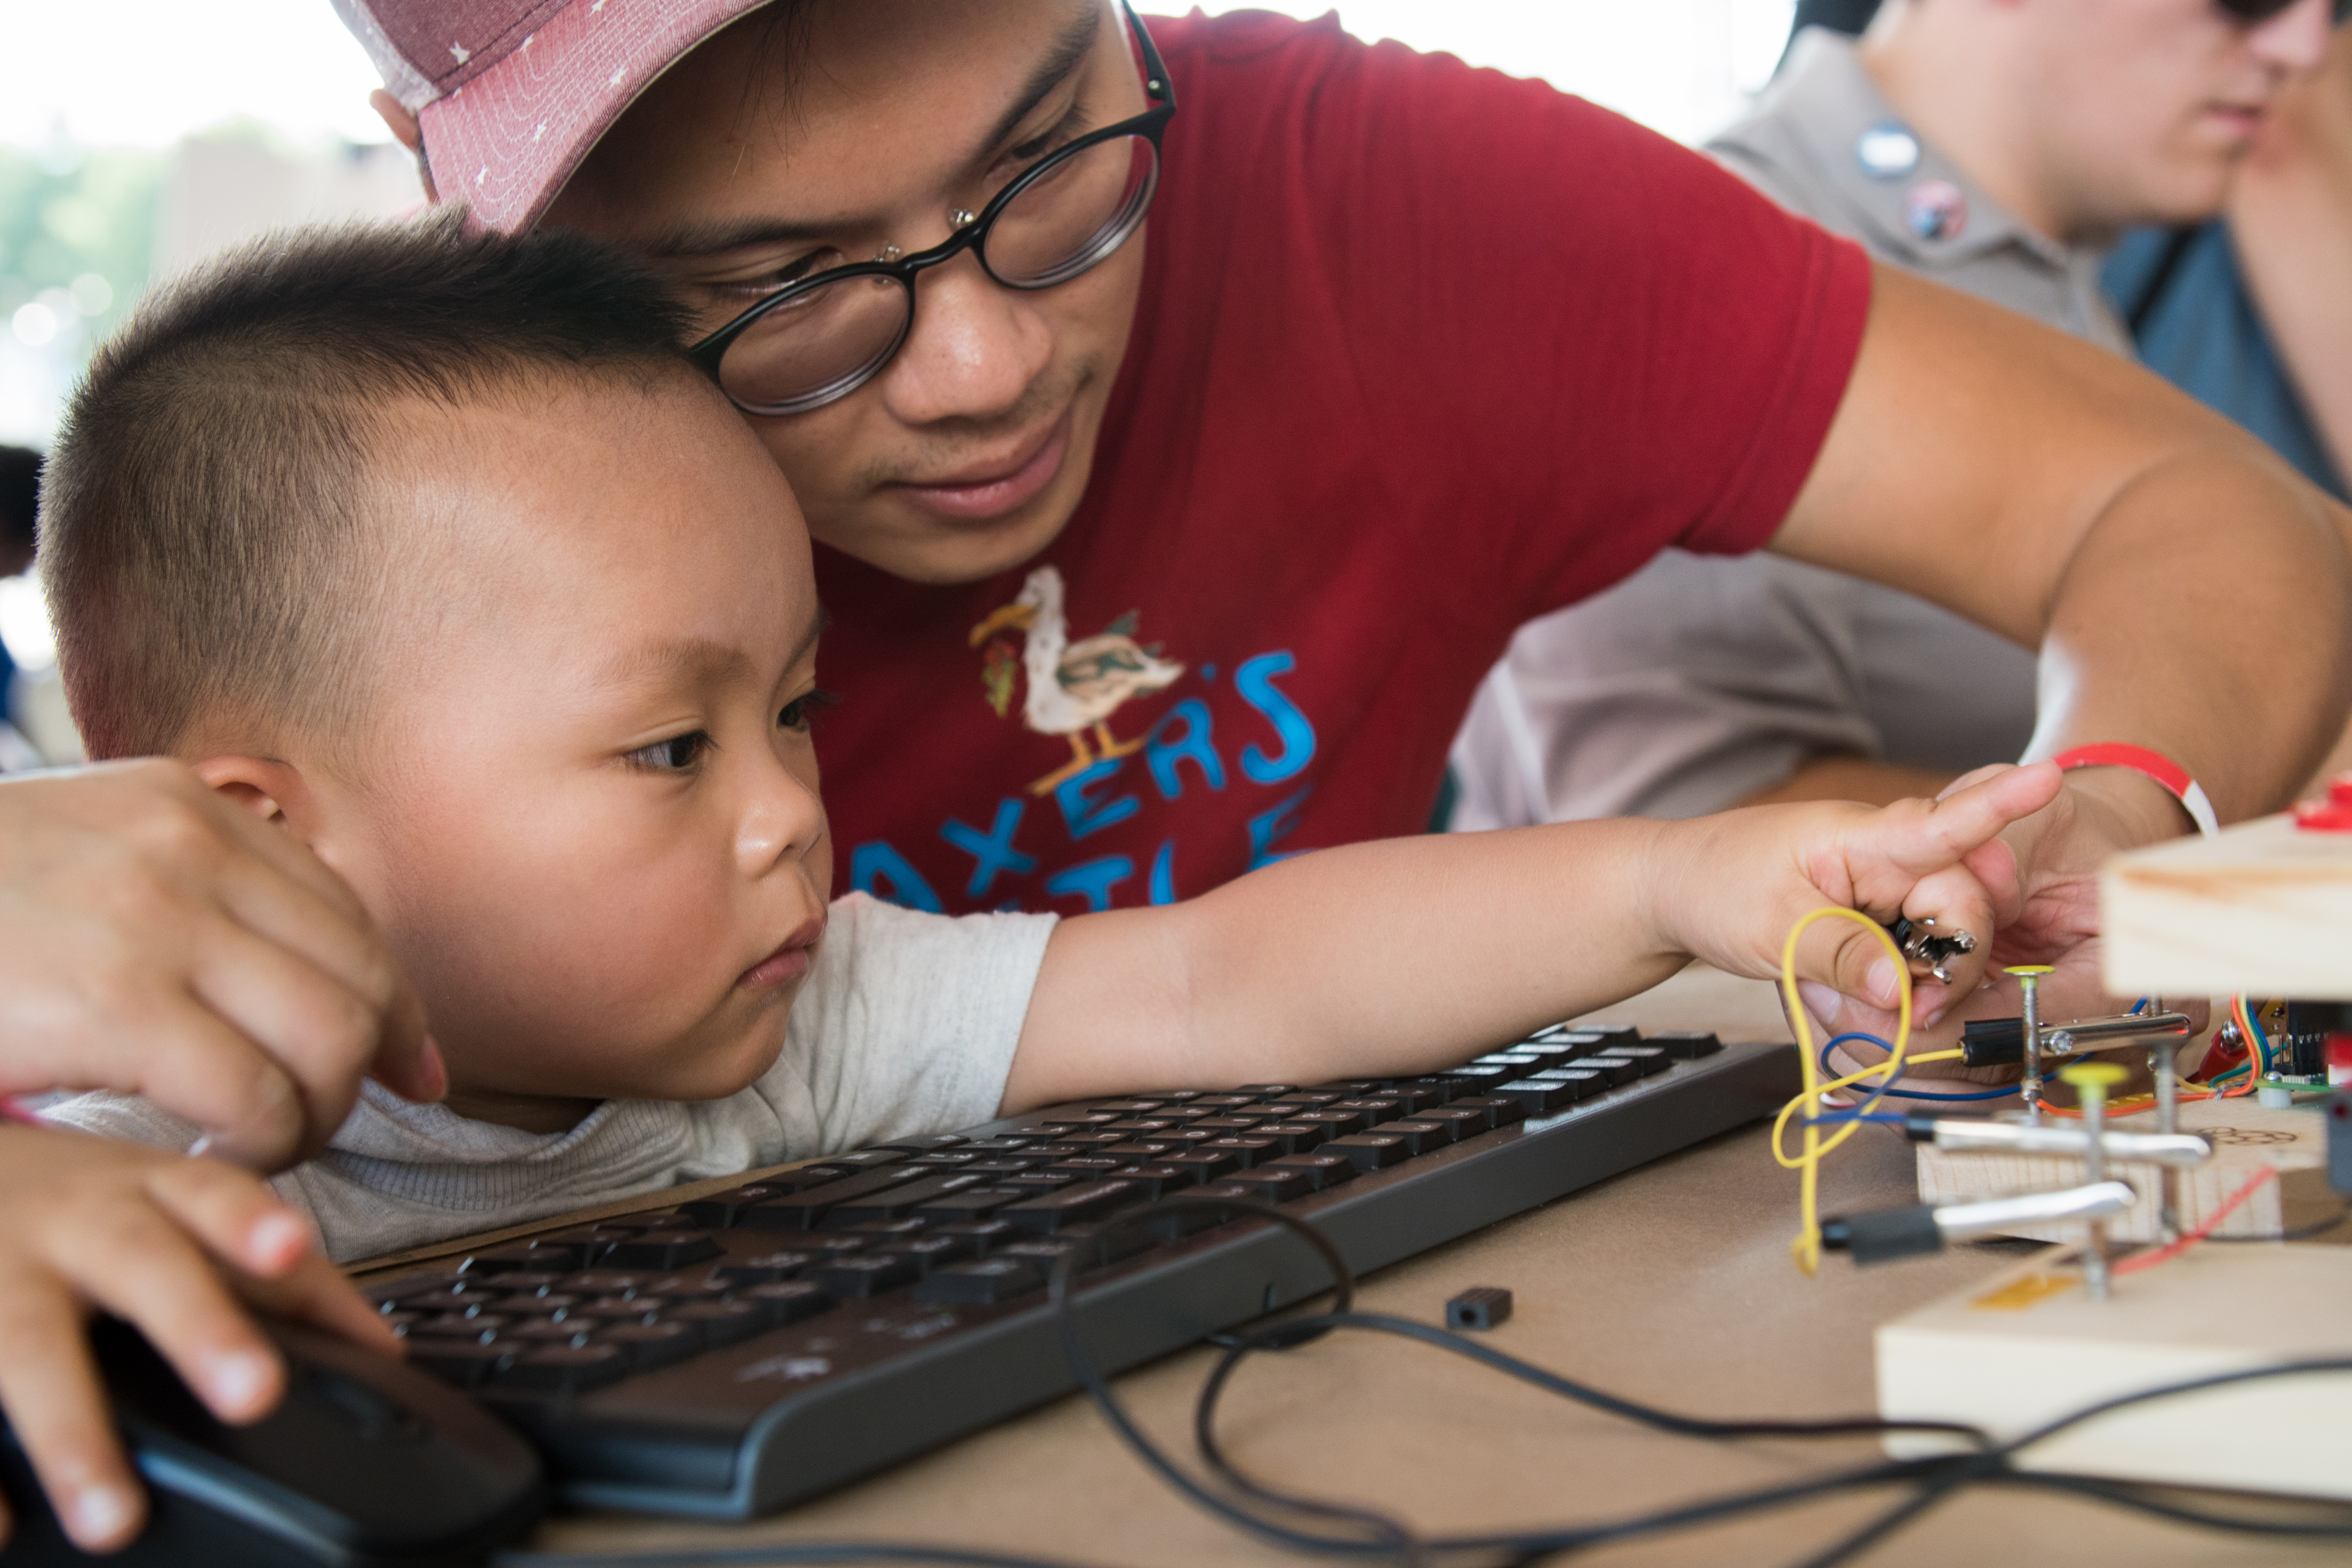
    Father and infant child clip crocodile leads to the Raspberry Pi physical computing blocks at Maker Faire New York

    As you can see, the activity turned out really well, so we hope to bring it to more events in the future. Thank you, Ben Light, for collaborating with us on it!

    Website: LINK

  • Community Profile: Matthew Timmons-Brown

    Community Profile: Matthew Timmons-Brown

    Reading Time: 4 minutes

    This column is from The MagPi issue 57. You can download a PDF of the full issue for free, or subscribe to receive the print edition in your mailbox or the digital edition on your tablet. All proceeds from the print and digital editions help the Raspberry Pi Foundation achieve its charitable goals.

    “I first set up my YouTube channel because I noticed a massive lack of video tutorials for the Raspberry Pi,” explains Matthew Timmons-Brown, known to many as The Raspberry Pi Guy. At 18 years old, the Cambridge-based student has more than 60 000 subscribers to his channel, making his account the most successful Raspberry Pi–specific YouTube account to date.

    Matthew Timmons-Brown

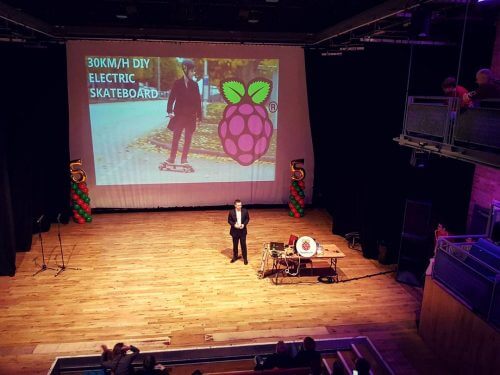
    Matt gives a talk at the Raspberry Pi 5th Birthday weekend event

    The Raspberry Pi Guy

    If you’ve attended a Raspberry Pi event, there’s a good chance you’ve already met Matt. And if not, you’ll have no doubt come across one or more of his tutorials and builds online. On more than one occasion, his work has featured on the Raspberry Pi blog, with his yearly Raspberry Pi roundup videos being a staple of the birthday celebrations.

    Matthew Timmons-Brown

    With his website, Matt aimed to collect together “the many strands of The Raspberry Pi Guy” into one, neat, cohesive resource — and it works. From newcomers to the credit card-sized computer to hardened Pi veterans, The Raspberry Pi Guy offers aid and inspiration for many. Looking for a review of the Raspberry Pi Zero W? He’s filmed one. Looking for a step-by-step guide to building a Pi-powered Amazon Alexa? No problem, there’s one of those too.

    Make your Raspberry Pi artificially intelligent! – Amazon Alexa Personal Assistant Tutorial

    Artificial Intelligence. A hefty topic that has dominated the field since computers were first conceived. What if I told you that you could put an artificial intelligence service on your own $30 computer?! That’s right! In this tutorial I will show you how to create your own artificially intelligent personal assistant, using Amazon’s Alexa voice recognition and information service!

    Raspberry Pi electric skateboard

    Last summer, Matt introduced the world to his Raspberry Pi-controlled electric skateboard, soon finding himself plastered over local press as well as the BBC and tech sites like Adafruit and geek.com. And there’s no question as to why the build was so popular. With YouTubers such as Casey Neistat increasing the demand for electric skateboards on a near-daily basis, the call for a cheaper, home-brew version has quickly grown.

    DIY 30KM/H ELECTRIC SKATEBOARD – RASPBERRY PI/WIIMOTE POWERED

    Over the summer, I made my own electric skateboard using a £4 Raspberry Pi Zero. Controlled with a Nintendo Wiimote, capable of going 30km/h, and with a range of over 10km, this project has been pretty darn fun. In this video, you see me racing around Cambridge and I explain the ins and outs of this project.

    Using a Raspberry Pi Zero, a Nintendo Wii Remote, and a little help from members of the Cambridge Makespace community, Matt built a board capable of reaching 30km/h, with a battery range of 10km per charge. Alongside Neistat, Matt attributes the project inspiration to Australian student Tim Maier, whose build we previously covered in The MagPi.

    Matthew Timmons-Brown and Eben Upton standing in a car park looking at a smartphone

    LiDAR

    Despite the success and the fun of the electric skateboard (including convincing Raspberry Pi Trading CEO Eben Upton to have a go for local television news coverage), the project Matt is most proud of is his wireless LiDAR system for theoretical use on the Mars rovers.

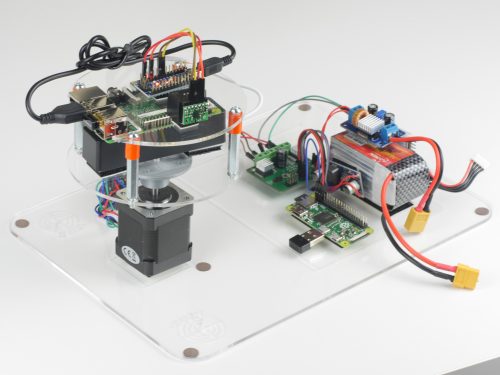
    Matthew Timmons-Brown's LiDAR project for scanning terrains with lasers

    Using a tablet app to define the angles, Matt’s A Level coursework LiDAR build scans the surrounding area, returning the results to the touchscreen, where they can be manipulated by the user. With his passion for the cosmos and the International Space Station, it’s no wonder that this is Matt’s proudest build.

    Built for his A Level Computer Science coursework, the build demonstrates Matt’s passion for space and physics. Used as a means of surveying terrain, LiDAR uses laser light to measure distance, allowing users to create 3D-scanned, high-resolution maps of a specific area. It is a perfect technology for exploring unknown worlds.

    Matthew Timmons-Brown and two other young people at a reception in the Houses of Parliament

    Matt was invited to St James’s Palace and the Houses of Parliament as part of the Raspberry Pi community celebrations in 2016

    Joining the community

    In a recent interview at Hills Road Sixth Form College, where he is studying mathematics, further mathematics, physics, and computer science, Matt revealed where his love of electronics and computer science started. “I originally became interested in computer science in 2012, when I read a tiny magazine article about a computer that I would be able to buy with pocket money. This was a pretty exciting thing for a 12-year-old! Your own computer… for less than £30?!” He went on to explain how it became his mission to learn all he could on the subject and how, months later, his YouTube channel came to life, cementing him firmly into the Raspberry Pi community

    Website: LINK

  • November Cosplay Showcase!

    November Cosplay Showcase!

    Reading Time: 3 minutes

    We were so inspired by the TwitchCon Cosplay Contest finalists that we decided to dust off the sewing machine and raid the local hardware store, only to find ourselves in a sticky situation. Don’t wind up like us with your Glitch superglued to your clothes and a glitter explosion. Check out this month’s spotlight to learn from some seasoned cosplay pros: RandomTuesday, EvilTed, and LittleSparkz!

    RandomTues

    RandomTuesday

    RandomTuesday has always loved making costumes and enjoys any excuse to dress up. Once she discovered cosplay, she was hooked! Her current project is a set of full size wings for her Ever After ball gown. Outside of cosplay, RandomTuesday likes to play tabletop RPGs and indie video games. Hop into her stream and join The Legion: a positive place full of puns, pins and airship pirates so peek at your peril!

    EvilTed

    EvilTed

    EvilTed has been making cool creations since 1989. Vampire Hunter D always held a special place in his heart and after gaining experience over the years, he was finally able to make his dream costume. Currently, he’s working on a character of his own design: a take on a fantasy warrior like you’d see in a video game. Join his stream to chat with a great community of fellow creators who love to teach and learn from each other.

    LittleSparkz as Master Chromie

    LittleSparkz

    After admiring the craft of cosplay for a long time, LittleSparkz decided to jump straight in at BlizzCon 2014. Sparkz’s latest costume was Mystic Kingdoms Arthas, which won the armor category at TwitchCon, and 4th place at Blizzcon this year. Her favorite costume is Master Chromie because it allows her to get very in character and bring smiles to people’s faces. Tune in to her streams for cosplay tips, fantasy games, and joining an active and fun chat community.

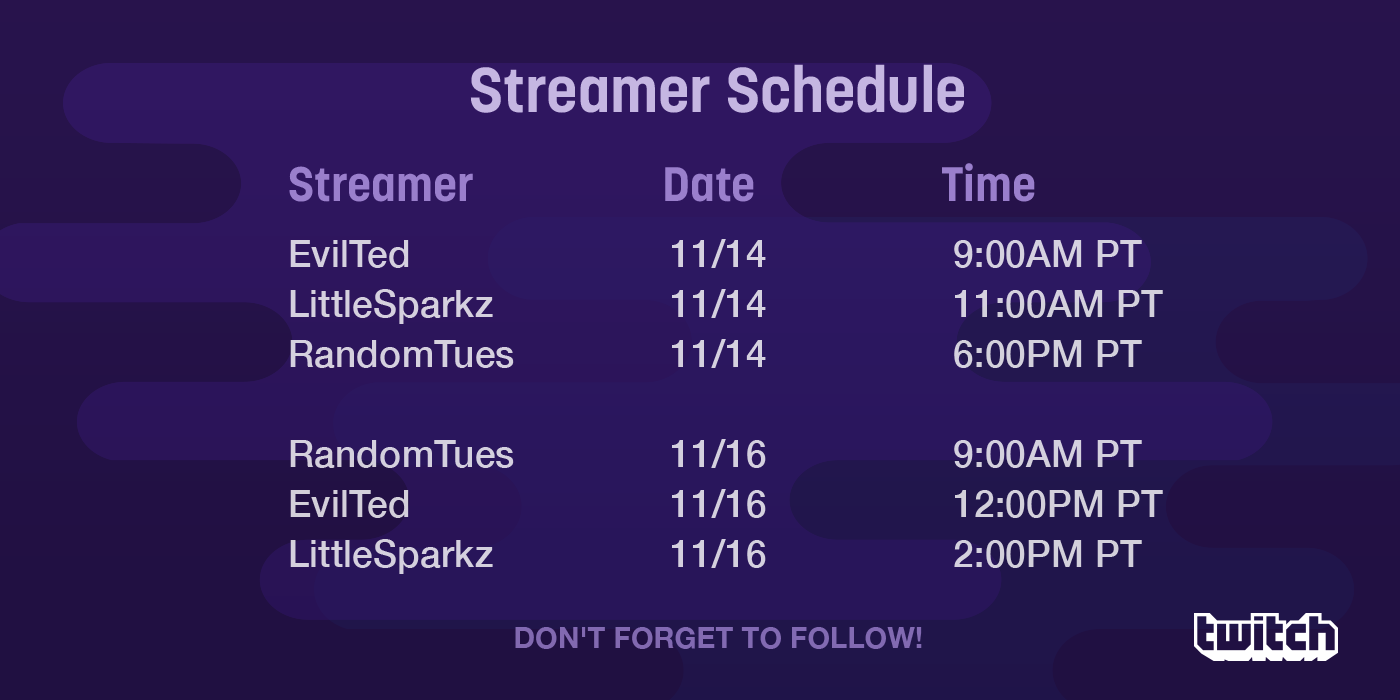
    The full schedule for all of the front page streams is below:

    Would you like your channel to be featured as part of the Cosplay Showcase? You can apply by going to fill out this form! And don’t forget to check out the finalists for the TwitchCon Cosplay Contest here!

    Website: LINK
  • Computing in schools: the report card

    Computing in schools: the report card

    Reading Time: 4 minutes

    Today the Royal Society published After the Reboot, a report card on the state of computing education in UK schools. It’s a serious piece of work, published with lots of accompanying research and data, and well worth a read if you care about these issues (which, if you’re reading this blog, I guess you do).

    The headline message is that, while a lot has been achieved, there’s a long way to go before we can say that young people are consistently getting the computing education they need and deserve in UK schools.

    If this were a school report card, it would probably say: “good progress when he applies himself, but would benefit from more focus and effort in class” (which is eerily reminiscent of my own school reports).

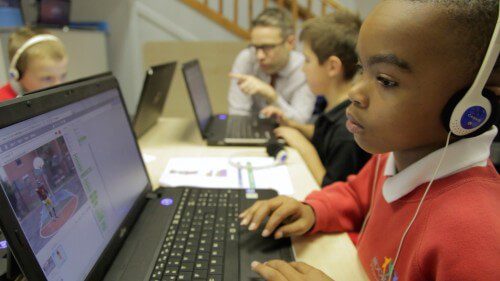
    A child coding in Scratch on a laptop - Royal Society After the Reboot

    Good progress

    After the Reboot comes five and a half years after the Royal Society’s first review of computing education, Shut down or restart, a report that was published just a few days before the Education Secretary announced in January 2012 that he was scrapping the widely discredited ICT programme of study.

    There’s no doubt that a lot has been achieved since 2012, and the Royal Society has done a good job of documenting those successes in this latest report. Computing is now part of the curriculum for all schools. There’s a Computer Science GCSE that is studied by thousands of young people. Organisations like Computing At School have built a grassroots movement of educators who are leading fantastic work in schools up and down the country. Those are big wins.

    The Raspberry Pi Foundation has been playing its part. With the support of partners like Google, we’ve trained over a thousand UK educators through our Picademy programme. Those educators have gone on to work with hundreds of thousands of students, and many have become leaders in the field. Many thousands more have taken our free online training courses, and through our partnership with BT, CAS and the BCS on the Barefoot programme, we’re supporting thousands of primary school teachers to deliver the computing curriculum. Earlier this year we launched a free magazine for computing educators, Hello World, which has over 14,000 subscribers after just three editions.

    A group of people learning about digital making - Royal Society After the Reboot

    More to do

    Despite all the progress, the Royal Society study has confirmed what many of us have been saying for some time: we need to do much more to support teachers to develop the skills and confidence to deliver the computing curriculum. More than anything, we need to give them the time to invest in their own professional development. The UK led the way on putting computing in the curriculum. Now we need to follow through on that promise by investing in a huge effort to support professional development across the school system.

    This isn’t a problem that any one organisation or sector can solve on its own. It will require a grand coalition of government, industry, non-profits, and educators if we are going to make change at the pace that our young people need and deserve. Over the coming weeks and months, we’ll be working with our partners to figure out how we make that happen.

    A boy learning about computing from a woman - Royal Society After the Reboot

    The other 75%

    While the Royal Society report rightly focuses on what happens in classrooms during the school day, we need to remember that children spend only 25% of their waking hours there. What about the other 75%?

    Ask any computer scientist, engineer, or maker, and they’ll tell stories about how much they learned in those precious discretionary hours.

    Ask an engineer of a certain age (ahem), and they will tell you about the local computing club where they got hands-on with new technologies, picked up new ideas, and were given help by peers and mentors. They might also tell you how they would spend dozens of hours typing in hundreds of line of code from a magazine to create their own game, and dozens more debugging when it didn’t work.

    One of our goals at the Raspberry Pi Foundation is to lead the revival in that culture of informal learning.

    The revival of computing clubs

    There are now more than 6,000 active Code Clubs in the UK, engaging over 90,000 young people each week. 41% of the kids at Code Club are girls. More than 150 UK CoderDojos take place in universities, science centres, and corporate offices, providing a safe space for over 4,000 young people to learn programming and digital making.

    So far this year, there have been 164 Raspberry Jams in the UK, volunteer-led meetups attended by over 10,000 people, who come to learn from volunteers and share their digital making projects.

    It’s a movement, and it’s growing fast. One of the most striking facts is that whenever a new Code Club, CoderDojo, or Raspberry Jam is set up, it is immediately oversubscribed.

    So while we work on fixing the education system, there’s a tangible way that we can all make a huge difference right now. You can help set up a Code Club, get involved with CoderDojo, or join the Raspberry Jam movement.

    Website: LINK
  • Using taxies to monitor air quality in Peru

    Using taxies to monitor air quality in Peru

    Reading Time: 3 minutes

    When James Puderer moved to Lima, Peru, his roadside runs left a rather nasty taste in his mouth. Hit by the pollution from old diesel cars in the area, he decided to monitor the air quality in his new city using Raspberry Pis and the abundant taxies as his tech carriers.

    Taxi Datalogger – Assembly

    How to assemble the enclosure for my Taxi Datalogger project: https://www.hackster.io/james-puderer/distributed-air-quality-monitoring-using-taxis-69647e

    Sensing air quality in Lima

    Luckily for James, almost all taxies in Lima are equipped with the standard hollow vinyl roof sign seen in the video above, which makes them ideal for hacking.

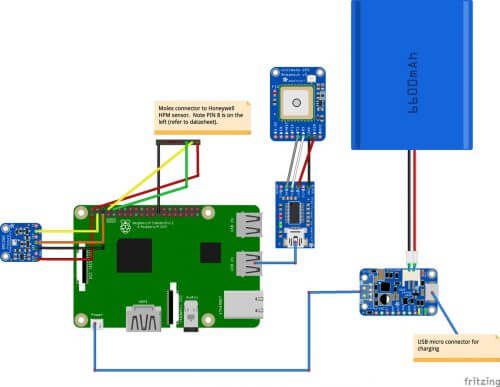
    Using a Raspberry Pi alongside various Adafuit tech including the BME280 Temperature/Humidity/Pressure Sensor and GPS Antenna, James created a battery-powered retrofit setup that fits snugly into the vinyl sign.

    The schematic of the air quality monitor tech inside the taxi sign

    With the onboard tech, the device collects data on longitude, latitude, humidity, temperature, pressure, and airborne particle count, feeding it back to an Android Things datalogger. This data is then pushed to Google IoT Core, where it can be remotely accessed.

    Next, the data is processed by Google Dataflow and turned into a BigQuery table. Users can then visualize the collected measurements. And while James uses Google Maps to analyse his data, there are many tools online that will allow you to organise and study your figures depending on what final result you’re hoping to achieve.

    A heat map of James' local area showing air quality

    James hopped in a taxi and took his monitor on the road, collecting results throughout the journey

    James has provided the complete build process, including all tech ingredients and code, on his Hackster.io project page, and urges makers to create their own air quality monitor for their local area. He also plans on building upon the existing design by adding a 12V power hookup for connecting to the taxi, functioning lights within the sign, and companion apps for drivers.

    Sensing the world around you

    We’ve seen a wide variety of Raspberry Pi projects using sensors to track the world around us, such as Kasia Molga’s Human Sensor costume series, which reacts to air pollution by lighting up, and Clodagh O’Mahony’s Social Interaction Dress, which she created to judge how conversation and physical human interaction can be scored and studied.

    Human Sensor

    Kasia Molga’s Human Sensor — a collection of hi-tech costumes that react to air pollution within the wearer’s environment.

    Many people also build their own Pi-powered weather stations, or use the Raspberry Pi Oracle Weather Station, to measure and record conditions in their towns and cities from the roofs of schools, offices, and homes.

    Have you incorporated sensors into your Raspberry Pi projects? Share your builds in the comments below or via social media by tagging us.

    Website: LINK
  • 4 Content Ideas for November

    4 Content Ideas for November

    Reading Time: 2 minutes

    November is a month of many exciting things: celebrations of food, family, friendship — and even beards. Here are four content ideas in the spirit of November that you can participate in and maybe even get discovered!

    1. Participate in #NoShaveNovember

    As autumn nights grow longer, so do the beards of many men this month. If you have (or plan on growing) a glorious beard or mustache in honor of #NoShaveNovember, it’s your time to shine! Upload your beard care technique videos, create a timelapse of your facial hair growth, or simply show us how you wear your beard, mustache, sideburns, muttonchops, etc., on your Twitch channel. Send us a tweet with your content hashtagging #NoShaveNovember and #TwitchLifestyle.

    Looking to take your beard growing to the next level? Get involved in a charity raising awareness for men’s health:

    You can reach out to charity@twitch.tv for more information.

    2. Cook up a Thanksgiving recipe

    Are you a magician in the kitchen? Nom your way through November by serving up some live cooking streams or uploaded videos to Twitch! Show off some pro tips.

    Are you a vegan, vegetarian, or simply don’t like turkey? Show us your alternatives! Break out Grandma’s cookbook and share that secret cranberry sauce recipe so the rest of the world can enjoy it (unless it gets you banned from future family Thanksgivings).

    Hashtag #TwitchLifestyle and #Thanksgiving, then send your content to @Twitch on Twitter!

    3. Host #Friendsgiving

    Thanksgiving is the ultimate social eating experience of the year. Spend it with family and/or gathering with streaming friends for a #Friendsgiving stream or Twitch vlog.

    We want in on the festivities too, so be sure to share your Thanksgiving social eating content with us on Twitter using #Friendsgiving and #TwitchLifestyle.

    4. Share what you’re thankful for

    Create a video about those you are thankful for and upload it to your Twitch channel. Whether it’s your family, a best friend, a moderator, a significant other, or your entire community, let them know how grateful you are for their love and support.

    Share it with us on Twitter @Twitch using #TwitchLifestyle and #Thanksgiving.

    Website: LINK
  • Halloween park challenge for Planet Coaster players

    Halloween park challenge for Planet Coaster players

    Reading Time: < 1 minute

    It’s the spookiest time of the year! Ghosts, witches, and monsters haunt amusement parks around the land looking for rides that would scare the wraps off a mummy. For that, you can count on some of the great creators in the Planet Coaster community to use their talents to make special parks for every boy and ghoul to enjoy!

    Check the schedule below for the Planet Coaster front page feature times, and tune into these amazing creators during the rest of October for a spooky good time!

    Get a glimpse of what lies in wait with these teaser videos:

    Ezilii

    DrGluon

    BlindIRL

    Website: LINK

  • Join us for an evening of League of Legends

    Join us for an evening of League of Legends

    Reading Time: 3 minutes

    Last month, we shared the news that Riot Games is supporting digital literacy by matching 25% of sales of Championship Ashe and Championship Ward to create a charity fund that will benefit the Raspberry Pi Foundation and two other charities.

    Raspberry Pi League of Legends Championship Ashe Riot Games

    Riot Games and CoderDojo

    CoderDojo and Riot Games have been developing the most glorious of relationships for some time now. Nuala, CoderDojo’s Communications & Community Engagement Lead, explains:

    “We’ve been partners with Riot Games for well over a year: together we ran a 24-hackathon at their Dublin office, where Riot games staff members gave their time to develop content for Dojos and to improve our platform; a Dojo regularly runs in their office to support local children to learn coding skills; they’ve also worked closely with us to support Coolest Projects.”

    With CoderDojo now part of the Raspberry Pi Foundation family, we’re excited to see where this growing relationship will go.

    Vote for the Raspberry Pi Foundation

    Riot Games is now calling for all League of Legends players to vote for their favourite charity — the winning organisation will receive 50% of the total fund.

    By visiting the ‘Vote for charity’ tab in-client, you’ll be able to choose between the Raspberry Pi Foundation, BasicNeeds, and Learning Equality.

    Players can vote only once, and your vote will be multiplied based on your honour level. Voting ends on 5 November 2017 at 11:59pm PT.

    League of Legends with Riot Gaming

    In honour of the Riot Games Charity Fund vote, and to support the work of the Raspberry Pi Foundation, KimmieRiot and M0RGZ of top female eSports organisation Riot Gaming (no relation to Riot Games) will run a four-hour League of Legends live-stream this Saturday, 21 October, from 6pm to 10pm BST.

    Playing as Championship Ashe, they’ll be streaming live to Twitch, and you’re all invited to join in the fun. I’ll be making an appearance in the chat box as RaspberryPiFoundation, and we’ll be giving away some free T-shirts and stickers during the event — make sure to tune in to the conversation.

    In a wonderful gesture, Riot Gaming will pass on all donations made to their channel during the live-stream to us. These funds will directly aid the ongoing charitable work of Raspberry Pi and our computing education programmes like CoderDojo.

    Make sure to follow Riot Gaming, and activate notifications so you don’t miss the event!

    We’re blushing

    Thank you to everyone who buys Championship Ashe and Championship Ward, and to all of you who vote for us. We’re honoured to be one of the three charities selected to benefit from the Riot Games Charity Fund.

    And a huge thank you to Riot Gaming for organising an evening of Raspberry Pi and League of Legends. We can’t wait!

    Website: LINK