The Raspberry Pi PiServer tool
As Simon mentioned in his recent blog post about Raspbian Stretch, we have developed a new piece of software called PiServer. Use this tool to easily set up a network of client Raspberry Pis connected to a single x86-based server via Ethernet. With PiServer, you don’t need SD cards, you can control all clients via the server, and you can add and configure user accounts — it’s ideal for the classroom, your home, or an industrial setting.
Client? Server?
Before I go into more detail, let me quickly explain some terms.
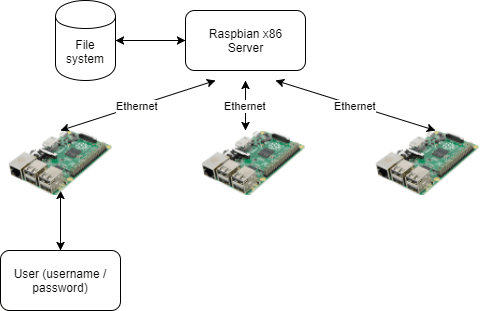
- Server — the server is the computer that provides the file system, boot files, and password authentication to the client(s)
- Client — a client is a computer that retrieves boot files from the server over the network, and then uses a file system the server has shared. More than one client can connect to a server, but all clients use the same file system.
- User – a user is a user name/password combination that allows someone to log into a client to access the file system on the server. Any user can log into any client with their credentials, and will always see the same server and share the same file system. Users do not have sudo capability on a client, meaning they cannot make significant changes to the file system and software.
I see no SD cards
Last year we described how the Raspberry Pi 3 Model B can be booted without an SD card over an Ethernet network from another computer (the server). This is called network booting or PXE (pronounced ‘pixie’) booting.
Why would you want to do this?
- A client computer (the Raspberry Pi) doesn’t need any permanent storage (an SD card) to boot.
- You can network a large number of clients to one server, and all clients are exactly the same. If you log into one of the clients, you will see the same file system as if you logged into any other client.
- The server can be run on an x86 system, which means you get to take advantage of the performance, network, and disk speed on the server.
Sounds great, right? Of course, for the less technical, creating such a network is very difficult. For example, there’s setting up all the required DHCP and TFTP servers, and making sure they behave nicely with the rest of the network. If you get this wrong, you can break your entire network.
PiServer to the rescue
To make network booting easy, I thought it would be nice to develop an application which did everything for you. Let me introduce: PiServer!
PiServer has the following functionalities:
- It automatically detects Raspberry Pis trying to network boot, so you don’t have to work out their Ethernet addresses.
- It sets up a DHCP server — the thing inside the router that gives all network devices an IP address — either in proxy mode or in full IP mode. No matter the mode, the DHCP server will only reply to the Raspberry Pis you have specified, which is important for network safety.
- It creates user names and passwords for the server. This is great for a classroom full of Pis: just set up all the users beforehand, and everyone gets to log in with their passwords and keep all their work in a central place. Moreover, users cannot change the software, so educators have control over which programs their learners can use.
- It uses a slightly altered Raspbian build which allows separation of temporary spaces, doesn’t have the default ‘pi’ user, and has LDAP enabled for log-in.
What can I do with PiServer?
Serve a whole classroom of Pis
In a classroom, PiServer allows all files for lessons or projects to be stored on a central x86-based computer. Each user can have their own account, and any files they create are also stored on the server. Moreover, the networked Pis doesn’t need to be connected to the internet. The teacher has centralised control over all Pis, and all Pis are user-agnostic, meaning there’s no need to match a person with a computer or an SD card.
Build a home server
PiServer could be used in the home to serve file systems for all Raspberry Pis around the house — either a single common Raspbian file system for all Pis or a different operating system for each. Hopefully, our extensive OS suppliers will provide suitable build files in future.
Use it as a controller for networked Pis
In an industrial scenario, it is possible to use PiServer to develop a network of Raspberry Pis (maybe even using Power over Ethernet (PoE)) such that the control software for each Pi is stored remotely on a server. This enables easy remote control and provisioning of the Pis from a central repository.
How to use PiServer
The client machines
So that you can use a Pi as a client, you need to enable network booting on it. Power it up using an SD card with a Raspbian Lite image, and open a terminal window. Type in
echo program_usb_boot_mode=1 | sudo tee -a /boot/config.txtand press Return. This adds the line program_usb_boot_mode=1 to the end of the config.txt file in /boot. Now power the Pi down and remove the SD card. The next time you connect the Pi to a power source, you will be able to network boot it.
The server machine
As a server, you will need an x86 computer on which you can install x86 Debian Stretch. Refer to Simon’s blog post for additional information on this. It is possible to use a Raspberry Pi to serve to the client Pis, but the file system will be slower, especially at boot time.
Make sure your server has a good amount of disk space available for the file system — in general, we recommend at least 16Gb SD cards for Raspberry Pis. The whole client file system is stored locally on the server, so the disk space requirement is fairly significant.
Next, start PiServer by clicking on the start icon and then clicking Preferences > PiServer. This will open a graphical user interface — the wizard — that will walk you through setting up your network. Skip the introduction screen, and you should see a screen looking like this:
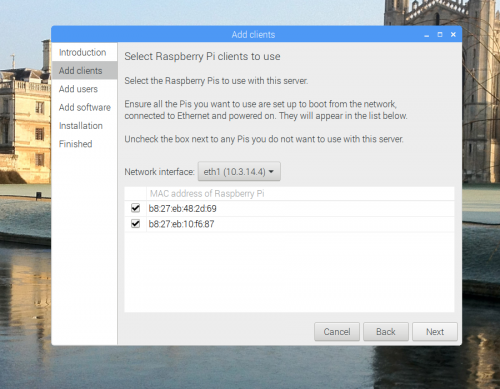
If you’ve enabled network booting on the client Pis and they are connected to a power source, their MAC addresses will automatically appear in the table shown above. When you have added all your Pis, click Next.

On the Add users screen, you can set up users on your server. These are pairs of user names and passwords that will be valid for logging into the client Raspberry Pis. Don’t worry, you can add more users at any point. Click Next again when you’re done.
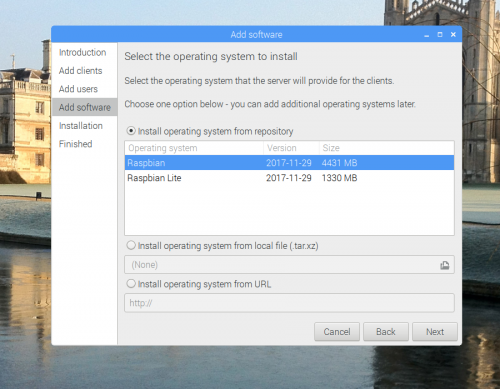
The Add software screen allows you to select the operating system you want to run on the attached Pis. (You’ll have the option to assign an operating system to each client individually in the setting after the wizard has finished its job.) There are some automatically populated operating systems, such as Raspbian and Raspbian Lite. Hopefully, we’ll add more in due course. You can also provide your own operating system from a local file, or install it from a URL. For further information about how these operating system images are created, have a look at the scripts in /var/lib/piserver/scripts.
Once you’re done, click Next again. The wizard will then install the necessary components and the operating systems you’ve chosen. This will take a little time, so grab a coffee (or decaffeinated drink of your choice).
When the installation process is finished, PiServer is up and running — all you need to do is reboot the Pis to get them to run from the server.
Shooting troubles
If you have trouble getting clients connected to your network, there are a fewthings you can do to debug:
- If some clients are connecting but others are not, check whether you’ve enabled the network booting mode on the Pis that give you issues. To do that, plug an Ethernet cable into the Pi (with the SD card removed) — the LEDs on the Pi and connector should turn on. If that doesn’t happen, you’ll need to follow the instructions above to boot the Pi and edit its
/boot/config.txtfile. - If you can’t connect to any clients, check whether your network is suitable: format an SD card, and copy
bootcode.binfrom/booton a standard Raspbian image onto it. Plug the card into a client Pi, and check whether it appears as a new MAC address in the PiServer GUI. If it does, then the problem is a known issue, and you can head to our forums to ask for advice about it (the network booting code has a couple of problems which we’re already aware of). For a temporary fix, you can clone the SD card on whichbootcode.binis stored for all your clients.
If neither of these things fix your problem, our forums are the place to find help — there’s a host of people there who’ve got PiServer working. If you’re sure you have identified a problem that hasn’t been addressed on the forums, or if you have a request for a functionality, then please add it to the GitHub issues.
Website: LINK