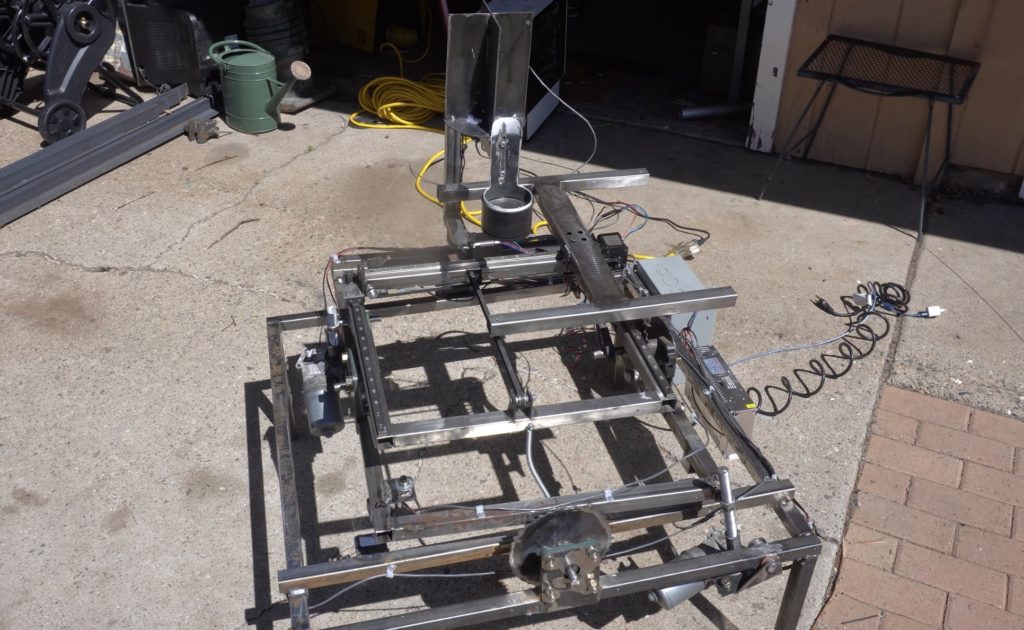
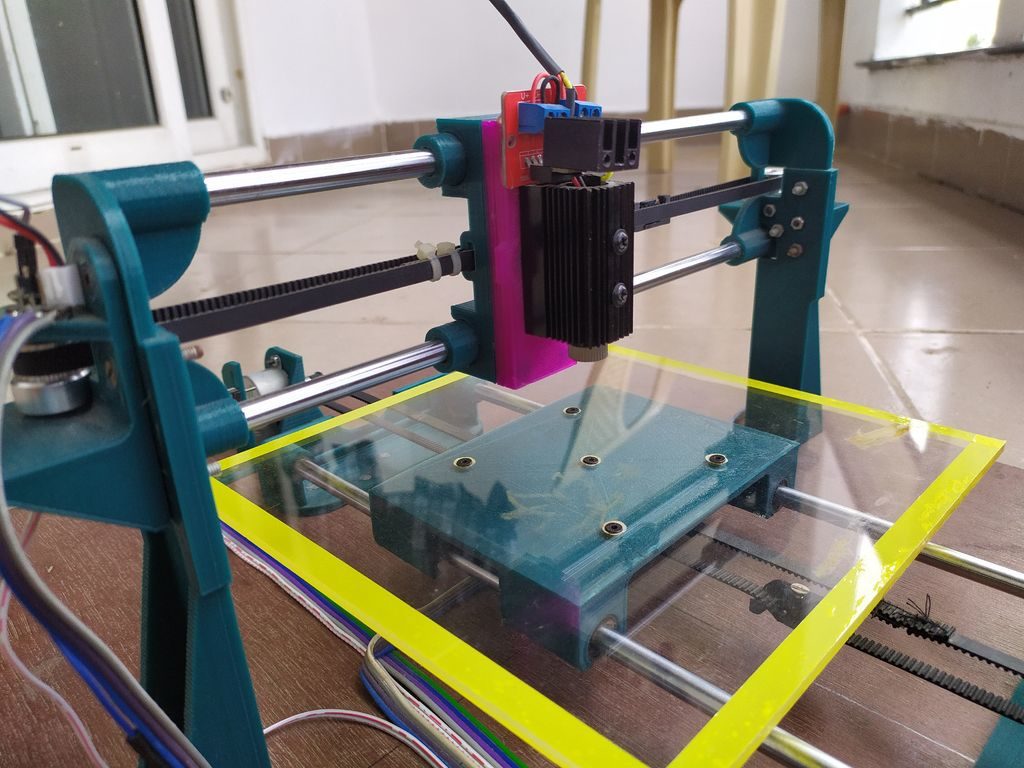
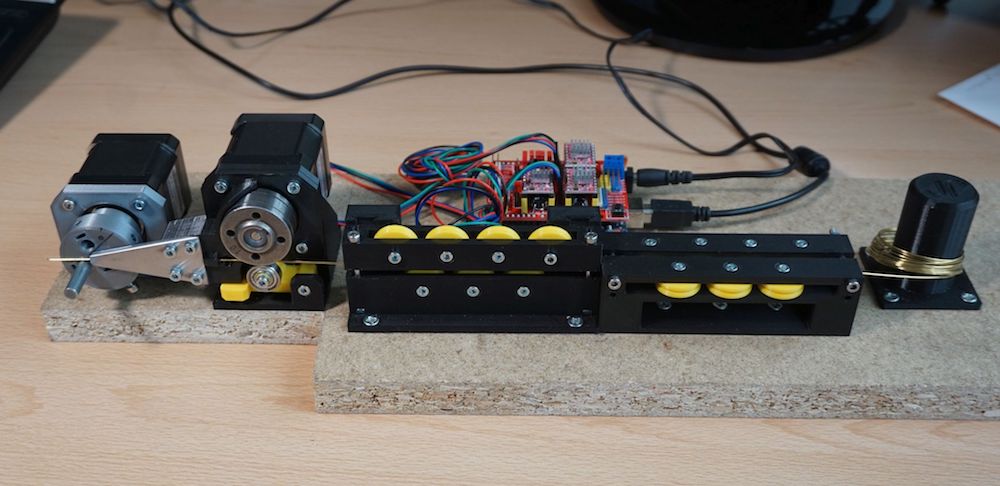
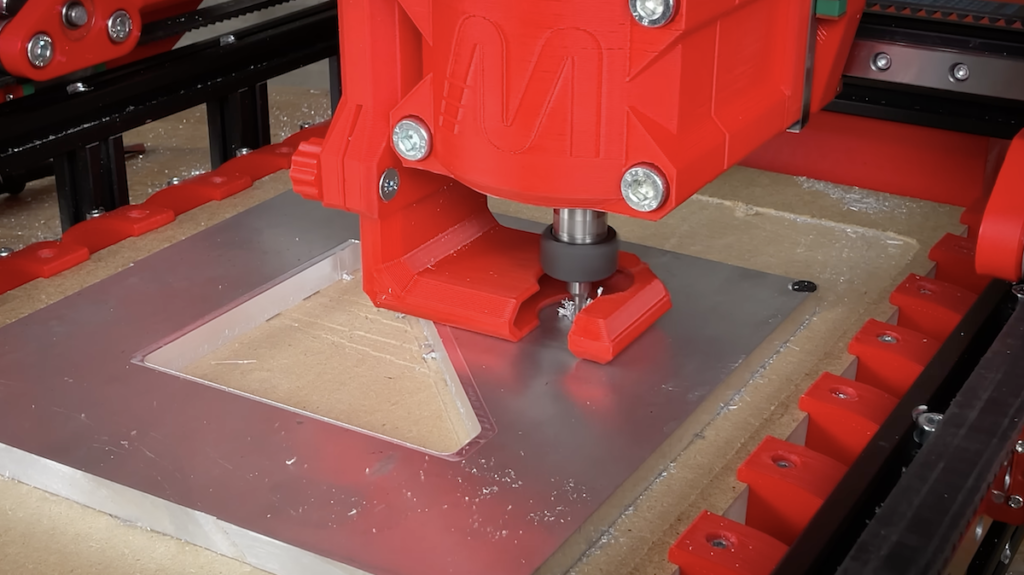
CNC machines (both CNC mills and CNC routers) are very useful to makers. With them, you can fabricate custom wood, plastic, or metal parts to the exact dimensions that you define in a CAD (computer-aided design) model. But CNC routers are expensive and CNC mills capable of cutting metal are even pricier—to the point where they are out of the reach of most makers. However, if you have a 3D printer, time, and a modest budget, you can build Ivan Miranda’s CNC mill from scratch.
Miranda designed several CNC routers and mills over the years. Like those, this is possible to build using common materials and doesn’t require any special tools except a 3D printer. Its frame is a combination of sturdy, yet affordable, aluminum extrusion and 3D-printed joints. The various hardware, like linear rails, belts, and bearings, is similar to what you would find on a 3D printer. That keeps costs down and makes the parts easy to find.
To control the stepper motors for the machine’s three axes, Miranda’s design calls for an Arduino Uno board paired with a Grbl-compatible CNC shield. It will accept g-code commands from a connected computer via the Serial port and will coordinate the movement of the motors. This mill uses a handheld Makita router for the spindle motor, so there is no need for spindle control provisions.
This machine will easily cut wood and can also handle soft metals, such as aluminum. That capability can do a lot to extend a maker’s fabrication abilities.
Usually when we use the term “solar power,” we are referring to indirect energy use: photovoltaic solar panels collect energy from the sun and then either pass it along to a device or store it for later use. But some systems can use power from the sun in a more direct manner. If you’ve ever used a magnifying glass to set fire to a twig, you were using solar power directly. YouTuber Cranktown City pushed that concept further and created an Arduino-controlled CNC engraver that takes advantage of solar power.
This machine doesn’t use energy from the sun to run the gantry motors or even the Arduino Uno board. Instead, it uses the sun and a glass lens in place of a conventional laser. Laser engravers are expensive because of the laser tubes, optics, and power supply. By replacing all of those with the sun and cheap lens, Cranktown City was able to engrave wood by burning it while saving a lot of money. He just needed a way to harness the sun’s energy and direct it with moderate precision.
As with a standard laser engraver, the focused beam of light from the sun needed to move in two axes relative to the workpiece. Cranktown City chose to move the workpiece itself, so he wouldn’t need to worry about losing focus with the sun. For that, he used his own custom CNC controller and motors on a welded steel frame. To keep the sun in focus and perpendicular to the workpiece, he used an Uno and four photoresistors.
The photoresistors sit in a + shaped shroud for isolation from each other. The Arduino takes readings from each to determine which receives the strongest light and which receives the weakest light. Based on those readings, it uses a pair of motors (driven through custom relay-based H-bridges) to reorient the entire machine and track the sun. This way, the machine always remains perpendicular to the sun’s rays in order to maximize the engraving power. As you can see in the video, it is slow but quite effective.
CNC (Computer Numerical Control) mills, routers, and lathes are indispensable manufacturing tools. If you need a part that adheres to tight tolerances, you turn to a CNC machine. Industrial CNC equipment is usually large, heavy, and very expensive. But small models exist for light-duty hobby jobs. This DIY version designed by Brian Brocken stands out because it is huge, has five axes, and is 3D-printable.
The most basic CNC mills and routers have three axes, so they move in the X, Y, and Z directions. But additional axes help a machine perform more complex operations. A fourth axis most often rotates the work piece, while a fifth axis tilts the spindle that rotates the end mill. It is rare to see a DIY CNC machine with five axes, but Brocken pulled it off with this project that has a massive work area of one square meter.
Brocken performed all the design work within Autodesk Fusion 360. The frame of the machine is aluminum tubing and 3D-printed parts. An Arduino Mega controls the stepper motors through a RAMPS 1.4 board. It accepts standard G-code, so Brocken can create toolpaths in Fusion 360 or other CAM (Computer-Aided Manufacturing) software. The frame lacks rigidity and there is no way it could handle milling aluminum or even wood. But it can mill foam, which is the intended purpose. It can also perform 3D printing and laser cutting. Brocken isn’t quite finished building his CNC machine, but it is already semi-operational.
The P-CNC Plotter is a DIY drawing machine ‘disguised as a quadruped robot’
Arduino Team — July 27th, 2021
In their quest to create a portable CNC plotter, Instructables user tuenhidiy combined several PVC pieces with a couple of motors to build the P-CNC Plotter. The small machine — which was designed to resemble a quadruped robot — features an Arduino Uno and a Gbrl control shield at its heart that takes incoming G-code and translates it into motor movements. The X axis consists of a single NEMA-17 stepper motor that actuates a threaded rod to slide the rest of the device along a path.
There is a central PVC assembly that holds both the threaded and smooth rods for both the X and Y axes while letting the entire thing move. Tuenhidiy was able to repurpose the linear gliding mechanism from a CD player as the Z axis, thus letting the pen or other drawing utensil go up and down with great precision. A set of three A4988 stepper motor driver modules provide the current to both the NEMA 17 motors and CD drive components.
Images are drawn within the vector-based program Inkscape, and they normally include text, basic shapes, and splines that the toolhead can follow. G-code was exported from Inkscape by using an extension, and this could then be sent to the Gbrl-enabled Arduino. To read more about this project, you can check out tuenhidiy’s write-up here.
This may be one of the cheapest and easiest CNC drawing machines you’ll find
Arduino Team — July 15th, 2021
CNC plotters are a lot of fun to build and use, as they teach mechanics, electronics, and how G-code works. However, traditional Cartesian machines often require expensive components such as linear rods and ample amounts of bearings to move in just two axes. YouTuber DAZ Projects set out to change that by assembling a form of a Polargraph to draw pictures with great detail. The idea is simple: use a pair of stepper motors to alter the length of a string on two sides that controls where the toolhead goes.
He started by 3D printing stepper motor mounts, a few pulleys for the string to wrap around, and the pen holding/lifting mechanism. Both 5V stepper motors plug into a generic Grbl CNC shield and are driven by a couple of A4988 modules. The servo is powered directly by an Arduino Uno, and its job is to adjust the pressure the pen applies to the page to define how dark the lines are.
Once the custom firmware written by the Polargraph’s creator, Sandy Noble, was flashed to the Uno, DAZ connected it to his computer which was running the Polargraph control software. In here, the program takes an image and outputs a series of toolpaths for the Uno to convert to motor movements. You can see how DAZ constructed and used the device below, as well as the find the code on GitHub and 3D design files on Thingiverse.
We’ve seen a number of homemade CNC machines throughout the years, but Tuenhidiy’s build — made from some discarded materials — is no less impressive. This unique CNC plotter features a frame cleverly constructed out of two wooden wine boxes, which appear to be the perfect size with space for an Y-axis bed and an upright structure that actuates X movements. For the Z component, a pen is lifted using parts from a recycled CD player drive.
Electronics-wise, the project is also quite interesting as it employs servos rather than steppers for its X and Y axes. Actuation is handled by an Arduino Uno with pre-installed GRBL firmware and a CNC shield, which sends commands to an Arduino Mega running custom firmware. The Mega — plus a custom adapter board and an L293D shield — takes care of PID control for the motors.
More details on the machine can be found in Tuenhidiy’s write-up, and you can see it demonstrated in the video below.
Draw on bottles using a CNC plotter made from old printer rollers and other scraps
Arduino Team — November 12th, 2020
To label used bottles that would otherwise go to waste, “tuenhidiy” created a CNC plotter that itself consists mostly of scraps!
The machine’s X and Z axes are formed out of a pair of old CD/DVD players, but instead of a traditional Y axis, it actuates two printer rollers to turn a bottle forwards or backwards. This allows the marking pen to be placed in just the right axial position, while still being very similar to a fully Cartesian (XYZ) plotter controls-wise.
Everything is powered by GRBL running on an Arduino Uno, which interfaces with its four steppers via a CNC shield and A4988 driver modules. Build info is available in tuenhidiy’s write-up, and you also check it out in the video below.
When working with Styrofoam, a conventional CNC machine like a router or laser cutter just won’t do. However, as shown in Michael Rechtin’s excellent video below, a hot wire can carve foam like butter, creating custom wings for RC aircraft or whatever else you can dream up.
Rechtin’s build uses a double gantry system to pull the wire in a horizontal and vertical directions. As each is mechanically independent of the other, they can move in tandem, or in a skewed orientation for cutting across both the horizontal and vertical planes.
Control is via an Arduino Mega running Grbl, with a RAMPS 1.4 shield.
Carve 2.5D shapes out of foam with this Arduino-controlled hot wire cutter
Arduino Team — February 8th, 2020
You may have a 3D printer or other “digital” tools like a laser engraver or CNC router, but what if you want to work with Styrofoam? As How To Mechatronics demonstrates in his latest project, many of the same techniques used there can be implemented to make your own Arduino-powered hot wire cutter.
This build is constructed with 20x20mm aluminum extrusion and 3D-printed parts, and uses an Uno board and CNC shield to drive three stepper motors. Two of these motors manipulate the wire in the horizontal and vertical directions, while the third controls a turntable that rotates the foam as needed.
As seen in the video below, it’s a brilliant design. Written instructions can be found in How To Mechatronics’ blog post, which walks you through the entire process from assembling the machine and connecting its components to preparing shapes and generate the G-code.
Pen plotter? Laser engraver? This DIY machine gives you both!
Arduino Team — October 30th, 2019
If you find yourself debating between a pen plotter or laser engraver, this project by Patrick Panikulam lets you have the best of both worlds in style. The DIY device pulls a writing instrument in the X-axis using a belt-driven overhead system, while the base itself moves in the Y direction.
Motion is handled by an Arduino Uno, along with a CNC shield and two A4988 drivers that actuate modified 28BYJ-48 steppers. The shield also outputs laser control signals, which are converted into PWM signals for the lifting servo when in pen mode.
It’s an extremely clean build, and even features a Bluetooth module for wireless communication with your computer. Panikulam provides more details here if you’d like to create your own!
A couple of months back while checking out a few laser engravers on aliexpress, I came across some USB powered laser engravers. It was awesome that these could engrave on a variety of materials and also cut out shapes and designs from sticker sheets and paper and doing all this powered by a 5V USB supply. But the downside of these engravers was that they had a small work area, in most cases just 40mm X 40mm which is definitely way too small for my needs.
So I thought why not design and 3D print my own laser engraver from scratch. I started the designing process in Fusion 360 while keeping in mind all the 3D printing tolerances. And finally came up with something really cool. Along the way, I decided to make the laser holder modular so that I can easily replace the laser with a pen or marker for pen plotting. I also added a Bluetooth connectivity feature so that wired connection between your PC and the engraver can be eliminated while transmitting G-codes.
While computer printers are readily available, if you’d like a plotting device that drags a pen, marker, or whatever you need across paper to create images, your options are more limited. To fill this gap, studioprogettiperduti has come up with the d.i.d, or Deep Ink Diver.
This scalable pen plotter uses a frame made out of 3D-printed parts, as well as aluminum extrusion, which could be lengthened to support the size of paper that you need. A timing belt pulls the writing carriage back and forth, while a roller advances the paper.
Control is handled by an Arduino Uno and a CNC shield, with a version of grbl that accommodates a servo used to lift the pen.
The materials and electronics used for the plotter are all standard and easy to source. The main frame is made of aluminum extrusion and 3D-printed connections. The motors are all standard NEMA 17 stepper motors and a single SG-90 servo motor. Everything is driven by a cheap Arduino Uno control board that handles the transition from g-code to movement. Furthermore, the software used to create G-code, Inkscape, is open source as well.
Makerspace i3Detroit was the recent recipient of a free yet non-functioning CNC router. While out of commission when received, the device’s mechanical components and motors appeared to be in operational condition, plus it had a large work surface. The decision was made to get the CNC up and running for now, with the eventual goal of turning it into a plasma cutter.
First, they booted up its (Windows 95) computer and replaced a power supply on the controller. An adapter board for the controller was then built using info from this Arduino Forum post, allowing the router to be controlled with an Arduino Mega running grbl firmware.
Although there is still some work to do, it can be seen happily jogging along in the video below, and appears well on its way to becoming a usable machine!
In order to produce the proper paint strokes, his device implements full six-axis brush control, moving not only in the X/Y/Z coordinate system, but rotating on three axes. Movement is handled by a modified version of Grbl running on an Arduino Mega.
If Then Paint also features the ability to change painting/art tools automatically, as well as a clever paint management system that turns a carousel of paint syringes.
More info on the build can be found here, and check out a few examples of how it works in the videos below.
Jiri Praus enjoys using brass wire for his freeform sculptures, but isn’t a fan of making the same bends over again. To solve this problem, he designed a CNC machine to handle that task for him.
His device features a series of rollers to straighten out the wire, with a servo-driven puller that utilizes a roller normally used with a welding machine. A second servo then precisely bends the wire into shape, creating squares, hexagons and even springs under the control of an Arduino/CNC shield.
You can see the project in action in the videos below, and if you want to build your own, the STL files for this mostly 3D-printed setup are up on GitHub.
Facere-Bot is a portable machine that draws iconic photos
Arduino Team — July 10th, 2019
Inventor Artist Darcy Whyte wanted a drawing robot that was light enough to carry around, and could quickly produce drawings. Naturally, he turned to an Arduino Uno, along with a CNC shield and a trio of A4988 stepper drivers. These control a NEMA 8 and two NEMA17 stepper motors in a gantry-style artistic setup.
The build is able to drag a marker across a page, apparently varying pressure applied with the z-axis, and thus how much ink is applied. In another mode, a pen can be used, which wobbles back and forth to create volume when needed.
Both methods, as seen in the clips below, can sketch a very recognizable—though certainly distinct—portrait of Marilyn Monroe, or presumably whatever other image you choose to program in.
If you’ve been waiting for a new way to generate geometric art, then be sure to check out the Cycloid-O-Matic from InventorArtist Darcy Whyte.
This three-axis cycloid drawing machine is something of an update on the classic spirograph toy, but instead of (only) using an arrangement of gears, it incorporates stepper motors to create smooth curving patterns.
Control is accomplished via an Arduino Uno and GRBL shield, while a single motor rotates the paper in a circle on top of a lazy Susan. A pen is held above in a linkage system, actuated by two steppers that spin to move the linkages and draw in the X/Y plane.
Arduino boards running GRBL software have long been used for CNC machine control, but usually you need to choose between having a router or laser cutter. This project, however, is specifically designed to accommodate both with a modular carriage system.
Build-wise, it’s a fairly standard XYZ gantry CNC — with a frame made out of V-slot aluminum extrusions from OpenBuilds cut to length by a circular saw. The X and Y axes are controlled via NEMA 17 stepper motor and belt drive assemblies, while height adjustment is accomplished with a NEMA 23 motor and screw drive.
The electronics are all hidden away in a separate enclosure, including the Arduino Uno/CNC shield that serves as the brains of the operation and a cooling fan to keep the temperature inside in check.
If you’ve been considering doing this type of build, this looks like a great place to start, and you can see a demos of it in laser and spindle modes in the videos below.
For an easy plotter design that you can build with only simple hand tools, be sure to check out this tiny project from Mr Innovative. The machine features a pair of stepper and lead screw assemblies to maneuver a pen in an X/Y plane, along with a clever string and servo setup to handle retraction.
An Arduino Nano and two L293D ICs mounted to a custom PCB are used to control the device, though a breadboard could certainly substitute for the PCB in a pinch. Drawings are translated into the proper format via Inkscape and Processing.
Even if you don’t have access to fancy tools like a 3D printer or CNC router, that doesn’t mean you can’t make something interesting. James, using only a “hot glue gun, some scissors, and a screwdriver,” was able to construct a rudimentary drawing robot that marks paper with a sharpie.
Two CD drives were creatively modified to form X, Y, and Z axes, letting him lower his writing instrument and draw. An Arduino Uno along with an Adafruit Motor Shield forms the controls for the device, and the structure is built out of LEGO bricks.
As of now it’s described as more of an “Etch A Sketch type thing,” but it looks like a great starting point for more advanced drawbots in the future! Code for the build is available on GitHub.
The California-based company 3D Hybrid Solutions is offering three metal 3D printing tools for CNC machines, including Wire-Arc Additive Manufacturing (WAAM), Laser Metal Deposition (LMD), and Cold Spray toolheads.
Ever since 3D printing emerged onto the manufacturing scene, many have debated whether or not the technology could eventually displace CNC milling as the king of the production floor. As time has transpired, it’s become clear that these dueling manufacturing methods are at their best when used together. In fact, there are a number of hybrid machines that utilize both subtractive and additive manufacturing technologies.
The Los Angeles-based manufacturing company 3D Hybrid Solutions has recently unveiled three new metal 3D printing tools for CNC machines.
After experimenting with polymetallic alloy additive manufacturing for aerospace and research applications, the company decided to develop 3D printing tools based on electrical, optical, and kinetic energy. The trio of toolheads, which includes Wire-Arc Additive Manufacturing, Laser Metal Deposition, and Cold Spray, are compatible with almost any CNC machine.
3D Hybrid Solutions has designed these complementary tools to lower the barrier of entry into metal additive manufacturing. The three different methods aim to optimize the functionality of current machines with increased speed and multi-material capabilities. The price of these metal 3D printing toolheads start at $50,000.
3D Hybrid Solutions Adds Three Toolheads for CNC Machines
Each of these metal additive manufacturing tools offer a unique approach to hybrid manufacturing. Wire-Arc Additive Manufacturing uses a complex electrical discharge technology that is compatible with a wide variety of feed-stock alloys. This tool uses a patent pending co-deposition system that prints with both wire feed and metal powder.
The patent pending co-deposition system in the Wire-Arc Additive Manufacturing toolhead
The Laser Metal Deposition tool is equipped with a laser beam energy source and a powder-gas spray nozzle. The laser is used to melt the substrate, while the powder converges into the beam and melt pool. The deposit material is then metallurgically bonded and layered to form metal 3D printed objects.
Laser Metal Deposition process in action
Lastly, the Cold Spray tool is fast-paced technique ideal for large scale metal 3D printing. As 3D Hybrid Solutions explains on its website, this technique “uses solid metal powders that are accelerated in a gas to supersonic speeds around 1600-3500 feet/second”. After incurring impact, these substrate particles deform and combine with the substrate as the toolhead moves above the surface.
The Cold Spray toolhead
3D Hybrid Solutions is aiming to amalgamate metal 3D printing into CNC machines. By doing so, the company is expanding manufacturing beyond a single technology. In a market where both versatility and affordability are major keys to success, 3D Hybrid Solutions is giving customers more opportunities to innovate with both additive and subtractive manufacturing at the same time.
Um dir ein optimales Erlebnis zu bieten, verwenden wir Technologien wie Cookies, um Geräteinformationen zu speichern und/oder darauf zuzugreifen. Wenn du diesen Technologien zustimmst, können wir Daten wie das Surfverhalten oder eindeutige IDs auf dieser Website verarbeiten. Wenn du deine Einwillligung nicht erteilst oder zurückziehst, können bestimmte Merkmale und Funktionen beeinträchtigt werden.
Funktional
Immer aktiv
Die technische Speicherung oder der Zugang ist unbedingt erforderlich für den rechtmäßigen Zweck, die Nutzung eines bestimmten Dienstes zu ermöglichen, der vom Teilnehmer oder Nutzer ausdrücklich gewünscht wird, oder für den alleinigen Zweck, die Übertragung einer Nachricht über ein elektronisches Kommunikationsnetz durchzuführen.
Vorlieben
Die technische Speicherung oder der Zugriff ist für den rechtmäßigen Zweck der Speicherung von Präferenzen erforderlich, die nicht vom Abonnenten oder Benutzer angefordert wurden.
Statistiken
Die technische Speicherung oder der Zugriff, der ausschließlich zu statistischen Zwecken erfolgt.Die technische Speicherung oder der Zugriff, der ausschließlich zu anonymen statistischen Zwecken verwendet wird. Ohne eine Vorladung, die freiwillige Zustimmung deines Internetdienstanbieters oder zusätzliche Aufzeichnungen von Dritten können die zu diesem Zweck gespeicherten oder abgerufenen Informationen allein in der Regel nicht dazu verwendet werden, dich zu identifizieren.
Marketing
Die technische Speicherung oder der Zugriff ist erforderlich, um Nutzerprofile zu erstellen, um Werbung zu versenden oder um den Nutzer auf einer Website oder über mehrere Websites hinweg zu ähnlichen Marketingzwecken zu verfolgen.