Schlagwort: arduino

  • Minimal metal detector made with an Arduino and a coil of wire

    Minimal metal detector made with an Arduino and a coil of wire

    Reading Time: 2 minutes

    Minimal metal detector made with an Arduino and a coil of wire

    Arduino TeamOctober 21st, 2020

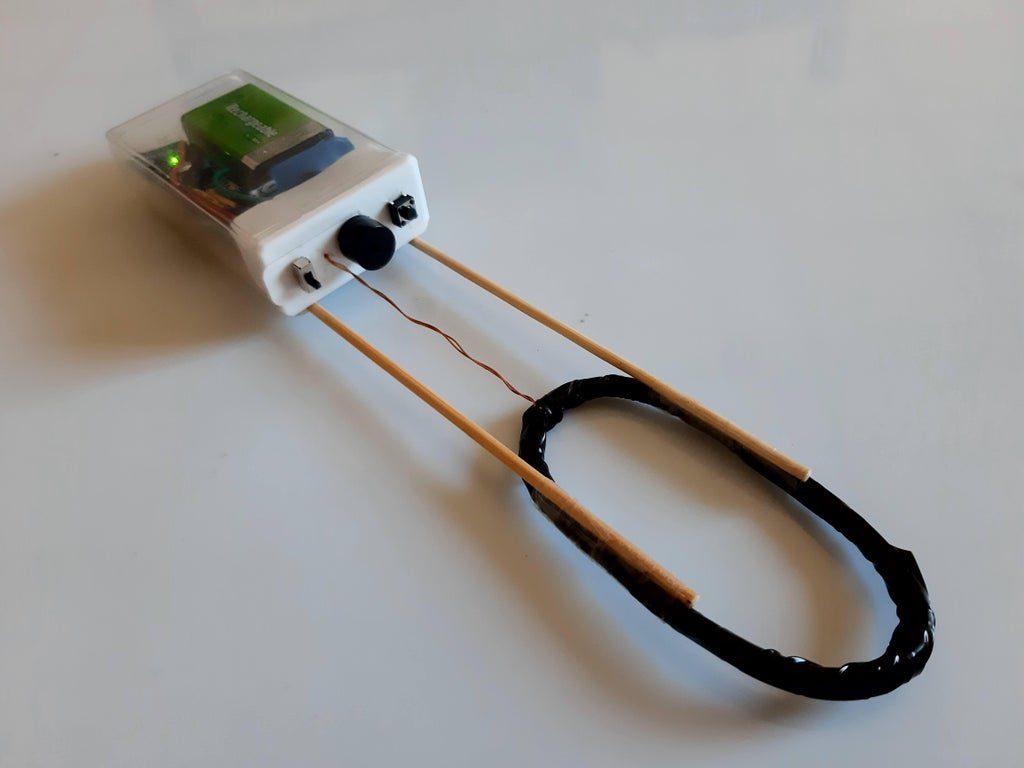
    For an easy DIY metal detector setup, look no further than this project by creator “rgco.” 

    The handheld device uses a 20-60 turn coil of 26AWG enameled wire, connected across an Arduino Uno or Nano’s pins 8 and 10. A series of pulses is continuously sent out by pin 10, which are delayed in reaching pin 8 according to the inductance across the coil. As this coil approaches other metallic objects, the effective inductance changes, thus varying the delay in the signal reaching pin 10.

    This effect is sensed by the Arduino, outputting chirps on a buzzer as audio feedback when metal is nearby. To convert it into a practical device, the Nano configuration is stuffed into a Tic Tac container, with the coil held at a distance with two skewer sticks.

    [youtube https://www.youtube.com/watch?v=QzSXCWkTyAo?feature=oembed&w=500&h=281]

    With an Arduino, 10m of wire and a 100 Ohm resistor you can build a metal detector in 10 minutes! It is based on sound physics and works for a large range of coil sizes and shapes. The sensitivity is not enough for treasure-hunting, but it can be made into a small hand-held device that is very useful indoors to check for the presence of metals. It will help you find nails inside wood or heating pipes in the wall, and to check the composition of tools and furniture. The method can also be used to integrate as a sensor, integrated with more elaborate projects.

    Website: LINK

  • Gigantic pumpkin dispenses candy at the push of a button

    Gigantic pumpkin dispenses candy at the push of a button

    Reading Time: 2 minutes

    Gigantic pumpkin dispenses candy at the push of a button

    Arduino TeamOctober 21st, 2020

    YouTuber Brankly is going to be giving out candy in style this Halloween. Or, more accurately, his automated pumpkin system is going to take care of the task for him.

    His large fake jack-o’-lantern sits atop a hilariously smaller skeleton body, and hides inside a servo-driven turntable dispensing mechanism. As it rotates, treats are pushed out of a tongue-like slide mechanism, where it’s detected by two infrared sensors. This detection stops (and reverses) the dispensing plate, while the bowl in front illuminates.

    Sounds and lighting are recycled from the modified bowl and pumpkin assembly, and LEDs under control of an Arduino Nano are added to a large button box that starts the cycle. Another Nano runs the rest of the setup, along with a stepper driver board and voltage regulator on a custom PCB.

    More build specifics can be found on GitHub.

    [youtube https://www.youtube.com/watch?v=NNeSOPg2tVk?feature=oembed&w=500&h=281]

    Website: LINK

  • S.H.I.E.L.D. yourself from unwanted mic and camera access

    S.H.I.E.L.D. yourself from unwanted mic and camera access

    Reading Time: < 1 minute

    S.H.I.E.L.D. yourself from unwanted mic and camera access

    Arduino TeamOctober 19th, 2020

    If you haven’t heard, a lot of us are working from home these days, making mic and camera discipline more important than ever. To help avoid unwanted recording, Tovi Levis created the S.H.I.E.L.D. device, which stands for Software and Hardware for Invisible Eavesdroppers and Lurkers Detection.

    This amply-named project uses an Arduino Uno to control a pair of WS2812B lights mounted to the top of your computer monitor. Lights shine through acrylic icons of a microphone and camera, with red indicating “on” and green for “off” and safe. There is also a buzzer to note status changes.

    The S.H.I.E.L.D. communicates with the host PC over USB, which runs a companion monitoring app that can be used independently as well. More details are available on GitHub, and a demo/explanation can be seen in Levis’ video below.

    [youtube https://www.youtube.com/watch?v=FTn1oHqCWCM?feature=oembed&w=500&h=281]

    Website: LINK

  • Tell time and temperature with sliding numbers

    Tell time and temperature with sliding numbers

    Reading Time: < 1 minute

    Tell time and temperature with sliding numbers

    Arduino TeamOctober 19th, 2020

    While dial clocks are functional and well-understood, for something a bit more uniquely styled, Luuk Esselbrugge has created a 3D-printed timekeeping unit with four rows of sliding numbers.

    As seen here, each digit moves up and down to show the appropriate hour and minutes under the power of a stepper. A rack system is integrated into the number-slider itself, with a printed driving gear affixed to the small motor. A WS2812B LED shines through the proper number on display, with red representing time and green indicating that it’s instead in temperature mode.

    The device is controlled by an Arduino Nano, with time obtained via a GPS module. More info — including Arduino code, print files, and necessary parts — is available on GitHub.

    Website: LINK

  • Keeping e-scooter riders off sidewalks with Arduino

    Keeping e-scooter riders off sidewalks with Arduino

    Reading Time: 2 minutes

    Keeping e-scooter riders off sidewalks with Arduino

    Arduino TeamOctober 18th, 2020

    Shared electric scooters can be found zooming many city streets, and while convenient, they can also be a nuisance when used on sidewalks instead of roadways. After receiving complaints about sidewalk riding, the city of Santa Monica, California approached the California Polytechnic State University’s Digital Transformation Hub (DxHub) about finding a solution beyond signage and outreach campaigns.

    What they developed, with help from student employee Casey Johnson, is a system to throttle scooters when they are traveling on sidewalks via a solenoid. Initial detection experiments involved a dual-band GPS receiver chipset, but after that proved insufficient, accelerometer readings were then used to sense successive periodic bumps observed in sidewalk riding. A scooter prototype was implemented with an Arduino Nano and cheap IMU module, which provided a high degree of accuracy that could be further refined in the future.

    More details on the DxHub team’s project can be found here.

    Website: LINK

  • This LED coffee table reacts to whatever’s on top

    This LED coffee table reacts to whatever’s on top

    Reading Time: 2 minutes

    This LED coffee table reacts to whatever’s on top

    Arduino TeamOctober 16th, 2020

    The YouTube team “Ty and Gig Builds” recently decided to make their coffee table a little more interesting, adding a chain of 96 addressable LEDs underneath its clear surface. This would have been neat enough by itself, but their project doesn’t just stop there and instead embeds 154 IR emitters and 154 IR receivers, allowing it to react to what’s on top. Beyond that, it’s able to display animations without using the sensors for a mesmerizing effect.

    The setup, as you might imagine, required a lot of wiring along with custom shift register and multiplexer boards to accommodate its vast I/O needs. These discrete I/O are eventually funneled down to an Arduino Mega for control, creating a one-of-a-kind table that should make for a great conversation piece while holding coffee and other knickknacks.

    [youtube https://www.youtube.com/watch?v=Dv_N8dXmnL0?feature=oembed&w=500&h=281]

    Website: LINK

  • Woven fabric becomes on-skin wearable interface

    Woven fabric becomes on-skin wearable interface

    Reading Time: 2 minutes

    Woven fabric becomes on-skin wearable interface

    Arduino TeamOctober 14th, 2020

    Researchers at Cornell University’s Hybrid Body Lab have been pursuing a novel woven interface that attaches to the user’s skin. Their aptly named WovenSkin integrates electronics into a fabric pattern, including capacitive sensing materials, shape-memory alloys (SMAs), and thermochromic materials to allow for both input and output functionality.

    The “second skin” is connected to Arduino Mini, small LiPo battery, and a capacitive touch controller, enabling it to perform tasks such as transforming the woven output from a visible “8” to “9” after being touched just after 0:40 in the video below. Bluetooth can also be implemented for phone or laptop interactions.

    The Hybrid Body Lab team’s full research paper is available here if you’d like to delve deeper into the WovenSkin project.

    Weaving as a craft possesses the structural, textural, aesthetic, and cultural expressiveness for creating a diversity of soft, wearable forms that are capable of technological integration. In this project, we extend the woven practice for crafting on-skin interfaces, exploring the potential to “weave a second skin.” Weaving incorporates circuitry in the textile structure, which, when extended to on-skin interface fabrication, allows for electrical connections between layers while maintaining a slim form. Weaving also supports multi-materials integration in the structure itself, offering richer materiality for on-skin devices. We present the results of extensive design experiments that form a design space for adapting weaving for on-skin interface fabrication. We introduce a fabrication approach leveraging the skin-friendly material of PVA, which enables on-skin adherence, and a series of case studies illustrating the functional and design potential of the approach. To understand the feasibility of on-skin wear, we conducted a user study on device wearability. To understand the expressiveness of the design space, we conducted a workshop study in which textiles practitioners created woven on-skin interfaces. We draw insights from this to understand the potential of adapting weaving for crafting on-skin interfaces.

    Images: Hybrid Body Lab (CC BY-NC-SA 4.0)

    Website: LINK

  • This bike blinks brightly to the beat!

    This bike blinks brightly to the beat!

    Reading Time: 2 minutes

    This bike blinks brightly to the beat!

    Arduino TeamOctober 14th, 2020

    Natasha (AKA TechnoChic) is a member of a bicycle club that goes for rides at night during the summer, and while off-the-shelf lights are fine, she wanted something a bit more interesting. To accomplish this, while learning more about the technologies involved, she decided to equip her bike with an array of addressable LEDs.

    The bike frame’s NeoPixels run on an Arduino Nano 33 IoT, which is connected to a boombox via a 3.5mm jack that enables the LEDs to react to the music. Two other Nano 33 IoT boards are used to drive the lights on each of the wheels, with the eventual goal of linking them wirelessly for central control. The system is powered by a 10,000mAh battery pack along with a pair of 2000mAh LiPos for the wheels to keep things glowing for several hours.

    More details on the project are available in TechnoChic’s tutorial here.

    [youtube https://www.youtube.com/watch?v=Pj4wwsllfUU?feature=oembed&w=500&h=281]

    Website: LINK

  • This mechanical clock tells time using steel balls

    This mechanical clock tells time using steel balls

    Reading Time: 2 minutes

    This mechanical clock tells time using steel balls

    Arduino TeamOctober 11th, 2020

    There’s certainly no shortage of DIY clocks in the Arduino community; however, Eric Nguyen has come up with a rather unique way of showing hours and minutes: steel balls arranged as seven-segment displays.

    For each time change, the face rotates down and a tray of arranged balls is lifted up to meet it via a servo motor assembly. Inside, a series of 28 servos capture and release the balls using magnet and linkage systems, plus another for the colon.

    The device is powered by a Nano along with an RTC module for accurate timekeeping, and two PCA9685 driver boards control the motors directly.

    As illustrated in the videos below, it’s an incredible build from a mechanical standpoint. Making it even more impressive, this is actually Nguyen’s first Arduino project!

    [youtube https://www.youtube.com/watch?v=mdI39l8DD80?feature=oembed&w=500&h=375]

    [youtube https://www.youtube.com/watch?v=YSdPB8y8CCI?feature=oembed&w=500&h=375]

    Website: LINK

  • DIY quadruped robot brought to life for under $60

    DIY quadruped robot brought to life for under $60

    Reading Time: 2 minutes

    DIY quadruped robot brought to life for under $60

    Arduino TeamOctober 10th, 2020

    Animals like dogs, cats, raccoons, rhinoceroses, and many more get around on four legs. To help imitate this natural phenomenon, maker “Technovation” decided to create a low-cost quadruped robot using 12 servo motors and a variety of 3D-printed and laser-cut parts.

    Each leg features two servos that move inline with the body, as well as one arranged with its rotation axis at 90 degrees. This enables it to walk forward, scoot side-to-side, and perform a variety of twisting motions.

    The robot is powered by an Arduino Uno, along with a sensor shield for easy motor connections. Inverse kinematics can be used to properly calculate servo moves, which is integrated into the device’s control sketch.

    Check it out in action in the video below, and specifics are available in Technovation’s write-up.

    [youtube https://www.youtube.com/watch?v=AoXK8bL9ubc?feature=oembed&w=500&h=281]

    Website: LINK

  • Building a cheap and easy nanosheet machine

    Building a cheap and easy nanosheet machine

    Reading Time: < 1 minute

    Building a cheap and easy nanosheet machine

    Arduino TeamOctober 9th, 2020

    Chemist Biljana Mojsoska at Roskilde University in Denmark has been working on nanosheets, an anti-bacterial coating for medical surfaces. During her research, a piece of expensive equipment failed, causing Jakub Klust and Bo Thorning at FabLab RUC to attempt to replace the machine with rapid prototyping techniques.

    What they came up with turns sample vials using a servo motor, controlled by an Arduino Uno. Buttons and an encoder form the user interface, with a small display for feedback. Mojsoska’s research involves rotating vials of the coating for days at a time, so the unit must be reliable, and gear reduction on the servo is implemented to prevent excessive vibration throughout the process.

    You can read more about the project in FabLab RUC’s blog post, while design specifics are available on GitHub.

    Website: LINK

  • Light painting with a gesture-controlled drone

    Light painting with a gesture-controlled drone

    Reading Time: < 1 minute

    Light painting with a gesture-controlled drone

    Arduino TeamOctober 9th, 2020

    Researchers at the Skolkovo Institute of Science and Technology (Skoltech) in Moscow, Russia have come up with a novel way to interface with a drone via hand movements.

    As shown in the video below, the device can be used to create long-exposure light art, though the possibilities for such an intuitive control system could extend to many other applications as well.

    In this setup, a small Crazieflie 2.0 quadcopter is operated by a glove-like wearable featuring an Arduino Uno, along with an IMU and flex sensor for user input, and an XBee module for wireless communication. The controller connects to a base station running a machine learning algorithm that matches the user’s gestures to pre-defined letters or pattern, and directs the drone to light paint them. 

    [youtube https://www.youtube.com/watch?v=SdnIqLjtGeU?feature=oembed&w=500&h=281]

    The team’s full research paper is available here.

    Website: LINK

  • Upgrading an inexpensive exercise bike with a Nano 33 BLE Sense

    Upgrading an inexpensive exercise bike with a Nano 33 BLE Sense

    Reading Time: < 1 minute

    Upgrading an inexpensive exercise bike with a Nano 33 BLE Sense

    Arduino TeamOctober 8th, 2020

    After purchasing a basic foldable exercise bike, Thomas Schucker wondered if he could get a bit more out of it, perhaps even using it with virtual riding apps like Zwift and RGT. By default, this piece of equipment is set up to output cadence info via a simple headphone jack, using a demagnetized portion of the flywheel for sensing.

    Taking this a step further, Schucker found that the magnetic field amplitude actually changes with the resistance input, allowing him to correlate the two with an analog sensor built into the Arduino Nano 33 BLE Sense.

    The Nano is attached near the flywheel, and sends data over BLE, enabling him to use this rather cheap indoor bike in a much more involved way than it was likely ever intended. Code for the project is available on GitHub, while a demo of it controlling Zwift can be seen in the video below.

    Website: LINK

  • How can we help? New Help Center makes it easier than ever to enjoy Arduino

    How can we help? New Help Center makes it easier than ever to enjoy Arduino

    Reading Time: 3 minutes

    How can we help? New Help Center makes it easier than ever to enjoy Arduino

    Arduino TeamOctober 8th, 2020

    The Arduino customer support team is excited to announce the final release of the Arduino Help Center. A place where you can find answers to your questions and lots of useful troubleshooting articles to help you enjoy and get the most out of the Arduino experience.  

    With the active Arduino community finding ever more creative ways to use an Arduino, building a purposeful help center with customers at heart has been a challenge that we enjoyed taking. The design, development and customer support teams have been studying all the different contact points in our ecosystem to gather more information and insights on how users interact with Arduino; providing a solid foundation to build a Help Center with useful sections and friendly navigation.

    One primary aim of putting together the Help Center was to specifically make it easier for new Arduino users to access all the information that can help them to get the most out of their Arduino experience. This new solution expands the channels we use to support our customers, and rest assured we are still here to help if you can’t find the answer you’re looking for — plus there is the Arduino forum with millions of community members out there willing to share their tips. Given the constantly active nature of the Arduino community, we will continue to add new articles on a monthly basis with the most topical and useful solutions.

    How to use the new Arduino Help Center

    The Arduino Help Center is always available — simply click ‘Help’ in the bottom right of your screen.

    Once there you will find 4 main sections:

    • Search bar: The search will immediately find any relevant article within the Help Center. For instance, if you are looking for information about the ‘MKR NB 1500’,  simply type the name of the board and you will have access to all the available articles for this board.
    • Articles: For each of navigation the articles have divided into 6 categories:
      • Hardware Products: boards and shields (by family)
      • Software: IDE and Libraries. 
      • Arduino Create Apps: Web editor, Arduino IoT cloud, Arduino Sim card and linux devices.
      • Education: All our educational offers.
      • Store Support: orders, shipping and payments.
      • About Arduino:  Using your Arduino account, Arduino logos and trademark.
    • Tutorials: Useful tutorials including ‘getting started’ and examples to explore.
    • Additional support: Other ways to interact with the Arduino Customer support and the Arduino Community  (The Arduino Forum, our contact us forms and our discord server).

    What is next?

    Our customers and community are fundamental for our evolution and the Help Center is just the first move towards a better customer experience. Therefore we want to hear from all of you and for now we want to understand how relevant is every article and if it helped you solve your question. Just by answering the questions at the end of the article, it helps us to produce better and more accurate explanations. Also, don’t hesitate on suggesting new articles or fixes through our contact us form. 

    Website: LINK

  • The Pixel Mask animates mouth movements for fun yet safe trick-or-treating

    The Pixel Mask animates mouth movements for fun yet safe trick-or-treating

    Reading Time: 2 minutes

    The Pixel Mask animates mouth movements for fun yet safe trick-or-treating

    Arduino TeamOctober 7th, 2020

    While trick-or-treating may or may not be in effect this Halloween, if you’re planning to participate, a mask could be a good idea. To help add some “expression” to your COVID-19 facial covering, BuildXYZ has come up with the Pixel Mask — capable of showing fangs and other graphics on an 128×64 OLED screen to match any costume.

    But that’s not all. The device is equipped with an Arduino Nano and microphone that senses sound levels and then animates a mouth on the front display to mimic a wearer’s mouth movements. There’s even a button to activate a special “Trick or Treat” message.

    The build can be equipped with N95 filter material, and is powered by a portable USB pack. Print files are available on Thingiverse and code is on GitHub if you’d like to construct your own.

    [youtube https://www.youtube.com/watch?v=XleVUkH1xlI?feature=oembed&w=500&h=281]

    Website: LINK

  • This Arduino-powered clock tells time in colors

    This Arduino-powered clock tells time in colors

    Reading Time: 2 minutes

    This Arduino-powered clock tells time in colors

    Arduino TeamOctober 7th, 2020

    As humans, we’ve divided time up into 24 hours per day, 60 minutes per hour, and 60 seconds per minute. With many of us now working from home on differing schedules, time may seem a bit less concrete than before, like something that fades from one part of the day to another.

    To express this new reality, e14 Presents’ Matt Eargle has constructed a clock that cycles through “every” color in the rainbow, subbing in a scaled version of the HH:MM:SS time value for RGB values on a 5” LCD TFT display.

    The build is powered by an Arduino Uno with an RTC module for accurate timekeeping. The resulting color panel is quite interesting, if not so useful for, say, catching a train. If you do need to be punctual for something, the actual digits are shown along the side, so it should still be usable when things are (hopefully) a bit more normal.

    [youtube https://www.youtube.com/watch?v=jtvV1r_LD4U?feature=oembed&w=500&h=281]

    In the socially-distanced, work-from-home apocalypse of Southern California, clocks have become obsolete as time has become essentially meaningless. After months of no longer using an alarm clock, Matt has missed the simple act of checking the time — even for curiosity’s sake — and decides to build a clock that measures the passage of time in a completely novel way: by converting hours, minutes, and seconds into hexadecimal values and displaying the relative color value associated with that time. It’s certainly not the most practical chronometer in the world, but this hexadecimal color code clock proves that form doesn’t always have to follow function!

    Website: LINK

  • Embedded machine vision goes pro with the new Portenta Vision Shield

    Embedded machine vision goes pro with the new Portenta Vision Shield

    Reading Time: 3 minutes

    Embedded machine vision goes pro with the new Portenta Vision Shield

    Arduino TeamOctober 6th, 2020

    [youtube https://www.youtube.com/watch?v=RGLlcgOFx6U?feature=oembed&w=500&h=281]

    We’re excited to announce the launch of the Arduino Portenta Vision Shield, a production-ready expansion for the powerful Arduino Portenta H7 that adds a low-power camera, two microphones, and connectivity — everything you need for the rapid creation of edge ML applications.

    Always-on machine vision

    The Portenta Vision Shield comes with an ultra-low-power Himax camera. The camera module autonomously detects motion while the Portenta H7 is in stand-by — only waking up the microcontroller when needed.

    Voice and audio event recognition

    The Portenta Vision Shield features two ultra-compact and omnidirectional MP34DT06JTR microphones, bringing voice recognition and audio event detection. Both the video and audio data can be stored on an SD card, and transmitted through Ethernet or LoRa® modules (plus option of the WiFi or BLE on the Portenta H7 module).

    Additional LoRa® or Ethernet connectivity

    The powerful Arduino Portenta H7 makes machine possible learning on-device — greatly reducing the communication bandwidth requirement in an IoT application. The LoRa® module option is specifically designed for edge ML applications, enabling low-power, long distance communication over LoRa® wireless protocol and LoRaWAN networks. 

    The Ethernet version is perfect for all those wired applications that need high bandwidth data transfer speed. 

    (N.B. The LoRa® and Ethernet connectivity options on the Portenta Vision Shield are in addition to the existing WiFi and BLE connectivity provided by the Portenta H7 module.)

    Embedded computer vision made easy

    In tandem with the launch of the Portenta Vision Shield Arduino has teamed up with OpenMV to make their IDE  fully compatible with the Portenta. The OpenMV IDE provides an easy way into computer vision using MicroPython as a programming paradigm. There are an abundance of AI/machine learning algorithms available straight ‘out of the box’ providing a user experience we are sure you will appreciate.

    Download the free license to OpenMV for Arduino Editor and browse through the examples we have prepared for you to try out embedded machine vision with your new Portenta Vision Shield.

    Embedded machine learning will transform industries. The Portenta Vision Shield is now the fastest way to go from concept to deployment of low-power machine vision and audio applications delivering certified, production-ready hardware with support from easy-to-use ML software frameworks,” says Andrea Richetta, Arduino Pro BU leader. 

    The Ethernet version of the Arduino Portenta Vision Shield is now available for pre-order on the Arduino Store, while the LoRa® version will be in stock by the end of this year.

    Website: LINK

  • Microphone open/mute control with repurposed racing pedals

    Microphone open/mute control with repurposed racing pedals

    Reading Time: < 1 minute

    Microphone open/mute control with repurposed racing pedals

    Arduino TeamOctober 6th, 2020

    Ribeiro de Azeredo, like many of us, has been working from home as of late. Also like many of us, he has a child around the house, which isn’t always conducive to online meetings. To help with this, he built a foot-based microphone switcher using the pedals off of an old racing controller.

    Pedal inputs are simply a pair of variable resistors, so he created a voltage divider for each one, reading the resulting analog output with an Arduino Nano.

    Data is then passed along to his Linux computer, which mutes or opens the mic on (foot) command. Additionally, he set up an onscreen mic status indicator using Polybar, ensuring that his audio doesn’t get unintentionally sent out!

    Website: LINK

  • Solar Scare Mosquito 2.0 detects and destroys potential disease-carrying insects

    Solar Scare Mosquito 2.0 detects and destroys potential disease-carrying insects

    Reading Time: 2 minutes

    Solar Scare Mosquito 2.0 detects and destroys potential disease-carrying insects

    Arduino TeamOctober 2nd, 2020

    Not only are mosquitoes extremely annoying, they can also carry deadly diseases like malaria, yellow fever, dengue, and the Zika virus. In order to prevent epidemics, Pranav Agarwal has developed the Solar Scare Mosquito — a solar-powered repellent device that allows the insects to lay their larvae at dusk and dawn, then produces intermittent ripples during the day to prevent the offspring from breathing at the surface of standing water.

    A finalist in this year’s Hackaday Prize, Agarwal is currently developing the second version of the platform that will be able to sense mosquito presence via a built-in microphone, and even help determine the sex and type of the pest by its wingbeat frequency.

    An Arduino MKR GSM 14000 controls the Solar Square Mosquito and provides IoT communication capabilities, with the goal of alerting affected populations to potential outbreaks using a smartphone app.

    [youtube https://www.youtube.com/watch?v=-TmqptTB3bc?feature=oembed&w=500&h=281]

    Website: LINK

  • Light[s]well is a voice-controlled custom lighting installation

    Light[s]well is a voice-controlled custom lighting installation

    Reading Time: < 1 minute

    Light[s]well is a voice-controlled custom lighting installation

    Arduino TeamSeptember 30th, 2020

    Designed by Brian Harms of NSTRMNT, Light[s]well is a beautifully crafted 4’x8′ light installation for a triple-height living room that’s voice-responsive thanks to the Arduino Alexa skill.

    Light[s]well is constructed out of 80/20 extrusions and fasteners, with individually addressable LED strips embedded in the channels of the structure. 74 sheets of laser-cut cardstock make up the undulating light-diffusing wave pattern.

    According to Harms, 30 LEDs per meter strips were used to give each gap in the cardstock two LEDs per structural metal beam, for a total of six LEDs per gap. The LEDs are controlled by a MKR1000 (via a logic level shifter) along with the Arduino IoT Cloud.

    More details and images of the incredible project can be found on Harms’ NSTRMNT website.

    [youtube https://www.youtube.com/watch?v=JBNFrtWiiJ4?feature=oembed&w=500&h=281]

    Website: LINK

  • Watch your houseplant’s growth really take off in this Saturn V planter

    Watch your houseplant’s growth really take off in this Saturn V planter

    Reading Time: 2 minutes

    Watch your houseplant’s growth really take off in this Saturn V planter

    Arduino TeamSeptember 29th, 2020

    As first reported by Technabob, almost two years after he made a rather stunning Saturn V lamp, SimonRob decided to create something a bit different in the form of his Saturn V planter.

    The device is based on the lower section portion of a 3D-printable rocket model, which is modified and sealed to hold dirt and water. A succulent now pops out where the rest of the rocket should be, and when combined with a 30mm thick wood plank, gives it a very unique and polished look.

    A switch on the front lights up the printed flame assemblies emanating from the engines, using a trio of SMD LEDs on each exhaust. These LEDs are controlled by an Arduino Nano nestled inside the wooden base to produce random lighting effects when an activation button is pressed.

    [youtube https://www.youtube.com/watch?v=Mg0TcEaZRzw?feature=oembed&w=500&h=281]

    Website: LINK

  • This interactive screen slides smoothly from side to side

    This interactive screen slides smoothly from side to side

    Reading Time: < 1 minute

    This interactive screen slides smoothly from side to side

    Arduino TeamSeptember 29th, 2020

    When you need to grab someone’s attention at an event, an interactive screen is a good idea. MakerMan, however, went several steps beyond this, creating an installation with a bank of static screens that depict the Moscow skyline. In front of this, a single touch-enabled display moves back and forth automatically to present information on various points of interest.

    Sliding action is handled by a large stepper motor, which pulls the screen along on a carriage assembly. The motor, in turn, is controlled via an Arduino Uno and a stepper driver. All of these electronics are hidden behind a nicely painted wooden facade, letting the technology driving it fade elegantly into the background.

    [youtube https://www.youtube.com/watch?v=cp7Tq-6iAvg?feature=oembed&w=500&h=281]

    Website: LINK