Schlagwort: arduino

  • Arduino Science Journal surpasses 100K total downloads!

    Arduino Science Journal surpasses 100K total downloads!

    Reading Time: 2 minutes

    Arduino Science Journal surpasses 100K total downloads!

    Arduino TeamNovember 12th, 2020

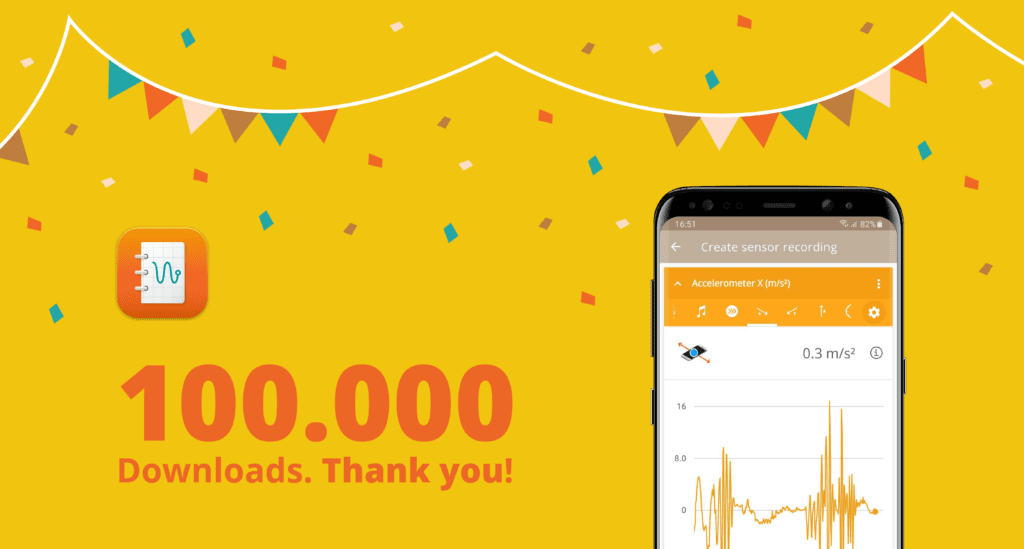
    The Arduino Science Journal is a mobile application that allows anyone to conduct scientific experiments by measuring the surrounding world with sensors, documenting and comparing data, developing and validating hypotheses, and taking notes. The app and all learning materials are free, open source, and available for download on Google Play Store, Apple App Store, and starting from today on Huawei App Gallery.

    The Arduino Science Journal encourages students to explore how the world works, record data, document observations, and experiment like a real scientist — all through their mobile device, providing in effect a pocket-sized science lab!

    We are happy to announce today that the Arduino Science Journal has surpassed 100K total downloads since its launch!

    Students can choose between dozens of hands-on science experiments, designed by education experts.

    All experiments are free and cover a range of different areas, such as light, sound, motion and electricity, and can be used to enrich the learning experience within a variety of subjects such as math, physics, biology, and chemistry.

    The Science Journal is aligned with the UK National Curriculum for Science and NGSS in the US.

    We want to thank all the students, educators, and our community members that have downloaded the app, empowering the Arduino Education community! 100K times thanks!

    Help us build an even bigger worldwide community of scientists! For more information, visit our website

    Share this article and download your app today on Google Play Store, Apple App Store, and Huawei App Gallery.

    Website: LINK

  • Draw on bottles using a CNC plotter made from old printer rollers and other scraps

    Draw on bottles using a CNC plotter made from old printer rollers and other scraps

    Reading Time: 2 minutes

    Draw on bottles using a CNC plotter made from old printer rollers and other scraps

    Arduino TeamNovember 12th, 2020

    To label used bottles that would otherwise go to waste, “tuenhidiy” created a CNC plotter that itself consists mostly of scraps!

    The machine’s X and Z axes are formed out of a pair of old CD/DVD players, but instead of a traditional Y axis, it actuates two printer rollers to turn a bottle forwards or backwards. This allows the marking pen to be placed in just the right axial position, while still being very similar to a fully Cartesian (XYZ) plotter controls-wise.

    Everything is powered by GRBL running on an Arduino Uno, which interfaces with its four steppers via a CNC shield and A4988 driver modules. Build info is available in tuenhidiy’s write-up, and you also check it out in the video below.

    [youtube https://www.youtube.com/watch?v=rRHOq8oxpGU?feature=oembed&w=500&h=281]

    Website: LINK

  • This useless box has lights, sounds, and a real attitude

    This useless box has lights, sounds, and a real attitude

    Reading Time: 2 minutes

    This useless box has lights, sounds, and a real attitude

    Arduino TeamNovember 11th, 2020

    You’ve probably seen an example of the “useless box,” or “useless machine,” which when switched on does nothing except open up to turn itself back off again. This one by creator Alex Pikkert adds a few new tricks, giving it a bit of a mood, and not one but two switches and fingers!

    When switched on, the device uses a micro servo to open the box. The correct finger then extends under the power of one of the other two servos to turn the particular switch you flipped off again.

    To help give it “attitude,” the Arduino Uno-controlled unit employs a pair of ID1820 sound boards that let it squawk out giggles and other noises as it seems to become increasingly annoyed over time. Tri-color LEDs can also flash angrily next to the switches, and there’s an as-yet unused passive infrared sensor, potentially usable for further automated hijinks.

    [youtube https://www.youtube.com/watch?v=RY2XYQ_1Hc0?feature=oembed&w=500&h=281]

    Website: LINK

  • FREE advanced debugger for Portenta H7

    FREE advanced debugger for Portenta H7

    Reading Time: 3 minutes

    We are happy to announce a new partnership with Lauterbach to provide all Portenta H7 customers with the TRACE32 debugger for free.

    Lauterbach’s TRACE32 debugger has been at the forefront of debug technology for more than four decades, and it is this wealth of experience and expertise that Lauterbach will draw on for the Arduino Portenta.

    How to get your debugger

    Each Portenta H7 comes with a unique serial number which can be displayed in the Arduino IDE or TRACE32. This serial number can be used to obtain a free license  via the Lauterbach registration page – once you’ve submitted your details you will receive an email with your license to unlock the full version of the TRACE32 debugger. 

    For those users who need advanced capabilities, such as JTAG debugging and real-time trace a carrier module is available. This module makes the debug and trace pins available to the TRACE32 uTrace® for Cortex-M (MIPI20T), and the switch to TRACE32 uTrace® for Cortex-M is almost transparent to the user.

    How to use the debugger with the Portenta H7

    This tutorial explains how to use the Lauterbach TRACE32 GDB front-end debugger with your Portenta H7. The debugger communicates with the Portenta via GDB on a serial interface which means that all you need to start debugging is a USB cable to connect Portenta to TRACE32.

    To enable the GDB interface on Portenta, simply include and compile Arduino’s ThreadDebug library as part of your sketch. Then flash your compiled sketch either via Arduino IDE or directly inside TRACE32. After flashing the sketch you can connect to it in TRACE32 and start inspecting, logging and tracing. Amongst other interesting data it is possible to inspect variables, registers, stack frames, raw memory contents or interrupts which allow you to track down any bug or other issue you may encounter when developing an application.

    This is a meeting of minds of two of the biggest forces in embedded computing and I am waiting with anticipation to see where the vibrant Arduino community takes this,” said Maurizio Menegotto, Managing Director of Lauterbach SRL. “We are honored to be working with Arduino on this exciting project and look forward to welcoming the next generation of embedded engineers to the Lauterbach community.

    “We are more than happy about the partnership between Arduino and Lauterbach, which will enable our customers to benefit from an advanced debugger tool, fundamental for each professional application,” added Andrea Richetta, Arduino Pro BU Leader.  

    If you are a Portenta H7 user and want to get the TRACE32 debugger for free, please complete the registration form on the Lauterbach website

    Website: LINK

  • Skee-ball-like indoor golf game gets an automatic scoring system

    Skee-ball-like indoor golf game gets an automatic scoring system

    Reading Time: 2 minutes

    Skee-ball-like indoor golf game gets an automatic scoring system

    Arduino TeamNovember 10th, 2020

    After making an indoor Executive Par 3 golf game with a ramp and cups like a skee-ball machine, creator “gcal1979” decided to add an automatic scoring system to the rig.

    What he came up with uses infrared break beam sensors for each of the three holes, feeding info to an Arduino Mega. Stats are shown on an electronic scoreboard behind the play area, with a seven-segment display for the hole number, as well as two four-digit units for player scores.

    Individual LEDs tell what kind of shot was detected (e.g. bogey or hole-in-one), if there are one or two players, and if a new game is in progress. A three-button control console starts new games, switches between one and two player mode, and even lets you indicate whether there’s been an undetected out-of-bounds double bogey shot!

    Website: LINK

  • Retro cassette player gets modern MP3 playback and RFID functionality

    Retro cassette player gets modern MP3 playback and RFID functionality

    Reading Time: 2 minutes

    Retro cassette player gets modern MP3 playback and RFID functionality

    Arduino TeamNovember 9th, 2020

    When creator mattb_138’s parents were cleaning out their house, he came across an old cassette player and decided to upgrade it with MP3 capabilities and an RFID interface.

    The newly-enhanced device uses an Arduino Nano for control, along with a DFPlayer Mini module to play songs stored on a microSD card. An RC522 reader enables him to select tracks based on RFID cards, printed with their appropriate album art.

    The cassette player’s internals are kept largely stock, using a potentiometer to adjust the volume of the original speakers. Two buttons are also implemented with long and short press functionality, allowing for pause/play, skip, shuffle, and selection between A/B “side” of each card.

    [youtube https://www.youtube.com/watch?v=Rkm5AI8038w?feature=oembed&w=500&h=281]

    You can find more details on the upcycled project — which was inspired by the Juuke RFID playerin mattb_138’s Instructables tutorial.

    Website: LINK

  • The GPRino is a $300 ground penetrating radar

    The GPRino is a $300 ground penetrating radar

    Reading Time: 2 minutes

    The GPRino is a $300 ground penetrating radar

    Arduino TeamNovember 9th, 2020

    Ground penetrating radar systems, which can be used to sense the density of objects under the Earth, are normally seen as a fairly exotic piece of equipment. Naturally, such devices cost thousands of dollars. Mirel Paun’s “GPRino” prototype, though, aims to accomplish this viewing task for the comparatively paltry sum of $300.

    The GPRino uses antipodal Vivaldi antennas to see into the ground, under control of an Arduino Mega. Onboard visualization is handled by an LCD shield, and collected data can also be transmitted to a PC for further analysis.

    More information homemade GPR can be found in Paun’s project write-up. You can see a demo of it scanning in the first video below, while a quick clip of its wheel switch (a simple cam setup) is shown in the second.

    [youtube https://www.youtube.com/watch?v=nFR2I9GdFXM?feature=oembed&w=500&h=281]

    [youtube https://www.youtube.com/watch?v=V5B5Lwu-gq4?feature=oembed&w=500&h=281]

    Website: LINK

  • This perpetual calendar displays the date, month, and day using cryptic rings

    This perpetual calendar displays the date, month, and day using cryptic rings

    Reading Time: 2 minutes

    This perpetual calendar displays the date, month, and day using cryptic rings

    Arduino TeamNovember 7th, 2020

    Earlier this year we covered an automated perpetual calendar, which used three ring gears to align the date, month, and day of the week with a viewing window. After building one of these devices, Wolfspaw was inspired to put a new “spin” on things by combining it with a linear Cryptic Calendar, featuring digits that only make sense in the viewing window.

    The resulting project looks like a few rings inscribed with alien symbols, until each is rotated in place. This frames the numerical date, as well as abbreviated month and day so that they can be read.

    Everything runs on an Arduino Nano and an RTC module, while 28BYJ-48 stepper motors with drivers to turn the trio of rings.

    Full details can be found in Wolfspaw’s write-up!

    [youtube https://www.youtube.com/watch?v=SfphHIlmCLM?feature=oembed&w=500&h=281]

    Website: LINK

  • Fabricate flexible electronics directly on your skin with the BodyPrinter

    Fabricate flexible electronics directly on your skin with the BodyPrinter

    Reading Time: 2 minutes

    Fabricate flexible electronics directly on your skin with the BodyPrinter

    Arduino TeamNovember 5th, 2020

    What if you could print circuit “tattoos” right on your body? While the idea of augmentation with a pre-assembled electronic sticker isn’t new, the technique proposed by a team of KAIST and MIT Media Lab researchers takes things to a new level.

    Their small BodyPrinter device — composed of a custom 3D-printed plotter with a movable head and a mounted extruder — can be strapped directly to multiple body parts, including fingers, arms, back, stomach, forehead, neck, laps and shoulders. After a little calibration, it deposits conductive ink on a “liquid bandage” substrate that’s already attached directly to a subject’s skin.

    The BodyPrinter is controlled by an Arduino Uno and CNC shield, and a number of experiments with the resulting circuits have already been explored. A quick overview of the system can be seen in the video below, and more details are available in the team’s paper.

    [youtube https://www.youtube.com/watch?v=fkMPmDZeFsk?feature=oembed&w=500&h=281]

    Website: LINK

  • An old-school “neon” sign made with LEDs

    An old-school “neon” sign made with LEDs

    Reading Time: 2 minutes

    An old-school “neon” sign made with LEDs

    Arduino TeamNovember 5th, 2020

    Can you make an Arduino-controlled neon sign? While certainly possible, such a setup would involve working with rather high voltages, and the skill to shape glass tubing. As an easier alternative, Max Danilin (who also goes by “gabbapeople”) created an animated pub display using lengths of LED strips made to look like old-school neon tubes.

    Although such tubes don’t quite have the same glow as their true neon counterparts, shaping segments was a matter of arranging them on a wooden backing with nails for support. Everything is powered by an Arduino Uno, programmed using the XOD IDE. This activates different LED segments via a pair of eight-channel MOSFET switch arrays.

    In action, the word “SALOON” lights up, and a picture of a cowgirl winks and lifts her drink. More details on this impressive project can be found in Danilin’s Instructables post.

    [youtube https://www.youtube.com/watch?v=zmeLh06xB2E?feature=oembed&w=500&h=281]

    [youtube https://www.youtube.com/watch?v=t6zGR22zTOM?feature=oembed&w=500&h=281]

    Website: LINK

  • An Arduino-powered puck with LEDs that react to acceleration

    An Arduino-powered puck with LEDs that react to acceleration

    Reading Time: < 1 minute

    An Arduino-powered puck with LEDs that react to acceleration

    Arduino TeamNovember 3rd, 2020

    While you may or may not have frozen ponds where you live, if you have an available smooth surface you can still enjoy a game of floor hockey with this brilliantly illuminated puck.

    Yuksel Temiz’s 3D-printed device features a 12-LED ring inside, which shines brightly through the top of its translucent body and reacts to acceleration. Control is via an Arduino Nano along with an MPU-6050 IMU for sensing.

    Two versions are made in the video below — one with CR2032 batteries and another with a rechargeable LiPo. PTFE furniture glides on the bottom help the puck slide across the hardwood floor. The build, which also includes a set of 3D-printed sticks, looks like a lot of fun for Temiz and his two-year-old son!

    [youtube https://www.youtube.com/watch?v=fs35TY9EAiM?feature=oembed&w=500&h=281]

    Website: LINK

  • Pump and Surf uses an air pump to ‘manually’ surf the web

    Pump and Surf uses an air pump to ‘manually’ surf the web

    Reading Time: 2 minutes

    Pump and Surf uses an air pump to ‘manually’ surf the web

    Arduino TeamNovember 3rd, 2020

    Everyday you likely visit websites like this one, browsing the content without giving much thought to how it gets to your eyeballs. Of course there is plenty technology required throughout this process, but how much energy does all this equipment consume?

    As a hands-on (or foot-on) demonstration of the energy involved, ECAL’s Aurélien Pellegrini created Pump and Surf, which makes you pump the equivalent of the energy needed to load the webpage.

    The device utilizes an air pump, with a pressure sensor to take readings via an Arduino Uno that interfaces with your computer. A special Chrome extension calculates the energy necessary to pull up a particular page, forcing you to put in the equal amount of physical effort to display the site in its original form.

    Website: LINK

  • Researchers propose a coil spring-based soft actuator using two flexible ultrasonic motors

    Researchers propose a coil spring-based soft actuator using two flexible ultrasonic motors

    Reading Time: < 1 minute

    Researchers propose a coil spring-based soft actuator using two flexible ultrasonic motors

    Arduino TeamNovember 3rd, 2020

    Researchers Yunosuke Sato, Ayato Kanada, and Tomoaki Mashimo have developed a novel continuum (snake) robot actuator that can flex and sense its position with twin coil spring assemblies. Each uses a couple of piezoelectric actuators to induce ultrasonic vibrations on a stator block, pushing the spring inside forwards or backwards. When combined, the springs can advance together, or twist left and right when lengths are varied.

    Extension sensing is accomplished via voltage feedback through the springs, allowing its Arduino Uno-based experimental setup to determined each position with no extra equipment. With this data, the curvature angle of the two springs together can be calculated, and while the “snake” now works in two dimensions, perhaps such a system could be used with another spring for full 3D control!

    [youtube https://www.youtube.com/watch?v=c7sTVg_7zi8?feature=oembed&w=500&h=281]

    For more information, the team’s research paper is available here.

    Website: LINK

  • This Inspector Gadget hat actually responds to voice commands

    This Inspector Gadget hat actually responds to voice commands

    Reading Time: 2 minutes

    This Inspector Gadget hat actually responds to voice commands

    Arduino TeamOctober 31st, 2020

    If you ever watched the 1980s Inspector Gadget cartoon, you undoubtedly wanted a hat like his, which can pop out all kinds of useful tools under voice control. Although it won’t allow you to fly off after saying “go go gadget ‘copter,” DJ Harrigan’s replica does produce a spinning propeller and an emergency light with 16 RGB LEDs.

    Underneath this 3D-printed hat is a pair of micro servos, with linkage systems that open the top flaps. A standard servo extends the actual gadget. Controlling the device is a MKR1000, and voice commands are registered via a MikroElektronika SpeakUp click board.

    [youtube https://www.youtube.com/watch?v=XelqOddKPGc?feature=oembed&w=500&h=281]

    While many characters sparked DJ’s imagination for invention and quest for technical skills, one of the earliest was everyone’s favorite 1980’s cyborg policeman: RoboCop, er uh Inspector Gadget! While Inspector Gadget’s gadgets certainly obeyed the laws of cartoon physics rather than real physics, they’re just beyond the edge of plausibility. So in a year long preparation for Halloween 2021, DJ is setting out to make a voice activated hat that can summon real gadgets from his head. No plastic surgery necessary. Some assembly required. 

    Website: LINK

  • Arduino joins the Open Source Security Foundation

    Arduino joins the Open Source Security Foundation

    Reading Time: 2 minutes

    Arduino joins the Open Source Security Foundation

    Arduino TeamOctober 30th, 2020

    As an open-source project, Arduino has always considered security a top priority: making tools and products easy to use for our community has consistently been as important as making them secure. 

    Today, we are excited to announce that Arduino has joined the Open Source Security Foundation (OpenSFF), the collaborative cross-industry effort to secure the open-source ecosystem.

    Hosted at the Linux Foundation, the OpenSFF brings together the efforts of the Core Infrastructure Initiative (CII) and GitHub’s Open Source Security Coalition and is committed to working both upstream and with existing communities to advance the security of open-source software. The foundation will initially include technical initiatives and working groups that will address vulnerability disclosures, security tooling, security best practices, and the identification of security threats to the open-source project. 

    Arduino is proud to become a member of the OpenSFF alongside GitHub, Google, IBM, Facebook, Red Hat, Facebook, Huawei Technologies, and Samsung. Arduino’s membership to the OpenSFF is also part of the Arduino Donation Program, our philanthropic initiative to fund projects and institutions that can make the difference for the worldwide open-source community.

    Our aim is to make complex technologies simple to use for everyday people and security out of the box is part of the user experience we strive for. We believe that working with skilled security experts and industries across the globe is crucial in identifying security weaknesses and vulnerabilities, “said Arduino co-founder Massimo Banzi. “We are excited to join the Open Source Security Foundation and we look forward to collaborating with other members to improve the security of any open-source ecosystem.”

    Website: LINK

  • This aerial system launches Nano 33 BLE Sense darts for data collection

    This aerial system launches Nano 33 BLE Sense darts for data collection

    Reading Time: < 1 minute

    This aerial system launches Nano 33 BLE Sense darts for data collection

    Arduino TeamOctober 29th, 2020

    Sensor deployment via unmanned aerial vehicles is an interesting concept. Up until now, you’ve had two options: use a drone that drops sensors onto the ground, or one with some kind of manipulator to stick them in particular place. However, researchers at Imperial College London have been studying a third approach, which shoots sensor pods from an aerial platform like darts.

    The system utilizes a compressed spring, along with a shape-memory alloy (SMA) trigger to fling the sensor pods at a nearby surface, at up to a four-meter range. The actual sensor package used here is an Arduino Nano 33 BLE Sense, allowing for a variety of measurements without extra hardware  in hazardous environments or inaccessible locations.

    Several methods of attachment were proposed, including magnets and chemical bonding, but the experiment’s research paper focuses on dart-like wood attachment, since this would require the most force.

    More details on the project can be found on IEEE Spectrum and in the video below.

    [youtube https://www.youtube.com/watch?v=duPRXCyo6cY?feature=oembed&w=500&h=281]

    Website: LINK

  • ESUB Tracks is a smart bicycle helmet with built-in electronics for enhanced safety

    ESUB Tracks is a smart bicycle helmet with built-in electronics for enhanced safety

    Reading Time: 2 minutes

    ESUB Tracks is a smart bicycle helmet with built-in electronics for enhanced safety

    Arduino TeamOctober 27th, 2020

    Bike helmets can help minimize injuries in the event of an accident, but could a helmet also be used to help prevent a crash, or even enhance your riding experience? ESUB Tracks from WertelOberfell attempts to do both, featuring a variety of electronic enhancements which are powered by photovoltaic cells wrapped around its outer surface.

    ESUB Tracks includes a lighting arrangement on the back for turn signaling, triggered using voice commands to the helmet’s piezoelectric microphone. Additionally, it has a sensor to detect rapidly approaching vehicles from behind, warning the wearer of this condition via haptic feedback. Bone-conductive speakers are provided for listening to Bluetooth audio, and if all of that wasn’t enough, it even tightens down the straps when the buckle is fastened.

    Overall control is accomplished using an Arduino Nano 33 BLE Sense, and you can see more of this amazing device in the video below.

    Website: LINK

  • This machine dispenses labels, making it easier to peel them off

    This machine dispenses labels, making it easier to peel them off

    Reading Time: 2 minutes

    This machine dispenses labels, making it easier to peel them off

    Arduino TeamOctober 27th, 2020

    Labels are easy enough to take off of a roll, but doing so repeatedly while trying to keep count, could perhaps change one’s mind. If you find yourself having to apply label after label… after label, then an Arduino-based dispenser like Mr Innovative’s could be just the thing you need to streamline the process.

    The automated machine uses a stepper motor to pull labels past a series of rods, separating the sticky-backed “FRAGILE” sign upon encountering an especially abrupt change in direction. An IR sensor beneath detects the presence of the label, keeping the device from advancing further until it’s removed.

    An Arduino Nano on a custom PCB, along with an A4988 driver control the rig. User input consists of a rotary knob and push button, and a 16×2 LCD display shows the number of labels dispensed as well as the label length during setup.

    [youtube https://www.youtube.com/watch?v=IGeIINUt_no?feature=oembed&w=500&h=281]

    Website: LINK

  • Transform a pile of clothing into the robot of your nightmares

    Transform a pile of clothing into the robot of your nightmares

    Reading Time: 2 minutes

    Transform a pile of clothing into the robot of your nightmares

    Arduino TeamOctober 26th, 2020

    While whatever you heard bump in the night was probably nothing to be concerned about, if you see a suspicious blob of clothing on the floor, you might give it another look. Although not particularly dangerous, YouTuber “Sciencish” has come up with a robot that causes a pile of clothes to turn and face, then travel towards the light source you used to check it out.

    The device features four photoresistors, along with an Arduino Uno and two steppers on a robotic chassis for movement. It also accommodates a filament or wire frame on which clothing can rest. When a light is shined at it, the LDRs pick up this “signal” through the clothes. The robot then waits until the lights are off, pauses a bit more, and then rotates to face the person and incrementally advances.

    It’s a terrifying idea, and something that could be implemented in many forms, such as the Minecraft spider disguise Sciencish made for it out of cardboard — perfect for some Halloween fun!

    [youtube https://www.youtube.com/watch?v=HtD9XxNFDxI?feature=oembed&w=500&h=281]

    Website: LINK

  • Say hello to the new Arduino Oplà IoT Kit: Experience the Internet of Things in your hands!

    Say hello to the new Arduino Oplà IoT Kit: Experience the Internet of Things in your hands!

    Reading Time: 3 minutes

    We’re excited to announce the launch of the Arduino Oplà Kit, the first open programmable IoT platform that allows you to add smart connectivity to the devices around your home or workplace and build custom IoT devices. 

    The Oplà IoT Kit contains all the hardware necessary to create eight connected applications, access to an online platform with assembly instructions, and a 12-month subscription to the Arduino Create Maker Plan. This kit is perfect for beginners with basic DIY experience, while more advanced users can leverage it to customize and hack their smart applications and devices, with full control of their data and processes. 

    [youtube https://www.youtube.com/watch?v=livKtMZQMS8?feature=oembed&w=500&h=281]

    Eight out-of-the-box projects to connect your home or workplace

    The projects included in the Oplà IoT Kit enable users to turn everyday appliances into smart appliances, which can be controlled remotely on a mobile phone: 

    • Remote Controlled Lights — Change color, light modes, and switch on/off
    • Personal Weather Station — Record and monitor local weather conditions
    • Home Security Alarm — Detect motion and trigger warnings
    • Solar System Tracker — Retrieve data from planets and moons in the solar system
    • Inventory Control — Track goods in and out
    • Smart Garden — Monitor and manage the environment for your plants
    • Thermostat Control — Smart control for heating and cooling systems
    • Thinking About You — Send messages between the kit and the Arduino IoT Cloud

    Create, connect, control. The Internet of Things has never been so easy! 

    No soldering is required with the Oplà IoT Kit, which is based on a MKR IoT carrier with an OLED color display, on-board environmental sensors and capacitive touch buttons. The kit also includes a MKR WiFi 1010 board, a circular plastic enclosure and supporting accessories, such as two cables, a motion sensor, a moisture sensor, and a USB cable. 

    To build applications, users can rely on the Oplà online platform. Each project includes goals, an intro to the components, step-by-step instructions with illustrations and videos to guide you through assembling the product and building the code. 

    Finally, the kit acts as the physical interface of the Arduino IoT Cloud and comes with a 12-month subscription to the Arduino Create Maker Plan, offering unlimited compilation time and extended access to all the features of the Arduino IoT Cloud. 

    When creating the Oplà IoT Kit, we wanted to design a platform that would allow anyone to gain a complete experience of what the Internet of Things has to offer around the home or workplace and I really believe we have achieved this. It is a great kit for users to build custom devices and enjoy being creative, no matter your level of experience,” says Arduino CEO Fabio Violante. “With this launch, we take yet another step towards lowering the barrier to entry for IoT development and cannot wait to see the projects created by users embracing connected devices both in their homes and at work.” 

    The Oplà IoT Kit is available on the Arduino online store.

    Website: LINK

  • Driving a mini RC bumper car with a Nintendo Wii Balance Board

    Driving a mini RC bumper car with a Nintendo Wii Balance Board

    Reading Time: 2 minutes

    Driving a mini RC bumper car with a Nintendo Wii Balance Board

    Arduino TeamOctober 23rd, 2020

    Taking inspiration from Colin Furze’s 600cc bumper car constructed a few years ago, Henry Forsyth decided to build his own RC miniature version. His device features a 3D-printed and nicely-painted body, along with a laser-cut chassis that holds the electrical components.

    The vehicle is driven by a single gearmotor and a pair of 3D-printed wheels, with another caster-style wheel that’s turned left and right by a servo steering. An Arduino Uno and Bluetooth shield are used for overall control with a motor driver.

    The Bluetooth functionality allows for user interface via a PS4 controller, or even (after a bit of programming) a Wii Balance Board. In the end, the PS4 remote seems to be the better control option, but who knows where else this type of balance technique could be employed?

    [youtube https://www.youtube.com/watch?v=JfjPqZ6sY9s?feature=oembed&w=500&h=281]

    Website: LINK

  • Upgrade your flight sim setup with Tom Stanton’s floor-mounted joystick

    Upgrade your flight sim setup with Tom Stanton’s floor-mounted joystick

    Reading Time: < 1 minute

    Upgrade your flight sim setup with Tom Stanton’s floor-mounted joystick

    Arduino TeamOctober 23rd, 2020

    Most joysticks sit on your desktop, allowing you to control flight sims and other such games with a bit more realism than a keyboard and mouse. YouTuber Tom Stanton, however, decided to take things to the next level by creating one that pivots from the floor out of aluminum extrusion and 3D-printed parts.

    [youtube https://www.youtube.com/watch?v=SgqflcHBTwc?feature=oembed&w=500&h=281]

    The device’s main control stick attaches the base via a ball bearing pivot system, using Hall effect sensors to detect its relatively limited rotational distance. Foot pedals are also implemented with a Hall effect sensor setup, and a throttle/switch/button interface is presented to the user by another extrusion section. The build interfaces with a computer using an Arduino Micro and the Arduino Joystick Library.

    [youtube https://www.youtube.com/watch?v=XcKmBWGFUn8?feature=oembed&w=500&h=281]

    Code for the project is available on GitHub, while print files can be found on Thingiverse if you’d like to make your own!

    Website: LINK