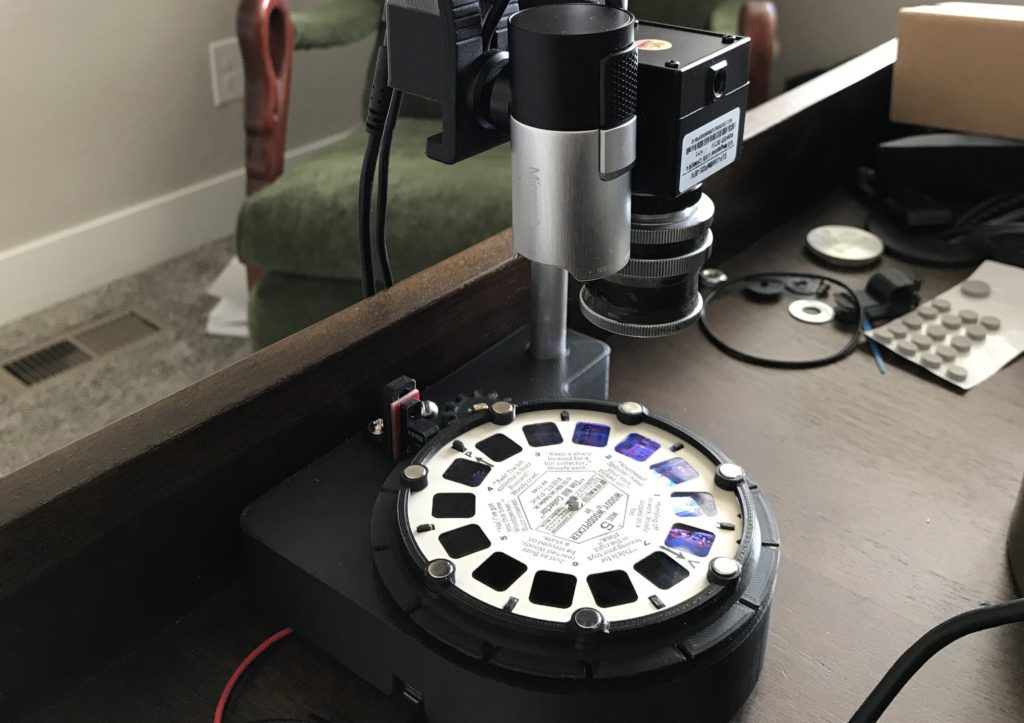
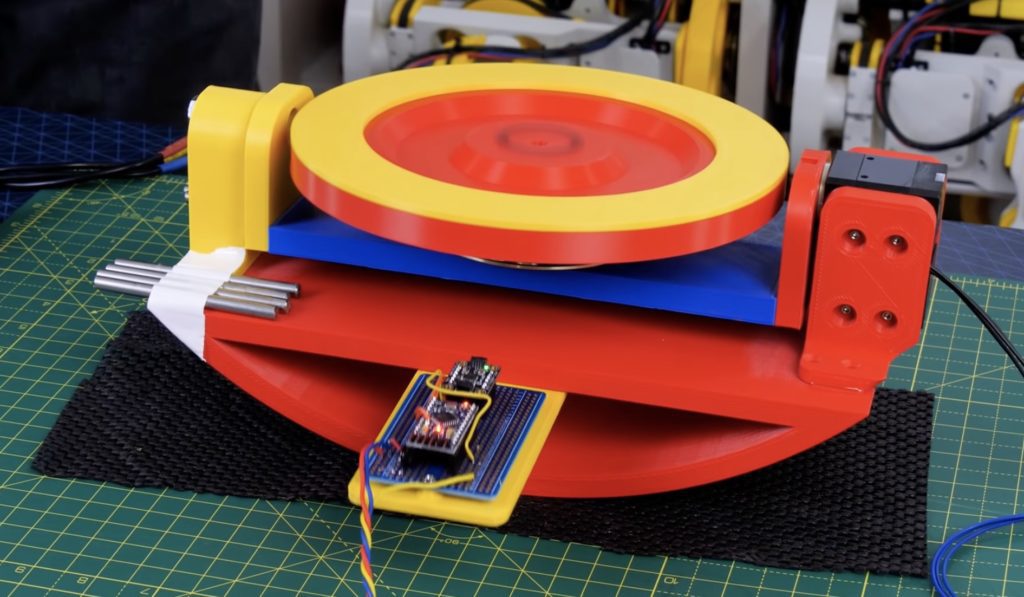
Many of us have probably come across a View-Master reel at one point or another. They are those little disks that contain pairs of images for viewing through a special headset. When illuminated through the back, images can spring to life with both vivid colors and even captions, akin to an early VR headset. However, the format is now dead, and converting these images to a digital format presents a fairly large challenge, which is why W. Jason Atlice wanted to build a machine for just this task.
His View-Master Reel Scanner project, dubbed “the View-Remaster,” utilizes a camera to take pictures of each slide along with a stepper motor and an Arduino Nano to rotate the reels. Slides are illuminated with the help of an RGB LED ring and a bright spotlight that are both controlled through the Nano.
Once everything is captured, Atlice’s custom software automatically adjusts each image to ensure they are in the correct orientation. Text is also extracted from the captions with the use of an optical character recognition (OCR) library. Once manual adjustments have been completed, the images are sent to DaVinci Resolve and rendered into a video.
To see how Atlice built this project, make sure to check out the video below as well as take a look at his Reel3D YouTube channel to see some of the slides he has scanned.
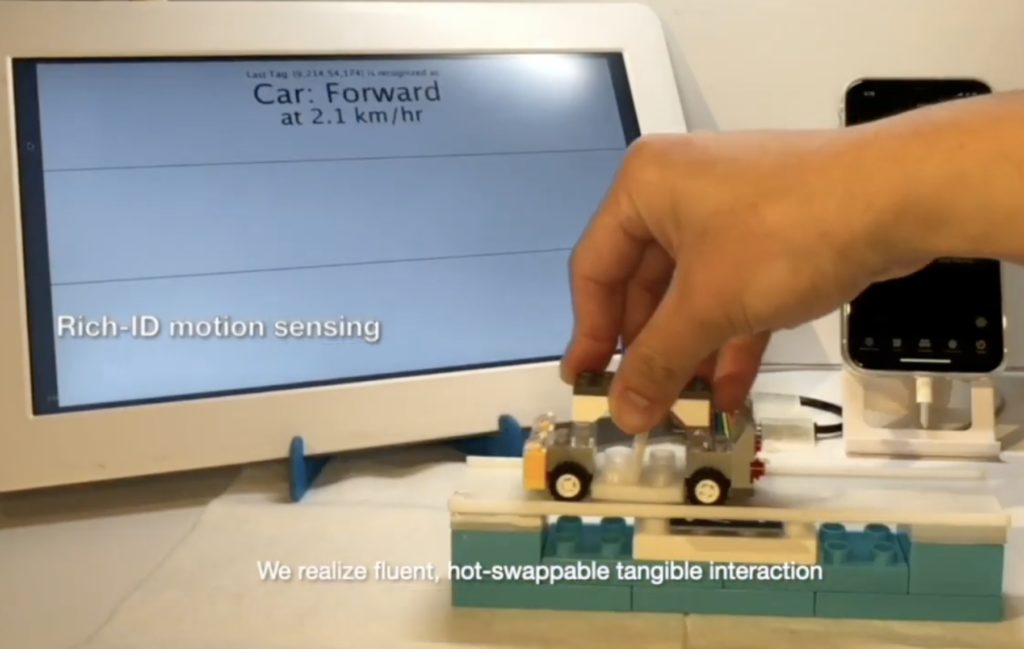
NFC (Near-Field Communication) technology is generally used for identification, because NFC tags can carry a substantial amount of data, like a unique identifier or a text file, without a battery. But NFC readers are capable of reading tags quite quickly, which is a feature that is largely ignored. NFCSense, created by Rong-Hao Liang and Zengrong Guo, takes advantage of that read speed to measure the movement of objects.
NFCSense only requires a computer, an Arduino Uno board, a cheap RC522-based NFC/RFID reader, and a few NFC tags. It works a lot like a Hall effect sensor by detecting the presence of an NFC tag and using that to calculate the motion of an object. For example, if you attach an NFC tag to the wheel of a bicycle, you can calculate the bicycle’s movement speed by counting how much time passes between moments that the tag is detectable.
The advantage of using NFC, when compared to a Hall effect sensor and magnet, is that each tag is identifiable. That means that NFCSense can differentiate between individual tags. It can monitor the movement of a virtually unlimited number of objects or provide better resolution of singular objects. If the entire perimeter of a wheel were lined with NFC tags, NFCSense could recognize the rotational angle of the wheel at any given time.
Rong-Hao Liang and Zengrong Guo have made the NFCSense API open source, so you can experiment with it yourself.
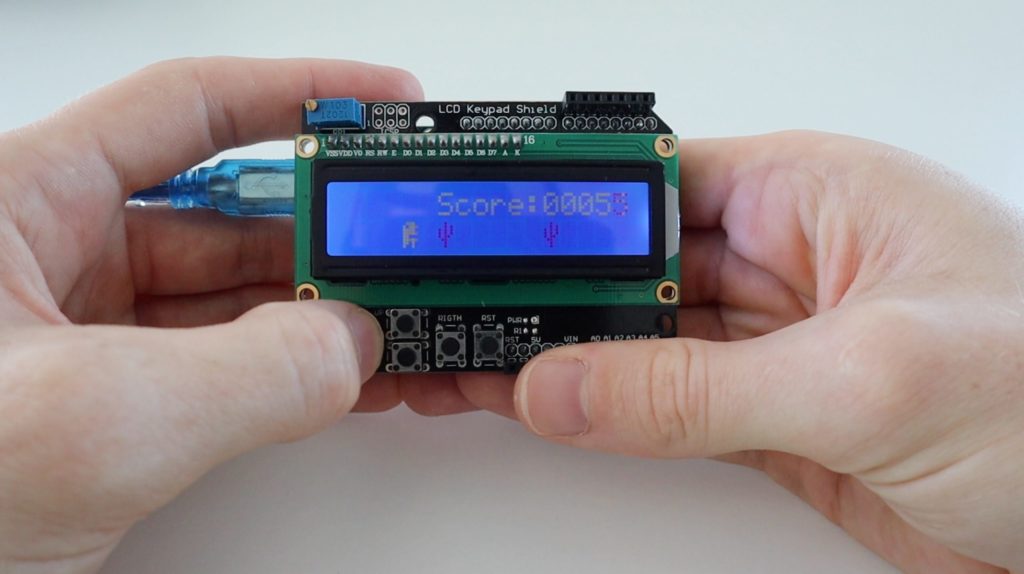
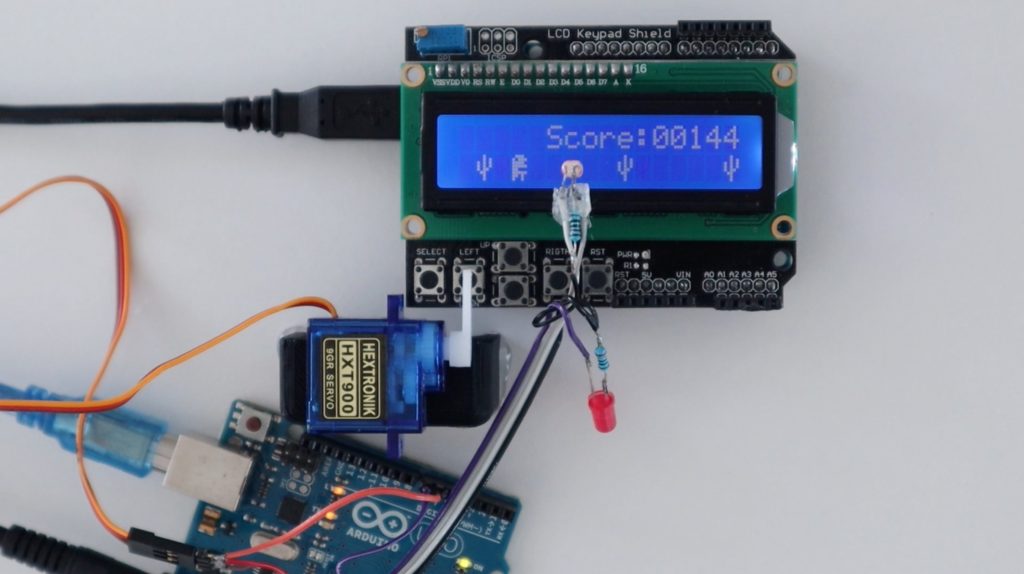
There has been a trend over the past few years to automate certain games using microcontrollers — especially mobile ones. But none are perhaps as popular as the Dinosaur Game that shows up whenever the Chrome browser lacks an Internet connection. The game is simple: just tap or click to make the little T-Rex jump over various obstacles. And even though Arduino projects already exist that play perfectly for you and run the game, what about combining the two? This exactly what Michael Klements did with his Arduino Uno that plays the dino game on another Uno.
The game itself runs on an Uno with an LCD keypad shield stacked on top which displays the sprites and exposes a couple of buttons for player interactions. He got the code from a different project and loaded it. From here, there is the challenge of knowing when to press the button to make the dinosaur jump, as the cacti are spaced at random intervals along the field. So rather than doing anything fancy, he connected a photoresistor and an LED to an Arduino that detect the presence of cacti and actuate a servo motor accordingly.
You can see from his video that the system works quite well in this regard and was able to achieve a high score of 374. For more information about this project, check out Klements’ blog post.
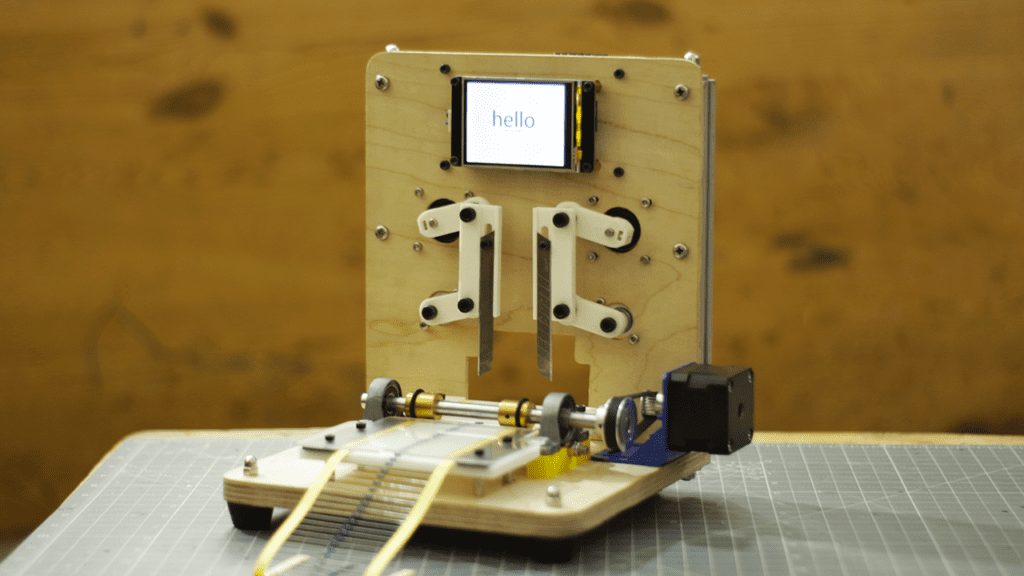
Mr Innovative’s resistor cutting machine is ‘reely’ awesome
Arduino Team — May 10th, 2021
If you need some help separating out lots of resistors, then Mr Innovative’s latest automated rig is the perfect solution for you. At the heart of his homemade device is an Arduino Nano, along with a multipurpose PCB for electrical connections and a touchscreen user interface.
The machine advances the reel of resistors through a slot via a stepper-driven rod and o-ring friction wheel assembly. When properly positioned, it cuts off the correct number of resistors using a pair of razors, set in motion by two stepper motors and corresponding linkage systems.
You can see the project being constructed out of wood, extrusion, 3D-printed parts, and more in the video below.
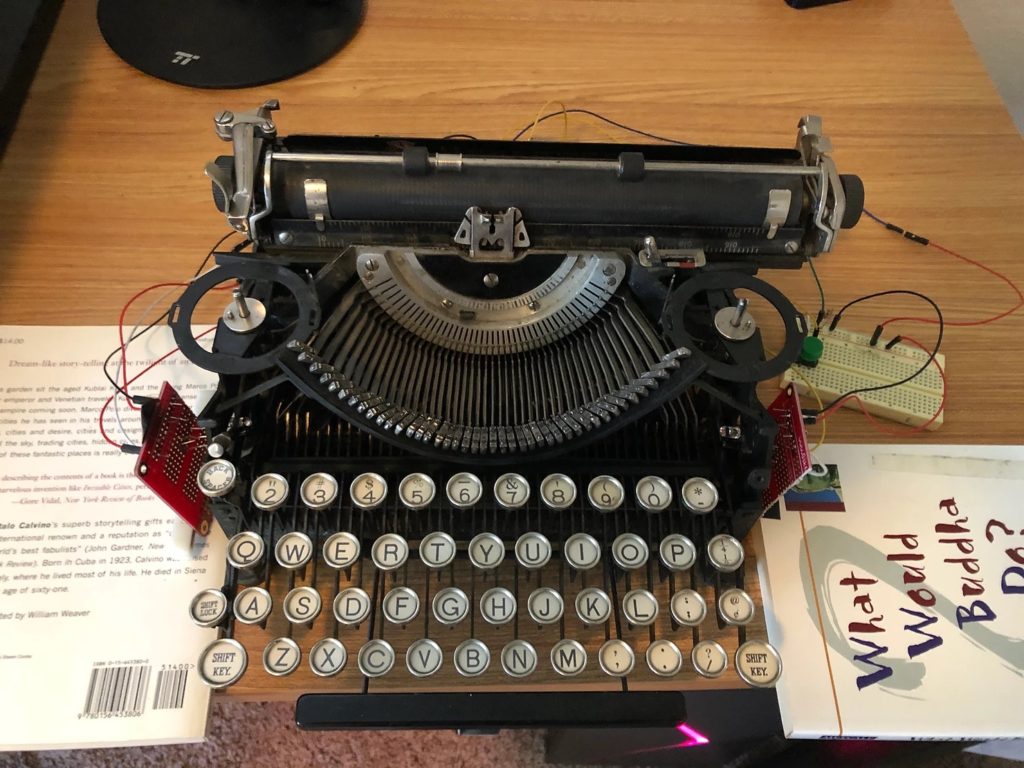
Although mechanical keyboards are more popular than ever in gaming communities, getting that perfect “click” when you press down on the key is still being chased. That’s why maker Jason Ron wanted to convert an old typewriter into the perfect gaming controller. It works by using some tape wrapped around several of the typebars that either reflects more light when held up or none when it’s lowered. A pair of IR emitters and receivers were used to detect these changes in light levels, where their values were then read by an Arduino Leonardo.
The code Ron wrote takes advantage of the Leonardo’s native USB peripheral, letting it act as a keyboard for a host device. When the light level falls between certain predetermined values a key is pressed virtually and then sent to the computer, although this functionality can be toggled on or off to prevent unwanted keypresses.
If you want to see more about how this project was built along with some footage of Ron playing Red Dead Redemption 2, be sure to check out the video below and associated write-up on his blog.
Many modern automobile manufacturers have switched from traditional analog gauges to digital LCD screens. These let the driver configure their dashboard to suit their needs. When driving on the highway, they might want to see a map and a speedometer. When on the track, they can switch that to a tachometer, g-force meter, and shift light. To modernize his NA Miata, Jroobi used two Arduino Due boards to create an LCD dashboard.
The first Mazda MX-5 (the Miata for Americans), referred to as the “NA” by enthusiasts, went into production way back in 1989, which was decades before LCD gauge clusters became common. Jroobi has spent years modifying his NA Miata and one of those modifications was a Raspberry Pi in place of the stereo that lets him control and monitor the car. His newest modification is even more impressive, because it gives him a customizable touchscreen LCD right behind the steering wheel.
Jroobi has been working on this dashboard upgrade for years, but it was on the backburner for 18 months due to problems caused by a bad power supply. But he has now reached the point where it seems to be working very well. A pair of Arduino Dues control the touchscreen, which fills the two large gauges. The two smaller gauges, for fuel level and oil temperature, remain analog. The LCD gauges can display all kinds of information and are customizable. Jroobi can, for example, adjust the soft redline shown on the tachometer. There are far too many features for us to cover here, so check out Jroobi’s video to get all the details.
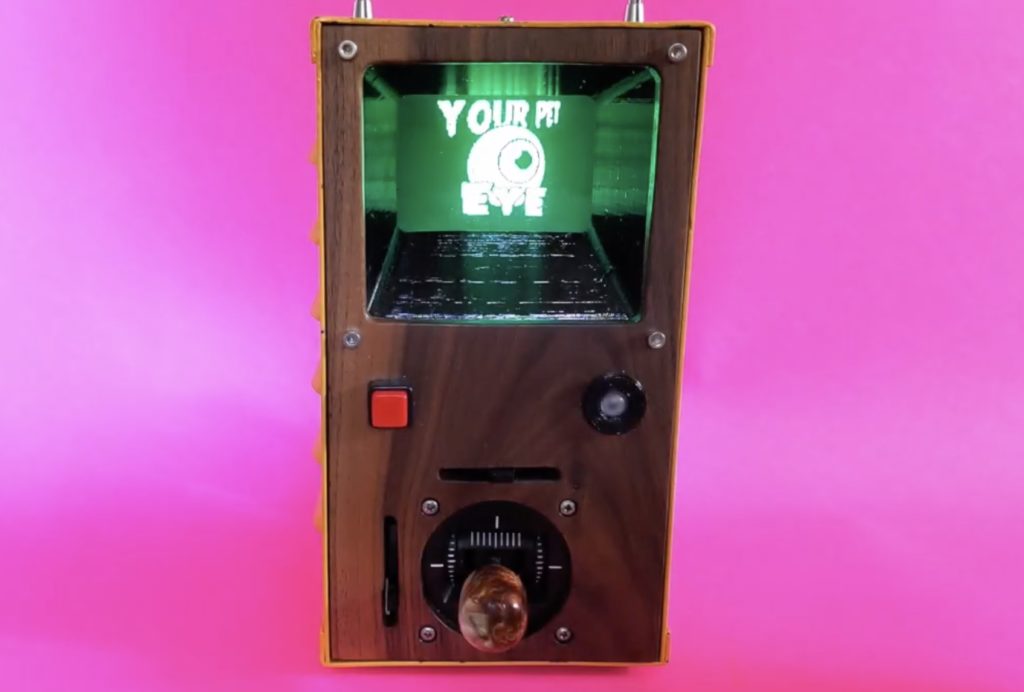
“Avant-garde” is a French term that translates literally to “advance guard,” as in the vanguard that leads an army into battle. In the arts, the term describes people or works that are experimental and push the boundaries of their medium. Emily Velasco, of the Emily’s Electric Oddities YouTube channel, used an Arduino Nano to build a bizarre video game and “avant-garde” is the best way to describe it.
This handheld device runs a video game that charges players with the care of a pet eyeball. A CRT (cathode-ray tube) screen displays that eyeball in beautifully low-res monochrome graphics. An Arduino generates the composite video signal for the CRT screen using the TVout Arduino library. The Nano, CRT screen, and controls are housed within a retro-style enclosure that Velasco made out of an old motor controller case and a custom walnut wood face plate.
The only user input controls are a joystick and a button. The player can move the joystick to direct the eyeball’s gaze and push the button to make it blink. The eye’s pupil even reacts to the ambient light in the room, which the Arduino monitors through a light sensor. The game doesn’t have a goal in the traditional sense. The player isn’t given any quests or objectives. Their only job is to control the eyeball. Velasco described her creation as “the worst fake video game,” but we prefer to say that it is avant-garde and that the masses simply won’t understand its genius.
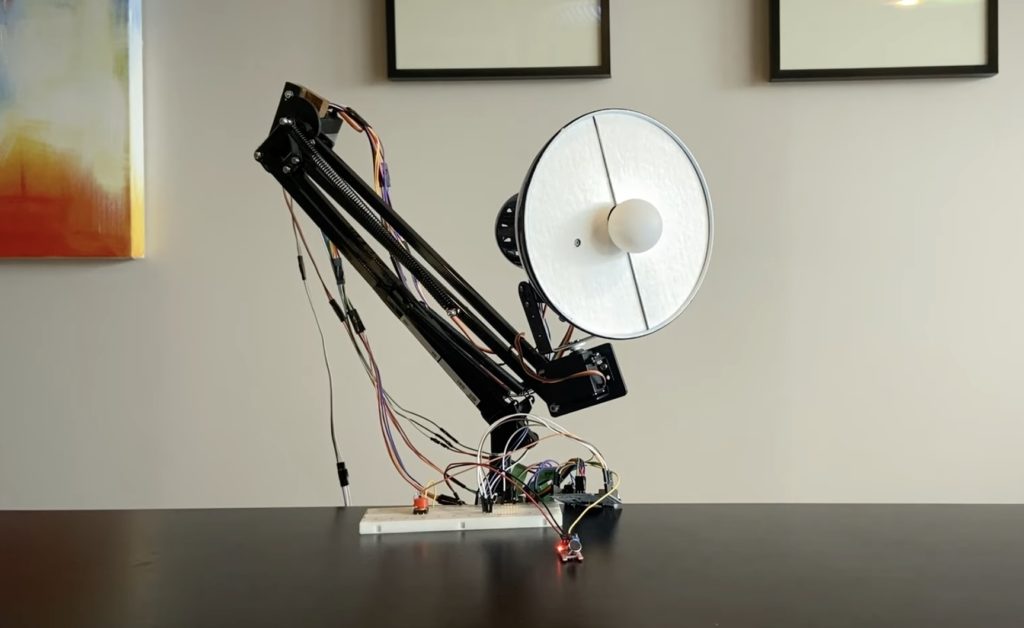
YouTuber Allyson decided she wanted a real-life version of the Pixar lamp mascot, and actually made one in the video below. Her version uses a servo to raise the modified Luxo lamp up and down via the elbow joint, and another two servos to pan and tilt the shade like a wrist.
The device is controlled by an Arduino Uno, along with a compact vision system. This allows the lamp assembly to move in pre-defined paths and even track objects. The new setup now employs an LED inside of a ping pong ball as the bulb. This can be turned on and off as a “clapper” through a sound sensor.
It looks like a lot of fun so far, and perhaps we’ll see it develop further in the future!
When you use a “gyroscope” in Arduino and robotics projects, generally this means a small IMU that leverages several methods of sensing to tell how a device is moving. However, physical gyroscopes are able to employ a spinning disk stay upright mechanically. Could one be combined with advanced electronics to stabilize a robot or other craft?
James Bruton answers this question in the video below, going from a “bare” gyroscope, to an unpowered gimbal, and finally to a simulated boat. This utilizes a powered gimbal for stabilization that’s tilted in one axis by a DYNAMIXEL servo. Angle is measured using an Arduino Pro Mini along with an MPU-6050 IMU, and the gyroscope is controlled by an Arduino Mega.
You can check out the progression of this fun experiment in the video below, and find code/CAD info on GitHub.
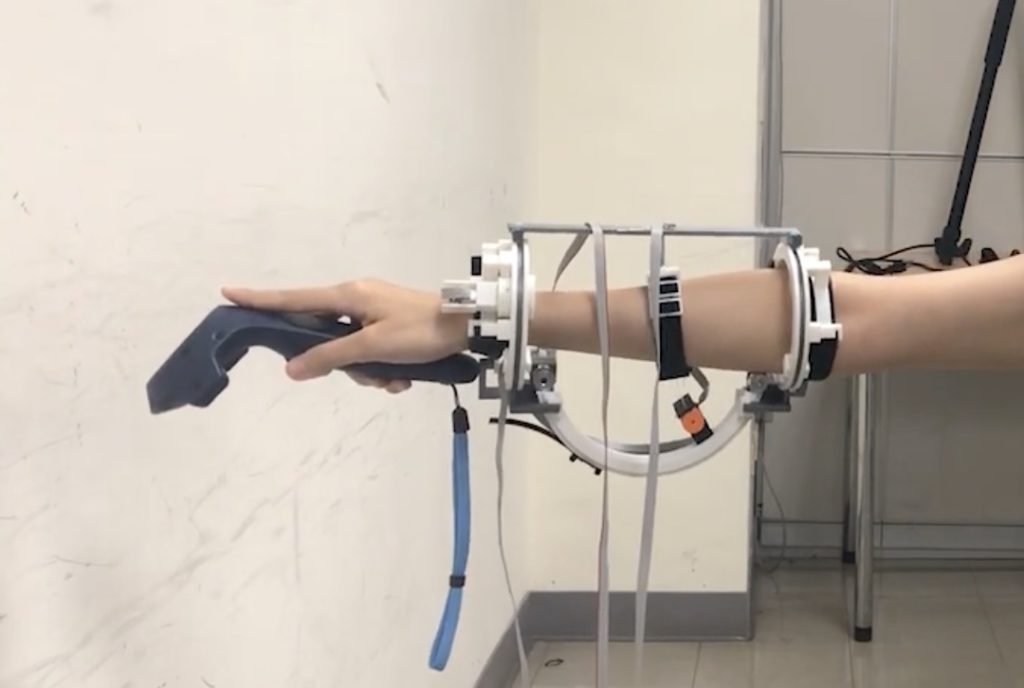
Virtual reality (VR) technology has improved dramatically in recent years and there are now a number of VR headsets on the market that provide high-quality visual immersion. But VR systems still struggle to stimulate our other senses. When you can’t feel the virtual objects that you can see, the immersion falls apart. That’s why an international team of researchers has developed GuideBand, which is an arm-mounted contraption that physically guides players within VR.
This device looks a bit like an external fixation apparatus for securing broken bones. It straps onto the user’s arm and has three motors controlled by an Arduino Mega via TB6612FNG motor drivers. The first motor moves the device’s gantry radially around the user’s arm. The second motor adjusts the angle of attack, offset perpendicularly from the forearm. The third motor acts as a winch and pulls a cable attached to a strap on the user’s arm.
The unique layout of GuideBand lets it impart the feeling of pulling onto the user’s forearm, like a parent tugging their child through a grocery store. That guidance could correspond directly to action in the virtual world, such as an NPC (Non-Player Character) pulling the player out of the way of danger. Or it can provide more subtle direction, like a game tutorial demonstrating how the player should move to interact with a virtual object.
As with many other VR haptic feedback systems, GuideBand is highly experimental and we don’t expect to see it on the market anytime soon. But it is still an interesting solution to a specific problem with virtual reality.
We’re on the lookout for the most creative and innovative Arduino projects made by you – our EDUvision viewers!
Each week, we’ll feature the projects we think should be put in the spotlight. If your project is featured, we’ll send you a selection of some super cool Arduino merchandise, such as:
Lanyards
Water bottles
Notebook
Hats
Beanies
Stickers
Stationary
How to share your Arduino project
All you need to do is shoot a short video (maximum of one minute) of your project, explaining what it’s all about, what it does, and how it works. Because we’re featuring these on the show, and on the Arduino channels, we want you to make your video looks as great as possible.
Here are some tips:
Make sure you shoot in landscape (horizontal)
You can send in .mp4 or .mov video files
A voice over is effective, to help explain your project
Make sure the lighting is good
Reduce background noise as much as possible
Video files can only be submitted if they’re less than 10MB in size. If yours is bigger, you can upload it to a file sharing service like Dropbox, Google Drive or WeTransfer and put the link into your application form instead. Even then, please keep them to one minute.
You’ll also need a project name and a short written description. Submissions to EDUvision’s featured Arduino projects are open until 24th June, 2021.
The necessary bit: First we need you to read and accept these terms and conditions.
If you’re under 18, you’ll also need to provide permission from a parent or guardian to share your Arduino projects. You can take care of that in the application form.
Finally, you’ll need to be a registered Arduino user to be able to send your project in. It’s totally free to sign up if you aren’t already, and comes with lots of great benefits including being able to participate in the forum and get Arduino news as it happens.
Make sure you join us each week on the EDUvision livestream to see which projects have been featured!
We have very big plans for Arduino Cloud this year, which took a major leap forward with the recent name change. But that’s not all we’re working on. We’ve already got some exciting new features to bring to you, including a watchdog timer that keeps your hardware ticking.
WiFi Module Firmware Update
First of all, we’re updating the WiFi module firmware on Arduino Cloud-compatible boards. It’ll be moving to a newer version (1.4.4), as well as the library used to connect devices to Arduino Cloud.
These measures will significantly reduce memory footprint on SAMD. The primary benefit of which is allowing for larger user sketches than was previously possible.
Just follow the process below to update your boards to the latest WiFi firmware.
How to Update Your Firmware
The WiFi module firmware is updated automatically when uploading a new sketch from Web Editor or Arduino Cloud interface. So you don’t need to take any action to do this.
If you want to manually apply a firmware update, go to “Devices” and select your device. Look for “NINA firmware” in device properties. If the device firmware is older than 1.4.4, an update button will be available. Please remember that if you update firmware this way, you’ll have to re-upload your sketch when it’s complete.
Watchdog Function
This release of the Arduino Cloud IoT library also adds watchdog functionality. It’s intended for all ATSAMD21G18-based cloud-connected boards such as MKR boards and Nano 33 IoT.
The watchdog is essentially an electronic timer, counting down from a preset value. When it hits zero, the watchdog triggers a reset of the microcontroller. The timer is periodically reset to its starting value at the beginning of the loop()function, which means the software is running smoothly.
Should something on your Arduino board crash, the starting value doesn’t get reset and the watchdog eventually restarts it. This will save you a lot of time as it helps to automatically recover from temporary hardware faults or unrecoverable software errors whenever you have an unattended or remote device. Watchdog enabled by default, but can easily be disabled, should you wish to.
When playing the guitar, working the fretboard is only half of the equation. The other half is plucking or strumming the strings. But some people, particularly those with disabilities, may find it difficult to do both. To help with the strumming part of the equation, Jacob Stambaugh designed this DIY AutoStrummer device.
Stambaugh’s AutoStrummer fits into the sound hole of an acoustic guitar, so that it sits over the strings. A guitar pick, attached to an arm actuated by a stepper motor, swings back and forth to strum the desired strings. An Arduino board controls the movement of the stepper motor through a DRV8825 stepper motor driver chip.
The guitarist uses an array of six tactile push buttons to select which strings to strum. If both the high E and low E buttons are pressed, then the device will strum all six strings. If the D and G buttons are pressed, then it will only strum those two strings. A potentiometer lets the guitarist set the strumming tempo and the strumming pattern is configurable through a menu system.
A 3D-printed case houses all of those components. Stambaugh designed it to fit his specific guitar, so you may need to tweak the size to fit your own guitar. He created the device for the University of South Florida’s Makecourse, and uploaded build instructions and the necessary files to Instructables so that anyone can build their own AutoStrummer.
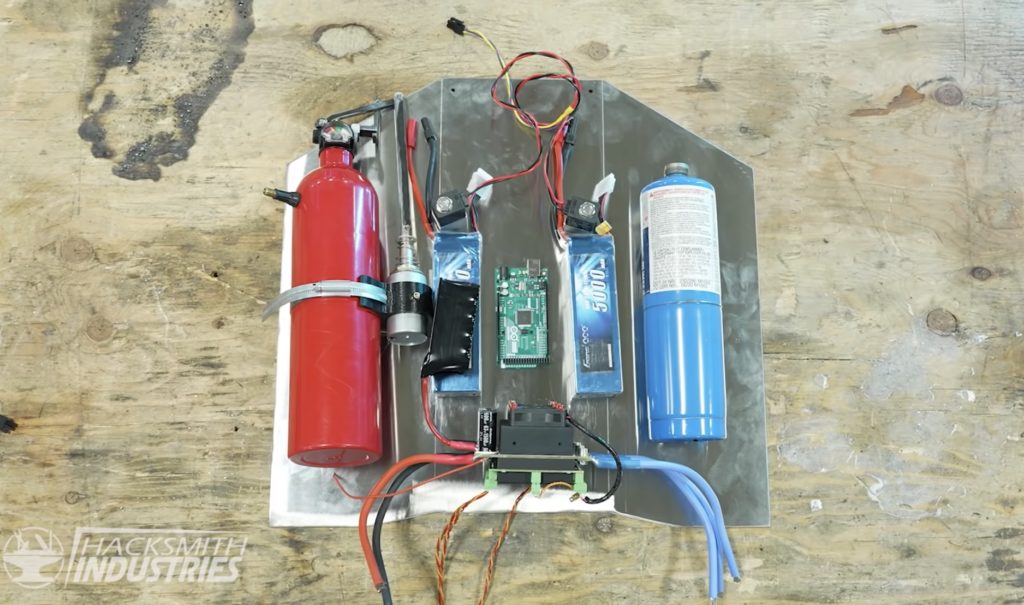
Almost all of us have thought “That thing looks pretty cool, I wish I could build one of my one” while watching a movie or TV show. In the latest Hacksmith video, the team set out to do just that – construct a jetpack that looks nearly identical to the one seen in The Mandalorian.
The team began by cutting out several pieces of stainless steel with their CNC plasma cutter and then added some precise bends to form the shell. Because jetpack technology has not progressed enough to where people can fly with sleek packs, they had to settle with producing a couple of bright flames. This was accomplished by using the same techniques as their flamethrower build, as a propane tank provides fuel whose flow is regulated by a solenoid connected to an Arduino Mega with a custom PCB shield on top.
The nozzles themselves can be actuated on a gimbal mechanism through a set of two servo motors that rotate in the X and Y axes. After adding a weathered look to the surface and placing the electronics into the jetpack, it was time to test it. The pack attaches to a harness via a set of bolts and wing nuts, and as seen in their YouTube below, the results are quite close to the show. For more information, be sure to read the Hacksmith’s write-up over on Maker.io.
It goes without saying, but please do not try to recreate this at home.
Hokey religions and ancient weapons might not be a match for a good blaster, but Arduino Star Wars projects certainly are. To celebrate May the 4th (also known as Star Wars Day), we’ve put together a list of inspired builds from a galaxy far, far away that you can make yourself.
So I Fixed a Broken Hasbro Lightsaber
It’s a rite of passage for every Jedi to build their own lightsaber. That goes for Arduino Jedi, too.
Alan Wang expertly upcycled a broken lightsaber toy by adding a Nano, an MP3 player module and a NeoPixel ring. The result is a Jedi weapon that’s far superior to the original toy.
One of the first droids we meet in Star Wars is a mouse droid. The quirky little bots that zoom about the floor of the Death Star, getting under Stormtrooper’s feet.
They never actually appear to do all that much. But this zippy little droid by PotentPrintables has a hidden LED matrix that lets it deliver messages. And lots of terrible Star Wars puns, of course.
If you’re looking for sci-fi toasters, Red Dwarf is usually the first choice. But this hilarious video from Device Orchestra brings the dark side to your devices.
An Arduino controls the electromagnet in this toaster to turn it into a tuneful buzzer. Accompanied by toothbrushes and a typewriter, we get the immortal Imperial March played by droids.
A game that’s as simple as it is small and cute (like R2!), all run on a Nano on a breadboard.
And just consider how its graphics are comparable to those of the Death Star’s display as it moves into range of Yavin. Talk about human-cyborg relations!
It was a pretty big deal when it turned out Lucasfilm built an actual droid for Star Wars Episode VII. It would have been easier to make BB8 in CGI. But we’re glad they went the practical route, as the cool ball droid has inspired a lot of makers.
Not least of them being Angelo, who built his very own amazing life-size BB8 using Arduino.
Recreating the Death Star Trench Run Scene with LEGO
As much as Wani Kim’s recreation of the iconic trench run is an incredible feat of LEGO engineering, it wouldn’t be complete without Arduino. The whole diorama is embedded with a galaxy-full of LEDs, bringing the scene to life.
As Han told us, there’s no match for having a good blaster at your side. Ismail took that quite literally, and built a Star Wars laser shooting range that lets you take out those pesky Stormtroopers with a homemade blaster.
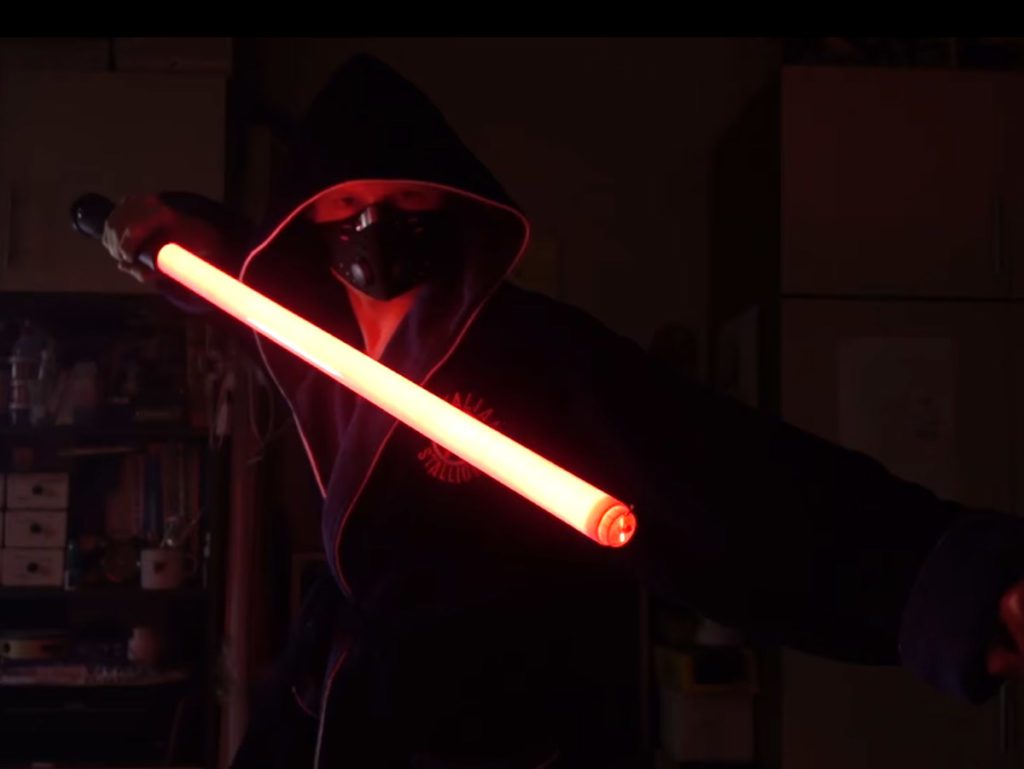
Arduino-Based Lightsaber with Light and Sound Effects
A great lightsaber build isn’t just about the colorful blade. It’s about the audio combinations, and the lighting effects when the blade makes contact. Bring all these things together, like Mad Gyver did, and you have an elegant weapon, of a more civilized age.
Perfect for Halloween, as well as Star Wars Day, this motion activated Darth Vader head is just as creepy as its inspiration. It can be programmed with as many voice clips as you like, and wouldn’t it make a great option for a dark side Alexa?
To be honest, D-O didn’t get nearly as much screen time or plot involvement as he deserved. But the latest addition to the growing line-up of Star Wars droids has been lovingly recreated by Matt Denton using a MKR WiFi 1010. No bad motivators here!
In our quest for a fully integrated online experience, Arduino Create has been expanded over the years to include many additional features. It enables everyone to write code, compile and upload directly from the browser, connect IoT devices, and build real-time dashboards. As it grew, it called for a new name: the Create platform became the Arduino Cloud. This change will be gradually applied, so you’ll still see the old name around for a bit.
Apart from this, we have big news today. Based upon your feedback, we’re happy to announce two new Cloud plans and significant free upgrades to the existing ones.
If you’re a new explorer, you can start with the Free plan. Use it to build your IoT project and easily control it from yoursmartphone with the Arduino IoTRemote app (available for iOS and Android). Now you can connect two devices rather than just one, as well as creating unlimited dashboards.
Check out the new Arduino Cloud plans
Or, for just $2.99/month, benefit from unlimited storage and compilation time with the new Entry plan. Access advanced features, up to 10 things, 15 days of data retention and over the air updates.
If you need more control and power, the Maker plan has everything from the Entry plan, and is increasing from five to 25 things. It has shared dashboards and 90 days of data retention (previously 15) for the same great price of $6.99/month. Existing users will receive this upgrade automatically.
For those managing small fleets, things can get serious! Jump into the new Maker Plus plan at $23.99/month. This solution gives you up to 100 things, one year of data retention, and all features from the other plans.
Plans can be subscribed tomonthly or yearly. With a one-off yearlypayment,you can save up to 30% off your subscription and receive a $30 voucher for your next purchase on theArduino store.
That’s not all. We’re working around the clock to enhance your experience on our existing platforms while cooking up new cloud-based solutions, services and community features. They’ll be available in the future to all Arduino users, sostay tuned.
Note for existing Free plan users: You can now use third-party devices such as ESP8266, which previously required a paid plan subscription. API usage now requires an Entry plan; if you have existing API keys, those will continue to work until June 1st, 2021.
In the latest Arduino Education update, we’ve made the Arduino Create app free for Chrome. From today, as many educators, students, and parents around the world as possible can now access the Arduino Create Agent.
What is Arduino Create (soon to become Arduino Cloud)?
Arduino Create is an online platform that lets students write code, access tutorials, configure boards, and share projects.
Designed to provide users with a continuous workflow, Arduino Create connects the dots from inspiration to creation. This means students can manage every aspect of their projects right from a single dashboard.
Get the app for Chrome and Chromebooks
The app lets you use the Arduino Create on Chromebooks. You can then code online and save your sketches in the Cloud. Then you can upload them to any Arduino board connected to your computer, and do it all without having to install anything locally.
Developed with the classroom in mind, the Arduino Create app runs on Chrome OS. It enables you to teach and play with Arduino electronics and programming in a shared environment. Because it’s a Cloud-based environment, you can also be sure it’s always up-to-date. All the contributed libraries are automatically included, and any new Arduino boards are supported out-of-the-box.
Arduino’s CEO, Fabio Violante, says, “The aim of Arduino Education is to put technology into the hands of every student around the world. Making Arduino Create free, and therefore more accessible, is a step towards doing this. We’re proud to provide open-source software, and want to inspire students and educators in STEAM learning.”
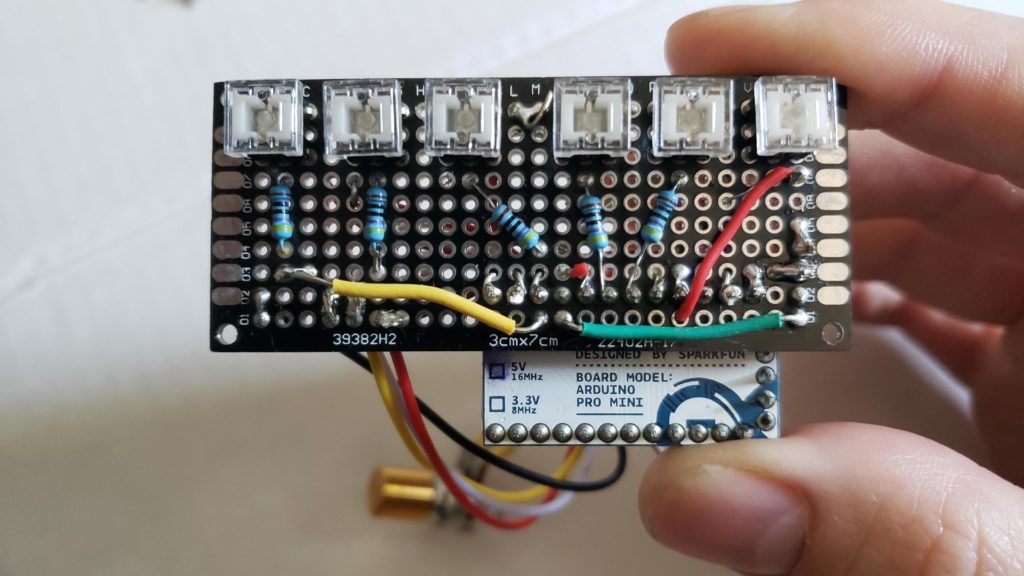
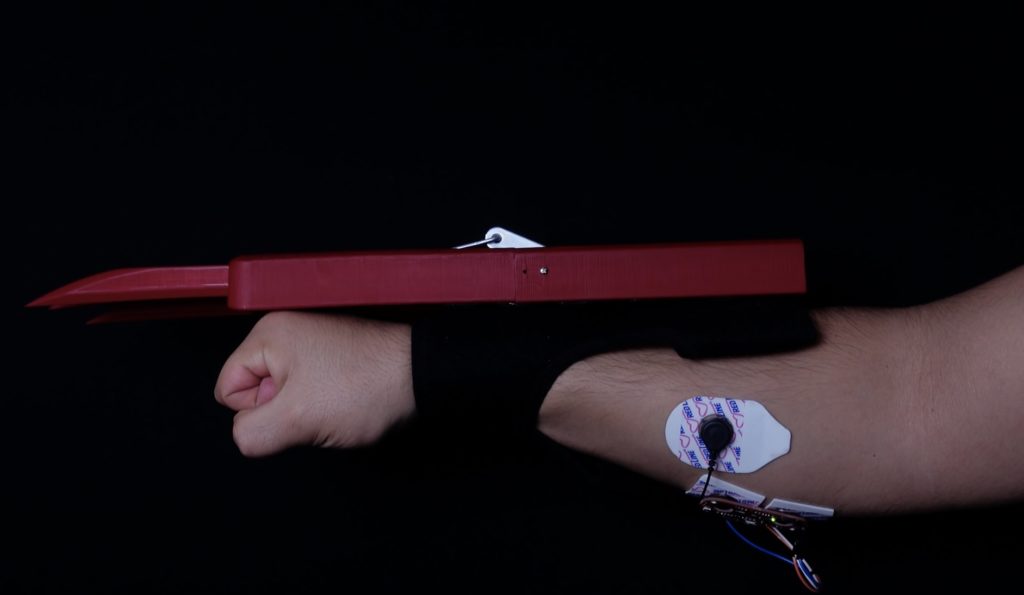
In the fictional Marvel Universe, Wolverine has sets of claws that pop out of his hands as if they were natural parts of his body. While a seemingly fantastic concept, myoelectric sensors are able to pick up on muscle movements in order to illicit a response. YouTuber MERT Arduino & Tech decided to take this concept and build a pair of forearm-mounted claws.
The wearable device senses muscle activation via a MyoWare muscle sensor, which sends information on to an Arduino Nano on a custom carrier board. Depending on the signal, it’s able to extend or retract claws, with the help of a servo motor and linkage system.
The project looks like a lot of fun, and more information can be found in the video’s description below. It’s also not the first time we’ve seen some 3D-printed bionic claws — similar instructions are available in this Make: tutorial.
Bicycle theft is, unfortunately, a very common problem. Most bicycle locks are easy to overcome, which makes bike theft a crime of opportunity. Recovering a stolen one is usually improbable, but this DIY GPS tracker could provide the help that you need.
The GPS tracker, designed by Johan, is like Lojack for your bicycle. If the device detects that the bike has moved, it will send a text message and start tracking the GPS location. It will periodically send an update with the current location, so you can track down your stolen bike (with the help of the police).
The key component in this device is a MKR GSM 1400, which is a development board that is capable of sending SMS messages over GSM cellular networks. It uses an ADXL345 three-axis accelerometer to sense when the bike moves. A MKR GPS Shield monitors the unit’s real-time physical location. Power comes from a 4400mAh lipo battery through a SparkFun LiPo Charger Plus board.
Those components are housed within a plastic case that mounts to the bike frame. Johan placed that case underneath his bike lock holder, so it isn’t obvious to would-be thieves. That helps to avoid the possibility of the thief removing the tracker before Johan can recover the bike. If you want to build your own tracker, Johan provides all the schematics and code that you need to tackle the project.
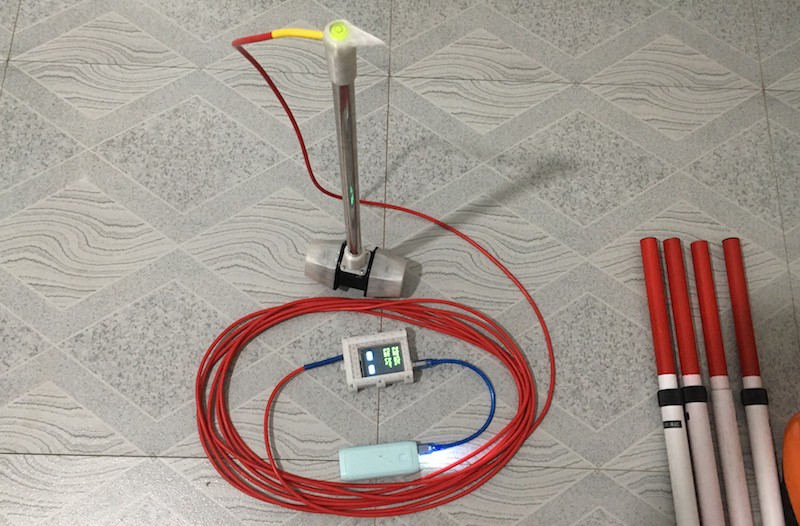
Scientific equipment is notoriously expensive, and for schools, there are often monopolies on which suppliers can provide it. Eben Farnworth wanted to do something about this problem. His design for an open flow meter only costs around $60 USD, which pales in comparison to the typical price tag of $1,000.
Flow meters are great tools to measure how quickly a liquid (typically water or air) passes through a certain area. By using a propeller inside of an enclosure with a known diameter, the amount of liquid per unit of time can be calculated, along with how fast it is going. Farnworth’s design employs a DN80 water sensor, an Arduino Uno, and a 2.4″ TFT touchscreen.
The case houses all the electronics plus a battery for power. Then at the bottom of the device is a port for plugging in the flow sensor itself. After a bit of calibration, Farnworth was able to get the display to show the flow of a river with impressive accuracy.
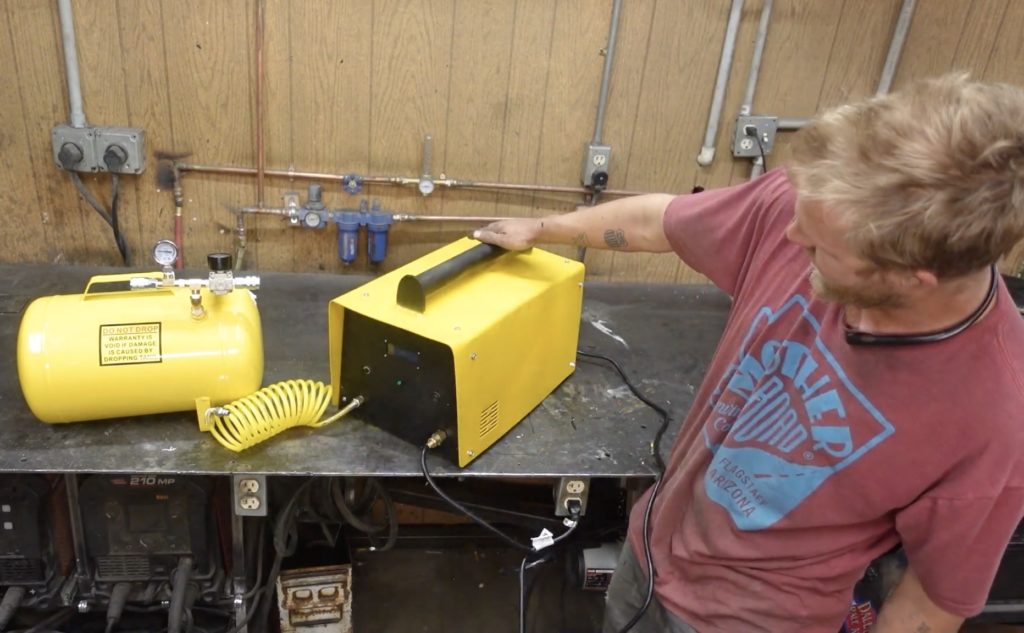
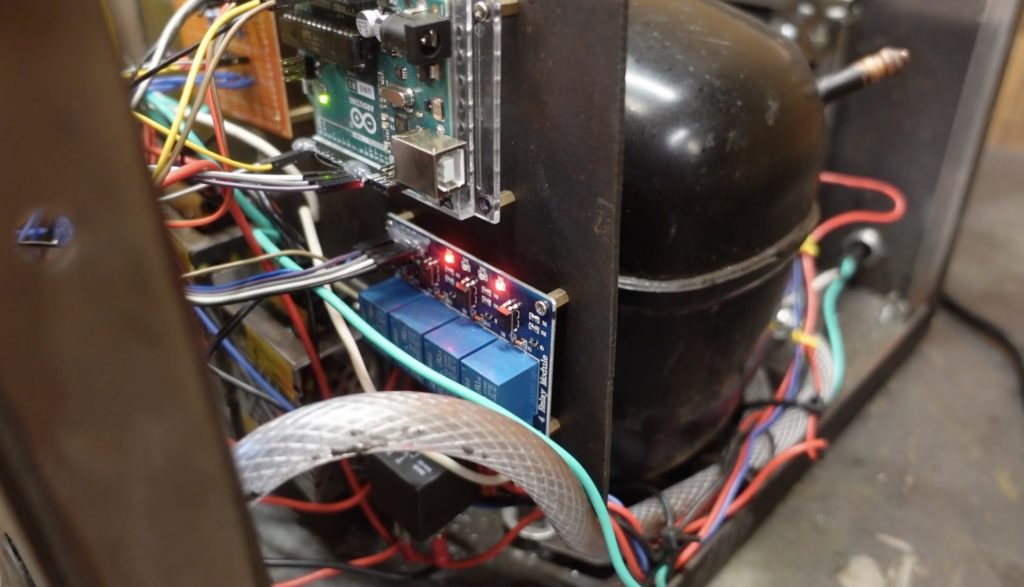
Lasers come in two varieties: solid-state and gas tube. As the name suggests, the latter types contain gas. That is a mixture of gas in precise proportions. To fill his DIY laser tube, Cranktown City built an Arduino-controlled gas mixer.
This device has an Arduino Uno board that drives three relay modules. The first relay switches power to a gas pump, the second relay controls an output valve, and the third relay controls an input valve. A push button starts the pumping process. The pump turns on and the input valve opens. Gas from a storage tank is pumped into an inflatable bag. Once the bag is full, as detected by a limit switch, the two valves flip and the gas pumps into the laser tube.
Cranktown City knows the exact volume of the inflatable bag, so he knows how much gas has been pumped into the laser tube each time the device runs. Like mixing a cocktail, this lets him “pour” each part of the gas mixture into the laser tube until he ends up with the correct proportions.
The gas pump, Arduino, relays, and inflatable bag are all enclosed within a heavy duty case made from steel sheet cut on a plasma table. The resulting mixer is portable and robust enough to stand up to abuse of a shop environment. With this device, Cranktown City can continue with developing his DIY laser tube — a project we can’t wait to see completed.
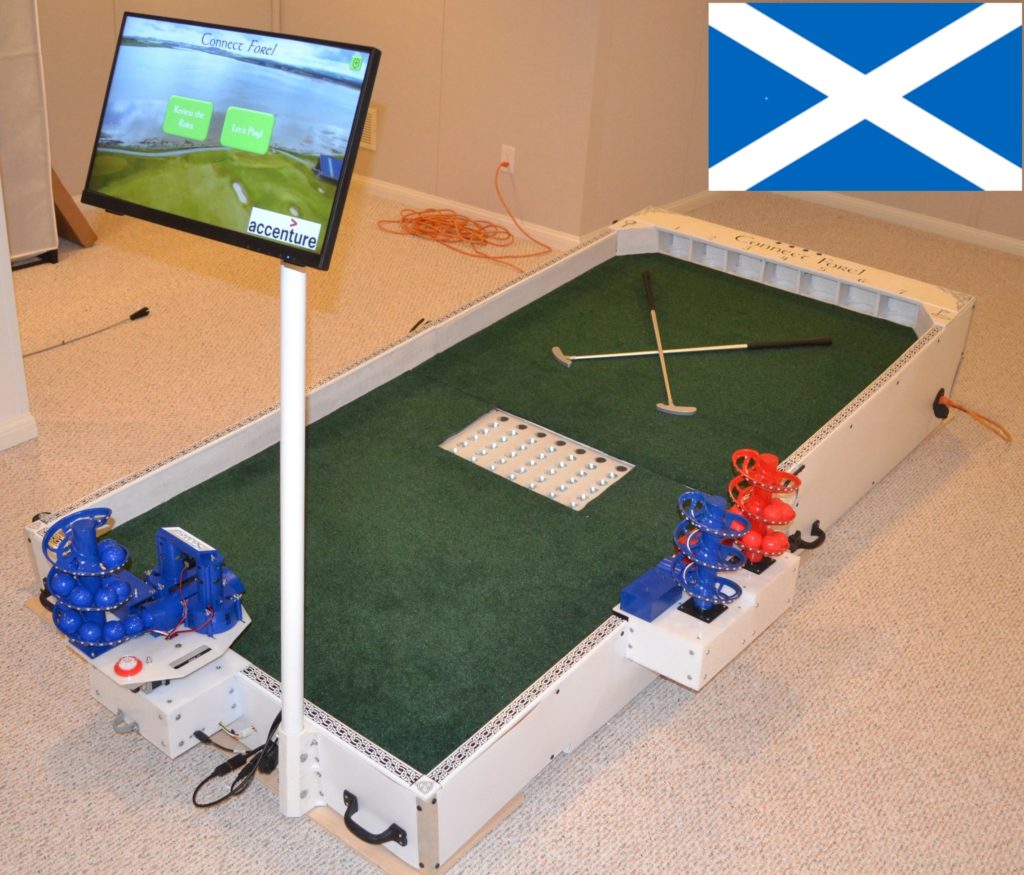
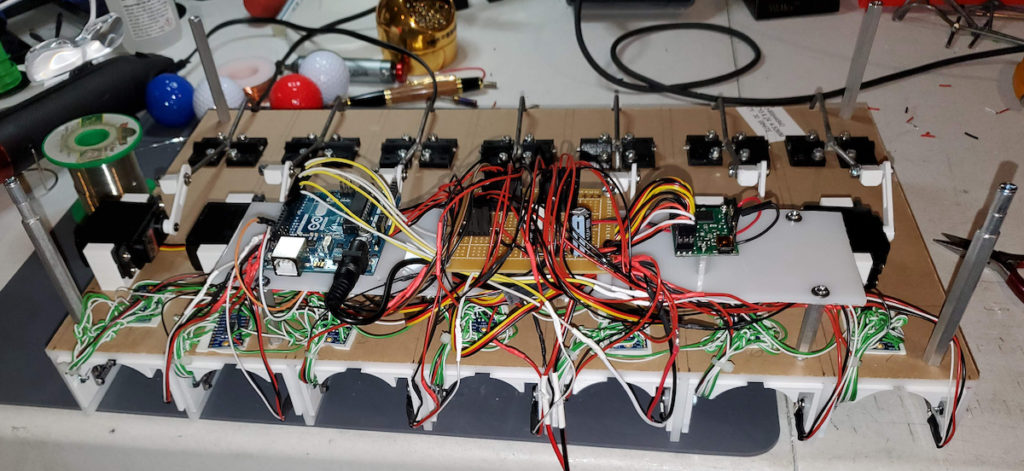
Have you dreamed of combining the two incredible activities putt-putt and Connect Four together into the same game? Well one daring maker set out to do just that. Bithead’s innovative design involves a mini golf surface with seven holes at the end corresponding to the columns. The system can keep track of where each golf ball is with an array of 42 color sensors that are each connected to one of seven I2C multiplexers, all leading to a single Arduino Uno.
The player can select from six distinct levels of AI, all the way from random shots in the dark to Q Learning, which records previous game-winning moves to improve how it plays over time. It can putt by first loading a golf ball into a chamber and then spinning up a pair of high-RPM motors that launch it. For the human player, there is a pair of dispensers on the left that give the correct color of ball.
The entire system runs on an Intel NUC that hosts the game which was written in C#. There’s a large 22″ touchscreen at the front that is mounted at eye-level for easy interactions. Although it took Bithead nearly 18 months and $3,500, the end result is spectacular.
Um dir ein optimales Erlebnis zu bieten, verwenden wir Technologien wie Cookies, um Geräteinformationen zu speichern und/oder darauf zuzugreifen. Wenn du diesen Technologien zustimmst, können wir Daten wie das Surfverhalten oder eindeutige IDs auf dieser Website verarbeiten. Wenn du deine Einwillligung nicht erteilst oder zurückziehst, können bestimmte Merkmale und Funktionen beeinträchtigt werden.
Funktional
Immer aktiv
Die technische Speicherung oder der Zugang ist unbedingt erforderlich für den rechtmäßigen Zweck, die Nutzung eines bestimmten Dienstes zu ermöglichen, der vom Teilnehmer oder Nutzer ausdrücklich gewünscht wird, oder für den alleinigen Zweck, die Übertragung einer Nachricht über ein elektronisches Kommunikationsnetz durchzuführen.
Vorlieben
Die technische Speicherung oder der Zugriff ist für den rechtmäßigen Zweck der Speicherung von Präferenzen erforderlich, die nicht vom Abonnenten oder Benutzer angefordert wurden.
Statistiken
Die technische Speicherung oder der Zugriff, der ausschließlich zu statistischen Zwecken erfolgt.Die technische Speicherung oder der Zugriff, der ausschließlich zu anonymen statistischen Zwecken verwendet wird. Ohne eine Vorladung, die freiwillige Zustimmung deines Internetdienstanbieters oder zusätzliche Aufzeichnungen von Dritten können die zu diesem Zweck gespeicherten oder abgerufenen Informationen allein in der Regel nicht dazu verwendet werden, dich zu identifizieren.
Marketing
Die technische Speicherung oder der Zugriff ist erforderlich, um Nutzerprofile zu erstellen, um Werbung zu versenden oder um den Nutzer auf einer Website oder über mehrere Websites hinweg zu ähnlichen Marketingzwecken zu verfolgen.