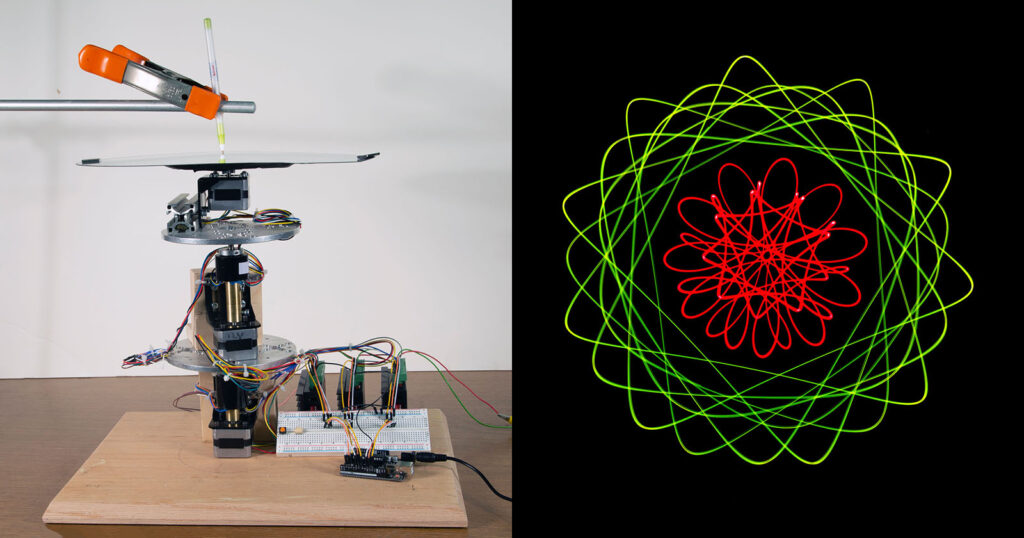
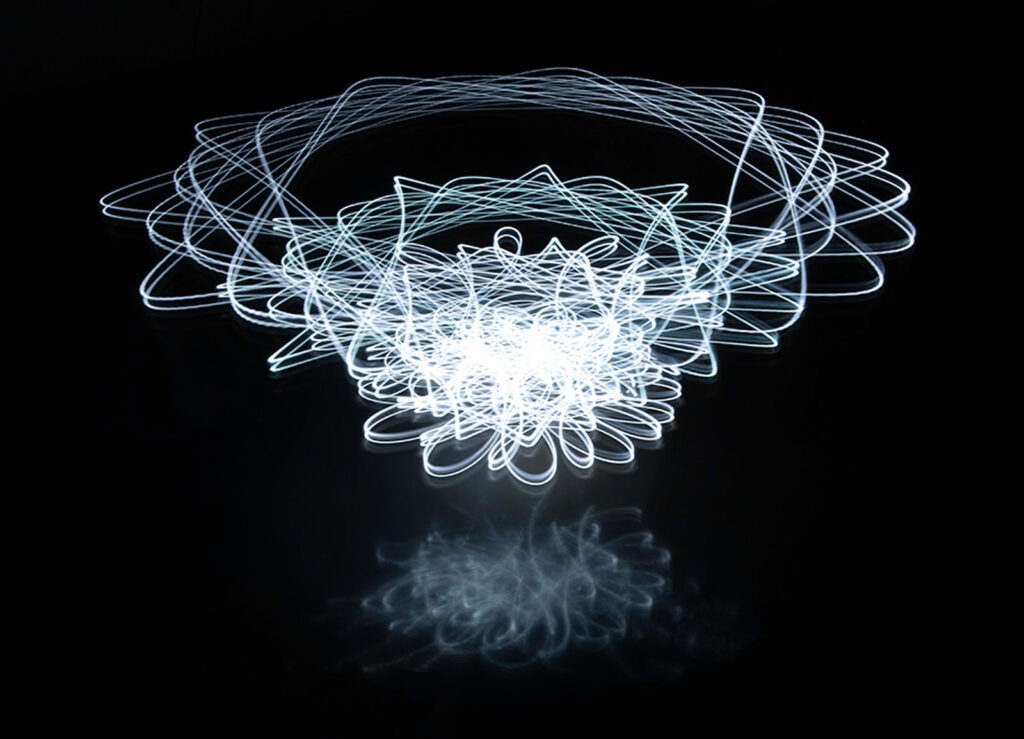
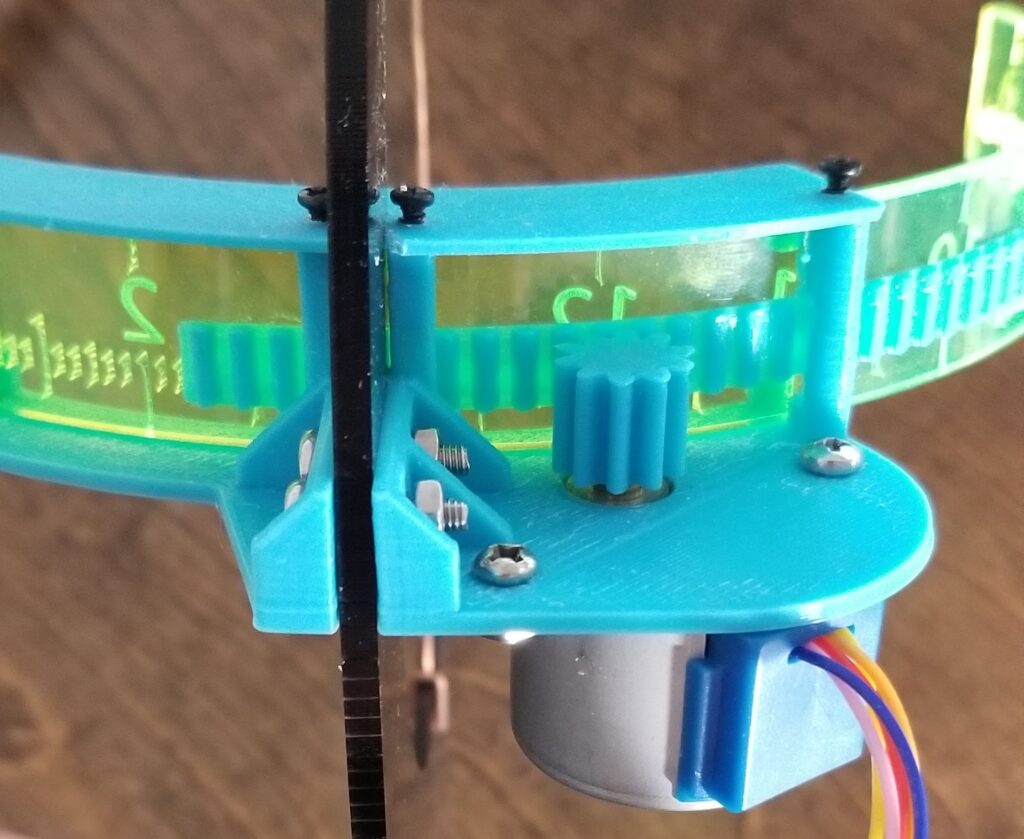
Light painting is a fun way to create digital images by using just a few points of light to “draw” across a camera with a long exposure time. This gives the illusion of a virtual streamer being dragged on the canvas and can produce amazing photos. Ted Kinsman wanted to build a light painting machine, which mimics the geometric chucks from the 1860s that used several spinning platters on a lathe that rotated at different speeds to carve ornate patterns into wood. His version has a series of three platters all stacked on top of each other and are driven by three stepper motors.
A single Arduino Uno runs the program for the geometric light painting machine, and it is responsible for controlling the stepper motors through its three attached TB6660 motor driver modules. The code works by first initializing each stepper as an AccelStepper object and then setting its max speed. The magic comes from this next part, and each motor gets assigned a constant speed value that determines what kind of pattern will be drawn. And finally, the motors are run at these speeds until the machine is stopped. The vast number of combinations from these variables means that even a small change to the motors’ speeds or where the LED is positioned on the top platter can generate wildly different results.
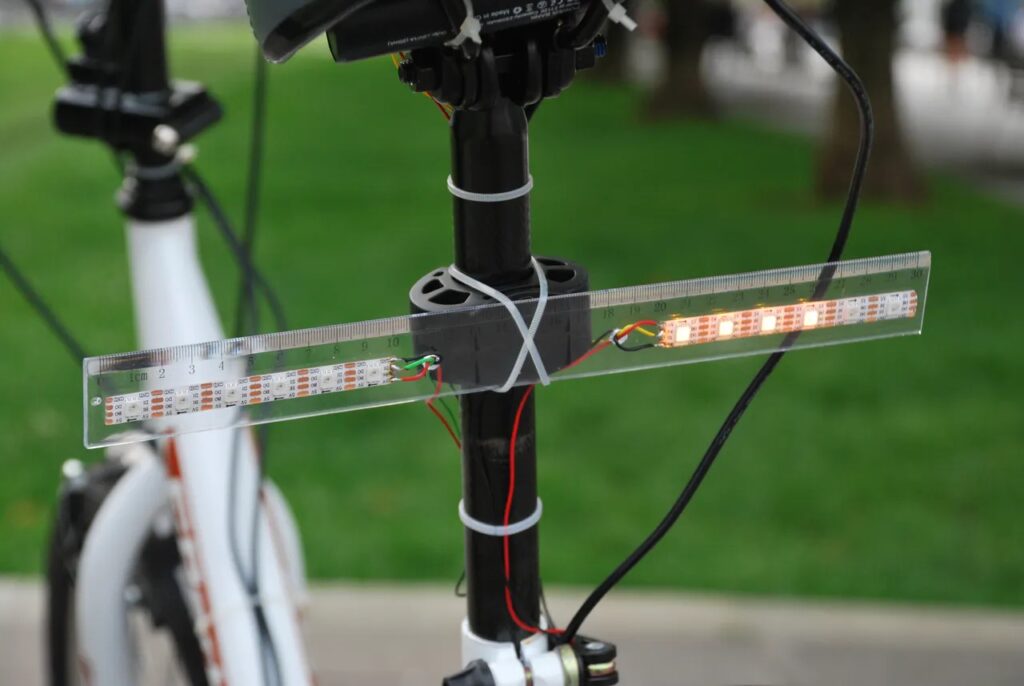
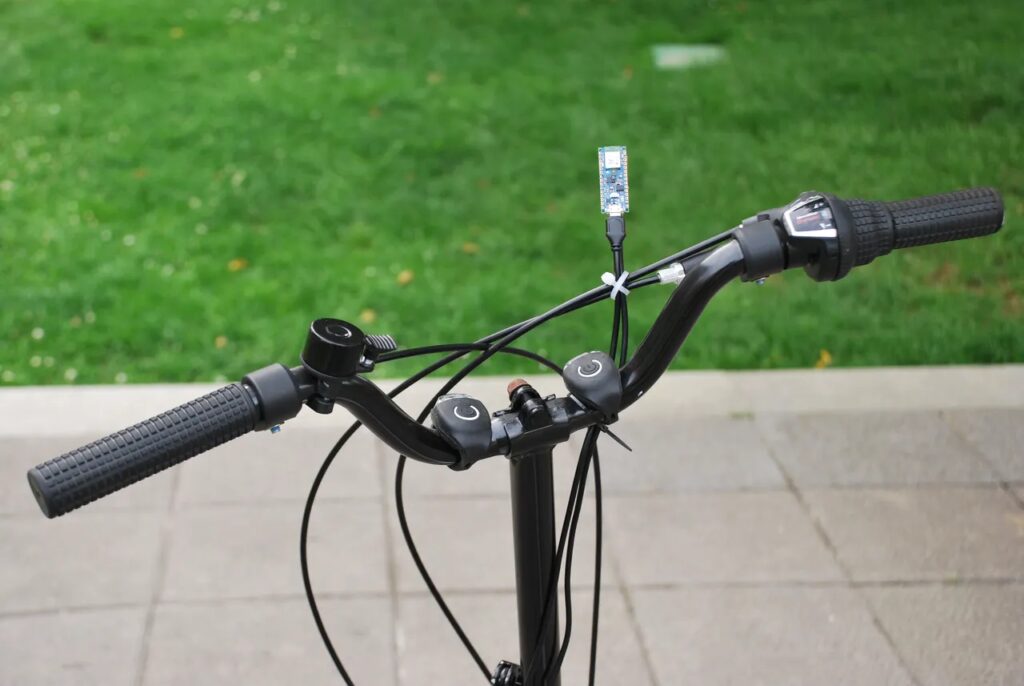
Whether commuting to work or simply having fun around town, riding a bike can be a great way to get exercise while also enjoying the scenery. However, riding around on the road presents a danger as cars or other cyclists / pedestrians might not be paying attention while you try to turn. That is why Alvaro Gonzalez-Vila created VoiceTurn, a set of turn signals that are activated by simply saying which direction you are heading towards.
VoiceTurn works by using the Arduino Nano 33 BLE Sense at its heart to both listen for the “left” or “right” keywords and then activate the appropriate turn signal. Gonzalez-Vila took advantage of edge machine learning through the Edge Impulse Studio. First, he collected audio samples consisting of the words “left,” “right,” and then random noise via the Google Speech Commands Dataset. Next, he sent them through an MFCC block that does some processing to extract human speech features. And finally, the Keras neural network was trained on these features to produce a model.
With the model deployed to the Nano 33 BLE Sense, Gonzalez-Vila developed a simple program that continually reads in a waveform from the microphone and passes it to the model for inference. Based on the result, a string of NeoPixels on either the left or right will begin to light up for a predetermined number of cycles. As seen in his video below, the VoiceTurn works really well at detecting keywords and is easy to see from a distance. You can read more about how this project was built in its write-up here.
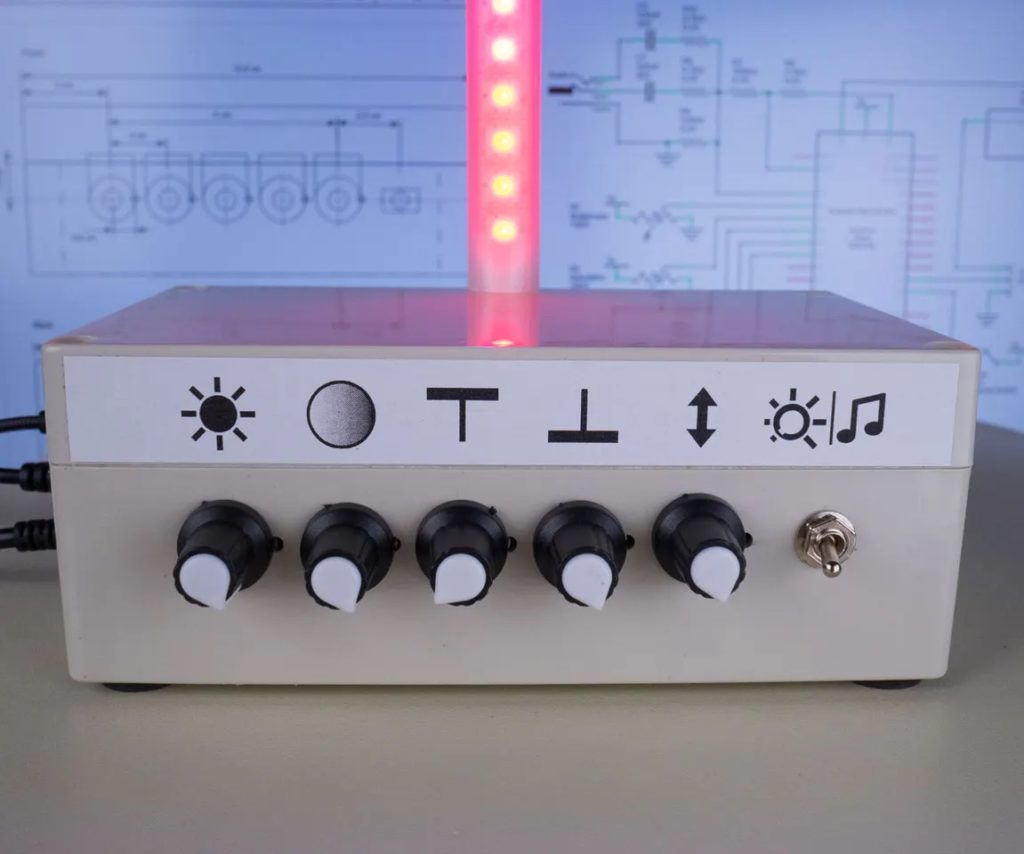
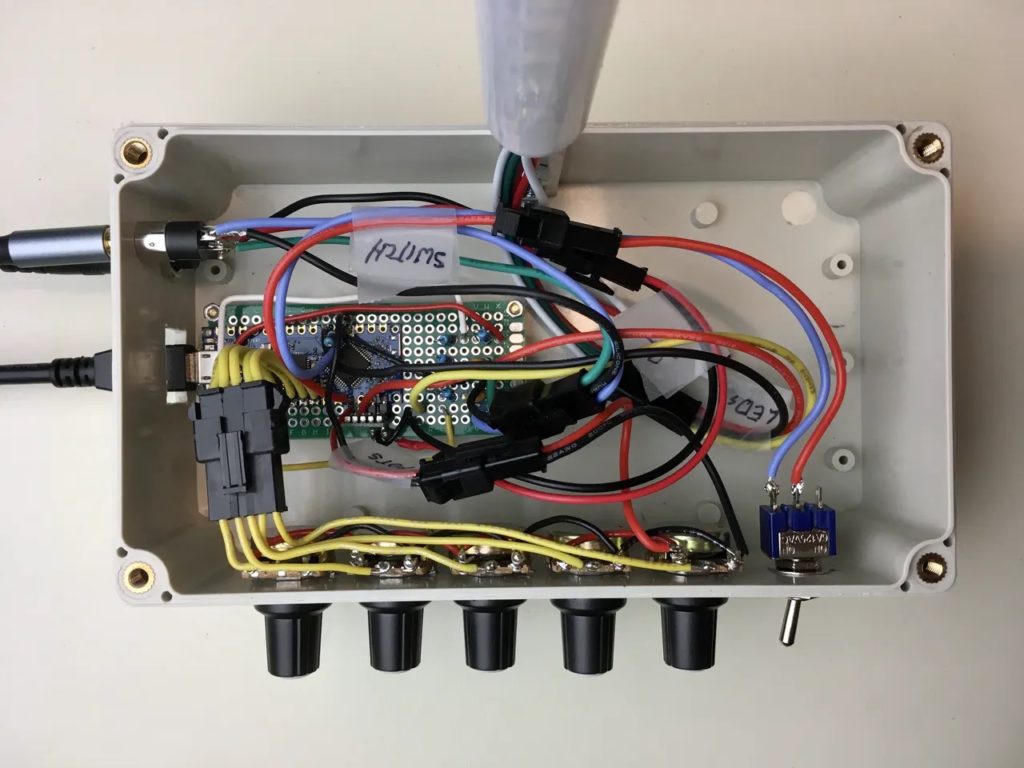
While thinking of an interesting project to create, Hackster user marcaubin started to imagine an audio spectrum visualizer, but not a traditional one that has a matrix of LEDs with columns corresponding to certain frequencies. Instead, his device would have just a single vertical NeoPixel strip featuring 29 LEDs in total, with the bottom ones displaying the lower frequencies while the top pixels would indicate the higher frequencies.
He built a small box that houses a few components, including an Arduino Nano Every for taking in sound data and controlling the LED strip, a jack for plugging in a sound source, and a series of potentiometers for carefully adjusting certain variables. Two of those potentiometers can change the color range of the LEDs, as the possible range of colors get divided amongst the pixels in between the two ends. There is a way to change both the saturation and max brightness of the LEDs as well.
Marcaubin’s code continuously reads values coming in from the audio jack and performs a Fast-Fourier Transformation (FFT) on the data which causes the resulting frequency bands and their corresponding amplitudes to be outputted. From there, the values of the potentiometers are combined in certain ways to produce a very nice-looking array of colors along the LED strip. As a certain frequency gets louder, the LED within the column will get brighter, and vice-versa for quieter amplitudes.
This may be one of the cheapest and easiest CNC drawing machines you’ll find
Arduino Team — July 15th, 2021
CNC plotters are a lot of fun to build and use, as they teach mechanics, electronics, and how G-code works. However, traditional Cartesian machines often require expensive components such as linear rods and ample amounts of bearings to move in just two axes. YouTuber DAZ Projects set out to change that by assembling a form of a Polargraph to draw pictures with great detail. The idea is simple: use a pair of stepper motors to alter the length of a string on two sides that controls where the toolhead goes.
He started by 3D printing stepper motor mounts, a few pulleys for the string to wrap around, and the pen holding/lifting mechanism. Both 5V stepper motors plug into a generic Grbl CNC shield and are driven by a couple of A4988 modules. The servo is powered directly by an Arduino Uno, and its job is to adjust the pressure the pen applies to the page to define how dark the lines are.
Once the custom firmware written by the Polargraph’s creator, Sandy Noble, was flashed to the Uno, DAZ connected it to his computer which was running the Polargraph control software. In here, the program takes an image and outputs a series of toolpaths for the Uno to convert to motor movements. You can see how DAZ constructed and used the device below, as well as the find the code on GitHub and 3D design files on Thingiverse.
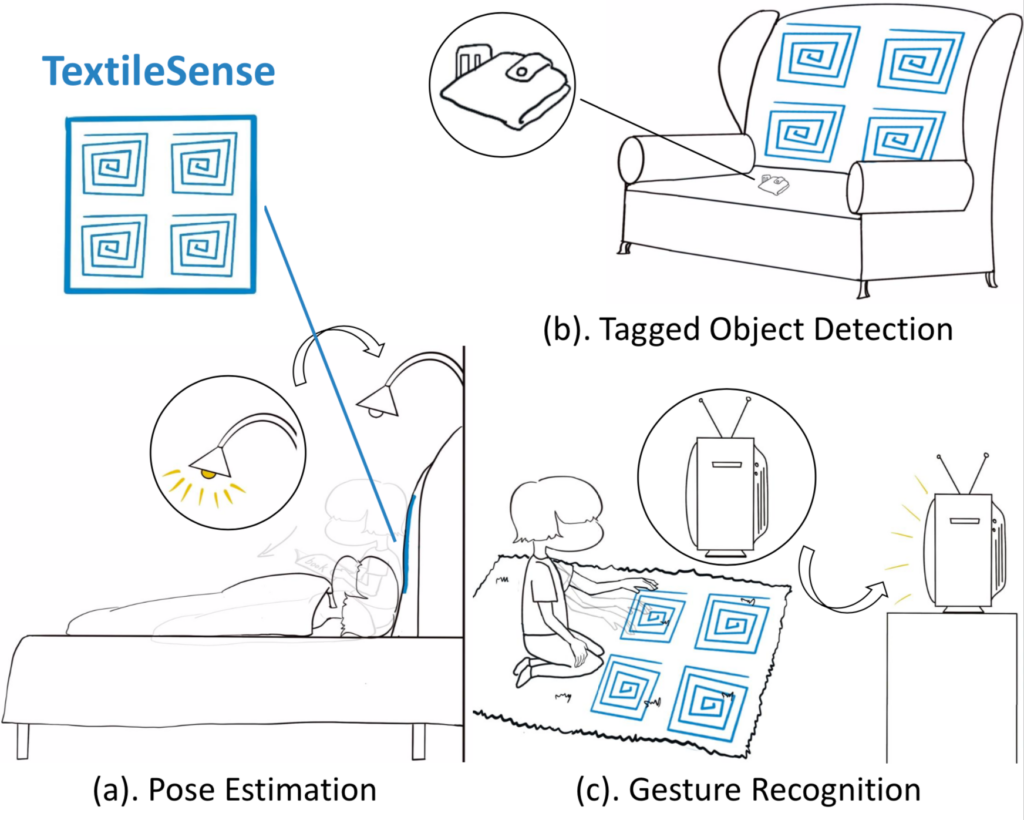
Near-field communication, or NFC for short, has started popping up everywhere as a way to easily pay, unlock doors, or even start a car. And now it can do one more thing: locate and track objects within a room. Researchers at Carnegie Mellon University’s Laboratory for Emerging Wireless Technologies have come up with an ingenious method to integrate NFC antennas into the fabric of pillows, furniture, and carpet to create smart environments.
Their system, which they call “TextileSense,” takes advantage of multiple-input and multiple-output (MIMO) antenna arrays to make aimed beams of radio waves that can be measured when they interact with a conductive object, like a hand.
The team plans on using this technology to perform various functions around the house such as allowing furniture to detect when a person is present, estimating the pose of someone who is sleeping, and letting carpet pick up gestures to control smart home devices. TextileSense can achieve accuracies of up to 3.6cm when using passive NFC tags and up to 2.9cm when detecting a human hand. All of this can be done at a max range of about 20.3cm using four software-defined radios, which helps address some of the privacy concerns associated with a system like this.
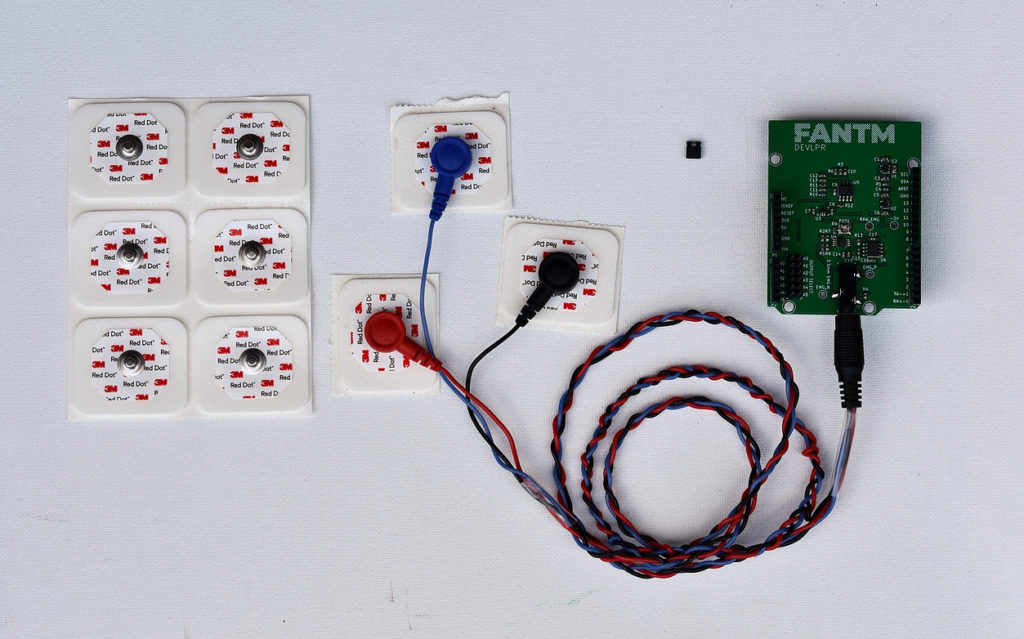
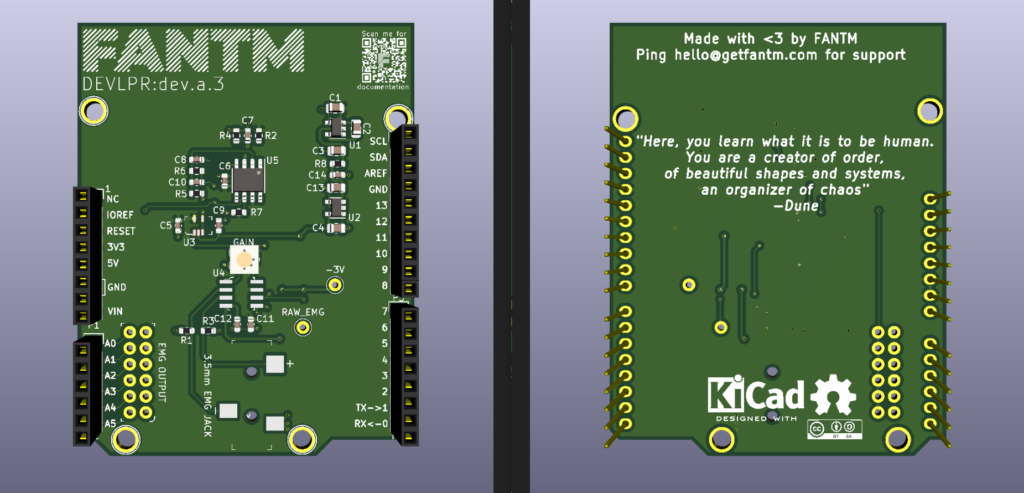
Human-to-computer interfaces are nothing new, but they are often difficult to set up or use in more hobby-oriented applications. The team of Ezra Boley and Finn Kuusisto is setting out to change this with their FANTM EMG Arduino Uno shield. It uses a series of conductive pads that pick up electrical signals from a user’s muscles and feeds that data through a set of filters. Once read by the Arduino’s analog input pin, the values are stored within a buffer for later processing.
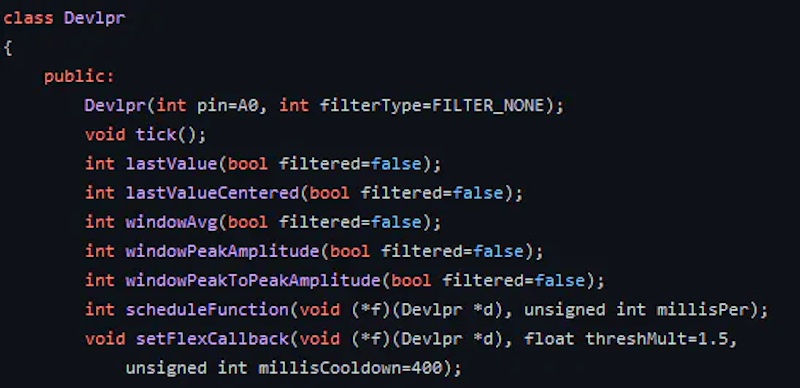
The FANTM DEVLPR shield was designed to be open source, letting makers tinker with its layout, capabilities, and hardware. There is a 3mm jack where sensors can be attached, along with a potentiometer for adjusting the gain of the signal. Up to six shields can be stacked and fed into their own analog input pins. The code is open source too and in the form of an Arduino library for easily dropping into whatever application it might be needed. Users can pass their own callback functions via the API that get called when certain events occur, such as a muscle flexing or after an amount of time has transpired. The API also provides basic statistical methods to retrieve average, peak, and latest values.
To see more about the FANTM DEVLPR Arduino shield, you can visit its website here.
‘Droop, There It Is!’ is a smart irrigation system that uses ML to visually diagnose drought stress
Arduino Team — July 13th, 2021
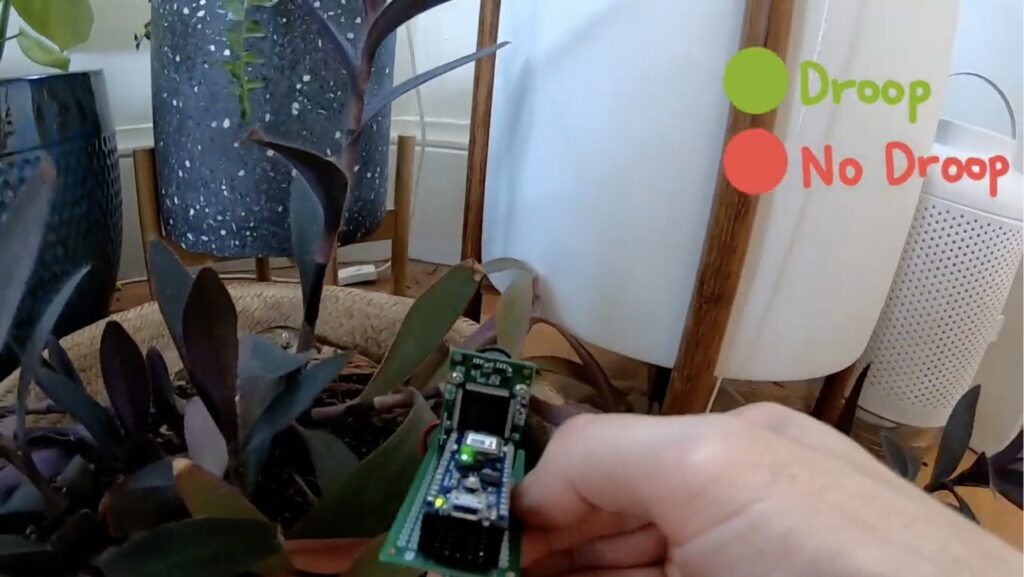
Throughout the day as the sun evaporates the water from a plant’s leaves via a process called transpiration, observers will notice that they tend to get a little bit droopy. Also known as drought stress, this response to a loss of water results in low turgidity (internal water pressure) and can impact the ability of the plant to grow correctly. Traditional irrigation monitors use soil moisture sensors to determine the soil’s water levels, but Terry Rodriquez and Salma Mayorquin wanted to create something a bit more unique: a visual droop detection system.
Their device, which they affectionately call the “Droop, There It Is”, features a Nano 33 BLE Sense and ArduCam camera module to take pictures of the plant and uses an image classifier to determine if the plant is drooping or not. They started by taking a pre-trained MobileNetV2 base model and fine-tuned it with a set of 6,000 images. After optimizing the result with grayscale reductions and knowledge distillation techniques, the team deployed it onto their Nano 33 BLE Sense for inferencing.
Although the device only signals when the plant needs water over Bluetooth Low Energy for now, it can be augmented in the future to directly control pumps and valves if needed. This project is a great demonstration of how machine learning can be harnessed to reduce overwatering and increase efficiency. You can read more about it here or check out their video below!
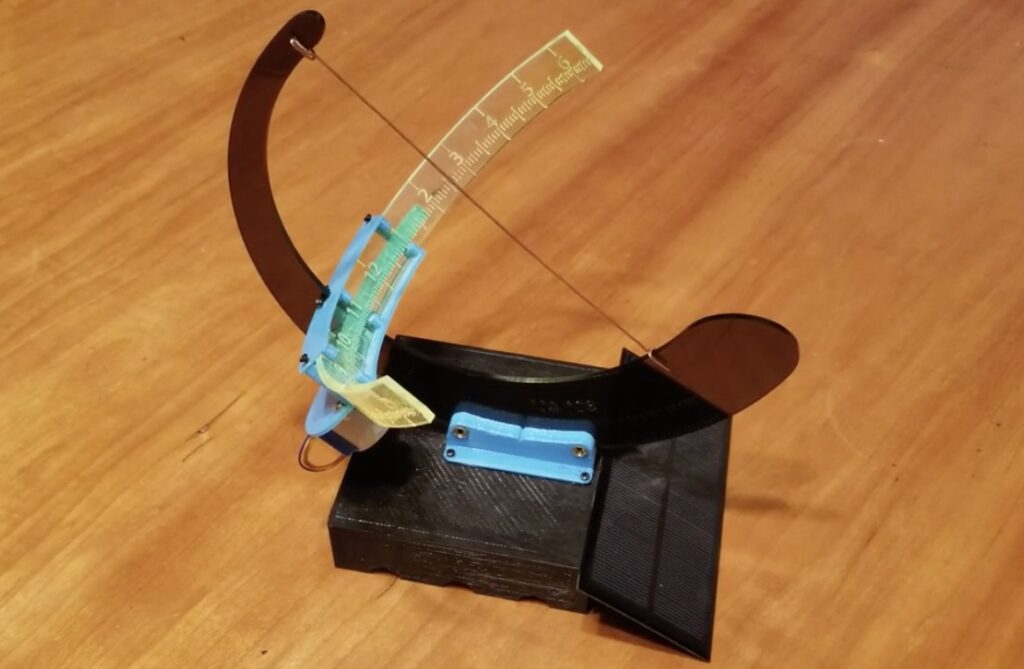
Some sundials are as simple as a stick pushed into the dirt, but they’re still reliable and accurate. The sun is, after all, quite consistent. But there are some caveats. The Earth’s orbit and its rotational tilt mean that the lengths of our days are variable and that means the simplest sundials are only perfectly accurate once a year. To compensate for those factors, Redditor Onemywaybackhome built this sundial that is capable of self-correction.
This sundial automatically compensates for the difference between solar noon (the time at which the sun is at its highest point) and civil noon (the time when the local clock is at 1200). Solar noon is dependent on the exact location on the planet’s surface. This sundial stays in a fixed location, so that variable in the solar noon calculation is known. The other important variable is the date. With the location and date, this sundial knows how to adjust itself so that it reads noon at the same time as a local clock.
The device features a real-time clock (RTC) to keep track of the date, which is ironic, because it knows the time. An Arduino Nano board uses the data from the RTC in its adjustment calculation. It adjusts the dial using a small 28BYJ-48 stepper motor. Power comes from a battery and a solar panel keeps that battery charged. The sundial’s frame and enclosure are a combination of laser-cut and 3D-printed parts.
We wanted to let you know about some scheduled maintenance we’ll be performing on Wednesday, July 14th, 2021.
Short loss of Arduino Cloud and Education services
The maintenance is planned between 7AM and noon (12PM CEST) on July 14th. During this time we’ll need to take Arduino Cloud and Arduino Education services offline.
On the Education side of things, this refers to the exclusive content and services you get access to after buying one of the Education products or kits. Naturally you’ll be able to access them again as soon as the work is complete.
You might also notice that a few other online Arduino services may run a little slowly throughout the day.
We’ll keep this post and our social media channels updated, in case there are any changes to the maintenance window. So do check back here if you want to stay apprised of how things are going.
Our apologies for the brief loss of service, and do let us know if you’ve any questions.
The Baldcorder is James Lewis’ tricorder-like device for measuring light levels and temperature
Arduino Team — July 11th, 2021
As part of element14’s Build Inside the Box Challenge, James Lewis (AKA Bald Engineer) decided to make his own DIY tricoder from Star Trek. In the series, a tricoder is a ubiquitous scanning tool that can perform various scans of the environment through its onboard sensors, as well as record and analyze them later — all in a handheld format. Lewis’ design incorporates a MKR Zero as the microcontroller, a phototransistor to detect light levels, and an analog temperature sensor to sense ambient temperatures.
The enclosure itself was based on a tricorder toy and recreated in Fusion 360. It features a hinge mechanism for easy opening and closing, as well as handling the wiring harness that connects both halves of the device. Once it was 3D-printed, Lewis moved onto the electronics.
A VL53L0X time of flight sensor was used to detect if the hinge was open, and thus if the OLED information screens should be turned on. Lewis utilized the SAM D21’s onboard capacitive touch controller to add four buttons onto his device for simple inputs. Finally, the DIY tricorder can play looped WAV files via its onboard SD card and DAC, along with an external op-amp and speaker circuit.
To read more about how the Bald Engineer created this fun project and view its associated schematics, code, and design files, be sure to check out its write-up here on element14’s website. You can also see the build log and demonstration below!
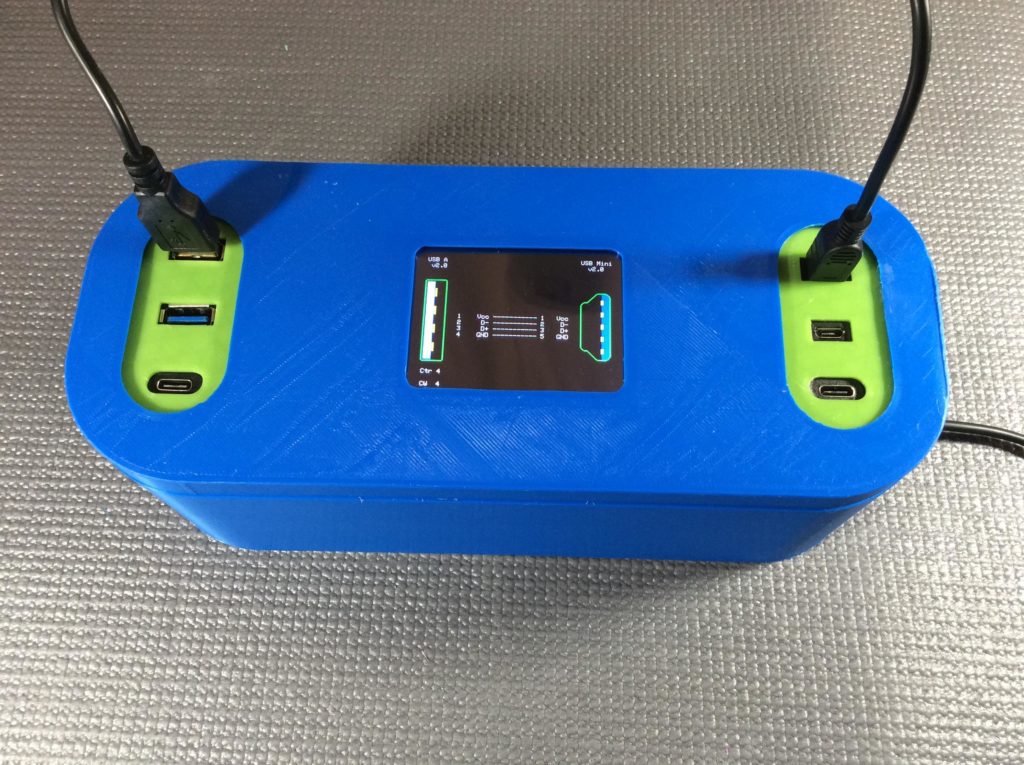
USB cables come in a variety of shapes and sizes, with a different of internal connections that may be unknown to the user. For an easy way to figure out these connections, and to diagnose if the cable itself is faulty, TechKiwiGadgets has come up the Arduino Cable Tracer.
This device features an Arduino Mega board inside a 3D-printed enclosure, with IO pins connected to USB-A, USB-C, Micro-B, and Mini-B ports. It scans these ports to determine the configuration and lets the user know exactly how the cable is wired via a 2.8” TFT screen on top.
Code and build info can be found here if you’d like to make your own Arduino Cable Tracer.
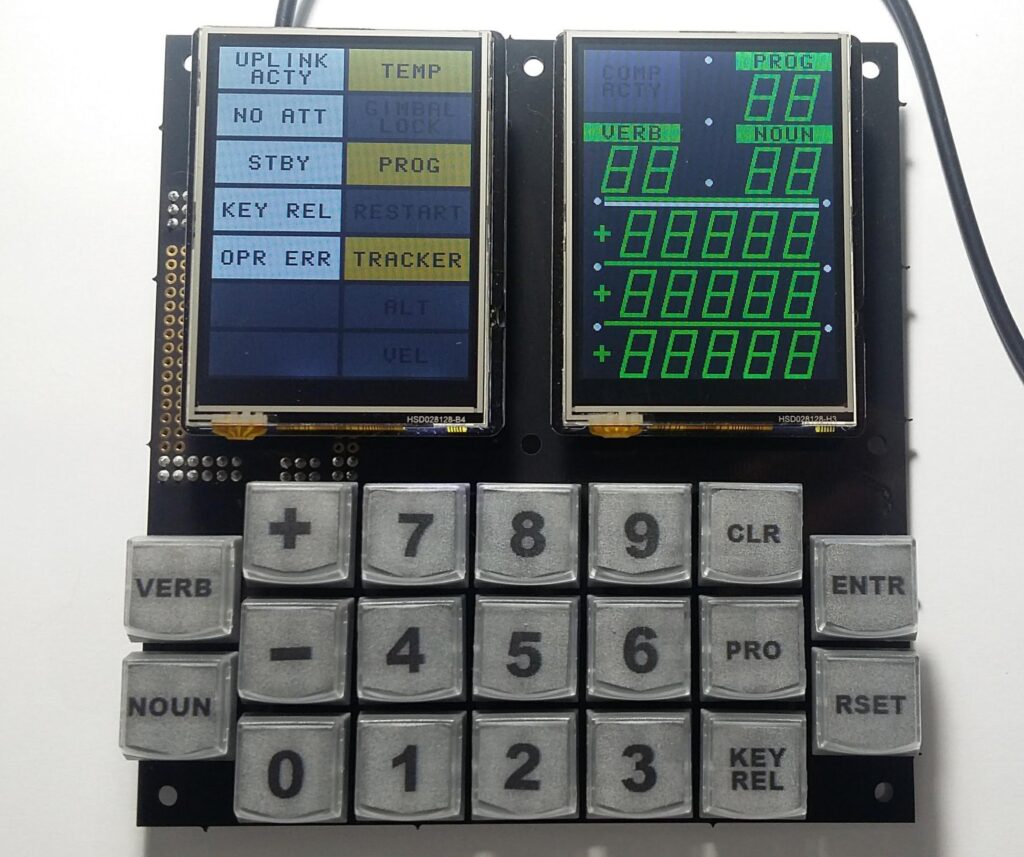
NASA’s history is full of fascinating facts and trivia. For example, the Apollo Guidance Computer, which handled navigation and control for both the Apollo Command Module and the Apollo Lunar Module, ran with less RAM and processing power than a TI-83 graphing calculator. But reading that fact isn’t the same as actually experiencing the Apollo Guidance Computer for yourself. That’s why a maker used three Arduino boards to create a simulator.
The actual Apollo Guidance Computer sat inside of a protective metal enclosure that was rather boring, but the DSKY (Display and Keyboard) interface, which acted like a terminal, had a very distinctive design. It had 19 buttons, including a numerical pad, situated below two displays. The left display had several indicator lights, similar to your car’s dashboard, to show the statuses and warnings. The right display had numerical readouts for the program number, verb, and noun, as well as data and a computer activity status light.
The Dual Screen Apollo DSKY simulator replicates all of that behavior when connected to a modern computer, which acts as the Apollo Guidance Computer. It has a couple 2.8″ 240 x 320 pixel LCD screens that mimic the DSKY’s displays. Below those are the same 19 buttons as the real DSKY. A pair of Arduino Nano boards control the two LCDs, while an Arduino Mega handles the keyboard. The Mega also appears as a virtual serial port when plugged into a computer. When MoonJS simulation software is running on the computer, the DSKY functions like the real deal.
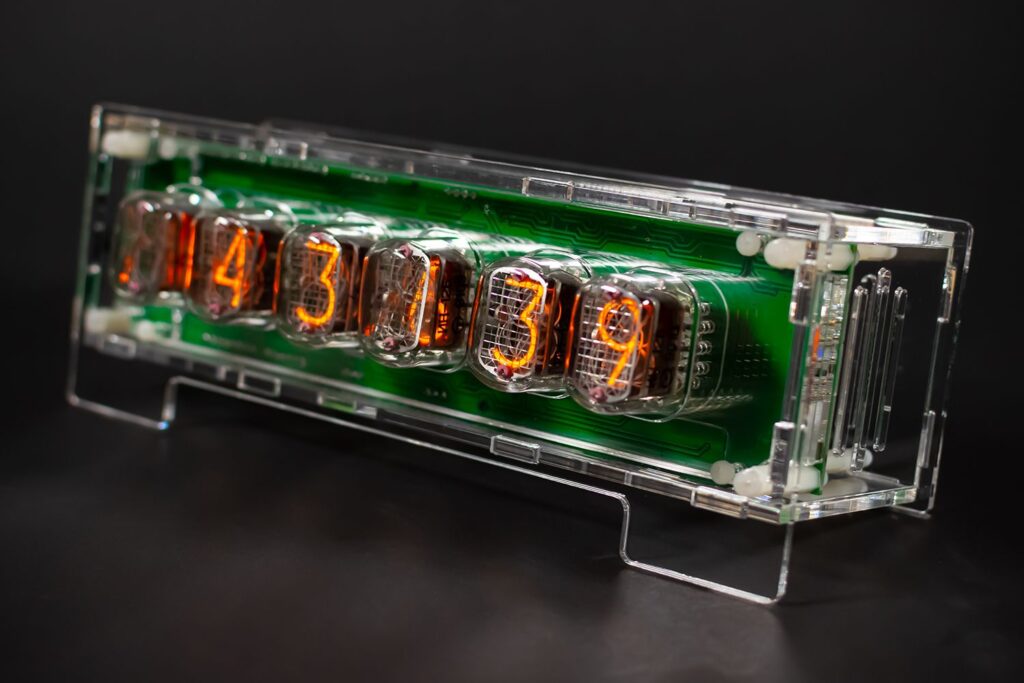
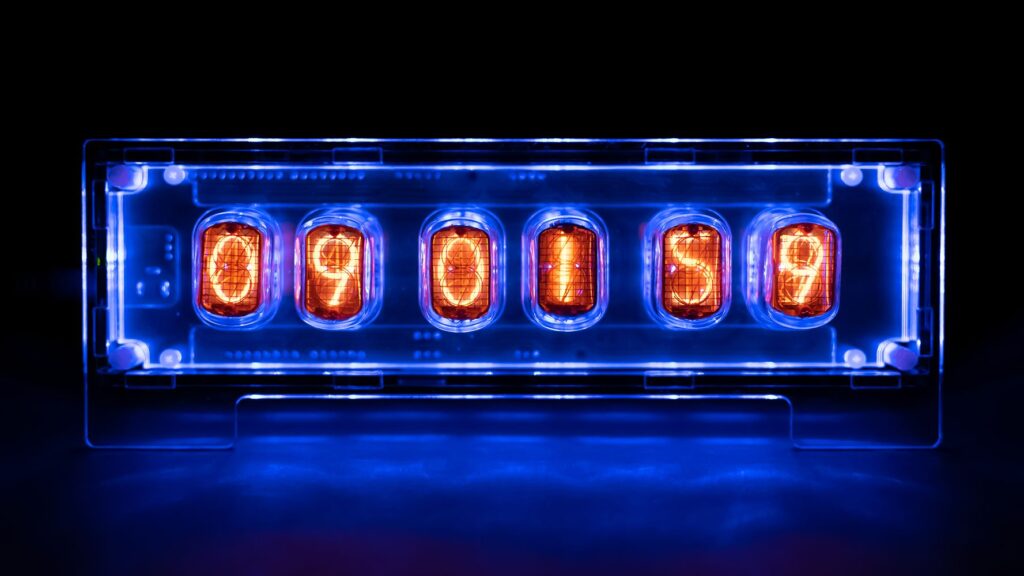
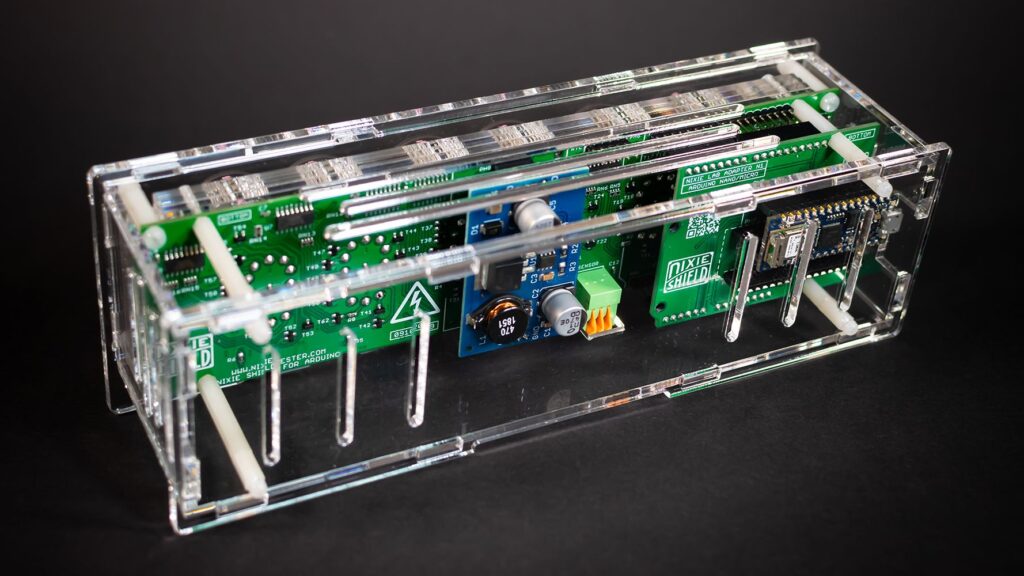
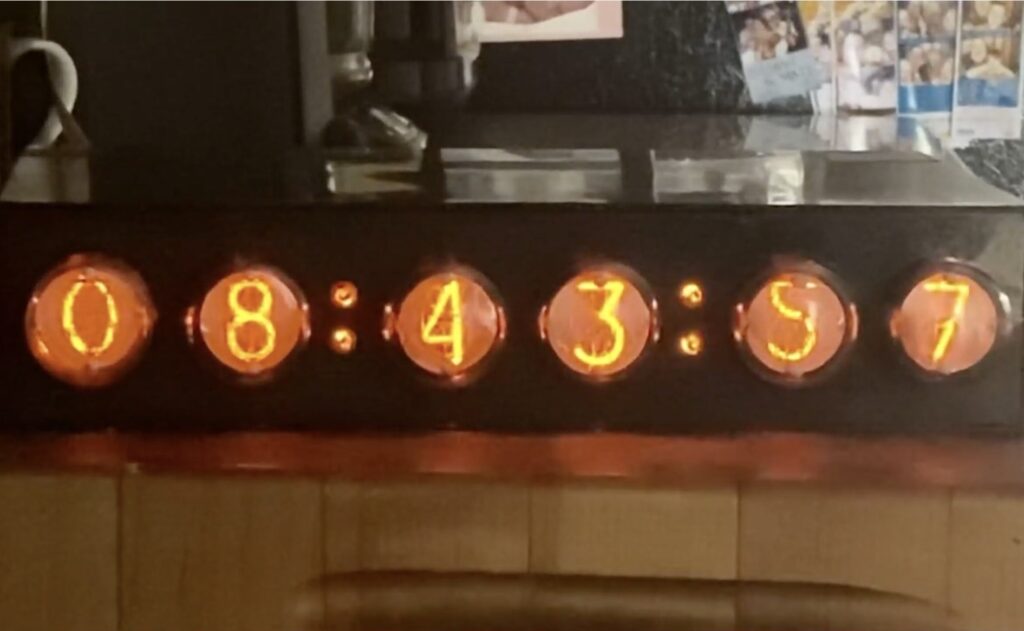
Nixie tubes are fun little devices that act like seven-segment display modules in that they can be lined up together in order to form a larger number by showing digits 0 through 9. One maker, Marcin Saj, has created a unique project that uses a series of six Nixie tubes that can show the current time, temperature, and humidity all within a compact footprint. It is also able to receive commands via the Arduino Cloud service and an Alexa skill, thus enabling users to toggle various functions on or off with a smart speaker or phone.
Saj’s IoT Nixie Clock Shield has an RGB backlight that can be easily adjusted via the Arduino Cloud’s RGB color picking tool, which allows for the device to match almost any environment. The built-in Nixie power supply is great as it lessens the chances of being shocked with 170V, and each tube is user-replaceable if it fails. The shield’s PCB has a header for plugging in an Arduino Uno, Nano, or Micro board, but it is best used with the Nano 33 IoT for cloud connectivity. The onboard DS3231 real-time clock module is able to keep the time accurately even when the power to the rest of the clock is removed.
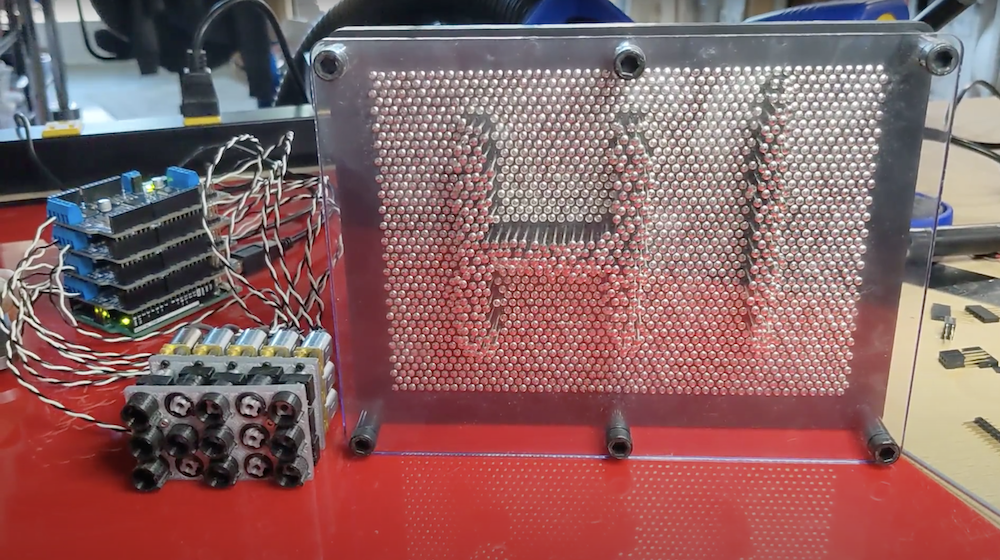
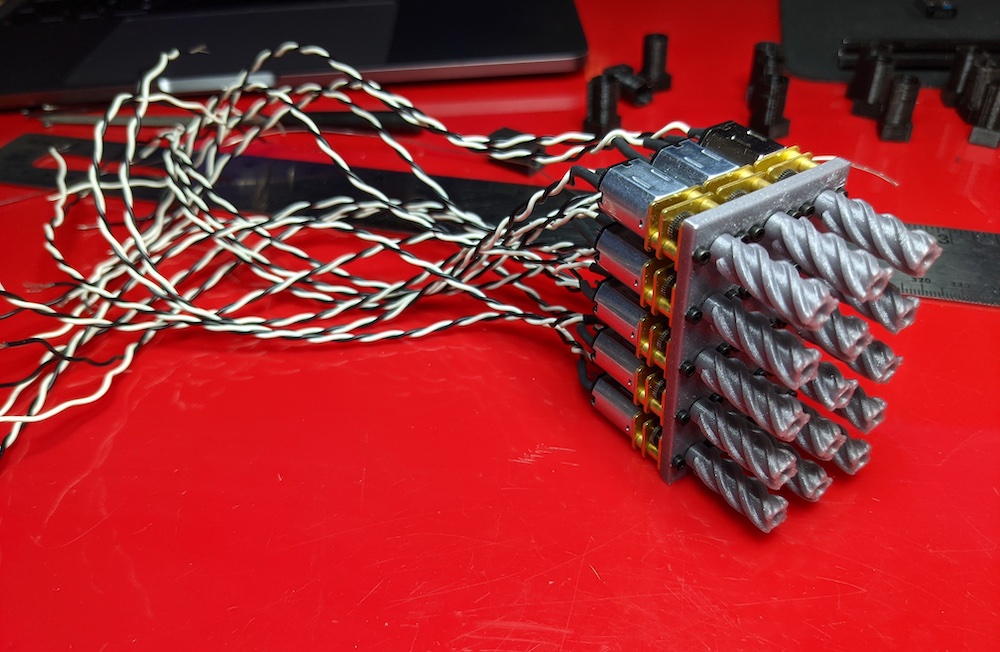
Tactile displays are one of the neatest ways to interact with how data is displayed, as it can not only be seen, but also felt. However, these kinds of systems are often quite expensive due to their complex nature, which is why Jason Higgins wanted to create his own pin display that he calls the PinThing. The device primarily consists of a five by three grid of “pixels” that are each driven by their own geared motor. When the motor turns, it slides a nut along a threaded rod, therefore pushing the pixel in or out.
Nearly the entire project was 3D-printed to keep costs low. This includes the backplate, bracing for the motors, and the threaded rod/nut assembly. Some of the earlier motor prototypes had a built-in homing pushbutton switch, but this was determined to be unnecessary.
A single Arduino Uno sits at the bottom of a stack that consists of two Adafruit Motor Shields, which have the PCA9685 I2C motor driver. This allows the Uno with its limited IO to still control the 15 motors easily. It runs the StandardFirmataPlus firmware and receives commands from a Node.js server over its serial port. In the future, the software could be expanded with extra functionality to draw pictures from a digital image, write text, and more.
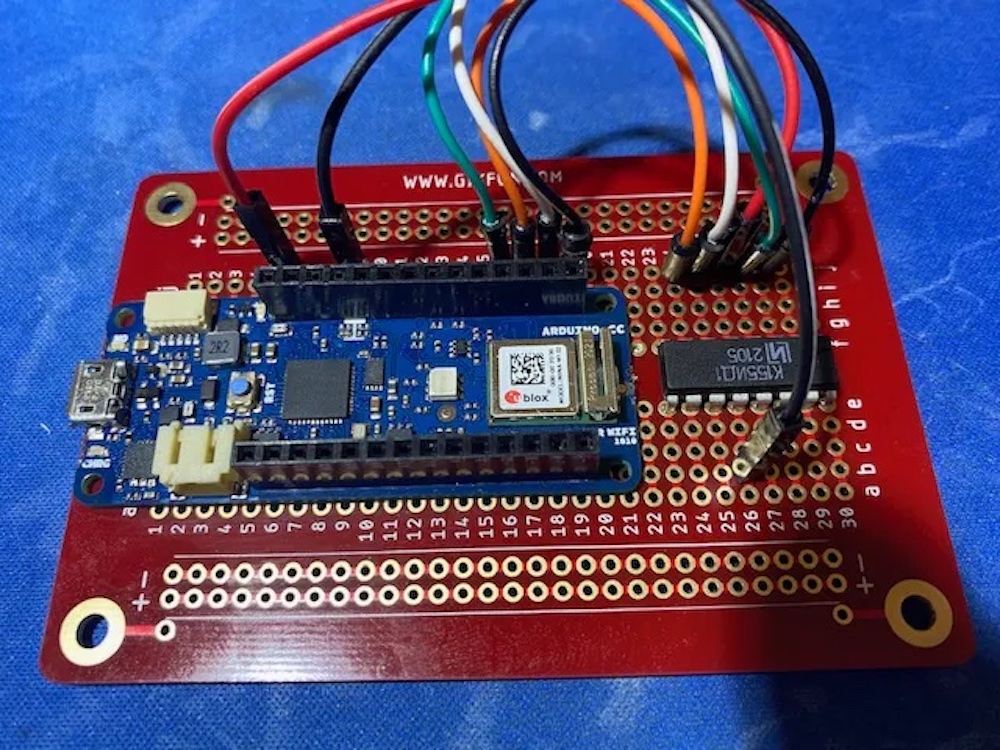
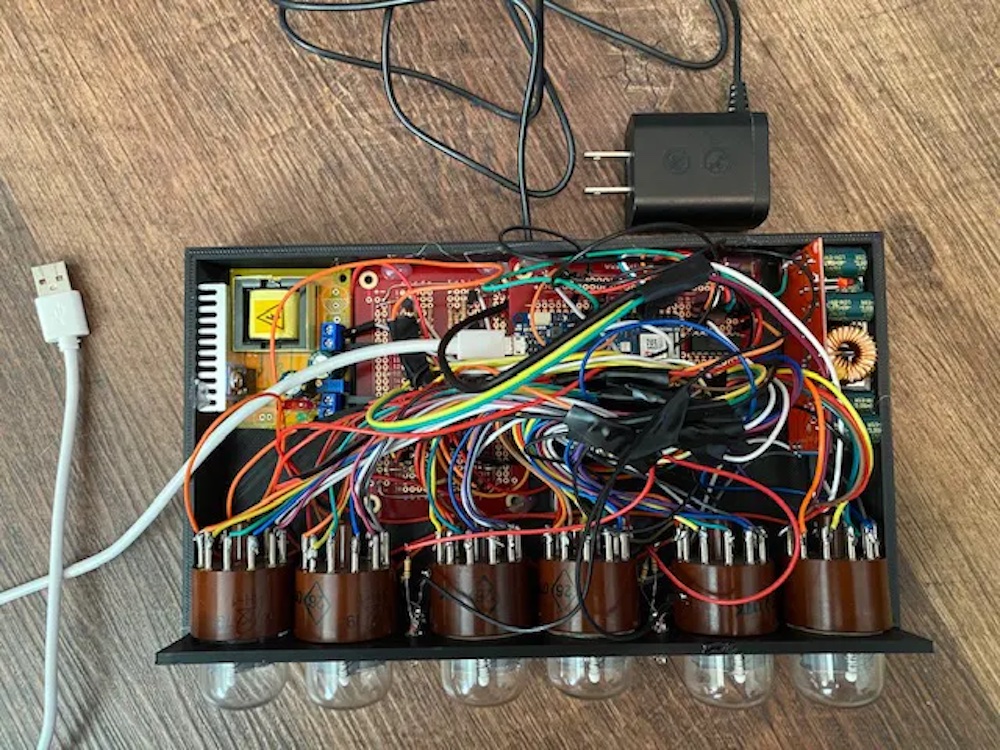
Nixie tubes are a great throwback to an era before the advent of LED and LCD screens; however, they often require expensive components or complex programming to operate. This challenge is what inspired Doug Domke to come up with his own solution that only costs $110. His design incorporates the Arduino MKR WiFi 1010, which has a powerful processor, ample amounts of storage, and WiFi connectivity along with a real-time clock.
In order to keep component costs down, letting each 170-volt Nixie tube have its own binary-to-decimal decoder chip would have required a total of 24 pins on the Arduino which it does not have. So instead, Domke used a few resistors, transistors, and a multiplexer to route the high voltage signals from the MKR WiFi 1010’s GPIO pins to the display. There is, unfortunately, a drawback to this approach, as only a single Nixie tube can be lit up at any one moment. Therefore, the code loops through each tube rapidly and flickers it faster than the human eye can perceive, thus giving the appearance of a solid digit.
After using the network time protocol (NTP) via the RTCZero library to set the time with incredible precision, Domke went about testing his project. As can be seen from his video below, the Nixie tube clock works great within its custom enclosure, and it will be exciting to see what new features will be added in the future. To read more about how this device was created, check out Domke’s write-up here.
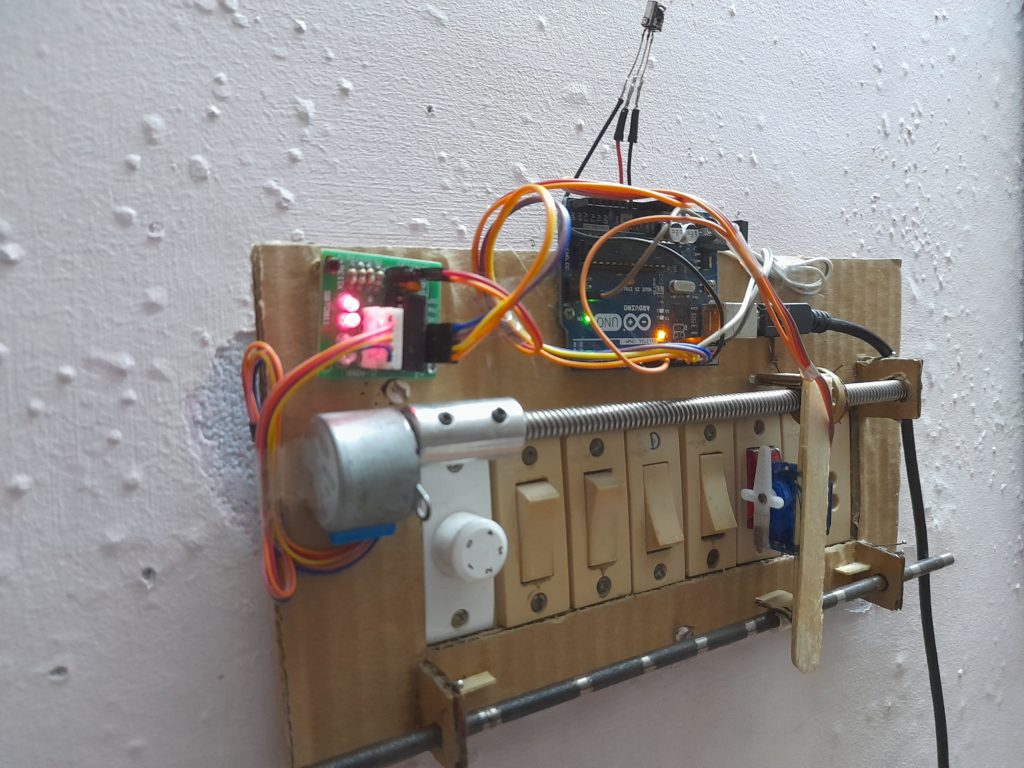
All too often, those who are new to Arduino struggle with creating large projects due to a lack of experience and components. This can be frustrating, but Instructables user MAKE_IT WITH_ME decided to tackle this issue by designing a super cheap way to automate home circuitry from just a single Starter Kit. His build uses a single Arduino Uno, although it can easily be swapped with something like a Nano or Mega, along with a stepper motor/driver, servo motor, threaded rod, and an IR receiver + remote combo.
The main portion of the home automation setup is the stepper motor assembly, and it is responsible for moving the servo motor back and forth across the bank of switches. Due to the stepper motor not knowing its initial position relative to the device, it must be “homed” or set to its zero position by moving right until the edge hits the limit switch. When a request to turn a switch on or off is received from the IR remote, the Arduino board decodes the instruction and converts the command into the number of steps the stepper motor must take to reach the desired location. After the servo moves and flips the switch on or off, the entire thing returns to where it started from.
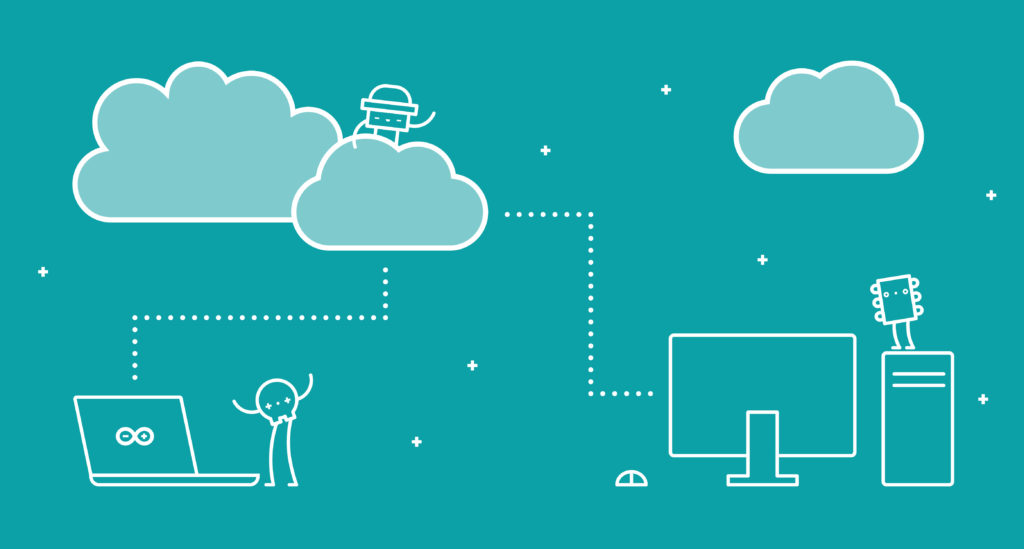
Remote sketchbook offers synchronization between the Arduino IDE 2 beta and Arduino Cloud. This powerful new feature now means you can work on your code from literally anywhere and everywhere.
Push, Pull and Sync Your Arduino Sketches
Currently you can work on Arduino sketches in the IDE on your computer. The files are stored there on your computer too. Unless you use a USB drive, or you’ve set up some kind of online file storage or backup option.
If you want, you can upload the sketch file and work on it in your Arduino Cloud. That’s always been an option. It’s super useful as it means you don’t need to install the IDE to work on your code, since it’s all done in the web browser.
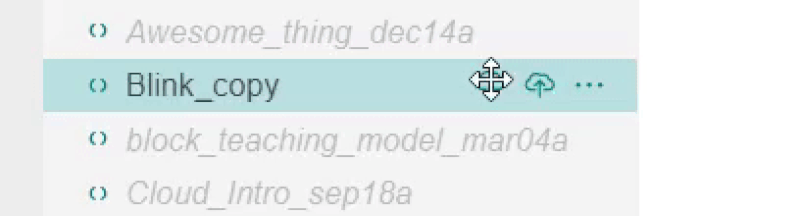
The new remote sketchbook feature gives you a way to store, access and edit your code from the Cloud. No matter which computer you’re working from. Next to each sketch in your Sketchbook are new “Pull Sketch” and “Push Sketch” buttons.
These sync your sketches between the IDE 2 and your Arduino Cloud. Once synced, you can access a sketch from other computers, devices, or directly from a web browser using Web Editor. And any changes you now make are synced across all devices!
Sync, Edit, Store, Share
So not only can you edit your code from anywhere, even if the Arduino IDE isn’t installed, but you have a solid backup option. By syncing your sketches to your Arduino Cloud you’re ensuring you never lose them.
USB drives are notoriously unreliable, especially if you’re reading and writing to them a lot. Which isn’t unlikely when working on a sketch. One click and you can now fire them off to the Cloud directly from within IDE 2. So your code is safely backed up in your Arduino Cloud’s encrypted file system.
Editing is then simply a matter of opening the file from your Arduino Cloud. You can do this from anywhere you sign into it, and you’re confident that you’re always working from the latest version. If you’re working offline, a single click once you’re connected again will update your remote sketchbook.
And you can still share remote sketches, just as you would with any others. By default they’re set to private, but you can change that to a shared sketch from your Arduino Cloud settings.
How to Get Remote Sketchbook
The new remote sketchbook feature is being rolled out today.
You’ll need to download or update to the latest version of IDE 2.0.0-beta.8. Make sure you’re signed into your Arduino Cloud account, and you can work on your sketches from anywhere you want. This new integration is available right now, totally free of charge! Here’s a bit more info on how it works, so go dive right in to remote sketchbook.
In the last few years there have been more and more solutions for running machine learning (ML) on microcontrollers. Some of the most popular are scaled down versions of frameworks designed for servers. But those are only suitable for fairly powerful MCUs.
Note: The Fraunhofer IMS is part of the Fraunhofer Society, which currently operates more than 80 research facilities, including 75 institutes, at over 40 locations all over Germany.
Arduino AI Framework Library Is Here
AIfES is a standalone AI framework completely written in C. It allows on-device training without the need for a PC and can be used on almost any hardware. Even on the 8-bit controller of the Arduino Uno, an ANN can be trained pretty quickly. Personal, customized devices can be created that adapt to the task at hand by way of training. AIfES , with Arduino’s support, is now available for the Arduino IDE using theArduino library manager.
This technology allows the development of small, self-learning, battery-powered devices that can be independent of a cloud or another device. Sensor data can be processed where it’s generated, directly on the device. Training data can be recorded by the device and used for training.
AIfES is comparable and compatible with well-known Python ML frameworks. This includes TensorFlow, Keras or PyTorch, while being significantly reduced in functionality. In the current version, feedforward neural networks (FNN) are supported, which can be configured completely freely. Also, common activation functions like ReLU, sigmoid or softmax are already integrated. A full implementation of Convolutional Neural Networks (ConvNet) will follow soon.
The model development is also based on the Python frameworks, so you can find your way around directly. The common algorithms for training, such as the gradient descent optimizer (SGD) or the adam optimizer, are also included.
Import ANNs from Other ML Frameworks
It’s possible to import a previously trained ANN from another ML framework. Only the network structure and weights are needed to map an ANN and train it further. A Keras example is included in the library, and it’s not necessary to port the model to TensorFlow Lite. The weights of an ANN in AIfES can also be read out, saved or sent directly from the device to be used on another device. Different ANNs can be loaded at runtime by reconfiguring the model and loading new weights. The weight sets can be stored in the cloud to make them available to other devices. The applications are endless.
All algorithms are optimized for use on resource-limited embedded systems. Even the required memory area for the ANN can be specified by the developer.
AIfES has been developed in a modular way to be able to exchange different components of the algorithms. A matrix multiplication, for instance. This allows the easy use of hardware accelerators of the different processor families. For example, the CMSIS DSP properties of the ARM Cortex controllers can already be used to compute or train deep neural networks particularly efficiently.
The Fraunhofer IMS has been using AIfES in AI research and development for years. Internally it’s been used as a development tool for customer-specific AI solutions until a level of development was reached where it could be used as a stand-alone product.
Pre-Trained and Adaptable AIfES Gesture Recognition
In gesture recognition, the model was pre-trained and the user performs the gestures as the developer trained them. This is the conventional way, but not very intuitive and the user has to adapt to the hardware. The new demonstrator uses the Arduino Nano 33 BLE Sense, which adapts to the user instead.
The desired gestures can be trained directly in the system without the need for a PC. A first example of product development within industry is the project “noKat“. A neural optical camera tracker for the detection of approaching persons, where a particularly compact human recognition system was realized using AIfES.
Due to their size, deep neural networks (DNN) are problematic for the implementation on a microcontroller. For this reason, Fraunhofer IMS has been researching techniques to realize particularly compact ML solutions for years. Using special feature extraction techniques the number of inputs can be reduced significantly, so only the relevant features are used.
AIfES is offered as a dual license model. For private projects or developers of free open-source software under the GNU General Public License (GPL) version 3, AIfES can be used free of charge. If AIfES is to be combined and distributed with commercially licensed software, or if the AIfES source code for commercially licensed software is not to be distributed under the GNU GPL V3, a commercial license agreement must be concluded with the Fraunhofer IMS. If you’re interested, contact the AIfES team.
AIfES for Arduino includes examples that get you started right away. Besides inference and training, it also shows how to import an ANN from Keras. The Arduino Fruit identification project has been re-implemented in AIfES for the Arduino Nano 33 BLE Sense. Now the colors of three objects are trained directly on the device, without the need for a PC.
We’re super excited about this technology at Arduino, and we can’t wait to see what the community is going to build with it! Make sure you let us know your thoughts, and about any applications you create, over on the forums.
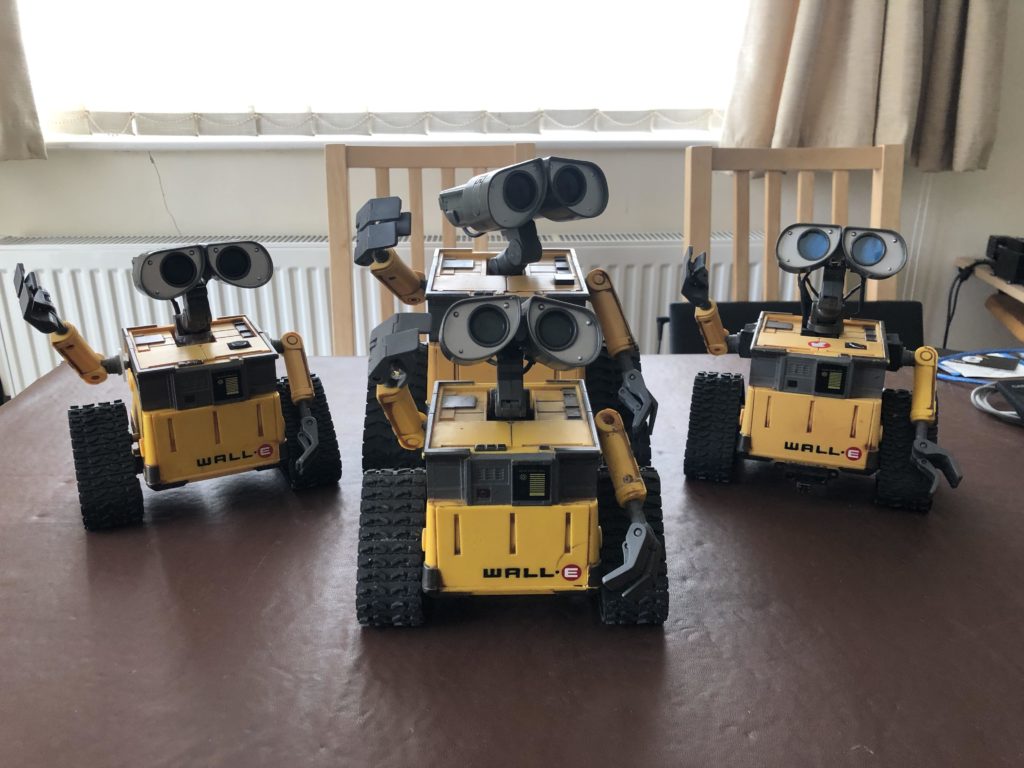
Film history is full of cute robots, but for our money, none are more charming than WALL-E. His vocabulary may be limited, but that doesn’t stop him from showing the full range of emotions through body language. Like Baby Yoda, WALL-E was an instant fan-favorite and a plethora of toys were made in his honor. If you can get your hands on one, Kevr102 has an Instructables tutorial that will walk you through how to bring that toy to life with the help of an Arduino.
To complete this project exactly as Kevr102 describes, you will need a specific 7″ tall plastic WALL-E toy. That toy has motors for the tracks, arm movement, and head movement. Starting with that will save you the trouble of mechanical design and 3D printing work. But you will replace all of the motors to make them easier to control. In total, you will need two 360 degree servo motors, three heavy duty servo motors, and two micro servo motors.
You will control those motors with an Arduino Nano through a servo shield. The exciting part of the build, which enables your WALL-E robot to respond to voice commands, works thanks to an EasyVR3 voice recognition module. That module also lets you play sounds, so WALL-E can emit his signature sound effects and modulated voice. Kevr102 explains how you can setup custom voice commands and sound effects, so you can tailor them to suit your tastes.
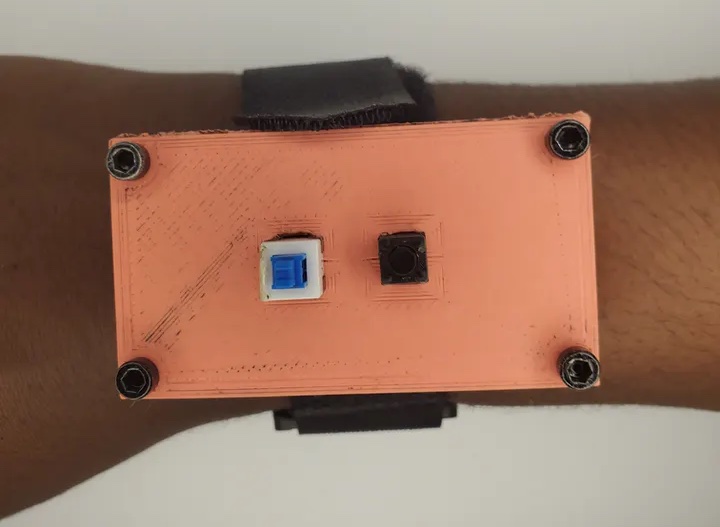
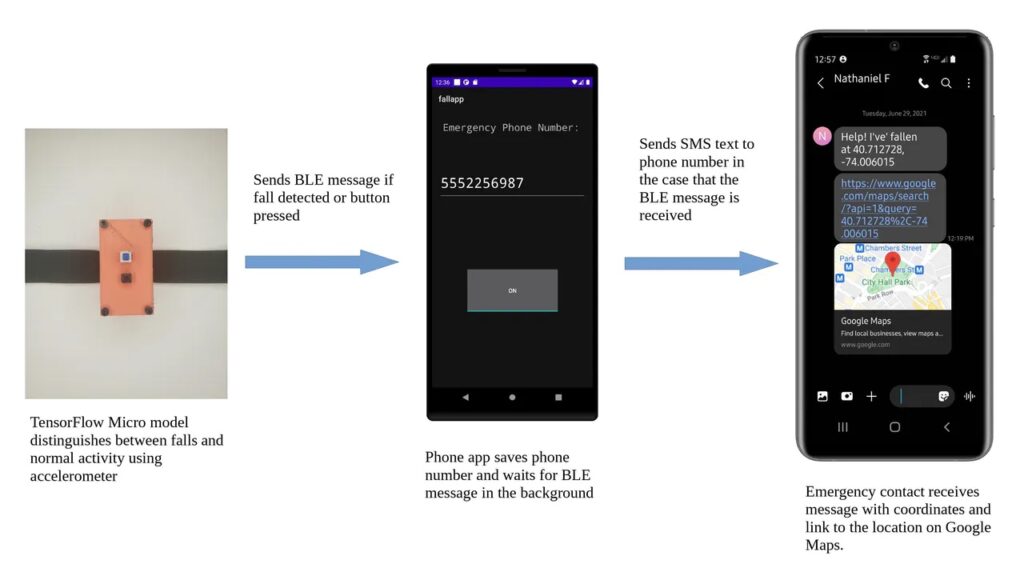
A dangerous fall can happen to anyone, but they are particularly dangerous among the elderly as that demographic might not have effective ways to get help when needed. Rather than having to purchase an expensive device that costs up to $100 per month to use, Nathaniel F. on Hackster wanted to build a project that harnessed the power of embedded machine learning to detect falls and send an alert. His solution involves the Arduino Nano 33 BLE Sense board, which not only has an integrated accelerometer but also contains Bluetooth Low Energy capabilities that lets the processor communicate with the accompanying mobile app.
Nathaniel trained his ML model on the SmartFall dataset, which allows the device to respond to a wide variety of falls and ignore non-harmful movements. Once training was completed, he was able to achieve an accuracy of 95%. The Nano 33 BLE Sense samples accelerometer data at 31.25Hz to match the dataset’s frequency, and it makes a prediction every two seconds. If a fall is detected or the built-in emergency button was pressed, the user has 30 seconds to deactivate the alarm, otherwise it sends a BLE message to the phone which in turn sends an SMS message to an emergency contact containing the current location.
Even though this DIY fall detector works well already, Nathaniel plans on making a custom PCB and extending the battery life for longer use time between charging. You can read more about his design here, and you can view his demonstration video below.
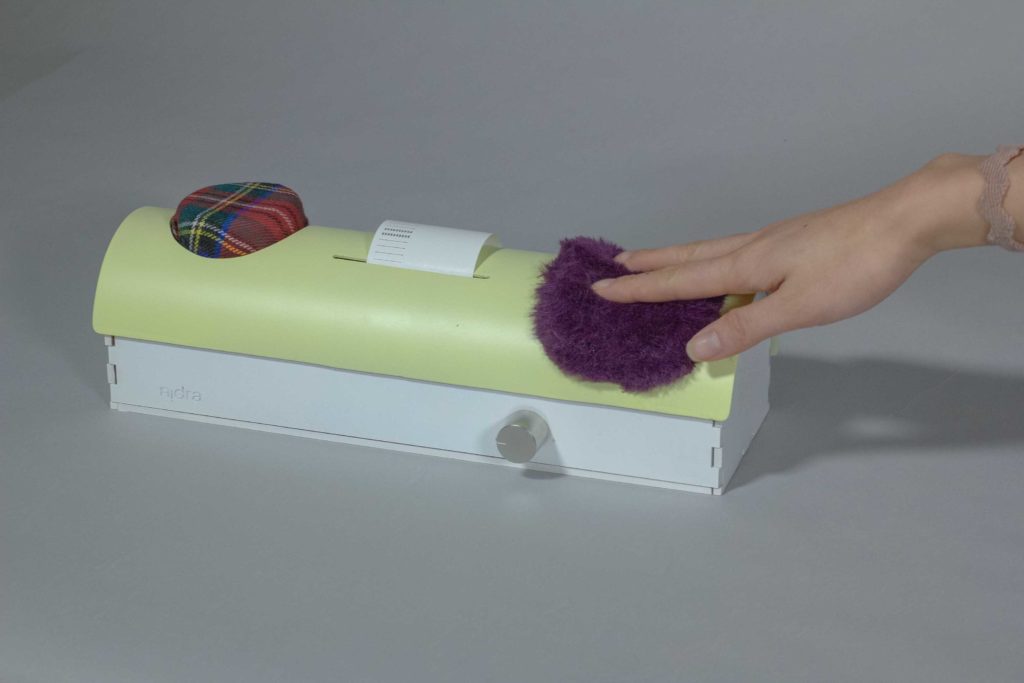
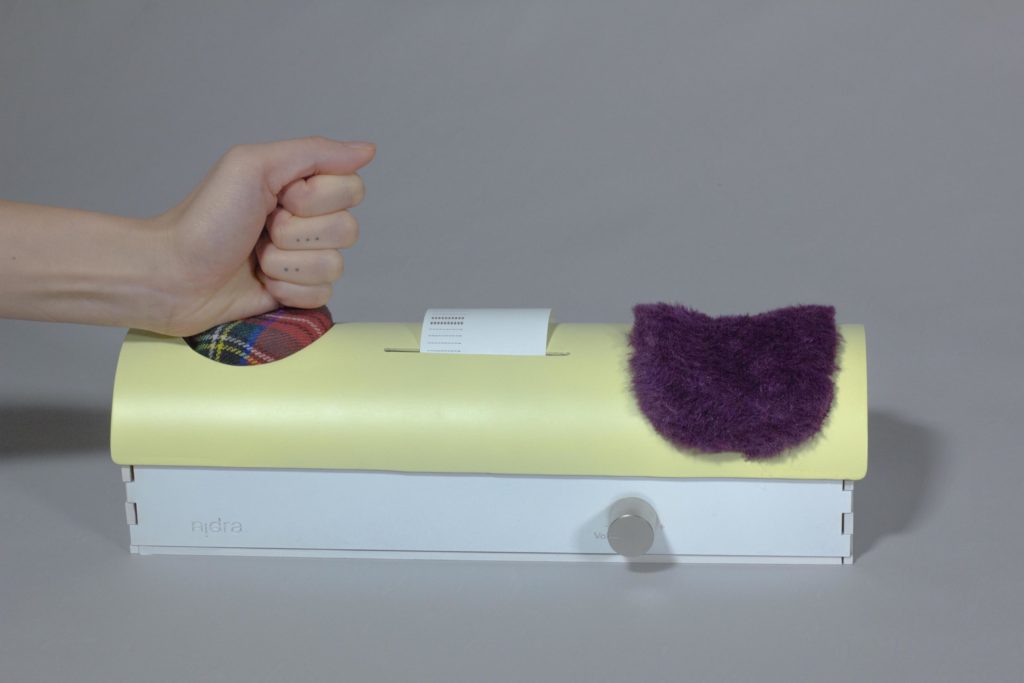
Very few of us are ever excited to wake up for the work day, but your mood can still vary from one morning to the next. If you had a rough night, you might wake up feeling melancholy. In that case, the last thing you want to do is hear depressing news on the radio. To help people enter wakefulness, Varenya Raj built a radio called Nidra that tailors the morning news to suit its user’s mood.
Nidra’s design is unusual, in that it doesn’t resemble any radio or alarm clock that you’ve ever seen. Atop its plastic enclosure there are two buttons. The first looks like a pin cushion and the second seems like it could have come from a shaggy, purple marmot.
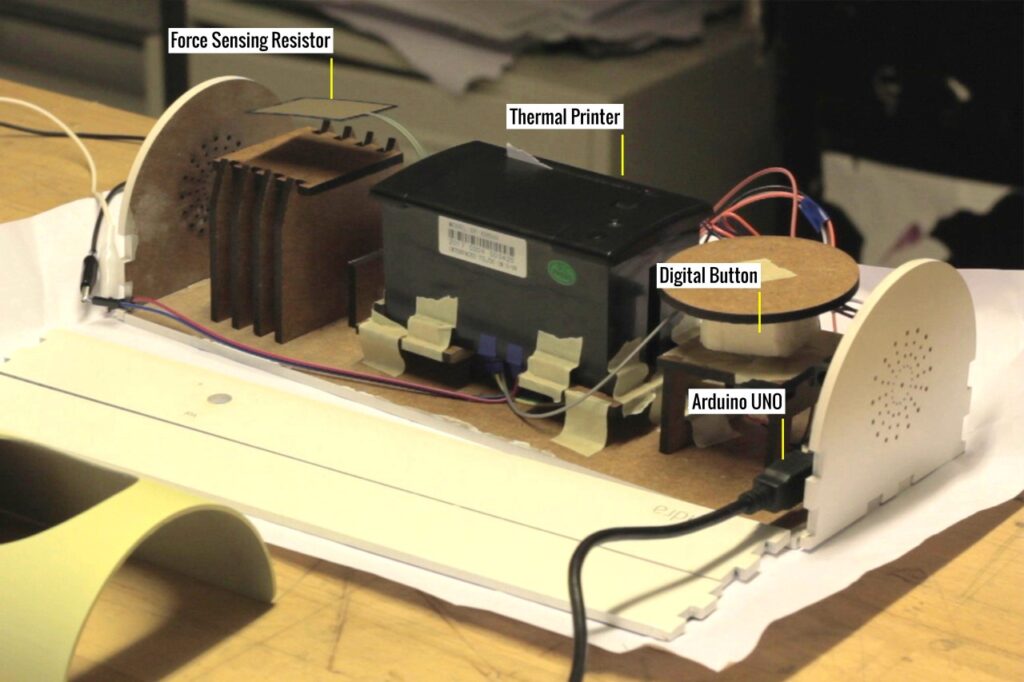
If the user is in a bad mood when the alarm goes off, they can slam their hand down onto the cushioned button. Nidra will then play only upbeat news. If the user is in a better mood and can handle the full breadth of the day’s news, they can stroke the purple fur. At the end of the month, a thermal receipt printer pops out statistics on the number of times the user pressed each button.
An Arduino Uno board controls Nidra’s behavior. The cushion has a standard button, while the fur attaches to a force sensitive resistor. Depending on the button pressed, the Arduino sketch tells a connected computer running a Processing sketch to play news from one of two RSS feeds. We imagine that most people will choose the happy news most mornings, but it is always nice to have options.
Arduino-controlled checklist makes sure you don’t forget anything when leaving the house
Arduino Team — July 1st, 2021
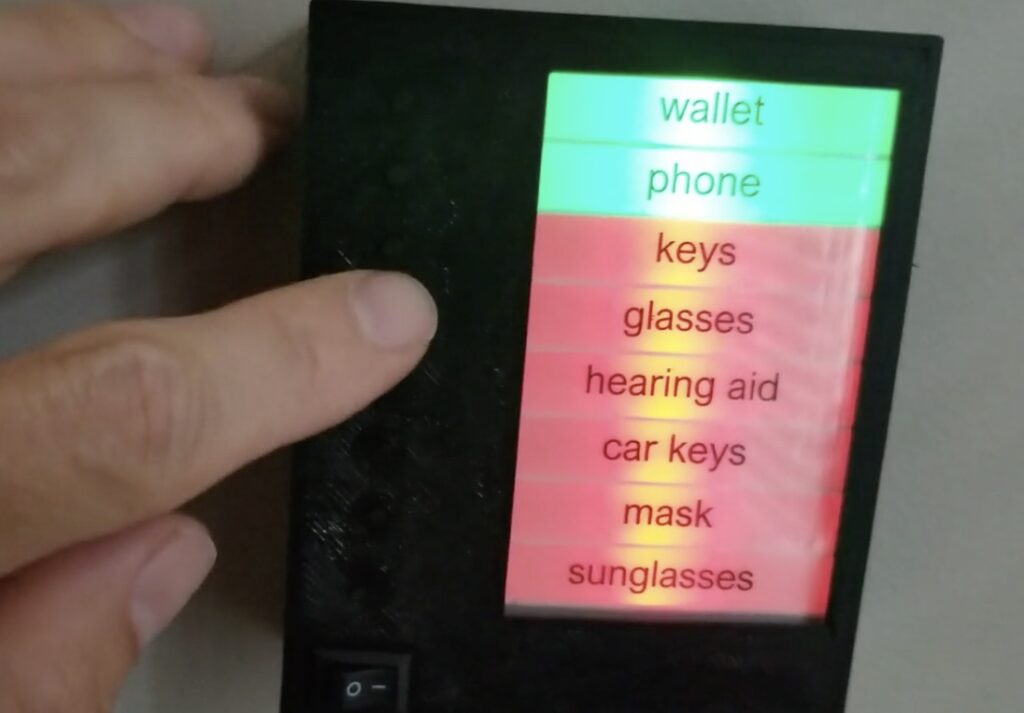
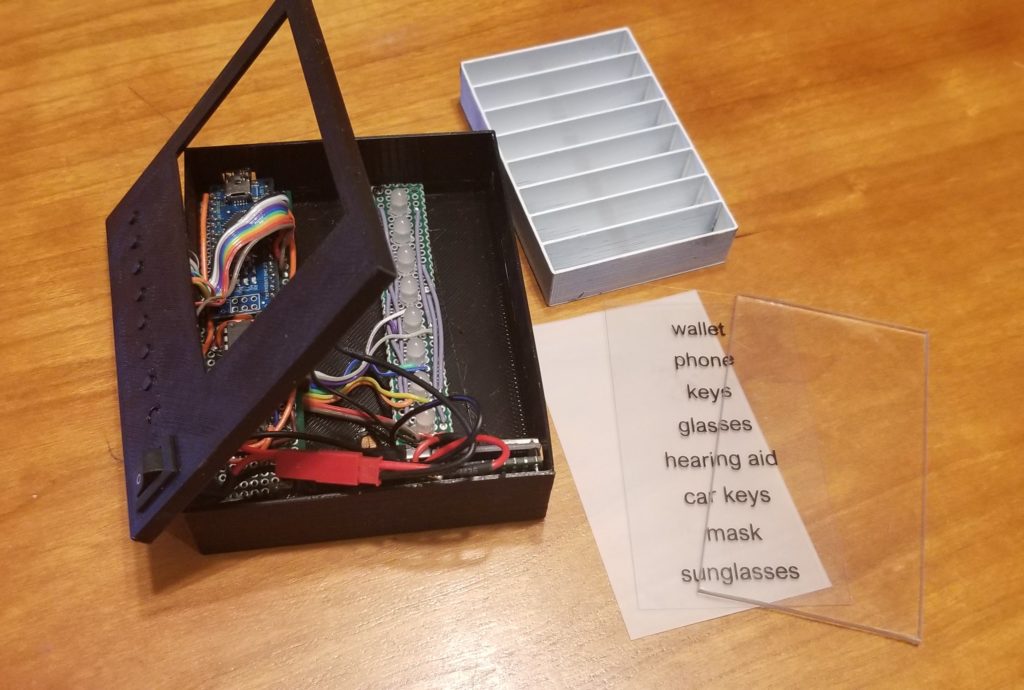
Redditor onemywaybackhome was having some issues remembering to grab certain items before he left the house, so they decided to create something to help. Their solution involves a short list placed within a 3D-printed enclosure, along with several red/green LEDs on the side. When something is yet to be gotten, its color is red, but pressing the button next to its entry will turn it green and mark it as ‘done.’
The current system uses an Arduino Nano to read in the states of each button, as well as keep track of which items have already been selected. If a button is detected as pressed, the MAX7219 LED display drivers will receive a command that sets an LED at the correct position to a certain color. The entire device is completely wireless and powered by a lithium-ion battery, which is recharged via a TP4056 module.
Um dir ein optimales Erlebnis zu bieten, verwenden wir Technologien wie Cookies, um Geräteinformationen zu speichern und/oder darauf zuzugreifen. Wenn du diesen Technologien zustimmst, können wir Daten wie das Surfverhalten oder eindeutige IDs auf dieser Website verarbeiten. Wenn du deine Einwillligung nicht erteilst oder zurückziehst, können bestimmte Merkmale und Funktionen beeinträchtigt werden.
Funktional
Immer aktiv
Die technische Speicherung oder der Zugang ist unbedingt erforderlich für den rechtmäßigen Zweck, die Nutzung eines bestimmten Dienstes zu ermöglichen, der vom Teilnehmer oder Nutzer ausdrücklich gewünscht wird, oder für den alleinigen Zweck, die Übertragung einer Nachricht über ein elektronisches Kommunikationsnetz durchzuführen.
Vorlieben
Die technische Speicherung oder der Zugriff ist für den rechtmäßigen Zweck der Speicherung von Präferenzen erforderlich, die nicht vom Abonnenten oder Benutzer angefordert wurden.
Statistiken
Die technische Speicherung oder der Zugriff, der ausschließlich zu statistischen Zwecken erfolgt.Die technische Speicherung oder der Zugriff, der ausschließlich zu anonymen statistischen Zwecken verwendet wird. Ohne eine Vorladung, die freiwillige Zustimmung deines Internetdienstanbieters oder zusätzliche Aufzeichnungen von Dritten können die zu diesem Zweck gespeicherten oder abgerufenen Informationen allein in der Regel nicht dazu verwendet werden, dich zu identifizieren.
Marketing
Die technische Speicherung oder der Zugriff ist erforderlich, um Nutzerprofile zu erstellen, um Werbung zu versenden oder um den Nutzer auf einer Website oder über mehrere Websites hinweg zu ähnlichen Marketingzwecken zu verfolgen.