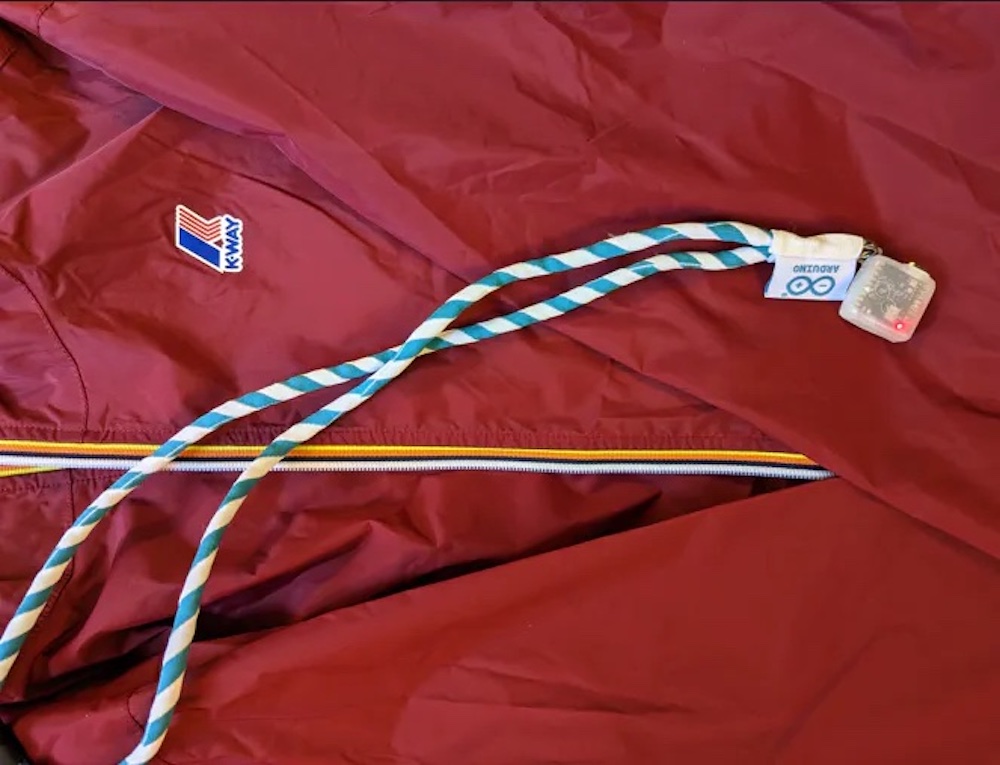
As part of our ongoing collaboration with K-Way, Justin Lutz set out to integrate intelligent electronics into one of the company’s iconic outdoor jackets. Due to the active lifestyle of the brand, Lutz chose to use the Arduino Nicla Sense ME board to detect gestures while hiking as well as monitor the barometric pressure for potential storms.
The project began by first gathering many samples of either idle motion, walking, or drawing a “C” in the air to set a checkpoint with the Nicla’s onboard accelerometer. Once this data was added to the Edge Impulse Studio, he trained a model to recognize each of the motions and return the corresponding label. Beyond this functionality, the Nicla Sense ME also outputs the detected motion and current pressure reading over Bluetooth to a connected phone.
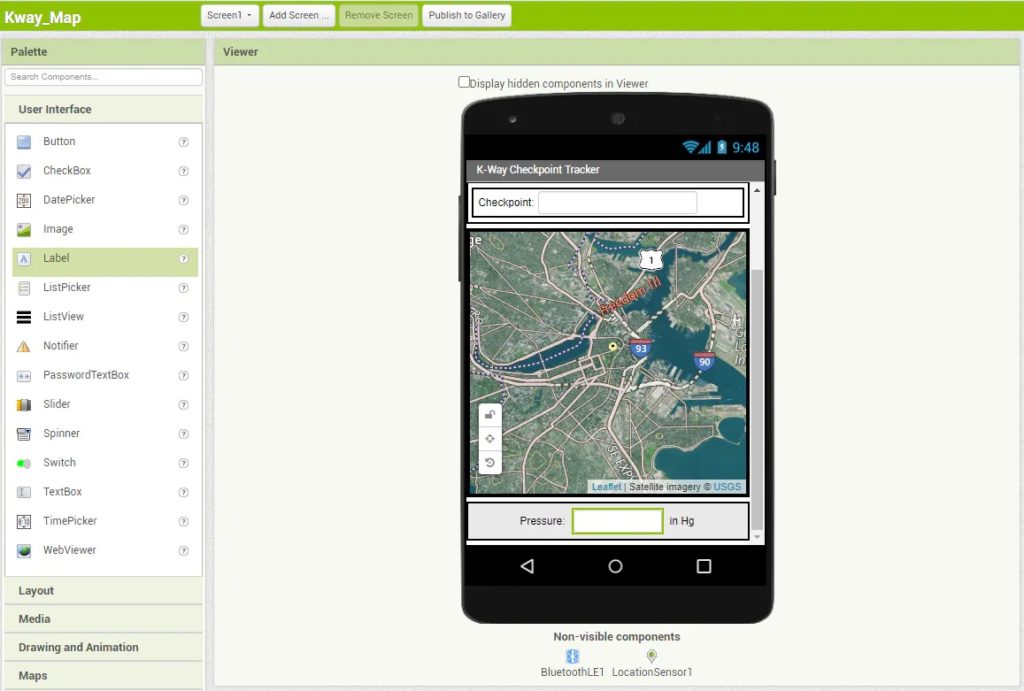
Interacting with the wearable device is done completely through an Android app that Lutz created with the help of MIT’s App Inventor online tool. While running in the background, the app checks for new Bluetooth data and marks the current coordinates on a map as a checkpoint whenever the user draws a “C” with their finger. Drops in pressure are also displayed by the app as a large warning that bad weather is on its way.
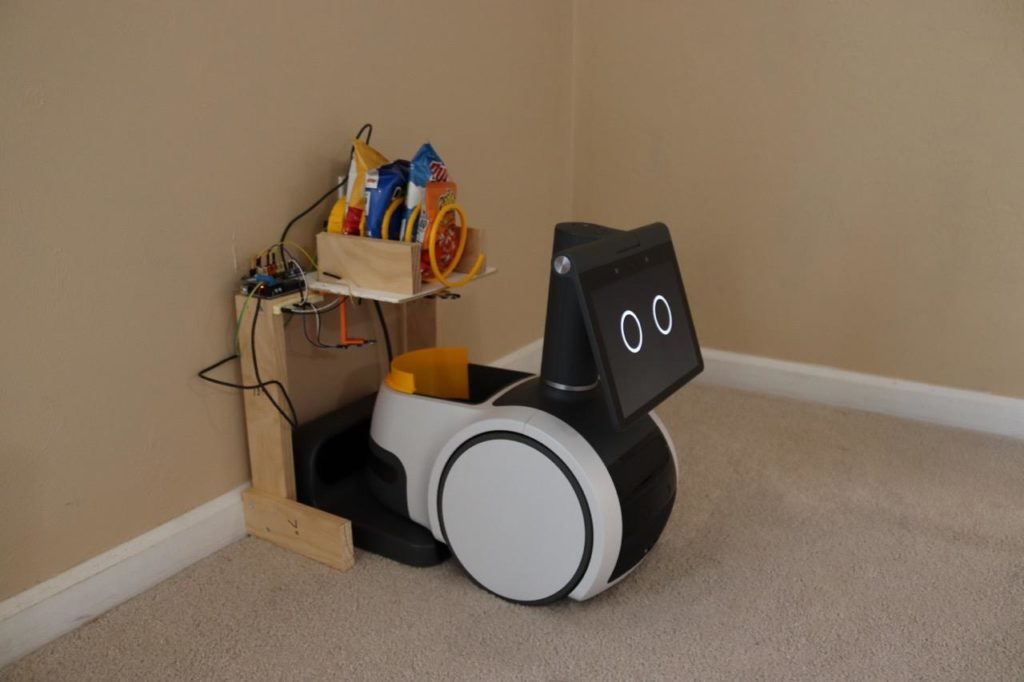
Sometimes you get a hankering for a snack, but there is no snack within arm’s reach. Such a situation is a tragedy and exactly what we built society and technology to avoid. To prevent this frankly appalling possibility, Michael Rigsby made Snacky, which is a snack-dispensing system that lets Amazon Astro robots deliver snacks to peckish people.
The Amazon Astro is a robot designed for helping around the home. It is a bit like an Amazon Echo on wheels, which extends Alexa’s abilities to the physical world. By default, it doesn’t do much except drive around to look at stuff — something that has potential for applications like security and teleconferencing. But because Astro utilizes Alexa, it can take advantage of developer and user-created Skills. In theory, that will make Astro very useful as accessories and abilities become available. Rigsby is leading that charge with Snacky.
Snacky is essentially a vending machine dispenser attached to the Astro robot’s charging dock. At Rigsby’s spoken request, Astro will drive over to the dock, park, wait as snacks drop into its storage bin, and then drive over to him to deliver a treat. The custom Skill tells Astro to head over to its dock, and then the Snacky hardware handles the rest.
That hardware includes an Arduino Uno board, an Arduino Motor Shield, two infrared sensor modules, a continuous rotation servo motor, and a DC power supply. The mechanical parts are a combination of wood and custom 3D-printed pieces. The Arduino detects the presence of Astro using the infrared sensors, then rotates the servo motor to spin the dispenser coil long enough to eject some nibbles.
Tune in on March 25th and celebrate 10 years of Arduino Day with us!
This year marks the 10th anniversary of Arduino Day – and what a great milestone to celebrate together.
News and insights for you
Every year, Arduino Day is an important moment for us to share with you some very cool projects and products we have cooking. Stay tunedfor the exciting announcements we have in store for 2023!
The celebrations are also a great chance to look at the bigger picture and reflect on what’s next in the tech field and beyond. We are putting the finishing touches on the program, but can already say your colleagues across the company will be sure to cover this year’s hot topics with a series of insightful talks.
Community highlights
Arduino Day is the perfect time to recognize our incredible community as well – it’s at events like these that we get to talk to brilliant people who are making a genuine difference through open source technology.
As per tradition, we will feature a selection of projects by Arduino users and fans. Don’t miss the opportunity to submit yours for the Arduino Day Community Challenge. Choose the project idea you want and pitch it here.
The Arduino team will pick 10 winners among the most creative and innovative ideas, awarding them an Arduino Day Box full of our favorite boards, kits and goodies – a total value of €250 EUR/$280 USD!
And if you’re planning on hosting your own event, we’ll be opening applications very soon. Once approved, you’ll be listed on the website as an official organizer!
Introducing the Arduino Cake Challenge!
How could we celebrate such an important birthday without cake? Especially when so many Arduino-inspired desserts have popped up in the past few years.
Let’s make it a game so we can all have a slice of the fun: craft your cake and post in on social media using the hashtag #ArduinoCake. We’ll reshare your creations and look for the most impressive and iconic. Remember to share the recipe, because we love open source!
If you want to be part of the live stream, just record a short video of yourself saying a big “happy birthday!” to Arduino, and we’ll include you in the global celebrations. Post your video on social media with the hashtag #ArduinoDay23 and we’ll add a virtual candle in the birthday cake just for you!
So, get ready for your front row seat atArduino Day 2023! We’ll be updating the program and adding information as we go, but let us know if you have any comments or questionsatevents@arduino.cc.
There are three types of motors that makers typically consider: stepper motors, servo motors, and DC motors (either brushed or brushless). Stepper motors are great when you need high precision and torque, but tend to have jerky movement. DC motors work well for high speed movement that doesn’t need any rotational accuracy. Servo motors are somewhat of a compromise between the two. But Aaed Musa’s 3D-printed continuous rotation servo motor is even better, because it is fast, smooth, and accurate.
This motor works like a standard servo motor, so you can set it to any desired position. But it features continuous rotation, an integrated gearbox to improve torque, very smooth movement, and a magnetic encoder to ensure accurate positioning. As you can see in the video, it responds almost instantly, moves fast, and isn’t jittery at all. Because all of the mechanical parts are 3D-printed, durability may be a concern. But otherwise this is a very attractive option.
Musa designed this to work with a 600RPM DC gear motor. He then further reduced the output with a 3D-printed gearbox designed in Autodesk Fusion 360. An Arduino Uno board controls the motor through a BTS7960 motor driver and monitors the position with an AS5600 magnetic encoder. The total build cost should be around $30, not including the cost of the Arduino. More details on the project can be found in Muse’s Instructables write-up.
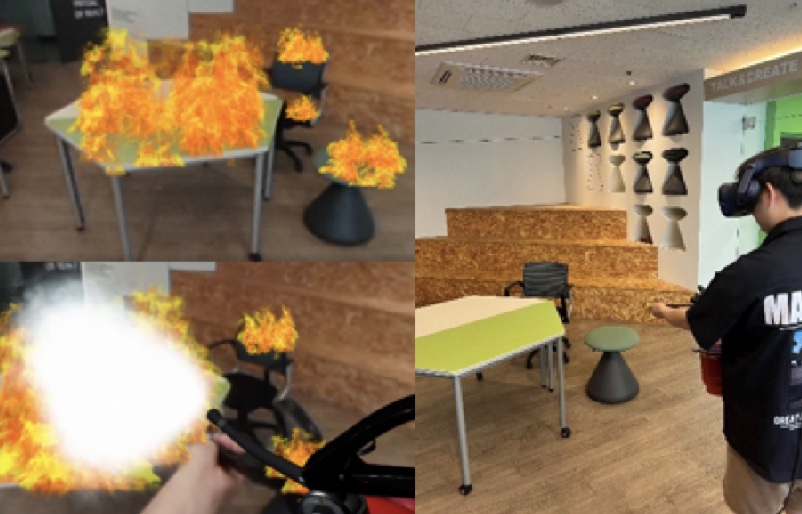
While we adults don’t experience them often, school kids practice fire drills on a regular basis. Those drills are important for safety, but kids don’t take them seriously. At most, they see the drills as a way to get a break from their lessons for a short time. But what if they could actually see the flames? Developed by a team of Sejong University engineers, this augmented reality fire drill system takes cues from video games to provide more effective training.
This mixed reality system, which combines virtual reality and augmented reality elements, makes fire drill training more interactive. Instead of just evacuating a building by following a predefined route, participants perform basic firefighting tasks and experience smoke-filled rooms. Using a familiar video game-esque medium, it gives kids a more realistic and believable idea of what an emergency might look like. It is equally useful for adults, because it challenges them to take action.
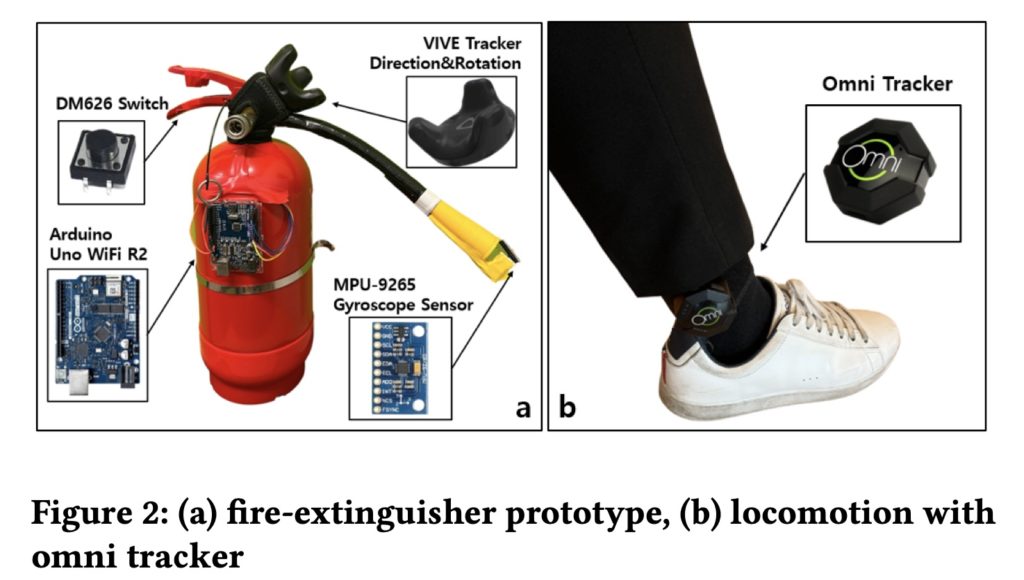
That action comes primarily in the form of virtual fires, which participants much douse using fire extinguishers. The mixed reality visuals are straightforward, as the technology is now mainstream. The VIVE VR system can, for example, recognize objects like tables and overlay flame effects. But the fire extinguisher stands out. Instead of a standard VR controller, this system uses a custom interface that looks and feels like a real fire extinguisher.
That extinguisher has a VIVE PRO tracker, which lets the system monitor its position. The nozzle has an MPU-9265 gyroscope and the handle has a momentary switch. Both of those connect to an Arduino Uno WiFI Rev2 board, which feeds the sensor data to the augmented reality system. With this hardware, participants can manipulate the virtual fire extinguisher just like a real one. The system knows when users activate the fire extinguisher and the direction in which they’re pointing the nozzle, so it can determine if they’re dousing the virtual fires.
Love your plants, but also have a life? If you work long hours, travel often or just can’t be tied down to a regular schedule, the Arduino Plant Watering Kit is for you.
It’s a complete kit with all the components you need to set up an automated mini irrigation system that will unfailingly water your favorite pothus, spider plant or monstera on a regular schedule.
There’s more: the humidity sensor in the kit connects to the Cloud so you can monitor soil moisture on-the-go from your computer or phone, via a custom dashboard.
This means you can trigger manual watering on a particularly hot day or skip a routine activation if not needed. Over time, you might even gain useful insight about your plants’ water requirements and fine-tune the best schedule for each one, from cacti to ferns.
The whole project is simple to put together and easy to use: a perfect solution to make your plants happy and feel empowered at the same time.
The Plant Watering Kit might be your first taste of home automation, leading to more ambitious projects – why not connect all of your plants, create a smart greenhouse, or explore other areas of the house where IoT can make your life easier?
Whether you want plants off your mind or wish they could just tell you exactly how much water they need, check out the new kit on the Arduino Store.
DSM (digital spectrum modulation) is a relatively new radio control technology that is ideal for long-range applications. It uses two methods, FHSS (frequency hopping spread spectrum) and DSSS (direct sequence spread spectrum), to transmit data, with the latter being especially resilient to interference and therefore suitable for transmission over long distances. If you want to take advantage of DSM for your robotics projects, James Bruton designed an open source transmitter that you can build.
Bruton makes a lot of remotely operated robots, so he had a strong need for a good remote. His previous designs, while full of great features, didn’t have the kind of range that he wanted. So he created this new remote that incorporates DSM transmission technology. It contains two DSM transmitters to harness 20 individual channels. It uses those channels for four joysticks (each with three axes), four toggle switches, and four momentary push buttons. Together, those are enough to control even the most complicated robots.
Inside the remote’s 3D-printed enclosure is an Arduino Mega 2560 board. It monitors the various controls and outputs the data to a pair of OrangeRX 2.4GHz DSMX transmitters. It also outputs the battery voltage to a small three-digit, seven-segment display. Power comes from four 18650 lithium battery cells. This remote will work with any compatible DSM receiver, which are affordable and easy to integrate into a project, as they operate like a standard RC receiver.
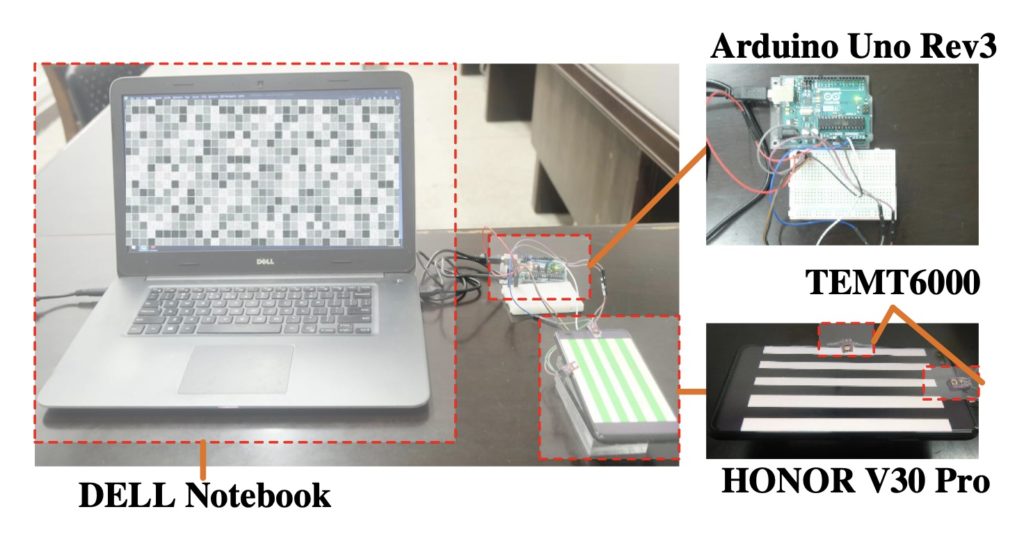
Biometric identification and authentication is big business. As an example, consider Apple’s Face ID technology, which has made strong smartphone security both user friendly and readily available. But Face ID requires substantial hardware and computational power to work, which makes it ill-suited for applications where cost is a major concern. To fill that gap in the market, an international team of researchers developed technology called LIPAuth that can identify people by the light reflected by their hands.
LIPAuth stands for “Light Intensity Pattern Authentication,” which accurately describes how this technology works. It measures the intensity of different light patterns as they reflect off of a person’s hand. As it turns out, those reflections are unique to the individual, just like a fingerprint. The reflected light depends on the shape of the hand, its unique crevasses and wrinkles, skin tone and capillary structure, and the way in which the individual holds their hand during scanning. By projecting different light patterns, LIPAuth can gather a large set of data points to compare for authorization.
The prototype built to test this concept consisted of an Arduino Uno board, an LCD screen from an HONOR V30 Pro smartphone, a TEMT6000 light sensor, and a Dell laptop. The LCD shows different patterns, which reflect off of the user’s hand. The Arduino monitors the intensity of the reflected through the TEMT6000. The Arduino then sends the data to the Dell laptop, which analyzes the information and compares it to that of authorized users.
In testing, the research team determined that LIPAuth could recognize users with accuracy higher than 99%. It is also quite resilient to attacks from unauthorized users. Because of the low requirements and high accuracy, LIPAuth could be very useful for low-cost biometric authentication.
Asking your boss for a raise when they are in a bad mood is not ideal, and this is what prompted Mark from element14 Presents to create a stress level indicating project that could show this mood to everyone else so they could avoid this awkward situation.
Mark started this project by laser cutting several panels from acrylic, including the base, four walls, and a special top cover with cutouts for the stress level lights, speaker holes, and a place for the selection button. After gluing these pieces together, he designed a circuit based on the Arduino Nano board that would let the user set their stress level and display it by illuminating a corresponding compartment within the “dial” portion. In addition to the visual aspect, a unique sound would also play to indicate the change.
In order to make his circuit more compact, Mark designed and fabricated his own PCB that not only contained the required headers for the Arduino, but also pads for the SD card slot, headers for the LEDs and buzzer, and custom power management circuitry to make everything power efficient so that a battery could be used. The end result was a compact box that illuminated one of the five possible compartments in colors ranging from green (relaxed), all the way to bright red (mad).
More information about Mark’s project can be found in the video below!
While most of us associate Morse code with old-timey telegraphs, it is still in use today. The benefits now are the same as they were a hundred and fifty years ago: it is an incredibly resilient way to encode information that works with a variety of different transmission methods. But what if you have trouble operating a standard Morse code key? This CWvox device, designed by Kevin Loughin (AKA KB9RLW), translates voice commands into Morse code keying.
CWvox could be useful for people with disabilities and for people who have trouble getting Morse code timing right. Morse code relies on tone length to convey information and it isn’t always easy to hold a key for the proper amount of time. CWvox takes care of that for you. Just speak out loud either a “dah” sound or a “dit” sound at something close to the right timing. The device will interpret those utterances and then output perfect keying.
The components to make this work include an Arduino Nano board, an audio input jack, a small transistor amplifier, a potentiometer, an LED, and an output transistor. Users can connect a headset with a condenser microphone, which feeds into the audio jack to the amplifier and then to the Arduino. The Arduino analyzes the incoming audio signal to detect “dahs” and “dits,” then keys the radio using the output transistor. The potentiometer lets the user adjust the sensitivity.
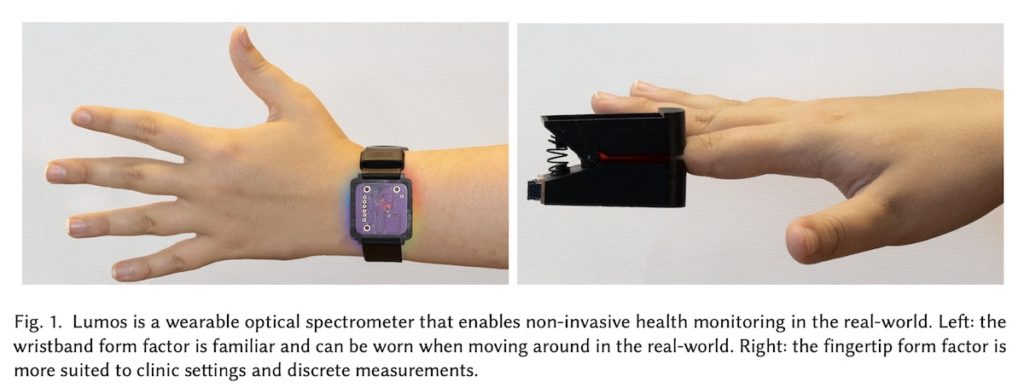
Spectroscopy is a field of study that utilizes the measurement of electromagnetic radiation (often visible light) as it reflects off of or passes through a substance. It can, for instance, help researchers determine the composition of a material, as that composition influences how the material reflects light. Spectroscopy is also used in medicine, but traditionally requires that patients visit a lab. To enable long-term spectroscopic analysis, a team of engineers built a wearable spectroscopy sensor called Lumos.
Lumos comes in two forms: a smartwatch-like wearable wristband and a fingertip model that resembles the pulse oximeters that nurses put on your finger when you go in for a checkup. The latter is meant for use in doctor’s offices and labs, but the former was designed for patients to wear as they go about their daily lives. It would continue to collect spectroscopic data as they do, which could provide valuable insight. Such long-term data collection would help physicians observe how conditions progress or to see conditions that don’t present consistently.
The engineers chose an A7341 spectral sensor for Lumos because it is compact, but still has a large sensing range. An Arduino Nano 33 IoT development board provides power to the A7341, receives the data from the A7341 through an I2C connection, and then sends the data to a base station via WiFi. Power comes from a 400mAh lithium-ion battery, which lasts for around five hours before it needs recharging. That’s five hours of spectroscopic data to analyze — far more than can be gathered using traditional in-lab instruments.
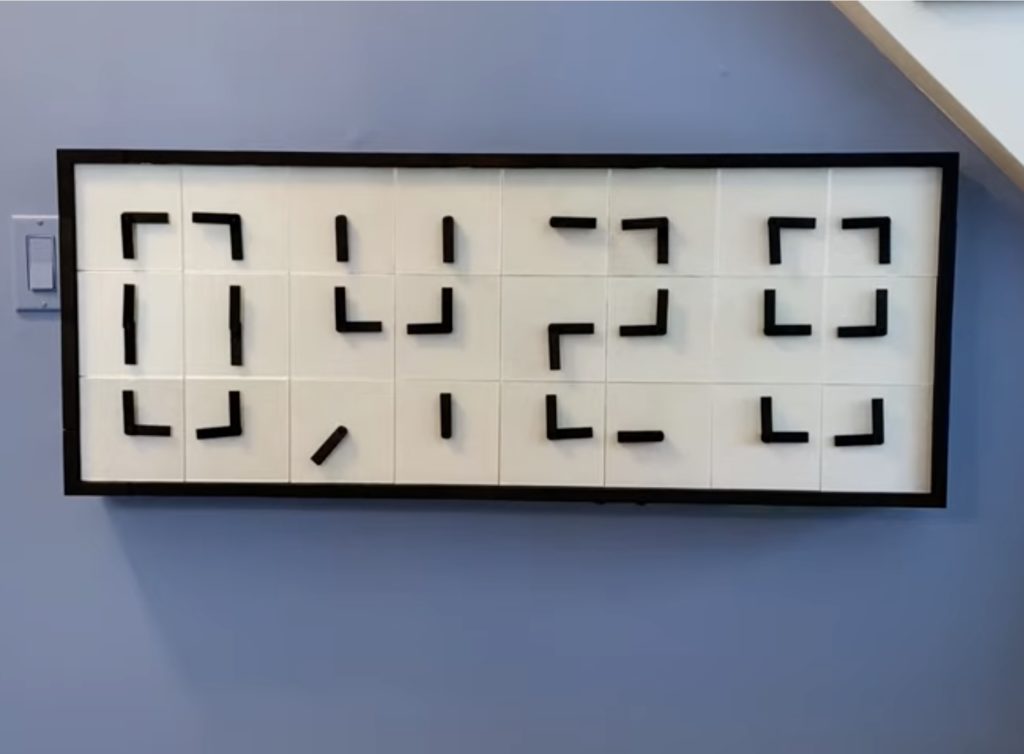
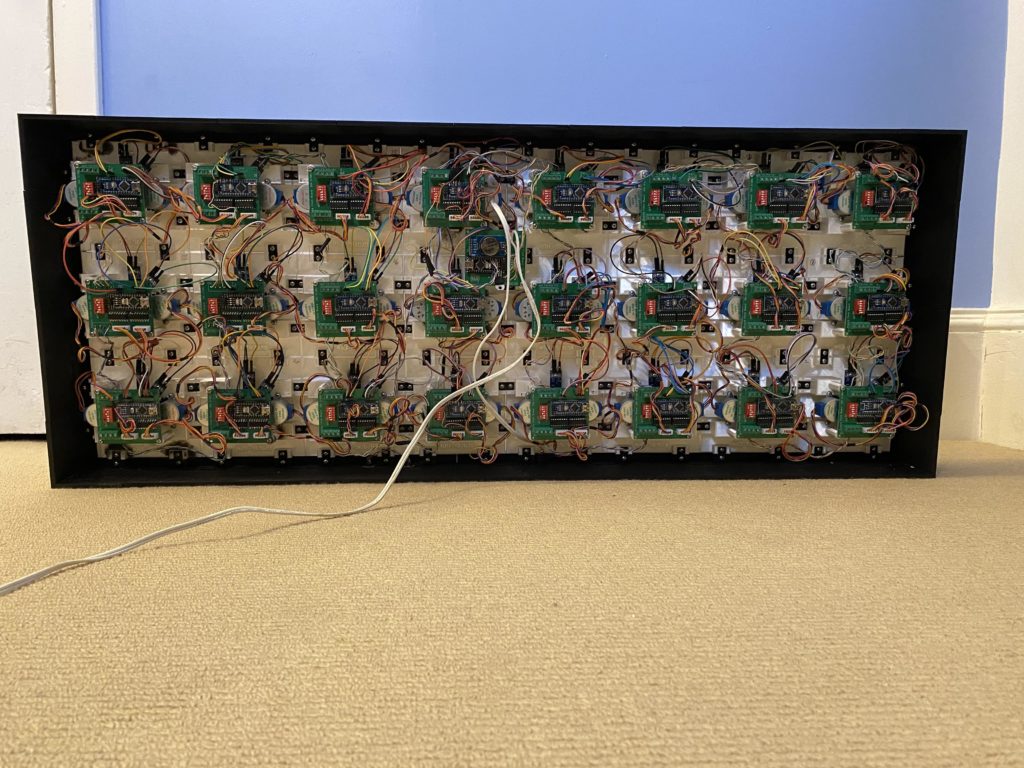
Clocks are fantastic means of creative expression, as they serve a practical purpose and therefore have a reason to exist, but aren’t limited to pure functionality. As such, we see many interesting clock designs. But ihart’s 3D-printed digital clock made from 24 individual analog clocks takes the proverbial cake.
When observed from a distance, this clock looks like it contains large seven-segment displays. But it actually displays the numerical digits of the time using the two hands of 24 individual analog clocks. Those analog clocks don’t show the time, but instead form the segments that make up the “digital” digits. The choreographed dance of the clock hands as the time changes is mesmerizing and the sheer complexity of the system should excite even the most stoic engineers in our audience.
Each of the 24 analog clocks has two hands that move independently, so this clock requires a total of 48 stepper motors. Each hand also requires a Hall effect sensor for finding its home position. While there were many other potential solutions, ihart chose to use one Arduino Nano board for every analog clock. That means that each Arduino controls two stepper motors. To simplify wiring and power distribution, ihart designed a custom PCB to host each of those 24 Arduino boards. A 25th Arduino Nano, paired with an RTC (real-time clock) module, coordinates the operation of the other 24.
All of the mechanical components of the clock were 3D-printed. The design is somewhat modular to keep the unique part count down, which means that this could be expanded into a larger display. But even as it is, the clock is very impressive.
The Arduino Cloud is Arduino’s integrated platform to develop, deploy, monitor, and control IoT devices with minimal effort. It enables makers, IoT enthusiasts, and professionals to build easily connected projects based on a wide range of hardware including not only Arduino boards, but also ESP32 and ESP8266 boards. Arduino is committed to making all the Arduino Cloud features available to all the supported hardware and as a result of this effort, ESP32 family of chipsets now support over-the-air (OTA) updates.
The Cloud for Makers
Due to their low price, integration and high performance, ESP32-based devices are among the most widely used ones for hobbyists and developers who want to create their small home appliances.
One of the facts that have contributed to this popularity is the ability to use the Arduino IDE to code and program the devices. You can find tons of resources describing how to get started. There are thousands of projects that will inspire you and help you create and develop your own ideas. You can reuse the code and sketches even if they have been originally developed for other ESP32 or Arduino boards. It is so easy to get started!
But what if you want to go a step further and interact with your devices remotely? That’s what Arduino Cloud was designed for. It is an online platform that enables you:
to develop your software online with the zero-touch Web Editor, keep your sketches in the cloud and share them with other users.
to deploy and manage your devices with the IoT Cloud and your custom dashboards that can be accessible remotely from your browser or the mobile app Arduino IoT Remote.
All that with just an integrated unique platform and taking benefit from the rich collection of Arduino’s libraries, examples and tutorials that help developers get at speed with minimum effort.
No cables any more: Update over-the-air
But programming the devices is still tedious work. You need to have the device at hand and connect a USB cable. This is acceptable for the first time you program the device, but it is really annoying when your device is already installed in a place with difficult accessibility. In those situations, you either have to remove the device from its place or bring your laptop as close as possible to its location.
That’s where over-the-air (OTA) is a game-changer. This feature enables you to upload programs wirelessly to your boards. This way, as soon as you have a compatible board connected to a WiFi network and configured to work with OTA, you won’t need to physically connect the board to the computer in order to upload new sketches to it. Instead, everything will work over-the-air.
Over-the-air update is available through both the Arduino IoT Cloud and the Arduino Web Editor for the sketches bound to your IoT Cloud things.
OTA for ESP32 now available
Over-the-air updates have been traditionally constrained only to Arduino boards and this feature has been widely adopted by users. Now, this support is extended to ESP32 boards. This unifies the experience across the most popular platforms.
There are plenty of ESP32 platforms available with different processors and memory sizes. This is an experimental feature that has been tested on the most popular ones, but there could be some limitations on some of the untested ones. We would be delighted to get your feedback.
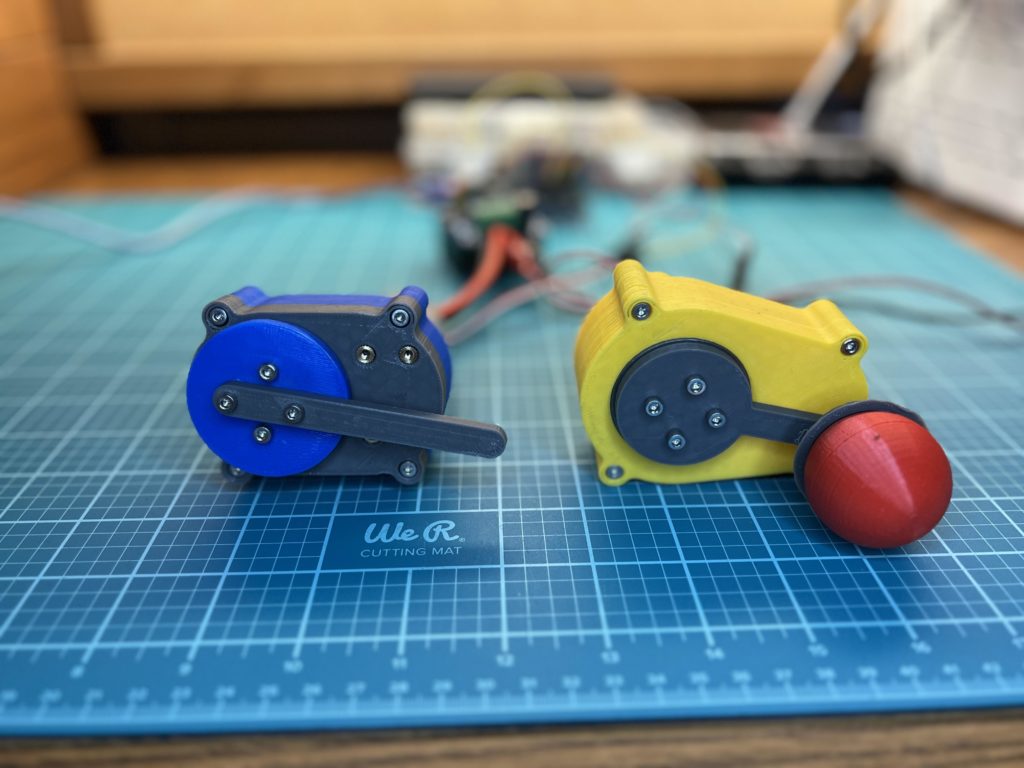
If you frequent driving ranges, you’ve probably seen a machine (often attached to the front of an armored golf cart) designed to pick up golf balls. Because a driving range can easily fill up with thousands of golf balls an hour, such machines are necessary. After noticing that nobody wanted to pick up the ping pong balls after matches, Maxime Monsieur and his team (Oumaima Achkif, Reda El Marsse, and Amir Farbod) built this robot that collects ping pong balls using a mechanism similar to those used for golf balls.
Like a golf ball collecting machine, this robot picks up golf balls using a spinning mechanism that resembles something you’d see on an agricultural harvester. Any ping pong balls in front of the robot get pushed towards that mechanism by a pair of spring-loaded arms. The rotating mechanism then pushes the ping pong balls up a ramp and into a bin. The robot navigates through the room like an old robot vacuum: by driving forward until it meets a wall, then turning in a random direction.
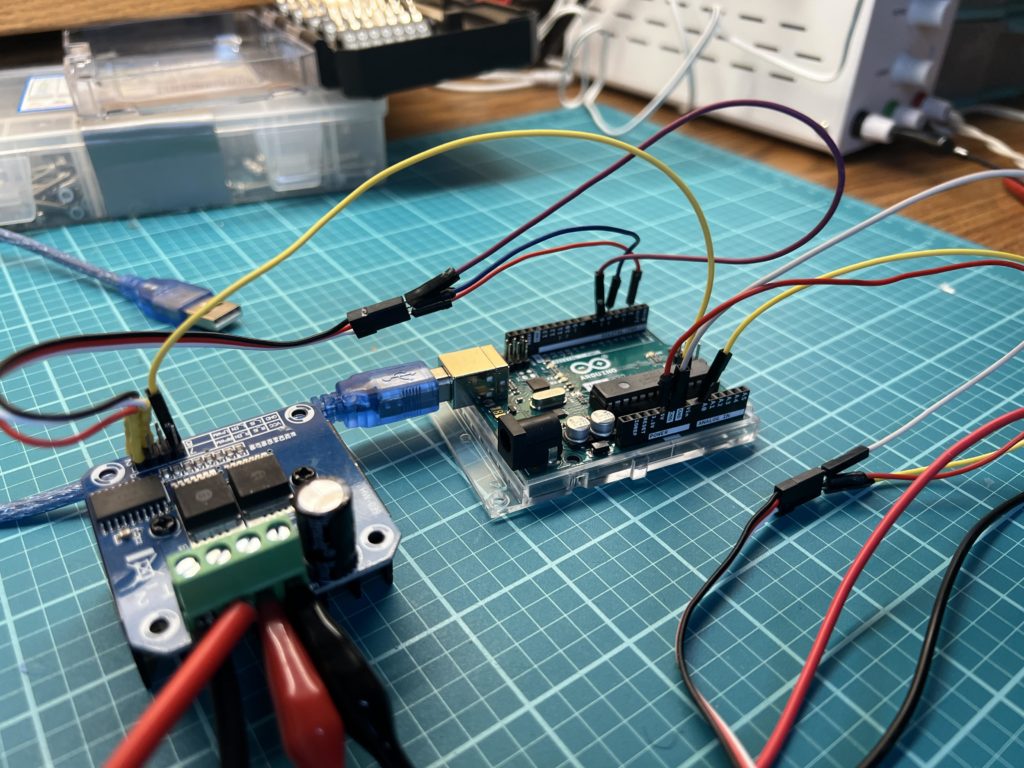
The team constructed the robot’s frame and body using a combination of laser-cut MDF and 3D-printed plastic parts. It has two stepper motors that spin the two drive wheels, and a DC motor that spins the collection mechanism. An ultrasonic sensor detects walls and other obstacles. An Arduino Uno board controls the two stepper motors via A4988 driver boards and turns the DC motor on via a relay module.
In tests, this robot seems to work quite well, even though its navigation is inefficient. No word on if nearby players attempt to pelt the robot with ping pong balls as it works.
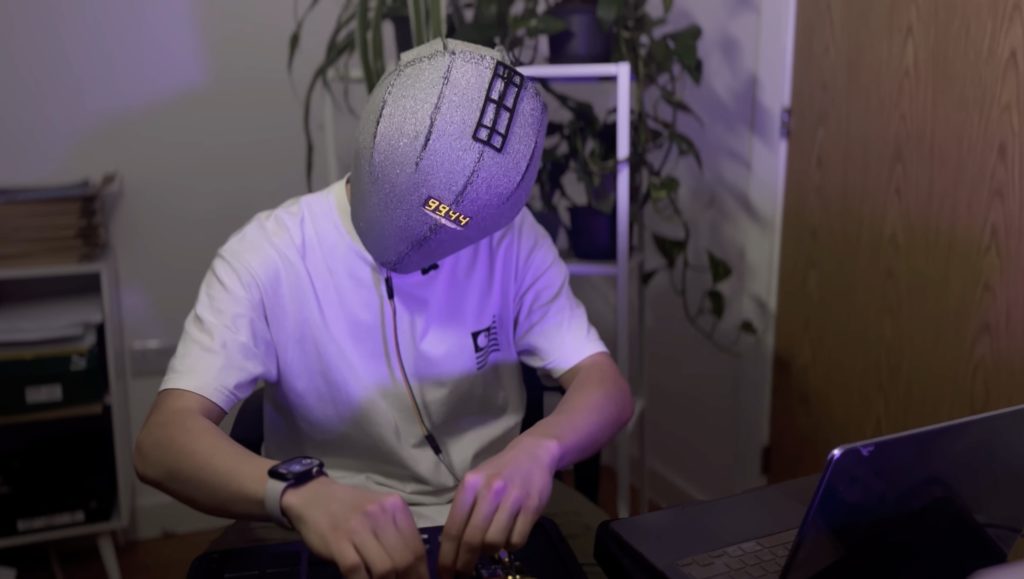
Take a moment to think about some of your favorite electronic music DJs. How many of them wear some sort of a helmet or mask? You can probably think of at least a few. For whatever reason, DJs like their privacy. Daniel Aagentah was tasked with making a sci-fi film prop helmet and decided to use it for DJing, too. The result is this cool sci-fi-themed, audio-reactive headpiece that incorporates an Arduino-controlled display.
Aagentah is part of a team working on an indie sci-fi movie being filmed in Manchester, England. He was assigned the job of constructing a helmet for a character costume and this is the result. He made the helmet out of every cosplayer’s favorite material: EVA foam sheet. That is a lightweight and strong material that is easy to cut and form. He carefully worked that EVA foam into a helmet shape, then gave it a coat of silver paint that we all know is synonymous with the future. The final touch was a seven-segment display mounted where the eyes should be.
An Arduino Uno board controls the four digits of that seven-segment display. It sets the digits according to MIDI notes coming from a connected computer running Ableton DJ software. Each MIDI note carries information on the corresponding digital instrument, which the Arduino uses to determine what numbers to show on the display. The result is a DJ helmet with a numerical readout that mirrors the music in real time, which also doubles as a prop for the sci-fi film.
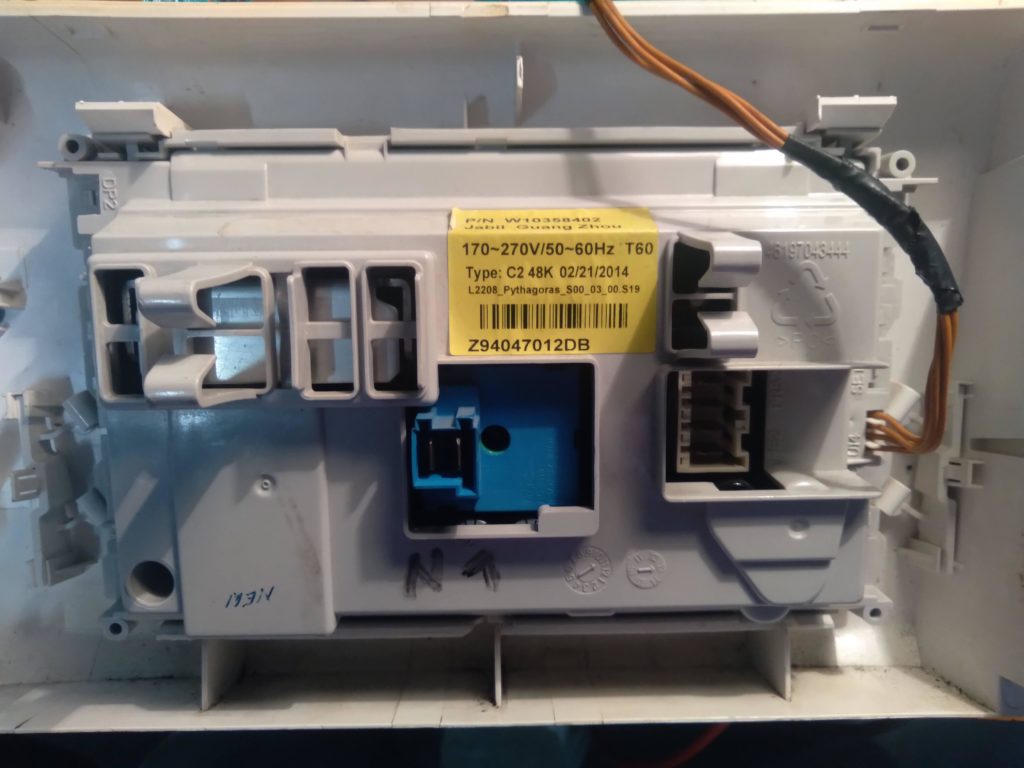
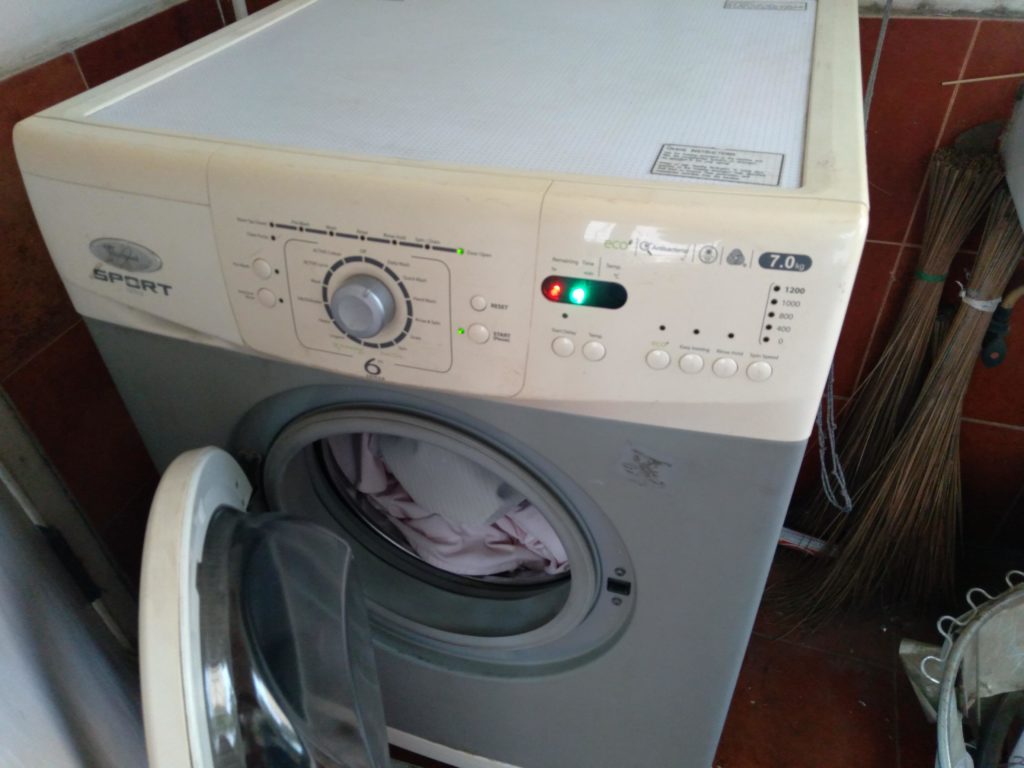
The maker movement often focuses on creation, but we should never overlook repair. In a consumer market increasingly moving towards planned obsolescence, manufacturers often fail to devote any resources towards the repair of their products. In many cases, replacement parts are unavailable or prohibitively expensive. But the maker skill set can provide recourse, as demonstrated by Balakrishnan Prashanth’s Arduino-based solution for a washing machine’s failed timer display.
Like many modern washing machines, Prashanth’s Whirlpool has a digital readout that displays the time remaining in a cycle. It’s a handy feature, but not one that is absolutely necessary to wash clothes. Unfortunately, this Whirlpool disagrees. They designed this model’s control board so that the entire machine’s functionality comes to a screeching halt if the digital display stops working. The control board sends data to the display and expects an acknowledgment. If it doesn’t receive that acknowledgment, it won’t let the washing machine run through a cycle. That’s what happened when Prashanth’s machine’s display failed.
Prashanth solved this problem using an Arduino Mega 2560. He determined that the Whirpool’s control board sends data to the display module via I2C and expects a confirmation from the module. Instead of trying to replicate the complete functionality of the display module, Prashanth chose to omit the display altogether — it is, after all, unnecessary. He put the Arduino in the display module’s place and programmed it to simply blink an LED when it receives I2C messages from the control board. It then sends a confirmation back to the control board, tricking it into proceeding with the normal wash cycle.
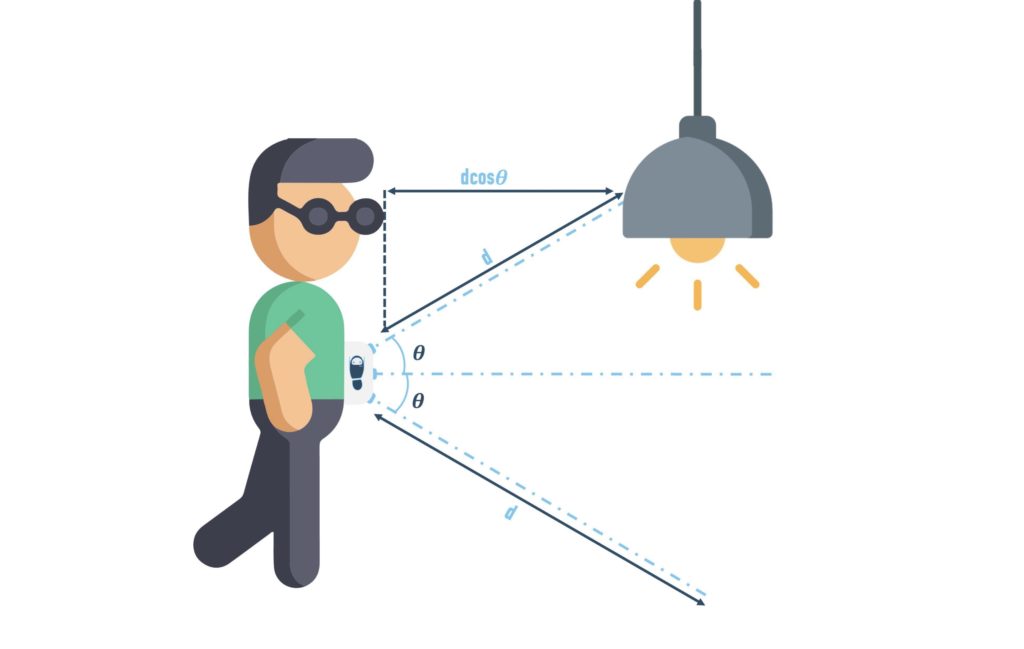
It is no secret that visual impairments — even those that don’t result in complete blindness — make it very difficult for people to live their lives. White canes can help people get around, but they require physical contact. Seeing eye dogs provide very valuable assistance, but they’re expensive and need care of their own. That’s why Nilay Roy Choudhury designed the Walk-Bot device to help people with visual impairments navigate safely.
Walk-Bot is a wearable navigation device that uses audible cues and haptic feedback to give visually impaired people a sense of their immediate environment. It has a host of sensors that let it identify nearby obstacles at any height from the floor to the ceiling. Walk-Bot performs onboard trigonometry to determine the distance to any obstacles that might interfere with its user’s ability to walk safely. And it is affordable and easy to build with common components.
Those components include an Arduino Nano board, two HC-SR04 ultrasonic sensors, a GP2Y0A02YK0F infrared sensor, a vibration motor, a buzzer, an MPU-6050 gyroscope, and an HC-05 Bluetooth module. Those all fit inside a 3D-printed wearable enclosure.
One ultrasonic sensor faces upwards at a 45-degree angle to detect high obstacles. The second ultrasonic sensor faces directly forwards. The infrared sensor points downwards at a 45-degree angle to detect low obstacles and was chosen because ultrasonic sensors struggle with some common floor surfaces. The gyroscope lets Walk-Bot determine its own orientation in space. When it detects an obstacle, Walk-Bot sounds the buzzer and activates the vibration motor. It also includes a panic button that will tell Walk-Bot to connect to the user’s smartphone through the Bluetooth module to message a chosen contact in the event of an emergency.
In our last annual report we described 2021 as one of the busiest and most productive years in Arduino history in terms of open source development (if you missed that report, go read it now as it contains so many nice things). Well, we didn’t rest in 2022 either!
The Arduino team has been busy releasing new important open source projects, both hardware and software, while the community continues to release and maintain libraries at an incredible pace.
Just to name one big release, the IDE 2 was launched a few months ago. For Arduino, such an incredibly complex project has been a massive investment in financial terms and we are proud of the very positive reception by the users and the active participation of contributors. There’s a healthy community and this can also be seen from many indicators that are not in this report, including participation in the Arduino Day yearly celebration as well as the forum activity and much more.
The report highlights the main achievements of our open source community. Among those, in 2022 we had three new open source hardware products, the new Lab for MicroPython, the language discussion space, 1,042 new libraries (+25% in one year), 421 new open source tutorials on Project Hub, 84 new releases of Arduino cores, and the ranking of the most active library maintainers.
All this is made possible by people who buy original Arduino products, subscribe to the Arduino Cloud, and/or make donations: THANK YOU for supporting us and our efforts in open source development. There’s a lot to do in 2023!
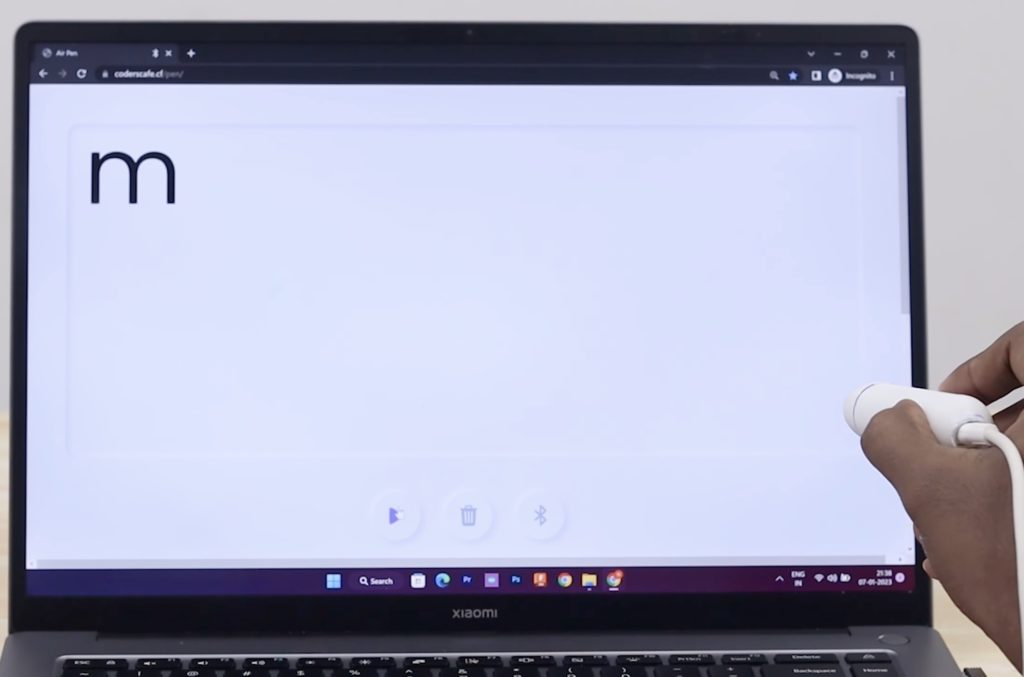
Released in 2015, the Apple Pencil is a technology-packed stylus that allows users to write on iPad screens with variations in pressure and angle — all while communicating with very low latencies. Nekhil Ravi and Shebin Jose Jacob of Coders Café were inspired by this piece of handheld tech to come up with their own pencil concept, except this one wouldn’t need a screen in order to function.
The pair’s writing utensil relies on recognizing certain gestures as letters, and once one has been detected, outputs the result over USB or Bluetooth® to the host device. They started by first gathering many samples of different letters and how they correlate to the change in motion on the Arduino Nano 33 BLE Sense’s built-in accelerometer. From here, they designed an impulse in the Edge Impulse Studio to extract spectral features from the time series accelerometer data and pass it to a classification Keras neural network. The resulting model could accurately determine the correct letter from each gesture, making it suitable for deployment back to the Nano 33 BLE Sense.
Before testing their new inferencing code on the hardware, a simple 3D-printed case was designed to fit around the board to look like the real Apple Pencil. Additionally, the team made a simple website that could receive data from the board over BLE and display the corresponding letter within the browser window. To see more about this project, you can watch their video below!
Most modern digital cameras are perfectly capable of capturing photos of the stars. But many of them have trouble collecting the small amount of light available in a short amount of time, which means that you need to leave the shutter open for 30 seconds or more to get a decent exposure. That presents a problem, because the Earth rotates. As it does, the light from the stars leaves trails in your long-exposure photo. To overcome that issue, Ondra Gejdos designed this 3D-printable star tracker.
The purpose of a star tracker like this one is to move the camera in the opposite direction of the Earth’s spin in order to keep the stars still in the frame. That lets astrophotographers keep the shutter open as long as they need to to get proper exposure without star trails. The “OG-star-tracker” mounts to a standard tripod and the camera attaches to it. A single stepper provides rotation, and it is up to the user to set the angle properly for their position on the planet.
An Arduino Uno board controls the movement, though Gejdos also uploaded firmware for the Nano. It controls the stepper motor through a TMC2209 stepper driver. The 3D-printable design includes a gear box that dramatically reduces the stepper motor output, resulting in very smooth movement that shouldn’t create any blurriness in the photos.
The documentation is a little bit rough at the moment, but all of the files are on the GitHub page so you can build your own star tracker.
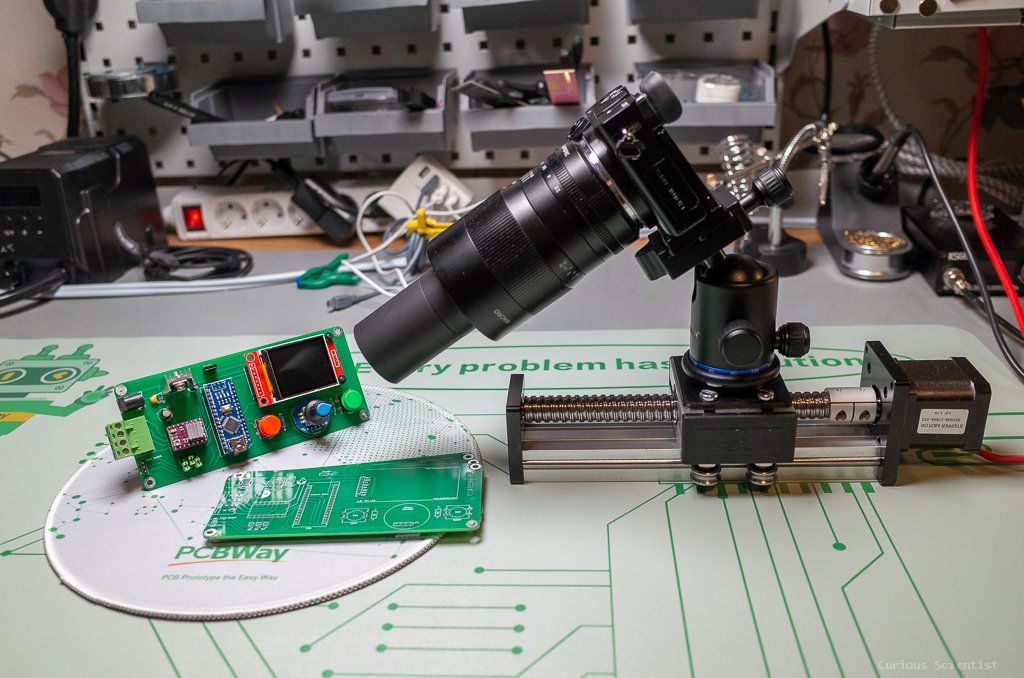
If you’re ever tried to capture some macro photographs (very close-up pictures), you’ve probably noticed that it is difficult to get proper focus. Because the depth-of-field (DoF) for macro lenses is so small, you can only keep a narrow range of distance in focus at any given time — everything else is blurry. One solution is “focus stacking,” in which you take many photos and then mash them together in software. Curious Scientist designed a macro photography focus stacking device that makes this technique easier.
The focus stacking technique requires several photos, each with a slightly different area of the subject in focus, until you’ve covered the entire subject. Then you can use photo editing software, like Photoshop, to blend the pictures together. The result is a macro photo where the entire subject is in focus. You can perform that process without any special equipment, but it is tedious and difficult to achieve consistent focus changes. Curious Scientist’s device speeds up the process and has perfect consistency.
Instead of refocusing the lens between photos, this device moves the entire camera. With auto-focus disabled and the lens manually focused to the nearest point of the subject, the whole camera moves forward by a predetermined distance after each photo.
The primary components in this project are an Arduino Nano board, a linear actuator with stepper motor, a stepper motor driver, a 1.8” LCD panel, and control buttons. With the LCD and buttons, the user can set the focus stacking parameters: f-stop, magnification, and so on. The device then calculates how far to move between shots. It uses a standard shutter trigger and should work with most cameras.
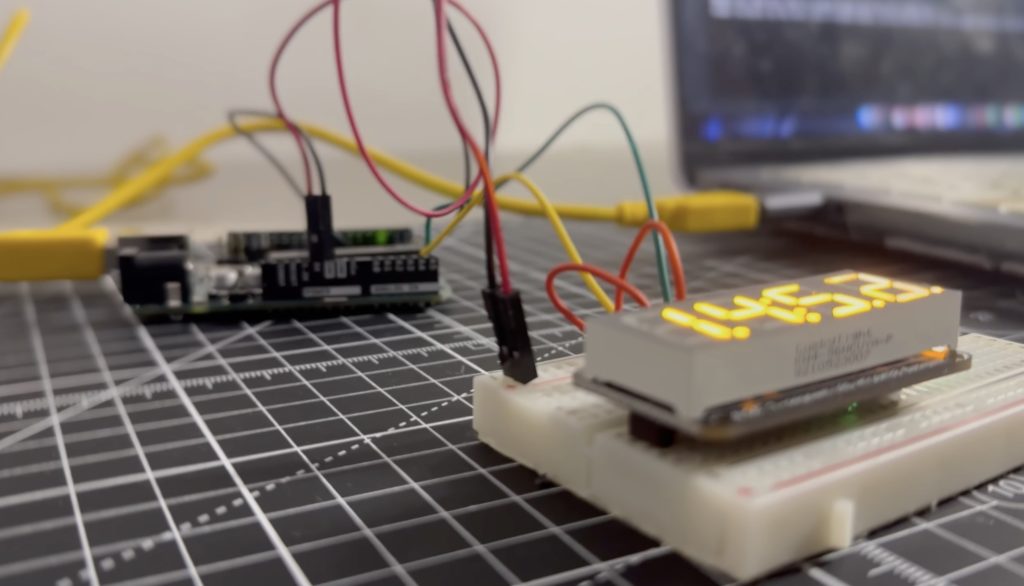
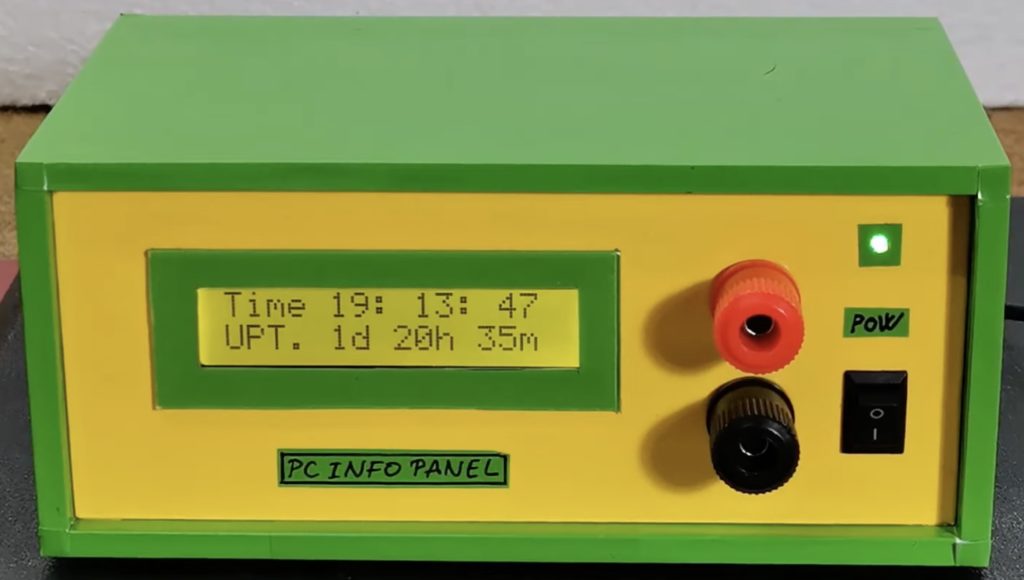
While the typical computer user doesn’t need to worry about it, those of us who overclock our computers or run them hard like to know how they’re performing. If, for example, you overclock your CPU, then you probably want to keep an eye on its temperature to ensure that it doesn’t exceed a safe level. This multi-function device, designed by Mirko Pavleski, displays all kinds of PC data and even current news.
This Arduino LCD Info Panel works with open source software (LCD Smartie) running on a Windows PC. That software monitors many data points, including CPU load, free disk space, memory usage, and much more. It can also download RSS news feeds and sync with other software, like Winamp. The software then sends the relevant data to the Arduino LCD Info Panel device via a USB connection. The unit displays the data on a 16×2 character backlit LCD screen and a pair of potentiometer knobs let the user flip through the data.
It doesn’t take much hardware to build your own Arduino LCD Info Panel. The only components you need are an Arduino Nano, an Adafruit Standard LCD, two potentiometers, and a few miscellaneous components like resistors. The wiring is pretty simple and makers can use a protoboard or a breadboard.
Um dir ein optimales Erlebnis zu bieten, verwenden wir Technologien wie Cookies, um Geräteinformationen zu speichern und/oder darauf zuzugreifen. Wenn du diesen Technologien zustimmst, können wir Daten wie das Surfverhalten oder eindeutige IDs auf dieser Website verarbeiten. Wenn du deine Einwillligung nicht erteilst oder zurückziehst, können bestimmte Merkmale und Funktionen beeinträchtigt werden.
Funktional
Immer aktiv
Die technische Speicherung oder der Zugang ist unbedingt erforderlich für den rechtmäßigen Zweck, die Nutzung eines bestimmten Dienstes zu ermöglichen, der vom Teilnehmer oder Nutzer ausdrücklich gewünscht wird, oder für den alleinigen Zweck, die Übertragung einer Nachricht über ein elektronisches Kommunikationsnetz durchzuführen.
Vorlieben
Die technische Speicherung oder der Zugriff ist für den rechtmäßigen Zweck der Speicherung von Präferenzen erforderlich, die nicht vom Abonnenten oder Benutzer angefordert wurden.
Statistiken
Die technische Speicherung oder der Zugriff, der ausschließlich zu statistischen Zwecken erfolgt.Die technische Speicherung oder der Zugriff, der ausschließlich zu anonymen statistischen Zwecken verwendet wird. Ohne eine Vorladung, die freiwillige Zustimmung deines Internetdienstanbieters oder zusätzliche Aufzeichnungen von Dritten können die zu diesem Zweck gespeicherten oder abgerufenen Informationen allein in der Regel nicht dazu verwendet werden, dich zu identifizieren.
Marketing
Die technische Speicherung oder der Zugriff ist erforderlich, um Nutzerprofile zu erstellen, um Werbung zu versenden oder um den Nutzer auf einer Website oder über mehrere Websites hinweg zu ähnlichen Marketingzwecken zu verfolgen.


 updates for ESP32 with Arduino Cloud")