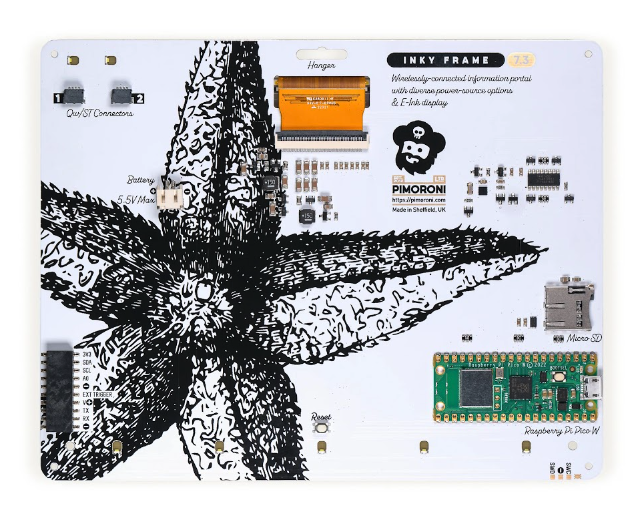
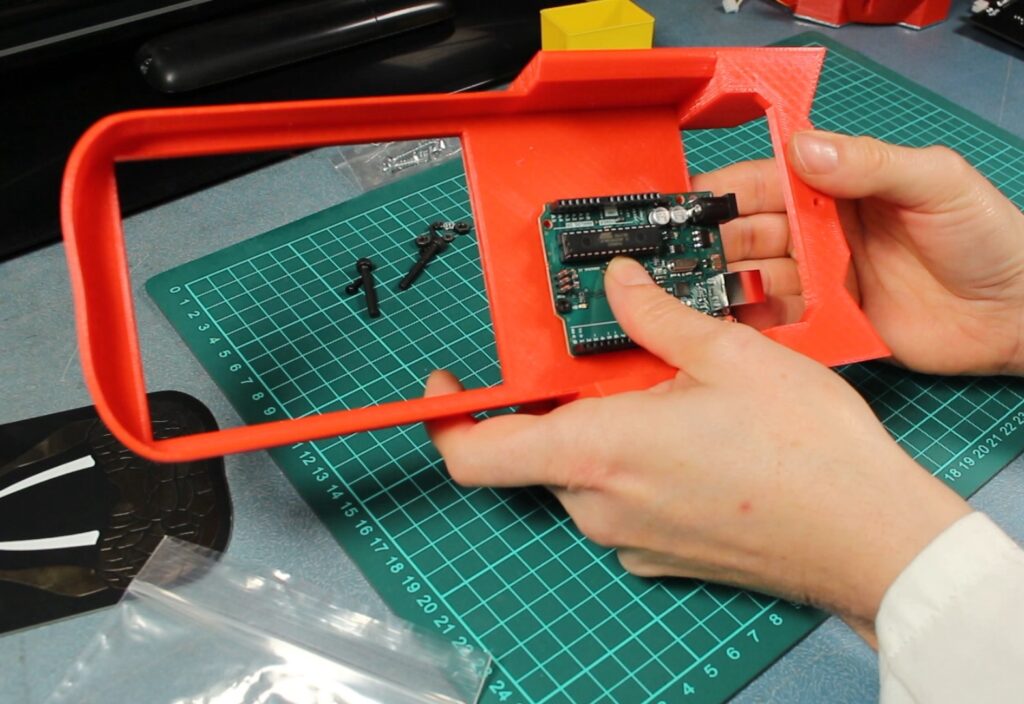
Other than that, it’s very similar in design to the previous Inky Frame models, with a seven-colour e-ink display with five tactile user buttons underneath. It’s based around a standard Raspberry Pi Pico W board pre-soldered to the rear of the board, so you can connect it to a computer via USB for programming, as usual. The rear also features two Qwiic/STEMMA QT ports (for attaching breakouts) and an extension header (including six GPIOs), along with a reset button, microSD card slot (extra storage for images etc.), and JST battery connector.
Slow but ultra-efficient
Like other e-ink displays, the Inky Frame 7.3˝ takes a while to refresh the screen: typically 25–30 seconds – a little longer if rendering JPG images. The big advantage is its ultra-low power drain: e-paper only uses power while refreshing. As well as keeping time, the on-board real-time clock can place Pico into an ultra-deep sleep mode that uses a tiny 20 μA until woken.
Software-wise, it’s preloaded with Pimoroni’s MicroPython firmware, including the PicoGraphics display library and several code examples. To connect Pico W to your wireless network, just fill in the SSID and password in the secrets.py file – see the Getting Started guide for more details.
Verdict
9/10
All the low-power advantages of colour e-ink combined with larger screen estate makes this a formidable display.
While I’ve made many, many (many!) Raspberry Pi projects over the last decade or so for tutorials and such, I still get a little extra spark of joy when I’m making something outside of a work setting. Last month I wrote a guide on how to create some interactive streaming lights with a Raspberry Pi Pico and some NeoPixel LEDs, and that had started off life as a personal project. Using it in a context outside of the magazine in my day-to-day (sorta) life has a different level of novelty to me.
In plain sight
That’s not to say I never use Raspberry Pi around the house. At the very least, I always have a Raspberry Pi NAS running in the background, and I’ve had a Raspberry Pi media PC for about as long as media centre software has been available for Raspberry Pi. These utilitarian builds live in the background though and are a bit less creative or unique.
I think that’s one of the reasons Raspberry Pi has taken off so well. You can have a functional project, a seasonal project, or a more ostentatious one and Raspberry Pi or Pico is usually the best (and cheapest) thing to use for the job. It’s also how we can have many fantastic projects each month in the showcase section at the beginning of the magazine.
One more thing
There’s always another Raspberry Pi build I want to do. Right now, I’m thinking about interesting LED customisation of a LEGO castle or a Gunpla model, and maybe upgrading the decorations on my Christmas tree. Not sure why it’s mostly light stuff right now, but I’m sure something else will pique my interest – and when it does I’ll probably get to write about it for the magazine.
Whether you have an outlet like me for your project (and I understand my situation is fairly unique) shouldn’t really matter – what matters is whether or not you turn on your project and think “oh cool, I made that.” It’s certainly helped me through other parts of my life.
The launch of the Arduino UNO R4 marks a huge leap forward for our community. For us, it’s also the chance to celebrate the people who bring our ecosystem to life with their bright ideas, radiant enthusiasm, and shining insight.
That is how the UNO R4 Stars blog post series began: to highlight makers who have not only created amazing projects with Arduino, but who are giving back to the community by sharing as they go and helping others make anything they wish.
We invite you to discover each profile, hoping you might find a North Star to navigate around an expanding galaxy or venture into completely new universes.
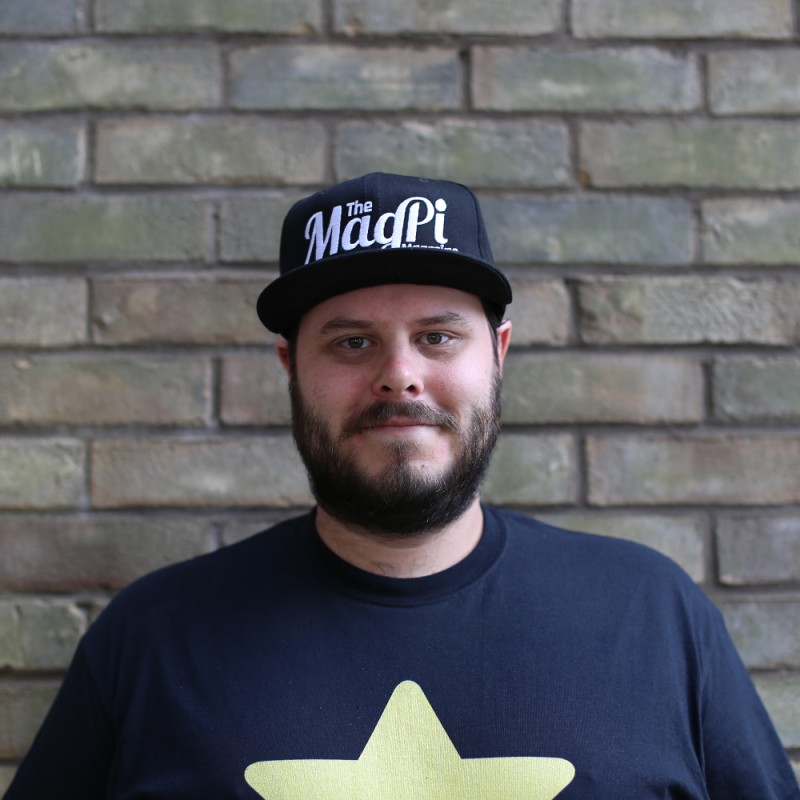
Greta Galli is a 20-year-old maker – as well as a content creator, student and teacher! – focusing her high energy levels on robotics and 3D printing. If you think that’s a lot, it is. But keep in mind she got her first taste of making at the young age of 11, when she took part in a kids’ workshop at a tech fair. Fast forward a few years and she heard her high school would start teaching with Arduino, so she jumped the gun and bought her first board.
But guess what? She couldn’t figure out how to get her first blink. And while she can laugh about it now – with 160+ tutorials uploaded to YouTube and the Minion robot she built running around her house – she had to quickly come to terms with the fact that failing is a huge part of making. She got help at the store where she had bought the board, and kept going.
Today, her work is inspired by the idea you can make anything you can imagine. The stranger the idea, the better! With robotics, 3D printing, and coding, you can create your own project from scratch – and learn everything you need to learn as you go.
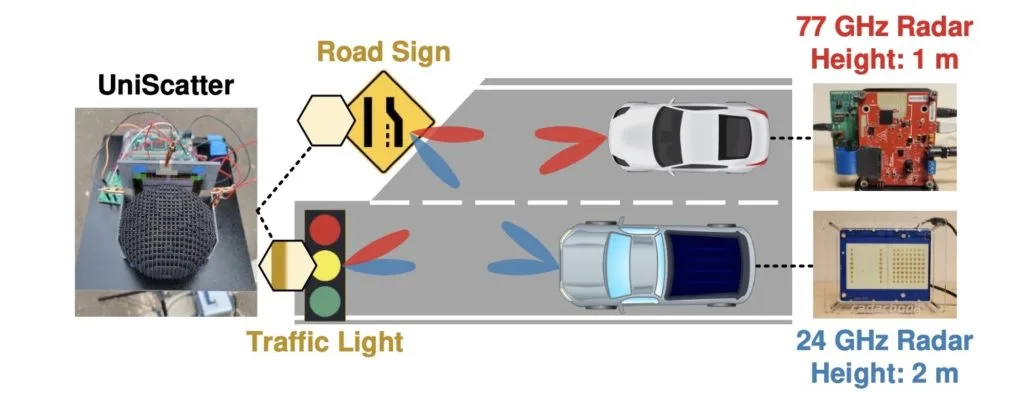
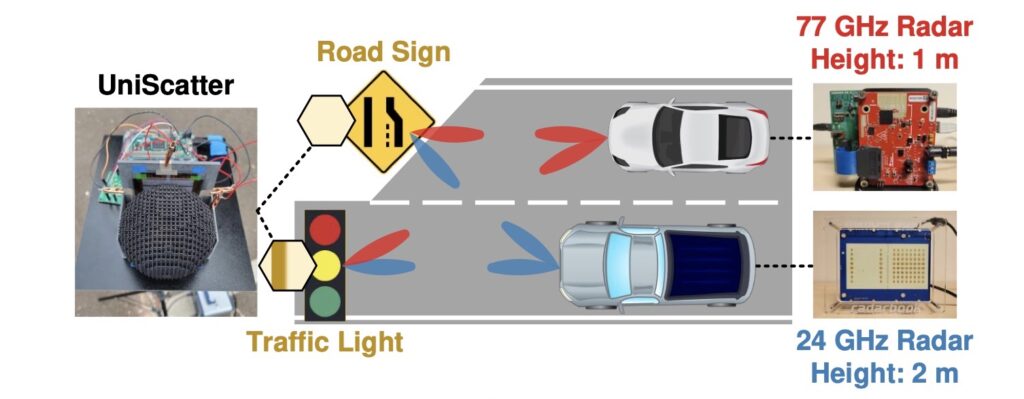
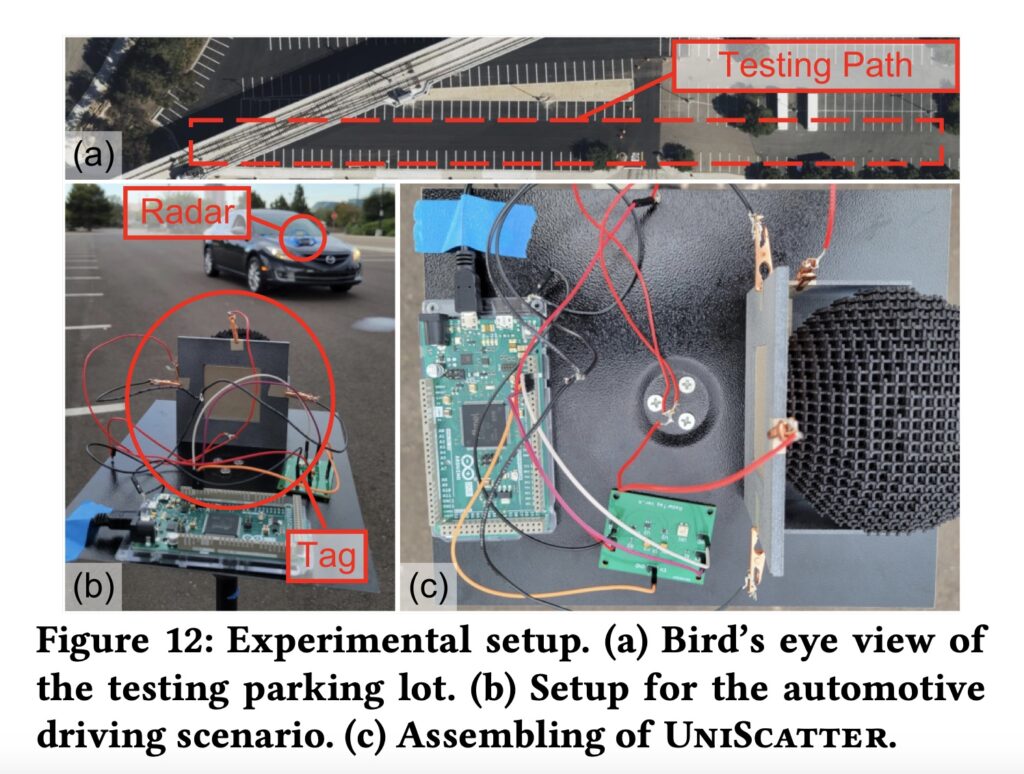
Traditional bi-directional wireless communication requires both a receiver and a transmitter at either end. Your laptop, for example, needs to receive a signal from your Wi-Fi router, but it also needs to transmit a signal back to that router. That transmission requires power proportional to the strength of the signal, which is less than ideal for many applications. Backscatter presents an alternative and UniScatter is new backscatter technology developed by a team of UC San Diego engineers that promises cost-effective reliability.
Backscatter communication works by reflecting a signal emitted by the receiver. But in order for that reflected signal to carry information, the reflector (the backscatter “tag”) needs to be able to introduce some form of modulation. That might information might be as simple as a static identifier, but it can be dynamic as well. A self-driving car could, for example, read backscatter tags on road signs with information as simple as a speed limit or something more complex like the state of a traffic light.
UniScatter utilizes metamaterials, like graphene, to enable more reliable backscatter reflections. It also adopts frequency shift keying (FSK), as opposed to amplitude shift keying (ASK), for modulation. For that to work, the UniScatter tag needs to alter the voltage bias of the graphene capacitor to control the backscatter reflection. UniScatter’s developers used an Arduino Due board to provide that modulation control.
In their research, UniScatter’s developers determined that this system works reliably from 20GHz to 90GHz. That allows for a lot of flexibility in system design and also ensures that communication remains stable across a wide variety of ambient conditions and physical orientations.
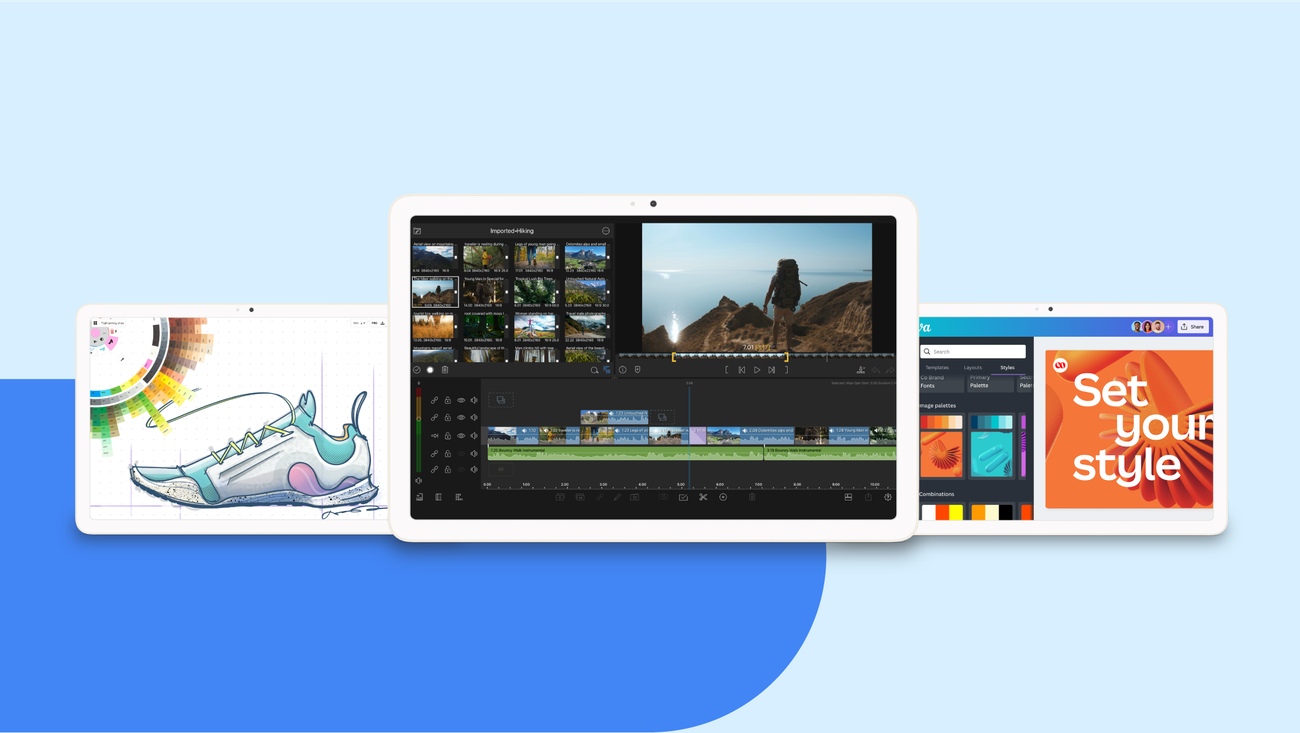
My Android tablet is my favorite device for editing family photos, using the large screen to see all the details in full display. It’s helpful for catching pictures where my son is closing his eyes, or easily adjusting elements like the vibrance and brightness.
With new tablets arriving on shelves like the Pixel Tablet and the recently announced Samsung Tab S9 series, Android is continuing to work with developers to adapt their creativity apps for large screens. Whether you’re looking to perfect family photos like myself, or to try your hand at video editing, drawing, painting or sketching, Android tablets are a great device to express your creativity.
Today, we’re highlighting six apps that you can try out on your Android tablet to make the most of your next creative project: LumaFusion, Concepts, Google Photos, Sketchbook, Adobe Lightroom, and Canva.
Find out more information about how Android keeps you safe
We care deeply about your safety, which is why we made sure to gather feedback from users, privacy and advocacy groups, and device manufacturers to help inform us as we designed unknown tracker alerts. We are committed to continuously working to improve how unknown tracker alerts work to help keep you safe on Android.
For more information about unknown tracker alerts and compatible Android devices, you can visit our help center.
The mission of the Raspberry Pi Foundation is to enable young people to realise their full potential through the power of computing and digital technologies. That’s what we say in our 2025 strategy. But how can we be sure we’re succeeding?
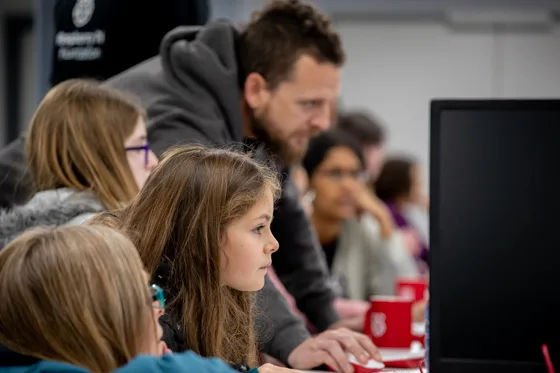
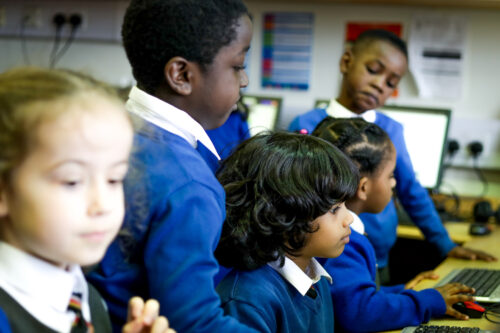
Participants at a CoderDojo in England.
In our strategy we also identify one of our values as being ‘focussed on impact’. This means that we are committed to learning from the best available evidence, and to being rigorous and transparent about the difference we’re making.
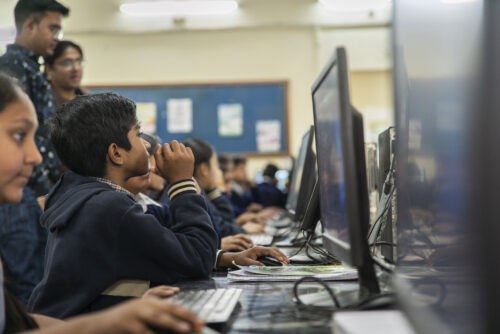
Participants at a Code Club in India.
Like all our values, our focus on impact infuses all of our work, and it is led by a dedicated impact team. This blog outlines four ways in which we put this value into practice in pursuit of our mission.
1. Do the right things
It doesn’t matter how fast you run, if you’re heading in the wrong direction, you’ll never get to your destination. We use data to prioritise our resources where we can make the biggest difference for young people.
For example, we use national statistics from the UK to assess how many of the Code Clubs and CoderDojos we support in the UK run in places where they can reach young people facing educational disadvantage, so that we can adopt an evidence-based approach to better serving these young people.
Learners in a classroom in Kenya.
And we know many of the young people who face the greatest barriers to accessing computing education and developing new skills and confidence live in countries with low- and middle-income economies. That’s why we are building new partnerships in India, Kenya, and South Africa and adapting our resources and programmes for the contexts of educators and learners living there.
2. Measure what matters
We’re really excited that we’ll soon be publishing an updated Theory of Change, which captures how we make an impact. This will be the foundation for Monitoring and Evaluation (M&E) plans for all of our initiatives, where we specify their goals and set down what kinds of data we will collect to make sure we have the measure of whether the initiatives are succeeding.
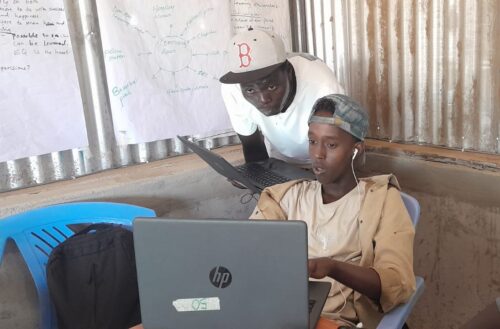
A learner and facilitator in a classroom in Kakuma refugee camp.
Strong M&E is equally important for our established programmes and our new pilot initiatives. Code Club, the worldwide network of free, after-school coding clubs for 9- to 13-year-olds we support, has been growing for more than 10 years. Durham University’s Evidence Centre for Education is currently conducting an independent evaluation of UK-based Code Clubs to help us understand how to better support Code Club volunteers and learners around the world. We ourselves recently evaluated the pilot of a new programme we designed in partnership with Amala Education to deliver a vocational skills course for displaced learners aged 16 to 25 in Kakuma refugee camp in Kenya.
3. Keep getting better
Data is only useful if it’s translated into insights that are acted upon. We use the findings from evaluations to inform the design and continual improvement of all our initiatives.
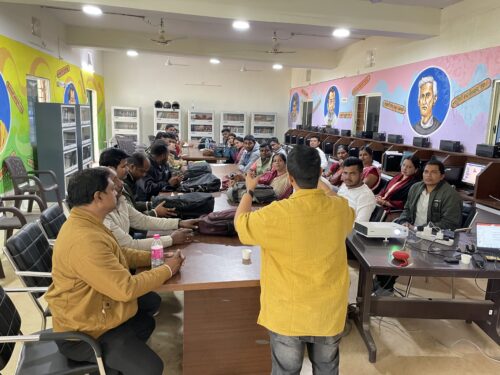
Teachers in Code Club training in India.
For example, the evaluation of our pilot vocational skills training in Kakuma refugee camp provided insights that have helped us adapt the programme for a second cohort of young people. The same was true of the M&E insights we gained from our partnership with Mo Schools in Odisha, India, where we have provided training and support to 1075 teachers to establish Code Clubs. Informed by survey data and informal feedback each step of the way, we are now gradually scaling up our support towards launching a more intensive computing and coding programme in 2000 schools in Odisha this year.
We are proud of the difference we are making. We want everyone to hear about it and feel inspired to get involved in our vital mission for young people. Our annual reviews are packed full of statistics and overviews of the difference we’re making, and we’re creating a growing video series of unique stories from people in the community we support. Watch this space for news about our updated Theory of Change, our next annual review, and more blogs about our impact.
A participant and a volunteer at a CoderDojo in England.
By doing these four things well, we can be confident that we are enabling young people to achieve their potential through the power of computing and digital technologies.
If you share our passion for impact and think our mission is important, why not get involved today? You can:
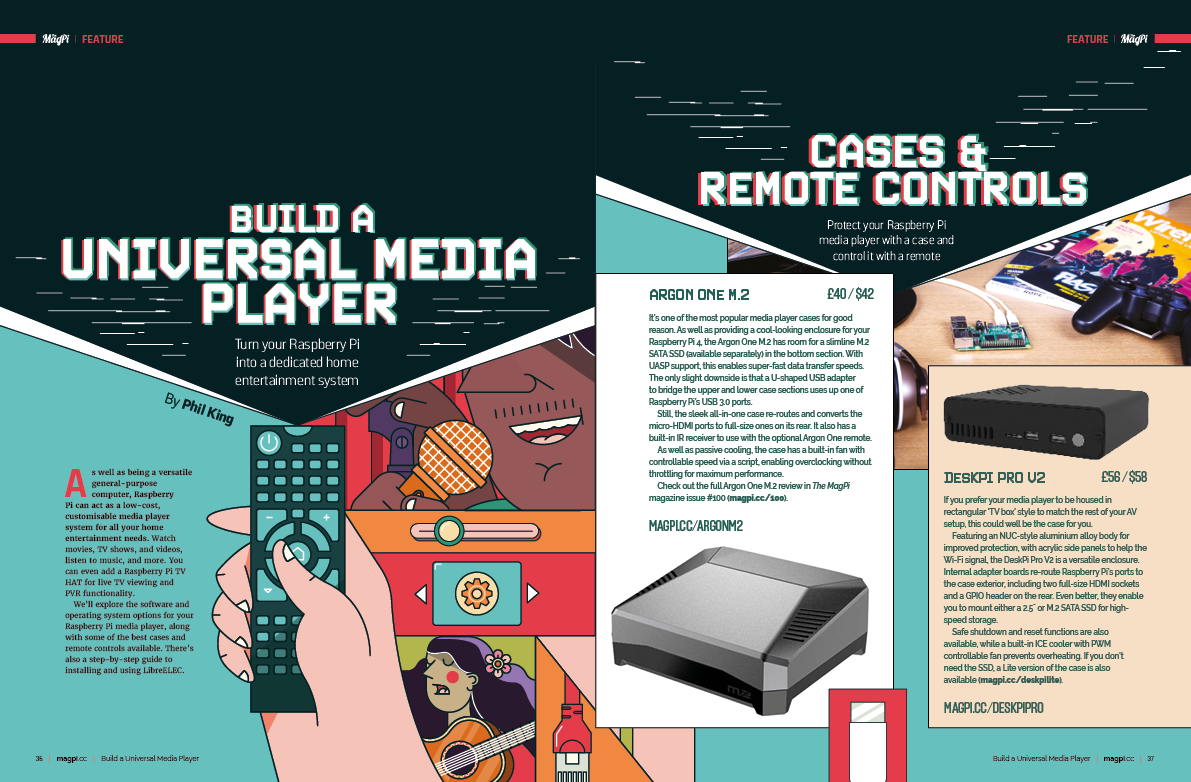
Turn a Raspberry Pi computer into a low-cost, but high-powered media box. Our media is far more capable than shop-bought options and plays media from a huge range of sources. Read our detailed guide to cases, remote controls and setting up media player software.
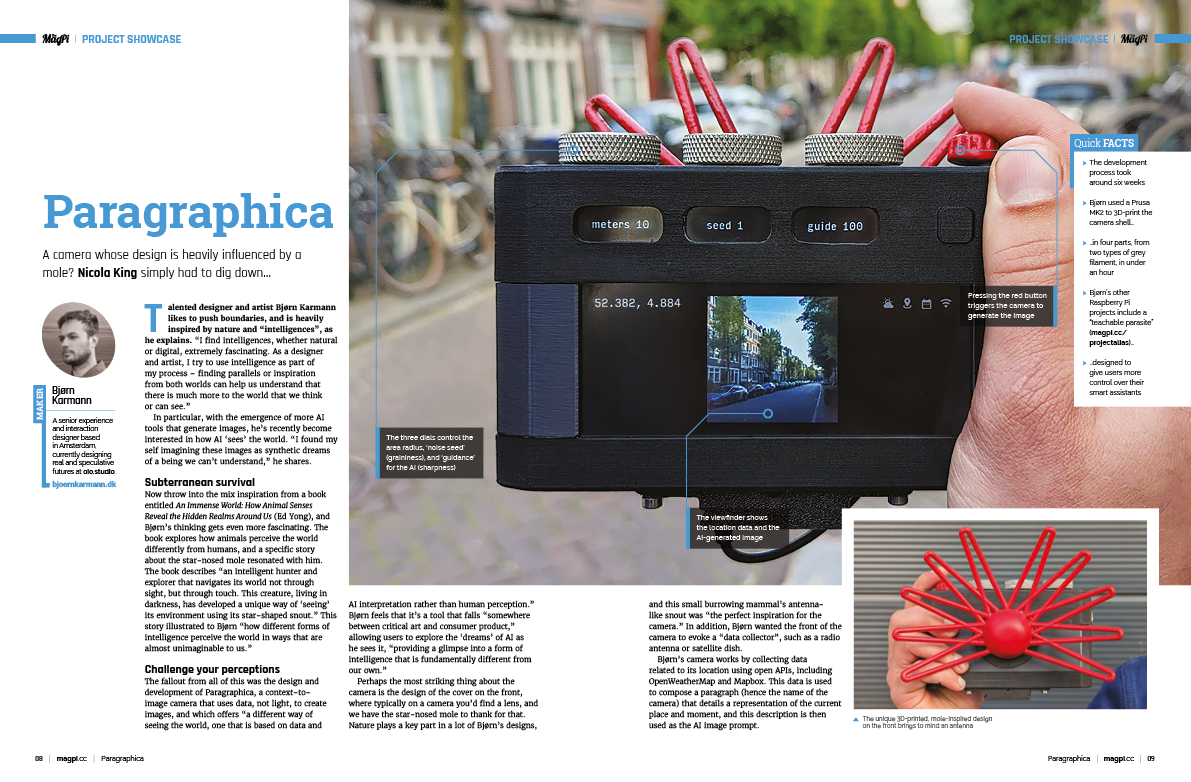
KitronikAn amazing Paragraphica AI camera
We love this unique lens-free camera build. Paragraphica gathers location information along with weather conditions and local buildings. Then feeds that into an AI model which generates a photograph. The results are often startling realistic, and always interesting.
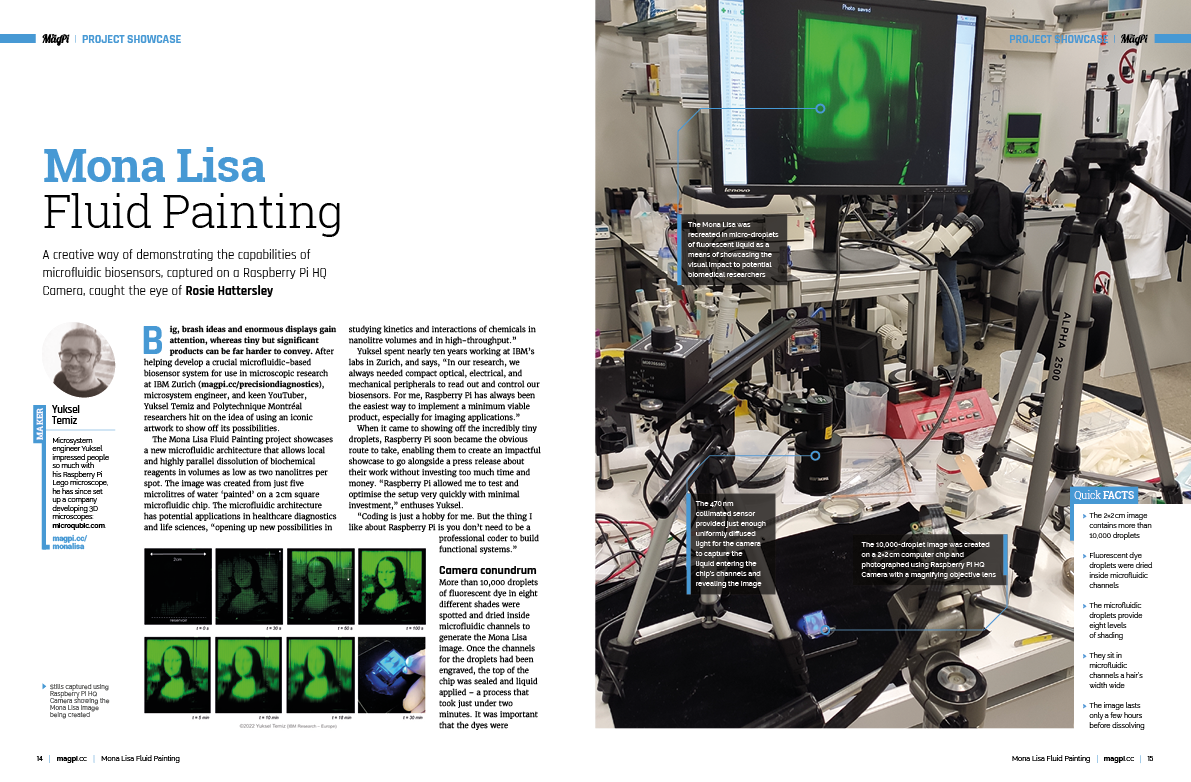
Discover this Mona Lisa fluid painting
This remarkable Raspberry Pi project showcases a new microfluidic architecture that paints images in volumes as low as two nanolitres per spot. The image was created from just five microlitres of water ‘painted’ on a 2 cm canvas.
Create a Star Wars diorama
Become a new hope for a galaxy far, far away by recreating an iconic scene from Star Wars. This Star Wars diorama uses Raspberry Pi and a hidden screen to recreate the holograph of Princess Leia.
Starter Electronics: True or False quiz game
We continue our exploration into electronics with this guide to building a true or false quiz game. This project introduces LCD screens to our Raspberry Pi Pico electronics projects. You’ll learn all about voltage shifting to power the Raspberry Pi and screen together.
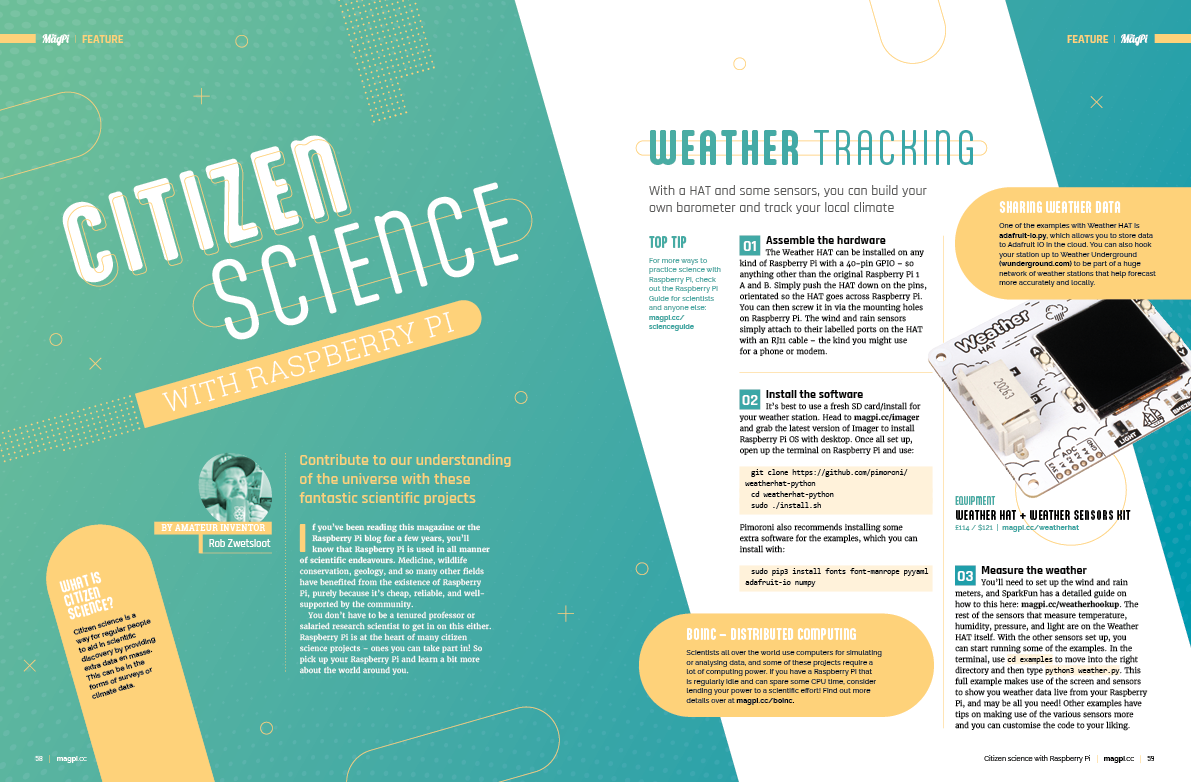
Get involved with Citizen Science
Raspberry Pi has had a huge impact on the scientific world, enabling low-cost citizen science projects. It’s small, cheap, reliable and has great community support. In this feature, we look at all the different scientific projects and programmes you can get involved with. From medicine to wildlife, geology and many other fields.
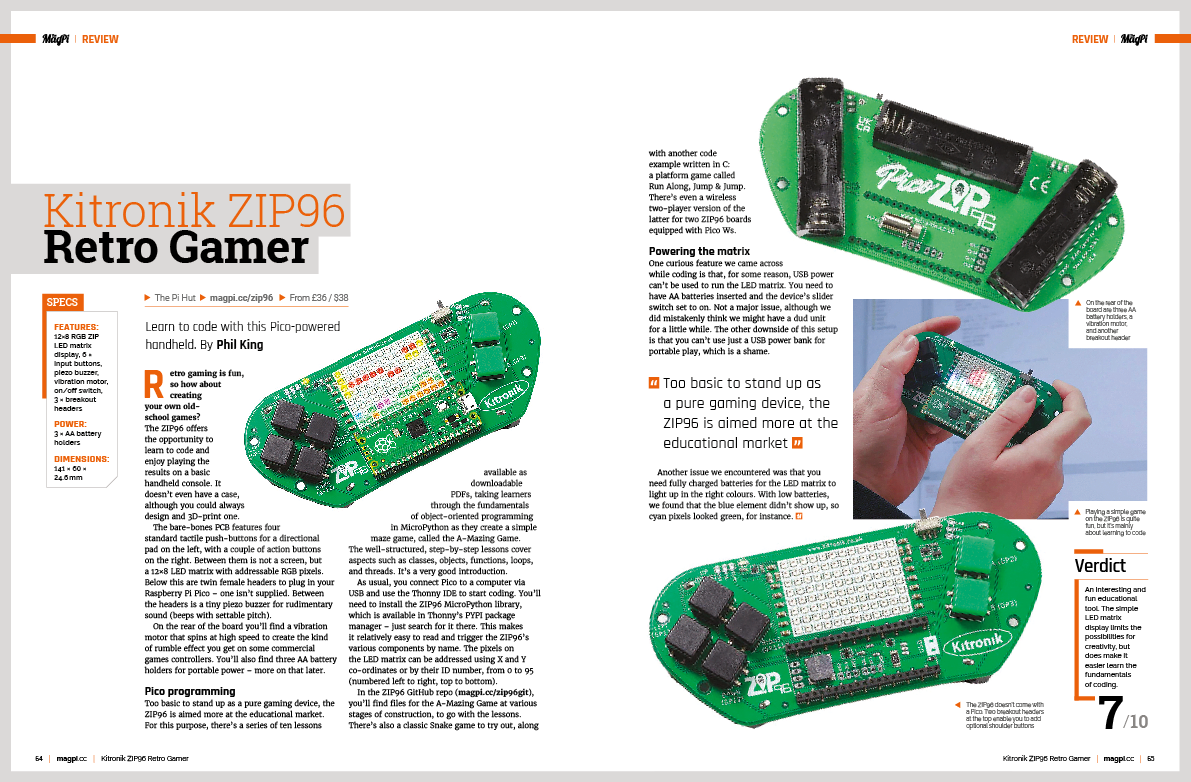
Learn to code with Kitronik ZIP96
This bare-bones PCB turns Raspberry Pi Pico into a basic retro computer. Rather than play games, you code your own for it. Instead of a LCE screen, it comes with a 12×8 LED matrix along with push-buttons.
Liverpool Makerfest
Set in the beautiful Central Library, Liverpool MakeFest is a free event that brings makers together from all over the country to enthuse about their creations, projects, and art. Roving reporter and The MagPi writer, PJ Evans spent time at Liverpool Makerfest and brings us this special report.
4. Enjoy YouTube and YouTube Music with the Tab S9 series
The new Samsung Galaxy Tab S9 series offers more room to watch your favorite YouTube videos and navigate your music library on YouTube Music. With its Dynamic AMOLED 2X display, the screen comes to life in vivid color and detail.
YouTube and YouTube Music are just a few of the more than 50 Google apps that have been optimized for Android tablets including the Galaxy Tab S9 series.
YouTube has updated layouts to fit perfectly within the unique dimensions of a tablet. And with the large screen of the Tab S9 Ultra, full screen mode hits even harder when you want to see more of the action.
With YouTube Music, you can listen to music, read lyrics, and see related content side-by-side with player controls for a more immersive experience. A two-column layout also enhances how you interact with your playlists, so you can scan and reorder songs while having access to playlist controls.
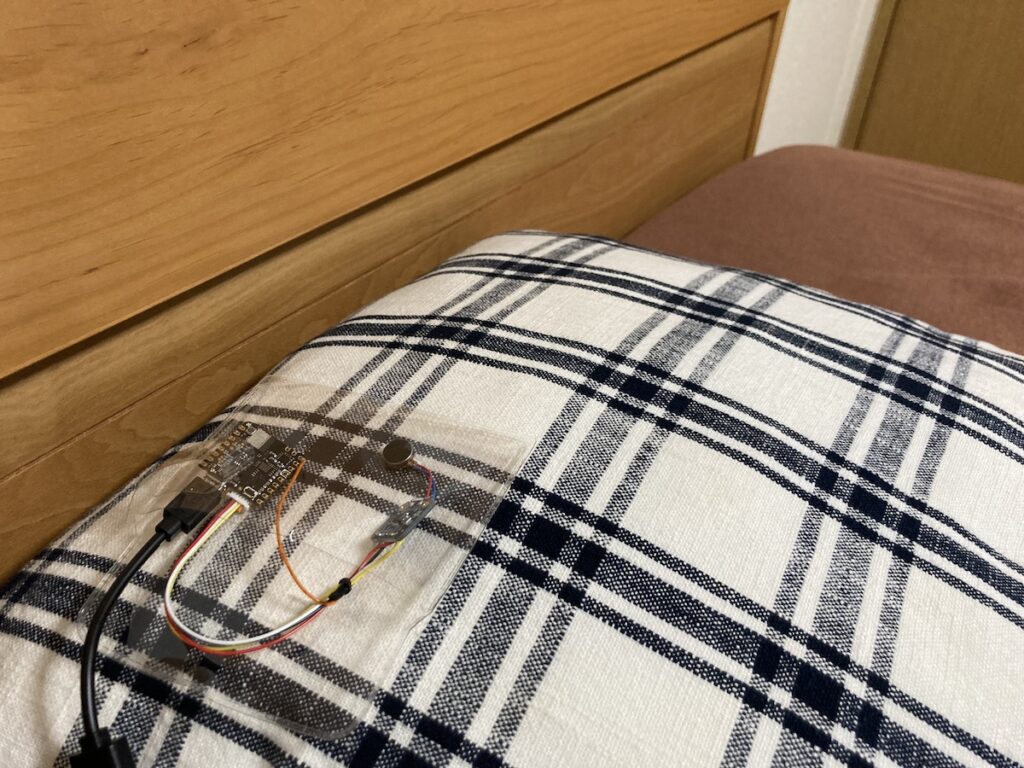
Despite snoring itself being a relatively harmless condition, those who do snore while asleep can also be suffering from sleep apnea — a potentially serious disorder which causes the airway to repeatedly close and block oxygen from getting to the lungs. As an effort to alert those who might be unaware they have sleep apnea, Naveen Kumar devised a small device using an Arduino Pro Nicla Voice to detect when a person is snoring and gently alert them via haptic feedback in their pillow.
Although many boards have microphones and can run sound recognition machine learning models, the Nicla Voice contains a Syntiant NDP120 Neural Decision Processor that is specifically designed to accelerate deep learning workloads while also decreasing the amount of power needed to do so. Apart from the board, Kumar added an Adafruit DRV2605L haptic motor driver and haptic motor as a way to wake up the user without disturbing others nearby.
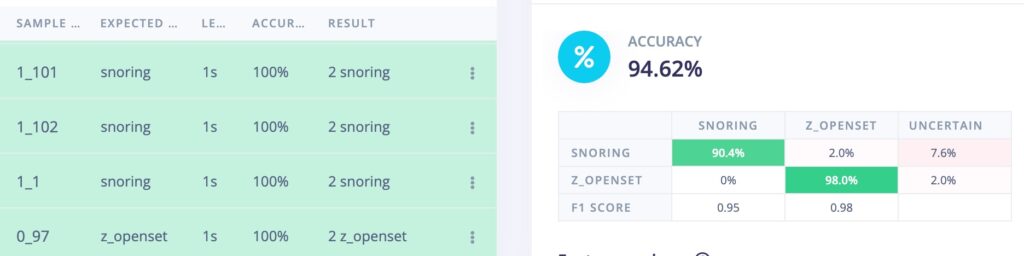
The model was created by first downloading a snoring dataset that contains hundreds of short samples of either snoring or non-snoring. After adding them to the Edge Impulse Studio, Kumar constructed an impulse from the Syntiant Audio blocks and trained a model that achieved a 94.6% accuracy against the test dataset. The code integrating the model continuously collects new audio samples from the microphone, passes them to the NDP120 for classification, and triggers the haptic motor if snoring is sensed.
Save 35% off the cover price with a subscription to The MagPi magazine. UK subscribers get three issues for just £10 and a FREE Raspberry Pi Pico W, then pay £30 every six issues. You’ll save money and get a regular supply of in-depth reviews, features, guides and other Raspberry Pi enthusiast goodness delivered directly to your door every month.
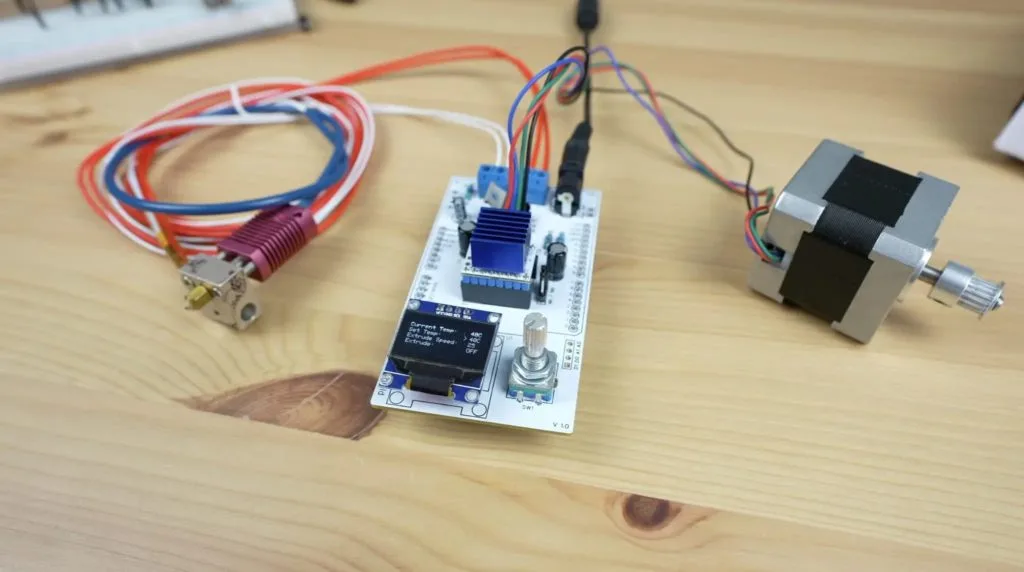
3D printers need to set their hot ends to a very specific temperatures suited to the filament material and keep them at those temperatures throughout the printing process. Most use PID (Proportional-Integral-Derivative) control for that purpose, which modulates power according to an algorithm that prioritizes stability and prevents feedback oscillations. But what if you want to control a hot end that isn’t connected to a 3D printer? In that case, Michael Klements has a guide on how to build a dedicated hot end controller.
This dedicated hot end controller is useful if you’re building something like a filament extruder. Klements designed it for the PET Bottle Recycler, which turns garbage into useful filament. That machine needs to melt down the plastic and, naturally, it uses a hot end to do so. But because it isn’t connected to a 3D printer, Klements needed some way to control the temperature of the hot end. A full 3D printer controller board would have been overkill, so he created this dedicated controller for the job.
Because Klements designed this for the PET Bottle Recycler, it includes a stepper motor driver as well. It is meant for use with a Creality Ender 3 hot end, but should work with others that have standard thermistor feedback (which is crucial for PID control). The custom PCB hosts an Arduino UNO R4 WiFi, which is brand new and has a lot of great features like a built-in LED matrix. That PCB also contains a MOSFET to control power to the hot end, a small OLED screen, and a rotary push button for navigating the menu.
After assembling the PCB and flashing the provided sketch, you’ll be able to directly control a hot end or a complete filament extruder like the PET Bottle Recycler.
Today we’re announcing four big updates to Google Play Games Beta on PC, which gives you access to mobile games on more devices. Taking into account feedback from players and developers around the world, we’ve added hundreds of new games, expanded to new regions, made it accessible for more players, and rolled out a new feature to make gameplay even easier.
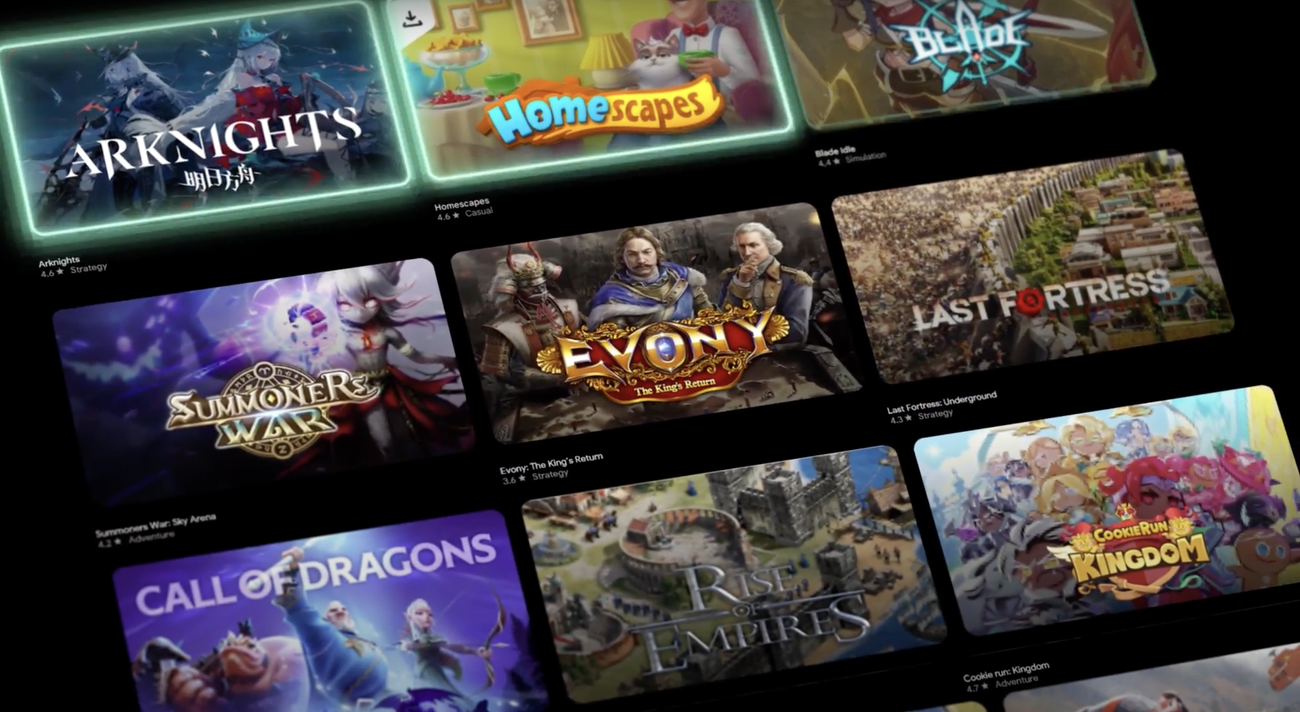
1. Play hundreds of games, including new titles like Free Fire MAX
We now have hundreds of games in our catalog, including popular titles like Cookie Run: Kingdom, Eversoul, Summoners War, Homescapes, Evony: The King’s Return, Call of Dragons and Arknights. One of our newest additions is Free Fire MAX, which is now available in Malaysia and Taiwan and launching to more regions in the coming weeks. And since your game progress and libraries sync across phones, tablets, Chromebooks and PCs, you can easily switch between devices during gameplay and pick up right where you left off.
2. Access Google Play Games in more than 120 regions around the world
Over the past few weeks, we’ve opened our beta to more than 60 new regions across Asia Pacific, Europe and Latin America. Today, you can play Google Play Games in more than 120 regions around the world.
3. Experience the beta on more PCs
To make Google Play Games available to as many players as possible, we’ve opened up access to the beta to more PCs. With this update, hundreds of millions of additional PC users can now give it a try.
4. Customize your keyboard
We’ve added keyboard remapping capabilities so you can customize which keys you want to use as controls and match them to your gameplay preferences.
These are just a few recent updates to Google Play Games Beta on PC — keep an eye out for more in the coming months. To access the beta, visit g.co/googleplaygames. If you’re a developer and want to learn more about Google Play Games, let us know on our developer site.
Thirty-three years ago, the Americans with Disabilities Act (ADA) was signed into law, ensuring that individuals with disabilities have the same rights and opportunities as everyone else. Among the people who worked tirelessly on this act, Judy Heumann, who passed away earlier this year, served as a shining champion for disabled people and a deeply loved member of the disability community.
Today, the musical tribute “Lift Me Up” honors Judy’s life and legacy. The tribute is created by artist and advocate Lachi, co-songwriters James Ian, Gaelynn Lea and April Rose, and the global network of Recording Artists and Music Professionals with Disabilities (RAMPD). Tony-winner Ali Stroker starts the video with an Audio Description for blind and low vision audiences. The captions and audio descriptions are sponsored by Google.
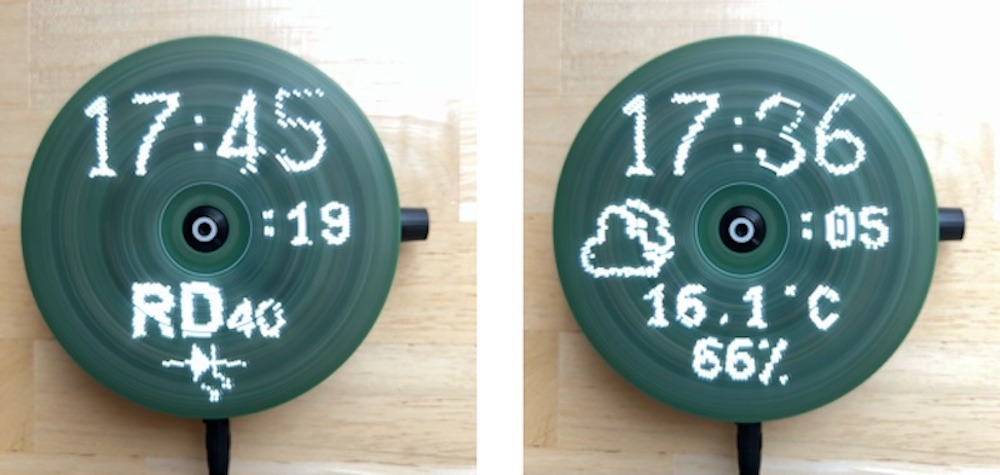
The human brain and eyes are imperfect, so your visual perception has a limited “frame rate.” That is somewhere between 30 and 60 frames per second (fps). Most films are 24fps, which is part of the reason they don’t quite look like real life. Once you reach the upper limits of the human visual frame rate, you begin to perceive moving objects like solid blurs. This small rotating display harnesses that effect and utilizes a CD drive motor to do so.
A PoV (persistence of vision) display like this one relies on your low frame rate perception. It is just a spinning disk with two lines of LEDs. But if it spins fast enough, it can blink those LEDs at certain angles and you will perceive a solid spot of light at each of those points. When the timing is right, it can create the appearance of graphics like alphanumeric characters or simple pictures. In this case, it reveals the weather and the time (in analog or digital style).
An Arduino Nano board controls the 40 LEDs, while an ESP8266 ESP-01 module tells it what image to show based on time and weather data pulled from the internet via Wi-Fi®. Those mount onto a custom circular PCB spun by a small CD drive motor. Because that PCB spins, it would have been difficult to run wires for power. So this takes advantage of wireless power transfer through coils on that primary PCB and a secondary PCB underneath that exists purely for that purpose.
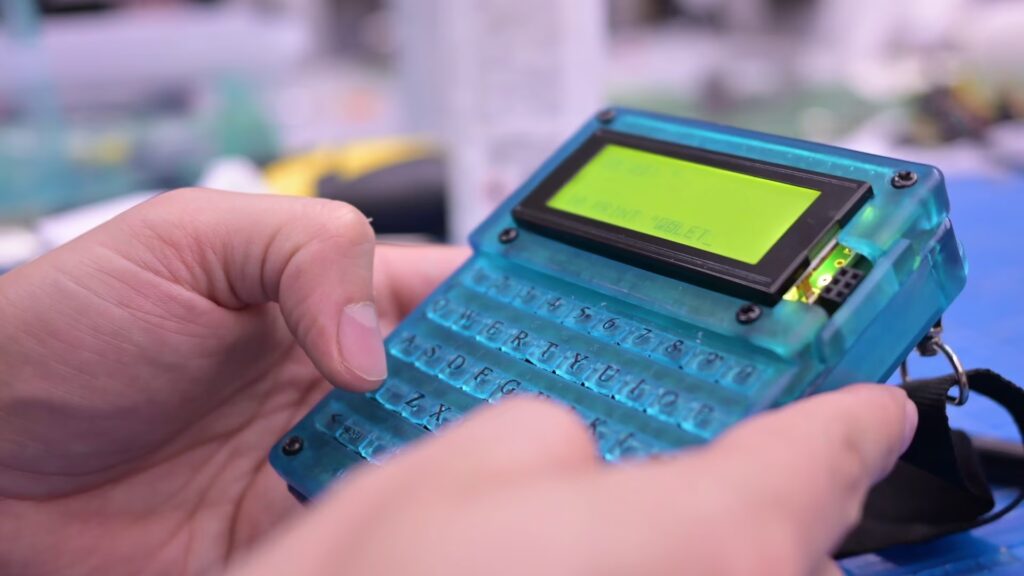
Although we recently launched the new 32-bit Arduino UNO R4, Clem Mayer wanted to honor its 8-bit predecessor by making something special using the Rev3. Drawing on old hardware designs, the ZX-81 is an 8-bit computer based on the Z80 processor which has 1KB of RAM and 1KB of EEPROM available for the user to utilize within the operating environment — typically a BASIC interpreter shell. Similarly, Mayer wanted to have one ATmega328P run the TinyBASIC interpreter while a secondary ATmega328P would handle the external keyboard and display due to resource constraints.
The PCB was designed to fit within the form factor of a standard event badge, complete with a small multiplexed keyboard and a 20×4 monochrome LCD screen to fit the retro theme. On the back layer of the board are both AVR MCUs in a surface-mount package to save on space along with a pair of battery holders and a buzzer/power delivery circuitry.
Although the code was working for the most part, Mayer still encountered a couple of problems which he solved mainly through bodges and ensuring the LCD was producing adequate contrast. Once the hardware was functioning as intended, he 3D-printed a case and turned it into a lanyard-attached device — complete with blinky lights and a highly interactive interface.
The finished handheld computer badge is a testament to the power and versatility of the Arduino Uno R3. By utilizing all available pins and space on the chip, Clem successfully transforms the Arduino Uno into a handheld computer with capabilities like the ZX-81. The project serves as a fitting tribute to the beloved Arduino UNO R3 and showcases the potential for DIY electronics with microcontrollers.
To see more on this project, be sure to watch Mayer’s video below!
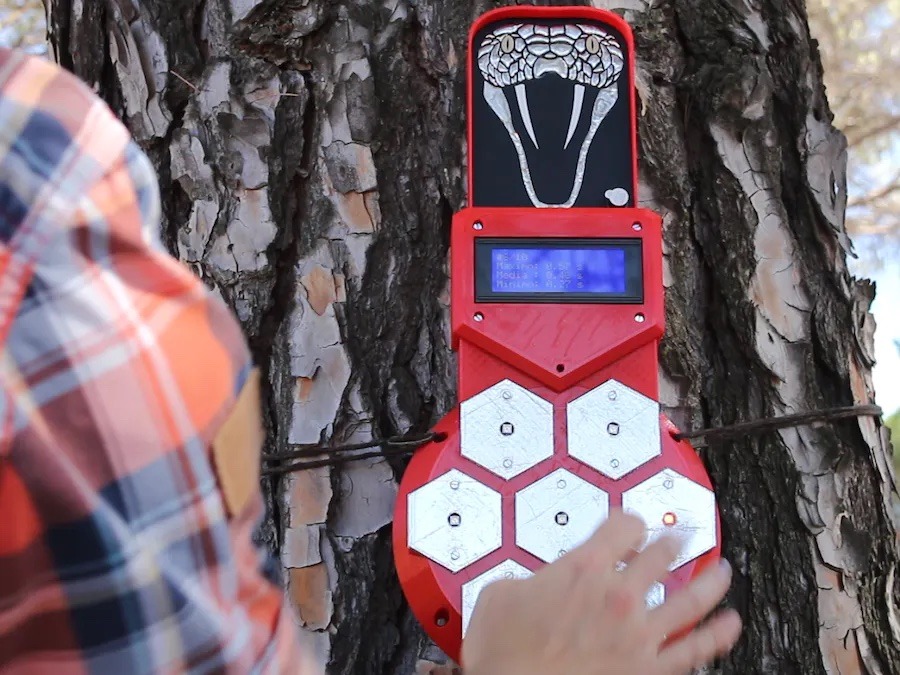
Video games are popular because they provide a clear and reliable loop of effort and reward. If you smash the baddie, you get experience; get enough experience and you level up. But real life isn’t like that and there is little direct correlation between effort and reward, which is dissatisfying. Gamification techniques address that by providing game-like rewards in real life. If you want to gamify physical speed and dexterity, then the DIY Cobra reflex coach may be the ticket.
Cobra works a lot like the consumer training devices on the market. It has several big buttons that you must push as quickly as possible after they light up. And it provides gamification by quantifying your performance. Get a little bit faster and you’ll immediately be rewarded with objective feedback on your enhanced speed. That gives you incentive to keep practicing and over time you agility should grow. Continue and you may just become the next Bruce Lee.
This is a compact unit, so the enclosure is 3D-printable and can be mounted to a wall or tree. Inside the housing there is a massive PCB, complete with cobra head artwork. That PCB contains an Arduino UNO Rev3 board, a 16×2 character LCD screen, and a small piezo buzzer. Adafruit NeoPixels illuminate the buttons, indicating which one you should strike at any given moment. Those buttons are actually capacitive touch pads, so you don’t have to hit them hard— even a light tap will register.
The launch of the Arduino UNO R4 marks a huge leap forward for our community. For us, it’s also the chance to celebrate the people who bring our ecosystem to life with their bright ideas, radiant enthusiasm, and shining insight.
That is how the UNO R4 Stars blog post series began: to highlight makers who have not only created amazing projects with Arduino, but who are giving back to the community by sharing as they go and helping others make anything they wish.
We invite you to discover each profile, hoping you might find a North Star to navigate around an expanding galaxy or venture into completely new universes.
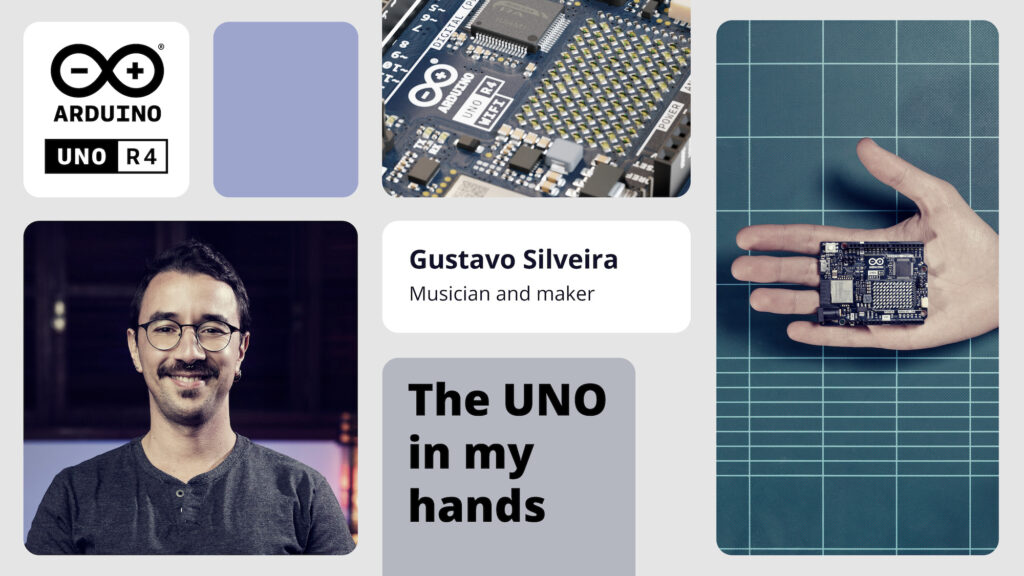
Officially a composer and multimedia artist, Gustavo Silveira has been a self-proclaimed “nerd musician” ever since he discovered the technological tools to build his own instruments. His most iconic project so far is the XT Synth — a mix of guitar, violin, and MIDI controller with a slightly psychedelic look he is particularly proud of.
What motivates him in his work is the possibility to create objects that didn’t exist before, to make art in completely new ways. After all, for Silveira making is a form of creativity: when he started “messing with Arduino” he immediately felt he could express himself artistically – not only through the results of his projects, but also through the process itself.
Sharing his work came naturally, as a way of giving back: “I learned everything I know from the community, so nowadays being able to teach – by making videos for YouTube, writing the blog, posting on Instagram – for me is really, really cool.”
We asked Silveira, “What’s your favorite part of UNO R4?”
This new version is now HID, so it can be recognized as a USB device. So you basically have a plug-and-play, MIDI-class compliant tool to create all your next “nerd music” projects.
It’s equipped with a very fast processor and already has a DAC and an amplifier: as a musician or sound designer, this means you can test, prototype, and then listen right there on the UNO R4 and do synthesis or audio processing.
It can replace any UNO project, but also opens up new possibilities for making that were simply not there with the previous versions.
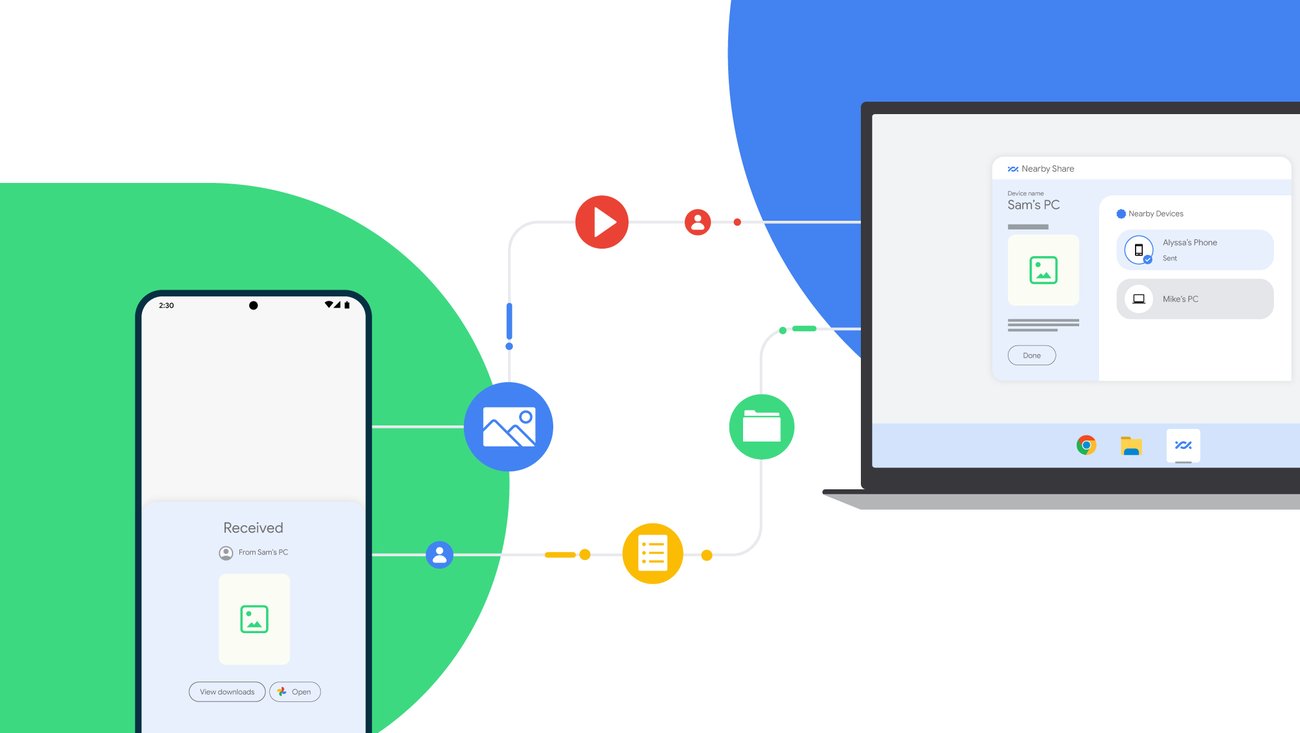
With nearly 3 billion active Android devices around the world, Nearby Share provides an easy way to share files across your phones, tablets, Chromebooks and more devices. Earlier this year, Nearby Share expanded with a beta to support Windows PCs, allowing you to connect a new type of hardware with nearby Android devices.
Nearby Share for Windows, available as an app download on PCs around the world, has now been installed by more than 1.7 million people. With photos and videos being the most popular file types to send, we’ve seen over 50 million files transferred between PC and Android devices since launch. No need to search for any cables or cords – sharing media to your own devices or with nearby friends and family is possible with just a few clicks.
Today marks the official launch of Nearby Share with Windows, offering improved performance and new functionality that can make it even easier for you to share content and stay productive.
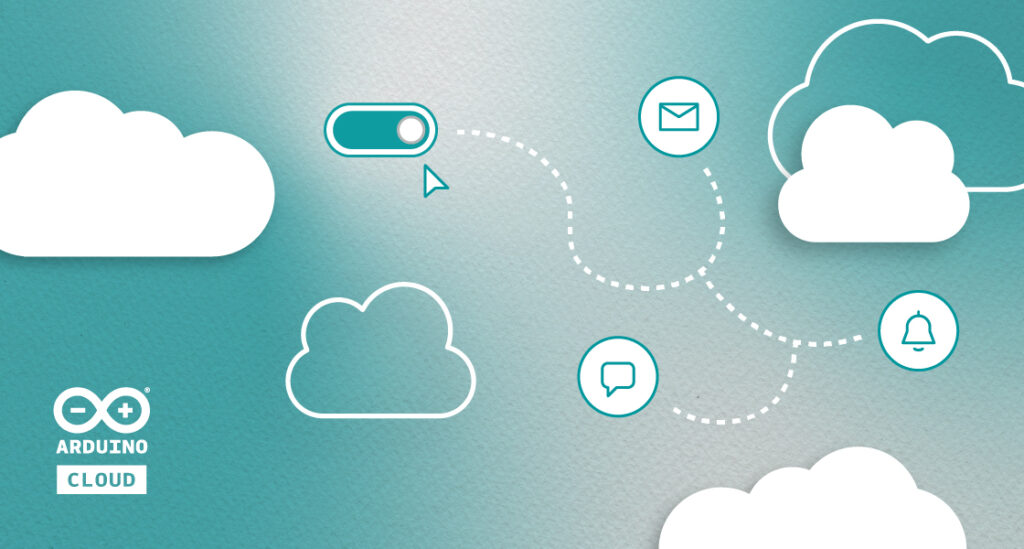
In the world of IoT, staying informed about your project’s status and events is crucial. Imagine receiving prompt notifications when your temperature sensor detects a critical temperature, or when your security camera detects motion in a restricted area. These real-time alerts enable you to take immediate action, prevent issues, and ensure the smooth operation of your IoT projects.
With Triggers, the Arduino Cloud takes project monitoring and management to the next level. You can stay connected to your IoT projects like never before, receiving instant alerts, and seizing control when it matters the most. Prompt notifications help you detect anomalies or critical situations promptly, optimize resource allocation and energy consumption, monitor equipment health and performance, or gain valuable insights and make data-driven decisions.
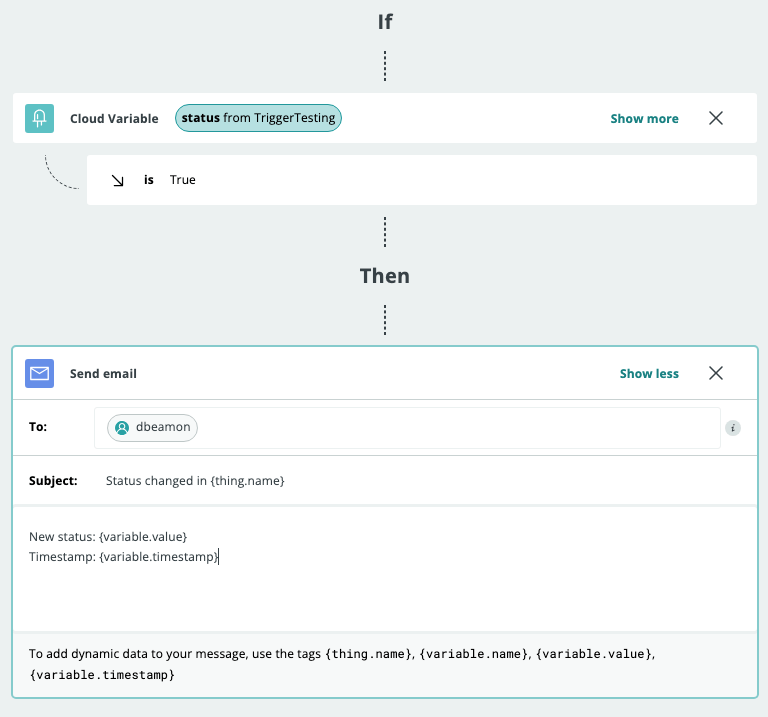
Triggers and Notifications in Arduino Cloud
Traditionally, implementing notifications in the Arduino Cloud required setting up webhooks that connected to external platforms like IFTTT, Zapier or Google Services. While effective, this approach involved a certain level of complexity and additional steps. With Triggers in the Arduino Cloud, the process is simplified to smooth the users’ experience.
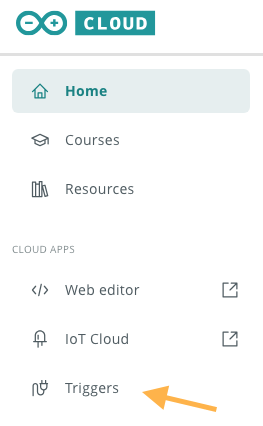
How to set up Triggers in Arduino Cloud
The beauty of Triggers lies in migrating the action from the sketch to the Cloud, removing complexity and simplifying the code. Instead of modifying the sketch in-depth, you can configure Triggers directly in the Arduino Cloud by associating it to a variable change.
Here’s how it works:
Identify the variable that will be synced with the Cloud as usual.
Define the condition using the previously defined variable.
Define the notification selecting the condition using the variable and indicating the notification to be run.
In most cases, no code modifications are needed. And for the majority of the cases, the following example snippet shows how simple it is to use this feature:
if (whatever_action_happens) { my_action_variable = true;	// Trigger the Cloud notification
}
else { my_action_variable = false;
}
Let’s explore a couple of practical scenarios where Triggers and Notifications within the Arduino Cloud add value to IoT projects:
Temperature monitoring: Receive an immediate notification when the temperature exceeds a predefined threshold, allowing you to prevent equipment damage or adjust environmental conditions.
Security alerts: Get notified whenever motion is detected by your IoT security system, enabling you to promptly assess the situation and take necessary measures.
System failure notifications: Ensure that you are immediately alerted when a critical component of your IoT infrastructure encounters an issue, minimizing downtime and facilitating swift troubleshooting.
Introducing Arduino Cloud
The Arduino Cloud is the next exciting journey for IoT enthusiasts to bring their projects to life quickly. It is an all-in-one intuitive IoT platform, supporting a wide range of hardware and backed by the vibrant Arduino community. The Arduino Cloud removes complexity to empower users from all levels of expertise to create from anywhere, and control and share their projects with stunning dashboards.
Triggers and Notifications in the Arduino Cloud empower you to create innovative IoT projects while staying informed about crucial events. We invite you to dive deeper into this feature by signing-up on the Arduino Cloud and exploring the comprehensive documentation available. Don’t miss out on the opportunity to bring your ideas to life with the Arduino Cloud! Create a new account today and unlock the full potential of your IoT journey. Kindly note that Triggers is a feature that comes with the Maker plan or higher. Upgrading to a paid subscription is a straightforward process, and you’ll be able to manage up to 25 devices and receive extra features such as over-the-air updates, shareable dashboards, advanced widgets, an extended data retention to maximize your IoT experience.
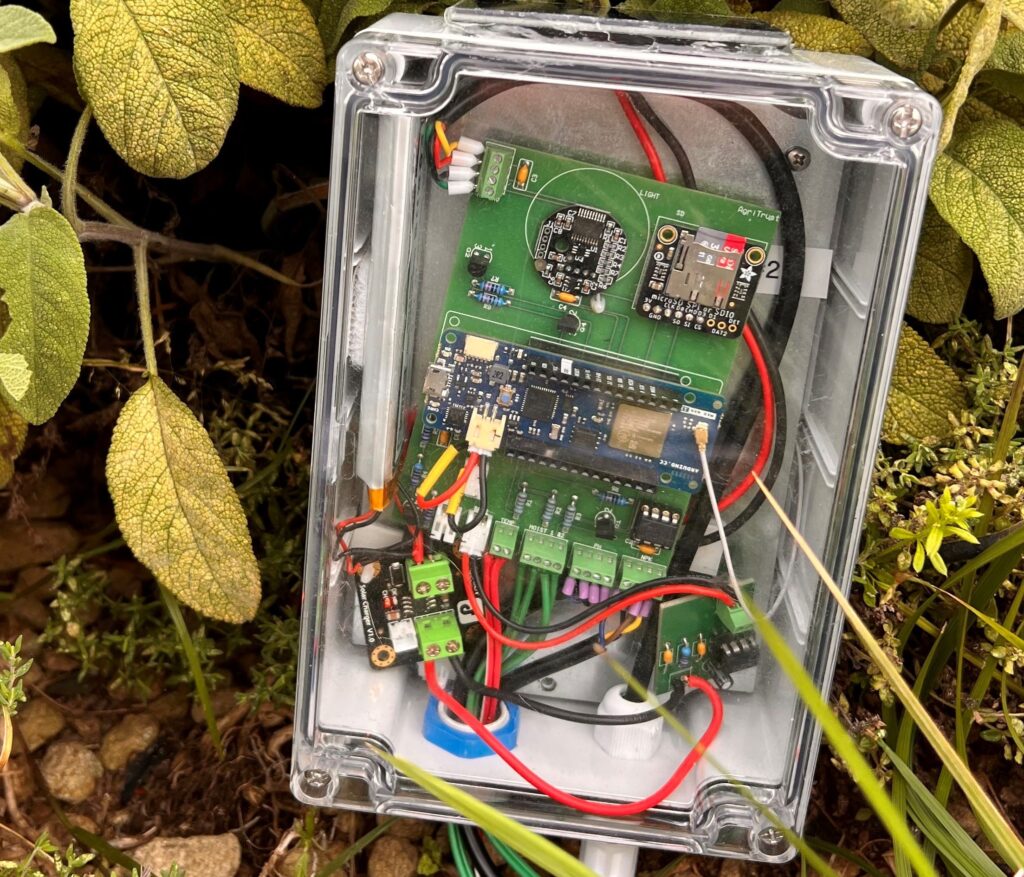
It may not be as exciting as other fields, but agriculture is incredibly important to humanity and technological advances have increased yields, efficiency, and productivity many times throughout history. All of the evidence suggests that smart agriculture is going to be at the heart of the next big technological leap and that will require trust in the data. To further that goal, researchers from Newcastle University and the University of Nottingham developed the Squirrel Box.
The Squirrel Box is a small, remote device that measures key soil metrics, like pH levels, moisture content, ambient conditions, and NPK (nitrogen, phosphorous, and potassium) levels. That data is important in determining the health of the soil in a field. It is useful for protecting potential yields and also for maintaining the soil to achieve maximum productivity. The Squirrel Box can transmit its readings over long distances via LoRaWAN® to a WisGate Edge Lite 2, which is an eight-channel gateway that many boxes can connect to in order to provide a comprehensive picture of soil health across an entire farm. An Arduino MKR WAN 1310 board monitors the sensors and contains an onboard LoRa® transceiver.
But as the Squirrel Box team points out in their paper, smart agriculture requires trust. If farmers are to rely on this data, they need to trust that it is accurate, reliable, and tamper-proof. For that reason, they implemented decentralized communication that is robust enough to survive the failure of any single unit. They also turned to machine learning to validate the data and identify potential anomalies that might represent anything from a sensor problem to falsified data. This focus on trust makes farmers more likely to adopt smart agricultural techniques.
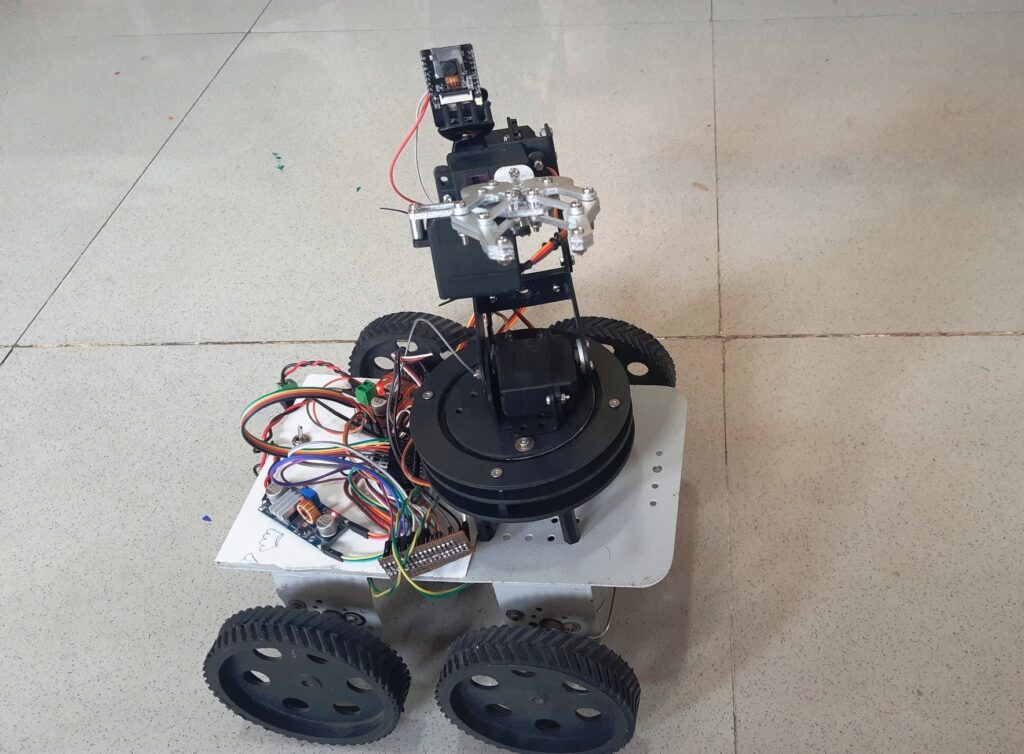
Static manipulators and mobile robot chassis each have their own advantages, and so by combining the two into a single platform, AadhunikLabs was able to realize both at the same time. The base frame is comprised of four individual wheels, each with their own high-torque geared motor and driven by a pair of VNH3ASP30 DC motor driver boards. All of the arm’s axes are moved via a single high-torque metal servo motor that not only can support its own weight, but also the weight of an object being picked up by the gripper on the end.
Beyond controlling the geared DC and servo motors, an onboard Arduino Nano RP2040 Connect receives commands over Wi-Fi® from a host PC running the control software. In here, the user can view a live camera feed coming from an ESP32 camera module as well as virtually view the robotic arm’s position in 3D space. Similar to a video game, pressing keyboard keys such as ‘WASD’ and sliding the mouse provide general movements for the chassis and arm, respectively. Meanwhile, other keys allow for manipulating the end-effector, moving the arm to default positions, and adjusting the speed.
Um dir ein optimales Erlebnis zu bieten, verwenden wir Technologien wie Cookies, um Geräteinformationen zu speichern und/oder darauf zuzugreifen. Wenn du diesen Technologien zustimmst, können wir Daten wie das Surfverhalten oder eindeutige IDs auf dieser Website verarbeiten. Wenn du deine Einwillligung nicht erteilst oder zurückziehst, können bestimmte Merkmale und Funktionen beeinträchtigt werden.
Funktional
Immer aktiv
Die technische Speicherung oder der Zugang ist unbedingt erforderlich für den rechtmäßigen Zweck, die Nutzung eines bestimmten Dienstes zu ermöglichen, der vom Teilnehmer oder Nutzer ausdrücklich gewünscht wird, oder für den alleinigen Zweck, die Übertragung einer Nachricht über ein elektronisches Kommunikationsnetz durchzuführen.
Vorlieben
Die technische Speicherung oder der Zugriff ist für den rechtmäßigen Zweck der Speicherung von Präferenzen erforderlich, die nicht vom Abonnenten oder Benutzer angefordert wurden.
Statistiken
Die technische Speicherung oder der Zugriff, der ausschließlich zu statistischen Zwecken erfolgt.Die technische Speicherung oder der Zugriff, der ausschließlich zu anonymen statistischen Zwecken verwendet wird. Ohne eine Vorladung, die freiwillige Zustimmung deines Internetdienstanbieters oder zusätzliche Aufzeichnungen von Dritten können die zu diesem Zweck gespeicherten oder abgerufenen Informationen allein in der Regel nicht dazu verwendet werden, dich zu identifizieren.
Marketing
Die technische Speicherung oder der Zugriff ist erforderlich, um Nutzerprofile zu erstellen, um Werbung zu versenden oder um den Nutzer auf einer Website oder über mehrere Websites hinweg zu ähnlichen Marketingzwecken zu verfolgen.