Kategorie: Linux

  • Laser-engraved Raspberry Pi hologram

    Laser-engraved Raspberry Pi hologram

    Reading Time: 2 minutes

    Inspired by an old episode of Pimoroni’s Bilge Tank, and with easy access to the laser cutter at the Raspberry Pi Foundation office, I thought it would be fun to create a light-up multi-layered hologram using a Raspberry Pi and the Pimoroni Unicorn pHAT.

    Raspberry Pi layered light

    Read more –

    Break it to make it

    First, I broke down the Raspberry Pi logo into three separate images — the black outline, the green leaves, and the red berry.

    Fun fact: did you know that Pimoroni’s Paul Beech designed this logo as part of the ‘design us a logo’ contest we ran all the way back in August 2011?

    Once I had the three separate files, I laser-engraved them onto 4cm-wide pieces of 3mm-thick clear acrylic. As there are four lines of LEDs on the Unicorn pHAT, I cut the fourth piece to illuminate the background.

    RASPBERRY PI HOLOGRAM

    To keep the engraved acrylic pieces together, I cut out a pair of acrylic brackets (see above) with four 3mm indentations. Then, after a bit of fiddling with the Unicorn pHAT library, I was able to light the pHAT’s rows of LEDs in white, red, green, and white.

    RASPBERRY PI HOLOGRAM

    The final result looks pretty spectacular, especially in the dark, and you can build on this basic idea to create fun animations — especially if you use a HAT with more rows of LEDs.

    Iterations

    This is just a prototype. I plan on building a sturdier frame for the pieces that securely fits a Raspberry Pi Zero W and lets users replace layers easily. As with many projects, I’m sure this will grow and grow as each interaction inspires a new add-on.

    How would you build upon this basic principle?

    Oh…

    …we also laser-engraved this Cadbury’s Creme Egg.

    Website: LINK

  • Coding Space Invaders’ disintegrating shields | Wireframe #9

    Coding Space Invaders’ disintegrating shields | Wireframe #9

    Reading Time: 5 minutes

    They add strategy to a genre-defining shooter. Andrew Gillett lifts the lid on Space Invaders’ disintegrating shields.

    Wireframe 9 Space Invaders

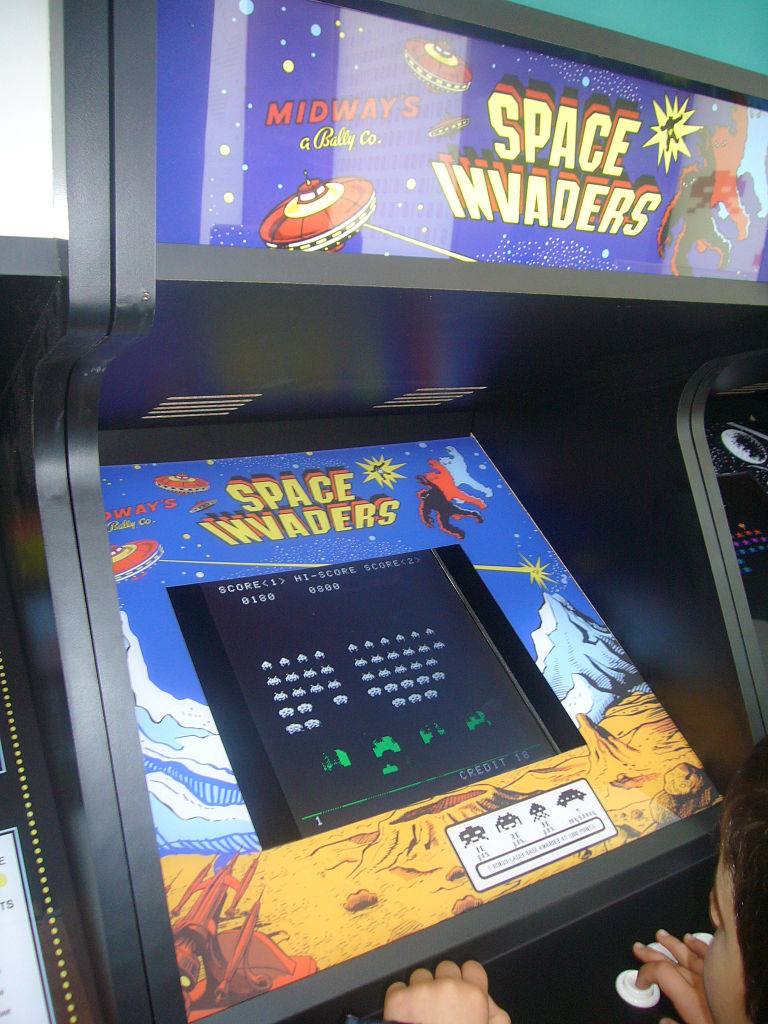
    Released in 1978, Space Invaders introduced ideas so fundamental to video games that it’s hard to imagine a time before them. And it did this using custom-made hardware which by today’s standards is unimaginably slow.

    Space Invaders ran on an Intel 8080 CPU operating at 2MHz. With such meagre processing power, merely moving sprites around the screen was a struggle. In modern 2D games, at the start of each frame the entire screen is reset, then all objects are displayed.

    For Space Invaders’ hardware, this process would have been too slow. Instead, each time a sprite needs to move, the game first erases the sprite from the screen, then redraws it in the new position. The game also updates only one alien per frame — which leads to the effect of the aliens moving faster when there are fewer of them. These techniques cut down the number of pixels which need to be updated each frame, from nearly 60,000 to around a hundred.

    Wireframe 9 Space Invaders

    One of Space Invaders’ most notable features is its four shields. These provide shelter from enemy fire, but deteriorate after repeated hits. The player can take advantage of the shields’ destructible nature — by repeatedly firing at the same place on a shield’s underside, a narrow gap can be created which can then be used to take out enemies. (Of course, the player can also be shot through the same gap.)

    The system of updating only the minimum necessary number of pixels works well as long as there’s no need for objects to overlap. In the case of the shields, though, what happens when objects do overlap is fundamental to how they work. Whenever a shot hits something, it’s replaced by an explosion sprite. A few frames later, the explosion sprite is deleted from the screen. If the explosion sprite overlapped with a shield, that part of the shield is also deleted.

    Wireframe 9 Space Invaders

    Here’s a code snippet that shows Andrew’s Space Invaders-style disintegrating shields working in Python. To get it running on your system, you’ll need to install Pygame Zero — you can find full instructions here. And download the above code here.

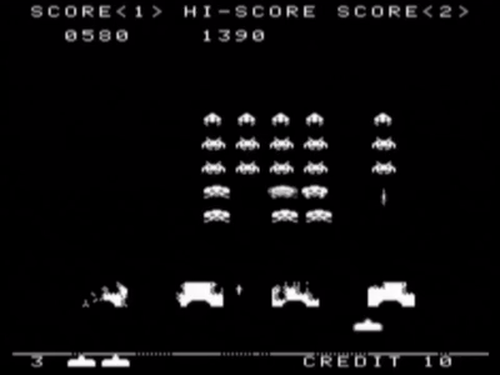
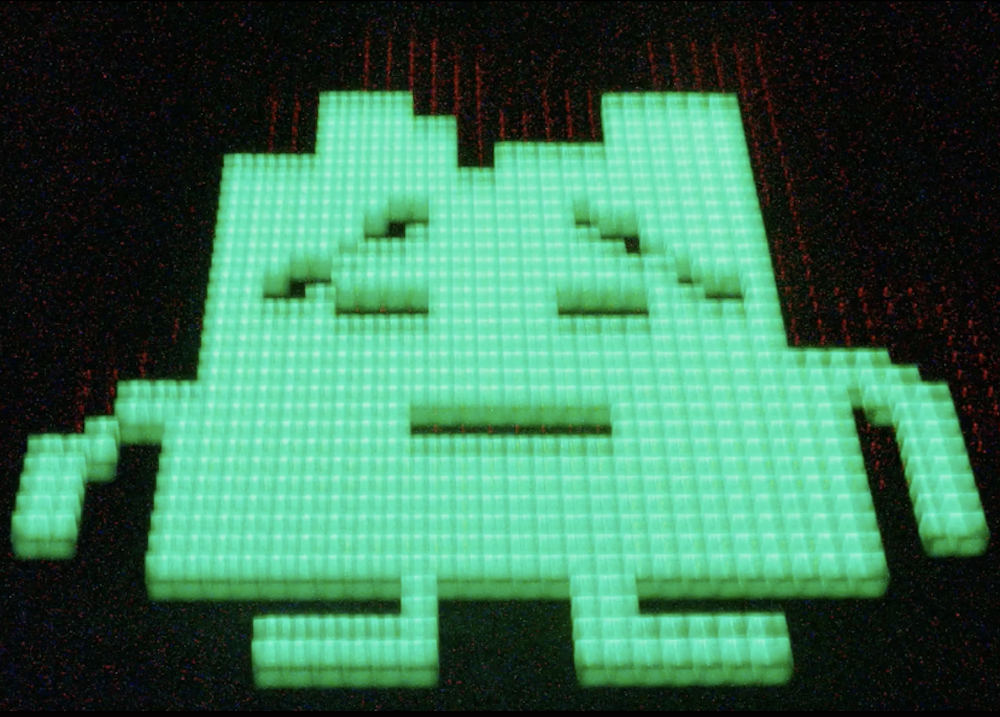
    The code to the right displays four shields, and then bombards them with a series of shots which explode on impact. I’m using sprites which have been scaled up by ten, to make it easier to see what’s going on.

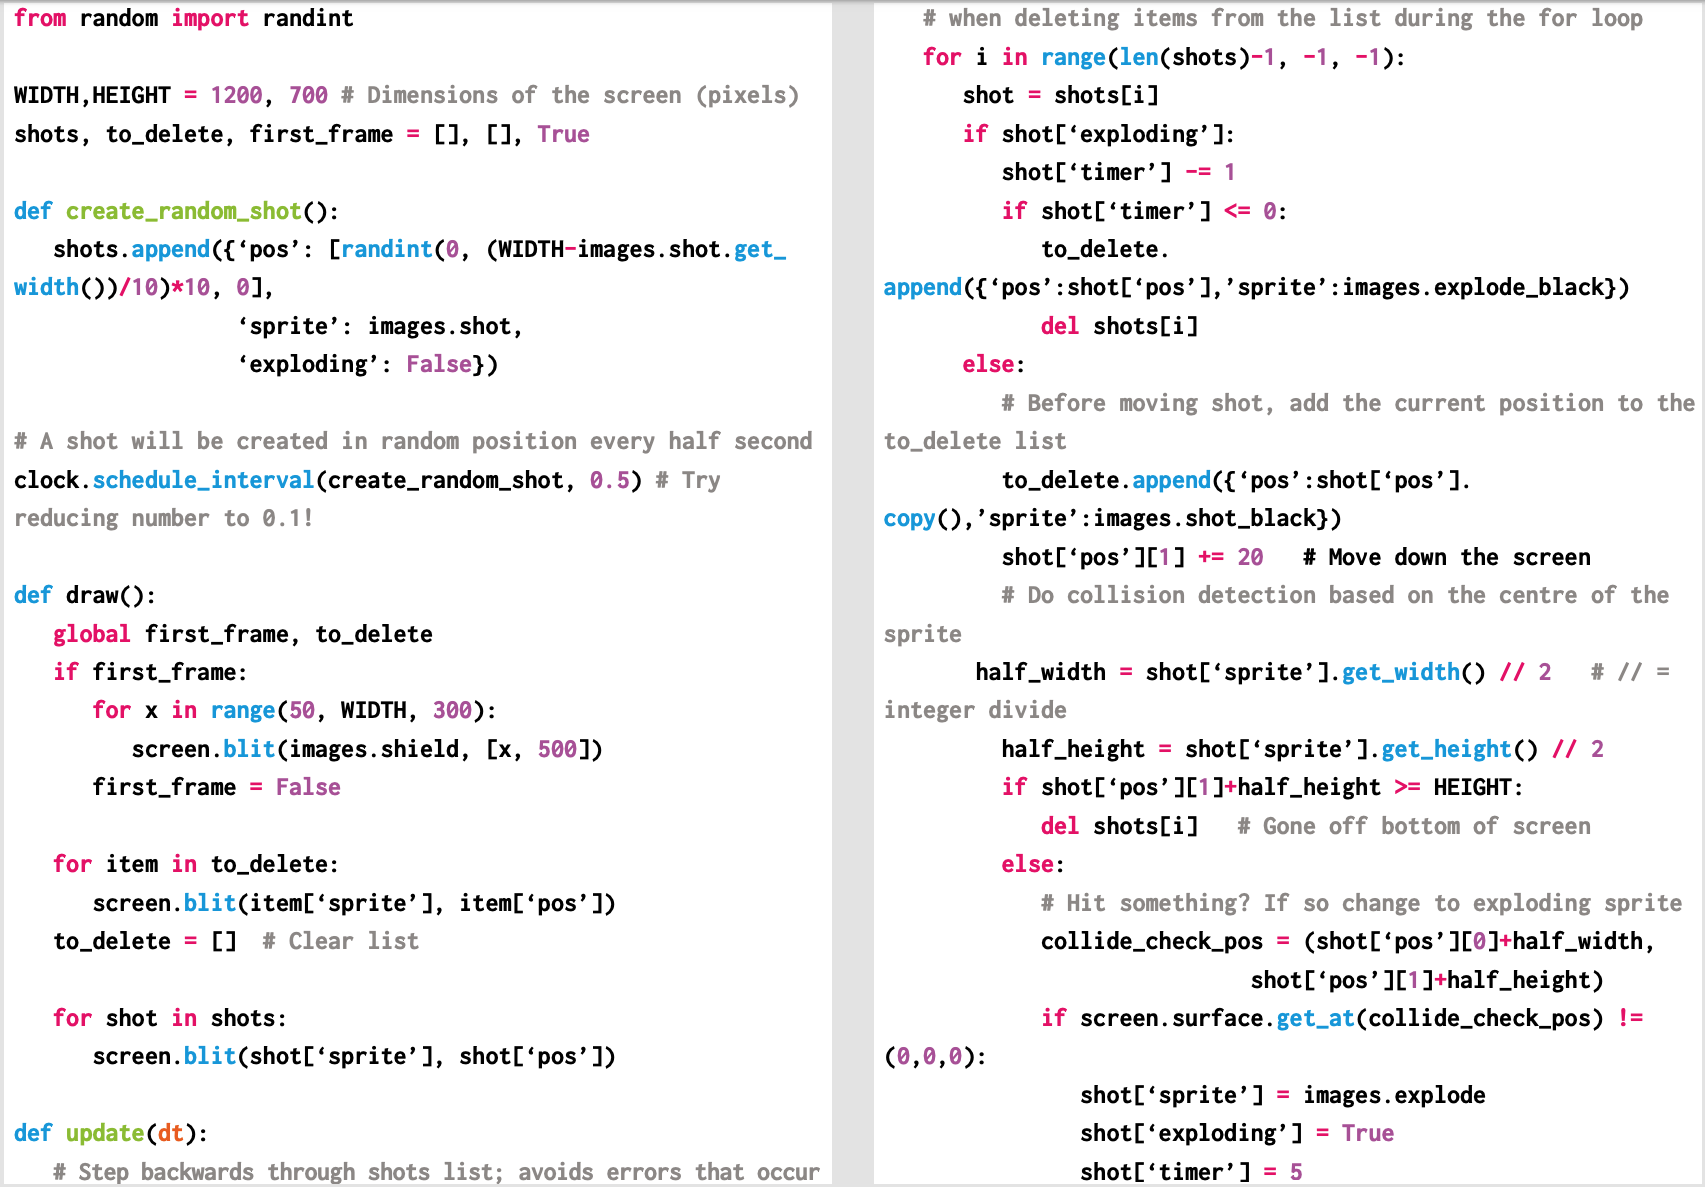
    We first create two empty lists — one to hold details of any shots on screen, as well as explosions. These will be displayed on the screen every frame. Each entry in the shots list will be a dictionary data structure containing three values: a position, the sprite to be displayed, and whether the shot is in ‘exploding’ mode — in which case it’s displayed in the same position for a few frames before being deleted.

    The second list, to_delete, is for sprites which need to be deleted from the screen. For simplicity, I’m using separate copies of the shot and explosion sprites where the white pixels have been changed to black (the other pixels in these sprites are set as transparent).

    The function create_random_shot is called every half-second. The combination of dividing the maximum value by ten, choosing a random whole number between zero and the maximum value, and then multiplying the resulting random number by ten, ensures that the chosen X coordinate is a multiple of ten.

    Andrew’s Space Invaders shields up and running in Pygame Zero.

    In the draw function, we first check to see if it’s the first frame, as we only want to display the shields on that frame. The screen.blit method is used to display sprites, and Pygame Zero’s images object is used to specify which sprite should be displayed. We then display all sprites in the to_delete list, after which we reset it to being an empty list. Finally we display all sprites in the shots list.

    Wireframe 9 Space Invaders

    In the update function, we go through all sprites in the shots list, in reverse order. Going through the list backwards avoids problems that can occur when deleting items from a list inside a for loop. For each shot, we first check to see if it’s in ‘exploding’ mode. If so, its timer is reduced each frame — when it hits zero we add the shot to the to_delete list, then delete it from shots.

    If the item is a normal shot rather than an explosion, we add its current position to to_delete, then update the shot’s position to move the sprite down the screen. We next check to see if the sprite has either gone off the bottom of the screen or collided with something. Pygame’s get_at method gives us the colour of a pixel at a given position. If a collision occurs, we switch the shot into ‘exploding’ mode — the explosion sprite will be displayed for five frames.

    You can read the rest of the feature in Wireframe issue 9, available now in Tesco, WHSmith, and all good independent UK newsagents.

    Or you can buy Wireframe directly from us – worldwide delivery is available. And if you’d like to own a handy digital version of the magazine, you can also download a free PDF.

    Make sure to follow Wireframe on Twitter and Facebook for updates and exclusives, and for subscriptions, visit the Wireframe website to save 49% compared to newsstand pricing!

    Website: LINK

  • Official Arduino Day in Milan: Schedule and Streaming

    Official Arduino Day in Milan: Schedule and Streaming

    Reading Time: 4 minutes

    Arduino Day is quickly approaching and we are blown away by the amazing support of the Arduino community, with over 620 events in more than 100 countries scheduled for March 16th.

    As recently announced, the Official Arduino Day (register here)—directly organized by the Arduino team—will be held in Milan at the Milano Luiss Hub for Maker and Students, in collaboration with Manifattura Milano Camp.

    The agenda of the official event includes an exhibition of Arduino projects, free kids activities, several keynotes by Arduino team members, and last but not least, an ‘Ask Me Anything’ with Massimo Banzi. The talks and the AMA will be live streamed via Arduino’s homepage, YouTube, and Facebook.

    Here’s a look at the Official Arduino Day’s program:

    11 AM (CET): Doors open and exhibition of Arduino projects, in collaboration with WeMake

    2:30 – 5:30 PM: EDU activities for children ages 5 to 15

    1:45 – 3:15 PM: Talks by local makers, in collaboration with WeMake (in Italian)

    3:30 – 5:30 PM: Keynotes by the Arduino team. These sessions will be streamed on Arduino’s homepage, YouTube, and Facebook.

    3:30 – 3:35: Welcome by Massimo Banzi and Fabio Violante

    3:35 – 3:50: The State of Arduino with Massimo Banzi and Fabio Violante

    3:50 – 4:15: Winners of the Arduino Day Community Challenge

    4:15 – 4:30: Arduino and the open-source community

    4:30 – 5:00: Arduino for IoT with Luca Cipriani and Gianluca Varisco

    5:00 – 5:15: Arduino Education with Nerea de la Riva Iriepa

    5:15 – 5:30: Closing remarks

    6:00-7:00 PM: Ask Me Anything with Massimo Banzi

    The AMA will also be streamed on the Arduino homepage, YouTube and Facebook. Have a question? Please register on the Arduino Forum and submit it by 6:45 PM (CET) at this link.

    We look forward to celebrating Arduino Day with everyone!  In the meantime, don’t forget to share your events on social media using the hashtag #ArduinoD19.

    Mancano poche ore ad Arduino Day, e siamo grati ed emozionati per l’incredibile supporto della nostra Community, che organizzerà nella giornata del 16 Marzo 2019 oltre 620 eventi in oltre 100 nazioni.

    Come annunciato di recente, Official Arduino Day, ovvero l’evento direttamente organizzato dal team Arduino (registrazione qui) si terrà a Milano presso Milano Luiss Hub for Maker and Students (Via Massimo D’Azeglio, 3 – zona Porta Garibaldi), in collaborazione con Manifattura Milano Camp.

    L’agenda dell’evento ufficiale include una mostra di progetti Arduino, delle attività edu per bambini/e teenager dai 5 ai 15 anni, un programma di talk con il team Arduino e, infine, una sessione di Ask Me Anything con Massimo Banzi. Le talk e l’AMA saranno trasmessi in streaming sull’homepage di Arduino e sui canali Youtube e Facebook .

    Ecco il programma di Official Arduino Day a Milano:

    11.00 AM: Open Day e mostra di progetti Arduino, in collaborazione con WeMake

    1.45 – 3.15 PM: Community Talk a cura di maker locali, in collaborazione con WeMake

    2.30 – 5.30 PM: Attività educative per bambine/i e teenager. Le attività sono gratuire e continuative, non serve prenotazione.

    • 5-8 anni: Laboratorio di pasta modellabile conduttiva Anche i più piccoli possono giocare con l’elettricità! Con la pasta modellabile si può dare spazio alla manualità e alla creatività, con (in più) la magia dei led!
    • 8-12 anni: Laboratorio di tinkering “Voglio Fare l’Inventore” Oggi tutti possono fare gli inventori! Flussi di energia, luci, suoni e movimenti non sono mai stati così facili da realizzare. Programmando con i sensori e attuatori, si possono costruire un’elica, un semaforo e addirittura un braccio robotico.
    • 12-15 anni: Laboratorio di robotica “mBot and basic robotics” I robot sono tutti intorno a noi, non solo umanoidi ma anche automobili ed elettrodomestici! Con un’ app, cacciaviti e un pizzico d’ingegno, è possibile imparare le prime mosse per dargli vita e controllarli!

    3.30 – 5.30 PM: Talk con Massimo Banzi e Arduino team. Le talk saranno disponibili via streaming sui canali social Arduino.

    3.30 – 3.35: Welcome con Massimo Banzi e Fabio Violante

    3.35 – 3.50: The State of Arduino con Massimo Banzi e Fabio Violante

    3.50 – 4.15: Arduino Day Community Challenge: Winners

    4.15 – 4.30: Arduino and the open-source community

    4.30 – 5.00: Arduino for IoT con Luca Cipriani e Gianluca Varisco

    5.00 – 5.15: Arduino Education con Nerea de la Riva Iriepa

    5.15 – 5.30: Chiusura

    6.00 – 7.00 PM: Ask Me Anything con Massimo Banzi

    Anche l’AMA (Ask me anything) sarà trasmesso in streaming sulla homepage di Arduino e sui canali Youtube e Facebook. Vuoi fare una domanda? Per favore, registrati sull’Arduino Forum e invia la tua domanda entro le 6.45 cliccando qui.

    Non vediamo l’ora di festeggiare Arduino Day, nel frattempo non dimenticarti di condividere  il tuo evento sui social con l’hashtag #ArduinoD19.

    Website: LINK

  • Win a Raspberry Pi 3B+ and signed case this Pi Day 2019

    Win a Raspberry Pi 3B+ and signed case this Pi Day 2019

    Reading Time: < 1 minute

    Happy Pi Day, everyone!

    What is Pi Day, we hear you ask? Today, people who use the date format ‘month/day/year’ celebrate that the date forms the first three digits of Pi: 3.14!

    In celebration of Pi Day, we’re running a Raspberry Pi 3B+ live stream on YouTube — hours upon hours of our favourite Pi in all its glorious wonderment.

    PI DAY 2019

    Celebrate Pi Day with us by watching this Pi

    At some point today, we’re going to add a unique hashtag to this live stream, and anyone who uses said hashtag on Instagram and/or Twitter* before midnight tonight (GMT) will be entered into a draw to win a Raspberry Pi Model 3B+ and an official case signed by Eben Upton himself.

    Raspberry Pi - PI Day 2019

    So sit back, relax, and enjoy the most pointless, most wonderful live stream to ever grace the realm of YouTube!

    *Those of you who don’t have a Twitter or Instagram account can also comment here with the hashtag.

    Website: LINK

  • Q-Bot is an Arduino Mega-driven Rubik’s Cube solver

    Q-Bot is an Arduino Mega-driven Rubik’s Cube solver

    Reading Time: < 1 minute

    Q-Bot is an Arduino Mega-driven Rubik’s Cube solver

    Arduino TeamMarch 14th, 2019

    Rubik’s Cubes seem to have been most popular in the 1980s, but never really went away. As such, if you have one lying around your house unsolved, why not ‘simply’ construct a machine to do this for you? 

    One possibility is the Q-Bot, outlined here. While it won’t break any world records, it’s a solid-looking assembly that appears to be relatively easy to build.

    The Q-Bot features six NEMA 17 stepper motors, four of which turn one face at a time. When needed, the other two use timing belts to alternatively pull opposed stepper motor pairs back, allowing the other two to rotate the entire assembly. An Arduino Mega is utilized to control the steppers via a custom shield, with a computer running the Kociemba’s Algorithm.

    [youtube https://www.youtube.com/watch?v=IGStJeXubtQ?feature=oembed&w=500&h=281]

    Website: LINK

  • This DIY radio controller resembles one you’d find on the market

    This DIY radio controller resembles one you’d find on the market

    Reading Time: 2 minutes

    This DIY radio controller resembles one you’d find on the market

    Arduino TeamMarch 13th, 2019

    If you’ve ever considered constructing your own wireless RC transmitter, be sure to check out this build by Electronoobs.

    The device uses an nRF24L01+ module to transmit inputs from a pair of joysticks and toggle switches, along with an Arduino Nano for interface and control. 

    What sets this project apart from his previous versions, however, is the very nice 3D-printed enclosure for the electronics and a pair of high-quality joysticks that allow for precise input. 

    Additionally, Electronoobs’ latest design features tuning buttons to properly center the sticks, and an OLED display to show the actual input value that it’s sending to the receiver (a simple Nano/nRF24 setup for demo purposes). 

    Yes, I’ve made another radio controller. Why? well, I wanted to have a more commercial look. So, I’ve designed a 3D case, then I’ve used some high quality joysticks in order to have better analog read, It has an OLED screen so we could see the data we send and we could also digitally adjust the data. It also has 2 modes, linear and exponential

    [youtube https://www.youtube.com/watch?v=YMF5NXeHOnk?feature=oembed&w=500&h=281]

    Code and more details can be found in Electronoobs’ tutorial.

    Website: LINK

  • Play Heverlee’s Sjoelen and win beer

    Play Heverlee’s Sjoelen and win beer

    Reading Time: 4 minutes

    Chances are you’ve never heard of the Dutch table shuffleboard variant Sjoelen. But if you have, then you’ll know it has a basic premise – to slide wooden pucks into a set of four scoring boxes – but some rather complex rules.

    Sjoelen machine

    Uploaded by Grant Gibson on 2018-07-10.

    Sjoelen

    It may seem odd that a game which relies so much on hand-eye coordination and keeping score could be deemed a perfect match for a project commissioned by a beer brand. Yet Grant Gibson is toasting success with his refreshing interpretation of Sjoelen, having simplified the rules and incorporated a Raspberry Pi to serve special prizes to the winners.

    “Sjoelen’s traditional scoring requires lots of addition and multiplication, but our version simply gives players ten pucks and gets them to slide three through any one of the four gates within 30 seconds,” Grant explains.

    As they do this, the Pi (a Model 3B) keeps track of how many pucks are sliding through each gate, figures how much time the player has left, and displays a winning message on a screen. A Logitech HD webcam films the player in action, so bystanders can watch their reactions as they veer between frustration and success.

    Taking the plunge

    Grant started the project with a few aims in mind: “I wanted something that could be transported in a small van and assembled by a two-person team, and I wanted it to have a vintage look.” Inspired by pinball tables, he came up with a three-piece unit that could be flat-packed for transport, then quickly assembled on site. The Pi 3B proved a perfect component.

    Grant has tended to use full-size PCs in his previous builds, but he says the Pi allowed him to use less complex software, and less hardware to control input and output. He used Python for the input and output tasks and to get the Pi to communicate with a full-screen Chromium browser, via JSON, in order to handle the scoring and display tasks in JavaScript.

    “We used infrared (IR) sensors to detect when a puck passed through the gate bar to score a point,” Grant adds. “Because of the speed of the pucks, we had to poll each of the four IR sensors over 100 times per second to ensure that the pucks were always detected. Optimising the Python code to run fast enough, whilst also leaving enough processing power to run a full-screen web browser and HD webcam, was definitely the biggest software challenge on this project.”

    Bottoms up

    The Raspberry Pi’s GPIO pins are used to trigger the dispensing of a can of Heverlee beer to the winner. These are stocked inside the machine, but building the vending mechanism was a major headache, since it needed to be lightweight and compact, and to keep the cans cool.

    No off-the-shelf vending unit offered a solution, and Grant’s initial attempts with stepper motors and clear laser-cut acrylic gears proved disastrous. “After a dozen successful vends, the prototype went out of alignment and started slicing through cans, creating a huge frothy fountain of beer. Impressive to watch, but not a great mix with electronics,” Grant laughs.

    Instead, he drew up a final design that was laser‑cut from poplar plywood. “It uses automotive central locking motors to operate a see-saw mechanism that serve the cans. A custom Peltier-effect heat exchanger, and a couple of salvaged PC fans, keep the cans cool inside the machine,” reveals Grant.

    “I’d now love to make a lightweight version sometime, perhaps with a folding Sjoelen table and pop-up scoreboard screen, that could be carried by one person,” he adds. We’d certainly drink to that.

    More from The MagPi magazine

    Get your copy now from the Raspberry Pi Press store, major newsagents in the UK, or Barnes & Noble, Fry’s, or Micro Center in the US. Or, download your free PDF copy from The MagPi magazine website.

    MagPi 79 cover

    Subscribe now

    Subscribe to The MagPi on a monthly, quarterly, or twelve-monthly basis to save money against newsstand prices!

    Twelve-month print subscribers get a free Raspberry Pi 3A+, the perfect Raspberry Pi to try your hand at some of the latest projects covered in The MagPi magazine.

    Website: LINK

  • FREE NOODS with FOODBEAST and Nissin

    FREE NOODS with FOODBEAST and Nissin

    Reading Time: 2 minutes

    Push a button and share a hashtag to get free ramen, games, or swag with the Dream Machine, a Raspberry Pi–driven vending machine built by FOODBEAST and Nissin.

    foodbeast.com on Twitter

    This Instagram-powered vending machine gives away FREE @OrigCupNoodles and VIDEO GAMES 🍜🎮!! Where should it travel next? #ad https://t.co/W0YyWOCFVv

    Raspberry Pi and marketing

    Digital viral marketing campaigns are super popular right now, thanks to the low cost of the technology necessary to build bespoke projects for them. From story-telling phoneboxes to beer-pouring bicycles, we see more and more examples of such projects appear in our inbox every week.

    The latest campaign we like is the Dream Machine, a retrofit vending machine that dispenses ramen noodles, video games, and swag in exchange for the use of an Instagram hashtag.

    Free ramen from FOODBEAST and Nissin

    With Dream Machines in Torrance, California and Las Vegas, Nevada, I’ve yet to convince Liz that it’s worth the time and money for me to fly out and do some field research. But, as those who have interacted with a Dream Machine know, the premise is pretty simple.

    The Dream Machine vending machine from FOODBEAST and NissanPress the big yellow button on the front of the vending machine, and it will tell you a unique hashtag to use for posting a selfie with the Dream Machine on Instagram. The machine’s internet-enabled Raspberry Pi brain then uses its magic noodle powers (or, more likely, custom software) to detect the hashtag and pop out a tasty treat, video game, or gift card as a reward.

    The Dream Machine vending machine from FOODBEAST and Nissan

    The Dream Machines appeared at the start of March, and online sources suggest they’ll stay in their current locations throughout the month. I’d like to take this moment to suggest their next locations: Cambridge, UK and Oakland, California. Please and thank you!

    Hold your horses…

    We know this is a marketing ploy. We know its intention is to get Joe Public to spread the brand across social media. We know it’s all about money. We know. But still, it’s cool, harmless, and delicious. So let’s not have another robocall debate, OK 😂

    Website: LINK

  • Model van mirrors actual van’s doors

    Model van mirrors actual van’s doors

    Reading Time: < 1 minute

    Model van mirrors actual van’s doors

    Arduino TeamMarch 11th, 2019

    When your car door isn’t shut quite correctly, you’ll normally look down at the control panel to see what the problem is. What if, instead of indicator lights or a low-res image of your doors, you had a tiny actuated version of your vehicle on your dashboard?

    Mathis Ochsenmeier’s Analogous Door Display is exactly that. It mirrors his VW van’s front and rear doors using an Arduino Nano to take in sensor information and actuate three servo motors to mimic door positions. 

    Now when the van’s front doors or rear hatch open or close, the little van on the dash’s doors follow suit—both a useful diagnostic tool, and an entertaining model.

    [youtube https://www.youtube.com/watch?v=L7fMLqAD3MQ?feature=oembed&w=500&h=281]

    Website: LINK

  • Instaframe: image recognition meets Instagram

    Instaframe: image recognition meets Instagram

    Reading Time: 3 minutes

    Bringing the digital photo frame into an even more modern age than the modern age it already resides in, Sean Tracey uses image recognition and social media to update his mother on the day-to-day happenings of her grandkids.

    Sharing social media content

    “Like every grandmother, my mum dotes on her grandchildren (the daughter and son of my sister, Grace and Freddie),” Sean explains in his tutorial for the project, “but they don’t live nearby, so she doesn’t get to see them as much as she might like.”

    Sean tells of his mother’s lack of interest in social media platforms (they’re too complex), and of the anxiety he feels whenever she picks up his phone to catch up on the latest images of Grace and Freddie.

    So I thought: “I know! Why don’t I make my mum a picture frame that filters my Instagram feed to show only pictures of my niece and nephew!”

    Genius!

    Image recognition and Instagram

    Sean’s Instaframe project uses a Watson Visual Recognition model to recognise photos of his niece and nephew posted to his Instagram account, all via a Chrome extension. Then, via a series of smaller functions, these images are saved to a folder and displayed on a screen connected to a Raspberry Pi 3B+.

    Sean has written up a full rundown of the build process on his website.

    Photos and Pi

    Do you like photos and Raspberry Pi? Then check out these other photo-focused Pi projects that we’re sure you’ll love (because they’re awesome) and will want to make yourself (because they’re awesome).

    FlipFrame

    FlipFrame, the rotating picture frame, rotates according to the orientation of the image on display.

    FlipFrame

    Upstagram

    This tiny homage to the house from Up! takes bird’s-eye view photographs of Paris and uploads them to Instagram as it goes.

    Pi-powered DSLR shutter

    Adrian Bevan hacked his Raspberry Pi to act as a motion-activated shutter remote for his digital SLR — aka NatureBytes on steroids.

    Website: LINK

  • Massive wall-mounted skull lights up workshop under Arduino control

    Massive wall-mounted skull lights up workshop under Arduino control

    Reading Time: < 1 minute

    Massive wall-mounted skull lights up workshop under Arduino control

    Arduino TeamMarch 8th, 2019

    While you may or may not want a gigantic backlit skull cutout haunting the wall of your workshop, this was perfect for Jay and Jamie of the “Wicked Makers” YouTube channel. 

    Their device is cut of two 30” squares of plywood with a CNC router. This forms a base layer that holds everything off the wall, while an outer layer provides a nice circuit/skull texture.

    They affixed WS2812B LED strips to the base layer, controlled by an Arduino Micro. These strips shine off the wall for a glow through the edges, along with circuit board style cutouts inside the skull, diffused using wax paper. 

    Arduino code and the circuit diagram are found in the project’s write-up if you’d like to construct your own!

    [youtube https://www.youtube.com/watch?v=0l_HoY0G6h0?feature=oembed&w=500&h=281]

    Website: LINK

  • Gaming on multiple CRT monitors

    Gaming on multiple CRT monitors

    Reading Time: 2 minutes

    Gaming on multiple CRT monitors

    Arduino TeamMarch 8th, 2019

    While you might see a CRT by the side of the street and think noting of it, Ryan Mason has come up with a novel use for five of them in a row called the Cathode MK1.  

    This set uses the Unity game engine along with an Arduino board to spread games across five tube TVs arranged side-by-side. 

    In order to keep project costs down, Mason’s gaming rig is restricted to displaying a game signal on one TV at a time. This makes gameplay even more interesting, especially considering that the way that each TV handles a loss of signal contributing to the experience. 

    Several games are available for this unique system, including Long Pong AKA Pooooong, where a ball bounces from screen to screen as shown in the clip below.

    [youtube https://www.youtube.com/watch?v=w9cco60jOXM?feature=oembed&w=500&h=375]

    Website: LINK

  • Omni-wheel robot slides across the paper as a mobile plotter

    Omni-wheel robot slides across the paper as a mobile plotter

    Reading Time: < 1 minute

    Omni-wheel robot slides across the paper as a mobile plotter

    Arduino TeamMarch 8th, 2019

    Retired maker “lingb” created an omni-bot, with four wheels that allow sliding motion in the X/Y plane courtesy of their perpendicular rollers. While that alone would have been a fun build, he also attached a pen, along with a servo-based lifting mechanism, turning this robot into a free-range plotter!

    The device is controlled by an Arduino Uno and Bluetooth module, and takes movement commands via a linked smartphone or tablet. Four 28BYJ-48 stepper motors with ULN2003 drivers move each wheel, though outputs are shared between opposite motors to save on I/O. 

    This means that rotating the robot isn’t possible, but as shown in the video below, this isn’t needed to plot straight and curved lines with good accuracy.

    [youtube https://www.youtube.com/watch?v=hvl-QNBkcoc?feature=oembed&w=500&h=375]

    Website: LINK

  • Real role models for International Women’s Day 2019

    Real role models for International Women’s Day 2019

    Reading Time: 4 minutes

    The Raspberry Pi Foundation’s mission is to bring computing and digital making to everyone. Tackling the persistent gender imbalance in technology is a crucial part of this undertaking. As part of our work to increase the number of girls choosing to learn how to create with technology, we are marking International Women’s Day with a celebration of real role models.

    Real role models for International Women’s Day 2019

    Maria Quevedo, Managing Director, Code Club & Raspberry Pi Foundation, talks about the importance of real role models who show girls and women that computing

    Real role models are important

    There is strong evidence to indicate that the presence of role models is a very effective way to inspire women and minorities to become interested in subjects and industries where they are underrepresented. Research suggests that the imbalance among the role models that girls and women are exposed to in their everyday lives contributes significantly to the persistently low number of girls pursuing science, technology, engineering and mathematics (STEM) subjects at school, and ultimately impacts their career choices.

    Female role models in UK media

    In order to understand the extent of this imbalance, we carried out an analysis to explore the visibility of female technology role models in the UK media.

    One of our most striking findings was that in the twelve months since International Women’s Day 2018, each of the women competing in UK television’s Love Island 2018 was written about in the UK media on average seven times more often than 50 of the UK’s top female technology role models. And popular UK men’s lifestyle magazines were twice as likely to write about top female technology leaders than magazines aimed at women.

    We also looked at the subject matter covered by popular women’s and men’s magazines in the UK. We found that fashion (37% of all articles) and beauty (26%) were the most popular topics in women’s lifestyle media, while politics (5%) and careers (4%) were some of the least popular. The contrast with men’s lifestyle media was very pronounced. There, topic coverage was much more evenly distributed: fashion (21%) and politics (16%) came top, with grooming (12%) and careers (12%) close behind.

    In other words, in the women’s lifestyle magazines, about 14 articles are written about fashion and beauty for every one about careers. Men’s lifestyle magazines, meanwhile, publish one careers piece for every three fashion and grooming articles.

    Real role models in Code Club, CoderDojo, and beyond

    It’s alarming to see such a dramatic imbalance in visibility for female technology leaders, and such stark differences between the focus of women’s and men’s media. We work hard to make sure our activities such as Code Club and CoderDojo are equally welcoming to girls and boys, and we’re proud that 45% of the volunteers and educators who run these clubs are women. However, role models in wider society are just as important in shaping the values, beliefs, and ambitions of girls and women.

    We have a consistently high proportion of girls – around 40% – attending our Code Clubs and CoderDojos. But girls’ perceptions of computing, and their confidence, can be influenced hugely before they ever arrive at our clubs to give it a try – so much so that they may never arrive at all.

    In this context, the differences we observed between the topics that women’s and men’s media cover are troubling. It really comes down to balance: there is absolutely nothing wrong with reading about fashion or beauty, but greater diversity in the women, interests, and careers that saturate our popular culture would undoubtedly impact the gender imbalance that persists in sectors such as technology and science.

    We are for everyone

    When it comes to encouraging girls to take part in our digital skills activities, our approach is highly adaptable, but ultimately we are for everyone. We believe this inclusive approach is the most effective way of reinforcing that all genders are equally capable of enjoying and excelling at computing. It would be invaluable to see this reflected in popular culture.

    This International Women’s Day, we’re encouraging women to consider the ways in which we are real role models. Join us to celebrate the #RealRoleModels who inspire you, and share the fantastic contributions of girls and women in technology.

    Website: LINK

  • Control discarded copier and tape drive-style displays with Arduino

    Control discarded copier and tape drive-style displays with Arduino

    Reading Time: 2 minutes

    As hardware hackers, we’re always on the lookout for discarded components that can be re-purposed into something even more awesome. One such class of component that you may find is the controller-less graphics LCD modules, which can be found on old copiers, tape libraries, and the like.

    This project by Ivan Kostoski shows how to drive one of these displays with a 320×240 resolution. He’s tested his code using several types of Arduino board, such as the Uno and Leonardo, using minimal external components. 

    Summary
    Repository contains code samples for driving 4-bit parallel controllerless graphics LCD (CLGLCD) module with AVR MCU on an Arduino board, using minimal external components and staying within Arduino IDE.

    4-bit Controllerless Graphics LCD modules
    Controllerless graphics LCD modules are antiques that can be salvaged from old copiers, tape libraries, etc… They commonly are missing, well, the controller chip, the one with the memory. Don’t go buying one of these, for Arduino usage, even if you find them on sale. They are usually industrial, have poor viewing angles, generally slow response time, and pain to work-with. There, I said my peace… But if you already have one, their size (i.e. 5.7in) or simplicity can have its uses and beauty.

    I have tested this code with 320×240 STN LCD monochrome module marked as F-51543NFU-LW-ADN / PWB51543C-2-V0, salvaged some time ago from retired tape library, without the controller module (which it appears is based on FPGA and wouldn’t be of much use anyway).

    The same type of interface (4-bit data) with various signal names is present on many industrial modules based on multiplexed column and common row LCD drivers, like LC79401/LC79431. Or this is what is behind the controller IC. They all have some variations like LCD drive voltage (positive or negative, depending on temperature and size of the module), backlight (LED/CCFL), some logic quirks (i.e. CL2 is ignored while CL1 is up, etc…), so maybe this code can be adapted to other controllerless modules. Module’s datasheet is necessity for the connector pinouts and timing requirements. Some modules may even generate LCD drive voltage internally, and outputting it on a pin so actual V0 driving voltage can be adjusted.

    More info on the build/technique is found on GitHub, where you can also download project code and find more background on how interfacing with these devices works.

    Website: LINK

  • Make our light-up Raspberry Pi box for #MonthOfMaking

    Make our light-up Raspberry Pi box for #MonthOfMaking

    Reading Time: 3 minutes

    On Tuesday, Rob at The MagPi magazine tweeted this:

    The MagPi magazine on Twitter

    Hey @Raspberry_Pi, wanna join us in making some stuff for #MonthOfMaking? Rob has some cosplay to do this week and other plans for the rest of the month…

    And we said YES!

    At this point in time, Alex was hiding in the Raspberry Pi Foundation makerspace, creating thingamabobs and whatsits with the laser cutter, and an idea came into her mind.

    (Is it weird that I’m referring to myself in the third person? It is. I’ll stop.)

    The idea started with this:

    Raspberry Pi laser cut box #MonthOfMaking

    Oddly satisfying, right?

    And ended like this:

    Raspberry Pi laser cut box #MonthOfMaking

    Raspberry Crepe Cake?

    With a little bit of this in between:

    Raspberry Pi laser cut box #MonthOfMaking

    For hiding treasures

    And thanks to some cheap battery-powered lights and magnets from Poundland…

    #MonthOfMaking

    Whosits and whatsits galore

    …it lights up too!

    Raspberry Pi laser cut box #MonthOfMaking

    Photograph taken inside my rucksack for ambience

    Make your own

    So, do you want to make your own? Of course you do.

    Ideally, you need access to a laser cutter, but if you don’t have one, you can just cut out the layers from some thick cardboard using a craft knife.

    You’ll need these four files:

    These are slightly different to the ones I used, so the acrylic should press-fit without the need for the backing frame you see in the image above. And, though you can’t see them in the photos, magnets keep the box closed. You could also use velcro.

    Feel free to resize the files and change the box design to better fit whatever you want to put inside, but remember: making these boxes to sell, or diverging from our brand guidelines when using the Raspberry Pi logo, is against our trademark rules.

    #MonthOfMaking

    Join Raspberry Pi and The MagPi magazine in the #MonthOfMaking by using the hashtag in your social posts sharing your makes online. And, just as you can see from my light-up box, your make doesn’t have to use any digital technology. Bake a cake, stitch loop art, restore a car — whatever you plan on making this month, make sure we see your creation! Have fun!

    Website: LINK

  • The world’s smallest forklift?

    The world’s smallest forklift?

    Reading Time: < 1 minute

    The world’s smallest forklift?

    Arduino TeamMarch 6th, 2019

    Remote control cars are interesting, but as Leon van den Beukel shows in the video below, an RC forklift can be even more challenging and fun to create. 

    His project was constructed using a variety of hand and automated techniques, resulting in a build that can easily manipulate tiny pallets. Forks are lifted into the air via a motor and belt assembly, and tilted with a small servo.

    The device uses an Arduino Mega for control, and is linked to an Android phone over Bluetooth for user interface. Code, along with STL files and drawings, are available on GitHub and the custom Android control app can be found here.

    [youtube https://www.youtube.com/watch?v=_YNgo8A7p8A?feature=oembed&w=500&h=281]

    Website: LINK

  • This faux candle lights, flickers, smokes, and smells like the real thing

    This faux candle lights, flickers, smokes, and smells like the real thing

    Reading Time: 2 minutes

    This faux candle lights, flickers, smokes, and smells like the real thing

    Arduino TeamMarch 6th, 2019

    Keith of “Keith’s Test Garage” wanted an LED candle. While somewhat realistic flicking units are easy to find, he was in search of something much more like the actual thing, and after several years of work has come up with a rather amazing replica.

    The device’s wax-embedded glass enclosure houses an Arduino, along with a series of six  RGBW LEDs inside that randomly flicker away to simulate a flame. This effect is triggered via a real match, which is sensed by an IR module. To stop the effect, one literally blows out the candle through a microphone input that picks up on this action. 

    Most impressively however, upon putting out the faux flame, a length of resistive wire heats up glycerin and smelling oil on a wick, producing a puff of smoke to end the light performance.

    [youtube https://www.youtube.com/watch?v=Y96owyGh2Pw?feature=oembed&w=500&h=281]

    Website: LINK

  • Light painting with a CNC router

    Light painting with a CNC router

    Reading Time: < 1 minute

    Light painting with a CNC router

    Arduino TeamMarch 6th, 2019

    Maker Jeremy S. Cook has experimented with both CNC machinery and light painting in the past, and decided to combine these two skills into a new artistic device. 

    His setup uses a web app found here to program a CNC router as a sort of dot matrix printer. But instead of a pen, pencil, brush or other marking utensil, it uses a button as an input to the onboard Arduino Nano when pressed to the router’s surface.

    From this input, the Arduino then commands a diffused RGB LED to “mark” the surface with light, painting an image on the camera’s exposed sensor. 

    Code and print files are are available on GitHub if you’d like to try your own light art experiments!

    [youtube https://www.youtube.com/watch?v=Y_4NdVgSwuA?feature=oembed&w=500&h=281]

    Website: LINK

  • Handheld text-based adventure gaming with Quest Smith

    Handheld text-based adventure gaming with Quest Smith

    Reading Time: 3 minutes

    Play text-based adventure games that print out in real time, with Quest Smith: the Raspberry Pi Zero W–driven handheld gaming device from Bekir Dağ.

    Quest Smith

    Quest Smith is a raspberry pi zero driven thermal printing text based game. In each level, it gives you options to choose so every game is different than the other one.

    Text-based adventure games

    Today I learned:

    Around 1975, Will Crowther, a programmer and an amateur caver, wrote the first text adventure game, Adventure (originally called ADVENT because a filename could only be six characters long in the operating system he was using, and later named Colossal Cave Adventure).

    But I’m sure you already knew that.

    According to the internet, text-based games in their most simple form are video games that use text instead of graphics to let players progress. You read the description of your surroundings and choose from a set of options, or you type in your next step and hope the game understands what you’re talking about.

    Colossal Cave Adventure

    We have a conversation going in our team right now about whether the term ‘text-based games’ is solely used for video games of this nature, or whether choose your own adventure books also fall into the category of text-based games. Leave your thoughts in the comments.

    Anyway…

    Quest Smith!

    After encountering a similar handheld gaming device in a Berlin games museum, Bekir Dağ decided to build his own using a Raspberry Pi Zero W.

    Quest Smith text-based game

    For Quest Smith’s body, Bekir Dağ designed a 3D print, and he provides the STL files for free on Thingiverse. And for the inner workings?

    A Raspberry Pi Zero W fits snugly into the body alongside a thermal printer, a battery, and various tactile buttons. The battery is powered by a solar panel mounted on the outer shell, and all components are connected to a TP4056 board that allows the battery to power the Pi.

    Quest Smith text-based game

    The Quest Smith software is still somewhat of a work-in-progress. While users can build Quest Smith today and start playing, Bekir has put out the call for the community to submit their own parts of the story.

    Each level requires two versions of the story, which makes the possiblities grow exponentially. So it will be very difficult for me to finish a single story by myself. For the player to reach level 9, we will need to have 1023 story parts to be written. If you can help me with that, it would be amazing!

    To see more of Quest Smith’s build process, find the files to make your own device, and instructions on how to contribute toward the story, visit the Quest Smith Hackster.io page.

    More text-based adventuring with Python

    If you’re interested in writing your own text-based adventure game in Python, we’ve got a free online course available in which you can learn about object-oriented programming while creating a text-based game. And for a briefer intro, check out Wireframe magazine issue 6, where game developer Andrew Gillett explains how to make a simple Python text adventure.

    Website: LINK

  • Electronic dummy load is a work of readily-available art

    Electronic dummy load is a work of readily-available art

    Reading Time: 2 minutes

    Electronic dummy load is a work of readily-available art

    Arduino TeamMarch 5th, 2019

    As seen here, Juan had some problems with his power supply, and while he wanted to “simply” build another one, he didn’t let the power supply go to waste. Instead he converted it into an adjustable dummy load based on the design by Dave Jones’ shown below.

    This device, however, is no mere duplication of Jones’ and adds an Arduino for control, allowing for voltage, current, power, and temperature monitoring. The enclosure was designed in Fusion 360 and 3D-printed, and the front panel overlay in Inkscape. 

    Other interesting tricks include using a readily available DC motor for input instead of an encoder, along with an array of 7-segment displays that don’t quite all match, but act as functional outputs nonetheless. 

    Code for the project is up on GitHub.

    [youtube https://www.youtube.com/watch?v=8xX2SVcItOA?feature=oembed&w=500&h=281]

    Website: LINK

  • 3D print your own Arduino hovercraft

    3D print your own Arduino hovercraft

    Reading Time: < 1 minute

    3D print your own Arduino hovercraft

    Arduino TeamMarch 5th, 2019

    If you’ve ever considered building your own RC hovercraft, be sure to check out the latest project from “How To Mechatronics.” 

    The build shows how to assemble one using a variety of 3D-printed parts, a pair of brushless DC motors for hover airflow and forward motion, and a servo for steering.

    An Arduino Uno along with an nRF24L01 module are employed for control, and as demonstrated in the video below, it slides across a basketball court with the greatest of ease! 

    More info is available on How To Mechatronics’ write-up, including CAD/3D printing files, a parts list, and Arduino code.

    [youtube https://www.youtube.com/watch?v=2XIG_DD4tt4?feature=oembed&w=500&h=281]

    Website: LINK