Taking inspiration from a cube he had filmed at the 34th Chaos Communication Congress in Leipzig, Germany, polyfloyd gathered friends Sebastius and Boekenwuurm together to create their own.
The build
As polyfloyd’s blog post for the project notes, Sebastius led the way with the hardware portion of the build. The cube is made from six LED panels driven by a Raspberry Pi, and uses a breakout board to support the panels, which are connected in pairs:
The displays are connected in 3 chains, the maximum number of parallel chains the board supports, of 2 panels each. Having a higher degree of parallelization increases the refresh rate which in turn improves the overall image quality.
The first two chains make up the 4 sides. The remaining chain makes up the top and bottom of the cube.
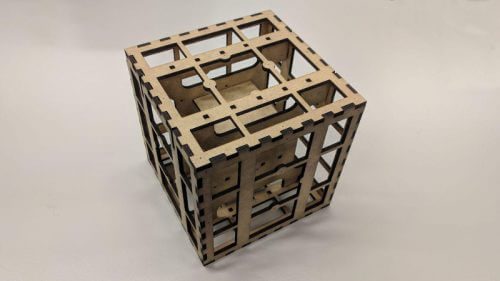
Sebastius removed the plastic frames that come as standard on the panels, in order to allow them to fit together snugly as a cube. He designed and laser-cut a custom frame from plywood to support the panels instead.
Software
The team used hzeller’s software to drive the panels, and polyfloyd wrote their own program to “shove the pixels around”. polyfloyd used Ledcat, software they had made to drive previous LED projects, and adapted this interface so programs written for Ledcat would also work with hzeller’s library.
The full code for the project can be found on polyfloyd’s GitHub profile. It includes the ability to render animations to gzipped files, and to stream animations in real time via SSH.
Mapping 2D and spherical images with shaders
“One of the programs that could work with my LED-panels through [Unix] pipes was Shady,” observes polyfloyd, explaining the use of shaders with the cube. “The program works by rendering OpenGL fragment shaders to an RGB24 format which could then be piped to wherever needed. These shaders are small programs that can render an image by calculating the color for each pixel on the screen individually.”
The team programmed a shader to map the two-dimensional position of pixels in an image to the three-dimensional space of the cube. This then allowed the team to apply the mapping to spherical images, such as the globe in the video below:
The team has interesting plans for the cube moving forward, including the addition of an accelerometer and batteries. Follow their progress on the polyfloyd blog.
Fun with LED panels
The internet is full of amazing Raspberry Pi projects that use LED panels. This recent project available on Instructables shows how to assemble and set up a particle generator, while this one, featured on this blog last year, tracks emojis used on the Chelsea Handler: Gotta Go! app.
Schreibe einen Kommentar
Du musst angemeldet sein, um einen Kommentar abzugeben.