HandiPi: All-in-one handheld desktop computer
Richard was inspired by the PICOmputer PCB created by Peter ‘Bobricius’ Misenko. “It’s a sort of carrier board for Raspberry Pi Pico that includes a keyboard using 6 mm push-button tactile switches and a display,” he explains.
“When I later ordered a Raspberry Pi 4 computer, I got to thinking: what if I could build a case with a screen and a keyboard? I’d still use it with a monitor, keyboard, and trackball at my desk most of the time, but I could take it with me if I wanted to go hack at a friend’s house or makerspace.”

Snug fit
From the start, Richard knew what he wanted. “The new unit had to be small enough to fit nicely on my workbench, and I wanted it to be battery-powered with some sort of keyboard/screen for use away from the bench,” he says.
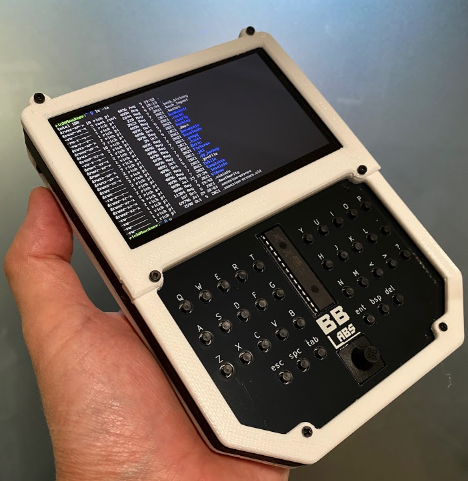
With this in mind, he picked a 4.3-inch touchscreen roughly the same width as Raspberry Pi 4 and, having had experience creating a portable computer based on Raspberry Pi Zero with a full-size 36-key keyboard and foldable screen, he cracked on designing a similar keyboard.
“The focus was on keeping the size minimal and it meant I did away with the Ethernet and most of the USB ports on Raspberry Pi 4,” he adds. “But, while the screen is smaller than is comfortable for long periods of work, the 36-key keyboard works surprisingly well for thumb-typing. There was, however, a bit of a learning curve figuring out the minimum required support circuitry to make the chip function and output USB.”
Key to success
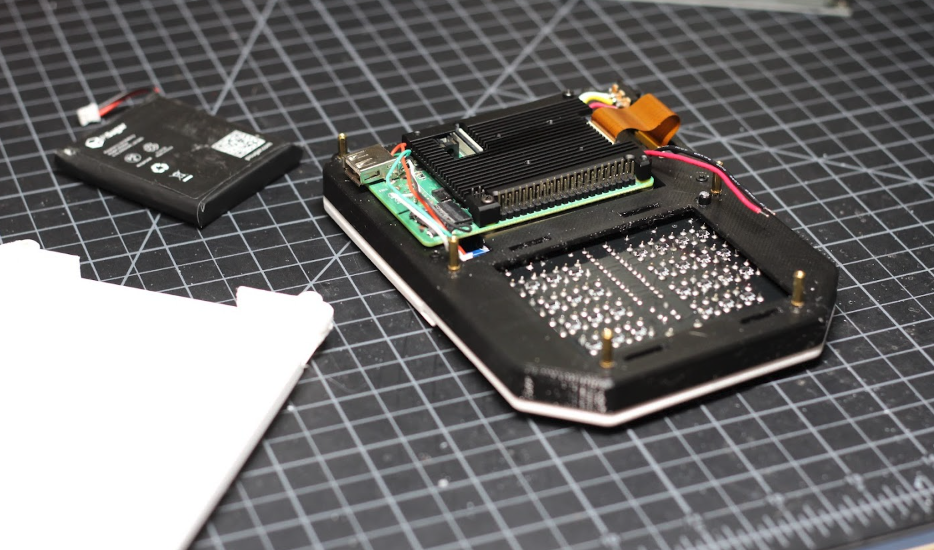
The custom 10 × 4 ortho keyboard incorporates a five-way directional button, and it makes use of an ATmega328 DIP IC running a version of QMK firmware. Richard has also made use of a 5000 mAh battery pack which allows HandiPi to be used as a portable for up to four hours.
“I chose the PiSugar module for battery management because it was designed to mount under Raspberry Pi and connect to the GPIO header via pogo-pins, rather than on top as with most HATs. This let me wedge it between [Raspberry] Pi and the display, only adding a couple of millimetres to the overall design.”

With hindsight, he’d have retained the Ethernet and double-stack USB ports. “After the work to remove them was done, I’m convinced it wasn’t worth it – using a modified Raspberry Pi 4 turned out to be just something like five millimetres thicker. I built a cutout for the Ethernet jack so it sits flush with the case bottom. Having the USB 3.0 ports would be nice and the Ethernet port could potentially come in handy.”
Still, with a cool 3D-printed case and an original Game Boy-like styling, the overall project is immensely impressive. “For the primary use – powering my workbench computing – it’s perfect,” he says. “The second, smaller screen on the unit itself can come in handy to show little bits of info from a distance, and I’ve found it can be pretty handy to ‘borrow’ the USB-C power sometimes. The reaction has also been pretty positive and, overall, I’m definitely pleased with how it turned out.”