Kategorie: Reviews

  • Play classic console games legally on Raspberry Pi

    Play classic console games legally on Raspberry Pi

    Reading Time: 5 minutes

    In this tutorial we’re going to look at a much broader range of legal console ROMs. Some can be purchased legally, while others have been developed and are distributed for free.

    So let’s set up a RetroPie console and play some classic games.

    Thriving scene

    Sega’s Mega Drive Classics collections include ROM images of the games that you run on any emulator you like, and brand new commercial releases for Sega and other platforms are thriving, as are active homebrew scenes bringing innovative new games to console formats that went out of production over 25 years ago.

    Sega is incredibly supportive of its emulation community, and is happy to just sell you some classic Mega Drive ROMs, included in the Sega Mega Drive Classics collections for Windows, macOS, and Linux. You can buy 50 classic Mega Drive games on Steam, either individually or as a pack.

    Once bought, to find the ROMs, open the title’s Steam Library page, clear the gear icon on the right, select properties Properties, select the Local files tab, and then click Browse local files. You’ll find all the ROMs in the clearly labelled uncompressed ROMs directory. Rename all files with ‘.68K’ and ‘.SGD’ extensions to ‘.bin’ and copy them over to Raspberry Pi using a USB stick or via its Samba share.

    Buy new classics

    If you’re after new games for classic systems, itch.io should be your first port of call. The Nintendo Entertainment System is the most popular 8-bit console for modern developers, while the Mega Drive has won the hearts of 16-bit devs. Games are also available for the 8-bit Sega Master System and 16-bit Super Nintendo Entertainment System.

    We’ve made itch.io collections for each of those platforms, going out of our way to avoid unauthorised ports and ROM hacks. These include both commercial and freeware games, plus a couple of open-source titles:

    That’s not the only place that you’ll find releases for those platforms. In the tutorial, we download Mystery World Dizzy by the Oliver Twins. It’s a wonderful example of a lost NES game that was recovered by its creators and released as freeware to the fan community, but it’s also rare to find Nintendo games from that era re-released with their creators’ blessing. And unlike Sega, Nintendo doesn’t look fondly on ROM hacks, fan games, and the like.

    On the homebrew side of things, projects such as Retrobrews and sites like vintageisthenewold.com and indieretronews.com compile collections and lists of homemade games for classic consoles, but watch out for the odd unauthorised port slipping into their catalogues.

    There’s a small but lively industry releasing cartridges for retro consoles, and a number of developers and publishers make the ROM files available online, either for free or a small price. Among these are RetroSouls, the team behind Old Towers, and Miniplanets publisher Playonretro.

    Image your RetroPie drive

    Download the Raspberry Pi Imager for your operating system. Insert a microSD card – 8GB will be fine if you plan to limit yourself to 8- and 16-bit games, but if you want to emulate more powerful consoles in future, a 32GB card is a good investment.

    Run Raspberry Pi Imager and pick RetroPie from the choose operating system list. You want the most powerful Raspberry Pi you can lay your hands on, but a Raspberry Pi Zero will do the trick if you stick to emulating relatively early systems, and is great for embedded console projects.

    Choose your microSD card, click Write, and give the software permission to overwrite any data on the microSD card. Wait for the image to be downloaded and flashed.

    Plug it in, baby

    Insert the microSD card and connect Raspberry Pi to a keyboard, mouse, and monitor. If you’ve got controllers or joysticks, plug them in before you power up.

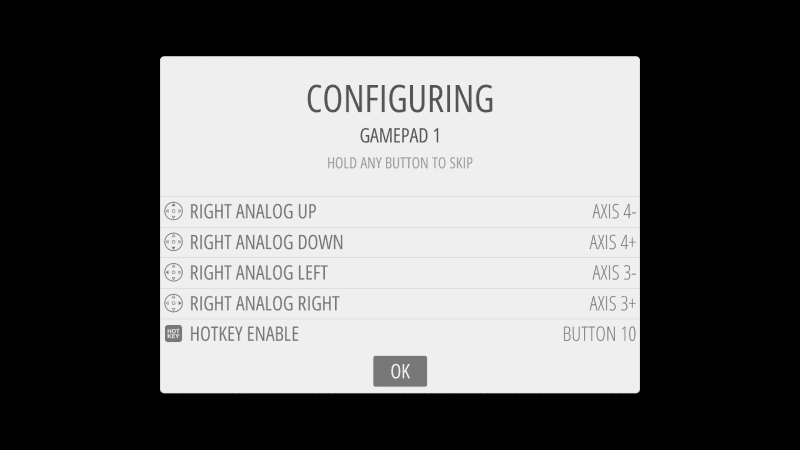
    After the image boots, you’ll be prompted to assign your gamepad’s buttons, if you have one. Trigger buttons on some controllers – notably Xbox 360 compatible gamepads – may not register when pressed. Press and hold any other button to skip configuring them for now. If you make a mistake, you’ll be able to go back and correct it when you get to the end of the configuration list.

    Fix your triggers (optional)

    If the triggers are unresponsive on your Xbox 360 compatible controller, you should update the xpad driver. Go to RetroPie configuration and select RetroPie Setup. From the ncurses menu, select Manage Packages > Manage Driver Packages > 847 Xpad Driver, then Update.
    Exit back to the main EmulationStation interface and open the Menu. You may find that this has been remapped from Start to the Right Trigger button after the update. Scroll down and select Configure Input.

    It takes a little getting used to, but EmulationStation’s controller configuration tool means that RetroPie can handle almost any gamepad you want to use with it

    Set me up

    With your controller configured, you’ll be taken to the main interface. You won’t see any emulators on offer until you’ve copied over games for them to play. Press A on RetroPie to enter the config menu.

    Select WiFi. Press OK at the following menu to go on to connect to a wireless network. Choose from the network list and enter the network key. Select Exit to return to the main EmulationStation config menu.

    Some 1920×1080 displays will show a black border. If this is the case, select raspi-config. Go to Advanced Options, then Overscan – this will get rid of the black border. Select No to disable overscan compensation. You’ll need to reboot for this to take effect.

    Get some ROMs

    Before we go any further, you’ll need some games to run on RetroPie’s suite of emulators. For our first NES ROM, we’ll grab the Oliver Twins’ Mystery World Dizzy. Go to yolkfolk.com/mwd and click Download. To test Mega Drive emulation, go to arkagis.com and click ‘Download trial version’ to take Arkagis Revolution’s great rotating field navigation for a spin.

    It’s easiest to download ROMs on another computer and copy them across your local network to RetroPie’s Samba share at retropie.local using your file manager. Each console has its own subdirectory under the roms directory. Windows users should ensure that network discovery is enabled.

    Time to play

    Back on Raspberry Pi, restart EmulationStation: press Start on your controller, select Quit, then Restart System. Restart the interface every time you add games to force it to re-check its ROM directories.

    If you have a keyboard connected, it’s quicker to press and hold F4 to quit to the command line, then type exit to restart EmulationStation.

    As you scroll to the left or right, you should see logos for the NES and Mega Drive. Press A to enter the menu, then press A while highlighting the game you want to play. Right and left directional controls switch between different consoles.

    Shortcuts, mods, and fixes

    Remember the Hotkey you defined during controller configuration? You’ll be using that a great deal, as it serves as a mode switch for controller shortcuts. You’ll find more info in the docs, but these are the most useful:

    • Hotkey + Start – quit the game

    • Hotkey + Right Shoulder – Save

    • Hotkey + Left Shoulder – Load

    • Hotkey + B – Reset

    • Hotkey + X – Open quick menu for save states, screenshots, recording and similar

    If you don’t get any audio from Raspberry Pi 4, make sure the HDMI lead connecting your monitor is plugged into the HDMI 0 port, nearest to the power connector.

  • Mister C (aka Mark Calleja) interview

    Mister C (aka Mark Calleja) interview

    Reading Time: 2 minutes

    The streams have evolved greatly since then to be a lot more streamlined and useful, and the Foundation also provides pre-recorded videos for students to follow along with.

    How did you first learn about Raspberry Pi and related programs?

    It was way back in 2014, when I was still teaching Year 3. I used to run a code club for my school and I was on the second ever Picademy, held at the old Raspberry Pi offices up on the hill in Cambridge. Since then, I’ve taught literally thousands of people with a Raspberry Pi – from six- and seven-year-olds taking their first steps in coding, to brainstorming ways for postgraduate marine biologists to maintain lab conditions, to the thousands of young people who run their code each year on the International Space Station as part of our Astro Pi project! I’ve been working with (and for) Raspberry Pi for quite a while, and now each week I get to host a live stream that is broadcast to the whole world, aimed at giving young people the opportunity to do some coding at home wherever they are. I’m very lucky.

    What has the reaction been to the streams?

    Really positive! We’ve had loads of guests from all over the world come onto the stream to discuss what they do, or do some coding with us – we’ve had people from all over the world as well as a few young people from Ireland and the UK. Now that we’re running at a later time each week, we’re able to get a lot more young people from the US to drop by for some practice in programming, both on and off camera. We’ve had environmental scientists, editors, inventors, and iconoclasts on the stream, as well as representatives from the European Space Agency and even one of the Founders of Raspberry Pi, Eben Upton. We’re taking a lot of what we’re learning and using it to help run online clubs, as well as training sessions for groups like the Scouts.

    Any upcoming plans you can share?

    This whole month on Digital Making at Home is about Self Care – we’re looking at ways you can create with technology that are therapeutic and stress-relieving during back-to-school madness. Have a look at rpf.io/home for more videos and info!

  • The Weather Station made from spoons

    The Weather Station made from spoons

    Reading Time: 3 minutes

    As luck would have it, Çağan Çelik has created a weather station using a fan and spoons.

    Çağan Çelik is a full-time hardware editor on a Turkish technology magazine. He has also been making tutorial and DIY videos on his YouTube channel about hobby electronics and programming in his spare time.

    In fact, he’s developed two weather stations – the first being five years ago. “The original was made using an Arduino Uno when I just starting to learn electronics and programming,” he recalls.

    “Where I used to live, the weather was often unpredictable and I wanted to know the forecast so I could dress accordingly just by glancing at a screen.”

    That version had outdoor sensors hooked up to the Arduino using long cables and the values were displayed on a small Nokia 5110 screen. “It was a neat project, but I hit the limitations of Arduino,” Çağan continues. “I couldn’t add functions to it because of the 32kB of code memory, and I wanted to include an early warning system when the air pressure suddenly dropped, which mostly means it’s going to rain or snow.” Cue Raspberry Pi, with the advantage of being able to show the results on a large and easily readable screen. “I could use fancy graphics if I wanted and also be far less conservative about my programming thanks to being able to use a massive microSD card as a storage medium. With a lot of CPU muscle in the background, it was a win for bringing my project alive again.”

    	A Raspberry Pi 3 sits in the housing and connects to a LiPo battery that also powers the LEDs and motors

    Inside and outside

    To start with, Çağan wanted to expand the functionality of the weather station by adding wind speed to the temperature, humidity, and air pressure sensors of the original. He also wanted to present the information more clearly.

    “The most important thing was separating the inside and outside modules because, in the previous iteration, the inside module – the Arduino and the screen – had to be placed near the window so that the cables would reach the exterior sensors,” he explains. By using wireless communication, he could dispense with wires. “I was very familiar with NRF24L01 transceiver modules, so I picked this.”

    Even so, Çağan had never used this transceiver module with Raspberry Pi before. He wanted the latter to communicate with an exterior module based on an Arduino Uno, so he headed online to research and troubleshoot his way through and eventually got the two to talk to each other.

    	Çağan feels the interface could be improved. “It’s one of my first GUI designs,” he says

    Sensor fun

    The Arduino Uno is used to gather information from the sensors at set intervals before transmitting the data wirelessly to a Raspberry Pi 4 located inside his house. This is attached to a 7-inch official Raspberry Pi touchscreen running a clean user interface that he created using the GUI framework Tkinter.

    “It was a new thing for me, although I realised it’s fun once you grasp the basics,” he says. “I learned how to use transparent PNG files with the Tkinter interface and how to resize and manipulate them.”

    Now that the weather station is up and running, Çağan doesn’t get caught by the ever-changing weather any more, but he admits he could easily get snowed under with extra work. “Maybe I could show the time and date, the wind direction, and the temperature inside using another sensor,” he suggests. “But I’m pleased at the good feedback I’ve had so far.”

  • SUDO: sudoku-solving robot

    SUDO: sudoku-solving robot

    Reading Time: 3 minutes

    Named after both the UNIX command and Japanese puzzle, SUDO began life as a companion to help Arijit with number-based puzzles. “I was trying to master sudoku puzzles and invested a lot of effort,” he explains. As an experienced inventor and programmer, he soon realised there was no need to solve sudokus manually. “I can build a robot to solve any complex sudoku within seconds,” he reasoned.

    SUDO is powered by a Raspberry Pi 3B+ and has been carefully trained using machine learning to recognise numbers shown in different fonts

    Keeping track with robot camera eye

    Arijit has been experimenting with Raspberry Pi possibilities since 2017, when he began trying out IoT projects. These include a Spy-Dog live video surveillance bot, a drowsiness detection device, and a web-based GPS tracker. His SUDO robot runs on a Raspberry Pi 3 B+, but he says it could easily run on a Raspberry Pi Zero.

    For the sudoku challenge, the robot required “an eye to see the sudoku, a brain to solve the sudoku, and a medium to communicate the solution”, says Arijit. He soon realised that Raspberry Pi’s Camera Module could act as the eye, its processor as the brain, and a display and speaker as the communication medium.

    As long as SUDO is able to detect the puzzle placed in front of its camera, it’s able to solve complex sudokus in a few seconds. The caveat, says Arijit, is that the robot finds it tricky to read the puzzle grid in poor light. When it recognises a grid, SUDO states: “I have detected a sudoku,” quickly followed by “I have solved the sudoku successfully.” SUDO then displays the solution on its touchscreen display.

    Arijit holds out a sudoku puzzle for the robot to scan and solve; at the moment, it needs to be held steady

    Puzzling it out
    : solving sudoku with Raspberry Pi

    Arijit is working on overcoming the challenge of low light, which can cause SUDO to misread numbers on a sudoku grid. He has put in many hours getting SUDO to recognise different fonts. “Accuracy was the ultimate factor, as misinterpreting numbers would give wrong results,” he says.

    This required training the robot using machine learning algorithms to recognise all those fonts. Arijit used OpenCV to train SUDO. He is currently looking at ways to get his robot to follow and track a piece of paper held in front of its camera, since people often unintentionally move the paper containing the sudoku puzzle while SUDO is trying to decode it.

    Having gained experience of machine learning when training Raspberry Pi to recognise vehicle number-plates for another project, Arijit knew which existing algorithms to use to get SUDO to solve the puzzles. He adapted them to work with Raspberry Pi and his own machine learning data set. He used open-source Python code to control the robot. The robot’s appealing case was originally that of one of his childhood toys. The fully operational robot has been shown off at Maker Faires and tech events, attracting selfie-takers and kids who plead with Arijit to make them a robot to solve maths problems. SUDO even had a human challenger. Arijit proudly relates what happened: “Before the guy wrote a single digit on the paper, SUDO solved [the sudoku puzzle] and showed the solution”.

    Build a sudoku robot

    Find instructions on how to build your own SUDO robot on GitHub.

    Place an IR sensor on top of the touchscreen and connect it to Raspberry Pi, then screw or clip the rear of the robot shell in place. Use sudoku grids to help train your robot to recognise numerals.

  • Set up a LAMP server with Mythic Beasts

    Set up a LAMP server with Mythic Beasts

    Reading Time: 7 minutes

    In this test, we’ll use it to set up a WordPress website similar to the one we use online. But you could also use LAMP to deliver any kind of website.

    Sign up with Mythic Beasts

    Start by ordering a Raspberry Pi 4 from Mythic Beasts.

    We’re going to use a faster Raspberry Pi 4, to get the extra 4GB RAM for our LAMP server. There’s a monthly charge of £7.25 for a Raspberry Pi 4 web server, which is an excellent deal for a dedicated computer with network storage (our look at non-Raspberry Pi services showed around £27 per month for a Linux machine with four cores).

    You can test out the service with a Raspberry Pi 3 for only £5.25 per month (this only has 1GB RAM).

    We’re going to stick with the default 10GB storage, although the ‘Disk space’ slider at the bottom is used to select up to 250GB (at 2p per GB).

    Click the green Order Now button.

    Enter a service name and tick the ‘I agree to the terms and conditions’ box. The other fields are optional. Click Confirm to provision (activate) your Raspberry Pi. Enter your payment details or click Raise Invoice.

    Wait for Raspberry Pi to be provisioned and the operating system to be installed. Don’t close the web window.

    Generate an SSH key

    When provisioning has completed, click ‘Configure your server’ (if you browse away, then you will find the server at
    mythic-beasts.com/customer/servers/rpi
    ).

    Mythic Beasts uses SSH keys to provide secure access between your local computer and the remote Raspberry Pi server. If SSH Keygen is new to you, then take a look at passwordless SSH access in the Raspberry Pi documentation.

    First, check whether there are already keys on the local computer. Open a Terminal window and enter:

    ls ~/.ssh

    If you see files named id_rsa.pub or id_dsa.pub then you have keys set up already, so you can skip the ‘Generate new SSH keys’ step below and head to Step 3. To generate new SSH keys, enter the following:

    ssh-keygen

    Upon entering this command, you will be asked where to save the key. We suggest saving it in the default location (~/.ssh/id_rsa) by pressing ENTER.

    You will also be asked to enter a passphrase, which is optional. The passphrase is used to encrypt the private SSH key so that if someone else copied the key, they could not impersonate you to gain access. If you choose to use a passphrase, type it here and press ENTER, then type it again when prompted. Leave the field empty for no passphrase.

    Add the key SSH

    Take a look a the content of the key:

    cat ~/.ssh/id_rsa.pub

    The output will start with ‘ssh-rsa’ and end with your hostname ‘pi@raspberrypi’.
    Use your mouse to select all the output of the SSH key, then right-click and choose Copy. Now head back to the browser and click ‘configure keys’. Right-click on the large ‘Keys’ text field and choose Paste to enter the SSH key. Click ‘Save changes’.

    A secure SSH key generated on your local computer is shared with the remote computer to provide access

    SSH access

    Scroll down the server window and take a look at the details in SSH access. Here you will see your Username, Host, Port, and Authentication information. You will use this information to connect to your Raspberry Pi server. There is also a Command section, with the Terminal command used to connect directly. Ours looks like this:

    ssh -p 5274 root@ssh.magpi01.hostedpi.com

    Copy and paste the command into the Terminal and press ENTER.

    Respond ‘yes’ at the ‘continue connecting’ prompt and your SSH key will be added to your list of ‘known hosts’.

    If you created one, you’ll need to add the SSH key password when prompted. When logged in, the command prompt will change to root@raspberrypi. You are logged in as ‘root’ and in the root user’s home directory ‘/root’.

    Install a web server

    We’re going to use the Apache web server, which you can install with the following commands:

    apt update
    apt upgrade -y
    apt install apache2 -y

    Note that you don’t need to use ‘sudo’ as you are the root user.

    Open a web browser and visit the following URL (replacing ‘magpi01’ with the name of your own hosted server: magpi01.hostedpi.com.)

    This will display the Apache2 Debian Default webpage with an ‘it works!’ message.

    This page is an HTML file located on your remote Raspberry Pi, at /var/www/html/index.html.

    Navigate to this directory in the Terminal and have a look at what’s inside:

    cd /var/www/html
    ls -al cat index.html

    Install PHP

    We now have the ‘L’ and ‘A’ of our LAMP server: Linux and Apache. The M and P come next: MySQL and PHP.

    MySQL is a database system, while PHP is a programming language. You’ll need both to run most content management systems, such as WordPress.

    Now is the ideal time to add the software. You can install PHP with the following command:

    apt install php -y

    And MySQL with this command:

    apt install mariadb-server php-mysql -y

    Now restart your Apache server to ensure both services are running.

    service apache2 restart

    Upload content remotely

    You don’t need to be logged in to your Raspberry Pi server to edit content in the html directory. Close the connection with:

    exit

    You can send files directly to the html directory from your local computer using secure copy (scp).

    First, we’re going to get a photo (of our cat) and name it cat.jpg. Then create an index.html file.

    nano index.html

    And enter this basic HTML code:

    <html> <head> <title>Siouxsie</title> </head> <body> <p>Our cat, Siouxsie!</p> <img src="cat.jpg"> </body>
    </html>

    Copy the two files directly to the html directory on your remote Raspberry Pi server:

    scp -P 5274index.html cat.jpg root@ssh.magpi01.hostedpi.com:/var/www/html/

    …making sure to replace the ‘5274’ and ‘magpi01’ parts with the port and hostname of your Raspberry Pi server. Press F5 to refresh your web browser and view the new webpage design.

    Test out PHP

    Let’s test that PHP is working, and also take a look at the index page for our website. Create the file index.php:

    cd /var/www/html
    nano index.php

    Put some PHP content in it:

    <?php echo "Hello, World!"; ?>

    Save the file and close with CTRL+O and CTRL+X.

    Now get rid of the index.html file (because it takes precedence over the index.php file):

    rm index.html

    Reload your website in the web browser and you will see ‘Hello, World!’. This page isn’t dynamic, but it’s created with PHP code.

    A LAMP (Linux, Apache, MySQL, and PHP) server can be used to run a WordPress-based website

    Install WordPress

    Now we’re going to head back into our remote server and do something a little more detailed. We’re going to set up WordPress, a popular CMS (content management system). This makes use of our PHP and MySQL database and is a great option if you’re looking for a powerful website with a minimum of coding.

    Log back into your remote Raspberry Pi server.

    ssh -p 5274 root@ssh.magpi01.hostedpi.com

    Go to your html folder and get rid of all the content.

    cd /var/www/html/
    rm *

    Now download the latest version of WordPress:

    wget http://wordpress.org/latest.tar.gz

    If you need to install wget, use apt install wget.

    Next, extract the WordPress tarball to get at the WordPress files:

    tar xzf latest.tar.gz

    Move the contents of the extracted wordpress directory to the current directory.

    mv wordpress/* .

    Tidy up by removing the tarball and the now-empty wordpress directory:

    rm -rf wordpress latest.tar.gz

    Use ls to view the contents of a WordPress directory inside your html directory. It will include a new index.php file along with various HTML and PHP files.

    The WordPress login page running on a Raspberry Pi web server using PHP and HTML

    Set up your WordPress database

    Although you have the WordPress files, you can’t use your website just yet. First, you need to set up the MySQL database. Enter this command:

    mysql_secure_installation

    As this is the first time running MariaDB, there is no password, so just press ENTER.

    Type in Y and press ENTER to ‘Set root password?’. Type in a password and press ENTER. Make sure you note this root password, as you will need it shortly.

    You’ll be asked four questions. Answer ‘y’ to each one: Remove anonymous users, Disallow root login remotely, Remove test database and access to it, and Reload privilege tables now.

    When complete, you will see the message ‘All done!’ and ‘Thanks for using MariaDB!’.

    Create a database

    Now that the database is installed, you need to create a database for WordPress:

    Run mysql in the Terminal window:

    mysql -u root -p

    Enter the root password you created. You should start up the MariaDB monitor and see this command prompt:

    MariaDB [(none)]>

    Enter this command:

    create database wordpress;

    If this has been successful, you should see this:

    Query OK, 1 row affected (0.03 sec)

    Now enter these two commands:

    GRANT ALL PRIVILEGES ON wordpress.* TO 'root'@'localhost' IDENTIFIED BY 'YOURPASSWORD';
    FLUSH PRIVILEGES;

    Exit the MariaDB monitor using CTRL+D.

    Open WordPress

    Open the web browser on Raspberry Pi and head to your website: magpi01.hostedpi.com.
    You should see a WordPress setup page; click on Let’s Go.

    You will see ‘unable to write to wp-config.php file’. Select all the code inside the window and right-click to copy. Now switch to the Terminal window on your remote Raspberry Pi and enter:

    nano wp-config.php

    Paste the code into the wp-config.php file in Nano, then save and exit (CTRL+O, CTRL+X). Switch back to your web browser, and click ‘Run the installation’.

    Fill out the information fields and click the Install WordPress button, then log in using the account you just created.

  • Pioneer600 review

    Pioneer600 review

    Reading Time: 2 minutes

    First of these features we noticed was a five-way joystick and 0.96-inch OLED display. This is backed up by a dual-LED and buzzer. On closer inspection, we discovered the on-board LFN0038K to enable remote control. A DS3231 real-time clock is also included (you’ll need to supply your own battery).

    There is a built-in BMP280 for measuring air pressure and temperature, but it’s the available ports for external sensors that are the key attraction: a PCF8591, 8-bit resolution, screw terminal interface, a 1-Wire device (a DS18B20 thermometer is included), a 4×4 pin sensor interface, and GPIO expansion.

    There is also a micro USB to UART connection and cable supplied. UART is normally used to debug Raspberry Pi, but with debugging mode disabled, you can send data to and from Raspberry Pi and a connected PC.

    One for the C crowd

    The physical setup is easy enough. This isn’t an official HAT (hardware attached on top) standard board, so manual installation of the various software library components is required.

    Sample programs for bcm2835, WiringPi, and Python can be found on the Pioneer600 wiki. We had more success with the bcm2835 and WiringPi sample code (both are in C) than Python, where we encountered a few errors.

    Perhaps this is better than the other way around: Pioneer600 is a professional sensor board that will find a happy home in an industrial environment running C code to sense and report on its findings. Ultimately, we recommend it to C developers over Python coders.

    Verdict

    7/10

    Pioneer600 is packed with a lot of I/O and the OLED screen is a nice touch. We found the Python sample code cranky, but the WiringPi code runs just fine. Better for C developers.

  • 10 amazing Raspberry Pi IoT projects

    10 amazing Raspberry Pi IoT projects

    Reading Time: 3 minutes

    Smart doorbell: See who’s ringing

    Internet-connected doorbells are quite popular these days. Instead of buying an expensive system, build your own, better one.

    Rosie RiOT

    Rosie IoT Brick: Outdoor IoT

    Allow friends and family to remotely track your marathon running with Rosie IoT Brick. It can also act as a GPS for the runner if required.

    PiRoomba

    PiRoomba: Robot vacuum enhanced

    The Roomba vacuum cleaner is fantastic. Using a Raspberry Pi, though, you can supercharge it like Tim ‘The Toolman’ Taylor. See PiRoomba.

    Sleepbuddy

    Sleepbuddy: Robot babysitter

    A social robot that can help looking after a child. It’s not a full-on Jetsons maid, but Sleepbuddy will help when you’re trying to enjoy some telly.

    Furlexa

    Furlexa. Nineties throwback assistant

    However you feel about Furbies, we’re sure you’ll definitely have stronger opinions about Furlexa, a smart Furby that can answer your questions. Put down the pitchforks.

    Smart Home Bulb

    Smart home bulb: Clap on

    Controlling your lights via the internet has never been easier, thanks to loads of companies now making smart bulbs you can hack.

    MudPi

    MudPi: Automated gardening

    Automated gardening is in vogue, and what better way than growing your own delicious vegetables (climate allowing) in your own garden with help from robots? Check out MudPi.

    AI Teasmaid

    Raspberry Pi AI Teasmade: Wake up to a brew

    Looking less like a classic teasmade and more like a Rube Goldberg machine, this AI Teasmade contraption will nevertheless make you a cuppa – possibly while playing Powerhouse.

    Magic Mirror

    Magic mirror: Smart casual

    A now popular Raspberry Pi project, smart/magic mirrors are an amazing way to make sure you’re ready for the morning.

    PiClock

    PiClock
    Time and weather

    A classic use of IoT is the weather. Turn a Raspberry Pi into something that powers a lovely PiClock that also displays the weather.

  • Petoi Bittle robot dog has bite

    Petoi Bittle robot dog has bite

    Reading Time: 2 minutes

    The teachable robot pet promotes STEM learning and reached its $50K Kickstarter fundraising goal. It went on to attract nearly ten times that amount in the subsequent month-long campaign period.

    The tiny robot dog is its maker Petoi’s second such endeavour: earlier this year it started shipping the successfully crowdfunded Nybble, an open-source robot cat.

    Robot pets have been around for more than a decade, but the extensible nature of the Petoi pets makes them ideal for learning how to control robots yourself. Petoi aims to bring down the cost of consumer robots.

    At around $225 for the Bittle kit, it’s aimed at adult tech enthusiasts. Unlike robot toys marketed at children, Bittle is a quadruped with controllable legs. This makes it closer to a £1000+ Sony Aibo robot dog although the design nods to Boston Robotic’s industrial Spot robot.

    Bittle has an Arduino controller board for the legs, while Raspberry Pi adds AI elements to the build such as image recognition and tracking. Bittle backers receive components of the robot dog and can share their pet’s exploits with others on a dedicated forum.

    New dog; old tricks

    As any Lego, Meccano, or train set designer will tell you, the enjoyment is in the construction at least as much as the finished article.

    The pet robot will be modular and Petoi claims it takes around an hour to assemble. Its maker explains that the pet dog is assembled from a ‘puzzle-like frame’ with demo codes downloadable from a GitHub page. Bittle can go for a walk, avoid obstacles, and right himself if he falls down steps.

    While teaching Petoi tricks will bring its own rewards, there will also be a competitive element. Owners can entertheir robot pet into a virtual dog show and demo the skills they’ve both learned.

    Arduino and Raspberry Pi provide the robot dog’s controls and artificial intelligence

  • Air Hockey Robot

    Air Hockey Robot

    Reading Time: 2 minutes

    Out of thin air

    The pair built the whole project from scratch, taking about a year. “A lot of work had to be done before even thinking about the actual implementation of the robot controlling the other side of the table,” reveals Ondřej. “It would be hard to pick the most difficult element. We had to overcome a lot of challenges, including electrical wiring of all the chosen hardware, robot movement control algorithms, computer vision, game strategy algorithms, user interface etc.”

    After designing the table in Fusion 360, it was constructed from spruce and plywood with an Alubond playing surface. To ensure smooth gliding of the puck, a square mesh of 920 holes was drilled into the game board, enabling air to flow through from two fans located under the table.

    As for the mechanical aspect, the pair opted for an ‘H-bot’ design to move the robot’s paddle. Held in a 3D-printed housing, the paddle is moved around using a pulley and belt system, with two stepper motors controlled by an Arduino Micro. “[The H-bot design] is really the best solution for this problem as both steppers are stationary,” explains Dominik.

    Look and learn

    The inner workings of the table revealing the two fans and extensive wiring required

    The processing power for the robot’s optical puck recognition and AI strategy is provided by a Raspberry Pi 4. It is connected to a Camera Module V1 mounted in the overhead part of the frame, along with LED strips to ensure good lighting. With the camera capturing frames at around 80 fps, OpenCV is used to recognise the bright green puck so its position can be determined.

    For the robot’s strategy, Ondřej and Dominik originally planned to use machine learning. That proved a step too far, however, given all the other fine-tuning issues that they faced in making the project. “Using machine learning was the plan from the beginning,” says Ondřej. “But, trust me. We tried. We tried a lot to make it work. But it was literally impossible to implement, given how hard it is to train an agent in such a complex state space with even more complex action space.”

    Instead, they manually programmed four types of strategies with slightly different algorithms – you can find the code on GitHub.

    The project’s Raspberry Pi is also connected to a touchscreen with a GUI made using Kivy. Apart from the purposes of setting up the game and keeping score, this makes it possible to “set all kinds of parameters ranging from camera properties/calibration and motor speeds to the type of strategy,” explains Ondřej.

    The Air Hockey Robot was a very complicated and time-consuming project, but the result is indeed a brilliant piece of engineering and programming, where only the quick-witted can win. So, how often have they actually beaten the robot? “30-40% of the time. More at the beginning when things were not tuned out,” says Dominik. “But, it got harder and harder. Especially for the not so good players that we are.”

  • PiBoy DMG review

    PiBoy DMG review

    Reading Time: 2 minutes

    Even on paper it has some interesting features – sure, it has a ton of buttons and a battery etc., but it also has an active cooling fan, an analogue joystick, and even a brightness control wheel for the screen – something very reminiscent of the contrast control on the original Game Boy.

    Usually, a lot of these kits can feel very cheap and rough, using standard 3D-printed parts for everything that can feel uncomfortable and flimsy and don’t really have the nicest aesthetic. The PiBoy feels more like the real deal: the main case is sturdy, the buttons are nice to use, and even the analogue stick has a little click-down thing. Unfortunately, like a lot of Game Boy form factor builds, the ‘shoulder’ buttons on the rear are a bit fiddly. With six face buttons, though, you’re probably set for playing any games up until the Mega Drive / SNES era.

    Pocket emulation

    Speaking of playing games, the software on the PiBoy is a slightly modified version of RetroPie, with specific Experimental Pi splash screens and branding to the startup. Thanks to this, you’re only really limited by your Raspberry Pi choice, with Raspberry Pi Zero, Raspberry Pi 3/3B+, and Raspberry Pi 4 supported.

    Because of this, the kind of games you’d be running on RetroPie systems run as smoothly as you’d expect. The LCD screen outputs at a fairly reduced resolution anyway, which reduces some of the load. With the fan on the rear of the PiBoy, we didn’t find it getting too hot with a Raspberry Pi 4 in it, although the whining of the fan is slightly unnerving for a handheld and sounds like a CD. Although you can play the PiBoy in any position you wish without scratching anything, thankfully.

    The various adapters and such for the PiBoy allow for all the output and input options of the installed Raspberry Pi to be accessible. As well as USB sticks which can be used for storage, and easy access to the microSD card, you can even plug in headphones and use a (regular size) HDMI cable to plug it into your TV. Use the available USB ports for some USB controllers and you have a very portable plug-and-play box.

    Amazingly, it also has a special Steam Link function. You’ll likely be connected to wireless LAN on the PiBoy and if you have a decent connection, it’s amazing to play some games in your hands in your own home.

    It’s a pretty fantastic piece of kit, and we think it earns its price tag. Just don’t rely on the shoulder buttons.

    Verdict

    10/10

    An incredible portable retro gaming build, this has just about everything you’d want from a Raspberry Pi-based Game Boy clone.

  • 3D printing, laser cutting, and PCB design with Raspberry Pi

    3D printing, laser cutting, and PCB design with Raspberry Pi

    Reading Time: 6 minutes

    Tim Richardson has been involved with the Raspberry Pi community from almost the start. He is part of the Pi Wars organising team and a course designer/builder, as well as writing the CamJam EduKit worksheets, CamJam organiser, and now a PCB designer.

    After seeing his first 3D printer at a Raspberry Jam back in 2014, Tim Richardson bought one. They were just starting to become affordable, albeit £600 for a ‘budget’ one back then! They are much more affordable now, as little as £150–£200 for a decent one. He has some advice for those new to or thinking about getting one.

    See also

    3D printing and making in The MagPi magazine 97

    Use a 3D printer with Raspberry Pi

    50 Raspberry Pi tips & tools

    OctoPrint

    Tim suggests that one of the best upgrades you can do is to add a Raspberry Pi computer running OctoPrint. It’s free and open-source and has been continuously developed by Gina Häußge since 2012. OctoPrint is used to control and monitor your printer, even remotely, and uses a Raspberry Pi Camera Module for creating a time-lapse video of your prints..

    OctoPrint runs on almost any Raspberry Pi computer, but you will get the best UI response from a Raspberry Pi 3 or newer.

    OctoPrint supports most consumer printers on the market, so it is likely to work with yours. Installation is a breeze! Just download OctoPi, an OS image with OctoPrint pre-installed, write it to a microSD card, boot up, connect your printer, and that’s it!

    Once you have set up OctoPrint for your printer, you can start moving the print head around (essential for bed levelling) and see the temperature of your print bed (if it is heated) and the extruder.

    During printing you can watch the temperatures, see the G-code as it is executed, and watch the progress of the print on your phone or computer.

    Tinkercad

    Tim uses Tinkercad for most of his designs; it’s simple and easy to use. He has a few tips which may help you design objects in this online tool from Autodesk.

    On starting a new design, add the ruler to the workplane. Every selected shape will show dimensions which can be edited with exact sizes. This even works for rotation.

    When designing a mount or case for something, Tim first models the item itself, simplified but accurately measured. He places solid blocks where ports or buttons need to be accessed. He then enlarges the model by 1 mm in each direction. After that, he changes the shape to be a ‘hole’ and uses it to remove material from simple blocks.

    Use the ruler tool to enable precise sizing of objects in the workplane

    Laser cutting with Raspberry Pi

    Laser cutters are the mainstay of almost all makerspaces. Tim is fortunate enough to have a large one of his own that he uses for building Pi Wars courses, but for most people the smaller cutters are more than enough, and cost around £300. Tim has a few bits of advice if you are using one for the first time.

    Laser cutters can be used for plastic, wood, and other materials. Some plastics just melt or burn, while some wood is hard to cut and you may end up breaking Rule Zero (don’t be on fire). Only buy materials designated as laser safe.

    Before cutting expensive materials, always do a test cut in cardboard first. While the thickness will usually not be right, you will be able to line up all the holes to ensure that everything fits. There is nothing more frustrating than carefully designing something only to find that it won’t fit together, or you cannot bolt your Raspberry Pi computer in place because you have forgotten about the space the cables take!

    Inkscape is a free and great tool to start with, which of course runs on Raspberry Pi. However, for some cutters the SVG files have to be exported to a different format. Dominic Morrow, from Smoke and Mirrors, recommends using Lightburn. It is commercial software, but updated regularly. It is able to connect directly to many laser cutters and control them, all in one tool. Inkscape does have some specific plug-ins which are very useful, though – especially the ‘living hinge’ tool for cutting ‘bendable’ wood and plastic.

    PCB design with Raspberry Pi

    Before Raspberry Pi, Tim knew nothing about electronics. Since Raspberry Pi, though, he has brought out three CamJam EduKits to help others learn. Tim says, “It helped that I knew nothing when writing the worksheets as I had to explain things in a way that noobs would understand.”

    He thought PCBs were something he could never do, but reading an article in HackSpace magazine gave him an idea. For Tim, the height of a Raspberry Pi Zero with micro-HAT (μHAT) was higher than he wanted; how about mounting a Raspberry Pi Zero and μHAT on the same plane?

    Designing PCBs might not be as hard as you think

    He found a μHAT template for KiCad (an open-source tool for designing PCBs) which has a single header and holes in place. With a second header, surely it was a simple case of ‘joining the dots’? Not quite – it’s advisable to connect all ground pins together. Tim had to move tracks to give space for ‘vias’ (channels that go between layers of the PCB).

    Once confident the connections were correct, it was time for manufacture. Tim searched for PCB makers, but for a simple board he didn’t want to pay much. PCBWay had an easy-to-use interface and instructions on preparing KiCad designs for manufacture.

    PCB design tips

    While waiting for the first PCB to be manufactured, Tim started designing the second. He wanted to control WS2812 LEDs (aka NeoPixels) with Raspberry Pi.

    When designing a PCB, you first have to find components that do what you want. For WS2812 LEDs, the 3.3 V from the

    GPIO pins must be increased to 5 V. The 74HCT125 chip has four ‘level shifters’ for that.
    The next task is to breadboard the circuit, and write code to control the electronics – open‑source software can help with this.

    Before designing the PCB, you have to design the schematic diagram: how each component connects to other components. It doesn’t have to be pretty, but it has to have all the right connections.

    Often, specific GPIO pins have to be used. Other pins seem to be logical on the breadboard, but when routing the tracks on the PCB you may find it is not quite as simple! “Be ready to change the design multiple times to make routing of tracks easier,” Tim advises. If you have to make any changes during the PCB design, always go back and rework the breadboard.
    Eventually Tim got a PCB that looked like it would work. He showed the design to some friends – an invaluable part of designing a PCB. For Tim, they suggested he should break out unused pins and add a button for turning Raspberry Pi off.

    After a redesign, Tim asked a PCB expert to check it. They came back with lots of advice.
    Firstly, protect the Raspberry Pi computer from powering the LEDs. It cannot supply much current, so a Schottky diode between the PCB’s power input and Raspberry Pi will stop that.
    There were ‘unsightly gaps’ on the PCB; the ground plain did not flow into spaces where tracks were too close. They also advised capacitors to help smooth power supply fluctuations, as well as button ‘bounce’ for the off button.

    Always breadboard your circuits

    Tim says, “Designing PCBs takes multiple iterations, especially if it is your first. Even experts don’t get it right the first time.”

    He ordered this second PCB from PCBWay and, with the express service, had the new boards within a week! However, as often happens, things were not perfect. Tim had placed the silk screen (printing) over components on the bottom of the board. A simple cosmetic mistake, fortunately.

    “I soldered the first PCB and… it didn’t work,” he recalls. “Raspberry Pi Zero did not boot.”He tested the supply and then, with a multimeter, worked through the PCB. The barrel jack had power, but the ground was the wrong leg! The ‘footprint’ Tim used was not the same as the physical jack.

    Fortunately, the fix was simple: soldering a wire between the ground and mounting pins was all that was needed. The rest worked perfectly!

  • Build a portable computer in The MagPi magazine #98

    Build a portable computer in The MagPi magazine #98

    Reading Time: 2 minutes

    Haunted House Hacks

    It’s the most wonderful time of the year. (Or the second most wonderful, depending on which The MagPi team member you talk to.) Get ready for Halloween and bonfire night with Rob’s collection of terror-ific projects. Haunt your house and make it a Halloween to remember.

    Haunted House

    Play classic games legally with Raspberry Pi

    Playing retro games and building retro consoles is a fun project, and we’re constantly on the lookout for better ways to play games. KG Orphanides is our retro expert and this month KG looks into ways to legally play classic Sega games, alongside new games for retro machines.

    Play classic console games legally on Raspberry Pi

    DIY Score Counter

    We’re endlessly impressed by how Raspberry Pi makers build incredible things with the world’s best computer. DIY Score Counter is a scoreboard that can be used to keep score in any kind of game. Built by the maker to rate beers in a head-to-head contest, the project can be used for any sport.

    DIY Score Counter

    CubeSat

    Raspberry Pi Compute Module is the amazing industrial computer behind a technical revolution. The CubeSat project builds a dual-redundant computer for space exploration using two Compute Modules.

    CubeSat

    PiBoy DMG review

    We’ve tested many fine gaming kits here at The MagPi. And this PiBoy DMG has Rob excited with its combination of analogue and digital controls, screen adjustment, high-quality finish, and excellent design. The perfect retro gaming kit? Certainly the highest rated so far.

    PiBoy DMG review

  • Win one of three M.A.R.S. Rover robot kits!

    Win one of three M.A.R.S. Rover robot kits!

    Reading Time: < 1 minute

    Sponsored! Add AI to your project & pi3g will supply the kit

    about 22 hours ago.

    Sponsored! Tell us what you’d like to make! Then pi3g will send five makers an AIY Voice Kit v2, AIY Vision Kit, or Coral USB Accelerator. Plus! Your project can appear in The MagPi

  • RadioGlobe

    RadioGlobe

    Reading Time: 3 minutes

    “It’s a globe which you spin to search web radio stations,” creator Jude Pullen summarises. “It’s really simple to use (even my four-year-old son gets it!), but the tech inside is pretty clever to make it work. It has a very special component called a rotary encoder, which has the ability to know the position of a rotating axis (in this case the longitude and latitude) to an accuracy of 0.3 degrees. It means we can navigate to all the major cities in the world and listen to their local stations.”

    Bringing radio to life

    The idea for the project arose through a combination of concepts that were on Jude’s mind at once. “I think I’d been reading books about space travel, and the emergence of communications while working on a Channel 4 show called David Jason’s Great British Inventions,” he says. “My job was to build a replica of the Bell telephone (using some scrap wood, piping, wires, tracing paper, and vinegar!), and it kinda blew my mind to consider the advent of this technology in the world. This led me to explore a lot of technology we take for granted, like radio. I was discussing this with a friend who then mentioned a website called RadioGarden which allows you to look up all radio stations on Google Earth. It’s a clever mash-up of two powerful technologies, and I guess my ‘build’ on this was to make it physical.”

    Just a few of the tools and items you need to build such a device

    Proof is in the concept

    The world is a big place – Jude tells us there are 44,000 radio stations around the world, and not all of them have great broadcast quality. For what he’s managed to achieve, he seems pretty happy, though.

    “There is a phrase in design called ‘proof of concept’ or in code it’s sometimes called ‘minimum viable product’,” he notes. “RadioGlobe is that in terms of its physical design (3D-printed) and code (V1.0 on GitHub). It works really well in that most of the 2000-odd radio stations do play, but yes there are bugs – in that some radio station links are in countries where broadcast is not perfect, so this can ‘trip up’ the code, and it stops playing.”
    Jude has some updates in the works for the RadioGlobe, some of which sound fairly obvious and genuinely useful, such as a recall function for favourites in case you stumble upon a K-pop station you really like, as well as a Shazam button to identify the latest Austrian hit.

    “This is possible because the project is open source, and the code can be contributed to be total strangers from around the world,” Jude explains. “I love the poetic-loop of this! And this has very much been the best of my experience in working with exciting companies like DesignSpark and Raspberry Pi who have championed new ideas that literally might come from anyone, anywhere in the world. Perhaps we’ll have RadioUniverse one day! I joke, but of course RadioGlobe would have seemed crazy 100 years ago too.”

    Self-proclaimed ‘prototyping expert’ and ‘technologist’ with an impressive resume of work designing concepts for Dyson, Sugru, Lego, DesignSpark, and even TV.

  • Retro TV MakeCode Arcade Machine

    Retro TV MakeCode Arcade Machine

    Reading Time: 3 minutes

    “I wanted to make a physical arcade machine with an Adafruit Metro M4,” he recalls. “However, [Microsoft MakeCode] does not have a firmware for this exact board… I didn’t know how to do soldering back then, so I didn’t pick ItsyBitsy or Feather M4.” Adafruit projects are almost unheard of in Taiwan, where Alan lives.

    Based in Taiwan, Alan is a former book translator and currently a junior editor in a local programming book publisher. He makes stuff like the Retro TV MakeCode Arcade Machine as a hobby.

    “Later I found out there’s a firmware for Raspberry Pi Zero, which I happened to have one [of]. Compared to microcontrollers, the firmware for Raspberry Pi Zero is surprisingly easy to install.” Add in a small HDMI LCD screen, some cables, and a button module for game controls, and Alan was nearly there.

    Hidden inside the case, a Raspberry Pi Zero powers the project

    Tiny controls

    Not too complicated to put together, Alan explains that once the MakeCode Arcade firmware is loaded, Raspberry Pi Zero will boot to the Arcade system. “Quick and easy. Buttons need to be connected to Raspberry Pi Zero.” For this, he connected a button module with a tiny joystick, adding an extra push-button. “I wish I knew how to make stuff with 3D printing or laser cutting, otherwise I would make my own arcade controller too.”

    It proved a very quick make for Alan. He says most of the time spent was in trying to fit the Raspberry Pi Zero and LCD into the tiny vintage-TV-style wooden housing, and the only coding required involved modifying the config.txt file in the Raspberry Pi firmware to make the LCD screen work.

    A 4-inch LCD is connected via HDMI, but enlarged by the magnifying plate

    Screen magnifier

    The physical appearance of the mini machine was important in order to really capture that crucial retro feel, so Alan chose to house the inner workings inside a WOODSUM 3D Puzzle Smartphone TV. Originally designed for use with smartphones, this case magnifies the screen for watching videos and so on.

    Alan immediately recognised the possibilities, as he shares: “Since small HDMI LCDs for Raspberry Pi [computers] are more or less the same size as smartphone screens, in theory I can use them in the TV box as well, right?”

    What’s more, the effect achieved using this particular case added to the vintage feel. “The magnifying plate of the TV box would enlarge and slightly distort the LCD. It would look a bit like an old cathode-ray tube TV,” explains Alan.

    Now, you may be wondering how easy it is to play games on such a tiny screen, but Alan says he’s found it pretty simple. “MakeCode Arcade is designed for devices with 160×120 TFT displays, which are smaller than my 800×480 LCD. And the magnifying plate makes it look like four times bigger.”

    All in all, Alan has found his make very reliable so far, although he says some games downloaded from the MakeCode Arcade website may crash it: “It’s software compatibility issues I guess; I can avoid them if I am writing and testing my own games.” And, surely a lot of the fun is in writing and testing your own games – why not give it a go?

    The button module is quite tiny, but Alan says it’s fine for playing games

  • Retro gaming NES frame

    Retro gaming NES frame

    Reading Time: 3 minutes

    Today, pixel art invokes pangs of nostalgia and it has evolved into a much-loved digital aesthetic in its own right. Ashley Green is certainly a huge fan, which is why he sought a quirky way of displaying his favourite pixel art, hitting on an idea that also paid homage to the past.

    “I’m the proud owner of a few Raspberry Pi computers and I’m always looking for new and interesting ways of using them, with retro gaming being the main driver,” he says. “Having previously used Raspberry Pi 3 in a mini-replica NES case, I always thought something was missing: the classic NES cartridge itself. There’s something extremely satisfying about handling physical media that you don’t quite get with emulation.”

    The project uses a 3.5-inch 320×480 LCD HDMI screen to display the retro footage

    Playing with power

    Rather than amass a large collection of cartridges – “I didn’t want to break the bank or shelves with stacks of old games” – Ashley felt that a single cart could be used to showcase the style of art he loves. 

    Inspired by a project that turned an NES case into a full handheld system complete with screen and controller, he decided to turn a cartridge into an art frame which could then be placed in his study as a constant reminder of the past. 

    “I thought it would allow me to appreciate the time and effort that went into the artwork and give me a little preview of classic NES games,” he reveals.

    Be careful: the case will need to be cut. Ashley has also used black vinyl for a finishing touch

    Let’s-a-go!

    Grabbing a Raspberry Pi Zero W and a 3.5-inch screen that he was using for another project, he got to work. “Not wanting to destroy an original cart, I searched online and found a new blank cartridge shell. All I then needed was the USB and HDMI cables as well as a slim battery pack.”

    Since the screen is placed in the area usually reserved for the cartridge label, the build required some cutting into the plastic. Most of the project, however, involved setting up the software, with Ashley using the cloud-based digital signage app Yodeck. This allowed him to create, schedule, and upload videos and images from his computer or smartphone, although he says OXMPlayer would work well for offline creations.

    “I found the best process was to upload media and create a playlist that I could place on a layout that suited the screen,” he says. “I’ve chosen to use mine to show a mix of artwork, game footage and classic NES commercials, but I’ve also used it to show off an action RPG called Induction Quest, which I created in Unity. It certainly makes for a great conversation piece – I’ve had a few people ask me what it is during my work video calls.”

  • Atomic TV

    Atomic TV

    Reading Time: 3 minutes

    Maker Ryan Cochran’s project evokes such memories of the past. “I have a passion for vintage modern design and early NASA aesthetics and I wanted to make something which would merge the two into an art piece that could fit on my shelf,” he recalls. “The first thing I could think of was a small television.” And so the idea for the Atomic TV came into being.

    Atomic TV: Made of wood

    Made of wood and using spare tech parts left over from a couple of past projects, it’s a television that’s as compelling to look at when it’s turned off as when it’s playing videos on a loop. “My main concern was fit and finish,” he says. “I didn’t want this thing to look amateurish at all. I wanted it to look like a professionally built prototype from 1968.”

    Raspberry Pi 4 sits neatly inside the project’s bespoke housing, secured using 3mm standoffs

    Before he began planning the look of the project, Ryan wanted to make sure everything would connect. “The parts sort of drove the direction of the project so the first thing I did was mock everything up without a cabinet to make sure everything worked together,” he says.

    This posed some problems. “The display is 12 volts and I would have preferred to simplify things by using one of the 5 volts displays on the market, but I had what I had so I figured a way to make it work,” Ryan explains, discovering the existence a dual 5V-12V power supply.

    Powered by Raspberry Pi 4

    With a Raspberry Pi 4 computer, the LCD display, a driver board, and a pair of USB speakers borrowed from his son all firmly in hand, he worked on a way of controlling the volume and connected everything up.

    “Power comes in and goes to an on/off switch,” he begins. “From there it goes to the dual voltage power supply with the 12V running the display and the 5V running Raspberry Pi 4 and the small amp for the speakers. Raspberry Pi runs Adafruit’s Video Looper script and pulls videos from a USB thumb drive. It’s really simply and there are no physical controls other than on/off switch and volume.”

    The bulk of the work came with the making of the project’s housing. “I wanted to nod the cap to Tom Sachs, an artist who does a lot of work I admire and my main concern was fit and finish,” Ryan reveals. 

    The speakers are plugged into the USB port and sound is drawn via the 3.5mm jack

    He filmed the process from start to end, showing the intricate work involved, including a base created from a cake stand and a red-and-white panel for the controls. To ensure the components wouldn’t overheat, a fan was also included.

    “The television runs 24/7 and it spends 99 percent of its time on mute,” says Ryan. “It’s literally just moving art that sits on my shelf playing my favourite films and video clips and, every now and then, I’ll look over, notice a scene I love, and turn up the volume to watch for a few minutes. It’s a great way to relax your brain and escape reality every now and then.”

  • Black Lives Matter projection

    Black Lives Matter projection

    Reading Time: 3 minutes

    Historical significance

    Kareem explains: “The idea was to display a juxtaposition of peaceful protestors with violent, oppressive police and elevating the names of Black people who have been killed by police in America.” Having had the germ of an idea for such a project, New York-based Kareem tweeted asking for someone to help him make it happen. Minnesotan David, who he’d worked with a decade previously, responded. The two worked remotely until the time came to install their project at its location.

    David suggested making use of Raspberry Pi. He describes it as his “go-to for small projects and display dashboards” at the gyms he administers, rather than politically charged public statements. “I’ve never done anything outside the realm of the strictly practical, so this was a cool opportunity to be a part of,” he says.

    Raspberry Pi Zero’s low cost appealed partly because the setup might get confiscated or destroyed

    Due to the nature of the project, there was always a risk that “the setup could get confiscated or destroyed,” says David. “So it was a huge advantage to have hardware that was cheap enough to be practically disposable.”

    Kareem is also a newcomer to public art displays, though he did help produce a projection mapping project for The Museum of Pizza in New York!

    For the Black Lives Matter projection, Kareem says: “We wanted to do something that would shock people a little bit, make them uncomfortable, and take advantage of this period of calm that was happening at night-time due to politicians successfully suppressing protests.” They worked with producer Hayley Pappas, creative director Smiley Stevens, and editor Khalil Anderson in Los Angeles to produce the first set of images and videos. Subsequent sets of content for the display were suggested by the local community in Minneapolis, as well as including transcribed speeches by Malcom X, James Baldwin, and leaders.

    Long-distance protest piece

    Minnesota-based David already had all the parts the project required. “I chose the non-wireless Raspberry Pi Zero specifically so there were no remote attack vectors possible. It’s more than powerful enough to play the content with no issue.”

    He built a small tiltable platform for the projector from wood scraps in his garage. The setup runs off a small generator, so it’s mobile and not dependent on a power outlet.

    Because it’s a public performance, it was important that the projection autoplays in a loop, with nothing to interrupt the Black Lives Matter message

    The software side worked perfectly from the first go, he says. The advice of other Raspberry Pi and commodity hardware users “cannot be overstated” says David, who admits he’s not the most talented coder or software engineer.

    Any tweaking needed was to get the optimum projection location so it covered the entire Gold Medal Flour building. “The site is historic, iconic, and massive. It’s also central to Minneapolis and can be seen from different parts of the city,” explains Kareem. With protests in cities across the US resulting in government imposed 10pm curfews, their projection was a risk.

    Responses to the projection were immediate and very enthusiastic. “We’re very happy with how the idea has been received and hope that our project has inspired others,” says Kareem. “We’d love to see others replicate the idea, especially with permanent installations!”

    Warning! Public Projection

    Be mindful of local laws regarding public screening in your area. Seek permission from the owner of the wall or projection surface, or provide your own screen. Adhere to public safety regulations. And be mindful of broadcasting regulations in your area. You need a ‘non-theatrical’ film licence to show films and TV programmes in public in the UK.

    Projection law

    Showing films in public

    Film licenses

  • Make a Raspberry Pi audio player with Mopidy Music

    Make a Raspberry Pi audio player with Mopidy Music

    Reading Time: 6 minutes

    Expand your local library collection

    Let’s start by looking again at our local collection. Storing music locally allows you reliable playback and complete control over how your music is organised. The downside is storage costs, so before embarking on ripping all your CDs, have a think about how you want to store them. Last month we discussed using abcde (A Better CD Encoder) to rip to FLAC, which produces large files with no quality loss. You can also consider using Ogg Vorbis. This open-source codec does involve quality loss, but produces much smaller files, and there’s every chance you won’t be able to tell the difference. To rip a CD to Ogg Vorbis:

    abcde -o ogg
    

    Warning! Where you live may or may not allow the copying of data from a CD. Check here for more info.

    Tag, you’re it

    Many CD rippers, abcde included, will use online services to find information about your CD and automatically name files after the artist, album, and track name. They will also record that information inside the file itself so servers like Mopidy can display details about what’s playing. This is called tagging. Unfortunately, the online services don’t always get it right, so if you find a tag is misnamed or contains mistakes, you can use Kid3 to set the tags yourself. To install from the command line:

    sudo apt install kid3
    

    This desktop app provides easy bulk retagging of files and can even import artwork.
    Figuring configuring

    In the following steps, we’ll be setting up a number of online services to interface directly with your Mopidy installation. In many cases, you’ll need to make changes to the Mopidy config file, so it’s worth explaining how it’s formatted. Each extension is named ‘Mopidy-Extension’. In the config file located at /etc/mopidy/mopidy.conf, Extension becomes [extension] and any relevant options go underneath that line in the form ‘key = value’. For example:

    [local]
    media_dir = /home/pi/Music

    We’ve provided an example config file to help make sure things are properly set up.

    Add Spotify to your Raspberry Pi audio streaming system

    Now your local collection is set up, let’s move on to the first of our extensions. Spotify is an amazing collection of music. Wouldn’t it be great to be able to access not only Spotify’s archive but also your playlists and tagged artists? If you’ve got a Spotify Premium account, you can do just that. Start by installing the extension from the command line:

    sudo apt install mopidy-spotify
    

    We now need to authorise Mopidy to use your account by visiting magpi.cc/mpdyspotify. Once you’re authorised, a config file will be displayed. Cut and paste this into /etc/mopidy/mopidy.conf and add your Spotify username and password. See the code listing overleaf for an example.

    Now restart Mopidy:

    sudo systemctl restart mopidy
    

    Go back to Iris and the world of Spotify is literally at your fingertips.

    Add audio services, like Spotify, SomaFM, and YouTube for a fully-fledged modern music system

    Radio waves with TuneIn and RadioNet

    How about adding radio stations to your Mopidy setup? There is easy and free access to thousands of radio stations streaming across the planet, catering for all interests. We have the option of two extensions for playing radio: TuneIn and RadioNet. The TuneIn extension provides access not only to live stations, but also historical recordings and is more suited to the curious browser rather that just getting to your favourite station. RadioNet is a simpler but easier-to-navigate service that allows you to create a list of favourite stations. To install:

    sudo apt install mopidy-tunein
    sudo pip3 install Mopidy-RadioNet
    sudo systemctl restart mopidy
    

    Playing podcasts

    If you prefer your radio programmes ‘on demand’, you’re probably a fan of podcasts. You’ve got two options for listening to your favourite shows on Mopidy. If you like to subscribe direct to podcast RSS feeds, then it’s as easy as this:

    sudo pip3 install Mopidy-Podcast
    sudo systemctl restart mopidy
    

    To use it, you need to point to an OPML file (a list of podcast locations), as shown in the listing. Most podcast clients can generate this for you. If you prefer to browse a huge catalogue of programming, then additionally install the iTunes plug-in:

    sudo pip3 install Mopidy-Podcast-iTunes
    sudo systemctl restart mopidy
    

    Now you can use Browse to find your favourite show and listen on demand.

    Listen to all your favourite podcasts directly from Mopidy and discover new shows with the iTunes Podcast catalogue

    SomaFM

    SomaFM was one of the early pioneers of internet audio streaming. Working through a donations model, it has expanded to over 30 channels, all with the theme of ambience but covering different genres from electronica to jazz. Often SomaFM makes for perfect background music. To add SomaFM to Mopidy (you’ve probably spotted a pattern emerging by now):

    sudo pip3 install Mopidy-SomaFM
    sudo systemctl restart mopidy
    

    SoundCloud

    SoundCloud is an excellent online showcase of music and other forms of audio. As well as providing a way for bands to sell direct to their fans, it’s a platform for new and upcoming material from unsigned musicians. You can browse SoundCloud’s vast collection from Mopidy, but as with Spotify, you need to have an account (it’s free to join) and authorise your installation.

    First, visit mopidy.com/ext/soundcloud and follow the instructions to authorise Mopidy. Copy and paste the resulting config file, and add it to /etc/mopidy/mopidy.conf. Now install the SoundCloud extension:

    sudo pip3 install Mopidy-SoundCloud
    sudo systemctl restart mopidy

    YouTube

    The ubiquitous YouTube contains countless hours of audio-specific content. Either listen to one of the many audio recordings uploaded or just the soundtrack of a favourite video. Again, the standard installation pattern applies:

    sudo pip3 install Mopidy-YouTube
    sudo systemctl restart mopidy
    

    One difference with this extension is the need to specifically enable it in /etc/mopidy/mopidy.conf. Make sure this is in the file or YouTube files will not appear in search results:

    [youtube]
    enabled = true
    

    Digging through the archives

    The Internet Archive (archive.org) is one of the crowning achievements of the internet. This vast resource aims to preserve anything that can be expressed in digital form. Unsurprisingly, its audio collection is vast, containing thousands of hours or public domain recordings, from vintage music to public speeches, documentaries, and a massive catalogue of Grateful Dead recordings! You can access all of these from your Mopidy system:

    sudo pip3 install Mopidy-InternetArchive
    sudo systemctl restart mopidy
    

    We recommend using the ‘Browse’ feature of Iris to navigate this resource. Search results can be overwhelming!

    Party time, excellent!

    You now have access to a mind-boggling array of music and audio. Time to celebrate. We’ve been using Iris as our interface to Mopidy, but in fact you can install different interfaces and even run them concurrently. If you’re having a few friends around, Mopidy-Party allows you to safely give everyone access to your music collection from their phones and add their picks to a playback queue. Now, who put Showaddywaddy on?

    Make your own

    Something missing from your collection? Is there no access to the latest and greatest streaming service? If you’re handy with a bit of Python coding, then you’re free to make your own Mopidy extensions and share them with users all over the world. Not only have the Mopidy developers provided detailed documentation, they have also provided a ‘cookiecutter’ project at magpi.cc/mpdycookie which will get you up and running in no time. Contributions to improve existing extensions are also welcomed.

    Click here to download the full code

    [http]
    # Make sure the web interface can be accessed by the local network
    hostname = 0.0.0.0 
    # Direct audio to the DAC, not HDMI
    output = alsasink # The File extension isn't of much use, so we can disable it
    [file]
    enabled = false # If enabled, this adds support for M3U playlists
    [m3u]
    enabled = false # Location of local music
    [local]
    media_dir = /home/pi/Music # Replace with the information given when you authorise
    # then add in you Spotify username and password
    [spotify]
    username = <Spotify username>
    password = <Spotify password>
    client_id = <Client ID>
    client_secret = <Client secret> # Getting to many results in TuneIn? Add this so you only get stations.
    [tunein]
    filter = station # Once authorised, add the provided token here
    [soundcloud]
    auth_token = <Auth token> # Most extensions are enabled by default. You must explicitly enable YouTube.
    [youtube]
    enabled = true
  • OpenFlexure Microscope

    OpenFlexure Microscope

    Reading Time: 3 minutes

    Dr Richard Bowman is spearheading the creation of an open-source, 3D-printed microscope that’s able to be adapted for use in labs, schools, and the home. He was inspired by his time as a Research Fellow in the NanoPhotonics Centre at the University of Cambridge, where an early attempt at such a project was falling short because most of the mechanism was based on linear bearings and metal rods.

    “The bulk of the components weren’t printable and I became curious as to how much of a microscope’s mechanism you could print,” he says. “My first version had basic focus control and an extension tube for a Raspberry Pi Camera Module to turn the stock webcam lens into a basic, but functional, microscope objective lens.” The aim is to create an easily replicable scientific instrument.

    The microscope uses three screws for fine control so that the sample can be moved along the X and Y axes and focused by moving on the Z axis. The microscope uses plastic flexures to ensure motion is free from friction and vibration; the condenser mount at the top houses a condenser lens and illumination LED

    Time to focus

    Initially, Richard sought an ideal way of moving a sample around and picking a region to view. Rather than use sliding rails which require precise machining to be smooth, the eventual design was based on the flexibility of plastic: samples are placed on a table with bendable legs that allow for controlled focus and movement on the X and Y axes.

    “It uses some fairly simple geometry to convert flexible hinges into linear motion,” explains Dr Joel Collins, who later joined the project at its home at the University of Bath. “It also means we can achieve really fine sample manipulation of tens of nanometres, for orders of magnitude cheaper than most commercial microscopes.”

    Unlike traditional microscopes, the project uses an upside-down design. The camera is at the base and the viewing lens is above with the light source at the top. It makes the microscope more stable. “You can arrange things so the sample is consistently close to being in focus when you place it on the microscope’s stage, which is nice,” Richard says.

    Such work has helped to keep costs down. As a consequence, a student group that became WaterScope saw its potential for cheaply identifying early-stage bacterial contamination in water. Another student project demonstrated how it could be produced in Tanzania by STICLab. This led to a study which found the microscope could be used for malaria diagnosis.

    Funding from the Royal Academy of Engineering and the Royal Society is being used to develop educational materials to enable the microscope to be used in schools

    Lighting the way

    In creating the project, Richard’s team has benefited from Raspberry Pi’s bustling community. “There are great libraries for interacting with physical hardware, such as picamera and GPIO Zero,” says Joel.

    “We created an HTTP API in Python and a graphical client in JavaScript that are both served by a Raspberry Pi,” he continues. “Since we have a full, powerful Linux machine in the microscope, we have many new ways to interact with the software.”

    It’s possible to create an offline, standalone microscope with a fully featured interface. “If you connect it directly to your laptop via Ethernet, you can control it ‘headless’ like that, or you could have a fleet of microscopes connected to a LAN, and our software will discover all the nearby microscopes and let you control them all from a single machine,” reveals Joel.

    There no doubting its impact. OpenFlexure Microscopes have been recorded on every continent, including Antarctica. The biggest challenge, however, is documentation and communication. Richard says: “Building a piece of hardware is more involved than installing pre-built software and I have a new respect for anyone who works at IKEA – their instructions must have been so carefully tested and optimised.”

  • Preston Raspberry Jam 100: Alan O’Donohoe interview

    Preston Raspberry Jam 100: Alan O’Donohoe interview

    Reading Time: 3 minutes

    Is there a particular flavour to activities at a Preston Jam?

    The activities include workshops, hands-on sessions, support, talks, project demonstrations, discussions about new hardware and software, and something that one of our regulars Simon calls a ‘gather round’ where people gather round a table to learn more about something. In the early days, most projects had a very strong link to the Raspberry Pi computer, but less so nowadays. In recent years there has been more emphasis on low-cost and affordable technologies like micro:bit, Arduino, and Linux. We regularly have children lead workshops, or present lightning talks on a project they’ve been working on.

    What are some of the challenges running an event like this for so long?

    When we first started, we’d never expected that it would run every month for eight years or more. I think we were all amazed, to be honest, how many people would turn up month after month after month. We’ve had to move and adapt with the times and to suit younger audiences and changing interests. In the early days, people used to bring along a Raspberry Pi computer with them, asking for help to set it up, or to show us something they had done with it.

    2014: A young Josh Lowe presents at the Raspberry Jam – he’d go on to make EduBlocks

    How have attendees changed over the last eight years?

    If you look at the photos of our first Jams, you’ll see it was mostly adults with only a handful of children. After some parents suggested we start the Jam events earlier in the evening, we noticed more families attending. We tried some Saturday morning Jams in 2012, but we found these difficult to sustain as we had lots of children and very few adults able to support the activities. We have some people who only attend once or twice a year, and others who attend every month without fail.

    What was the 100th Jam like in these odd times?

    About a year ago we started talking about what we should do for our 100th Jam celebration, but our plans had to change when social distancing restrictions were introduced. Instead we invited [a group of] people who have been on our #RJam journey right from the start to join us for a series of panel discussions in an online jam. That was Martin [Bateman, Senior Lecturer, Computing, UCLan]’s idea and it worked an absolute treat. Since March we’ve been holding all our #RJam events online. We increased the frequency to two Jams a month, one with lightning talks and another with workshops. It’s been incredible to see how our numbers have grown rapidly to about 100 every month as enthusiasts have joined us from areas way beyond Preston. We’ve had many attendees join us from Scotland that have long wanted to attend our Jams, but can now take an active part online.

    2020: The Centenary Raspberry Jam had a huge number of guests from around the Raspberry Pi community

  • Strictly legal game emulation with Innoextract and GOG

    Strictly legal game emulation with Innoextract and GOG

    Reading Time: 6 minutes

    You’ll need

    Build innoextract

    We’re going to build innoextract from source as, at time of writing, the main Raspberry OS repo has an older version.

    sudo apt install build-essential cmake libboost-all-dev liblzma-dev
    wget https://constexpr.org/innoextract/files/innoextract-1.8.tar.gz
    tar xzf innoextract-1.8.tar.gz
    cd innoextract-1.8
    mkdir -p build && cd build
    cmake ..
    make
    sudo make install

    Version check

    If your copy of innoextract is older than the file you’re trying to extract, then the process may fail. At the Terminal, type:

    innoextract -v

    This will give you the version number and which Inno Setup files it can handle.

    To confirm that you’re using the current version, go to the innoextract website to confirm what that is. If there’s any disparity, download the latest source code and follow the instructions above.

    Get a game

    If you don’t already have a GOG account, visit login.gog.com/register to create one. You’ll have to be 16 or over. If you’ve got an account, log in and move on.

    To make sure innoextract works, we’re going to start by downloading one of the free retro games available on GOG. Go to GOG to see a list of all the freebies on the service.

    You’ll probably want to grab all of these, but for now select Jill of the Jungle: The Complete Trilogy, click on the shopping cart icon towards the top right of the screen, and check out for zero pounds.

    Eye of the Beholder is a classic dungeon crawler, but remember to make a map to avoid getting lost in the sewers of Waterdeep

    Download a game

    Go to your games library and click on – or, if you’ve got lots of games in there, search for – ‘Jill’. On the download screen, make sure System is shown as Windows and ignore the prominent download button (that’s for GOG’s Galaxy manager).

    Instead, click on the heading further down that says ‘download offline backup game installers’ to open up the file list. Now click on the line below it that says ‘Jill of the Jungle: The Complete Trilogy’. While you’re here, download the manual from the link towards the right of the download screen.

    Extract a game

    In a Terminal window, enter:

    mkdir -p Games/{Jill,}
    cd Downloads
    cp setup_jill_of_the_jungle_1.0_cs_\(28162\).exe /home/pi/Games/Jill/
    cd /home/pi/Games/Jill
    innoextract setup_jill_of_the_jungle_1.0_cs_\(28162\).exe
    

    The version number of this file could change, so it’s easiest to just type setup_jill and press TAB to autocomplete the command when calling upon it.

    Play a game

    If you’ve not already installed DOSBox (or DOSBox-X) during one of our previous tutorials, you’ll need it for this, so:

    apt install dosbox

    Once your DOS emulator is installed, type:

    dosbox jill1.exe

    Jill of the Jungle is a classic platformer from an era when shareware ruled the genre on MS-DOS. If you have a USB controller plugged in, press C on the initial setup screen to configure it – it’s a bit easier to get used to than arrow keys if you’re a regular WASD user.

    The extraction process is the same for any of GOG’s Inno Setup packaged games, which includes most of their DOS era titles. If you’re working with games for Windows 95 through ME, such as Diablo, then you may need to follow our Windows 98 emulation feature. However, many now work smoothly with the ScummVM emulator, which runs natively on Raspberry Pi OS.

    A hive of Scumm and villainy

    If you want to play some games, rather than accurately emulating a full operating system, ScummVM, originally developed to play LucasArts point-and-click adventures such as The Secret of Monkey Island, is an outstanding tool with massive scope. Over the years, it’s expanded to emulate virtually every graphical adventure game out there, and the latest versions even support classic RPGs and text adventures.

    ScummVM was originally designed to run LucasArts/LucasFilm Games releases, such as Sam & Max Hit the Road

    At the time of writing, ScummVM is at version 2.1.1, and we strongly recommend always using the latest version to ensure the widest possible support for newly added games. The current version available in Raspberry Pi OS’s repositories is 2.0.0, which lacks some of the cooler features of its successor.

    So let’s head to the Terminal for a source install:

    wget https://www.scummvm.org/frs/scummvm/2.1.1/scummvm-2.1.1.tar.gz
    tar xzf scummvm-2.1.1.tar.gz
    cd scummvm-2.1.1
    apt install g++ make git libsdl2-dev liba52-dev libjpeg62-turbo-dev libmpeg2-4-dev libogg-dev libvorbis-dev libflac-dev libmad0-dev libpng-dev libtheora-dev libfaad-dev libfluidsynth-dev libfreetype6-dev zlib1g-dev libfribidi-dev libsdl2*
    ./configure
    make clean
    make -j4
    make install

    Even better for legal retronauts, you can find a range of classic games, re-released as freeware, to download at scummvm.org/games, including Revolution Software’s Beneath a Steel Sky and Lure of the Temptress, as well as other once-commercial releases like Creative Reality’s cyberpunk adventure DreamWeb and Interactive Binary Illusions’ Flight of the Amazon Queen. You’ll also find some of these in Raspberry Pi OS’s official repositories. If you want them, enter:

    sudo apt install lure-of-the-temptress beneath-a-steel-sky drascula flight-of-the-amazon-queen

    Just as re-releases of retro DOS games are frequently bundled with a functional copy of DOSBox, point-and-click re-releases often use ScummVM. When extracting files bought from GOG, you can delete or ignore the Windows version of the emulator that’s included and just point your own at the game files.

    Games for free

    Ensuring that your retro games are legally sourced can be a challenge online, but as well as digital storefronts, a number of free software sites are also committed to sharing only fully legit content, from shareware, homebrew, and demos to games made freeware by their publishers.

    All vetted for licensing, you’ll find everything from shareware FPS classics to game makers and freeware re-releases. A well-supplied kids’ section and a violence warning system are handy for both parents and anyone who’s all Grimdarked out.

    While there’s some replication between this and DOSGames, the inclusion of non-playable demos makes this archive an interesting stop for games history buffs.

    People are still making games for DOS, and you can find almost 20 years’ worth of those homebrew projects here, from the outré to the winningly sincere.

    Top tips

    Remember to check that the game you want to play is supported by your emulator of choice. DOSBox and ScummVM publish lists of supported titles, and GOG store pages list the emulator they use at the very bottom.

    Make sure the re-release includes any manuals, maps, and multimedia material you’ll need – some digital re-releases have been created with more care than others, and manual-based copy protection was common in the DOS era.

    GOG isn’t the only place to buy retro games, but it has a wide range of titles and its installers are easy to extract. However, if you already own some classics on Steam, there’s generally no DRM on these, so you can simply copy their files over to Raspberry Pi.

    Use the biggest microSD card you can. As games move into the full-speech era, you’ll find plenty that come in at around a gigabyte each.

    ‘Abandonware’ is a term used online for old software that players believe has been ‘abandoned’ by its rights holders. Although this scene has been important for games preservation, there’s no legal basis for abandonware in most countries, and downloading it is still software piracy. We stick to legal software.

    ‘Homebrew’, on the other hand, is new, independent, and generally non-commercial software made for traditionally closed or nominally defunct platforms. While homebrew titles can often be played on original hardware, they’re ideal for emulation. They’re generally fully legal, although some fan games have been known to appropriate graphical assets.

    Three to buy

    Loom | Price: £5

    With a soundtrack and imagery inspired by Tchaikovsky’s Swan Lake, Brian Moriarty’s Loom is a beautifully woven adventure game with a compelling magical setting. The CD version has full speech, but there’s a bit more game to play if you opt for the EGA original.

    Eye of the Beholder | Price: £8

    A classic of the flick-screen dungeon crawling genre, Eye of the Beholder is one of the most approachable Advanced Dungeons & Dragons RPGs and oozes atmosphere. Perhaps unexpectedly, it works perfectly through ScummVM, making for a particularly easy emulation experience. Both its sequels are included in the bundle.

    Blade Runner | Price: £8

    As dark and gritty as Blade Runner’s cinematic universe, and features some of the cast from Ridley Scott’s 1982 film, the Blade Runner adventure game was for years effectively lost to licensing disputes and lack of format support until it appeared in GOG’s catalogue in 2019. It’s a unique and much-lauded work that contributes to the series’ mythos in its own right, but carries content warnings off the bat for extremely mature subject matter.