Kategorie: Reviews

  • AI Weather Station: Machine learning how to forecast the weather

    AI Weather Station: Machine learning how to forecast the weather

    Reading Time: 2 minutes

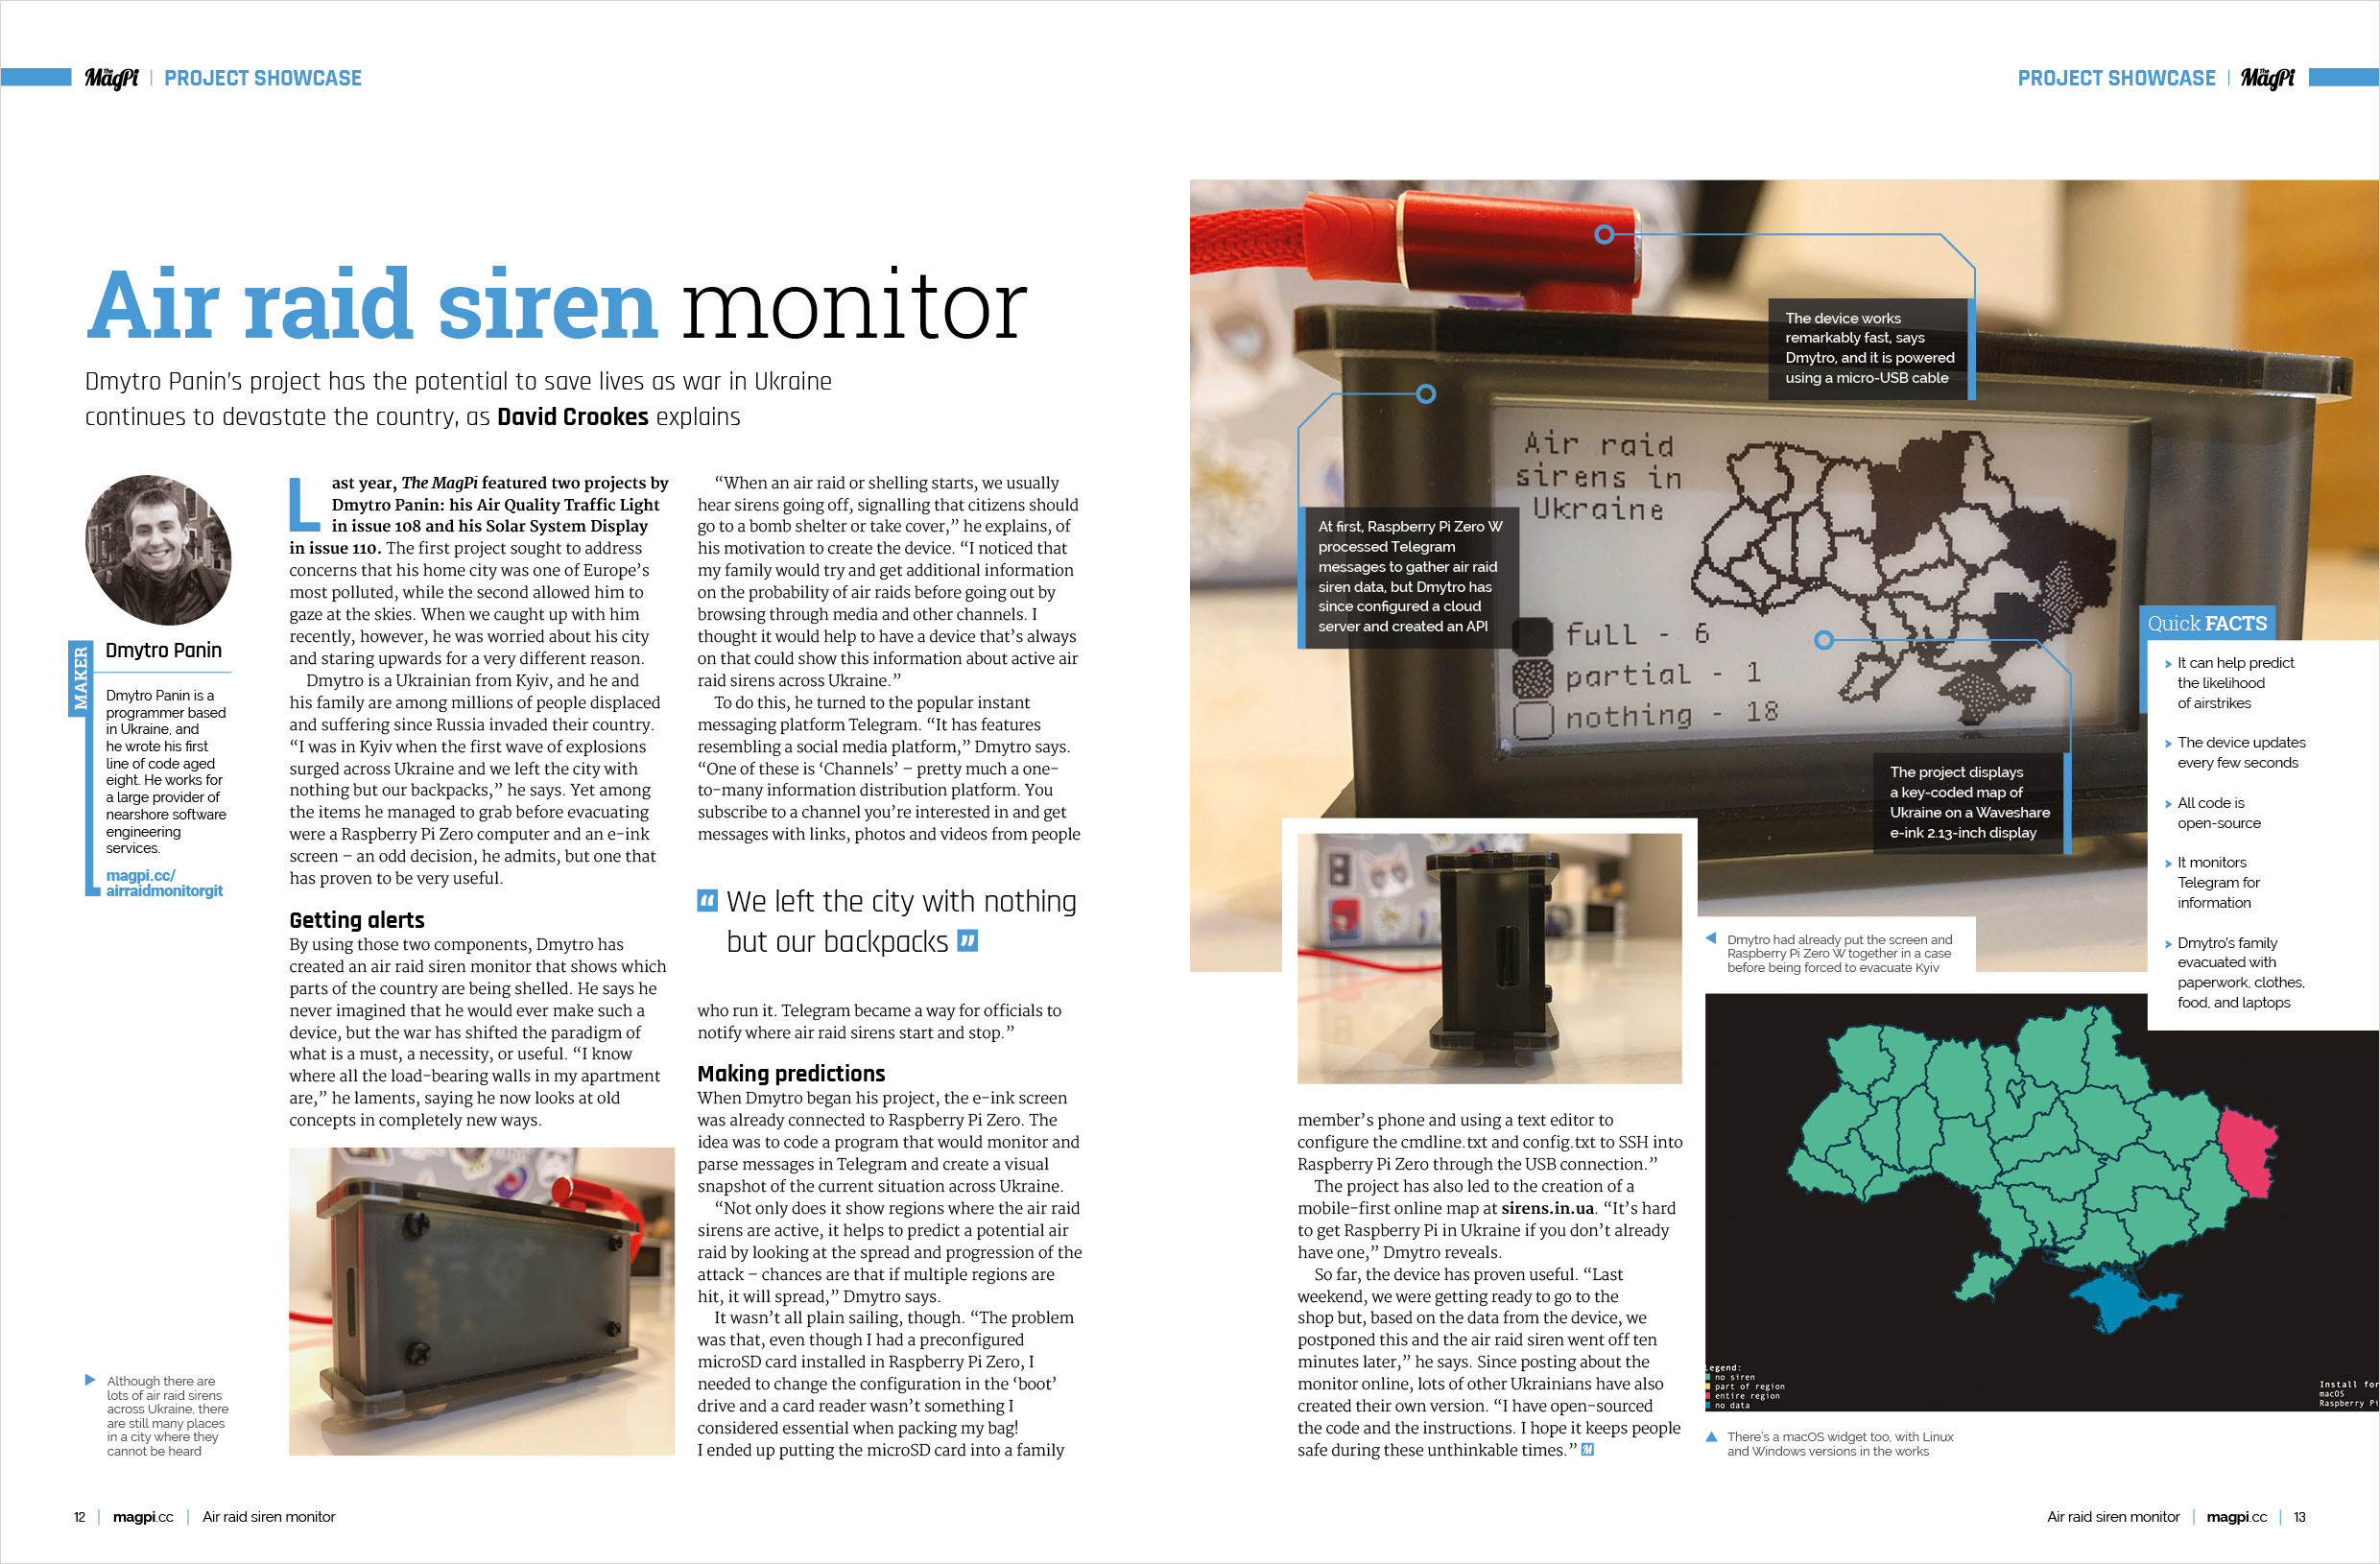
    It’s built like a regular home weather station, with sensors that can track local conditions. Combining those with the ozone concentration and online data in the training model adds that extra sauce to the project.

    Arduino and Raspberry Pi

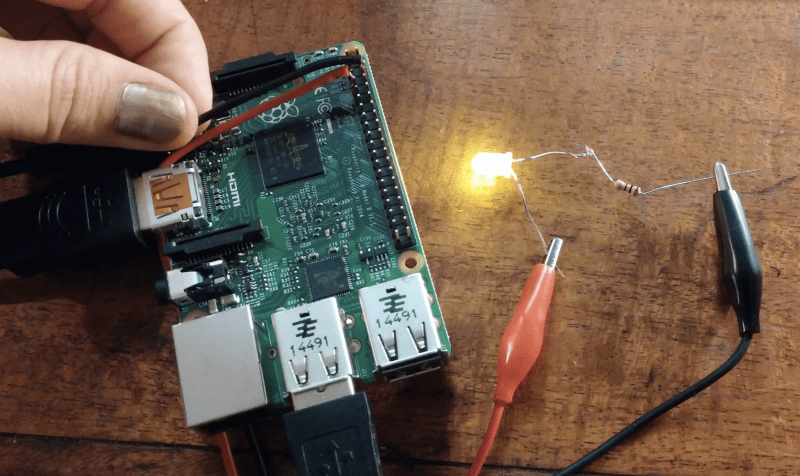
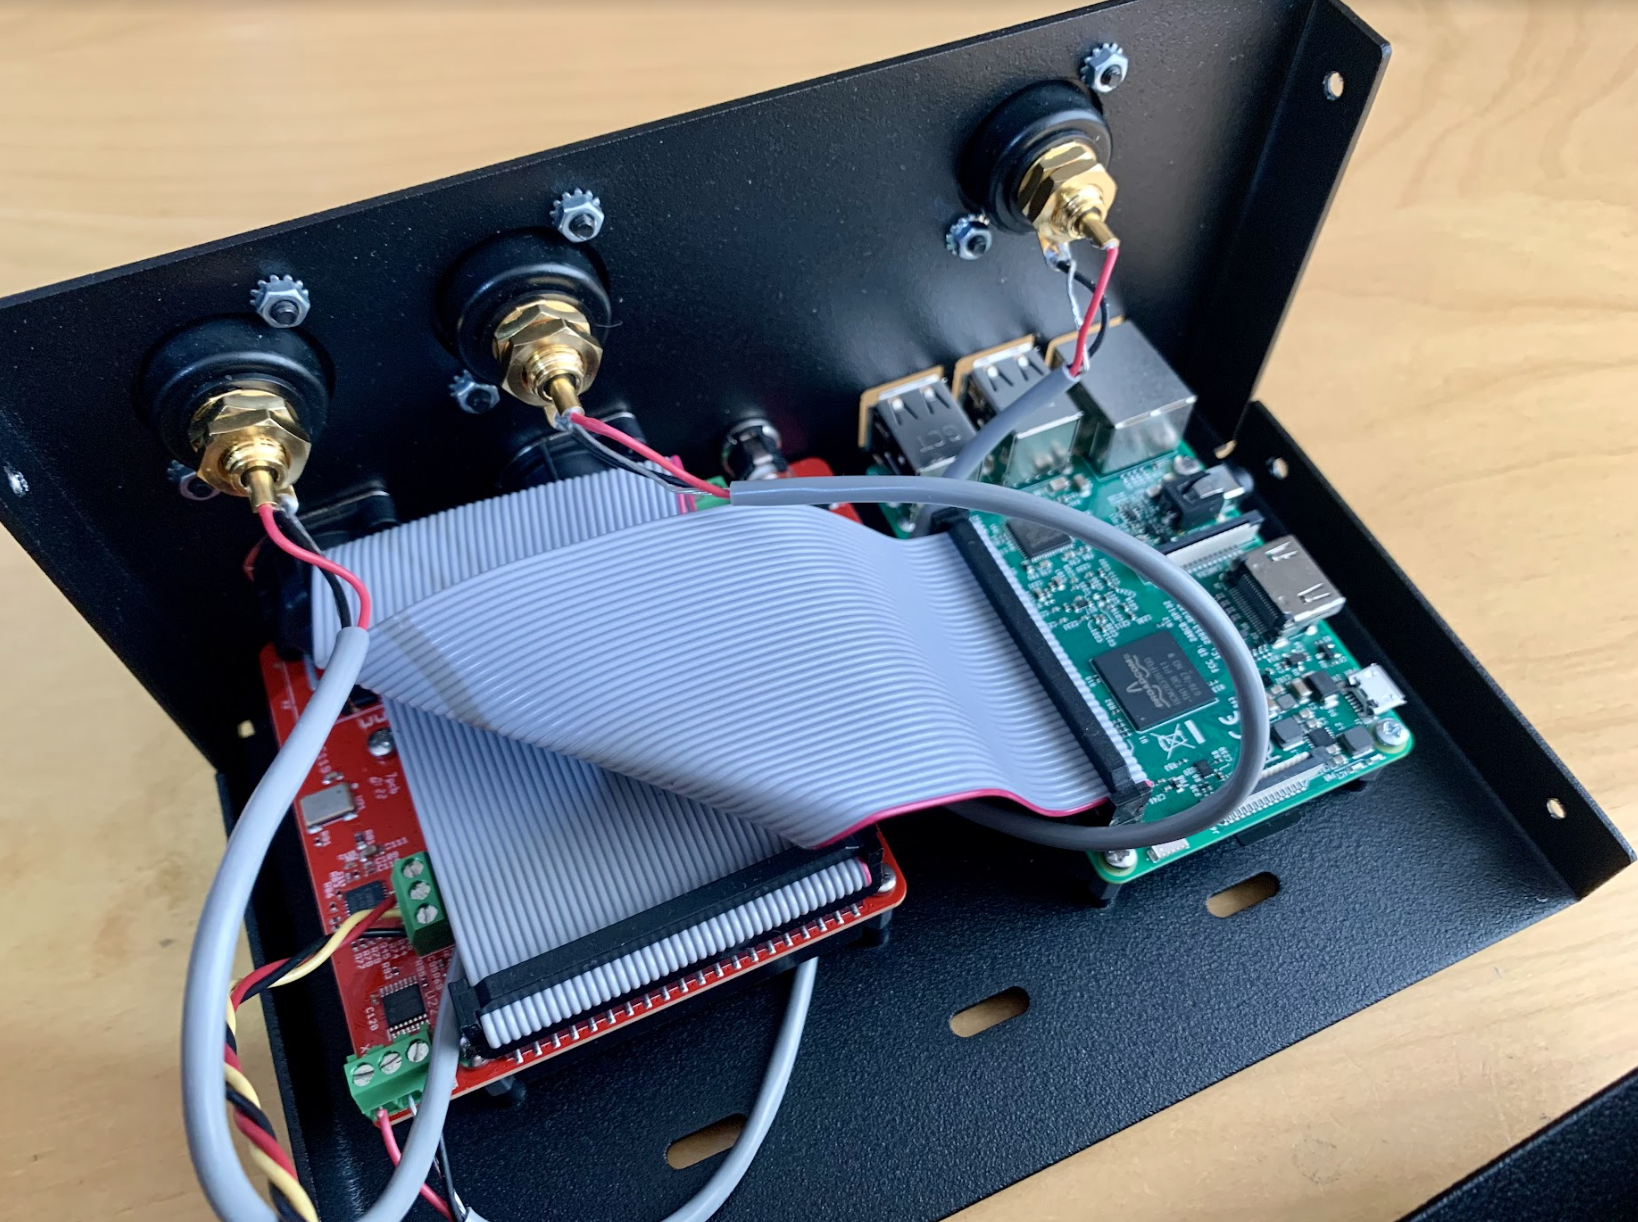
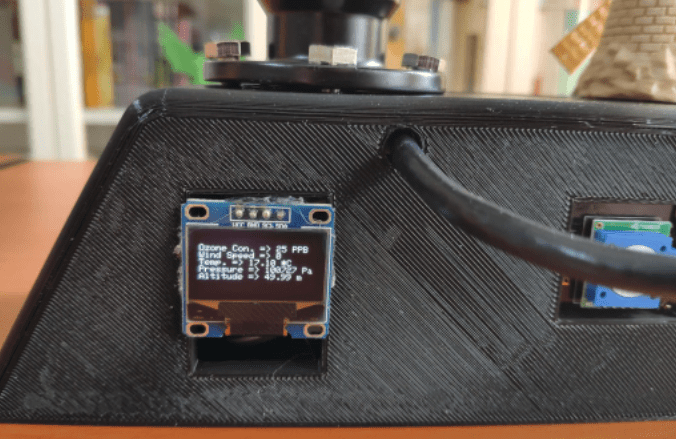
    Data is fed to Raspberry Pi from an Arduino Nano 33 BLE for analysis.“I decided to utilise an Arduino Nano 33 BLE in this project since it can easily collect local weather data with ozone concentration and run my neural network model outdoors after being trained,” Kutluhan explains. “To collect the required data to train my model, I connected an I2C ozone sensor, an anemometer, and a BMP180 precision sensor to the Nano 33 BLE. Then, I added an SSD1306 OLED display to monitor the collected data in the field.

    “Since I collected local weather data with ozone concentration on my balcony, I was able to transmit the collected data from the Nano 33 BLE to a Raspberry Pi 4 in my house over BLE instead of sending data packets to a web server as usual. In that regard, I was able to transfer data packets via the Nano 33 BLE without requiring any additional procedures.”

    After running the data through TensorFlow, he assigned the results to three categories: Good, Moderate, and Unhealthy. With the training done, he transferred the model back to the Nano 33 BLE as a C array so it could use the model on the system for predictions.

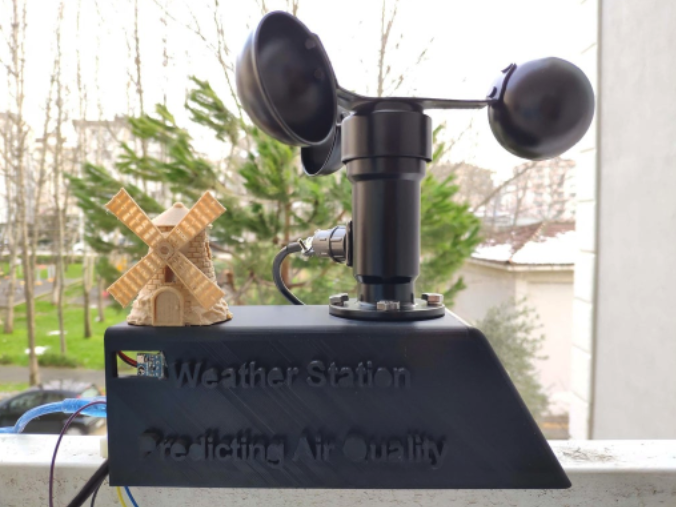
    “Lastly, to make the weather station as sturdy and robust as possible while enduring harsh weather conditions, I designed a windmill-themed case (3D-printable),” Kutluhan finishes.

    Good quality

    According to Kutluhan, the predictions are at roughly 92% accuracy for the three quality classes.

    “After publishing my project, I received encouraging comments to keep improving this weather station as an SDG (Sustainable Development Goals) project,” he reveals. “[I also got] questions regarding how to make the station compatible with WiFi or GPRS by utilising different development boards.”

    Kutluhan is planning to add LoRaWAN and GPS capabilities to the weather station in the future, for collecting data in forests and industrial areas. We look forward to seeing how it goes!

  • Vectrex Mini: shrunken vintage games console

    Vectrex Mini: shrunken vintage games console

    Reading Time: 3 minutes

    Anyone now wanting to get their hands on a Vectrex will find themselves hugely challenged, because this unique games system is extremely rare. With that in mind, Aussie retro gamer Brendan Meharry decided to fashion his own version of this classic console, investing some six months of his spare time into the project in the process.

    Honey, I shrunk the console

    Having experienced the console’s delights, playing on an original Vectrex in a local gaming museum, Brendan was motivated to make one. “They were released in Australia, but they’re quite rare,” he tells us. “I was inspired by official mini consoles like the SNES Mini or PlayStation Classic. I thought it would be fun to ‘mini-fy’ something more obscure, especially since the original included a built-in monitor.” So, with his 3D printer ready to roll, he set to work.

    The Vectrex Mini didn’t prove too expensive to create, totalling around $70 all-told, not including the spare Raspberry Pi that he already had in his stash. For the audio element of the build, he used a super-small PAM8302 amplifier by Adafruit. Brendan employed a Waveshare 2.5-inch LCD screen for the project, but would he entertain the idea of replacing that with a mini upcycled CRT display? “Maybe! To be honest, the high voltage of CRTs terrifies me (even the small ones), but I’d love to see if someone else could pull it off,” he enthuses.

    The Waveshare screen plugs into the GPIO pins of a Raspberry Pi 2 Model B which runs a Vectrex emulator using the latest build of RetroPie. “It took me a long time to figure out how to run the emulation in portrait mode with no weird scaling or stretching of the image,” says Brendan of one of several challenges he faced along the way.

    An achievable goal

    Brendan says that building the separate controller, which is based on an Arduino Pro Micro with a KY-023 joystick module, proved to be the easiest part of the build. “If you’ve watched the [YouTube] video, it’s plain to see that it was my first time designing something like that. But on the upside, the later designing/building of the controller went much smoother. It’s obvious I learned from my mistakes,” he affirms.

    Despite the learning curve, Brendan is confident that such a project would be within the grasp of many hobbyists. “The 3D modelling is likely the most complex portion of the project, but the wiring, software etc. is quite basic. Overall, I’d say it’s a reasonably easy project for an experienced maker.”

    Brendan has a detailed and informative YouTube video taking you through his build, which is well worth a watch if you’re interested in fabricating your own version, and he’s been bowled over by the response to his project. “As a newbie, I’ve been blown away by the encouraging comments and constructive criticism,” he recounts. But, more than that, he’s also gained a huge amount from the experience, and surely that’s what we all want to acquire from every project we make.

  • Szerafin MM5D Mushroom Farm

    Szerafin MM5D Mushroom Farm

    Reading Time: 3 minutes

    “The aim is to ensure the automatic operation of mushroom growing sites, so the characteristics of the growing environment can be monitored and modified remotely,” says Zsolt. “Devices must operate continuously and reliably in a humid environment without user intervention.” Remote management without smart controller devices such as relays and timers is impossible. “These operations should be user-friendly, with no programming knowledge required.”

    Zsolt wanted a small, low-power, Linux-based single-board computer. He chose Raspberry Pi for his mushroom farm on the recommendation of a technical vocational high school teacher who’d used them and said he wouldn’t be disappointed. Zsolt now uses Raspberry Pi 3B+ in all his projects, all of which he self-designs, making use of standard items such as display, relay boards, and third-party libraries. The hardware cost no more than 40,000 Hungarian forints (approximately $110, or £90). “The hardest part of building a device is making the box and making the front panel. It required a closed box. I bought this, but it was hard to find a company that deals with Plexiglas cutting and printing,” Zsolt explains.

    Mushroom for growth

    The mushroom monitoring system consists of a TTL-level input in which temperature and humidity are measured. The remotely accessible system shows the status of the lights, fans, humidifier, and watering system – including the pressure, and whether or not the tent door is open. “Measurement, timing, and electrical equipment control is done by a Python-language program that runs as a service in the background,” Zsolt tells us. The program requires an internet connection and access to data from OpenWeatherMap.org.

    The MM5D setup (one of several he’s developed and implemented at the family farm), uses Raspberry Pi 3B+ and has been in continuous use since 2019. “The devices were built one after the other, so I was able to use the experience gained in building for the next device.” This iterative process is reflected in Zsolt’s meticulous GitHub where he makes the installer software for his MM5D plant‑monitoring devices available online. He also maintains his own Debian repository for Raspberry Pi OS, Debian, and Ubuntu Linux.

    Grow more greens

    Growing mushrooms this way has proved successful enough for Judit and Zsolt to operate a local delivery service for customers in the vicinity of their farm in Tiszaföldvár, close to Budapest. Their mushrooms, as well as oyster mushroom compost useful for growing other crops, are sold in environmentally friendly packaging.

    They’ve also expanded with additional mushroom fruiting chambers, as well as diversifying into other crops. The addition of these vegetable plots has also given Zsolt the excuse to come up with another monitoring project adding automated irrigation to the whole site, as well as the mushroom tents. “The water and electrical system, electrical cabinet, and pump shaft will be ready by the summer. Tomatoes, eggplants, and pumpkins will grow and the environment will be beautiful.“

  • Kevin McAleer interview: master of robotics

    Kevin McAleer interview: master of robotics

    Reading Time: 3 minutes

    “I’ve always been into making things as far back as I remember,” Kevin tells us. “From making things with cereal boxes (the best source of robust and available cardboard) to creating robots and futuristic worlds in Lego, at age eight! There was probably a gap of about 30 years before I got back into making and practical computing; I bought an Arduino from Maplins and made some LEDs blink. However, I’ve always been passionate about computing and making things, so building robots is the ultimate Venn diagram, with my happy place right in the middle.”

    What is your history with making?

    When I was growing up, our house always had electronics and disassembled TVs and things as my father was a TV repair engineer. He had a lab full of repair equipment such as an oscilloscope, spectrum analyser, and a soldering station. So, understanding how electronic things work and how to repair them when they don’t is part of my DNA. I specifically remember reading a book on superheterodyne receiver theory from his room during high school and following along with it.

    When did you first learn about Raspberry Pi?

    Early 2012 – I checked my inbox and can see that I ordered my first Raspberry Pi back in June 2012 from RS Components!

    I remember my uncle asking if I’d heard about this credit card-sized computer that could run Linux and was around £20 (£21.60 – I just checked!). Having recently bought the 8-bit Arduino Uno for more than that, this seemed too good to be true, so I placed my order. That first Raspberry Pi has now been signed by Eben Upton. Eben kindly autographed it at the 10th Anniversary Raspberry Pi exhibit launch early this year at The National Museum of Computing.

    What was your first robot project?

    My first robot was a 3D-printed SMARS robot designed by Kevin Thomas, an engineering student. (Check out my fansite for this little robotic marvel.) It uses an Arduino Uno, a motor shield to connect up the two N20 motors, a 9V battery for power, and uses an ultrasonic range-finder to detect objects in front of it.

    This is an excellent robot for getting started with robotics; it doesn’t take too long to 3D-print out all the parts and is easy to get up and running with some simple code.

    What is your favourite project?

    My favourite project is a Python-based AI assistant I created for Raspberry Pi. The software is now embodied within the robot I call Isaaca (named after Isaac Asimov, my favourite robotics author). I created a couple of videos about this project on YouTube, and it’s also the most popular one I’ve made to date. The AI assistant can listen to spoken commands and perform a range of actions. This includes telling jokes, telling you the weather forecast, adding things to a to‑do list, and adding items to a calendar (that you can sync to your phone).

    I liked this project the most because, at first, it was a stretch for me to write. I was then able to simplify the code to the extent I could teach others how to build it, too – it’s much easier than you’d think, and I’ve shared the code on GitHub. I share all my code on GitHub; I’m a huge advocate of open-source projects.

  • Synch.Live: digital art project

    Synch.Live: digital art project

    Reading Time: 3 minutes

    Hillary explains that emergence can mean many things: “capturing the creation of galaxies, intelligent behaviour in ant colonies, economics, ecosystems, and conscious brains.” The use of it in this context is brand new.

    Idea emerging

    How does one go about creating such a system? “Functionally, the system needed to extract position and movement information, feed it into the emergence algorithm, and then create a visual feedback loop to signal how close the participants were to the goal of the game,” Hillary explains. “The system needed to run the emergence criterion in real-time and provide feedback to the player hats. The hats needed to be able to ‘blink’ in perfect sync, like fireflies do in nature. They needed to be safe and comfortable; flexible to allow for complex patterns and artistic expression; and precise and reliable in order for the results of the scientific part of Synch.Live to be valid.”

    Building the system wasn’t so easy, and the team also wanted to make the code easy to use as well. “We wanted to build a system that was easy for other artists, scientists, and enthusiasts to replicate and play with,” Hillary says. “Scalability was also an important requirement: while we are currently running small pilots with only a few players (ten), we envision a future for Synch.Live where dozens of players meet up to create large mesmerising displays of emergent co-ordination.

    “With those requirements in mind, we designed the software to be highly modular and extensible. Precise clock synchronisation and scalable deployment were tough nuts to crack; we solved them with RTC modules and Ansible. We have been lucky to have a network of very supportive friends and collaborators, including professional software engineers and computer vision researchers, who have helped us make this project a reality. The project has been developed fully open-source, and our in-house software engineer Madalina has thoroughly documented the build process in her blog.”

    Scientific fun

    If you’re like us, this all sounds very fascinating, and also a fun experience to participate in.

    “People are incredibly excited about the work and its potential applications,” Hillary mentions. “As one attendee wrote after one of our presentations: ‘The vision is powerful, the implications and potential are clearly articulated and beautifully expressed, and the need for this work is deep and significant.’”

    The project is currently undergoing further refinements as pilots are run to test the system, and Synch.Live will show up on 18-19 June at Imperial College London.

    “Once we have the data to demonstrate collective emergence, we want to scale-up the group size, design the wearable, develop new scenarios and rules sets, and explore applications such as conflict resolution and team building.” Hillary finishes, “Ultimately, we want to make the experience of Synch.Live available to communities around the world, and make a film that celebrates our collective humanity.”

  • Everybody needs a hobby(ist)

    Everybody needs a hobby(ist)

    Reading Time: 2 minutes

    He has a stone dragon gargoyle on his roof and a train layout, for which he built several landmark buildings from scratch.

    In his younger days, he inspected and reported on nuclear power stations and MOD nuclear installations, a very important job that required extreme focus to keep his nation safe. These power stations are handy, and I suspect we could use a few more of those at the moment.

    He is also one of the few people I know who will listen to me when I start talking about NAND gates and Z80 and ARM Assembly and Raspberry Pi. He hasn’t the faintest idea what I’m talking about. Which often makes two of us. But he appreciates a detailed-orientated chat, especially if I include some historical connection to the pre-digital era that he can more easily connect with.

    I suspect a few years younger and he’d have been into computing and Raspberry Pi. As it stands, his hobby is steam trains. So much so, he rescued a long-disused Belgian Cockerill Steam Tram with a fellow rail enthusiast, and brought it over to the UK by sea and road on the back of a lorry for renovation.

    It’s currently powering up and down the Mid-Suffolk Light Railway teaching a younger generation about the steam age. We showed Richard a recent YouTube video of it in action on Easter Weekend.

    Practical people do practical things.

    Full steam ahead

    Somebody who is wholly into a hobby watches the business side of things. Steam train fans are railway fans, and the industrial and consumer network is something they know an awful lot about. I chat chips; he chats coal.

    The big tech-chat at the moment is the supply chain. Last issue we mentioned a website called RPI Locator that provides alerts for when stores have Raspberry Pi in stock. We’re happy to see it joined by Hardware Locator.

    It’s something of a relief to note that Raspberry Pi isn’t the only company with more customers than it can supply. On the other hand, it’s disheartening to hear of our readers’ struggle to pick up, for example, Coral USB Accelerator kits to go with their new Raspberry Pi computers.

    I hope this situation picks up soon. In the meantime, you can get a Raspberry Pi by signing up with RPI Locator for an alert. Or, of course, by subscribing to The MagPi magazine.

    We will continue to make the finest magazine for the best hobbyist computer around. The hobbyists make Raspberry Pi what it is. More than just a useful tool, but a loved computer. Long may they tinker.

  • Air raid siren monitor

    Air raid siren monitor

    Reading Time: 3 minutes

    Dmytro is a Ukrainian from Kyiv, and he and his family are among millions of people displaced and suffering since Russia invaded their country. “I was in Kyiv when the first wave of explosions surged across Ukraine and we left the city with nothing but our backpacks,” he says. Yet among the items he managed to grab before evacuating were a Raspberry Pi Zero computer and an e-ink screen – an odd decision, he admits, but one that has proven to be very useful.

    There’s a mobile-first online app as well as the physical Raspberry Pi build

    Getting air raid alerts

    By using those two components, Dmytro has created an air raid siren monitor that shows which parts of the country are being shelled. He says he never imagined that he would ever make such a device, but the war has shifted the paradigm of what is a must, a necessity, or useful. “I know where all the load-bearing walls in my apartment are,” he laments, saying he now looks at old concepts in completely new ways.

    “When an air raid or shelling starts, we usually hear sirens going off, signalling that citizens should go to a bomb shelter or take cover,” he explains, of his motivation to create the device. “I noticed that my family would try and get additional information on the probability of air raids before going out by browsing through media and other channels. I thought it would help to have a device that’s always on that could show this information about active air raid sirens across Ukraine.”

    To do this, he turned to the popular instant messaging platform Telegram. “It has features resembling a social media platform,” Dmytro says. “One of these is ‘Channels’ – pretty much a one-to-many information distribution platform. You subscribe to a channel you’re interested in and get messages with links, photos and videos from people who run it. Telegram became a way for officials to notify where air raid sirens start and stop.”

    When Dmytro began his project, the e-ink screen was already connected to Raspberry Pi Zero. The idea was to code a program that would monitor and parse messages in Telegram and create a visual snapshot of the current situation across Ukraine.

    “Not only does it show regions where the air raid sirens are active, it helps to predict a potential air raid by looking at the spread and progression of the attack – chances are that if multiple regions are hit, it will spread,” Dmytro says.

    It wasn’t all plain sailing, though. “The problem was that, even though I had a preconfigured microSD card installed in Raspberry Pi Zero, I needed to change the configuration in the ‘boot’ drive and a card reader wasn’t something I considered essential when packing my bag!

    I ended up putting the microSD card into a family member’s phone and using a text editor to configure the cmdline.txt and config.txt to SSH into Raspberry Pi Zero through the USB connection.”

    The project has also led to the creation of a mobile-first online map at sirens.in.ua. “It’s hard to get Raspberry Pi in Ukraine if you don’t already have one,” Dmytro reveals.

    So far, the device has proven useful. “Last weekend, we were getting ready to go to the shop but, based on the data from the device, we postponed this and the air raid siren went off ten minutes later,” he says. Since posting about the monitor online, lots of other Ukrainians have also created their own version. “I have open-sourced the code and the instructions. I hope it keeps people safe during these unthinkable times.”

    Find the code for the Air Raid Monitor on Dmytro’s GitHub page.

  • Portsdown 4 Digital TV Transmitter

    Portsdown 4 Digital TV Transmitter

    Reading Time: 3 minutes

    “I was inspired by the desire to reproduce a capability that a few years ago would have occupied half a room and cost hundreds of thousands of pounds, and replace it with something cheap and portable that could be used by myself and my fellow amateur TV enthusiasts,’’ Dave tells us.

    Fellow enthusiasts had been discouraged by the seeming complexity of DTV (digital TV) broadcasting. It was assumed to be out of the reach of the home enthusiast, but the advent of Raspberry Pi changed all that. “Raspberry Pi brought two key elements to the project at the beginning. The first was hardware H264 encoding. Radio amateurs are limited in the amount of bandwidth and power that they can use for communication. The second was easy image capture using the camera, which works seamlessly with the H264 encoder.”

    Amateur TV enthusiasts can use satellite dishes to transmit digital TV worldwide

    Proof of concept

    The surge in popularity of software-defined radios (SDRs) meant that a relatively cheap piece of hardware could handle the reception and transmission of DTV signals using the DTB standard used by services such as Freesat. Dave started to piece together a proof of concept connecting a Raspberry Pi 3B, SDR, camera, and audio via a £5 USB dongle to create a rudimentary DTV transceiver. It was named Portsdown, in tribute to a late president of BATC in whose Portsdown home the idea took shape.

    Now Dave has completed Portsdown 4, using the more powerful Raspberry Pi 4 Model B. In addition, a Raspberry Pi 7-inch touchscreen and strong case have made a complete, travel-ready unit suitable for outdoor transmission. The power and frequencies that can be used are heavily regulated by Ofcom and you’ll need a licence to operate a Portsdown 4, but such licences have been granted to those as young as ten years old. Amazingly, you can add a powerful enough antenna to relay your DTV signal to a satellite that has transponders available to amateur radio enthusiasts.

    Here we can see the three key parts for the proof of concept: Raspberry Pi, SDR connected by USB, and touchscreen. Dave created the custom touchscreen software to control the system

    Compatibility

    Dave’s biggest challenge was compatibility. The build required specific components and peripherals. When he published the build and the software, he soon found that even very similar models of webcams and SDRs could cause problems. This led to the birth of the project wiki that provides a detailed bill of materials to anyone who wants to try their hand at building their own. It’s estimated that over 500 hobbyists have built their own Portsdown transmitter.

    We asked Dave, what was next for Portsdown? “Development of the Portsdown system as a piece of radio test equipment is proving to be very popular. Current capabilities include a radio frequency signal generator, a simple radio spectrum analyser, and a receiver noise-figure meter. Developments are underway to provide additional test-bench capabilities using the existing hardware.”

    Warning! Frequency restrictions

    Use of this project requires a valid UK licence and must not be operated in restricted frequencies. Different restrictions apply in different parts of the world. Do your research if attempting to recreate this project. See Radio Society of Great Britain.

  • Discover Raspberry Pi photography in The MagPi magazine issue #118

    Discover Raspberry Pi photography in The MagPi magazine issue #118

    Reading Time: 3 minutes

    Raspberry Pi Photography

    Raspberry Pi Photography

    The Raspberry Pi Camera Module offers up a world of creative possibilities. Discover how to add image recognition to your projects by connecting and coding with the camera. Learn how the ‚raspistill‘ and ‚libcamera‘ libraries are used to control your projects, and get inspiration from other makers.

    Wearables and Costumes

    Craft Wearables & Costumes

    Raspberry Pi is a tiny computer that is perfect for crafting Raspberry pi clothing masterpieces. In this feature, Rob Zwetsloot looks at turning clothes into Raspberry Pi masterpieces.

    Air raid siren monitor

    Air Raid siren monitor

    Dmytro Panin’s latest project has the potential to save lives during the war in Ukraine. His air raid siren (and interactive website) uses Raspberry Pi with the Telegram instant messaging system to show where air raid sirens are active.

    Vectrex Mini

    Vectrex Mini

    Many team members have hankered after a Vectrex. This little-known console played vector graphic games on a small screen. This Raspberry Pi recreation uses a 3D printed case and LCD screen to recreate the classic games machine.

    Fibre optic matrix display

    Fibre Optic Matrix Display

    This spellbinding project uses Raspberry Pi Pico and a 16×16 NeoPixel matrix along with some fibre optic cables to produce a unique artistic effect. 

    ArtEvolver: batch convert images with ImageMagick

    ArtEvolver: batch-convert images

    Sean Mcmanus starts the first in a new series of tutorials building ArtEvolver. A project that merges images endlessly to produce composite effects. In this first part of the tutorial, Sean shows us how to batch convert images using ImageMagick. 

    The best Raspberry Pi facial recognition projects

    Top 10 face-tracking projects

    With a little software like OpenCV it is possible to add facial recognition to a Raspberry Pi. This enables a range of interesting builds that respond to human facial activity, adding a layer of responsiveness to your builds.

    Learn Terminal with Raspberry Pi

    Learn Terminal

    Terminal is an application used to enter text-based commands to Linux (including the Debian-based Raspberry Pi OS). Learning terminal is one of the fundamental building blocks to becoming a better maker, and we gather together a range of tutorials that will make your terminal experience easier.

    Pick up your copy of The MagPi issue #118

    The MagPi magazine issue 118 is available as a free digital download, or you can purchase a print edition from the Raspberry Pi Press store. Subscribe to The MagPi in print for 12-months and get a free Raspberry Pi Zero 2 computer.

  • Win a CutiePi tablet!

    Win a CutiePi tablet!

    Reading Time: < 1 minute

    Subscribe

  • Pimoroni’s Pirate Audio headphone amp

    Pimoroni’s Pirate Audio headphone amp

    Reading Time: < 1 minute

    With a name like Pirate Audio (£20), it can only be our friends from Sheffield-on-Sea, Pimoroni. Its Pirate Audio range is similar to the HiFiBerry DAC but with more features. We’ve chosen the headphone version here, but line-out, 3W amp and even built-in speaker versions are available. All four Raspberry Pi Zero-sized HATs feature a 1.3-inch IPS screen and four control buttons, making them perfect for on-the-move audio. A comprehensive online guide takes you through installation including a full audio solution based on Mopidy, so you can get running right away.

  • Selin Ornek interview: A young maker who loves dogs, robots and Star Wars

    Selin Ornek interview: A young maker who loves dogs, robots and Star Wars

    Reading Time: 3 minutes

    What is your history with making things?

    When I was eight years old my dog Korsan passed away. I was really upset and wanted to bring him back to life. I had to do a math project for school, and I had to interview a technical professional, so I asked my dad’s friend, a mechanical engineer, lots of questions then showed him a drawing of a robot that I wanted to make to bring Korsan back to life. He told me that I should learn coding and robotics. My English teacher was also using MIT Scratch in class to make the lessons more fun. I asked him how he made the games, as I loved playing Minecraft at that time. He encouraged me to try and make games myself using Scratch.

    I also started to learn how to code from books and the internet. My parents then bought me a Mbot that I took to pieces and made into a little robot that I called “çirozbot” which means skinnybot. I used Scratch to code MBot and that is when I learned that I would be able to make more advanced projects using Arduino and C++.

    The first project I built was a smart collar for dogs with Arduino. I then used Arduino in the first version of IC4U. I had decided to take IC4U to Dublin to Coolest Projects International 2018, whilst building him I entered one of Coolest Projects’ social media competitions, and won my first Raspberry Pi Zero. Then I won first place in the hardware category at Coolest Projects, and one of my prizes was a Raspberry Pi 3B+. After this, I started to use Raspberry Pi in all my projects.

    How did you learn about Raspberry Pi?

    As I got more confident coding and using more advanced products in my projects, I started looking up other options I could use. Raspberry Pi was on the top of my list as I was looking for a powerful microcontroller and I was also very eager to learn coding with Python. Unfortunately, these were quite expensive, especially as I try to pay for all the parts I use for my robots out of my allowance. So I was extremely happy to win a Raspberry Pi Zero and Raspberry Pi 3B+ and start using them.

    What was the first thing you made with Raspberry Pi?

    IC4U2, [which was] the second version of my robot guide dog for blind people.

    I had built IC4U as when we were on holiday in France, I saw a guide dog with its visually impaired owner. I had never seen one before, as there were only a couple in Turkey at that time. It really made me think of Korsan and how sad I was when he died. I began to think that if I had been so upset, how would a blind person feel? Not only would they lose their best friend, but they would also lose their eyes again.

    So I decided to build IC4U, my robot guide dog. The Guide Dogs UK association and the American Guide Dog association were amazing, answered all my questions, and explained just how a guide dog is trained and what they should do. I built the first version using Arduino, IC4U and I won first place in Coolest Projects International 2018 in the hardware category. I was also very kindly given a Google AIY Voice HAT and Vision Kit. As soon as I got back home, I started to build IC4U2.

  • A bird in the hand: Smart bird feeder

    A bird in the hand: Smart bird feeder

    Reading Time: 3 minutes

    Inspired by this, maker Jeff Stockman looked to automate the process as part of his Internet of Things course at the University of Washington Tacoma. “I’d made a bird feeder a few years ago and used a first-generation Raspberry Pi computer and a basic webcam connected to my local network,” he says. “But I wanted to incorporate both edge and cloud technologies to improve the feeder’s capabilities.”

    The result has been a smart bird feeder that uses motion sensing and image recognition to monitor birds dropping by for something to eat. “It uses an ultrasonic ranger to detect the presence of a bird,” Jeff explains. “This detects the distance of the bird from the feeder and, when it decreases below 14cm, it triggers the camera to snap a photo. Once the bird is more than 14cm away, the camera is ready to take a photo again.”

    To achieve this, Jeff used a Raspberry Pi 3B computer connected to a Raspberry Pi HQ camera module. “Using Raspberry Pi was a main requirement for the course,” Jeff explains. He also used the flow-based development tool Node-RED to simplify the coding as well as the GrovePi+ HAT, which allows a variety of sensors to be easily connected – Jeff added temperature, humidity and light sensors as well.

    Training the model

    Once a photo is taken, the image is analysed using the free tier of Microsoft’s Azure Custom Vision machine learning service. “I wanted image recognition to understand which bird species were present throughout the year and to identify migratory patterns, as well as year-on-year differences in bird populations,” Jeff tells us.

    This required Jeff to train the model. “I pulled 20 to 25 images from Google for each of the popular bird species that frequent my feeder. I then uploaded them to Azure and tagged them with the correct species, testing the model from the convenience of my desk by printing out different pictures of birds.” Jeff then asked Azure to return the species name if the probability exceeded 50 percent. “This would increment the count in a database by one,” he adds.

    Caught on camera

    The model continued to be trained once the smart bird feeder was installed outside. “I could verify the photos and species tags on the Azure website. If incorrect, I’d retag the images and those would then get stored in Azure. Once I had enough real-world images, I retrained the model with new images and additional species that appeared. The model accurately identified 60, then 70, then 80 percent of birds over three iterations of the model.”

    There were some difficulties. Jeff would like a live feed but says the image capture doesn’t trigger when this feature is active. “The GrovePi+ ultrasonic sensor was also sporadic in its measurements – the measurements ranged from 15 to 27 cm,” Jeff adds. But the project has proven effective. The data and images are shared with the interactive visualisation web app, Grafana, allowing Jeff to see data and photos in real time. He’s also been able to track birds’ eating habits with some surprising results. “It identified quickly that there were no early birds,” he says. “None appeared before 10am!”

  • NOUS: uNdersea visiOn sUrveillance System

    NOUS: uNdersea visiOn sUrveillance System

    Reading Time: 3 minutes

    Dr George Papalambrou and his colleagues Vasilis Mentogiannis and Kostas Katsioulis, from the NTAU’s School of Naval Architecture and Marine Engineering, knew plenty about Raspberry Pi before selecting it for their underwater archaeology surveillance project. “It was our first choice from day one,” George says. For a start, he had used Raspberry Pi alongside Apple HomeKit for home automation, and while at university it was used in CAN-bus networks. George was also interested to read about Raspberry Pi Compute Modules being used by the University of Surrey for their Cube-Sats, confirming the hardware’s suitability in challenging environments and ability to communicate while being self-powered.

    NOUS, as the marine surveillance project came to be known, would also need to be able to communicate remotely.

    Sea-worthy specifications

    George says Greece had wanted to monitor its marine archaeological sites for many years, but one of the main obstacles was how to guard and protect them.

    It needed a system that was self-powered (since most wrecks are located a long way from a power supply), that could connect to the internet in order to communicate and be remotely controlled, have sensors to monitor the area of interest continuously, and be able to send alerts in cases of violations, alterations of the site or other events. As well as monitoring protected marine areas, scoping exercises suggested it would also be feasible to include real-time scientific observations throughout the day, and to monitor changes to the climate and biodiversity in the area over long periods of time.

    The sea is an unforgiving environment to operate in, and is very hard on equipment, says George, so it was critical they chose gear that could withstand both high pressure and low temperatures. NOUS needs to run continuously round-the-clock at submerged depths of 35 to 70 metres. George explains that the project also needs total software control at the operating system level, as well as at the application level: “We control our devices remotely over the web and SSH, so there is no space for failures or malfunction.” Raspberry Pi was always the team’s first choice, not least because of its affordability and the invaluable community forums.

    Having bought Raspberry Pi 3 and 4, plus some basic off the shelf electronics, the NOUS team soldered on cables and parts in order to save space in the rugged enclosures that also needed to accommodate AI cameras and networking hardware that could be attached via a harness and operate underwater.

    Academic expertise

    The software and specialist HATs were developed by George and his University of Athens colleagues to save money and reduce development time. Raspberry Pi boards were set up headless, with X11 forwarding used to optimise remote control along the lengthy undersea cables connecting each module to the base station. The onboard battery packs are supplemented by onshore solar panels sited near where divers set off to view the wreck in the Aegean, some distance short of its intended destination, the island of Skopelos.

    Operating full-time since 2020, the surveillance system is still running successfully today. “Raspberry Pi has been a success since the very beginning, providing stability on both the software and hardware sides”, says George.

    Live footage from the wrecked ship can be seen here.

  • PecanPi Streamer review: high-end audio driven by Raspberry Pi 3B

    PecanPi Streamer review: high-end audio driven by Raspberry Pi 3B

    Reading Time: < 1 minute

    Minimalist

    This case is minimalism taken to a new level. Looking at the rear, we see the ports from a Raspberry Pi 3B, and not only the usual phono (RCA) sockets but XLR sockets too. This unassuming box is aimed right at the professional market as well as the audiophile.

    Driving the PecanPi is Volumio, a popular interface amongst audiophiles. It can accept a number of different services such as Spotify or SoundCloud. In our tests it spotted our local Plex DLNA server immediately and we were playing music without delay. Such is the dedication to pure sound that Bluetooth and wireless LAN are unavailable because the radio interference is unwanted. The PecanPi demands a wired Ethernet connection, and nothing else.

    But what a sound. Even with fairly average speakers, The Dark Side Of The Moon encoded with FLAC gave amazing detail with a depth and warmth we’d never heard before. This will not be a disappointing product to those who care deeply about how their music sounds.

    Verdict

    9/10

    If you can stomach the price, Orchard Audio’s humble black Pi-containing box could change the way you think about sound and music.

    Specs

    Dimensions: 195 x 120 x 100mm
    DAC: Dual flagship Burr-Brown PCM1794
    Signal-To-Noise (RCA): 130dB (A-weighted)
    Dynamic Range (RCA): 125dB
    Total Harmonic Distortion (RCA): 0.0003%

  • Entry/Exit Notifier: A simple, well-engineered build

    Entry/Exit Notifier: A simple, well-engineered build

    Reading Time: 3 minutes

    Sounds simple, right? Wayne had found himself forgetting to send the necessary emails, and thought the process was a bit tedious when he did remember, which became the impetus for the project. There’s a little bit more to it than just being a button that makes it pretty cool though.

    “I used an old 512MB Raspberry Pi Model B that I had bought back in 2013 that I never did much with.” Wayne continues. “Because the project needed internet connectivity and the Model B didn’t have wireless LAN, I added a USB dongle. For a display, I decided to use a cheap 16-character by two-line LCD display instead of an LCD panel, because I only needed to know if the email transmission was successful.”

    Programmable entry

    The code on Raspberry Pi was well thought out as well: “Email was handled by msmtp, a lightweight command-line mail transfer agent,” Wayne explains.

    “Since the university used Microsoft Exchange, I used Davmail, an open-source program that acts as a gateway between non-Microsoft mail clients and MS Exchange servers. The push-button interface on the EN/EX Notifier could have been either two SPST momentary switches, one for entry and one for exit, or a single momentary on-off-momentary on SPDT rocker switch. I decided to go with the rocker switch, and connected it to Raspberry Pi’s GPIO pins. When the entry or exit button is pressed, it triggers the appropriate bash script to send an email, and displays a message on the LCD display to tell me if it was successful or not.”

    Wayne had thought about automating the system by using the room’s light switch. However, with other people occasionally going in and out, he found it better to just make it a dedicated switch.

    Exit, stage right

    While Wayne will soon not need to use it, he definitely was able to get some use out of it:

    “It functions fairly well. The main issue is that the wireless LAN connection is sometimes unreliable, so it doesn’t send a message when I push the button, but that is mostly due to my office being far away from the nearest router. I’ve had connection problems with other computers, so it’s not caused specifically by Raspberry Pi. I could probably improve the reception by using an adapter with an external antenna, or by using a wired Ethernet connection instead.”

  • CutiePi review: a Raspberry Pi 4 tablet

    CutiePi review: a Raspberry Pi 4 tablet

    Reading Time: 3 minutes

    While one of its headline features is that it’s very thin (14mm thin to be exact, thinner than a Raspberry Pi 4), it doesn’t skimp on screen size with an 8-inch IPS LCD touchscreen running at 1280×800. It’s bright and very responsive, the latter thanks to a Compute Module 4 being built into the tablet – in fact this is how it can be so thin while still having the power of Raspberry Pi 4.

    There are some sacrifices made to the input and output ports because of this. There’s only one USB port, one micro HDMI out port, and no GPIO or headphone ports. While USB ports can be extended with a hub, this adds extra space to something you’d want to be compact. A camera is installed on the rear though, much like other tablets, and you can easily access the microSD card to update the operating system from another computer.

    On a final hardware note; we adore the handle on it. And it’s not just a handle, it’s a stand in a similar way to smart covers. You can have it propped up near vertical in landscape to use like a display with keyboard attached, or raised at a 30 degree angle to peer down on. It can also be used to prop it up in portrait orientation, and is just nice to use to carry it around with.

    Interfacing

    CutiePi uses its own custom graphical interface, known as CutiePi Shell. It’s based on a browser, and allows for easier use of the tablet as a touchscreen computer – much in the way that an iPad or other tablet has its own custom display. The onscreen keyboard is very good and responsive, and the orientation of the screen will change as you move it. It’s a really nice and clean experience, and has the usual trappings you’d expect, like the ability to turn off the display with a button, a lock screen, and a rotation lock.

    You can also press a button and return to Raspberry Pi OS’s default desktop, where it will function just like any other Raspberry Pi.

    A lack of GPIO pins does mean you’re limited in the digital making you can do either way. For pure code it’s great, and far more hackable than any other tablet, however if you want to connect it to the real world it’s a bit trickier.

    For what it may lack in GPIO it makes up for in media playing. YouTube and other video services run great, and the speaker is decent. With a few parental controls this could be a great budget tablet for younger people wanting to explore coding.

    Verdict

    8/10

    While lacking in ports it makes up for a lot with its user-friendly design and interface. Great for younger makers.

    Specs

    Processor: BCM2711, Quad-core Cortex-A72 (ARM v8) 64-bit SoC @ 1.5 GHz (Raspberry Pi Compute Module 4, Wireless, 2GB Lite (CM4102000))

    Display: 8” IPS LCD (1280×800)

    Connectivity: WLAN 2.4 GHz, 5.0 GHz IEEE 802.11 b/g/n/ac, Bluetooth 5.0, BLE, 1x USB type-A, USB type-C, 1x micro HDMI 1x microSD slot

    Dimensions: 206(W) x 134(H) x 14(D) mm

  • History lesson: knowing our place in time

    History lesson: knowing our place in time

    Reading Time: 2 minutes

    Print magazines are important for legacy preservation, as well as being a great monthly joy to read. Every copy of The MagPi magazine is filed with the British Library. The legal requirement for publishers to file copies of publications has existed in English law since 1662.

    In 60 years’ time, when people are looking back at the history of computing and Raspberry Pi’s involvement during this period, I like to think that The MagPi magazine is one of the places that they will look.

    We’re hoping to spend a little more time looking at the history of computing here in The MagPi. In 2021 Tim Danton wrote a book for  our sister publication Wireframe called The Computers that Made Britain. It’s a wonderful book and I fully recommend picking up a copy. It’s packed with the stories of all the amazing people who made the computers that led to Raspberry Pi.

    The Computers that made Britain 180x240 Mockup

    Meanwhile, we have been looking at the practicalities of using Raspberry Pi to explore computing concepts, covering both classic computers and ultra-modern coding techniques, in our Retro Gaming with Raspberry Pi.

    Retro Gaming with Raspberry Pi 2nd Edition

    Moving forward, I’m hoping to combine the two, looking at some of the stories from those classic computers and emulating them with Raspberry Pi computers.

    We’ve also been making a concerted effort to go both low and high-end in recent editions of The MagPi magazine. Thanks to those readers who noticed and wrote in with compliments. The idea is to welcome newcomers with introductory projects and basic computing techniques, while simultaneously having more detailed projects and programming techniques for those of us who are further along our computing journey. Moving forward we hope to go to higher coding peaks and further back in time while remaining friendly and at the cutting edge. Exciting stuff!

    Of course, there are problems with computing in the here and now. While it is vastly more accessible these days than back in the 1950s, it’s fair to say that getting hold of a Raspberry Pi computer is currently a bit of a challenge.

    I’m glad Eben Upton spoke out again on these issues to give Raspberry Pi fans an indication of where things are at. Hopefully, as the global supply chain eases, we will be able to pick up as many Raspberry Pi computers as we want, whenever we want.

  • Open Weed Locator: use AI to detect weeds with Raspberry Pi

    Open Weed Locator: use AI to detect weeds with Raspberry Pi

    Reading Time: 3 minutes

    Precise planting

    Guy Coleman has extensive experience as an agricultural scientist, and began using Raspberry Pi five years ago as a means of exploring how computer vision might be used in such settings. Weed recognition and precision control using deep learning is the focus of his PhD at the University of Sydney. Before this, Guy was more comfortable doing precision weed-control fieldwork on large-scale paddocks in Australia than developing projects using Python such as the OpenWeedLocator.

    He works alongside Dr William Salter, whose background is in plant physiology and open-source technology for plant phenotyping, and who had already built several light sensors and an instrument for the high-throughput measurement of photosynthesis.

    “Managing weeds in crops so they don’t reduce yields is a big challenge in agriculture, and current methods rely on herbicide applications to whole fields,” explains Guy. “Being able to assess where weeds are with cameras means the herbicide is only applied to individual weeds, meaning big savings to the farmer and reduced chemical inputs to the environment.”

    However, weeds vary hugely in colour, size, and shape and the team needed to find a way of recognising them in all sorts of environmental conditions. Since the weed detector also had to work at a reasonable speed, any algorithm used would have to operate with high frame rates, Guy explains. They chose to base OWL around an 8GB Raspberry Pi 4 because of its combination of low cost, high power and small form factor. “Being easily connected to a whole variety of inputs and outputs has been absolutely essential to this project,” Guy comments.

    A green detection algorithm running on Raspberry Pi identifies any green weeds that appear in the video feed and then activates a GPIO pin that connects to a relay board. A solenoid can then be switched on to deliver herbicide to the detected weeds.

    Smarter applications

    Guy and William wrote the code for OWL in Numpy and OpenCV. Keeping OWL open source means it can be easily updated with improved weed detection capabilities. Their biggest challenge was developing an algorithm that performed at an acceptable level in a range of conditions but testing convinced them to settle on a combination of the Excess Green + HSV thresholding systems.

    OWL is very much a community project, with the full hardware details posted on GitHub (magpi.cc/owlgit) including a 3D-printable enclosure. This has already led to versions of OWL being assembled and used on four different continents, with some tweaking of the enclosure design for easier printing and assembly. The most critical pieces are the Raspberry Pi 4 with 8GB, Raspberry Pi HQ Camera, a relay control board and 12V to 5V 5A DC to DC converter, says Guy. Aside from printing parts, building OWL takes a couple of hours and running costs are minimal – only 12V of input power required for it to run.

    Guy and William plan to add in-crop weed detection and GPS and say quite a few farmers have spoken to them about different uses they see for OWL to improve the efficiency of food and fibre production globally. The ability to find anything green means OWL can also be used to only apply fungicide or insecticide to the crop or to defoliate green cotton plants. “OWL is a living project. Now that it has ‘flown the nest’, so to speak, we’re excited to see where the community takes it.”

  • Build a Raspberry Pi Smart Garden in The MagPi magazine issue #117

    Build a Raspberry Pi Smart Garden in The MagPi magazine issue #117

    Reading Time: 3 minutes

    Build a Raspberry Pi Smart Garden

    Raspberry Pi Smart Garden

    Spring has well and truly sprung, so it’s time to head outside and make the most of the sunshine. That doesn’t mean we have to leave our electronic toys behind though. We’re going to automate our garden, with low-cost watering systems and robot mowers. Power up your patio with smart BBQs, and internet weather stations and have endless fun in the garden with RC cars, sound systems and drones.

    Raspberry Pi high-end audio

    Raspberry Pi high-end audio

    Make some noise with a whole-house audio system that bounces music from room to room. Raspberry Pi is ideally suited for quality audio systems. PJ Evans shows us how to attach the best audio kit to Raspberry Pi and set up a sound system with Mopidy.

    Open Weed Locator project showcase

    Open Weed Locator

    A weed is just a plant in the wrong place, at the wrong time. Fortunately, we can now use technology to automate that process. Open Weed Locator is a project that uses a Raspberry Pi-based AI system to distinguish between valuable crops and unwanted weeds.

    NOUS project showcase

    Going underwater with NOUS

    Researchers at The National Technical University of Athens have developed this incredible Raspberry Pi underwater system that acts as an archaeological surveillance system. 

    TARDIS treasure hunt project showcase

    TARDIS Treasure Hunt

    One maker used Raspberry Pi Pico and LEGO to build a Doctor Who-themed treasure hunt party. Kids play a game outside where they hunt down the TARDIS box and enter a key phrase on the keyboard hidden inside the roof. We love this project.  

    Selin Ornek interview

    Selin Ornek interview

    Selin built the amazing Kimberlina robot from The MagPi magazine #116, and we loved it so much we decided to interview her and see what else she’d been up to. From robotic dogs for blind people to smart dog collars, and anti-bullying devices. Discover what a new generation of makers is building with Raspberry Pi.

    Pick up your copy of The MagPi issue #117

    The MagPi magazine issue 117 is available as a free digital download, or you can purchase a print edition from the Raspberry Pi Press store. Subscribe to The MagPi in print for 12-months and get a free Raspberry Pi Zero 2 computer.

  • Win! 1 of 5 Argon EON cases

    Win! 1 of 5 Argon EON cases

    Reading Time: < 1 minute

    Subscribe

  • Time Machine Radio

    Time Machine Radio

    Reading Time: 3 minutes

    “I had thought a little music box which played content from the 1930s and 1940s would be an excellent addition to the car when it’s on display,” explains George. “After putting some thought into making one myself, the idea of having content from each decade in the 20th century somehow seemed more naturally appropriate.”

    Radio refit

    So, George set to work on a project that would take him around four months. For the hardware, he gutted a vintage-look NR-3013 radio bought from Amazon, salvaging a few components like the speakers, one of the potentiometers, and the lithium battery.

    A Raspberry Pi Zero 2 W equipped with a Pimoroni Audio Amp SHIM (with built-in DAC) provides analogue audio out to the speakers. “The finished project has two working potentiometer knobs, one for the volume and one for ‘tuning’ the decade,” says George. “They’re both connected to a MCP3008 [ADC] and then [Raspberry] Pi.” An Adafruit PowerBoost 1000C acts as both a charger for the lithium battery and a power supply for Raspberry Pi. 

    Regarding the software, Raspberry Pi boots up to a Python script which is infinitely looping. “At each loop it does three things: changes the channel if someone has ‘tuned’ to a different decade; plays the next song if it’s appropriate to do so; and then sleeps for 50 milliseconds so we don’t smash the CPU. Rinse and repeat ad infinitum.”

    To ensure that each tune gets a fair chance of being played, George has worked it so that once a song is selected, it is moved from an ‘unheard’ array to a ‘heard’ array, “effectively removing it from the pool of songs to be plucked from. Once all songs have been heard, they get moved back and the process starts again.”

    Doctor Who?

    Whenever the dial is turned to move between decades, the sound of Doctor Who’s TARDIS is heard. “We used to watch Doctor Who together when I was a kid, and so using the TARDIS sound to ‘move through time’ to another decade seemed appropriate,” says George. 

    Another lovely touch is the inclusion of a “secret decade” within the radio’s setup, which contains some personal content that George’s uncle had digitised from old tapes. “They’re recordings of my late grandfather who died when my father was a young man and whom I’ve never met,” he explains.  He did the same for another version of the radio that he made for his father-in-law, as he managed to include some audio of his late father too in that radio’s hidden decade.

    George thinks making a time-travelling retro radio is within the grasp of many. “Anyone with either an interest or rudimentary understanding of electrical engineering and/or microelectronics could make one,” he urges. “Provided you’ve got Googlefoo you should be right, and I would encourage all who are interested to give it a crack. Anyone reading this can get in touch at georgeedwardsmail@gmail.com, and I’ll be happy to answer any questions.”

    With that generous encouragement, have a go, personalise your decades as George has done, and enjoy a trip to yesteryear.