
It’s hard to comprehend how far machine learning has come in the past few years. You can now use a sub-£50 computer to reliably recognise someone’s face with surprising accuracy.
Although this kind of computing power is normally out of reach of microcontrollers, adding a Raspberry Pi computer to your project with the new High Quality Camera opens up a range of possibilities. From simple alerting applications (‘Mum’s arrived home!’), to dynamically adjusting settings based on the person using the project, there’s a lot of fun to be had.
Here’s a beginner’s guide to getting face recognition up and running.
1. Prepare your Raspberry Pi
For face recognition to work well, we’re going to need some horsepower, so we recommend a minimum of Raspberry Pi 3B+, ideally a Raspberry Pi 4. The extra memory will make all the difference. To keep as much resource as possible available for our project, we’ve gone for a Raspberry Pi OS Lite installation with no desktop.
Make sure you’re on the network, have set a new password, enabled SSH if you need to, and updated everything with sudo apt -y update && sudo apt -y full-upgrade. Finally, go into settings by running sudo raspi-config and enable the camera in ‘Interfacing Options’.
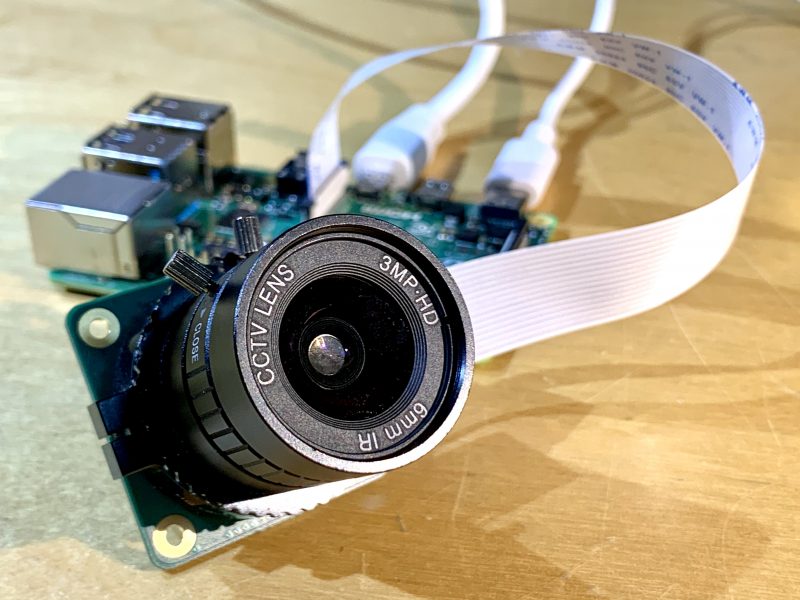
2. Attach the camera
This project will work well with the original Raspberry Pi Camera, but the new official HQ Camera will give you much better results. Be sure to connect the camera to your Raspberry Pi 4 with the power off. Connect the ribbon cable as instructed in hsmag.cc/HQCameraGetStarted. Once installed, boot up your Raspberry Pi 4 and test the camera is working. From the command line, run the following:raspivid -o test.h264 -t 10000
This will record ten seconds of video to your microSD card. If you have an HDMI cable plugged in, you’ll see what the camera can see in real-time. Take some time to make sure the focus is correct before proceeding.
3. Install dependencies
The facial recognition library we are using is one that has been maintained for many years by Adam Geitgey. It contains many examples, including Python 3 bindings to make it really simple to build your own facial recognition applications. What is not so easy is the number of dependencies that need to be installed first. There are way too many to list here, and you probably won’t want to type them out, so head over to hsmag.cc/FacialRec so that you can cut and paste the commands. This step will take a while to complete on a Raspberry Pi 4, and significantly longer on a Model 3 or earlier.
3. Install the libraries
Now that we have everything in place, we can install Adam’s applications and Python bindings with a simple, single command:sudo pip3 install face_recognition
Once installed, there are some examples we can download to try everything out.cdIn this repository is a range of examples showing the different ways the software can be used, including live video recognition. Feel free to explore and remix.
git clone --single-branch https://github.com/ageitgey/face_recognition.git
5. Example images
The examples come with a training image of Barack Obama. To run the example:cd ./face_recognition/examples
python3 facerec_on_raspberry_pi.py
On your smartphone, find an image of Obama using your favourite search engine and point it at the camera. Providing focus and light are good you will see:
“I see someone named Barack Obama!”
If you see a message saying it can’t recognise the face, then try a different image or try to improve the lighting if you can. Also, check the focus for the camera and make sure the distance between the image and camera is correct.

6. Training time
The final step is to start recognising your own faces. Create a directory and, in it, place some good-quality passport-style photos of yourself or those you want to recognise. You can then edit the facerec_on_raspberry_pi.py script to use those files instead. You’ve now got a robust prototype of face recognition. This is just the beginning. These libraries can also identify ‘generic’ faces, meaning it can detect whether a person is there or not, and identify features such as the eyes, nose, and mouth. There’s a world of possibilities available, starting with these simple scripts. Have fun!
Issue 38 of Hackspace Magazine is out NOW
Each month, HackSpace magazine brings you the best projects, tips, tricks and tutorials from the makersphere. You can get it from the Raspberry Pi Press online store, The Raspberry Pi store in Cambridge, or your local newsagents.
Each issue is free to download from the HackSpace magazine website.
Website: LINK
Schreibe einen Kommentar
Du musst angemeldet sein, um einen Kommentar abzugeben.