


A little introduction
Twitch Extensions create new ways to bring Twitch streamers and viewers together, to create amazing content, and to connect games to a live broadcast. But like any new technology, it can feel overwhelming to start using it.
I’m Breci, a member of the Twitch Developer community, I currently work as a full-stack developer, and I specialize in interactive experiences.
In 2018, I started to experiment and see how they could be developed and what are the limits. Since then, I’ve published two Extensions, Live Requests and Quests; an open source boilerplate for newcomers; and an open source NPM package for Vue/Vuex developers.
In this article, I will share what I’ve learned when making Twitch Extensions, how they are made, and how you can use Twitch tools to reduce hosting costs, improve scaling, and engage streamers and viewers in your work.
If this is your first time working with Twitch Extensions, you should check out the Getting Started first and install the Developer Rig.
Extensions are webpages
If you look at the Getting Started page for Twitch Extensions, you will see this information: “Extensions are programmable, interactive overlays and panels, which help broadcasters interact with viewers.”
It can be said differently, “Extensions are static webpages displayed on top of or entirely below the video.”
With that in mind, you can easily create your first Extension using HTML/CSS/JS, like any other website. And, of course, you can use frameworks like React, Vue, Angular, etc. to build your Extensions.
Please note that the pages need to be static webpages; you can’t use server-side rendering.
You can find a minimal Twitch Extension here:
Use the right Extensions types

There are three types of Extensions: panel, video component, and video overlay.
Each Extension type has certain advantages and limitations, so consider these as you think about what type of Extension you want to build.
Panel
- The panel Extension lives under the stream and can be popped out if the viewer wants to.
- To see them, viewers have to scroll down.
- They should mainly be used for informative content that requires little interaction or content totally separated from the stream.
- Three can be active at the same time.
Video component
- The video component Extension lives on top of the stream and inside of an Extensions Sidebar on the channel page.
- They can take all the interactive space on the video player, but you can take less space if you want, and they have a transparent black background.
- These Extensions will be minimized when the viewers join the stream.
- They should be used for specific use cases that bring complementary or interactive content.
- Two can be active at the same time.
Video overlay
- The video overlay Extension lives on top of the stream; it covers the whole video player.
- These Extensions will be directly visible when the viewer joins the stream.
- They should be used for content that will go hand in hand with the broadcast like game integrations.
- One can be active at a time.
Choosing the right type impacts engagement. Moving my Extension Live Request from a panel to a video component doubled the engagement, because it was meant to be interactive and complementary to the stream.
The JavaScript helper is your new best friend
When building Twitch Extensions, you will need to use the JavaScript helper.
It is a small library, provided by Twitch, that must be imported on your Extension.
https://extension-files.twitch.tv/helper/v1/twitch-ext.min.js
With it, you can access all the useful information from the current user and your Extension. You can also trigger functionality like asking the user to share their identity, follow a channel, and trigger Bits transaction. You can even receive messages from the Extension or react to changes in the stream, allowing you to adapt the content of your Extension appropriately.
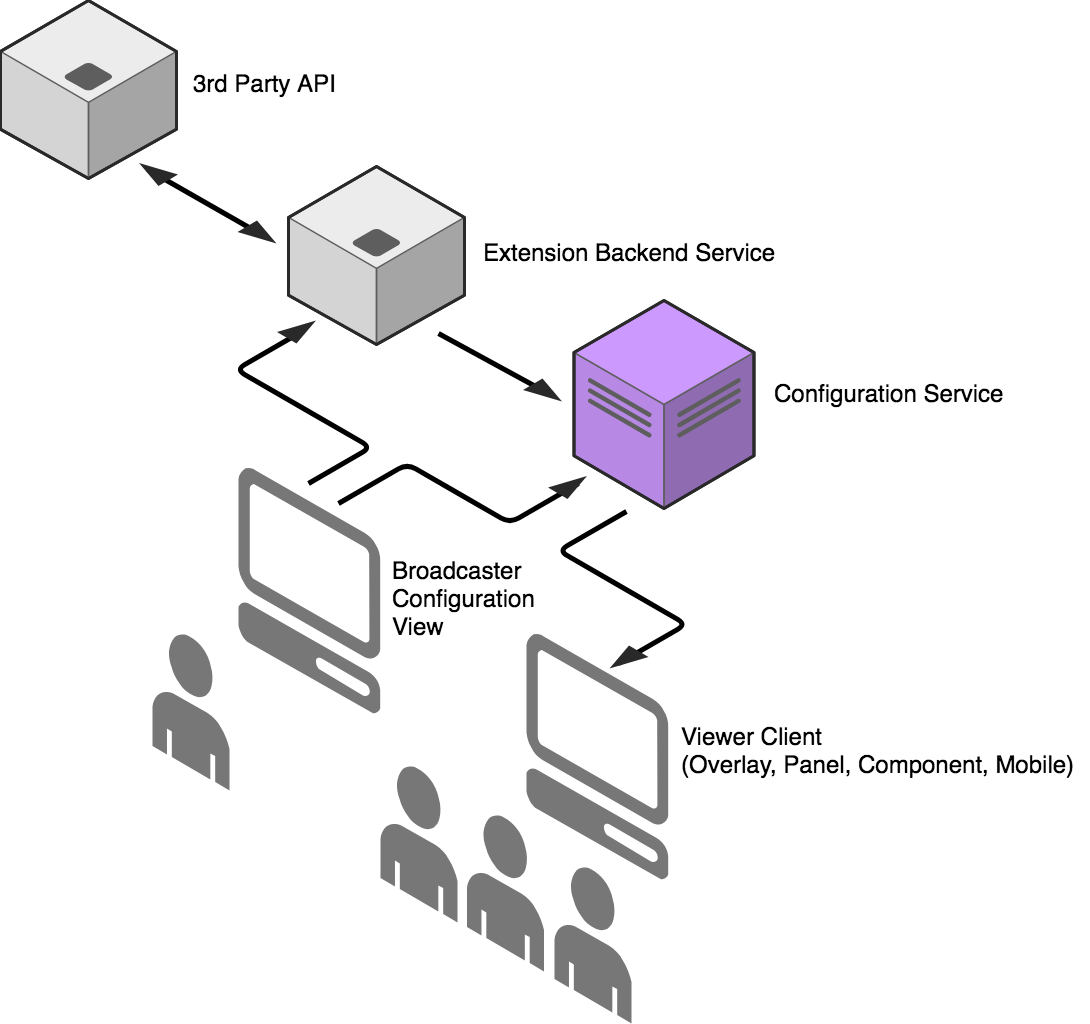
Store data with the Configuration Service
Let’s talk about saving the data. For example, you want to display some messages that can be customized by the streamer.
You could use a database for this, but you will have to set up an API and the database as well as manage scaling and the costs associated with it.
Using the Twitch Configuration Service in my Extension Quests allowed me to remove all costs involved in the project and focus on the concept without having to worry about costs.
The Configuration Service is a free service that allows developers to store data hosted by Twitch and access it directly from their Extension without the need for a backend.

This service offers three segments where you can store data:
- broadcaster: data is shared only on the channel of the broadcaster and can be set from the JavaScript helper by the broadcaster or from an API endpoint. Each channel has its own segment.
- developer: data is shared only on the channel of the broadcaster and can only be set from an API endpoint. Each channel has its own segment.
- global: data is shared with all the channels using the Extension and can only be set from an API endpoint. There is only one for all the channels of your Extension.
You can store up to 5KB of data per segment.
For global data, like maintenance status, or certain configurations, you should use the global segment.
If you want to handle more data, you will need to have your own data storage with a backend in front of it to protect it.
A broadcaster with a bit of experience in programming could change the content of his broadcaster segment easily. To set up things like exclusive features, you should use the developer segment.
PubSub messages help with scaling
You may be wondering: How can I start a poll when the broadcaster hits a button? Do I have to add a WebSocket connection for every user?
You could… Or you can just use the Twitch Extension PubSub. It allows you to send messages to the users of your Extension without having to manage all the scaling of WebSocket or do massive polling from each client. Twitch already manages a PubSub system for you.
With this system, you can send PubSub messages to two targets:
- broadcast: to all the users of a channel.
- global: to all the users of your Extension, but can only be sent from an Extension Backend Service (EBS), which is simply the backend of your application, and you are responsible for hosting it and creating it if you need one.
As an example with this system, a broadcaster could press a button that triggers a PubSub message to all viewers and make text appear on the stream.
Note: You can only send up to 5KB of data and one PubSub per second, per channel.
Engage viewers with Bits
Bits are a virtual good that viewers can use to celebrate and support streamers on Twitch. As a developer, you can enable your Extension so that viewers can use Bits for everything from getting on leaderboards to playing sounds or messages directly on stream, and even influencing gameplay.
Each time a viewer uses Bits in your Extension is an opportunity to engage a stream by displaying visual feedback and showing viewers more ways that they can interact with the stream.
You can listen to Bits transactions in two ways:
Inside the Extension
twitch.ext.bits.onTransactionComplete( transaction => {
if ( transaction.initiator === ‘CURRENT_USER’){
// do personalized feedback
}
else {
// do generic feedback
}
}
From your EBS, using Webhooks
You can then send a PubSub message to your Extension or to a video source overlay.

Note: Bits transaction broadcast does not count in the Twitch Extension PubSub rate.
Let Streamers choose the Bits value
There is no “premade” way to allow streamers to set their own Bits value for a feature in the Extension.
When using Bits in your Extension, you have to create Bits products. They are used to define the possible Bits transaction in your Extension. But, you can create several of them and use them to allow multiple values.
For example, you can create:
- value100: 100 Bits
- value250: 250 Bits
- value500: 500 Bits
And the streamer can simply choose one of them. You could have 50 possible values or two; it is up to you.

You can call the Twitch API from the Extension
Some you might need more information than what the JavaScript helper provides. Since your Extension is a webpage, you can call Twitch’s API directly from it.
Do you want to deactivate your panel Extension when the stream is offline? Check it directly from the API on your Extension using the Streams endpoint with the channelId of the current channel.
window.Twitch.ext.onAuthorized(auth => {
const url = `https://api.twitch.tv/helix/streams/id=${auth.channelId}`;
const fetchData = {
method: “GET”,
headers: {
“Client-ID”: “YourExtensionClientIdHere”
}
};
fetch(url,fetchData)
.then(resp => resp.json()) // Transform the data into json
.then(data => {
if (data.data && data.data.length) {
// Display extension
} else {
// Show offline message
}
});
});
If you have an EBS, make sure to always check server-side the validity of the data sent by your users.
Help viewers notice your Extension
Twitch Extensions are fairly new, so some viewers don’t yet know how to interact with them.
For video overlay Extensions, you might want to engage viewers by showing them they can interact with something on the stream. The best time to do this is when viewers move the mouse on top of the video player, because it means the viewer might not be 100 percent focused on the content in the stream. This is a great opportunity to create a nice call to action and/or animations to engage and educate the viewer about the Extension.
One way to do it is to use the arePlayerControlsVisible from the onContext callback
twitch.ext.onContext( context =>{
if (context.arePlayerControlsVisible) {
// display information
}
else {
// hide information
}
}

Your Extension can — and should — be lazy
Your Extension will not be the primary content of the stream; it will complement it. Viewers will first come for the streamer, then use your work.
With that in mind, you don’t have to display your Extension as fast as possible like a regular website. There will be a bit of buffering before the live feed starts, the viewers will first focus on the content of the stream, then on your Extension. This gives you a lot of time to gather all the necessary data and display it nicely for the viewers.
I recommend you check out this talk by Karl Patrick from TwitchCon 2018 Developer Day to learn more about how to set up design patterns for Twitch scale.
Conclusion
I hope my experiences and learnings building Twitch Extensions help you get started. Extensions are a new paradigm in live interactive content, and I hope to see many of you joining this fun journey!
For more information, visit dev.twitch.tv/build or join the TwitchDev Community Discord.
Ready to build interactive experiences on Twitch? Start now!
Website: LINK

