Kategorie: Technology

  • MicroPython programming on Arduino just got easier

    MicroPython programming on Arduino just got easier

    Reading Time: 3 minutes

    If you’ve been exploring MicroPython on Arduino, you already know how powerful and flexible this Python-based language can be for microcontroller programming. Whether you’re a pro or just starting out, MicroPython opens up a new world of quick prototyping and clean, readable code.

    Now, we’re making it even easier to get started and manage your MicroPython projects with the brand new MicroPython Package Installer for Arduino!

    What’s the MicroPython Package Installer?

    Installing libraries and managing MicroPython code on your Arduino boards can sometimes feel like a chore. Hunting down the right libraries, uploading files manually – let’s be honest, it takes time.

    The MicroPython Package Installer streamlines the entire process:

    • Find packages: Search for libraries directly from Arduino’s official MicroPython package index.
    • Install in seconds: Connect your board, pick a package, and install it with a single click.
    • Custom installations: Want to add a package from a GitHub URL? You can do that too.

    Plus, it automatically converts files into the efficient .mpy format, optimizing size and speed on your microcontroller.

    Why is this a big deal?

    As MicroPython gains importance in the Arduino ecosystem, so does the need for tools that make it accessible and fun. Here’s how the MicroPython Package Installer does that:

    • Automated package installation: No need to worry about manual file management – installing libraries is quick and straightforward.
    • Works on any platform: Whether you’re using Windows, macOS, or Linux, the tool is ready for you.
    • Perfect for beginners: No complicated workflows – just search, install, and start coding.

    With the Arduino MicroPython Package Installer, you can spend less time setting things up and more time building your projects.

    What packages can I find?

    The MicroPython Package Installer connects to the growing Arduino MicroPython package index where you can find:

    • Official Arduino MicroPython libraries: A collection of packages curated and maintained by Arduino for common hardware and tasks.
    • Community-contributed libraries: Useful libraries contributed by the MicroPython community, including sensors, drivers, and more.
    • MicroPython standard libraries: All the official MicroPython libraries from the micropython-lib repository are also available for installation.

    We’re excited to see this registry grow! If you’ve created a library that could help others, consider contributing to the package index on GitHub. Let’s build this ecosystem together!


    How to get started

    Here’s your step-by-step guide to running MicroPython on Arduino:

    1. Install MicroPython on your board

    If your board doesn’t have MicroPython installed yet, start with the Arduino MicroPython Installer. It automatically detects your connected board, downloads the latest firmware, and installs MicroPython with a single click.

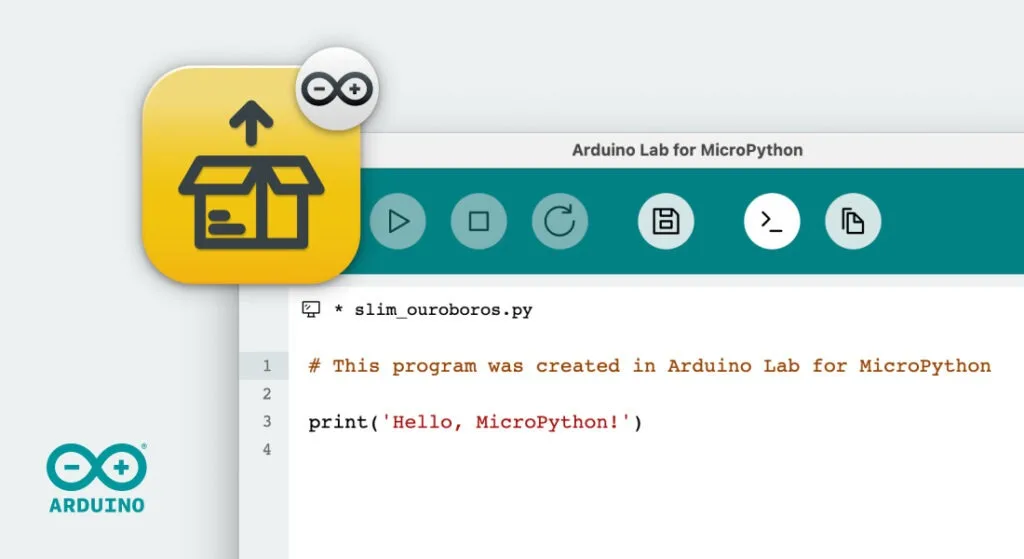
    2. Write and upload code

    Once MicroPython is running, you’ll need a lightweight editor to write and manage your programs. Arduino Lab for MicroPython is the perfect tool for the job. Connect to your board, write your MicroPython code, upload files, and interact with the REPL shell to test your scripts in real time.

    3. Manage MicroPython packages

    Finally, use the MicroPython Package Installer to find and install libraries directly to your board. Search for packages, install them in seconds, or add custom ones from a GitHub URL.

    Ready to dive in?

    MicroPython has been part of the Arduino ecosystem for a while now, but with these tools, the experience is smoother and more beginner-friendly than ever before.

    So, what’s stopping you? Grab your Arduino board, follow the steps above, and start experimenting with MicroPython today. Whether it’s a quick sensor readout, an IoT project, or a creative prototype, you’ll be up and running in no time.

    We can’t wait to see what you’ll build next.

    The post MicroPython programming on Arduino just got easier appeared first on Arduino Blog.

    Website: LINK

  • Adventure Time self-playing guitar

    Adventure Time self-playing guitar

    Reading Time: 3 minutes

    Sensible but silly

    Allie has form with Adventure Time builds, having created a life-size BMO games console to house an OctoPrint 3D printer (see Allie’s GitHub page).

    “My technical background is incredibly diverse, but when it comes to electronics I am completely self-taught,” reveals Allie. “I got interested in the Raspberry Pi because of how incredibly powerful it was (at a really good price point!) and the community behind it.”

    The axe-shaped guitar completes Allie’s cosplay based on Adventure Time’s Marceline character

    Allie chose Raspberry Pi for this “incredibly silly and frivolous” prop project since it would “cover everything needed without me needing to spend tons of time looking for usable peripherals and testing things to make sure that they worked. It was also a chance to try Raspberry Pi 5 for the first time… [I] knew that it would demolish anything I threw at it; [I] didn’t want to worry about lag or usability”

    Since Allie can’t play the bass guitar, it was time for a creative solution that involved real musical instrument hardware and a means of making it play on demand. Allie designed a guitar case to house the electronics, cannibalised small speakers for their innards, and found a way to fool Raspberry Pi 5 into thinking it was drawing the mandated 5 amps, allowing for residual power to connect up a portable battery pack and a generic touchscreen.

    Time trial

    Allie says the time constraint was by far the biggest challenge, since inspiration came only two months before the DragonCon cosplay event at which it was to debut. “It was a huge undertaking to get everything done in time.”

    Allie designed their take on Marceline’s guitar in Fusion 360, with custom speaker enclosures for the Dayton Audio boards, electronics attachments, and detachable parts plus a sliding panel. Allie says the software side was pretty easy. “Raspberry Pi provides most useful things baked right into the OS. I only had to write some simple Python code to create the custom song buttons.”

    This project is based on the Adventure Time cartoon, but the design and fabrication was all down to Allie

    Although some tweaks were needed – “what project would be complete with a couple of iterations?” – these were mainly related to the sliding panel that covers the touchscreen when it’s not in use and which needed to be 3D-printed and painted and still be able to slide smoothly. Allie also tried to find an alternative solution to simply playing Spotify in the Chromium browser, feeling certain there would be a Python library for it, “but alas, there was not!”

    Although designing and creating the Adventure Time Self-Playing Guitar was a considerable task, Allie says the key to any successful build is breaking it into achievable bite-sized pieces. “When tackling a large project, especially if it has elements that are new to you, it’s really easy to get a bit overwhelmed and not know where to start or what to do next. Figuring out the broad strokes of a project first, then separating them into smaller and smaller pieces really helps make things feel a lot more manageable. Also, good sandpaper will save your life!” For another Adventure Time build.

    Allie tries on the newly printed and sanded guitar for size

  • Motion-controlled Rock ‘Em Sock ‘Em Robots will make you feel like Jackman in Real Steel

    Motion-controlled Rock ‘Em Sock ‘Em Robots will make you feel like Jackman in Real Steel

    Reading Time: 2 minutes

    2011’s Real Steel may have vanished from the public consciousness in a remarkably short amount of time, but the concept was pretty neat. There is something exciting about the idea of fighting through motion-controlled humanoid robots. That is completely possible today — it would just be wildly expensive at the scale seen in the movie. But MPuma made it affordable by scaling the concept down to Rock ‘Em Sock ‘Em Robots.

    The original Rock ‘Em Sock ‘Em Robots toy was purely mechanical, with the players controlling their respective robots through linkages. In this project, MPuma modernized the toy with servo motors controlled via player motion. 

    As designed, the motion-controlled robot has three servo motors: one for the torso rotation, one for the shoulder, and one for the elbow. If desired, the builder can equip both robots in that manner. An Arduino UNO Rev3 board controls those motors, making them match the player’s movement.

    The Arduino detects player movement through three potentiometers — one for each servo motor. Twisting the elbow potentiometer will, for example, cause the robot’s elbow servo motor to move by the same angle. That arrangement is very responsive, because analog potentiometer readings are quick. It is, therefore, suitable for combat.

    The final piece of the puzzle is attaching the potentiometers to the player’s body. MPuma didn’t bother with anything complicated or fancy, they just mounted the potentiometers to pieces of cardboard and strapped those to the player’s arm.

    This may not be as cinematic as Real Steel’s robots, but you can recreate MPuma’s project for less than you spent to see that movie in theaters. 

    [youtube https://www.youtube.com/watch?v=YuDbFviV1bw?feature=oembed&w=500&h=281]

    The post Motion-controlled Rock ‘Em Sock ‘Em Robots will make you feel like Jackman in Real Steel appeared first on Arduino Blog.

    Website: LINK

  • The Swervebot is an omnidirectional robot that combines LEGO and 3D-printed parts

    The Swervebot is an omnidirectional robot that combines LEGO and 3D-printed parts

    Reading Time: 2 minutes

    Robotic vehicles can have a wide variety of drive mechanisms that range from a simple tricycle setup all the way to crawling legs. Alex Le’s project leverages the reliability of LEGO blocks with the customizability of 3D-printed pieces to create a highly mobile omnidirectional robot called Swervebot, which is controllable over Wi-Fi thanks to an Arduino Nano ESP32.

    The base mechanism of a co-axial swerve drive robot is a swerve module that uses one axle + motor to spin the wheel and another axle + motor to turn it. When combined with several other swerve modules in a single chassis, the Swervebot is able to perform very complex maneuvers such as spinning while moving in a particular direction. For each of these modules, a pair of DC motors were mounted into custom, LEGO-compatible enclosures and attached to a series of gears for transferring their motion into the wheels. Once assembled into a 2×2 layout, Le moved onto the next steps of wiring and programming the robot.

    The Nano ESP32 is attached to two TB6612 motor drivers and a screen for displaying fun, animated eyes while the robot is in-motion or idling. Controlling the swerve bot is easy too, as the ESP32 hosts a webpage full of buttons and other inputs for setting speeds and directions.

    For more details on the Swervebot, you can read Le’s write-up here on Instructables.

    [youtube https://www.youtube.com/watch?v=khSZFTIIhO8?feature=oembed&w=500&h=281]

    The post The Swervebot is an omnidirectional robot that combines LEGO and 3D-printed parts appeared first on Arduino Blog.

    Website: LINK

  • A Game Boy is the worst and best option for a car’s dash

    A Game Boy is the worst and best option for a car’s dash

    Reading Time: 2 minutes

    If your car was made in the last decade, its dash probably has several displays, gauges, and indicator lights. But how many of those do you actually look at on a regular basis? Likely only one or two, like the speedometer and gas gauge. Knowing that, John Sutley embraced minimalism to use a Game Boy as the dash for his car.

    Unlike most modern video game consoles, which load assets into memory before using them, the original Nintendo Game Boy used a more direct tie between the console and the game cartridge. They shared memory, with the Game Boy accessing the cartridge’s ROM chip at the times necessary to load just enough of the game to continue. That access was relatively fast, which helped to compensate for the small amount of available system RAM.

    Sutley’s hack works by updating the data in a custom “cartridge’s” equivalent of ROM (which is rewritable in this case, and therefore not actually read-only). When the Game Boy updates the running “game,” it will display the data it sees on the “ROM.” Sutley just needed a way to update that data with information from the car, such as speed.

    The car in question is a second-generation Hyundai Sante Fe. Like all vehicles available in the US after 1998, it has an OBDII port and Sutley was able to tap into that to access the CAN bus that the car uses to send data between different systems. That data includes pertinent information, such as speed.

    Sutley used an Arduino paired with a CAN shield to sniff and parse that data. The Arduino then writes to the “ROM” with whatever Sutley wants to display on the Game Boy’s screen, such as speed.

    This is, of course, a remarkably poor dash. The original Game Boy didn’t even have a backlight for the screen, so this would be downright unsafe at night. But we can all agree that it is very cool.

    [youtube https://www.youtube.com/watch?v=xroxYBp9DOo?feature=oembed&w=500&h=281]

    The post A Game Boy is the worst and best option for a car’s dash appeared first on Arduino Blog.

    Website: LINK

  • The need to invest in AI skills in schools

    The need to invest in AI skills in schools

    Reading Time: 6 minutes

    Earlier this week, the UK Government published its AI Opportunities Action Plan, which sets out an ambitious vision to maintain the UK’s position as a global leader in artificial intelligence. 

    Whether you’re from the UK or not, it’s a good read, setting out the opportunities and challenges facing any country that aspires to lead the world in the development and application of AI technologies. 

    In terms of skills, the Action Plan highlights the need for the UK to train tens of thousands more AI professionals by 2030 and sets out important goals to expand education pathways into AI, invest in new undergraduate and master’s scholarships, tackle the lack of diversity in the sector, and ensure that the lifelong skills agenda focuses on AI skills. 

    Photo of a group of young people working through some Experience AI content.

    This is all very important, but the Action Plan fails to mention what I think is one of the most important investments we need to make, which is in schools. 

    “Most people overestimate what they can achieve in a year and underestimate what they can achieve in ten years.”

    While reading the section of the Action Plan that dealt with AI skills, I was reminded of this quote attributed to Bill Gates, which was adapted from Roy Amara’s law of technology. We tend to overestimate what we can achieve in the short term and underestimate what we can achieve in the long term. 

    In focusing on the immediate AI gold rush, there is a risk that the government overlooks the investments we need to make right now in schools, which will yield huge returns — for individuals, communities, and economies — over the long term. Realising the full potential of a future where AI technologies are ubiquitous requires genuinely long-term thinking, which isn’t always easy for political systems that are designed around short-term results. 

    Photo focused on a young person working on a computer in a classroom.

    But what are those investments? The Action Plan rightly points out that the first step for the government is to accurately assess the size of the skills gap. As part of that work, we need to figure out what needs to change in the school system to build a genuinely diverse and broad pipeline of young people with AI skills. The good news is that we’ve already made a lot of progress. 

    AI literacy

    Over the past three years, the Raspberry Pi Foundation and our colleagues in the Raspberry Pi Computing Education Research Centre at the University of Cambridge have been working to understand and define what AI literacy means. That led us to create a research-informed model for AI literacy that unpacks the concepts and knowledge that constitute a foundational understanding of AI. 

    In partnership with one of the leading UK-based AI companies, Google DeepMind, we used that model to create Experience AI. This suite of classroom resources, teacher professional development, and hands-on practical activities enables non-specialist teachers to deliver engaging lessons that help young people build that foundational understanding of AI technologies. 

    We’ve seen huge demand from UK schools already, with thousands of lessons taught in UK schools, and we’re delighted to be working with Parent Zone to support a wider roll out in the UK, along with free teacher professional development.  

    CEO Philip Colligan and Prime Minister Keir Starmer at the UK launch of Experience AI.
    CEO Philip Colligan and Prime Minister Keir Starmer at the UK launch of Experience AI.

    With the generous support of Google.org, we are working with a global network of education partners — from Nigeria to Nepal — to localise and translate these resources, and deliver locally organised teacher professional development. With over 1 million young people reached already, Experience AI can plausibly claim to be the most widely used AI literacy curriculum in the world, and we’re improving it all the time. 

    All of the materials are available for anyone to use and can be found on the Experience AI website.

    There is no AI without CS

    With the CEO of GitHub claiming that it won’t be long before 80% of code is written by AI, it’s perhaps not surprising that some people are questioning whether we still need to teach kids how to code.

    I’ll have much more to say on this in a future blog post, but the short answer is that computer science and programming is set to become more — not less — important in the age of AI. This is particularly important if we want to tackle the lack of diversity in the tech sector and ensure that young people from all backgrounds have the opportunity to shape the AI-enabled future that they will be living in. 

    Close up of two young people working at a computer.

    The simple truth is that there is no artificial intelligence without computer science. The rapid advances in AI are likely to increase the range of problems that can be solved by technology, creating demand for more complex software, which in turn will create demand for more programmers with increasingly sophisticated and complex skills. 

    That’s why we’ve set ourselves the ambition that we will inspire 10 million more young people to learn how to get creative with technology over the next 10 years through Code Club. 

    Curriculum reform 

    But we also need to think about what needs to change in the curriculum to ensure that schools are equipping young people with the skills and knowledge they need to thrive in an AI-powered world. 

    That will mean changes to the computer science curriculum, providing different pathways that reflect young people’s interests and passions, but ensuring that every child leaves school with a qualification in computer science or applied digital skills. 

    It’s not just computer science courses. We need to modernise mathematics and figure out what a data science curriculum looks like (and where it fits). We also need to recognise that AI skills are just as relevant to biology, geography, and languages as they are to computer science. 

    A teacher assisting a young person with a coding project.

    To be clear, I am not talking about how AI technologies will save teachers time, transform assessments, or be used by students to write essays. I am talking about the fundamentals of the subjects themselves and how AI technologies are revolutionising the sciences and humanities in practice in the real world. 

    These are all areas where the Raspberry Pi Foundation is engaged in original research and experimentation. Stay tuned. 

    Supporting teachers

    All of this needs to be underpinned by a commitment to supporting teachers, including through funding and time to engage in meaningful professional development. This is probably the biggest challenge for policy makers at a time when budgets are under so much pressure. 

    For any nation to plausibly claim that it has an Action Plan to be an AI superpower, it needs to recognise the importance of making the long-term investment in supporting our teachers to develop the skills and confidence to teach students about AI and the role that it will play in their lives. 

    I’d love to hear what you think and if you want to get involved, please get in touch.

    Website: LINK

  • The big One-Five-Oh

    The big One-Five-Oh

    Reading Time: 2 minutes

    Like Raspberry Pi itself, the magazine has just been going from strength to strength – although we’d have not got anywhere without the wonderful community we get to highlight, and the readers who pick up a copy at the shops or get it delivered to their door every month. Thank you all!

    Ten years official

    Next year will also coincide with ten years of the magazine being official, which means I’ll have worked on the magazine for ten years. At an old job, someone told me about how they change careers every ten years, and it’s something I think about often. I don’t mean because I’m thinking about leaving The MagPi – as a career I’ve been a magazine writer for about 13 years, so I’m long past due that anyway – but because ten years is a long time. It also probably feels especially longer because since 2015 a lot of major things have happened around the world.

    In my first year at Raspberry Pi, we put Raspberry Pi Zero on the cover – that was 2015! In fact when I joined, several months before the famous issue 40 came out, it was already on the cards. We were working up to it happening, building up the magazine with that issue as the goal. While issue 150 won’t be that grand (unfortunately we cannot put Raspberry Pi 500 on the cover, sorry), it will still be just as important. We’ll even have a fancy cover! We don’t know what kind of fancy cover yet but mark my words, fancy.

    Beyond 150

    As you may have noticed, a huge number of Raspberry Pi products have been released over the last few months and I am very excited to get to play with them more in 2025. The X00 series of Raspberry Pi are my fave, so I’m looking forward to getting my 500 shortly (it’s not even been announced as I write this) and upgrading my little workstation. I still have an AI Camera waiting to be used as well and I’m excited to get started with that – computer vision is one of my favourite uses of machine learning.

    So I hope you’ll join us for issue 150 and for the rest of 2025. While I may not be a spry 20-something anymore like when I started on it, the magazine is not slowing down one bit.

  • PiFi review: mobile wireless access solution

    PiFi review: mobile wireless access solution

    Reading Time: 2 minutes

    Enter, PiFi, a simple kit that allows you to easily create a fast and secure wireless network with just a Raspberry Pi.

    The kit comes with just three items: a microSD card with the software preloaded, an Ethernet cable to plug into the nearest router, and the all-important Wi-Fi dongle that handles a lot of the heavy lifting for the wireless.

    ou can use PiFi with WireGuard or OpenVPN

    External vs internal

    When plugged into a USB 3.0 socket, the wireless dongle is actually faster than the internal wireless on Raspberry Pi 4 when utilised as an access point – PiFi reckons it’s up to eight times faster, and in our tests it was definitely running noticeably faster for internal speeds.

    Set up is a doddle – you literally just plug everything in and turn Raspberry Pi on. You can then connect via the smartphone app, set up a new admin password, and you’re done. There’s extra settings you can start digging around in, and you can even tunnel through a VPN if you have one. By default, WireGuard is available for connecting to a VPN; however, OpenVPN can be selected in the VPN tab of the app.

    A smartphone app is used to configure it

    Plug and play

    While PiFi is still fairly new, the documentation is very robust. Access to the latter is made available straight from the app if you fancy diving deeper into the configuration – and there’s quite a lot of depth to it, to the point where you might break some stuff. Luckily, there’s a clever hardware reset involving unplugging the dongle and waiting a minute or so before plugging it back in.

    The range is fine. You won’t be replacing your home router with something like this, but it can easily work to bring better Wi-Fi to a room or corner of the house if you have a spare LAN port available. And, as we said before, it’s definitely coming with us to all future Airbnbs.

    Verdict

    9/10

    A very good piece of kit that simplifies portable access points, with good enough wireless range to boot.

  • Hackberry Pi Zero

    Hackberry Pi Zero

    Reading Time: 4 minutes

    “I was inspired to create the Hackberry Pi Zero about three years ago when I found a project about reverse-engineering on Hackaday,” Zitao says. “I thought it would be really cool to have a device with a thumb keyboard, so I began reverse-engineering old BlackBerry keyboards and made it technically work. I then saw a project called Beepberry and thought it would be super-cool to create a similar device with a different BlackBerry keyboard. I basically looked to use the same design but mount a Raspberry Pi Zero 2 W instead.”

    Well-connected

    Beepberry – or Beepy as it’s now known – is a versatile device designed primarily to run various messaging services via the chat app Beeper. Created by Eric Migicovsky, who founded the Pebble smartwatch, Beepy uses the keyboard of a BlackBerry Classic and a Raspberry Pi Zero W. It allows access to Linux, which can be viewed on a 2.7-inch black and white LCD display.

    Zitao created printable buttons designed to look like the symbols you’d see on a PlayStation controller

    “My start point was to design a learning tool for Linux beginners like me, but also address the pain points from the Beepberry such as using a display with a backlight and adding external USB ports,” Zitao says. It’s why the Hackberry Pi Zero has three USB 2.0 ports, made possible thanks to the use of an internal hub. “As the project progressed, I found it would also be cool to add a STEMMA-style I2C port for communicating with sensors. In this way, beginners can learn to code with Python.”

    The device also has an external TF card slot so that the operating system image can be replaced very easily. Flip the device onto its back and you’ll find Zitao has added three compartments as well. One of these can be opened to reveal Raspberry Pi Zero 2 W, giving users easy access. The other two house a pair of swappable batteries and, in keeping with the mobile phone theme, these take Nokia BL-5C rechargeable lithium-ion packs. You’re able to replace them within ten seconds without killing the power.

    Key to success

    Of all of the components, the keyboard is arguably the most eye-catching and Zitao says the choice of BlackBerry keys was rather straightforward. “The BlackBerry keyboards are known to be good quality and they offer a great typing experience,” he notes. “The optical trackpad from a BlackBerry keyboard can work as a mouse too and this also offers a very good user experience. The choice of keyboard influenced the size of the screen because I needed them to fit alongside each other.” As it happens, it’s a perfect fit.

    The testing stage shows how the device, regardless of computer used, is connected together before being placed in the case

    Zitao hasn’t stuck to using just one BlackBerry Qwerty keyboard. Although he initially chose to incorporate one from the BlackBerry Classic (or Q20), a smartphone that was unveiled in 2014, he has also created another device that makes use of the keyboard from a Q10 (unveiled the previous year). He has also developed a third variant – one that uses a keyboard from the BlackBerry Porsche Design P’9983. And there has been scope for a bit of fun.

    One of the devices Zitao has made features a set of colourful buttons showing a circle, triangle, cross, and square, which gamers will instantly spot as having been inspired by Sony’s PlayStation controller. “I actually started making a Bluetooth keyboard variant of the BlackBerry keyboards about six months ago and at that time the top row of keys were the original BlackBerry-style keys,” he says. “Then a customer suggested I try PlayStation-like buttons. I found they fitted very well and were easy to print.”

    Mapping the way

    The keyboards needed a bit of work in order to get them to operate with Raspberry Pi – notably, hooking them up to a keyboard controller which uses a RP2040 chip. There’s an analogue button which needs to be switched on so that the keyboard controller communicates with Raspberry Pi Zero 2 W. If it is turned off, another device can be connected to the USB-C port – a PC keyboard, perhaps – and that will be used to communicate with Raspberry Pi instead.

    A STEMMA QT port has been added, accessible from the right-hand side. It allows breakout boards and sensors to be connected

    It’s also possible to customise the keymap. “I chose the open-sourced firmware QMK to power the keyboard through the USB interface and one benefit for that is the user can remap the keyboard layout if they want by using the Vial app,” Zitao explains. “The BlackBerry keyboard only has about 40 keys so I designed three layers for the keyboard, which means each key can be mapped into three symbols or letters.”

    The remapping tool vial is basically a web app and Zitao says Raspberry Pi Zero 2 W doesn’t have enough power to open it due to its limited RAM. “I designed a USB-KVM on board to make the keyboard controller chip able to communicate with the external computer so the customer can edit the keymap on their computer,” he adds. “At the same time, the hardware can make the Hackberry Pi Zero work as an emergency keyboard.”

    It certainly works well. Hackers are likely to use Kali Linux – an advanced penetration testing distro for ethical hacking and network security assessments – but Zitao just likes to play around. “I’ve used the devices to learn coding with Python, learn the Linux command-line terminal, and to play some retro games. It really is a lot of fun.”

  • Entry is open for Coolest Projects 2025

    Entry is open for Coolest Projects 2025

    Reading Time: 6 minutes

    Coolest Projects is our global technology showcase for young people aged up to 18. Coolest Projects gives young creators the incredible opportunity to share the cool stuff they’ve made using digital technology with a global audience. Everyone who takes part will also receive certificates and rewards to celebrate their achievements.

    Young creator Jay showcases his Coolest Projects creation at an in-person event.

    What you need to know about Coolest Projects

    The Coolest Projects online showcase is open to young people worldwide. Young creators can enter their projects to share them with the world in our online project gallery and join our extra special livestream event to celebrate what they have made with the global Coolest Projects community.

    By taking part in Coolest Projects, young people can join an international community of young makers, represent their country, receive feedback on their projects, and get certificates to recognise their achievements.

    Coolest Projects is completely free to take part in, and we welcome all digital technology projects, from young people’s very first projects to advanced builds. The projects also don’t have to be completed before they can be submitted.

    Photo of two young people sitting at laptops at a Coolest Projects event.

    Projects can be submitted to one of seven categories: Scratch, games, web, mobile apps, hardware, advanced programming, and AI (new for 2025).

    • Young creators up to age 18 can take part individually or in teams of up to five friends
    • Any young person anywhere in the world can take part in the online showcase, and there are in-person events in some countries for local creators, too (find out more below)
    • Submissions for the online showcase are now open and close on 28 May 2025
    • All creators, mentors, volunteers, teachers, parents, and supporters are invited to the special celebration livestream on 25 June 2025

    We know Coolest Projects has a big impact on young people all over the world, and we can’t wait to see your creations for 2025. You can find out more about the incredible creativity and collaboration from mentors and makers worldwide in our 2024 impact report.

    How to submit your project

    Photo of three young creators discussing their project at an in-person Coolest Projects event.

    Taking part in Coolest Projects is simple:

    • Young people think of an idea for their project or choose something they’ve already made and are proud of
    • Young people work with friends to create their project or make it on their own 
    • Creators (with the help of mentors if needed) enter projects via the Coolest Projects website by 28 May
    • Creators’ projects are shared with the world in the online showcase gallery
    • Creators, mentors, and supporters explore the amazing projects in the online gallery and join the livestream on 25 June to celebrate young creators’ achievements with the Coolest Projects community worldwide

    Mentors — entering more than one project? Sign up for a group code, and your young people can link their projects to your account.

    1. Sign up or log in. If you don’t have one already, you’ll need to set up a Raspberry Pi account. Click on the ‘sign up’ link in the top right-hand corner of the website to create one, and provide your details. You’ll be emailed a verification code as part of the sign-up process. If you already have an account, you can just log in.
    1. Create a group. Once signed in, you’ll be able to create a group. You’ll be asked questions about your group, including the group name and the country you’re based in, and be asked to agree to some privacy policies before continuing. You will then be able to view your group code and group submissions on your group dashboard. 
    Digital photo of the Coolest Porjects 2025 group code dashboard
    1. Share your group code with your young people. Your group dashboard should look like this, with your group code displayed. The group code is what your young people will need to link their submissions to your account. They’ll be asked to input their group code at the start of the project submission form.

    Submit your coolest projects. Every young person who uses your group code will have their project linked to your account. You can review and edit their projects in your group dashboard and submit them from there. There is no limit to the number of young people who can submit entries using your group code.

    For a more detailed run-through of how to use group codes, please see our ‘how-to’ video.

    Coolest Projects in-person events in 2025

    As well as the global online showcase, Coolest Projects in-person events are held for young people locally in certain countries. We encourage creators to take part in both the online showcase and their local in-person event. In 2025, creators can attend the following in-person events, run by the Raspberry Pi Foundation and partner organisations around the world:

    • Coolest Projects Ireland, 1 March 2025 (run by the Foundation) — entry closes on Friday 14 February 
    • Coolest Projects Belgium, 26 April 2025 (run by CoderDojo Belgium)
    • Coolest Projects USA, 5 April 2025 (run by the Foundation) — entry closes on Friday 14 March 2025
    • Coolest Projects UK, 17 May 2025 (run by the Foundation) — entry closes on Friday 2 May 2025 
    • Coolest Projects India, 2025 date coming soon (run by the Foundation)
    • Coolest Projects Ghana, 2025 date coming soon (run by Ghana Code Club)
    • Coolest Projects Malaysia, 2025 date coming soon (run by Penang Science Cluster)
    • Coolest Projects South Africa, 2025 date coming soon (run by CoderLevelUp)
    Photo of young creators getting ready to cheer, whilst attending an in-person Coolest Projects event.

    More events are on the way, so sign up for the Coolest Projects newsletter to be sure you hear about any in-person events in your country. And if there isn’t an event near you, don’t worry, as the online showcase is open to any young person anywhere in the world.

    Need help with your submission? 

    Coolest Projects welcomes all digital tech projects, from beginner to advanced, and there are loads of great resources available to help you help the young people in your community to take part. If you’re searching for inspiration, take a look at the 2024 showcase gallery, where you can explore the incredible projects submitted by participants last year.

    You’ll find everything you need to know about all seven Coolest Projects categories on our category pages, including our brand new AI category. Our projects site is also a great place for participants to begin — there are hundreds of free step-by-step project guides to help young people create their own projects, whether they’re experienced tech creators or just getting started.

    Photo of a young creator showcasing they're project to two Raspberry Pi Foundation judges.

    We will also be running a series of online webinars for mentors and young people to help participants develop their creations for each Coolest Projects category. Sign up for the sessions here. All sessions will be recorded, so you can watch them back if you can’t join live.

    Be sure to check out the Coolest Projects guidance page for resources to help you support young people throughout their Coolest Projects journey, including a mentor guide and session plans. 

    There’s lots more exciting news to come, from the announcement of our VIP judges to details about this year’s swag, so sign up for updates to be the first to know. 

    Whether your coders have already made something that they want to share, or they’re inspired to make something new, Coolest Projects is the place for them. We can’t wait to see what they create!

    Website: LINK

  • This robot can dynamically change its wheel diameter to suit the terrain 

    This robot can dynamically change its wheel diameter to suit the terrain 

    Reading Time: 2 minutes

    A vehicle’s wheel diameter has a dramatic effect on several aspects of performance. The most obvious is gearing, with larger wheels increasing the ultimate gear ratio — though transmission and transfer case gearing can counteract that. But wheel size also affects mobility over terrain, which is why Gourav Moger and Huseyin Atakan Varol’s prototype mobile robot, called Improbability Roller, has the ability to dynamically alter its wheel diameter.

    If all else were equal (including final gear ratio), smaller wheels would be better, because they result in less unsprung mass. But that would only be true in a hypothetical world on perfectly flat surfaces. As the terrain becomes more irregular, larger wheels become more practical. Stairs are an extreme example and only a vehicle with very large wheels can climb stairs.

    Most vehicles sacrifice either efficiency or capability through wheel size, but this robot doesn’t have to. Each of its wheels is a unique collapsing mechanism that can expand or shrink as necessary to alter the effective rolling diameter. Pulley rope actuators on each wheel, driven by Dynamixel geared motors by an Arduino Mega 2560 board through a Dynamixel shield, perform that change. A single drive motor spins the wheels through a rigid gear set mounted on the axles, and a third omni wheel provides stability. 

    This unique arrangement has additional benefits beyond terrain accommodation. The robot can, for instance, shrink its wheels in order to fit through tight spaces. It can also increase the size of one wheel, relative to the other, to turn without a dedicated steering rack or differential drive system. 

    [youtube https://www.youtube.com/watch?v=hq-aZHGpPWU?feature=oembed&w=500&h=281]
    [youtube https://www.youtube.com/watch?v=LHD4KCo69gI?feature=oembed&w=500&h=281]

    The post This robot can dynamically change its wheel diameter to suit the terrain  appeared first on Arduino Blog.

    Website: LINK

  • This maker designed a custom flight controller for his supercapacitor-powered drone

    This maker designed a custom flight controller for his supercapacitor-powered drone

    Reading Time: 2 minutes

    Basic drones are very affordable these days—you can literally find some for less than the cost of a fast food drive-thru meal. But that doesn’t mean drones are easy to control. That is actually quite difficult, but manufacturers are able to work off of established reference designs. In a video that perfectly illustrates the difficulty, The Tinkering Techie attempted to make a supercapacitor-powered drone with his own custom flight controller. 

    Most airplane designs have inherent aerodynamic stability. Even without power, they can continue to glide. Even helicopters have some inherent stability in the form of autorotation. Quadrotor drones do not—they need constant power and very frequent motor control updates just to stay aloft. Even the slightest control error will result in catastrophic failure. Despite knowing the challenge, The Tinkering Techie wanted to try making his own flight controller.

    Aside from the custom flight controller, this drone is also unique for its power storage. Instead of conventional lithium batteries, it has a bank of supercapacitors. Those can fully charge in seconds—though they don’t store energy well over long periods of time. 

    The job of the flight controller is directing power from the supercapacitors to the motors (brushed DC motors, in this case) in a very precise manner. An Arduino Nano 33 IoT board oversees that process and The Tinkering Techie chose it because it has onboard sensors useful for a quadcopter, including a gyroscope and an accelerometer. A custom PCB hosts the Arduino and the supercapacitors, while a simple 3D-printed frame ties everything together.

    Unfortunately, this isn’t a success story and The Tinker Techie ultimately failed to achieve stable flight. The are many potential reasons for that, but one of the most glaring was the use of brushed DC motors, which can’t respond as fast as brushless DC motors can — an important factor for a drone.

    [youtube https://www.youtube.com/watch?v=s_Mqow2XjDA?feature=oembed&w=500&h=281]

    The post This maker designed a custom flight controller for his supercapacitor-powered drone appeared first on Arduino Blog.

    Website: LINK

  • Export data from Arduino Cloud to AWS S3

    Export data from Arduino Cloud to AWS S3

    Reading Time: 3 minutes

    Managing your IoT data just got a whole lot easier — Arduino Cloud, now lets you send your time series data straight to AWS S3. With this seamless connection, organizing and analyzing your data is a breeze.

    In case you don’t know, Arduino Cloud is a robust, integrated platform that simplifies the development and lifecycle management of IoT and industrial products at scale. Today, we’re very excited to share its integration with AWS S3 storage.

    This is all part of our ongoing work with AWS, which also brings you Arduino Cloud licenses on the AWS Marketplace and soon, support for AWS IoT SiteWise. Stay tuned for more!

    New feature spotlight: AWS S3 integration

    If you’re familiar with the AWS ecosystem and you’ve started using Arduino Cloud, you can now extract time series data and publish it directly to Amazon S3 buckets. This new feature uses AWS’s scalable storage system and helps you access, manage, and analyze your IoT data easily.

    You can now extract data at scheduled intervals, aggregate, and store it in CSV files within S3; which is a huge step to connect your Arduino devices with your current AWS setup. This functionality is available to all users on premium Arduino Cloud plans that support API access: Entry, Maker, Maker Plus, School and Business, . Whether you’re tracking environmental data from a smart garden or monitoring industrial equipment, the AWS S3 integration provides a straightforward way to manage large datasets.

    Check out this Github link to learn how to extract time series samples from Arduino cloud and publish them to a AWS S3 destination bucket. 

    Seamless experience with AWS Marketplace

    The new S3 integration feature is even more powerful when combined with the availability of Arduino Cloud licenses on the AWS Marketplace. By purchasing licenses through AWS, there is no need for separate billing platforms, you benefit from unified billing. This makes it easier to manage subscriptions and simplify accounting, especially for organizations that are s already using AWS. They can get started with Arduino Cloud without the hassle of separate billing platforms. You can learn more about it here

    With this new AWS S3 integration, Arduino Cloud keeps growing its ecosystem. This makes it easier for developers to create and expand IoT solutions. 

    Get started with the new AWS S3 and Marketplace integration 

    With the new AWS integrations, you can:

    • Take control of your IoT data with our new AWS S3 integration. Check out the documentation to learn more details.
    • Simplify your billing by purchasing Arduino Cloud licenses directly through the AWS Marketplace. Explore the available plans on our AWS Marketplace listing.

    This is just the beginning. We’re also adding support for AWS IoT SiteWise, bringing even more capabilities to your IoT projects. Stay updated by following the Arduino blog.

    If you have questions or need support, visit our contact page. We’re here to help you get the most out of Arduino Cloud. Get started today!

    The post Export data from Arduino Cloud to AWS S3 appeared first on Arduino Blog.

    Website: LINK

  • Highlights from Coolest Projects South Africa 2024

    Highlights from Coolest Projects South Africa 2024

    Reading Time: 4 minutes

    Afandi Indiatsi, our Programme Coordinator in Africa, recently attended Coolest Projects South Africa 2024. Read on to hear her highlights.

    What happens when creativity, enthusiasm, fun, and innovation come together? You get Coolest Projects South Africa 2024 — a vibrant showcase of students from all walks of life displaying their talent and shaping the future of technology.

    Dozens of projects exhibited at the event in Cape Town

    Hosted by our partner, Coder Level Up, Coolest Projects South Africa brought together creators, mentors, educators, and industry leaders to celebrate the creativity and ingenuity of young tech enthusiasts from across the country.

    A group of educators at the Coolest Projects South Africa event.

    With nearly 200 projects submitted and dozens showcased, the event highlighted the impressive talent and potential of South Africa’s next generation of innovators.

    Taking place at the University of Western Cape’s Department of Education in Cape Town, the event was a hub of excitement. Right from the start the venue was buzzing with activity, with the South African World Robot Olympiad (WRO) team kicking things off with a fantastic demonstration of their robotic inventions. Their creations came alive to cheers and applause as they performed flawlessly, leaving attendees in awe — what an inspiration they were!

    A group of young people showcases their projects at Coolest Projects South Africa.

    Standout projects ranged from garbage collection to chocolate

    The participants then presented their projects, each of which was ingenious in its own way. From hardware and visual programming to game development and website creation, there was a wealth of ideas on display — and a demonstration of the boundless potential of young minds when given the right tools and guidance. Adding to the inclusive spirit of the event, participants from Durban and East London joined remotely, their energy resonating through Zoom.

    Two young students display their creations at Coolest Projects South Africa.

    One standout project was a garbage collection robot created by an all-girls team from Nguzo Saba School. Using a LEGO kit, these creators transformed their idea into a functional invention. What made their project exceptional was their ability to improvise and enhance the kit to achieve their desired functionality. This was a true testament to their creativity, resilience, and problem-solving skills.

    A group of young people showcases their projects at Coolest Projects South Africa.

    Another memorable presentation came from Emma, who used Scratch to tell the story of the history of chocolate. Her engaging narrative spanned the journey of chocolate from the Olmec civilisation in Latin America to today’s chocolate museums. Emma’s research was extensive, and she captivated the judges not only with her presentation but also with chocolate samples for everyone to enjoy — a sweet touch that left a lasting impression!

    Young people display their creations at Coolest Projects South Africa.

    How Coolest Projects harnesses the power of education, creativity, and mentorship  

    A recurring theme throughout the event was the importance of mentorship. Many of the young people shared that they had sought guidance from mentors, teachers, and family members while developing their projects. This collaborative spirit underscored the role of supportive communities in fostering innovation and creativity among young creators.

    Coolest Projects South Africa 2024 was more than a showcase of talent. It was a reminder of the transformative power of education, mentorship, and creativity. Every project had a story of passion and perseverance, and every creator left inspired to dream bigger.

    As we reflect on this event — and the many other Coolest Projects events that took place around the world this past year — we are reminded that the future of technology is in capable, imaginative hands.

    Get involved with Coolest Projects in 2025

    Coolest Projects will be back and bigger than ever before in 2025. 

    The Coolest Projects online showcase is open globally to any young person up to age 18. Registration opens 14 January, and we’ll host a celebratory livestream on 25 June.

    Thanks to an incredible network of partners, Coolest Projects events will also be hosted in person in many countries around the world. Go to the Coolest Projects website for more event dates and details.

    Website: LINK

  • Prototype faster and smarter in 2025: Meet the Arduino Pro Portenta Proto Kit

    Prototype faster and smarter in 2025: Meet the Arduino Pro Portenta Proto Kit

    Reading Time: 3 minutes

    Launching today at CES 2025, the Arduino Pro Portenta Proto Kit is here to revolutionize how professionals approach prototyping. Designed to empower engineers, designers, and innovators from all walks of life, this kit provides everything you need to turn your ideas into functional prototypes quickly, efficiently, and without conventional limitations.

    Available in two variants – Portenta Proto Kit ME (Motion Environment) and VE (Vision Environment, available later this month) – the kit equips you with advanced tools to tackle any challenge, from environmental sensing to machine vision to vibration detection, accelerating the prototyping phase from weeks to days and days to hours. Whether you’re developing predictive maintenance systems or high-speed test rigs, the flexible and comprehensive Portenta Proto Kit has you covered.

    What’s inside the Portenta Proto Kit?

    At the heart of the kit is the powerful Portenta H7, paired with the versatile Portenta Mid Carrier. These components support advanced processing and edge machine learning, ensuring your prototypes are as future-ready as they are functional. 

    The kit also includes the full set of our innovative Modulino nodes for rapid sensing and actuation, 4G GNSS Module Global for connectivity, and an Arduino Cloud for Business Voucher for your first three months of seamless cloud integration – so you can store, display, and analyze data remotely. 

    Depending on your chosen configuration, you’ll also find everything you need for motion, vision, and environmental sensing in one kit:

    You’ll easily integrate all of these hardware tools with the new Proto Shield included, and leverage the Arduino IDE on the software side to develop quick, scalable, IoT-enabled prototypes.

    Go from concept to reality in a wide range of applications

    The Arduino Pro Portenta Proto Kit is suitable for many industries and countless applications: the kit’s modular design means you can tailor your prototypes to meet specific requirements, ensuring your projects are always on track. What’s more, you’ll often be able to transition from prototyping to production with no redesigns required.

    Here are some ideas you could explore:

    • Predictive maintenance: reduce downtime and monitor machinery health, using advanced Nicla sensors and cloud-based predictive algorithms.
    • Environmental monitoring: precisely track air quality, noise, and other parameters for real-time decision-making.
    • Machine vision: implement object recognition, motion detection, and people counting using Nicla Vision.
    • Logistics tracking: monitor goods in transit with environmental data and cloud-enabled location tracking.
    • Intruder detection: use motion and face recognition for security monitoring, with cloud-based real-time alerts.
    • EV charging station: create a prototype for efficient, remotely managed charging with data analytics.
    • High-speed test rigs: build scalable test benches for automated sensor calibration, load testing, and real-time data analysis.

    As always, we are curious to find out what the Arduino professional community will come up with next! 

    Learn and innovate with the ACE-220 course

    Ready to hit the ground running? Enroll in ACE-220: Portenta Proto Kit Certification Course on Arduino Academy. This 8-hour professional program is designed to provide embedded engineers, hardware designers, and firmware developers with hands-on modules that cover everything from hardware and software setup to cloud integration. By dedicating a few hours to the ACE-220 course, you’ll gain the expertise to leverage the kit’s capabilities fully, saving significant time and effort in your prototyping process and accelerating your path to innovation.

    Get started on your greatest idea now!

    Whether you’re building the next big thing in automation, smart cities, or IoT, the Arduino Pro Portenta Proto Kit offers the tools to make it happen. Explore the full kit online and take the first step toward redefining what’s possible in prototyping.

    The post Prototype faster and smarter in 2025: Meet the Arduino Pro Portenta Proto Kit appeared first on Arduino Blog.

    Website: LINK

  • This telescope can intelligently point itself anywhere in the sky

    This telescope can intelligently point itself anywhere in the sky

    Reading Time: 2 minutes

    Known by their characteristic mounting solution, Dobsonian telescopes are the standard in amateur astronomy due to their lower cost and ease-of-use. But after seeing how some of the larger, motorized telescopes at observatories can simply pivot to a target of interest, one member from the FabLab at Orange Digital Center Morocco wanted to add this functionality to his own hobbyist telescope.

    The base of the telescope guidance system was made by cutting a large disk from a sheet of plexiglass on a laser cutter and then wrapping it in a timing belt for setting the azimuth (yaw). Once mounted, a 3D-printed set of gears, along with some bearings, were attached to one side in order to provide the altitude adjustments. Each axis is moved by a single stepper motor and accompanying A4988 stepper driver, and both plug into an Arduino Nano.

    Over on the controls side of the project, an interface was added that gives the user two buttons, an analog joystick, and an LCD screen at the top. With it, they can select between three different modes. In offline mode, locations that have been preloaded into the other Nano can be chosen as the target, while any arbitrary location can be sent via serial from a host PC in online mode. Finally, the joystick can be used in manual mode to move anywhere.

    To read about this project in more detail and see some of the incredible photos that were captured, you can visit its write-up here on Instructables.

    [youtube https://www.youtube.com/watch?v=H4y4p9HcZMU?feature=oembed&w=500&h=281]

    The post This telescope can intelligently point itself anywhere in the sky appeared first on Arduino Blog.

    Website: LINK

  • Control your volume with a wireless rotary encoder, as you deserve

    Control your volume with a wireless rotary encoder, as you deserve

    Reading Time: 2 minutes

    Every decent stereo sold since the invention of sound has included a knob on the front for adjusting volume. There are influencers and entire communities dedicated to evaluating the feel of those wonderful knobs. So why would you settle for the mushy volume buttons on a remote? Eric Tischer didn’t think he should have to, so he built his own wireless rotary encoder device for controlling his DAC’s volume.

    A digital-to-analog converter (DAC) is an important part of modern digital audio systems. Tischer’s DAC/preamp takes the digital signal from a TV or other device, turns it into an analog signal, and then pushes that out to an amplifier. The DAC has a rotary encoder on the device itself for adjusting volume, but the remote just has the standard buttons. Tischer measured that remote and found that it takes 25 seconds to go from zero to full volume. That’s almost as annoying as the horribly unsatisfying buttons.

    Tisher’s solution was to construct a new wireless remote with only one job: controlling volume. It has a big CNC jog-wheel style rotary encoder that reportedly has a very nice feel, with 100 total detent “clicks” per revolution. That matches perfectly with the number of volume levels.

    An Arduino Nano ESP32 board monitors the remote rotary encoder and communicates the detected position (via pulse-counting) to another ESP32 board by the DAC. That second board attaches to the DAC’s built-in rotary encoder pins and simulates pulses that match the remote. So as far as the DAC knows, Tischer is rotating the built-in encoder. In reality, he’s sitting comfortably on the couch spinning that handheld knob instead of pushing buttons dozens of times per commercial break.

    [youtube https://www.youtube.com/watch?v=UF-4i1yZT8A?feature=oembed&w=500&h=281]

    The post Control your volume with a wireless rotary encoder, as you deserve appeared first on Arduino Blog.

    Website: LINK

  • Valorant: Meet Your New Agent, Tejo

    Valorant: Meet Your New Agent, Tejo

    Reading Time: 6 minutes

    Summary

    • Say hello to our newest Agent, Tejo, who’s joining our roster from Colombia.
    • As part of the Initiator class, Tejo specializes in flushing out enemies with a unique kit consisting of information gathering, explosions, and a concuss.
    • Those who have strategic game sense and understand how the enemy plays will be able to thrive on this Agent.
    • Tejo, like all Valorant Agents, is unlocked for those with a Game Pass membership.

    “This should be simple enough. I flush them out. You finish them.” This statement from Tejo perfectly encompasses our newest Initiator-class Agent, the well-dressed man of action.

    Hailing from Colombia, Tejo will undoubtedly shake up the gameplay with his unique kit that flushes out enemies using a top-down approach. Tejo will require you to think proactively and strategically–analyzing the situation mid-round and using his abilities to help clear the way for your team.

    Tejo’s abilities, which revolve around flushing out enemies, consist of 3 outputs: information gathering, damage, and concuss effects:

    • Stealth Drone: Throw and possess a stealthed drone that, upon activation, creates a small sonar pulse at its location.
    • Guided Salvo: Pull up a map to target one or more missiles towards a location. Upon reaching their location, the missiles explode twice, pushing enemies off of angles.
    • Special Delivery: Toss a grenade that bounces once (sticks to players immediately), sticks, then winds up and explodes. Explosion concusses.
    • Armageddon: Cast a wave of explosions, forcing enemies to move in the direction of your choosing.

    The perfect teammates for Tejo will be those who can quickly follow up on the space he creates. Let’s take a closer look at how that’s done.

    Stealth Drone

    Valorant Tejo Screenshot

    Whether your team is attacking and attempting to take a site or defending and playing retake, having a drone can be extremely impactful. Especially on maps where there are a lot of corners to clear, it allows your team to take space safely or be prepared to fight for that space. Since drones are great pieces of utility, the enemy team is often prepared to shoot down whatever you’re using to take space. Tejo’s Stealth Drone is unique in that it’s invisible at long range, giving you more time to grab information about where the enemy team could be.

    “Drones typically give a lot of baseline value of information gathering, but we wanted to give this drone a little spin where the information is secondary, and the effect of suppressing an enemy is why you take this drone over others,” Game Designer Ryan Cousart tells us.

    Guided Salvo

    Valorant Tejo Screenshot

    When we asked the devs, “Why rockets?”, Cousart smiles and says, “Because rockets are sweet.”

    In addition to rockets being sweet, they made sense thematically for what the devs were trying to accomplish.

    “When you start putting things like a map targeter or world placements on Agents, you force people to think about the game more proactively and more strategically. We wanted something to lead your team in and show you the effect of telling your team, ‘Hey something is going to happen.’ We could’ve used anything but we landed on rockets for these reasons,” Cousart adds.

    Tejo’s abilities, which revolve around flushing out enemies, consist of 3 outputs: information gathering, damage, and concuss effects. “There’s a lot to consider and be careful about when deciding the output of an ability. Damage as an output is a lot more permanent than a concuss or a flash. It’s worthwhile to explore though and I think we’ve landed in a pretty good spot but that’s one we’ll need to keep a really sharp eye,” states Cousart.

    Special Delivery

    Valorant Tejo Screenshot

    “With how naturally ‘guns down’ his other abilities are, Tejo really needed something that was just simple to understand and simple to cast but still captured that feeling of being explosive but directed. I wanted Special Delivery to be a quick, like, ‘Let’s fight’ button”, states Cousart.

    Unlike the other abilities where Tejo needs time to set up the play, Special Delivery allows him to initiate a fight quickly in the moment. Whether or not an enemy is there for the concuss, using the ability there will give them the confidence they need to take that space. One thing is for certain – even if players can use the ability quickly, we won’t be surprised when players are making fancy lineups to get that perfect angle to land on that perfect circle.

    Armageddon

    Valorant Tejo Screenshot

    “Tejo’s rockets are really only valuable if you’re following up on the pressure that’s created. But the sweet spot is when you fire your rockets and you force people to move and then while they’re moving, you’re able to capitalize on them having to reposition. Tejo would be great with another Agent that can go in very fast, like Neon, who can capitalize on the distance he casts his abilities from,” notes Character Producer, John Goscicki.

    Tejo’s ult, Armageddon, is something enemies will need to be aware of round-to-round. Watch that scoreboard and check how many ult points he’s away from being able to use it, since it can heavily impact the flow of a round. The wave of explosions will force enemies to move in a direction of Tejo’s choosing or at least have players moving further back, since the site will be difficult to hold. This will give his team the perfect opportunity to follow up and take control of the space he just created.


    Everyone can play Tejo but those with strategic game sense can make this new Agent really shine. All of Valorant’s Agents are unlocked for Game Pass members, so step up to the challenge and learn to use him to your advantage before everyone else.

    In the words of Tejo, “We can stand around all day talking about killing them… or we just do it.” So what are you waiting for?

    VALORANT

    Riot Games

    783

    Xbox Game Pass

    VALORANT is a character-based 5v5 tactical shooter set on the global stage. Outwit, outplay, and outshine your competition with tactical abilities, precise gunplay, and adaptive teamwork. DEFY THE LIMITS
    Blend your style and experience on a global, competitive stage. You have 13 rounds to attack and defend your side using sharp gunplay and tactical abilities. And, with one life per-round, you’ll need to think faster than your opponent if you want to survive. Take on foes across Competitive and Unranked modes as well as Deathmatch and Spike Rush. CREATIVITY IS YOUR GREATEST WEAPON
    More than guns and bullets, you’ll choose an Agent armed with adaptive, swift, and lethal abilities that create opportunities to let your gunplay shine. No two Agents play alike, just as no two highlight reels will look the same. FIGHT AROUND THE WORLD
    Each map is a playground to showcase your creative thinking. Purpose-built for team strategies, spectacular plays, and clutch moments. Make the play others will imitate for years to come.

    Website: LINK

  • Ready to remix? Favourite projects to tinker with

    Ready to remix? Favourite projects to tinker with

    Reading Time: 4 minutes

    From crafting interactive stories to designing captivating games, the Raspberry Pi Foundation’s coding projects offer a hands-on approach to learning, igniting creativity and developing the skills young people need, like perseverance and problem-solving. In this blog, I explore two of my favourite projects that young coders will love.

    An educator helps two young learners with a coding project in a classroom.

    Our projects are free and open to all. They are easy-to-follow, step-by-step guides that young people use to make their own games, animations, and websites using coding languages such as Scratch, HTML/CSS, and Python. The projects introduce coding concepts one by one and allow young people to build their knowledge progressively. As such, educators and volunteers running clubs don’t need to be experienced coders, and many volunteers in our community enjoy learning alongside their club members.

    The power of remixing

    One of the brilliant things about our projects is how easy it is to adapt them. This is called remixing, and it gives the learner the opportunity to create and modify a brand-new project that is personal to them. 

    “Remixing allows beginners to tinker with a pre-existing project and make increasingly complex modifications”

    Do you have the reaction speeds of an astronaut?

    My favourite project brings space into the classroom. Space is such an intriguing and mysterious thing, but aspects like the extremely high speeds that satellites and the International Space Station (ISS) travel at are difficult concepts for young people to understand. 

    The Astronaut Reaction Time Game in Scratch introduces young people to the fact that things happen very quickly at the speed the ISS travels. It includes links to maths and science (speed, distance, time, velocity, units, calculations, operators) and, for older learners, prompts discussions on computational abstractions and problem-solving.

    The Astronaut Reaction Time Game in Scratch.

    The project tests reaction speeds, something that real astronauts have to do as part of their training. NASA has found that reaction speeds are slower on the ISS than on Earth, possibly as a result of the stress of zero gravity. It’s also a fun activity young people can share and play with their friends. Sharing is a key part of the club environment, and this project is ideal for generating a little bit of competition. 

    As with all projects, a scaffolded approach is taken, with challenges set for learners so that they can complete part of the project independently. If someone is stuck, they can get a hint in the form of an explanation or sentence, which then turns into the code blocks they need to solve the problems, finally giving them the solution if they really need it.   

    Remix: Exploring speed on planet Earth

    Club volunteers can also introduce their learners to some of our physical computing projects, or they could design their own race track that measures the speed of a vehicle. They could even develop a program on a microcontroller like a Pico or micro:bit to measure the speed of young athletes on a running track. If learners are inspired to do more space-themed projects, we have that covered in our project collection

    Unleashing the creativity of coding through colour

    My other go-to project is Colourful Creations. Coding is an excellent vehicle for self-expression, and this project showcases the ways programming can be used to create digital art. It uses the turtle library, which is an excellent tool for creating designs and patterns. 

    An example of a colourful poster.

    The name “turtle” stems from the Logo programming language created in the 1960s. Logo is mainly known for drawing lines, shapes and patterns on the screen and using a “turtle” on the floor to draw them on paper. The turtle library is, therefore, a selection of functions that can be used for drawing. 

    Part of the project’s appeal is that learners are given a blank canvas to which they can apply any theme. There are limited instructions, leaving lots of space for creativity. Whether it be climate change, a period in history, or some other topic, learners can work on their own poster or in pairs to create something bigger.

    Remix: From project to presentation

    The possibilities for remixing are almost endless, as learners can add more screens and turn their project into a mini presentation or unleash their artistic side and go wild with colours. The learning in this project leads perfectly to more complex turtle drawing projects like Robo-Trumps, providing a solid foundation in creative computing for you to build on later.

    We want you to create your own versions of these projects. You could organise a themed day, which can give learners more freedom, or link with other projects such as Astro Pi. Try remixing the projects to start with, then building up to develop new and exciting projects based on the skills that have been learnt. Happy coding!

    A version of this article also appears in Hello World issue 24.

    Website: LINK

  • This autonomous go-kart only needs a camera to navigate a workshop circuit

    This autonomous go-kart only needs a camera to navigate a workshop circuit

    Reading Time: 2 minutes

    Autonomous vehicles, and self-driving cars in particular, are probably one of the most enticing technologies of the 21st century. But despite a great deal of R&D and even more speculation, we have yet to see a self-driving car that can actually operate on real public roads without any human oversight at all. If, however, we remove that “real public roads” constraint, the challenge becomes a lot more approachable. All you need is a few Arduino boards and a webcam, as proven by Austin Blake’s self-driving go-kart.

    Blake previously attempted a miniature self-driving Tesla project, which was supposed to drive around a park walking path. That was only a partial success, because the vehicle struggled to put its “behavioral cloning” machine learning algorithms into practice. Blake took those lessons and applied them here, with much better results.

    Behavioral cloning, in this context, means that the machine learning algorithm watches what Blake does as he drives around the track, then attempts to replicate that while driving on its own. During training, it looks ahead of the kart through a webcam while monitoring the steering angle. Then, while driving on its own, it looks through the webcam at the track and tries to match the steering angle to what it saw during training.

    The machine learning model runs on a laptop, but Blake needed a way for it to control the kart’s steering and throttle. He used three Arduino Nano boards to pull that off. The first just listens to the machine learning model’s serial output for a PWM signal representing the steering angle. It then sends that to the second, which uses that information and the real-time steering angle to control a Cytron motor driver for the steering. The third controls the throttle using an RC car-style circuit.

    This proved to work quite well and the go-kart can navigate around a small track in Blake’s workshop. In theory, it could also handle new tracks — so long as they have similar clearly marked edges.

    The post This autonomous go-kart only needs a camera to navigate a workshop circuit appeared first on Arduino Blog.

    Website: LINK

  • 60 of our biggest AI announcements in 202460 of our biggest AI announcements in 2024

    60 of our biggest AI announcements in 202460 of our biggest AI announcements in 2024

    Reading Time: 6 minutes

    It’s been a big year for Google AI. It may seem as though features like Circle to Search and NotebookLM’s Audio Overviews have been around for as long as you can remember, but they only launched in 2024. Joining them were a slew of other product releases and updates meant to make your day-to-day life even a little bit easier. So, as we say goodbye to 2024 (and prepare for the exciting AI news that’s sure to come in 2025), take a look at some of the top Google AI news stories that resonated with readers this year.

    January

    2024 began, quite fittingly, with fresh updates across a host of products and tools, including Gemini, Chrome, Pixel and Search. The announcement of our Circle to Search feature made a particular splash with readers. Here were some of the top Google AI news stories of the month:

    1. The power of Google AI comes to the new Samsung Galaxy S24 series
    2. New ways to search in 2024
    3. Circle (or highlight or scribble) to Search
    4. Chrome is getting 3 new generative AI features
    5. New Pixel features for a minty fresh start to the year

    February

    February brought a new chapter of our Gemini era, including the debut of Gemini 1.5; the news that Bard was becoming Gemini; the launch of Gemini Advanced; and more. We also announced new generative AI tools in Labs and tech to help developers and researchers build AI responsibly. Here were some of the top Google AI news stories of the month:

    1. Our next-generation model: Gemini 1.5
    2. Bard becomes Gemini: Try Ultra 1.0 and a new mobile app today
    3. The next chapter of our Gemini era
    4. Gemma: Introducing new state-of-the-art open models
    5. Try ImageFX and MusicFX, our newest generative AI tools in Labs

    March

    Health took center stage in March, with our annual Google Health Check Up event to show how AI is helping us connect people to health information and insights that matter to them. Stories about how we’re using AI for good also made the top-news cut, along with AI-based travel tools coverage as readers looked toward summer. Here were some of the top Google AI news stories of the month:

    1. Our progress on generative AI in health
    2. How we’re using AI to connect people to health information
    3. 6 ways to travel smarter this summer using Google tools
    4. How we are using AI for reliable flood forecasting at a global scale
    5. 21 nonprofits join our first generative AI accelerator

    April

    Spring showers bring…generative AI? Many of April’s top stories focused on how helpful generative AI can be to different groups of people, including developers, business owners, advertisers and Google Photos users. It was also a big month for AI skills-building, thanks to our AI Opportunity Fund and AI Essentials course. Here were some of the top Google AI news stories of the month:

    1. AI editing tools are coming to all Google Photos users
    2. Cloud Next 2024: More momentum with generative AI
    3. Grow with Google launches new AI Essentials course to help everyone learn to use AI
    4. Enhance visual storytelling in Demand Gen with generative AI
    5. Our newest investments in infrastructure and AI skills

    May

    May is synonymous with Google I/O around these parts, so it’s no wonder that much of the month’s top news was from our annual developer conference. At this year’s event, we shared how we’re building more helpful products and features with AI. But even amid all the I/O chatter, Googlers were working on other launches, like that of our AlphaFold 3 model, which holds big promise for science and medicine. Here were some of the top Google AI news stories of the month:

    1. Google I/O 2024: An I/O for a new generation
    2. Generative AI in Search: Let Google do the searching for you
    3. 100 things we announced at I/O 2024
    4. Ask Photos: A new way to search your photos with Gemini
    5. AlphaFold 3 predicts the structure and interactions of all of life’s molecules

    June

    In June, much of our AI news emphasized how this technology can help people in ways big and small. Stories covered both land (how Google Translate is helping people connect with one another all around the world, even if they don’t speak the same language) and sea (how a first-of-its-kind global map of ocean infrastructure is creating a better understanding of things like biodiversity). Here were some of the top Google AI news stories of the month:

    1. 110 new languages are coming to Google Translate
    2. Gemma 2 is now available to researchers and developers
    3. NotebookLM goes global with Slides support and better ways to fact-check
    4. New AI tools for Google Workspace for Education
    5. Mapping human activity at sea with AI

    July

    July was one of those months that makes clear how many things Googlers are working on at once with major announcements for Gemini, Google AI features on Samsung devices, our focus on secure AI and our Olympics partnership with Team USA and NBCUniversal. Here were some of the top Google AI news stories of the month:

    1. 4 Google updates coming to Samsung devices
    2. Gemini’s big upgrade: Faster responses with 1.5 Flash, expanded access and more
    3. 4 ways Google will show up in NBCUniversal’s Olympic Games Paris 2024 coverage
    4. Introducing the Coalition for Secure AI (CoSAI) and founding member organizations
    5. 3 things parents and students told us about how generative AI can support learning

    August

    August was a key moment for Google hardware, thanks to our Made by Google event, along with our Nest Learning Thermostat and Google TV Streamer releases. But software was in the mix, too — we’re looking at you, Chrome, Android and Gemini. Here were some of the top Google AI news stories of the month:

    1. The new Pixel 9 phones bring you the best of Google AI
    2. Gemini makes your mobile device a powerful AI assistant
    3. Your smart home is getting smarter, with help from Gemini
    4. 3 new Chrome AI features for even more helpful browsing
    5. Android is reimagining your phone with Gemini

    September

    Then came another month that underscored our mission to make AI helpful for everyone. Highlights included the launch of Audio Overviews in NotebookLM; the news of a new satellite constellation designed to detect wildfires more quickly; and tips on using Gemini features in Gmail. But that wasn’t all! Here were some of the top Google AI news stories of the month:

    1. NotebookLM now lets you listen to a conversation about your sources
    2. A breakthrough in wildfire detection: How a new constellation of satellites can detect smaller wildfires earlier
    3. Customers are putting Gemini to work
    4. How to use Gemini in Gmail to manage your inbox like a pro
    5. 5 new Android features to help you explore, search for music and more

    October

    October saw a slate of additional AI updates across products including Pixel, NotebookLM, Search and Shopping. Plus, we announced updates to the Search ads experiences at Google Marketing Live — helping advertisers use AI to reach their customers. Here were some of the top Google AI news stories of the month:

    1. October Pixel Drop: Helpful enhancements for your devices
    2. New in NotebookLM: Customizing your Audio Overviews and introducing NotebookLM Business
    3. Ask questions in new ways with AI in Search
    4. Google Shopping’s getting a big transformation
    5. New ways for marketers to reach customers with AI Overviews and Lens

    November

    This month was a time for both work and play, with news including how developers are using Gemini API and how chess-lovers can use AI to reimagine their sets. Plus, holiday prep was afoot with new updates to Google Lens and Shopping. Here were some of the top Google AI news stories of the month:

    1. 5 ways to explore chess during the 2024 World Chess Championship
    2. The Gemini app is now available on iPhone
    3. New ways to holiday shop with Google Lens, Maps and more
    4. How developers are using Gemini API
    5. Our Machine Learning Crash Course goes in depth on generative AI

    December

    We celebrated the one-year anniversary of our Gemini era by introducing our next, agentic era in AI — brought to life by our newest, most capable model, Gemini 2.0. We also shared landmark quantum chip news, and a whole raft of new generative AI offerings in Android, Pixel, Gemini, and our developer platforms AI Studio and Vertex AI. It’s certainly been a December to remember. Here were some of the top Google AI news stories of the month:

    1. Introducing Gemini 2.0: our new AI model for the agentic era
    2. Meet Willow, our state-of-the-art quantum chip
    3. Android XR: The Gemini era comes to headsets and glasses
    4. Try Deep Research and our new experimental model in Gemini, your AI assistant
    5. December Pixel Drop: New features for your Pixel phone, Tablet and more

    There you have it! Twelve months of top Google AI news in a flash. And the best part: Teams at Google are hard at work to keep the momentum going in 2025.

    Website: LINK

  • See how this homemade spectrometer analyzes substances with an Arduino Mega

    See how this homemade spectrometer analyzes substances with an Arduino Mega

    Reading Time: 2 minutes

    Materials, when exposed to light, will reflect or absorb certain portions of the electromagnetic spectrum that can give valuable information about their chemical or physical compositions. Traditional setups use a single lamp to emit white light before it is split apart into a spectrum of colors via a system of prisms, mirrors, and lenses. After hitting the substance being tested, a sensor will gather this spectral color data for analysis. YouTuber Marb’s Lab realized that by leveraging several discrete. LEDs, he could recreate this array of light without the need for the more expensive/complicated optics.

    His project uses the AS7431 10-channel spectrometer sensor breakout board from Adafruit due to its adequate accuracy and compact footprint. Once it was attached to the clear sample chamber and wired to a connector, Marb got to work on the electromechanical portion of the system. Here, a stepper motor rotates a ring of six LEDs that are driven by a series of N-channel MOSFETs and a decade counter. Each component was then wired into a custom-designed control board, which acts as a shield when attached to the Arduino Mega 2560 below.

    The sketch running on the Mega allows for the user to select between photometer (single wavelength) and spectrometer (multiple wavelengths) modes when sampling the substance. Once the data is captured, the user can then choose one of three interpolation modes to get a smooth curve, as seen here when measuring this chlorophyl.

    [youtube https://www.youtube.com/watch?v=e9Ja7LYqQIM?feature=oembed&w=500&h=281]

    The post See how this homemade spectrometer analyzes substances with an Arduino Mega appeared first on Arduino Blog.

    Website: LINK