Fine motor skills correlate strongly with cognition and the accurate assessment of an individual’s motor skills can be critical in diagnosing and treating a variety of conditions. But objective evaluation has been a challenge, as suitable sensors weren’t available. To help medical professionals better test fine motor skills, a team of researchers from Japan’s Shibaura Institute of Technology developed a new EIT-based tactile sensor system.
EIT (electrical impedance tomography) is traditionally used for non-invasive medical imaging of human body parts, but here it is used to image the internal structure of the sensor body in order to classify fine finger movements. When a subject pinches the sensor, for example, they deform the structure and that alters the voltage between the sensor’s 16 electrodes. Each finger movement or grip creates an identifiable pattern of voltages, enabling classification and therefore assessment.
This only works if the system can collect precise voltage readings from the electrodes, so the researchers turned to an Arduino UNO R4 Minima board for the task. The electrodes connect to the Arduino’s 14-bit ADC (analog-to-digital converter) through multiplexer chips, so the system can quickly scan through all 16 electrodes. It would be easy to expand that number in the future to produce more detailed images. After collecting the data, the team was able to utilize conventional EIT image reconstruction techniques for classification and even classify the voltage readings directly.
With the latter technique, the researchers reported 94.1% classification accuracy in testing of 12 subjects performing six unique motions. More details on the work can be found in the team’s paper here.
Image credit: R. Asahi, S. Yoshimoto and H. Sato, “Development of Pinching Motion Classification Method Using EIT-Based Tactile Sensor,” in IEEE Access, vol. 12, pp. 62089-62098, 2024, doi: 10.1109/ACCESS.2024.3395271
Enhance your IoT projects with our special offer! Get 20% off a yearly subscription to the Arduino Cloud Maker Plan using code CLOUD20MAY. Valid until the end of May, this deal saves you $14.38, reducing the price from $71.88 to $57.50.
Benefits of the Maker Plan:
Unlimited dashboards: Visualize sensor data in real time.
Device management: Control up to 25 devices from anywhere.
Over-the-air updates: Keep your devices up-to-date.
Real-time notifications: Get instant alerts via email or app.
Extensive resources: Access a vast library of IoT projects and tutorials.
What is Arduino Cloud?
Arduino Cloud is the next exciting journey to bring your creations to life in a snap. It’s an all-in-one IoT solution that empowers makers to create from anywhere, control their devices with stunning dashboards, and share their projects with anyone.
Coming in red/white or black, the official case comprises three plastic sections that snap-fit together, so assembly is a cinch. The middle section includes a clear insert with a fan that connects to Raspberry Pi 5’s Fan port. A small SoC heatsink is also included.
Capacity: By removing the clear insert and fan from the middle section, you can mount a HAT. Or you could use a booster header to lift it above the fan.
Port access: All side ports are accessible via cutaways, along with the power button. The middle section features a wide slot to enable access to the GPIO pins when the lid is removed; it could also be used for routing cables for a camera or other accessories.
Cooling: The variable-speed fan’s cooling is aided by vents in the bottom of the case, plus the SoC heatsink. It works even with the lid on, due to a circular gap. In our tests, it prevented throttling even under a heavy workload, but some other cases performed better.
Wi-Fi signal: As you’d expect, the plastic case has very little effect on the signal, which remained strong.
Verdict
A well-thought-out, versatile design that covers most uses.
Its cool-looking tower design is enhanced by RGB LEDs making it glow in various colours. Is it really a case? Well, it does have a plastic base, connected via screws and bolts to two metal mounting brackets and the main fan/heatsink section on top. Assembly is a little fiddly (especially the brackets), but not too tricky. The heatsink it connected to the SoC via a thermal pad.
Capacity: You won’t be mounting any HATs with that large fan and heatsink sitting atop Raspberry Pi!
Port access: The open design means access to all the ports and GPIO pins is unhindered.
Cooling: The vertically mounted fan blows air onto the aluminium fins of the large heatsink, whose base is connected to Raspberry Pi 5’s SoC via a thermal pad. This results in excellent cooling performance. By default, the fan doesn’t even kick in until the temperature reaches 60°C (which didn’t happen during our tests), but it could prove more useful if you’re overclocking Raspberry Pi 5.
Wi-Fi signal: The presence of that metal heatsink does have an effect on the signal, but not too much.
Verdict
With its unusual design and lighting, it looks very cool… and delivers great cooling.
A three-piece design – with two aluminium sections and a plastic base – the NEO 5 oozes style and quality with its red/black colour scheme and solid feel. The middle section is especially impressive, with a fan next to curved fins to aid cooling. Assembly is aided by a guide in a small booklet.
Capacity: With the top part removed, you could mount a HAT with a booster header to lift it over the fan. A special NVMe version of the case is also available.
Port access: The middle section has cutouts for the main ports, camera/display, PCIe, UART, RTC, and the GPIO pins (with a helpful labelled strip on the side).
Cooling: The fan’s effect is aided by vents in the middle section and base, plus a couple of thermal pads for the SoC and PMIC. This results in very good cooling performance.
Wi-Fi signal: The mainly metal case does result in a noticeable reduction in signal strength and quality.
Verdict
A stylish, quality case with great cooling performance.
The tallest case in the group, it’s 56mm high, and is designed to accommodate a Raspberry Pi 5 with a HAT mounted on top. The anodised aluminium case has no built-in cooling, but you could add an Active Cooler or heatsink. There’s plenty of room, and a GPIO booster header is supplied if needed to lift a HAT up slightly. Assembly is tricky, as you need to remove both side panels and slide in Raspberry Pi, screw it in place with tiny screws, and then add a HAT afterwards.
Capacity: The high headroom means there’s plenty of room to mount HATs on top of Raspberry Pi. Getting things in and out of the case and securing them in place is fiddly, though. We’d have preferred a removable lid.
Port access: The main ports are accessible via cutouts. There are slots for camera connections and PCIe ribbon cables. You’ll need to remove one or both side panels to access the other ports.
Cooling: There’s no built-in cooling, but the KKSB can be used with an Active Cooler, or most other coolers and heatsinks. Lots of slots in the case aid ventilation.
Wi-Fi signal: Maybe it’s all those ventilation slots, but the signal is hardly affected.
Verdict
Not the most user-friendly design and no built-in cooling, but good capacity.
Raspberry Pi 5 is sandwiched between the two case sections, with no side pieces. Each grooved aluminium piece is fitted with several thermal pads to aid passive cooling, including for Raspberry Pi 5’s SoC, PMIC, and wireless module. The two case sections are secured with long bolts.
Capacity: With the open design and GPIO header access, you can mount a HAT just above the top section.
Port access: With no side pieces, access to ports is unfettered, with cutouts for the GPIO pins, PoE header, PCIe and camera/display ports, plus UART and RTC battery connectors.
Cooling: Highly effective passive cooling is provided by the numerous thermal pads and grooved aluminium case pieces. It keeps Raspberry Pi 5 cool (37.8°C) even under a heavy workload.
Wi-Fi signal: The metal case does result in a noticeable reduction in signal strength and quality.
Verdict
Great port access and some impressive passive cooling performance.
While it doesn’t feel the most solid or weighty case, its two main sections have plentiful vents and you get a choice of coloured stripes to stick on the lid! An Armour Lite V5 fan-equipped heatsink sits on top of Raspberry Pi 5 via five thermal pads.
Capacity: The heatsink takes up a fair amount of space in the case. You could still mount a HAT with a GPIO header booster and the lid off.
Port access: The main side ports are accessible via cutouts. With the lid removed, you can access all the others.
Cooling: Five thermal pads connect the SoC, PMIC, RP1, RAM, and wireless module to the heatsink with built-in fan. Considering this, cooling performance was not quite as good as we expected, but decent.
Wi-Fi signal: There’s some effect on the strength and quality, possibly due to the metal heatsink.
Verdict
Middling cooling performance in a lightweight case.
Maker culture has always been a major part of magic performance. Some tricks are well-rehearsed slight of hand, but many of them rely on clever engineering to sell an illusion. And modern technology offers a great deal of interesting possibilities. That is the idea behind Peter Boie’s Engineering Wonder “STEM infused magic show.” That show includes a drone and Boie needed a way to reliably control it, so he created this purpose-built remote.
This remote works with the Tello drone, which is an interesting piece of hardware all on its own. It is an affordable quadcopter that we would normally categorize as a toy, except that it contains high-quality DJI components (and, presumably, flight control firmware) and versatile control schemes. Users can start flying right away by piloting the drone with a smartphone app, but the drone can also respond to simple commands sent over Wi-Fi by any device. For example, you can connect to the drone’s Wi-Fi network from your PC and run a custom Scratch program to send flight commands.
Boie needed a way to do that while performing during his magic show. He needed to send flight commands without drawing attention from the audience and that had to be very reliable. His solution was to build a custom remote based on the Arduino UNO R4 WiFi board.
Boie designed his own shield that contains several buttons to trigger specific flight commands, such as “go up 50” or “do a barrel roll.” That also has two big, bright LEDs. Those provide a very clear indication of the Wi-Fi connection status, so Boie doesn’t risk an onstage blunder if the connection fails for some reason.
When it detects a button press, the Arduino sends the corresponding Tello command over WiFi as a UDP (User Datagram Protocol) packet. Each button triggers a single function and Boie can find the buttons by touch on the custom 3D-printed enclosure, letting him focus on his magic performance.
As Minecraft turns 15 years old, we wanted to take a look back. As one of the most important (and best-selling) games of all time, Minecraft and Mojang’s journey has been incredible to witness – starting as a one-person creation and blossoming into a truly world-changing proposition.
With that in mind, we thought we’d take you back over the biggest moments in Minecraft’s history, year-by-year:
2009: Launching Classic Edition
Image credit: Jan Willem Nijman
On May 16, 2009, it all began. Inspired by the likes of Infiniminer and Dungeon Keeper, Markus ‘Notch’ Persson had begun work on what was initially known simply as “Cave Game” a week earlier, before settling on a catchier title: Minecraft: Order of the Stone. Then he was convinced to choose an even catchier title: Minecraft. What came to be known as the Java Classic Edition lacked much of what we’ve come to know from the game – but the building blocks (pun very much intended) were there.
Classic would generate a world, and allow you to dig and build freely, creating your own geometric slices of paradise in its technicolor world. Over the course of the year, Classic would split into Creative and Survival modes, ushering us closer and closer to the Minecraft we’ve known for a decade and a half.
2010: Minecraft Gets Its Crafting System – Plus Minecarts and Multiplayer
By January of 2010, Minecraft had already amassed over 100,000 players – but some of its most fundamental improvements were still to come – not least making good on that “Craft” part of the title. A crafting system was added late that month, introducing the familiar wood-iron-diamond ‘level’ system for items, and changing, well, everything about how we played the game. Dig-loot-craft-repeat was born.
But that was far from the only major change. By June, minecarts had appeared in the game, changing how players could travel through their worlds and, in August, the first version of multiplayer in Survival mode popped up. So much of Minecraft’s popularity is built on playing with your friends, and this was the first time we could see a glimpse of how huge that would be for the game.
2011: Minecraft 1.0 Released – and the First Port Arrives
If you want a sense of how fast Minecraft grew, consider this. By January of 2011, the game hit a million players. But July, that had jumped to 10 million. And, to top it all off – all of this came before the game had launched its full 1.0 version. That came on November 18, 2011. What came to be known as Minecraft: Java Edition was released during Minecon 2011, bringing everything millions of players were already loving to an even wider audience – even an “ending” to the game with the Ender Dragon boss fight.
And we can’t ignore that 2011 also saw the game’s first-ever non-PC ports. Minecraft: Pocket Edition launched exclusively for the Xperia Play smartphone in August, followed quickly by an iOS version – from these small beginnings, Minecraft would spread across practically every modern gaming device over the years, becoming the phenomenon it has been in the process.
2012: Minecraft Gets Lego-fied, Comes to Xbox 360, and Gets the Pretty Scary Update
If you wanted to pinpoint the moment where Minecraft became more than just a game, look no further than when Lego officially confirmed that Minecraft – in many ways the brick-building hobby’s digital cousin – would become an official set. Lego Minecraft Micro World allowed you to build four cubic vignettes from Minecraft in real-life, complete with Steve and Creeper mini-figs.
In the world of gaming itself, 2012 was no less important. This year marked the first meeting of Minecraft and Xbox, as Minecraft: Xbox 360 Edition launched in May, offering a console version of the game to millions of new players. This console edition became the basis for Minecraft’s off-PC future – from here, we’d see the game appear on almost every new Xbox, PlayStation and Nintendo console over the years.
We also saw a landmark new update: Pretty Scary brought a host of new mobs to fight off, and also brought one of the most important blocks in the game’s history – the Command Block became the basis for some of the most impressive creations in Minecraft, adding a level of programming that would allow magnificent ideas to spring forth.
2013: The Redstone Update Changes Everything and Horses Ride In
If 2012’s Command Block was the start of something special, 2013’s Redstone Update was when it got really special. Redstone, a block that allows players to power various elements of the game, had already been introduced, but this update opened up a host of new opportunities. Redstone could now be used to power pressure plates, change how rail blocks worked, detect daylight and much, much more. From here, players began to experiment with how far Redstone could take their creations – all the way up to creating working 8-bit computers inside the game.
On the less complicated side of things, we also got the Horse Update, which changed the game in a more adorable way, allowing you to tame and ride the majestic, blocky beasts and travel your world in a new way. Notably, this was a major moment for how Mojang worked with its community – the Horse Update was inspired by a mod, Mo’ Creatures, and shows how the game has been worked on with the fans themselves (many of whom went onto be Mojang developers, too).
2014: Microsoft Acquires Mojang and The Bountiful Update Blooms
I might not even be writing this article if it weren’t for 2014 – when Microsoft saw quite how earth-shaking Minecraft had become and acquired Mojang for $2.5 billion. After two years of working closely together, the two companies came together to shape the future of the game, which has only continued to grow in the decade since.
In the game itself, the Bountiful Update represented an enormous improvement. Built over a full 10 months, Bountiful saw massive changes to the codebase of the game, invisibly improving everything about the experience – but it also brought floating islands, underwater temples, killer rabbits, and much more.
2015: Minecon Breaks Records, and the HoloLens Demo Wows
Since humble beginnings in 2010, Minecon had been bringing fans of Minecraft together to celebrate the game – and had subsequently become the home of some of the game’s biggest releases. Come this year, it had become a truly enormous affair – record-breaking, even. Held in London, Minecon 2015 sold 10,000 tickets, earning a Guinness World Record for the largest convention in history for a single game.
2015 also saw Mojang showing just how creative it could get with its ideas – the Minecraft HoloLens demo became one of the most talked-about E3 presentations of recent years. The mixed-reality headset could effectively create parts of a Minecraft world amid the real world around you, offering a perspective on the game no one could have imagined. While it never became a full product, it’s a brilliant evocation of how restlessly creative Mojang is with its game.
2016: Hitting 100 Million Sales, and Minecraft: Education Edition Launches
There was no doubt that Minecraft was already a worldwide concern, but 2016 saw its biggest cultural landmark yet – passing 100 million copies sold. In 2016, 53,000 people were buying Minecraft every day – and four copies were even sold in Antarctica. The game has now passed triple that number, but it was here that Minecraft truly set out its stall as one of the most-loved, most important games of all time.
Its influence was so strong, in fact, that 2016 also saw the launch of Minecraft: Education Edition (now simply Minecraft Education). Developed alongside Xbox Game Studios, this version of the game was designed to be used in the classroom, and has allowed kids to build collaboratively, learn from educators inside the game itself, and been updated to include worlds that help learning on Cyber Safety, natural history, and much, much more.
2017: The Better Together Update Unites Players, Minecraft Marketplace Empowers Them
For years, players had been able to get Minecraft on their consoles, but 2017’s Better Together helped make that all the more significant. This was the moment that Mojang began to bring platforms together, allowing anyone with the Bedrock Edition of the game to play together, no matter what device they were playing on. It was a gigantic step, and a true piece of Minecraft magic.
In the same year, Mojang doubled down on its commitment to its community with Minecraft Marketplace – a store that sells curated creator-made skins, texture packs, and maps. Effectively, it offered modders – a huge part of Minecraft’s success over the years – to make money from their creations, and opened the door to literally millions of more people to access their hard work.
2018: Update Aquatic Opens Up New Worlds
70% of Earth is covered with water, and while that ratio may differ in your Minecraft world, that’s still a lot of space you might otherwise not see. Not so after Update Aquatic – the biggest update to Minecraft’s oceans saw new mobs, blocks, and mysteries added to the game’s underwater realms.
From dolphins and turtles to the only-slightly-horrifying Drowned enemies, there was a lot to play with under the sea, not to mention buried treasure, shipwrecks, and reefs to explore.
2019: 10 Years of Minecraft, and the Village & Pillage Update Storms In
A decade is a very long time in gaming, but it was just the start for Minecraft. The 10-year anniversary of the game went hard, not least with a beautiful map that acted as an interactive museum about the game itself – and a re-release of the Classic Edition of the game to show you just how far the game had come.
Looking forward, we also saw the Village & Pillage update, which populated your world in new ways. Revamped villages (and their villagers) now sprung up across the biomes, offering trading, jobs, and more ways to interact. But to combat all this loveliness, we also saw the addition of Pillagers, a new faction of bandit mobs who’d roam the map looking to spoil your good time. Also, pandas were added, which is only ever a good thing.
2020: Nether Update Takes Us Deeper Underground, and Minecraft Dungeons Arrives
The Nether had long been an object of fascination and terror for Minecraft players, offering a whole other dimension to the game. But the Nether Update changed this world of danger forever, adding new biomes and mobs that turned it from a curious, dangerous place into a true realm to explore in itself.
Meanwhile, Mojang also saw fit to release the biggest Minecraft spin-off yet – Minecraft Dungeons twisted the original game’s basics into an all-new action experience. In partnership with Double Eleven, this game offers a new story-driven approach to the Minecraft universe, transforming familiar items, mobs, and blocks into dungeon crawling essentials.
2021: Minecraft Passes 1 Trillion Views on YouTube, While Caves and Cliffs Emerges
YouTube has been an incredibly important part of Minecraft’s history, with creators across the globe enjoying and sharing the game, and becoming famous in their own right as a result. If you want a sense of quite how intertwined the two became, Minecraft became the first entertainment franchise to break through the 1 trillion views mark on YouTube. As YouTube itself put it: “If each of those one trillion views were just one second long, that would add up to over 30,000 years.” Please, take it from me, don’t try and catch up on all of it.
Inside the game, we saw an update so massive it had to be split into two parts. Caves & Cliffs was the most ambitious update Mojang had ever put together to this point, not only adding the expected new mobs, items, and blocks, but adding entire new biomes and overhauling how Minecraft worlds themselves were generated.
2022: New Default Skins Added and The Wild Update Bursts Forth
Skin-swapping had been easy for a long time, but good old default skins Steve and Alex were probably a little lonely come 2022. Enter Noor, Sunny, Ari, Zuri, Makena, Kai, and Efe – new default skins that let players express themselves more easily than ever while jumping into their world.
Meanwhile, the Wild Update included even more new biomes on top of 2021’s Caves & Cliffs, including the Deep Dark, a biome only found underground, replete with ancient cities to discover, and the terrifying, blind Warden enemy. Also: frogs!
2023: Minecraft Legends Offers Another New Adventure, and Trails & Tales Launches
Minecraft Dungeons was only the start. Last year, Minecraft Legends arrived to offer another new look at how Minecraft could be adapted. This action strategy game zoomed way out to offer you a bird’s eye view of the Overworld – and an army of mobs to help you protect it from Piglin hordes.
In Minecraft itself, the Trails & Tales update offered new means of self-expression in your world, not to mention added new stories underground with the addition of archeology in desert biomes. Count yourself lucky if you find the new, rare Cherry Blossom biome – and maybe find your way there on the new camel mob, which has space for you and a friend on its back.
2024: Looking to the Future
And so we reach 2024, asMinecraftturns 15. You might think Mojang might want a bit of a break, but not so – they’ve already released the Armored Paws drop, and announced a massive birthday sale, but there’s so much more still to come. From the upcoming Tricky Trials update to secrets yet to be revealed, this 15th year is, somehow, only the beginning.
Minecraft
Microsoft Studios
☆☆☆☆☆2017
★★★★★
$19.99$9.99
Xbox One X Enhanced
Xbox Game Pass
Explore randomly generated worlds and build amazing things from the simplest of homes to the grandest of castles. Play in creative mode with unlimited resources or mine deep into the world in survival mode, crafting weapons and armor to fend off the dangerous mobs. Scale craggy mountains, unearth elaborate caves and mine large ore veins. Discover lush cave and dripstone cave biomes. Light up your world with candles to show what a savvy spelunker and master mountaineer you are! FEATURES: If you can dream it, you can build it. Put your imagination and limitless resources to work with Creative Mode.
Battle mobs, construct shelters and explore the landscape – it’s all in a day’s work when you try to survive and thrive in Survival Mode.
New tools, locations and spaces are yours to explore, thanks to our regular updates. Cross-platform play for up to eight players across Windows, PlayStation, Nintendo, Xbox and mobile devices.
Discover skin, texture and mash-up packs from the community! Find out more at minecraft.net/marketplace. REALMS PLUS:
Play with up to 10 friends cross-platform in worlds that exist any time, anywhere – and get access to over 150 pieces of Marketplace content. Try a free 30-day trial in-app and learn more at minecraft.net/realms/bedrock. You can also play Minecraft with Xbox Game Pass – check it out at xbox.com/gamepass.
Now reboot Raspberry Pi, then open a terminal and type:
$ flatpak install speechnote
Say “yes” to confirm that you wish to use the suggested ref, that you wish to install it, and that you wish to proceed with the suggested changes to your system installation.
Open SpeechNote from the Sound & Video menu, then go to the Languages menu, search for English (and any other language you may require) and select the models you wish to use.
OpenAI’s Whisper is open-source, and transcription tools don’t carry the intellectual property violating baggage of text or image generators, so English Whisper Small should do the trick for Speech To Text.
A number of Text To Speech models are available. We find Piper Alba Medium to be both easy on the ears and conveniently near the top of the list.
A few translation options are also available, but this list is limited to only one per language pair. You can try them out based on your translation requirements – we installed English to French and French to English – the latter was only available when we selected French in the first step of the Language installation workflow. Some punctuation checkers are also available, which can be helpful for language learners.
Download the test file, which is four seconds of speech.
In Speech Note, click File > Transcribe a file, and open the file we just downloaded. Transcription will begin automatically, and the transcribed text will be output in Speech Note’s main text pane.
Integrate Piper with Orca
Piper speech synthesis is a clear upgrade from the eSpeak synthesised voices we’re all familiar with. It’s not yet available as a default option for many screen readers, but we can integrate it with Orca, the most mature Linux screen reader.
Using Orca with Piper has its limitations, such as comparatively slow reading performance when working in a command terminal and requiring more system resources, but the more natural voice can make it more pleasant to work with if you’re primarily interacting with a GUI via keyboard shortcuts.
Enter your password to install dependencies when prompted.
Once installed – assuming the test audio was produced, it’s time to configure the Orca screen reader to use Piper:
$ orca -s
In Orca’s settings tool, select the Voice tab. Under Speech synthesiser, select ‘piper-generic default voice’ from the pull-down menu.
Untick the ‘Break speech into chunks between pauses’ box on the right, then click Apply. You may also wish to change the Rate at which it speaks – we like putting this at 70.
You’ll now be hearing a Piper voice named Alan narrating your interactions. It’s worth noting that, if you’re a quick typist, Piper will not be able to keep up with your letter-by-letter text entry in the same way as eSpeak.
Orca works with both Xorg and Wayland, but we’ve seen slightly better performance in X. If you’re booting to command line and starting the GUI from there, simply invoke
$ startx
instead of
$ wayfair
If you’re booting to the GUI, you’ll have to change your config to reflect your preference. In a terminal type:
$ sudo raspi-config
Go to 6 Advanced Options > A6 Wayland > X1 X11 and select OK. Reboot to enact your settings changes.
ROVs (remotely operated vehicles) let us explore bodies of water and it is hard not to be excited by the possibilities. But traditional ROVs cost a lot of money and often require serious expertise to operate and maintain. Luckily there are affordable alternatives, such as this DIY underwater rover designed by Science Buddies’ Ben Finio.
Finio created this ROV specifically for educational purposes and so it accommodates a relatively small classroom budget. For about $100-150, a school science club can build this device and start exploring the depths.
In order to keep the costs down, Finio used as many everyday parts as possible. The hull, for example, is a food storage container and the weights to bring the vehicle close to neutral buoyancy are steel bar stock. This design doesn’t include a ballasts or thrusters to alter depth (it can only steer left or right), so users will have to experiment with the weights to reach the desired depth.
This ROV has two thrusters for propulsion and steering. Those are electric DC motors controlled by an Arduino UNO Rev3 board through H-bridge drivers. Power comes from an onboard lithium battery and users pilot the craft with a remote control connected via a tether. That remote has two joysticks, each with one axis tied to one motor’s power.
Finio suggests attaching a GoPro (or any other action camera) to the vessel to record the underwater action.
New designs for Project Relate and Sound Notifications
We’re committed to an ongoing partnership with the disability community to improve our accessibility features, including updates based on user feedback.
Customize how you teach Project Relate. In 2022, we launched Project Relate, an Android app for people with non-standard speech, that allows you to create a personalized speech recognition model to communicate and be better understood. Custom Cards allow you to customize the phrases you teach the model so it understands words that are important to you. Now, there’s a new way for you to select text and import phrases from other apps as Custom Cards, like a note in a Google Doc.
New design for Sound Notifications with feedback from you. Sound Notifications alerts you when household sounds happen — like a doorbell ringing or and a smoke alarm going off — with push notifications, flashes from your camera light, or vibrations on your phone. We’ve redesigned Sound Notifications based on user feedback, improving the onboarding process, sound event browsing, and making it easier to save custom sounds for appliances.
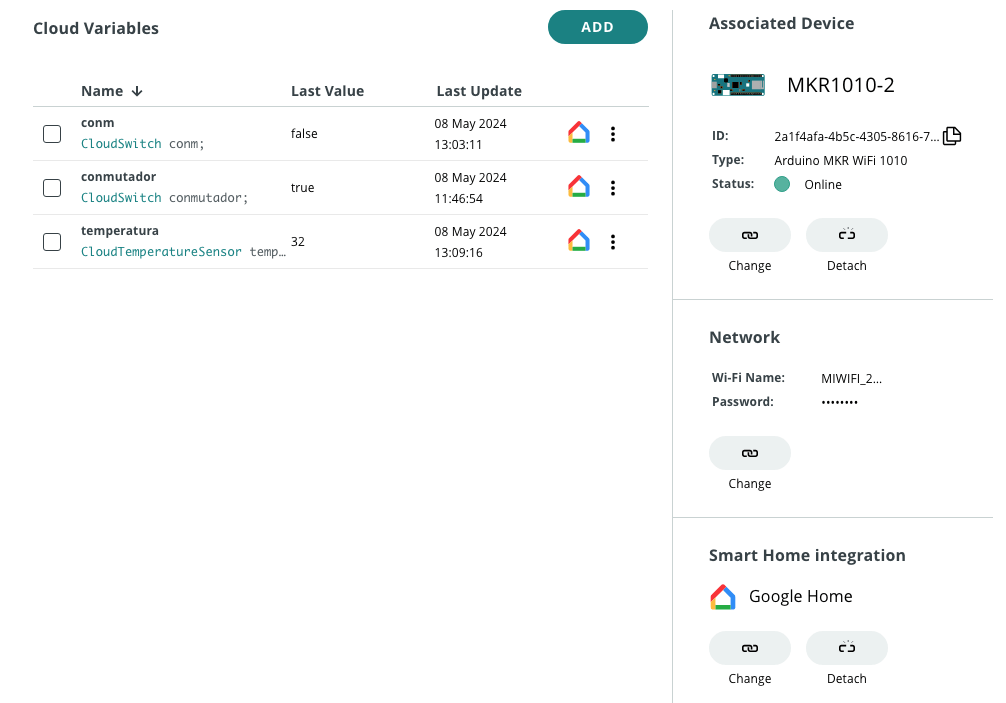
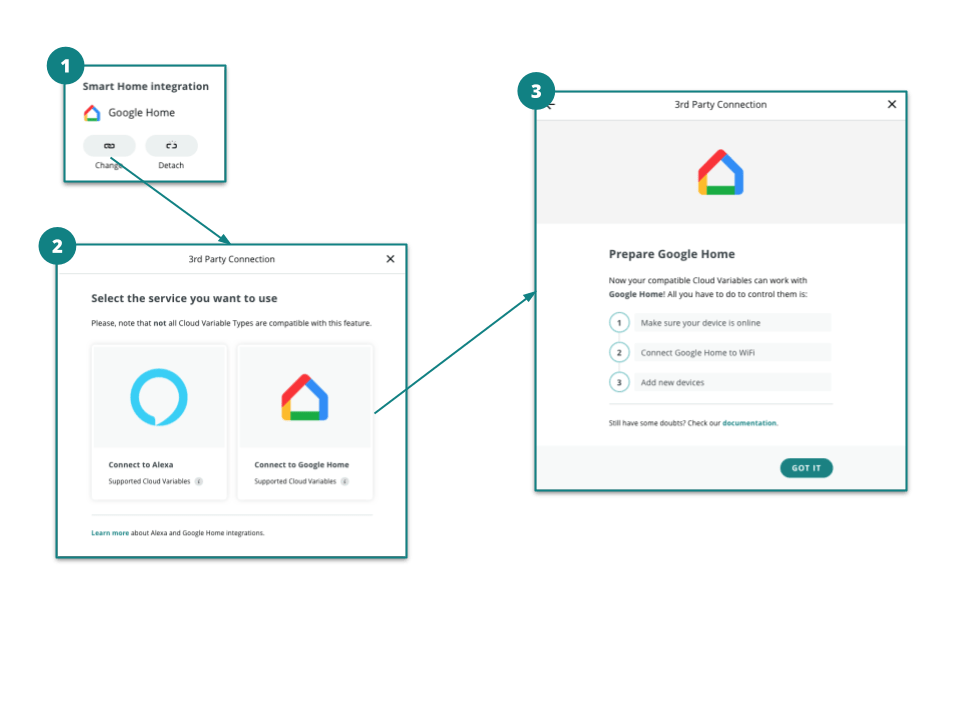
We’re excited to announce that the Arduino Cloud now supports Google Home! This means you can now interact with your devices, simply through your Google Home Assistant: use voice commands, the Google Home app, or create new routines integrating Arduino solutions.
This new integration expands our ecosystem of compatible applications, which already includes Alexa. The process is similar, making it easy for you to connect your devices in the most natural way: just by talking!
How to use Google Home with Arduino Cloud
1. Program your device
The first step is to create, configure and program your device in a way that it can be connected to Google Home. The process is very straightforward:
1. Create and set up a new Thing, configuring the network and associating a physical device. 2. Define your variables making sure that you choose from the Smart Home compatible ones. For example, if you have connected an LED strip to your board, add a “Colored light” variable.
3. Create the sketch of your application and program your device. 4. Configure your Smart Home Integration and set “Connect to Google Home.”
Your device is now ready to be detected! Every variable will be detected as a new device in Google Home.
2. Detect your device with Google Home
The next step is to enable Google Home to detect and configure your device. For that, follow the instructions below:
1. Wait until the board is connected to your network. 2. Open your Google Home app, go to the Devices tab and click on “Add Device.” 3. Select “Works with Google Home.” 4. Select the “Arduino” action from the list, and follow the instructions to link your Arduino account if requested.
Next, you will be prompted to add your devices (there will be one device per variable). Simply select each device to associate it to a room.
Congratulations! Your device is ready to use with Google Home.
Use your Google Home-compatible speaker or mobile phone
With the Google Home integration, you can now interact with any device connected to the Arduino Cloud using your Google Home-compatible speakers or the Google Home app. You can also include them in your Routines in Google Home Automations to help automate your tasks. Bear in mind that Arduino Cloud is compatible not only with devices based on Arduino or ESP hardware, but also with those programmed using Python, JavaScript or Node-RED.
What projects can you set up with Google Home and Arduino Cloud?
Currently, the supported Google Home sensors are temperature and motion detection, and the supported actionable accessories are light, dimmable light, colored light, smart plug and smart switch. So, with the Arduino Google Home Action, you can turn on the lights in the living room, check the temperature in the bedroom, start the coffee machine, water your plants, find out if your dog is sleeping in the doghouse, and much more.
The only limit is your imagination. Just try saying…
“Hey Google, turn on the lights in my bedroom.”
“Hey Google, what’s the temperature in the living room?”
“Hey Google, turn on the coffee machine.”
What is Arduino Cloud?
Arduino Cloud is an all-in-one IoT solution that empowers makers to create, monitor and control their devices from anywhere with stunning dashboards and share their projects with anyone.
The Google Home integration with the Arduino Cloud is free to use. Make sure you have an Arduino Cloud account and explore our documentation if you want to learn more.
And that’s it. It’s ready to use and it is free. You can explore the premium features for enhanced functionality.
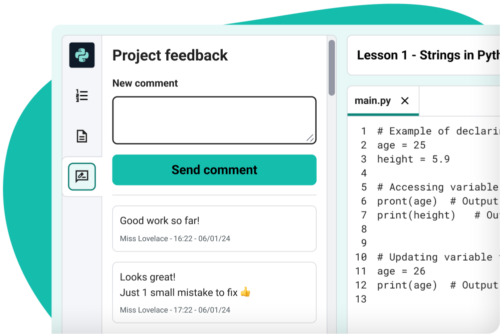
I’m excited to announce that we’re developing a new set of Code Editor features to help school teachers run text-based coding lessons with their students.
New Code Editor features for teaching
Last year we released our free Code Editor and made it available as an open source project. Right now we’re developing a new set of features to help schools use the Editor to run text-based coding lessons online and in-person.
The new features will enable educators to create coding activities in the Code Editor, share them with their students, and leave feedback directly on each student’s work. In a simple and easy-to-use interface, educators will be able to give students access, group them into classes within a school account, and quickly help with resetting forgotten passwords.
Example Code Editor feedback screen from an early prototype
We’re adding these teaching features to the Code Editor because one of the key problems we’ve seen educators face over the last few months has been the lack of an ideal tool to teach text-based coding in the classroom. There are some options available, but they can be cost-prohibitive for schools and educators. Our mission is to support young people to realise their full potential through the power of computing, and we believe that to tackle educational disadvantage, we need to offer high-quality tools and make them as accessible as possible. This is why we’ll offer the Code Editor and all its features to educators and students for free, forever.
Alongside the new classroom management features, we’re also working on improved Python library support for the Code Editor, so that you and your students can get more creative and use the Editor for more advanced topics. We continue to support HTML, CSS, and JavaScript in the Editor too, so you can set website development tasks in the classroom.
Educators have already been incredibly generous in their time and feedback to help us design these new Code Editor features, and they’ve told us they’re excited to see the upcoming developments. Pete Dring, Head of Computing at Fulford School, participated in our user research and said on LinkedIn: “The class management and feedback features they’re working on at the moment look really promising.” Lee Willis, Head of ICT and Computing at Newcastle High School for Girls, also commented on the Code Editor: “We have used it and love it, the fact that it is both for HTML/CSS and then Python is great as the students have a one-stop shop for IDEs.”
Our commitment to you
Free forever: We will always provide the Code Editor and all of its features to educators and students for free.
A safe environment: Accounts for education are designed to be safe for students aged 9 and up, with safeguarding front and centre.
Privacy first: Student data collection is minimised and all collected data is handled with the utmost care, in compliance with GDPR and the ICO Children’s Code.
Best-practice pedagogy: We’ll always build with education and learning in mind, backed by our leading computing education research.
Community-led: We value and seek out feedback from the computing education community so that we can continue working to make the Code Editor even better for teachers and students.
Get started
We’re working to have the Code Editor’s new teaching features ready later this year. We’ll launch the setup journey sooner, so that you can pre-register for your school account as we continue to work on these features.
Before then, you can complete this short form to keep up to date with progress on these new features or to get involved in user testing.
The Code Editor is already being used by thousands of people each month. If you’d like to try it, you can get started writing code right in your browser today, with zero setup.
1. Improved device and data protection to deter theft before it happens
We’re working to strengthen your device’s security against theft with new and improved protection features that will make thieves think twice about trying.
Factory reset upgrade prevents a reset by a thief. For some criminals, the goal is to quickly reset your stolen device and resell it. We’re making it more difficult to do that with an upgrade to Android’s factory reset protection. With this upgrade, if a thief forces a reset of the stolen device, they’re not able to set it up again without knowing your device or Google account credentials. This renders a stolen device unsellable, reducing incentives for phone theft.
Private space hides your sensitive apps. Some thieves just want the device, but many aim to extract valuable data and transfer funds from your phone that can be worth much more than your hardware. Private space is a new feature that lets you create a separate area in your phone that you can hide and lock with a separate PIN, giving you additional security for apps that might contain sensitive data, like health or financial information.
More steps for changing sensitive device settings to protect your data. Disabling Find My Device or extending screen timeout now requires your PIN, password or biometric authentication, adding an extra layer of security preventing criminals who got a hold of your device from keeping it unlocked or untrackable online.
Increased authentication to protect you in case your PIN is known by a thief. When enabled, our new enhanced authentication will require biometrics for accessing and changing critical Google account and device settings, like changing your PIN, disabling theft protection or accessing Passkeys, from an untrusted location.
Factory reset protection updates and private space will be released as part of Android 15. Enhanced authentication protections will be released to select devices later this year.
Catch up on episodes of your favorite shows on Max and Peacock or play a game of Angry Birds on select cars with Google built-in — which is expanding to car models like the Acura ZDX, Ford Explorer and more. You’ll also be able to enjoy a rapidly growing selection of mobile and tablet apps in the car with our new developer program.
In addition, Google Cast (formerly Chromecast built-in) is coming to cars with Android Automotive OS, starting with Rivian in the coming months. You can easily cast video content from your phone or tablet to the car, opening up even more entertainment options.
Find new content with AI on Google TV
With over 220 million active devices globally and a fast growing user base, Google TV helps you discover content faster with AI-based recommendations – so you can spend more time watching and less time searching. Now with the Gemini model, it’s even easier to pick what to watch with AI-generated descriptions on the homescreen, personalized for you based on your genre and actor preferences. AI-generated descriptions will also fill in missing or untranslated descriptions for movies and shows so you aren’t left guessing.
Improve your training with Wear OS 5 updates
With watch launches from Pixel, Samsung and more, Wear OS grew its user base by 40% in 2023 and has users in over 160 countries and regions. Now, Wear OS has expanded to more brands including OnePlus, OPPO and Xiaomi.
Later this year, battery life optimizations are coming to watches with Wear OS 5. For example, running an outdoor marathon will consume up to 20% less power when compared to watches with Wear OS 4. And your fitness apps will be able to help improve your performance with the option to support more data types like ground contact time, stride length and vertical oscillation.
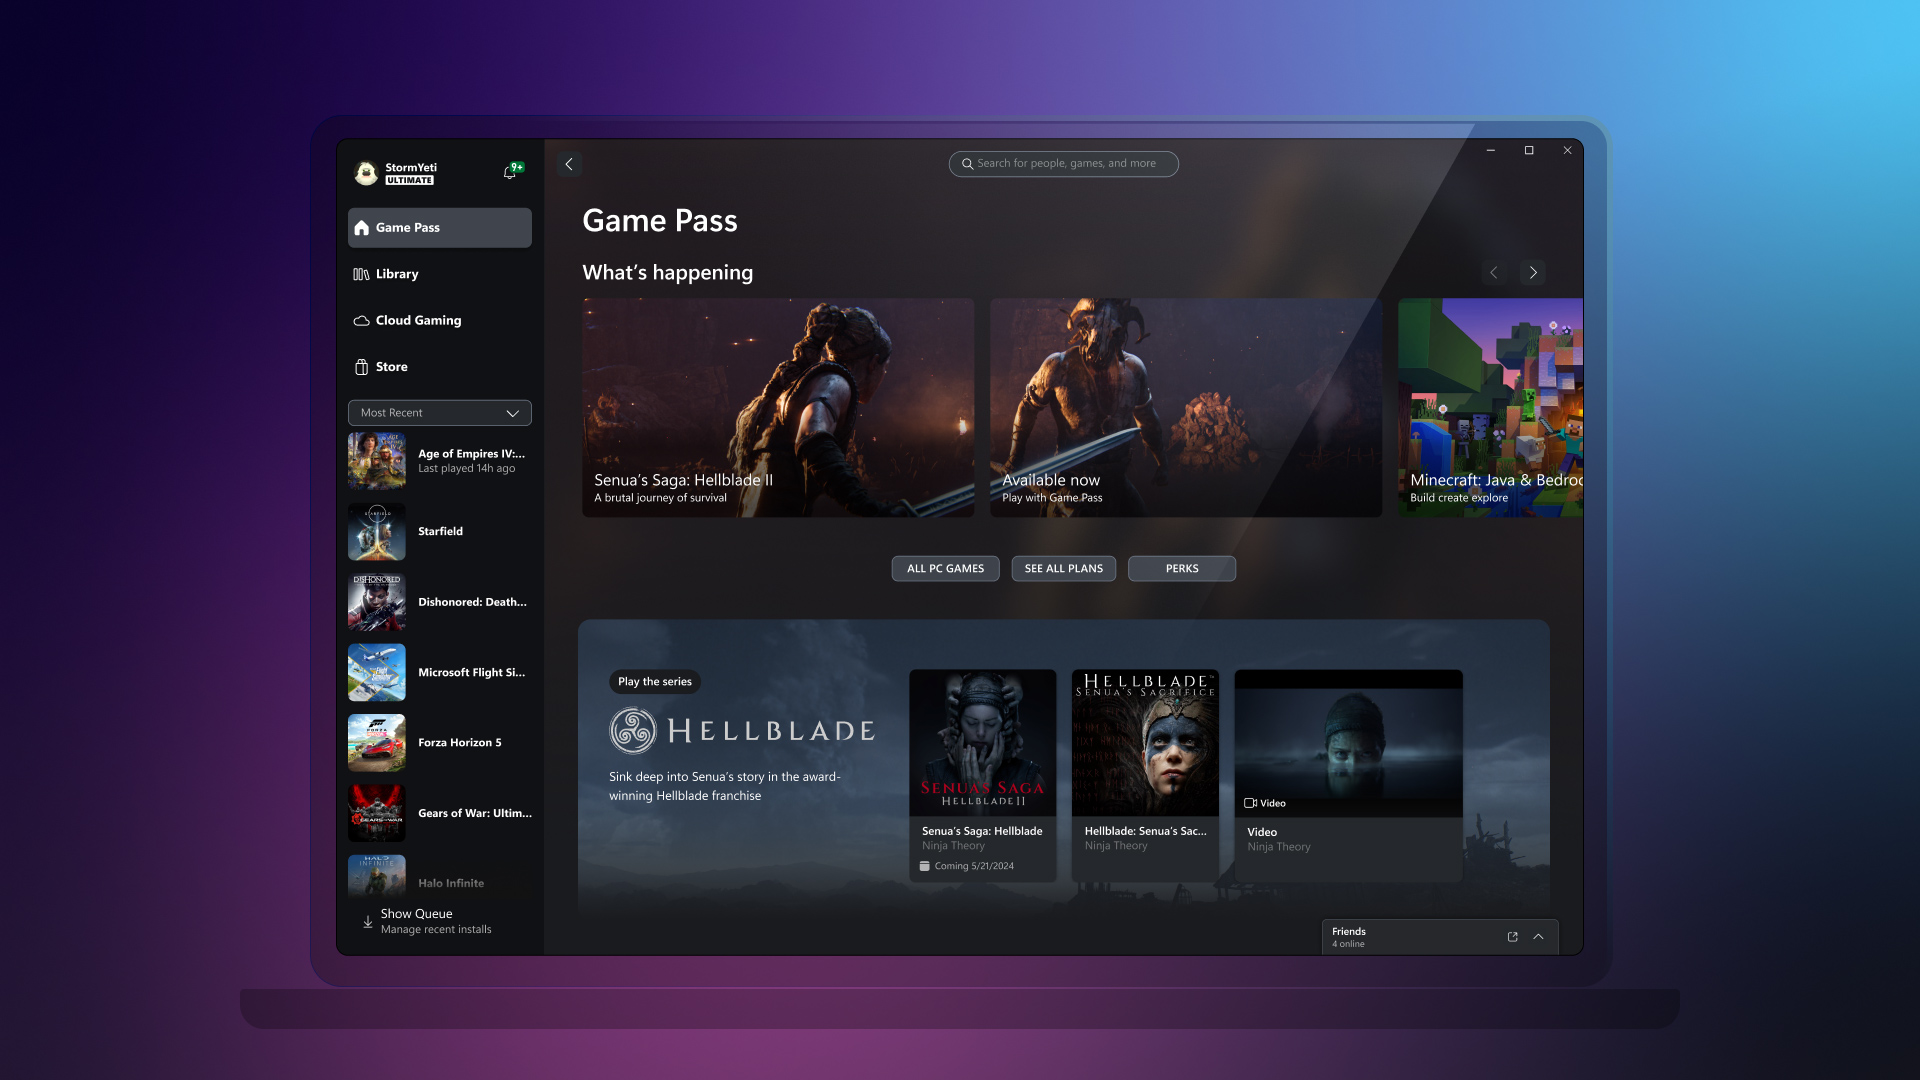
Starting today, Team Xbox is rolling out some highly requested features to continue to improve cloud gaming across devices and screens where Xbox is available. Also, to celebrate the upcoming game launch for Senua’s Saga: Hellblade II, you will be able to experience a new channel on the Xbox app for PC.
Use Your Mouse and Keyboard with Xbox Cloud Gaming (beta)
Mouse and keyboard support for cloud gaming will start rolling out today. You can now use your mouse and keyboard for your gaming experience on web browsers (Edge or Chrome).
To start gaming with your mouse and keyboard on web browsers, follow these steps:
Later this month, you’ll also be able to use the Xbox app on PC by selecting a game that has a mouse and keyboard badge. From there, you will be able to use your mouse and keyboard to control the game, just like you would on a PC game.
Pro Tip: You can also switch between using a mouse and keyboard combination and your controller at any time, by simply pressing any key on your keyboard or the Xbox button on your controller.
Mouse and keyboard support will initially be available for 26 titles, including:
ARK Survival Evolved
Atomic Heart
Cities: Skylines – Mayor’s Edition
Cities: Skylines – Remastered
Deep Rock Galactic
Doom 64
Fortnite (browser only)
Gears Tactics
Grounded
Halo Infinite
High on Life
House Flipper
Inkulinati (Game Preview)
Mount & Blade II: Bannerlord
Norco
Pentiment
Quake
Quake 2
Sea of Thieves
Slime Rancher 2
Sniper Elite 5
State of Decay 2
Terraria
The Sims 4
Valheim (Game Preview)
Zombie Army 4: Dead War
Celebrating Senua’s Saga: Hellblade II With a New Channel
We can’t wait for the return of Senua on May 21 in a brutal journey of survival through the myth and torment of Viking Iceland. To celebrate, our team has been working on a special channel that will elevate the new entry in the series, while also making it easier to find the previous title. The channel will also feature a captivating video that we hope you enjoy. Go pre-install the game today and be ready for launch day!
Compact Mode Improvements are Starting to Roll Out
We have started previewing new Compact Mode features, including Jump back in and Friends, with a subset of players and with all Xbox Insiders. To learn more about the changes you may see when you access the Xbox app on PC, click here.
Stay tuned to Xbox Wire for future updates and all the latest and greatest Xbox related news. For support related to Xbox updates, visit the official Xbox Support site.
We love hearing from the community, whether you have a suggestion for a new feature that you’d like to see added, or you want to give feedback on existing features that could use some improvement. We’re always looking for ways to improve Xbox experiences for players around the world. If you’d like to help create the future of Xbox and get early access to new features, join the Xbox Insider Programtoday by downloading the Xbox Insider Hub forXbox Series X|S and Xbox Oneor Windows PC. Let us know what you think!
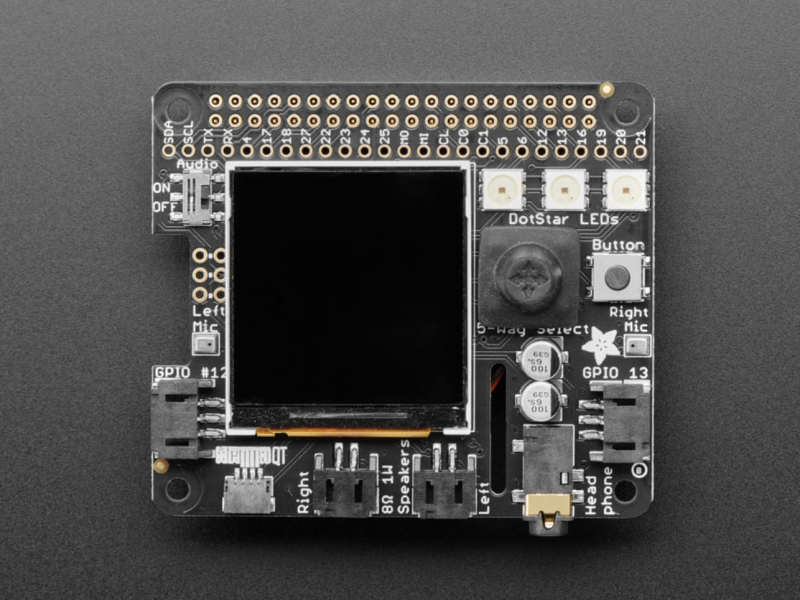
Built for Raspberry Pi 4, Adafruit’s Braincraft HAT is a pretty comprehensive kit for machine learning. It includes a 1.54-inch 240×240 TFT screen as a display, a joystick to navigate options you might wish to display on it, a cooling fan, three controllable LEDs, plus speaker, headphone and microphone ports to help you build text-to-speech tools or home assistant projects. There’s no integrated camera, but it does include a slot to connect one, as well as a range of other IC2 and JST STEMMA devices.
Adafruit publishes a range of projects targeting the Braincraft, and is currently updating its guides and software to support Raspberry PI OS Bookworm. The legacy version of Raspberry Pi OS Bullseye, which is known to be stable with the HAT, is available via both Raspberry Pi Imager and as a direct download.
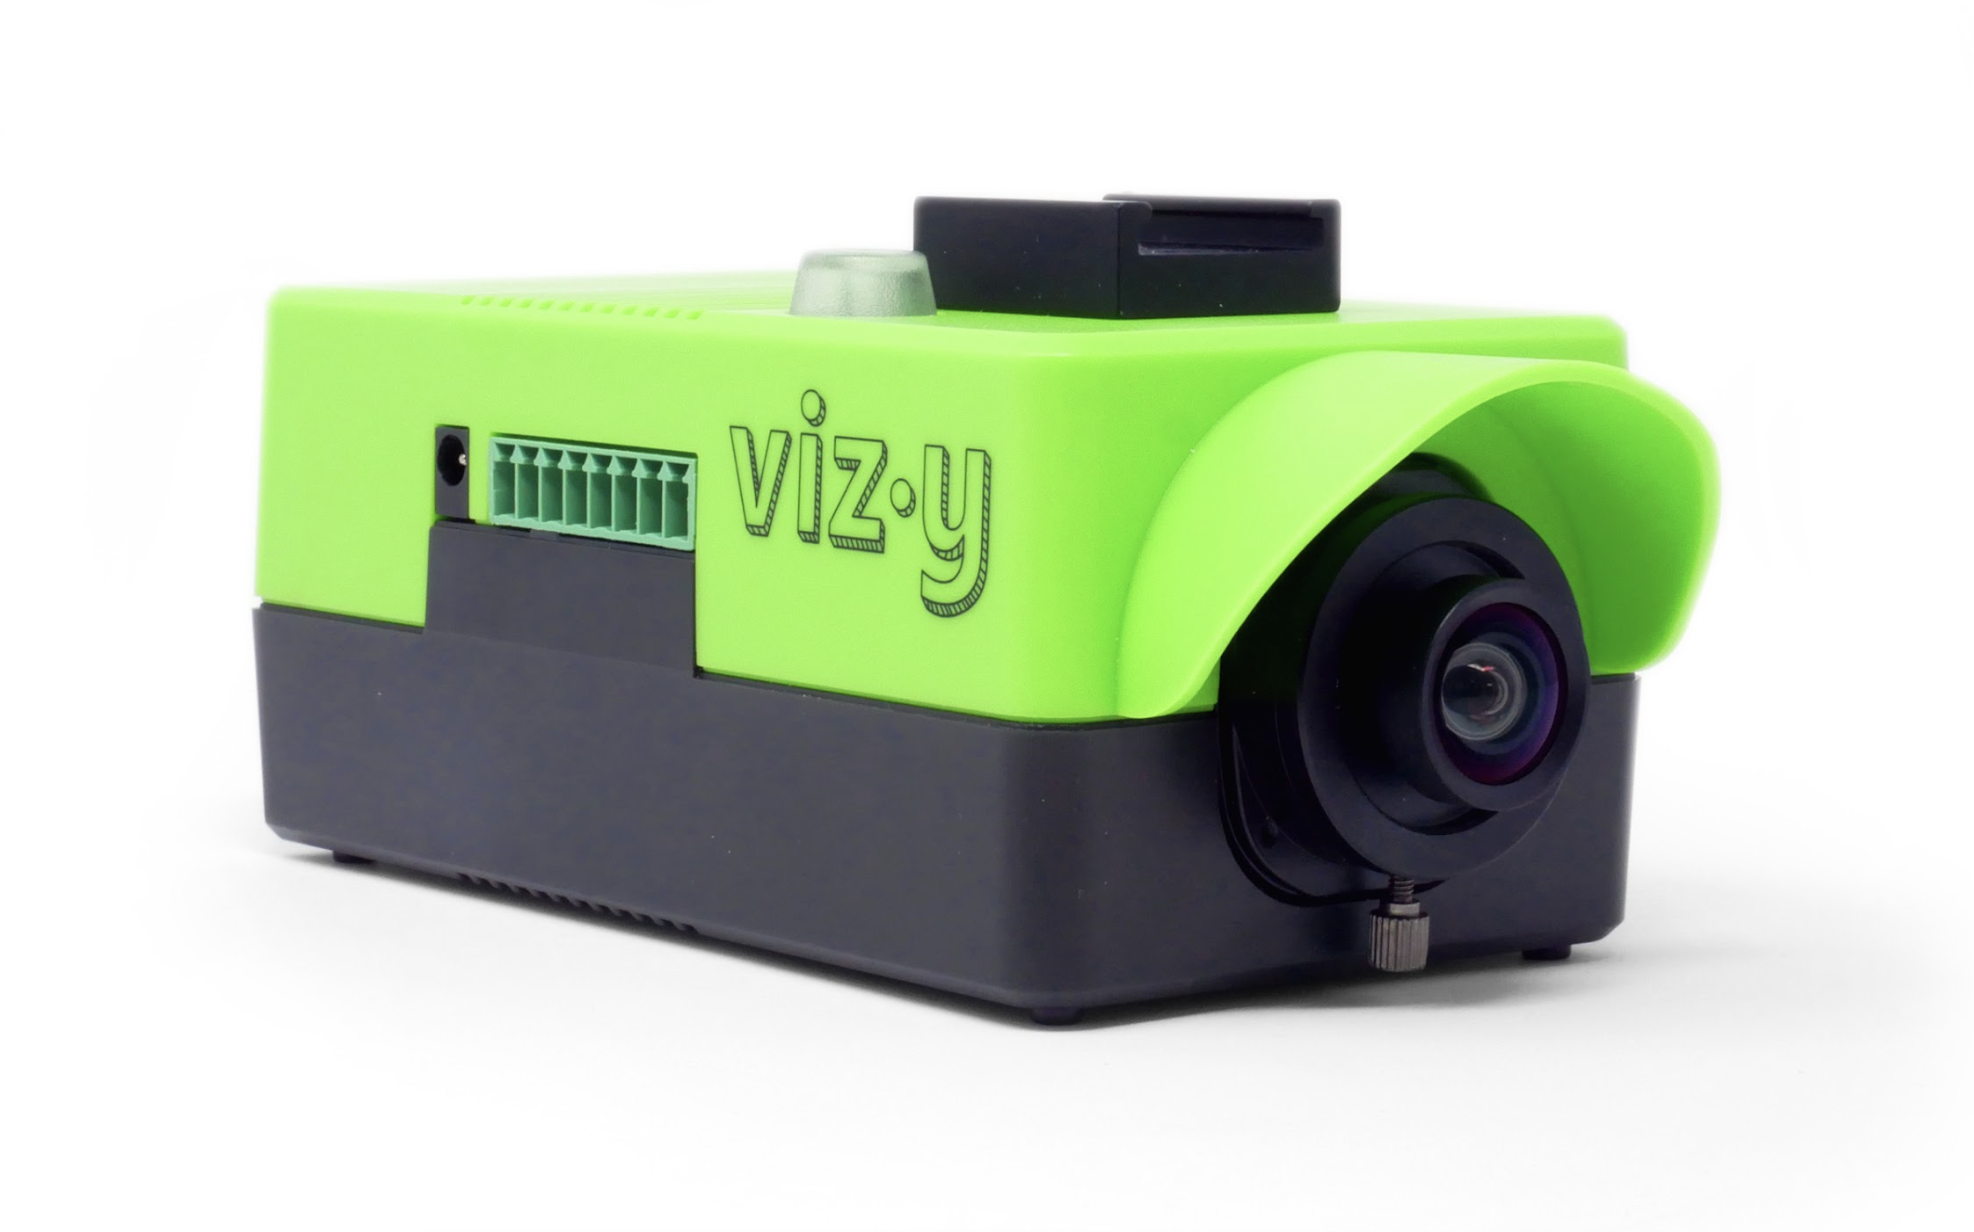
Vizy Camera
Like XGO, Vizi camera is driven by a Raspberry Pi, although it’s a standard version, rather than the Compute Module form factor. You can even choose how much RAM you’d like your camera to have.
Once set up on your network, it throws up a local intranet page that you can access from your browser. You can also configure it to be available over the internet. Here, you can access the cam’s feed and run a range of built-in machine learning applications including object identification, motion analysis, a bird species identifier for your bird feeder and a pet detector that can take photos or be used as a trigger for other events. Suggested projects include a treat dispenser or ball launcher.
As you’d expect for something that can be used to spy on garden birds, Vizy can be weatherproofed with an outdoor enclosure. Other add-ons include extra lenses, a 4G adaptor for enhanced portability, and a Power over Ethernet adaptor.
Luwu Dynamics XGO 2
Luwu Dynamics’ XGO Mini 2 and Lite 2 dogs look like desk-sized takes on Boston Dynamics’ Spot robot. The robot can be addressed by a variety of microcontrollers and single-board computers, but the default configuration uses Raspberry Pi CM4.
As well as manual control options, it has a selection of pre-programmed behaviour routines that you can invoke, including object recognition using the Yolo real-time object detection system, voice command recognition, and efforts at gender, emotion and gesture recognition. All of these behaviours are handled by a clutch of Python scripts and their accompanying libraries, which makes them really easy to customise.
If you don’t want to immediately dive into XGO’s scripts, there are also a range of programming interfaces available and custom libraries for controlling the cyberdog body. Your options range from a remote control smartphone app to a Python-based block-based programming interface accessible via a web browser.
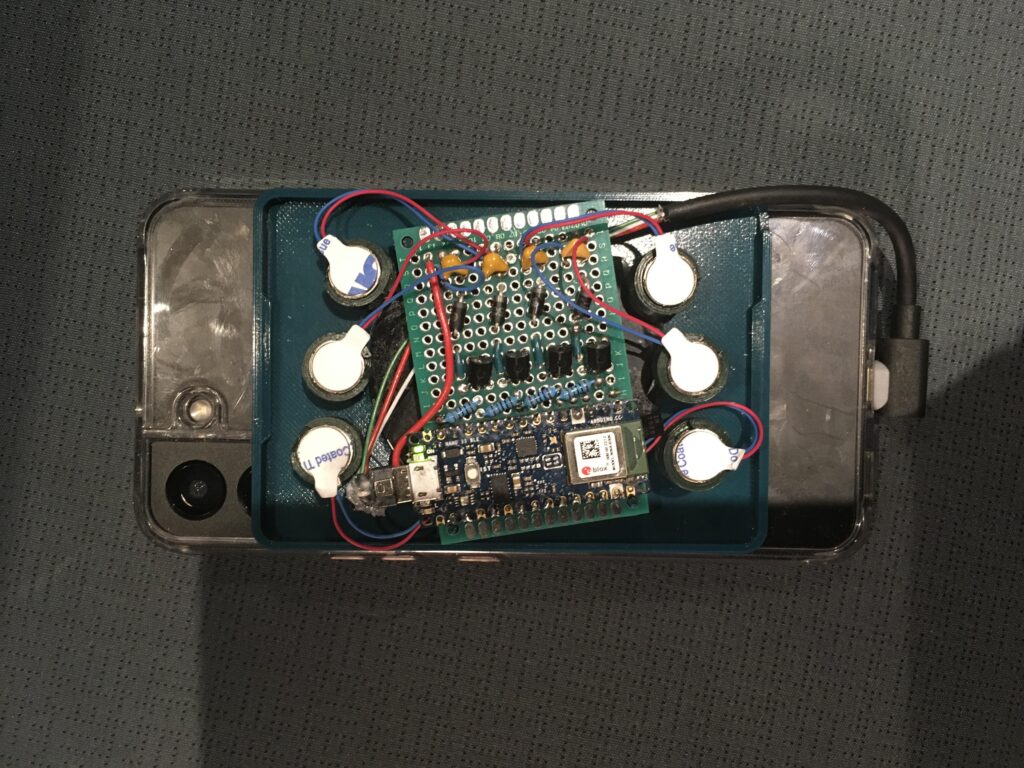
For the visually impaired community, most of their interactions on mobile phones are confined to text-to-speech (TTS) interfaces that read portions of the screen aloud. Dynamic braille displays also exist as a tactile means of communication, but their prices can get close to $15,000, putting them out of reach for most people. This is why Instructables user bmajorspin wanted to create an inexpensive, portable alternative that could work with other mobile devices.
Unlike other braille displays that use moving pins, this design leverages a set of six static pins housed within a 3D-printed enclosure that can vibrate independently. After connecting six haptic motors to an Arduino Nano 33 BLE through MOSFET drivers, bmajorspin mounted the entire circuit onto a small piece of perfboard and then soldered a micro USB cable for power. Lastly, a spring and 3D-printed cap were placed over each braille dot to isolate the vibrations and prevent the haptic signals from becoming muddled together.
The Nano 33 BLE is able to display braille characters thanks to it acting as a Bluetooth® Low Energy server that exposes a custom braille reader service. Through it, bmajorspin’s custom Android app can send encoded dot patterns to the device for it to then decode and present with the haptic motors.
Circle to Search can now help students with homework
With Circle to Search built directly into the user experience, you can search anything you see on your phone using a simple gesture — without having to stop what you’re doing or switch to a different app. Since launching at Samsung Unpacked, we’ve added new capabilities to Circle to Search, like full-screen translation, and we’ve expanded availability to more Pixel and Samsung devices.
Starting today, Circle to Search can now help students with homework, giving them a deeper understanding, not just an answer — directly from their phones and tablets. When students circle a prompt they’re stuck on, they’ll get step-by-step instructions to solve a range of physics and math word problems without leaving their digital info sheet or syllabus. Later this year, Circle to Search will be able to help solve even more complex problems involving symbolic formulas, diagrams, graphs and more. This is all possible due to our LearnLM effort to enhance our models and products for learning.
Circle to Search is already available on more than 100 million devices today. With plans to bring the experience to more devices, we’re on track to double that by the end of the year.
Our commitment to foster a safe, welcoming, and inclusive gaming community is powered by the ongoing investments and innovations we make to protect players and promote positive play. Today, we are releasing our fourth Xbox Transparency Report, which demonstrates our advancements in promoting player safety and our commitment to transparency.
At Xbox, we remain dedicated to advancing the responsible application of AI to amplify our human expertise in the detection of potential toxicity. We have a unique opportunity to create industry-leading safety innovations that better protect our communities, leveraging Microsoft’s investments that combine the latest generative AI advancements with human expertise and judgement.
Our progressive approach to leveraging AI to categorize and identify harmful content is guided by Microsoft’s Responsible AI Standard and allows our human moderators to focus on the more complex and nuanced harms, ensuring that our actions to safeguard the gaming community are accurate, consistent, and fair.
Early AI-supported investments include:
Auto Labeling helps to classify conversational text by identifying words or phrases that match criteria and characteristics of potentially harmful content. This approach uses AI to analyze reported text content and helps community moderators quickly sort out false reports so human moderation efforts can be focused on content that is the most critical.
Image Pattern Matching, powered by advanced database and image matching techniques enables rapid removal of known harmful content and identification of emergent toxic imagery.
Among the key takeaways in the report:
Effective New Ways of Protecting Players: Player behavior on Xbox voice chat has meaningfully improved since the launch of our new voice reporting feature. The feature has been effective in enabling players to report inappropriate verbal behavior with minimal impact to their gameplay. Since its launch, 138k voice records have been captured utilizing our ‘capture now, report later’ system. When those reports resulted in an Enforcement Strike, 98% of players showed improvement in their behavior and did not receive subsequent enforcements. Additionally, we have updated our proactive approach to more effectively prevent harmful content from reaching players (3.2 million more lines of text than last report, or 67%), allowing players to engage in a positive way. We will continue to invest in features that protect and enhance the Xbox player experience.
Understanding of Enforcements Leads to a Safer Community: The Enforcement Strike System was launched last year to promote positive play while helping players understand the severity of a violation. Since its launch, 88% of those who received an Enforcement Strike did not engage in activity that violated our Community Standards to receive another enforcement. We also reduced suspension lengths overall for minor offenses. Of enforcements that would have previously resulted in a 3-day or more suspension, 44% were given a reduced length. The combination of these results shows that the majority of players choose to improve their behavior after only one suspension, even when it is short.
Blocking Inauthentic Accounts Before They Have Impact: We have been continuously investing in ways to spot inauthentic accounts, which has allowed us to quickly block many of them as soon as they’re created, preventing them from affecting our players. Our improved methods prevented millions of inauthentic accounts from being used as soon as they are created and have led to a decline in the number of proactive enforcements on inauthentic accounts for the first time in two years, with enforcements dropping from 16.3 million in the last report to 7.3 million.
Outside of the Transparency Report, our team continues to work closely to drive innovation in safety and improve our players’ experience:
Launch of Microsoft Family Safety Toolkit: Microsoft understands that parents and caregivers are busy, and that the tech landscape keeps evolving. This toolkit provides guidance on how to leverage Microsoft’s safety features and family safety settings to support and enhance digital parenting, plus guidance for families looking to navigate the world of generative AI together. We’ve also included links to a selection of informational resources already made for parents, such as the Family Online Safety Institute’s How To Be A Good Digital Parent Toolkit.
Microsoft’s Annual Global Online Safety Survey: This survey seeks to better understand the digital ecosystem and individual’s experiences online. We share our results publicly so that others can benefit from the insights as we collectively strive to create a safer online environment. The survey looks at how people of all ages perceive the opportunities and risks posed by technology.
Building a better online community with Minecraft Education’s Good Game: This recent addition to the CyberSafe collection of immersive learning worlds is a story-based adventure aimed at helping players from ages 8-18 understand the responsibilities, tools, responses and strategies that foster empathy and enable healthy online interactions. Minecraft Education users can find CyberSafe: Good Game in the in-game lesson library. The world is also available for free for Minecraft Bedrock players in the Minecraft Marketplace.
Together with our players, we continue to build a strong and supportive community for everyone, free from intimidation and distractions. We are dedicated to improving our safety features to foster our connection to players through feedback and in-game reporting, and to apply layers of protection more effectively. The AI solutions we release are all part of the journey we are taking to build a safer and more welcoming environment for all, because everyone deserves to play comfortably and experience the joy that gaming has to offer. Thank you for taking part in this journey with us.
Interactive robots always bring an element of intrigue, and even more so when they feature unusual parts and techniques to perform their actions. Mr. Wallplate, affectionately named by Tony K on Instructables, is one such robot that is contained within an electrical wall plate and uses a servo motor connected to an Arduino UNO Rev3 for mouth movement.
The circuit for Mr. Wallplate is not very complex, as a single Arduino handles all of the processing. Users are able to control the robot with an IR remote thanks to a corresponding receiver that passes along the encoded signals to the Uno for parsing. After a valid code has been found, the Talkie library in the sketch accepts speech synthesis commands before converting them into waveforms for outputting to an amplifier. One of the more challenging aspects was getting the speech to align with the mouth moving, and Tony’s solution was to simply move the servo a predetermined amount based on the word.
After ensuring the electronics worked as intended, Tony fabricated the bot from a clear plastic bottle, a metallic toggle/duplex switch plate for the face, two halves of a ping pong ball for the eyes, and a ponytail holder for the lips. As seen in the demo video below, Tony’s creation is certainly captivating while it talks.
Immerse yourself in high-performance Track Toys including the lightweight Ginetta G40 Junior.
Celebrate the cars that are blurring the line between production road cars and high-end racecars in Forza Motorsport Update 8. Expand your garage with track-worthy machines and put them to the ultimate test in special events across Career, Multiplayer and Rivals.
Update 8 rolls out for download starting Monday, May 13 at 10:00 AM PT / 5:00 PM UTC on Xbox Series X|S and PC via the Microsoft Store and Steam. Spotlight cars and new in-game events begin on Wednesday, May 15 at 5:00 PM PT (12:00 AM UTC on Thursday, May 16).
Game Improvements and Release Notes
Today’s update introduces new fixes and experience improvements to Forza Motorsport, including tweaks to how Safety Ratings are calculated in Featured Multiplayer, a gloss-matte slider in the Livery Editor, a new Tire Wear scale option for Free Play and Private Multiplayer, and changes to Drivatar AI braking behavior.
Firstly, we’ve introduced a Vinyl Material tool to the Livery Editor which can be used to uniformly adjust all vinyl materials on a car from matte (non-reflective) to glossy (reflective). This includes a reset option to revert all vinyls to match car paint glossiness. Imported designs from Forza Horizon 5 using its similar feature will automatically inherit these values.
We’ve added a Tire Wear Scale option to Free Play and Private Multiplayer, allowing adjustments to the rate at which tires are worn. 1x is the default value. At 2x, tire wear will occur twice as fast. Values range from .5x to 10x. This setting is found in the Event Setup Rules tab and in the Fuel & Tire menu when on track.
We’ve updated Safety Ratings in Featured Multiplayer by increasing the number of previous races the Safety Rating uses to determine your rating from 10 to 20, and by making on-track collisions more impactful to Safety Rating. These changes will take effect after your first race in Update 8.
In addition, we’ve improved the matchmaking algorithm to search for a narrower range of Safety Ratings compared to your own. For example, players with an ‚S‘ Safety Rating should no longer be matched with players who have ‚E‘ and ‚D‘ Safety Ratings. Groups will be connected to matches based on the player with the lowest Safety Rating.
We’ve removed the 2020 KTM X-Bow GT2 and the 2020 Lamborghini Essenza SCV12 from the Forza GT Series and added them to the Modern Factory Racecar Series in Featured Multiplayer. Meanwhile, the 2019 Porsche #70 Porsche Motorsport 935 has been added to the Forza GT Series. We’re currently working on recategorizing Forza GT racecars into separate spec divisions and expect to push these changes into the game this summer.
Finally, we’ve reduced unnecessary braking scenarios for Drivatar AI opponents. Examples of this include braking while attempting to pass, two cars wide in corners, at the apex of corners, and on straights.
Mobil Celebrates 50th Anniversary with Forza Motorsport
In celebration of its 50-year anniversary, we’re excited to reveal a partnership with Mobil 1, which will include a series of exciting in-game Rivals events starting this summer.
To kickstart this special collaboration, Maple Valley has been updated to “Mobil 1 Presents Maple Valley” with new track signage featuring Mobil 1 branding. Check it out the next time you are racing through the sweeping turns and beautiful, fictional woods of New England.
Numerous fixes and improvements have been made to Maple Valley and Mid-Ohio in Update 8. Check out the release notes for the full overview of these adjustments.
Career Tour – Track Toys Tour
The Track Toys Tour invites you to experience high-performance cars that you could see hot lapping on the racetrack.
Compete in a single-make race series with Ginetta Juniors. This affordable entry point into motorsport for enthusiasts will see you behind the wheel of the nimble yet extraordinary 2019 Ginetta G40 Junior. Despite only 100 horsepower, the lightweight G40 has emerged as the most successful junior racing car on the circuit!
Weekend Warriors sees you racing cars like the exceptional 2015 Porsche Cayman GTS which could be taken to the track on a Sunday before being driven to work the following day. Whether it is on the road or the racetrack, this Cayman GTS tackles every twist and turn at high-speed without issue!
Appreciate the unforgettable shape and undeniable performance of the iconic Caterham R500 in Kit Caterhams. This driving machine must be skillfully handled. Despite its light chassis, the R500 catapults from 0 to 60 in just 2.9 seconds thanks to its 267 horses!
And finally, enjoy a celebration of purpose-built track cars like the aerodynamic 2019 Elemental RP1 in Track Toys. This lightweight car delivers a thrilling 320 horsepower from its 2-liter turbocharged engine! Not only does its massive low-pressure diffuser look truly incredible, but its aerodynamic capabilities create a truly staggering amount of downforce, ensuring you always have full control of the RP1 on the track.
Complete all 4 series in the Track Toys Tour to receive the ultimate racing warrior, the 2019 Porsche #70 Porsche Motorsport 935. This car’s exterior details are inspired by Porsche’s racing legacy, including rims and aerodynamics that pay homage to the 935/78 racecar –nicknamed the Moby Dick – as well as 919 Hybrid LMP1-inspired LED taillights. Enter the Reward Showcase with the 935 to take on a field of hypercars built for the track.
Series within the Track Toys Tour do not have to be completed in a particular week – you have until June 27, 2024, to finish this latest Featured Tour. Spotlight cars are available at a discount for the week during which they are featured.
Spotlight Cars and VIP Discounts
Spotlight cars are featured in the Showroom every week, available for you to acquire with a temporary 30% discount using in-game credits. Update 8 will showcase four Spotlight cars, one each week, three which are either new or returning to Motorsport.
These Spotlight cars can be used in the Track Toys Tour, as well as Spotlight Series events in Featured Multiplayer and Spotlight Rivals.
Forza Motorsport VIP Members also get an exclusive 15% discount on the 2014 BAC Mono in the Showroom. This is one of the few single-seat production cars that’s not only street legal, but ready to take on any track with its unique blend of formula racecar and aircraft-like design. Duke it out with this exhilarating track toy on the Mono a Mono VIP Rivals event and shave off those milliseconds at Yas Marina – South Circuit to secure your spot on the community leaderboard.
In addition, starting with Update 8, VIPs can look forward to an exclusive 15% discount on a car every week in the Showroom. Exclusive discounts for VIP Members in Update 8 include the following cars:
With each update to Forza Motorsport, the Open Class Tour gets refreshed with new events and a new reward car.
Open Class Tour is where you can continue the journey of your favorite cars. Cars that you’ve already built in a different Builders Cup series can be further levelled up and upgraded in the Open Class Tour.
Enter the Open Class Tour with your favorite cars across D, C, B, and A Classes and take on opponents racing inexpensive and highly modifiable production cars that you would expect to see at your local track on the weekend.
Complete the Open Class Tour in Update 8 to receive the 2011 BMW 1 Series M Coupé. Its incredible blend of performance, handling and practicality makes it the perfect choice for those seeking an exhilarating driving experience, especially in the Reward Showcase where you can race with other cars in its class.
With Forza Motorsport Update 8, the Open Class Tour in Career mode has been migrated from the Builders Cup tab to the Featured tab. The Open Class Tour will be found in the Featured tab going forward.
Featured Multiplayer – Spec and Open Series
As mentioned in the release notes, with Update 8, Featured Multiplayer introduces tweaks to how Safety Ratings are calculated, an updated matchmaking algorithm and small car changes to the Forza GT Series with more updates to this division planned for summer.
Here’s a look at your Featured Multiplayer calendar of upcoming events for Update 8:
Lotus 3-Eleven Spec Series – May 15-22
The 3-Eleven is an open-cockpit, mid-engine screamer that exemplifies Lotus founder Colin Chapman’s mantra “simplify, then add lightness.”
Early Factory Racecar Series – May 22-29
Bespoke racing versions of some of the most sought-after cars from the late 80s and 90s, now valued in millions of dollars by savvy collectors.
Mazda Miata Spec Series – May 29 – June 5
The popular MX5 ‘94 version of the best-selling Mazda Miata is perfectly balanced to handle the most demanding road courses with the speed and agility of cars costing much, much more.
Modern Factory Racecar Series – June 5-12
Race through a field of ultimate track day specials in the Modern Factory Racecar series. These mid-engine production cars feature unique upgrades designed to achieve extreme performance metrics and ensure victory on the track.
Featured Rivals
Set your fastest lap times across exciting new Rivals events in Forza Motorsport Update 8.
Compete for the leaderboard in this month’s Featured Spec Rivals event! Choose your favorite Forza Touring Car and challenge your skills and precision to achieve your fastest lap at Virginia International Raceway – Full Circuit. Cars have been pre-tuned for optimal competition but can be further adjusted to suit your playstyle.
Later in the month, we’re opening a special Rivals event where you can experience the ultimate track car developed to pay tribute to a world-famous driver – the McLaren Senna – at the same track where he achieved several victories, Silverstone – Grand Prix Circuit. The Senna is one of the lightest and most driver-focused cars McLaren has ever built, with uncompromised performance and aerodynamics that unleash their true capabilities on the racetrack.
Remember that every week a new Spotlight Rivals event will present an opportunity for you to challenge your skills in the latest Spotlight car!
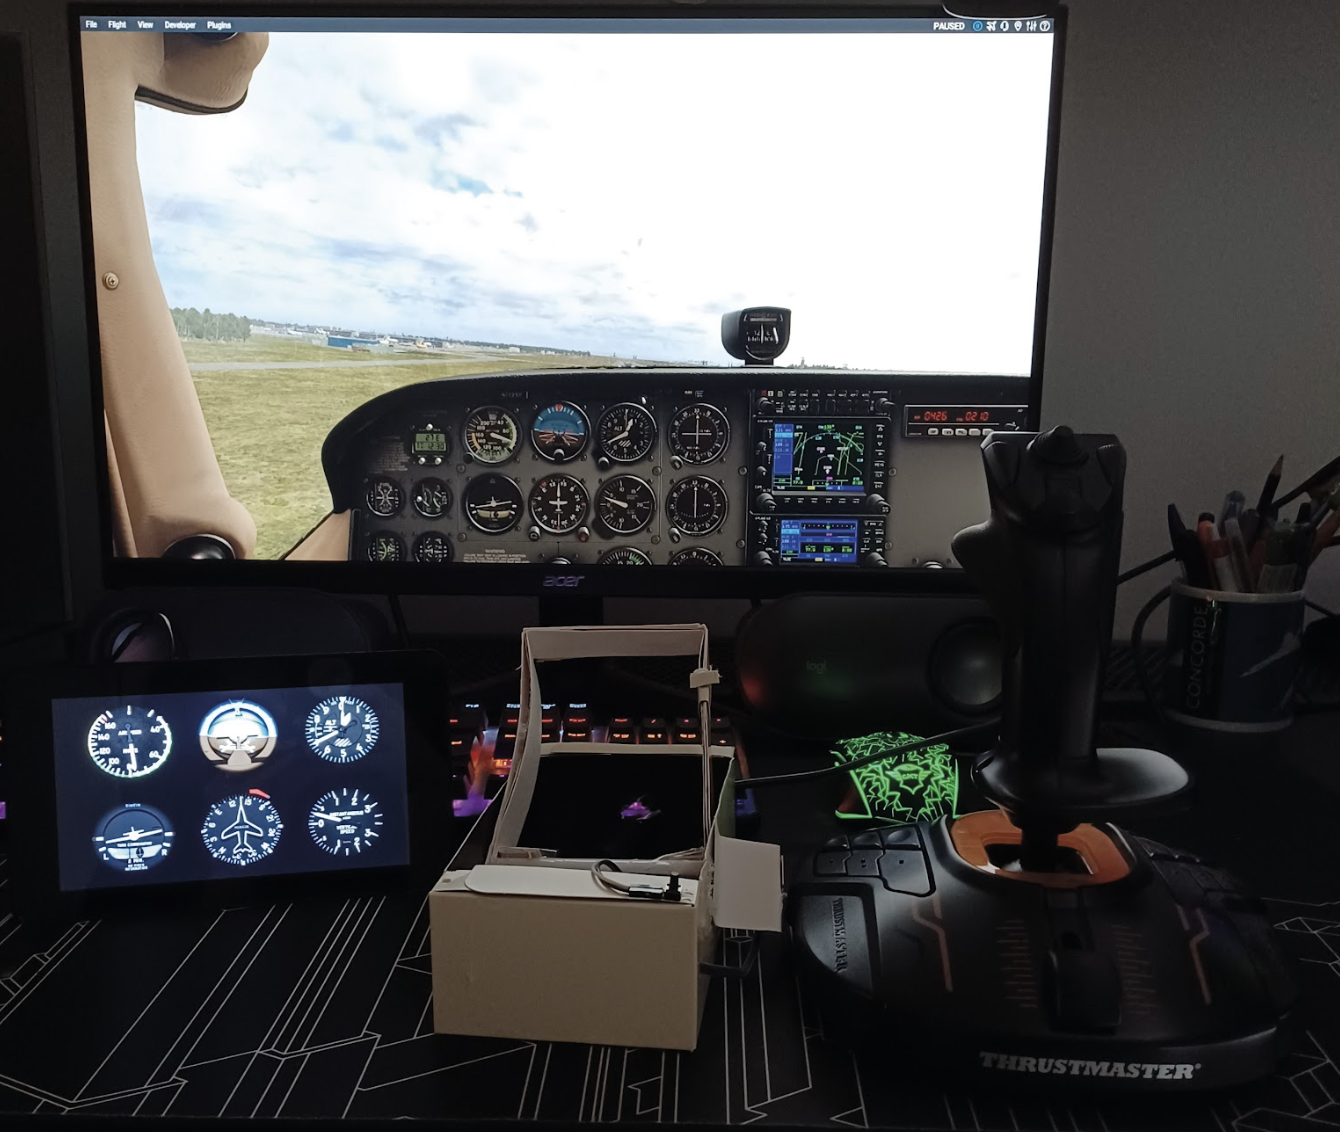
“I’ve often had the occasional flight on my grandad’s copy of Flight Simulator X when I visit him, but I purchased X-Plane 12 after Christmas, so I’ve been using it regularly for about three months.” Leo tells us about what inspired him. “[The throttle is] reasonably rigid. There’s some flex in the lever side-to-side, so the plate that pushes the reverser button has to be a bit wider, but the box and paper-tube pivot is solid enough. It is, however, very light and likes to move around the desk.”
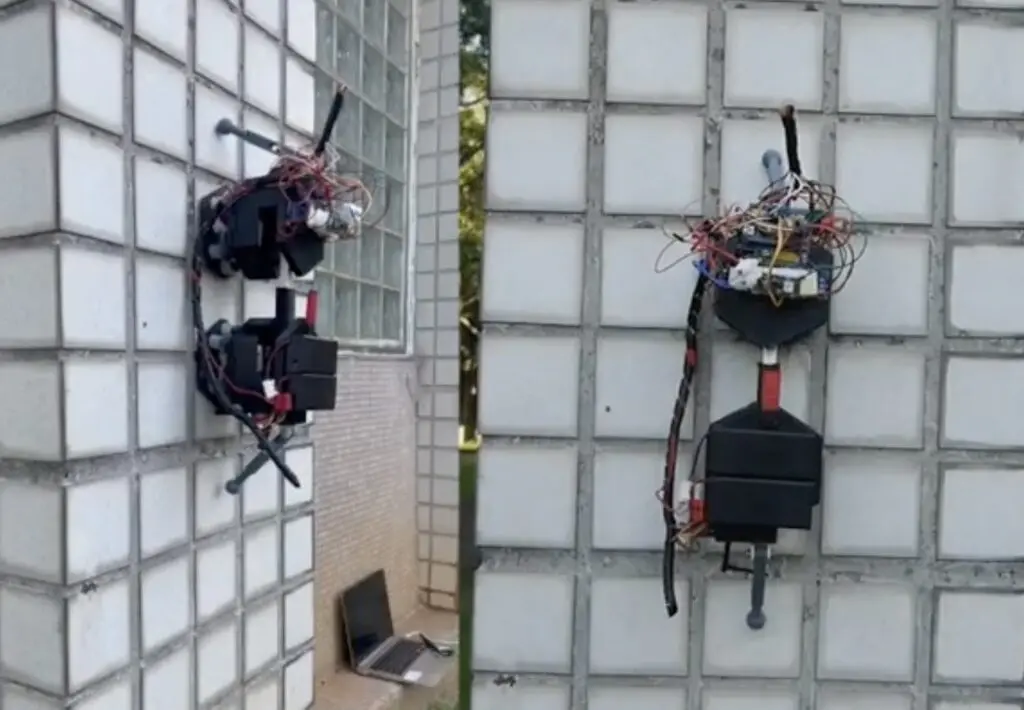
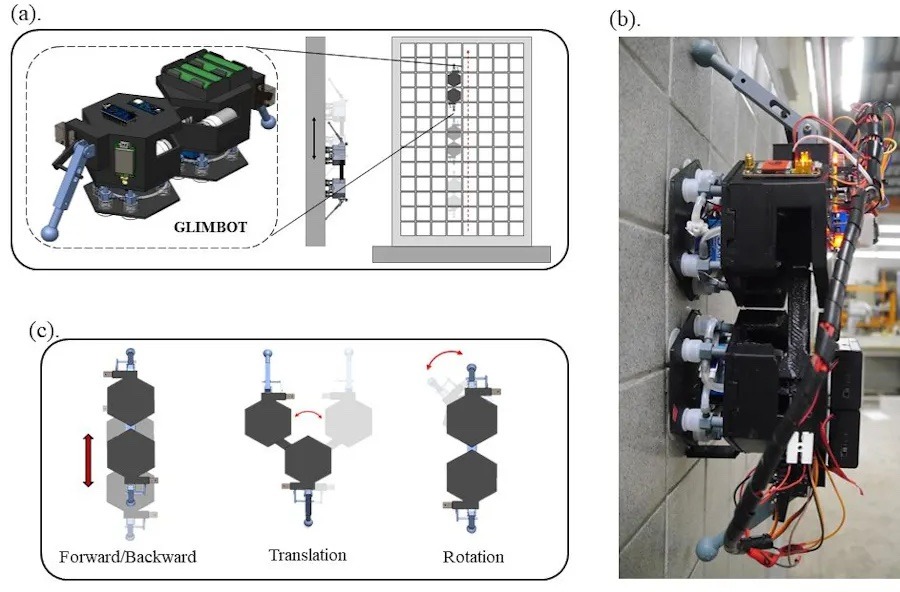
A great deal of building maintenance expenses are the result of simple inaccessibility. Cleaning the windows are your house is a trivial chore, but cleaning the windows on a skyscraper is serious undertaking that needs specialized equipment and training. To make exterior wall tile inspection efficient and affordable, the GLEWBOT team turned to nature for inspiration.
GLEWBOT climbs up walls like a gecko and taps on tiles like a woodpecker to evaluate wall integrity. Like cleaning the windows on a skyscraper, the traditional inspection method requires specialized tools and skills. GLEWBOT can perform the same functions autonomously, dramatically reducing costs.
This robot has a two-part design that lets it scale walls in a manner similar to a climber using ascenders. One part grips, while the other releases. When the bottom part grips, the top part can extend to move up the wall. When the top part grips, the bottom part can retract to repeat the process. The robot grips the tile using suction cup feet connected to micro vacuum pumps and a linear actuator performs the extension/retraction. Each end has a motor that lets it rotate relative to the linear actuator, so the robot can turn.
The system is equipped with two Arduino boards. An Arduino Nano serves as central command and handles general functions, while an Arduino Nano 33 BLE Sense acts as an acoustic recognition module and controls the inspection tool. That tool is a hollow drum hammer that taps each tile and listens for the resulting echo. An audio classification model trained for this task will detect a questionable tile based on the sound it makes, so engineers can investigate further.
As a Python developer, you’re probably eager to control and monitor your Raspberry Pi GPIOs remotely. Well, you have landed in the right place.
This article builds upon our previous introduction to “Visualize your Raspberry Pi data with Arduino Cloud | Part I.” Now, we’ll explore using Python to configure Raspberry Pi GPIOs, a fundamental step for many IoT projects that is usually considered as the “hello world” of IoT applications. Whether you’re controlling relays or monitoring digital inputs, managing GPIOs is crucial.
But IoT applications need to be accessed remotely with a dashboard that allows you to visualize your device data both in real time and its historical evolution, as well as acting remotely over your device.
Well, let’s deep dive into how we can achieve all that!
Physical setup
In this blog post, we show a very simple but comprehensive example. We will see how to use an Arduino Cloud dashboard to act remotely over your Raspberry Pi digital GPIOs. In a nutshell, we will see how to:
switch on and off an LED that is connected to your Raspberry Pi
detect when a push button that is connected to your Raspberry Pi is pressed
visualize the real time and historical value of an integer variable
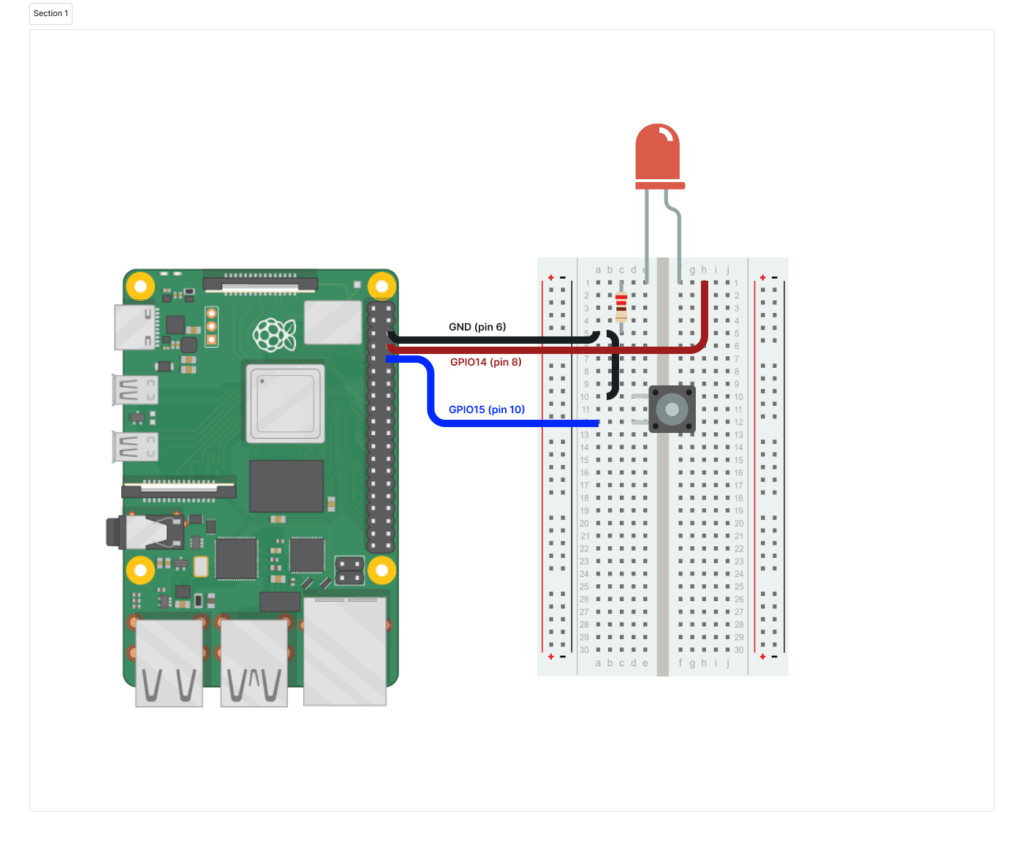
First, let’s connect our Raspberry Pi to an LED and a push button as shown in the following diagram.
It’s a very simple setup. Now that we have everything ready, let’s get started!
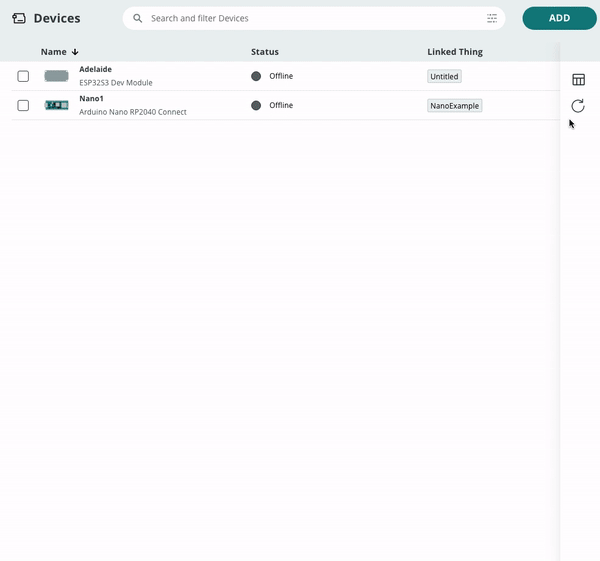
Create the Device and Thing in Arduino Cloud
To send your Raspberry Pi data to the Arduino Cloud, you have to follow these simple steps:
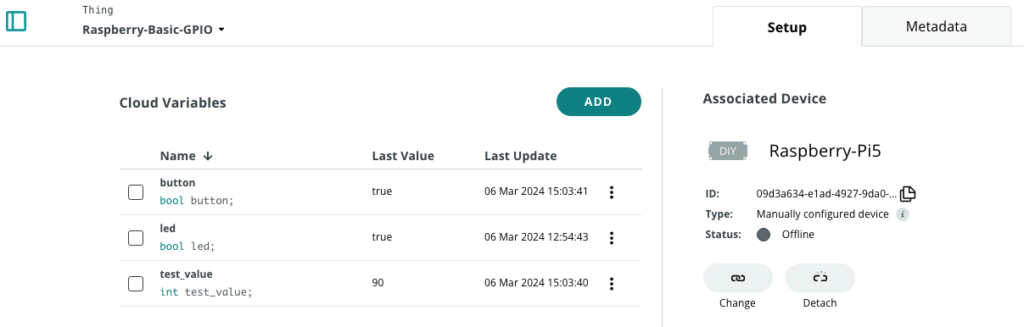
In the example shown in this blog post, we use the following three variables:
test_value: We will use this integer variable to show an integer value generated periodically in our Raspberry Pi application in our Arduino Cloud dashboard.
button: We will use this boolean variable to send the information to the Cloud when the push button is pressed.
led: We will use this boolean variable to switch on and off the LED from the Arduino Cloud dashboard.
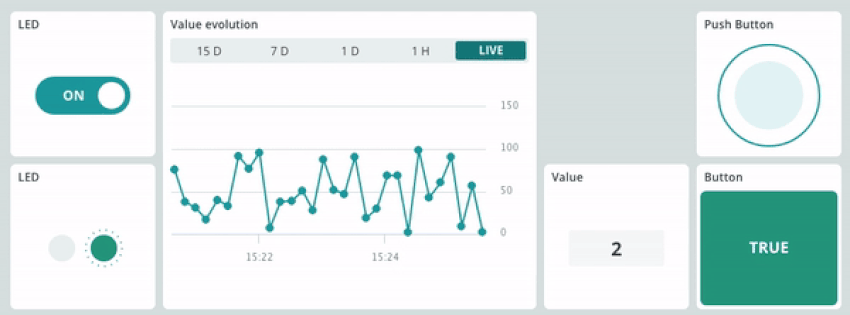
4. Create an Arduino Cloud dashboard for data visualization:
Create a switch widget (name: LED) and a LED widget (name: LED) and linke them to the led variable
Create a chart widget (name: Value evolution) and a Value widget (name: Value) and link them to the test_value variable.
Create a Push button (name: Push Button) and a Status widget (name: Button) and link them to the button variable.
With the dashboard, you will be able to:
Switch ON and OFF the LED using the switch widget.
Visualize the status of the LED with the LED widget.
Visualize the real time value of the variable test_value with the Value widget.
Visualize the evolution over time of the variable test_value with the chart widget.
Visualize on the Push Button and Button widgets when the push button has been pressed on the board.
#! /usr/bin/python3 import random
import gpiod
from gpiod.line import Direction, Value, Bias
from arduino_iot_cloud import ArduinoCloudClient
from credentials import DEVICE_ID, SECRET_KEY LED=14 # GPIO14, Pin 8
BUTTON=15 # GPIO15, Pin 10 # For Raspberry PI 5, the chip is gpiochip4. Check for other RPI flavours.
chip = gpiod.Chip('/dev/gpiochip4')
req=chip.request_lines(consumer="rpi-acloud-gpio-basic", config= { LED : gpiod.LineSettings(direction=Direction.OUTPUT), BUTTON : gpiod.LineSettings(direction=Direction.INPUT, bias=Bias.PULL_UP), }) # This function is executed every 1.0 seconds (as defined in the registration) and
# returns a random integer value between 0 and 100
def read_button(client): button = req.get_value(BUTTON) if button == Value.INACTIVE: return False else: return True # This function is executed every 10.0 seconds (as defined in the registration) and
# returns a random integer value between 0 and 100
def read_value(client): return random.randint(0, 100) # This function is executed each time the "led" variable changes
def on_led_changed(client, value): if value: req.set_value(LED, Value.ACTIVE) else: req.set_value(LED, Value.INACTIVE) print("LED change! Status is: ", value) if __name__ == "__main__": # Create Arduino Cloud connection client = ArduinoCloudClient(device_id=DEVICE_ID, username=DEVICE_ID, password=SECRET_KEY) # Register the Arduino Cloud variables with the callback functions client.register("test_value", on_read=read_value, interval=10.0) client.register("button", on_read=read_button, interval=1.0) client.register("led", value=None, on_write=on_led_changed) # Start the client client.start()
Create a file called credentials.py with your Device ID and secret.
This code can be used across all the various Raspberry Pi flavors and it should work also in any Linux-based machine. Just beware that you need to use the right gpiochip and set the right GPIO lines in the following code section:
LED=14 # GPIO14, Pin 8
BUTTON=15 # GPIO15, Pin 10 # For Raspberry PI 5, the chip is gpiochip4. Check for other RPI flavours.
chip = gpiod.Chip('/dev/gpiochip4')
You can get more information about the project in Project Hub and all the code and more details in the GitHub repository. Additionally, you can find a full python guide in the following article
Tutorial: Connect your Raspberry Pi to Arduino Cloud
Connecting your Raspberry Pi to the Arduino Cloud couldn’t be easier. All you need to do is create your free account and you are ready to go. It’s ready to use and it is free. You can explore the premium features for enhanced functionality.
So, if you’re looking to streamline data visualization of your Raspberry Pi applications using Python, give the Arduino Cloud a try and leverage its full potential for your projects.
Stay tuned for Part III and IV of our Raspberry Pi GPIO basic control blog post series in the Arduino Cloud.
Um dir ein optimales Erlebnis zu bieten, verwenden wir Technologien wie Cookies, um Geräteinformationen zu speichern und/oder darauf zuzugreifen. Wenn du diesen Technologien zustimmst, können wir Daten wie das Surfverhalten oder eindeutige IDs auf dieser Website verarbeiten. Wenn du deine Einwillligung nicht erteilst oder zurückziehst, können bestimmte Merkmale und Funktionen beeinträchtigt werden.
Funktional
Immer aktiv
Die technische Speicherung oder der Zugang ist unbedingt erforderlich für den rechtmäßigen Zweck, die Nutzung eines bestimmten Dienstes zu ermöglichen, der vom Teilnehmer oder Nutzer ausdrücklich gewünscht wird, oder für den alleinigen Zweck, die Übertragung einer Nachricht über ein elektronisches Kommunikationsnetz durchzuführen.
Vorlieben
Die technische Speicherung oder der Zugriff ist für den rechtmäßigen Zweck der Speicherung von Präferenzen erforderlich, die nicht vom Abonnenten oder Benutzer angefordert wurden.
Statistiken
Die technische Speicherung oder der Zugriff, der ausschließlich zu statistischen Zwecken erfolgt.Die technische Speicherung oder der Zugriff, der ausschließlich zu anonymen statistischen Zwecken verwendet wird. Ohne eine Vorladung, die freiwillige Zustimmung deines Internetdienstanbieters oder zusätzliche Aufzeichnungen von Dritten können die zu diesem Zweck gespeicherten oder abgerufenen Informationen allein in der Regel nicht dazu verwendet werden, dich zu identifizieren.
Marketing
Die technische Speicherung oder der Zugriff ist erforderlich, um Nutzerprofile zu erstellen, um Werbung zu versenden oder um den Nutzer auf einer Website oder über mehrere Websites hinweg zu ähnlichen Marketingzwecken zu verfolgen.


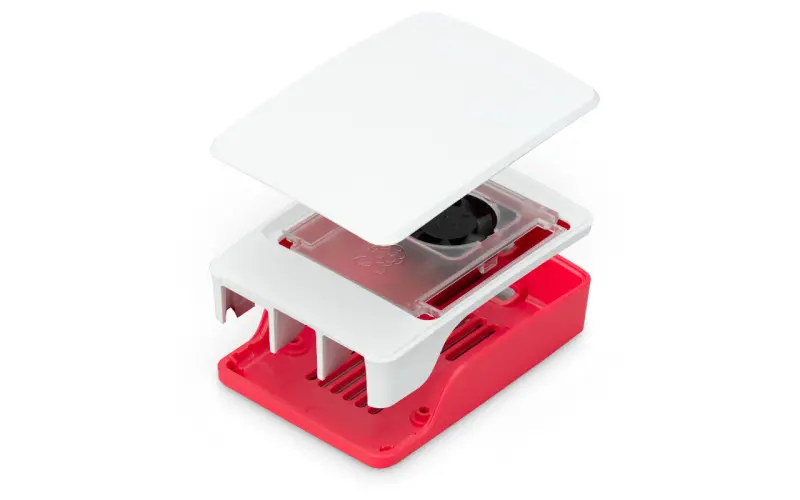


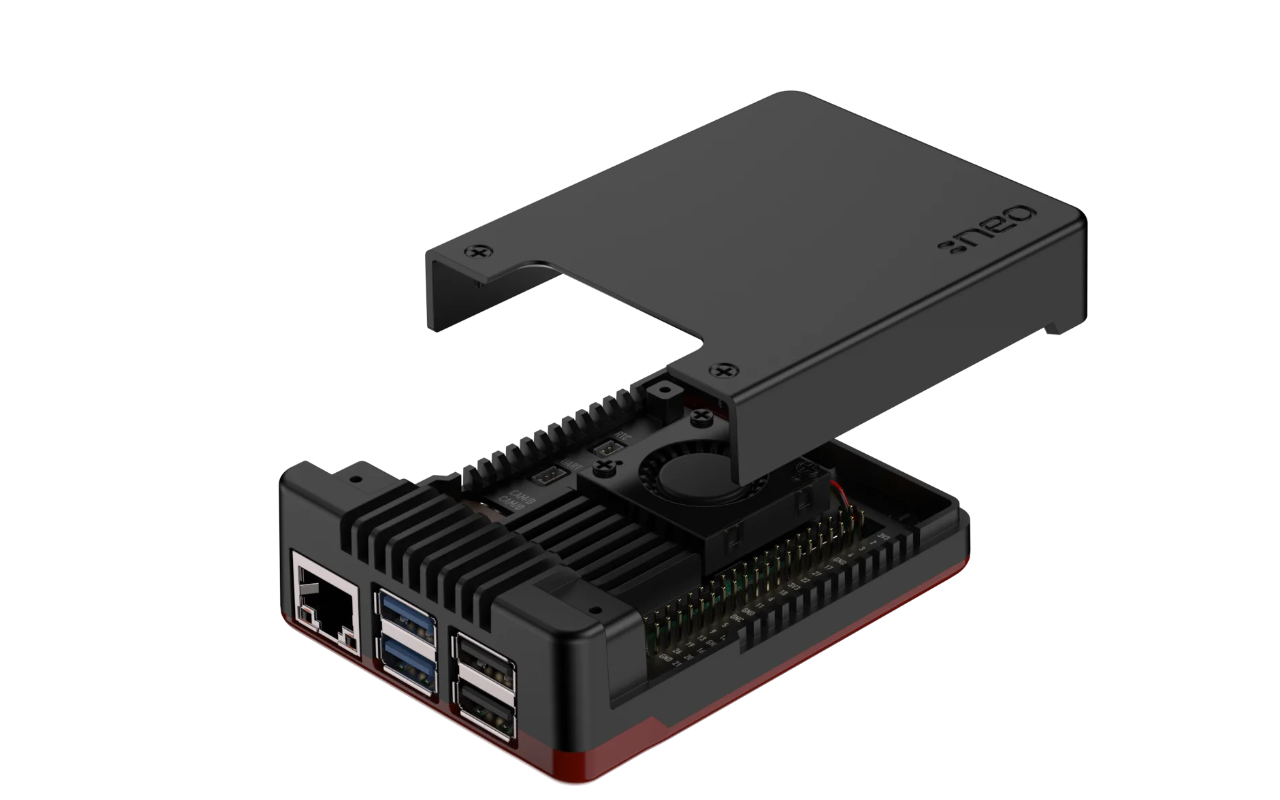
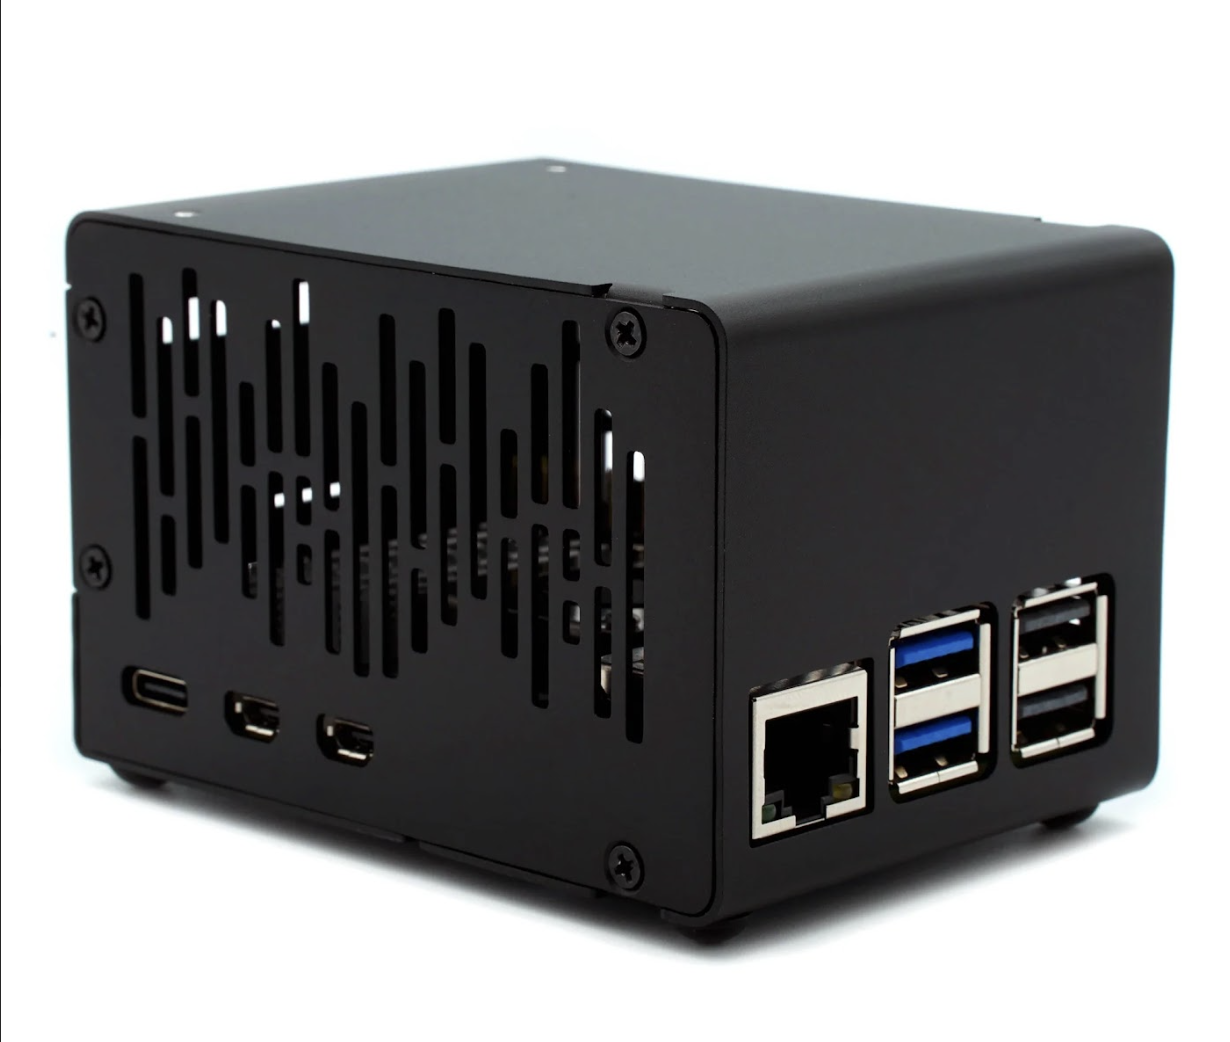
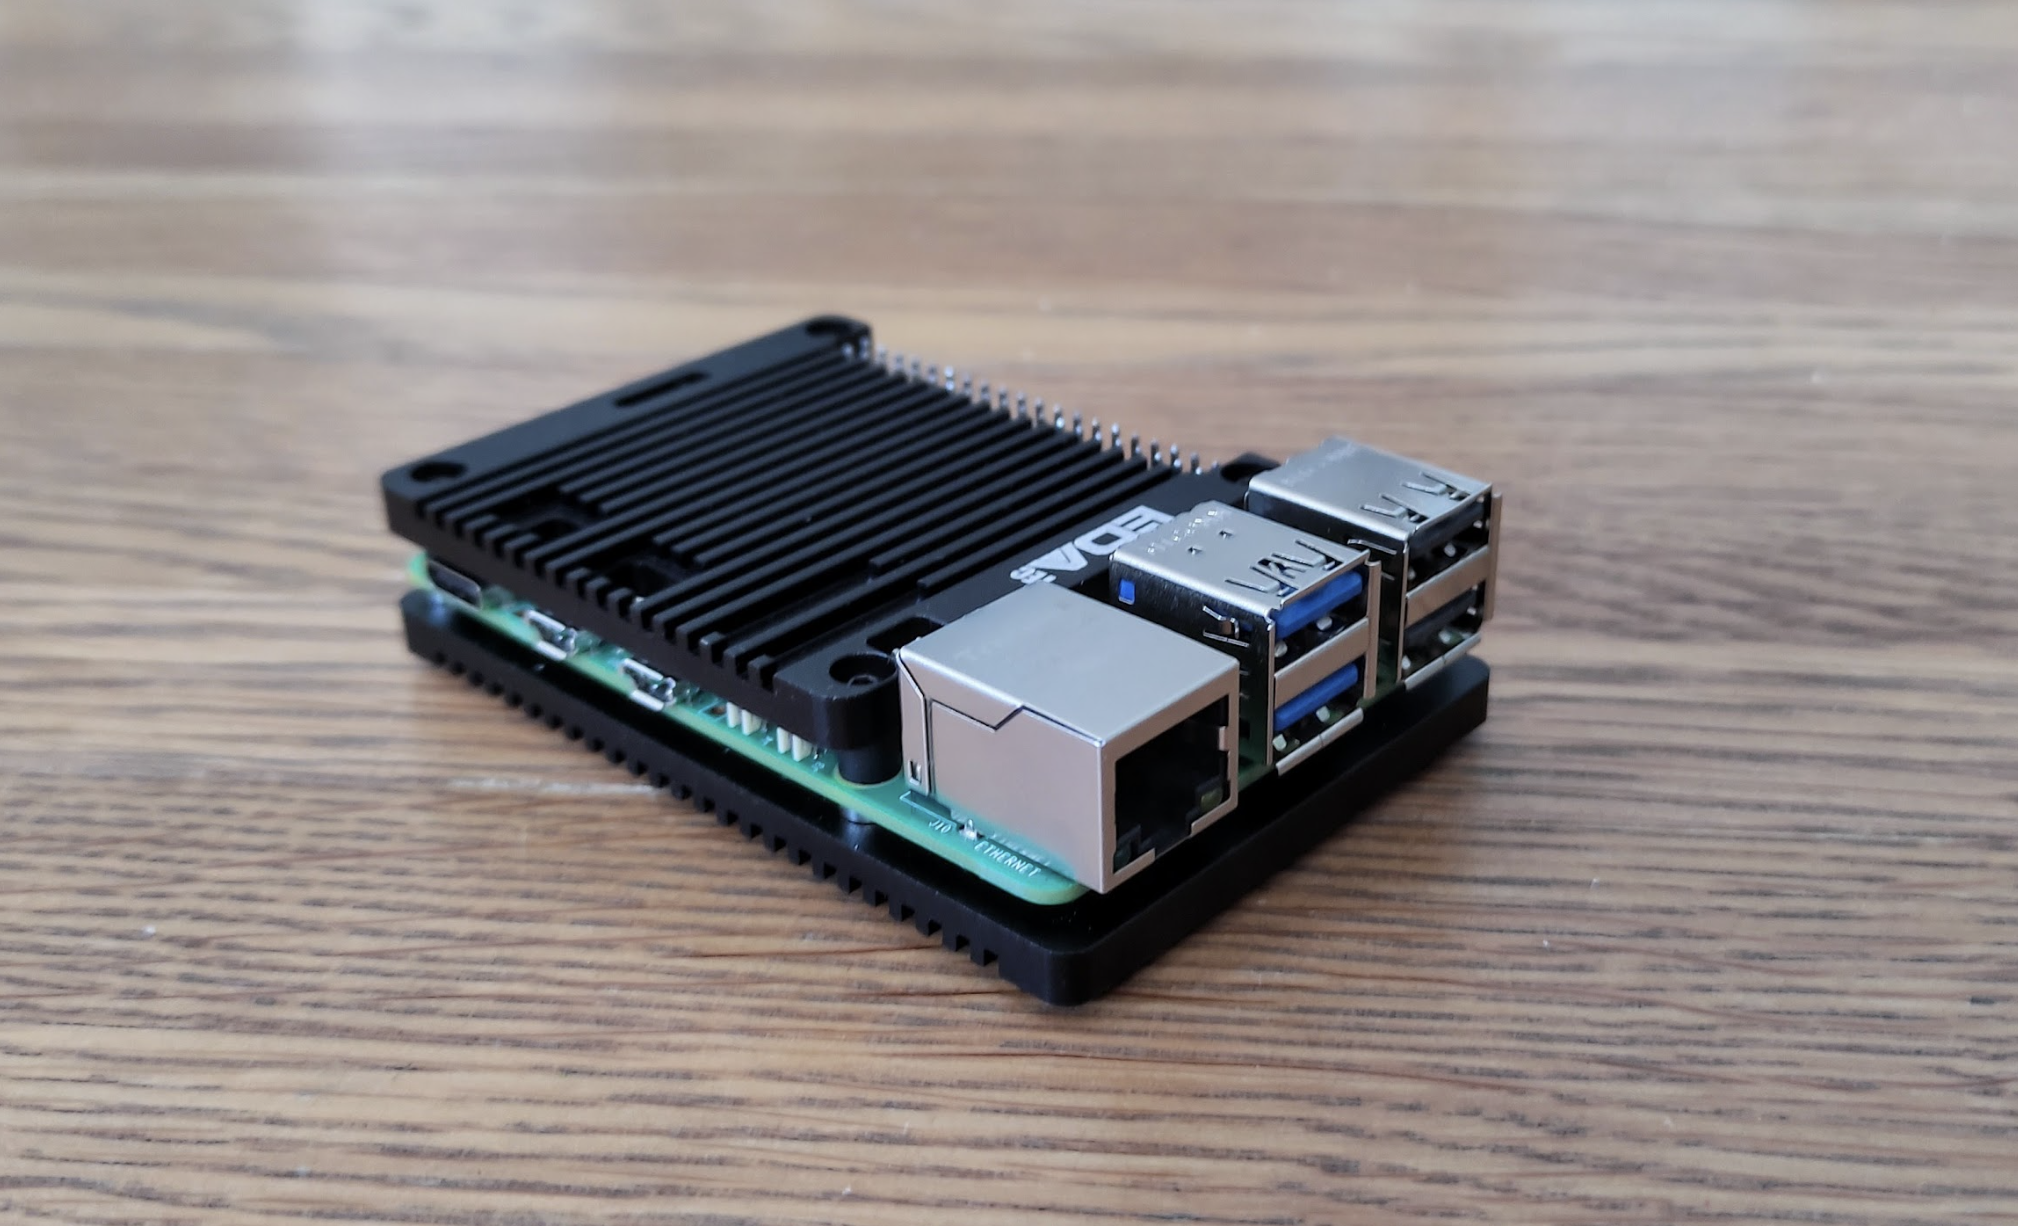


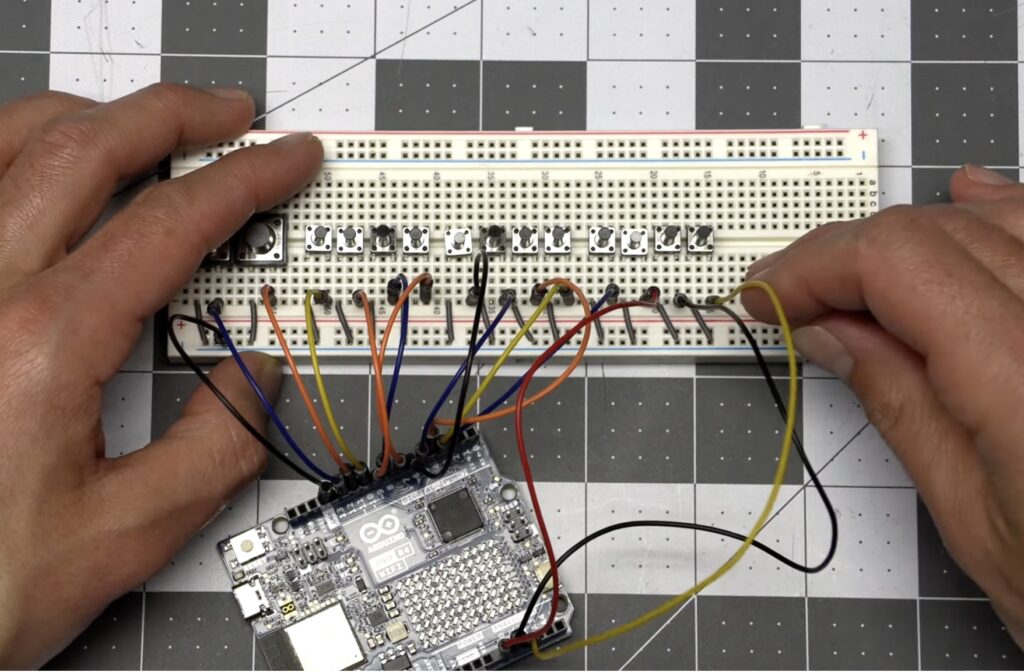


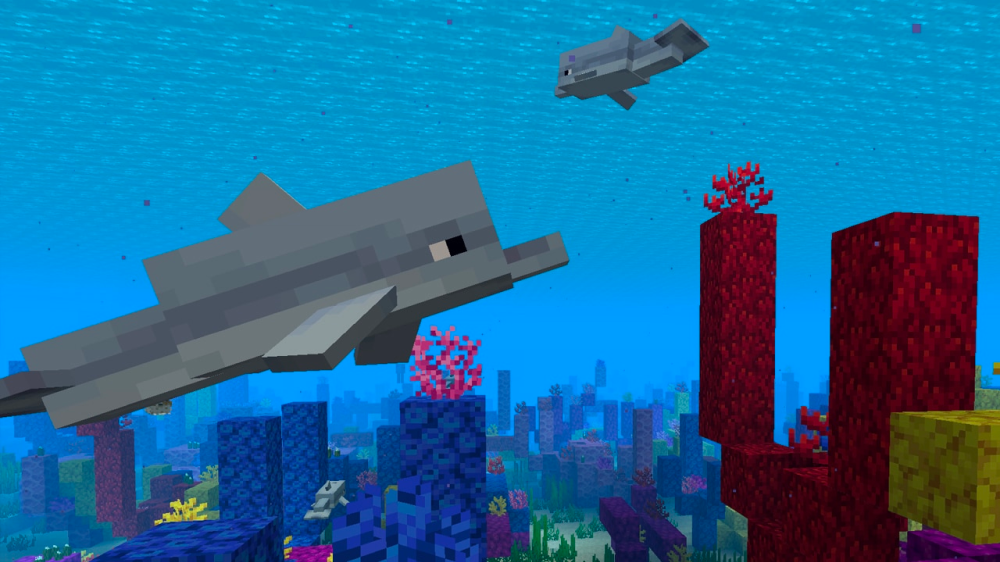
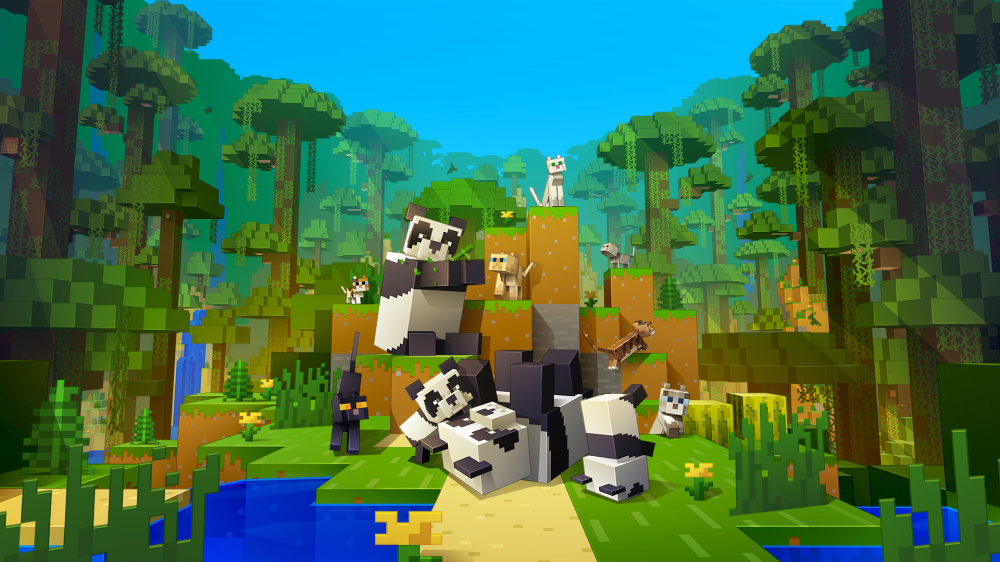
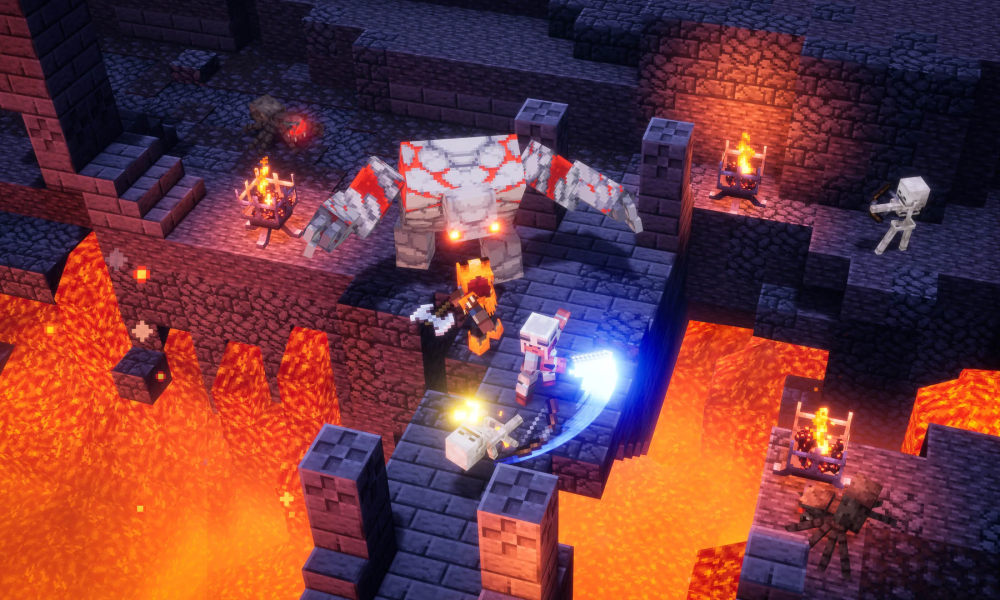
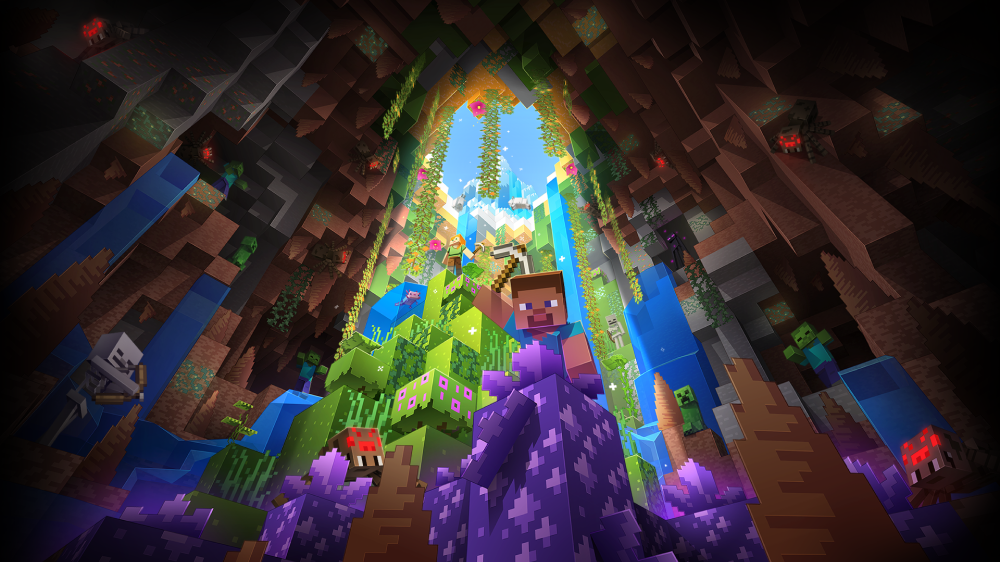


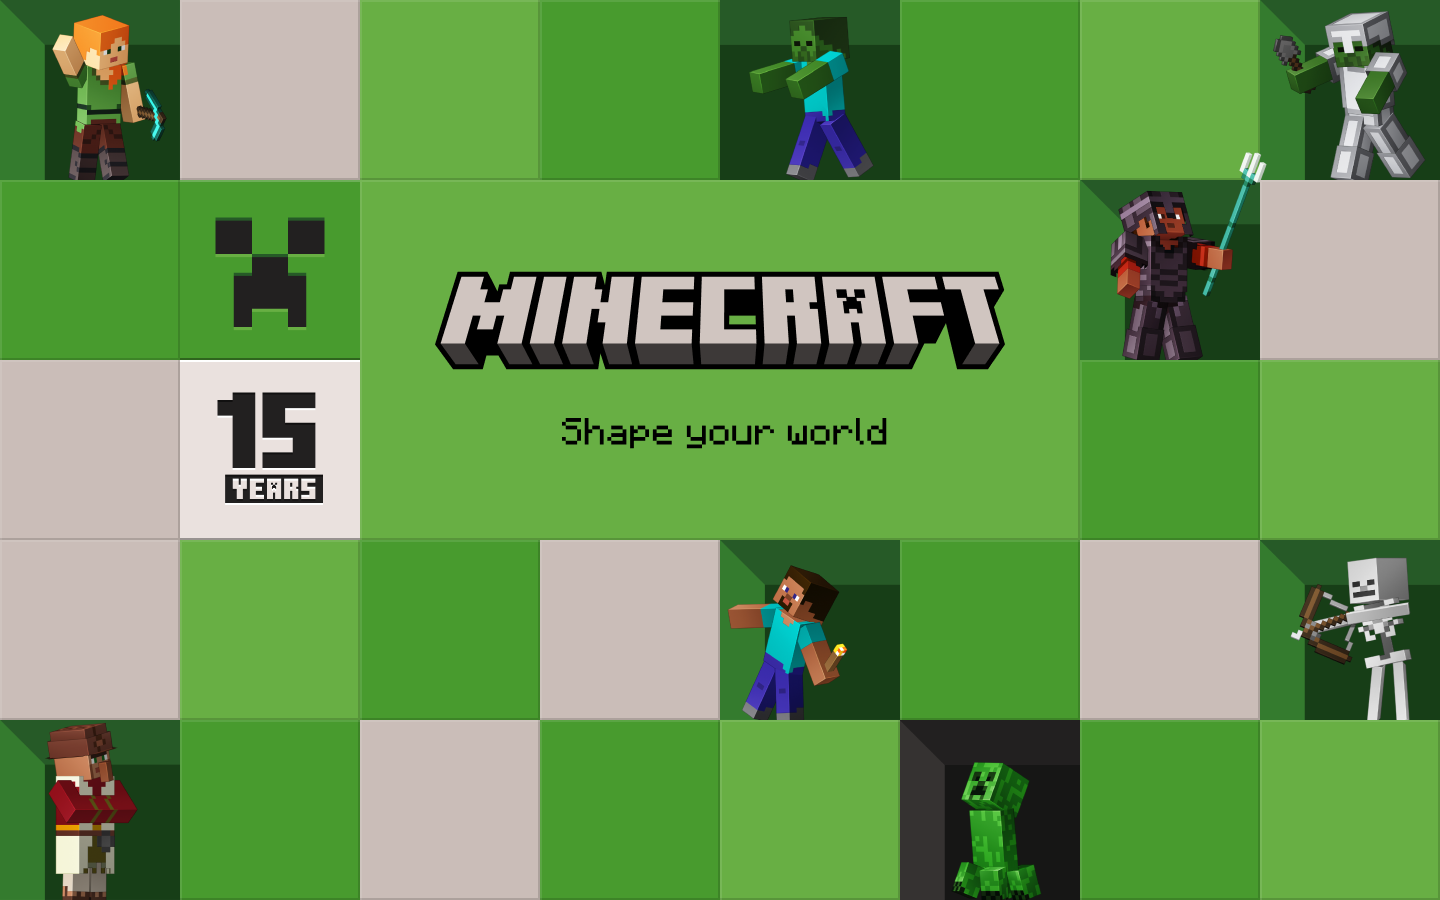


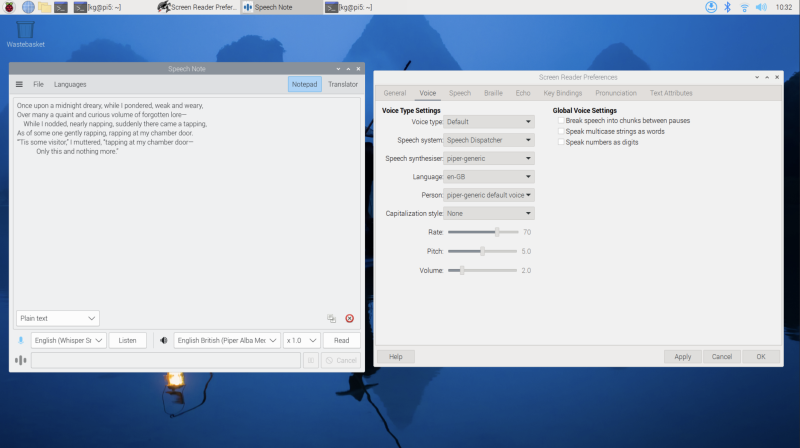


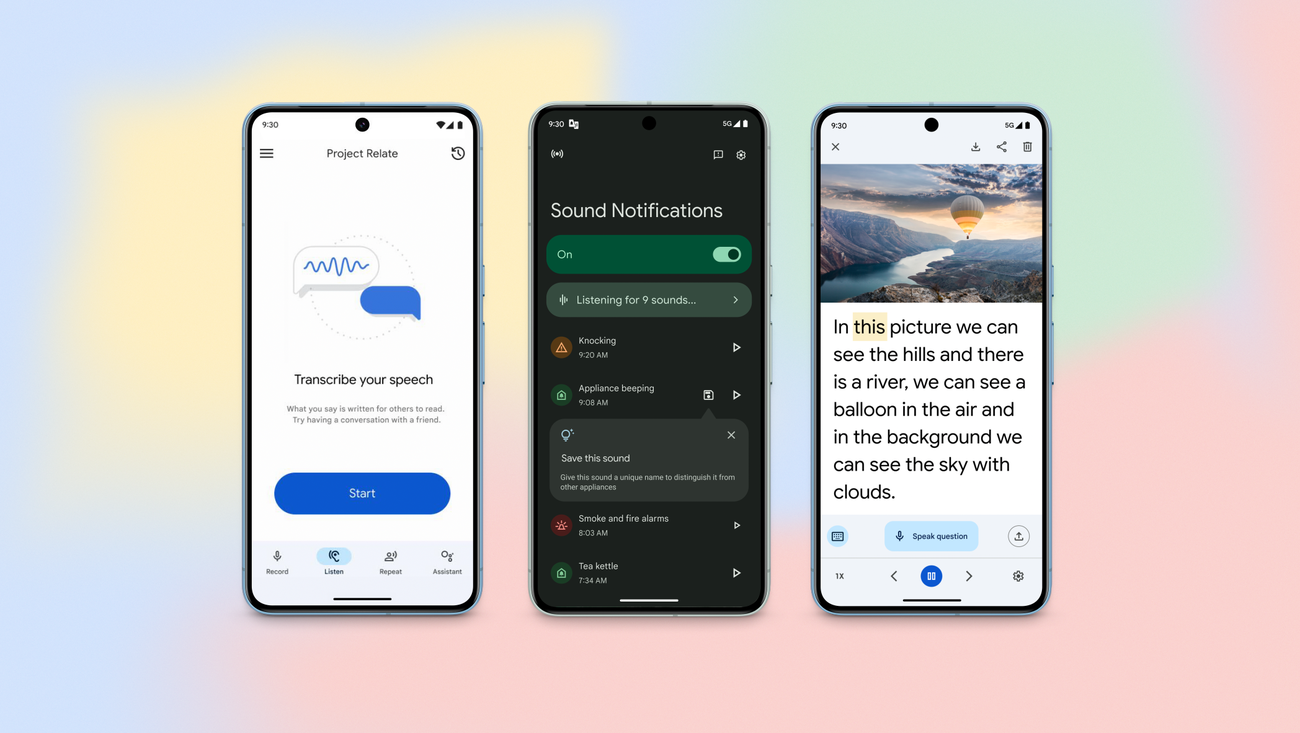

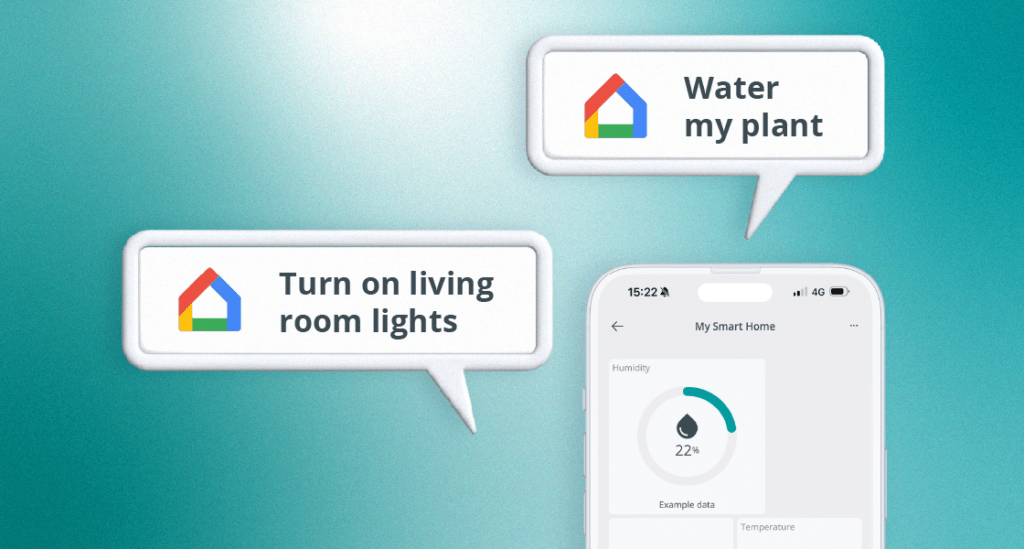

 ! This means you can now interact with your devices, simply through your Google Home Assistant: use voice commands, the Google Home app, or create new routines integrating Arduino solutions.