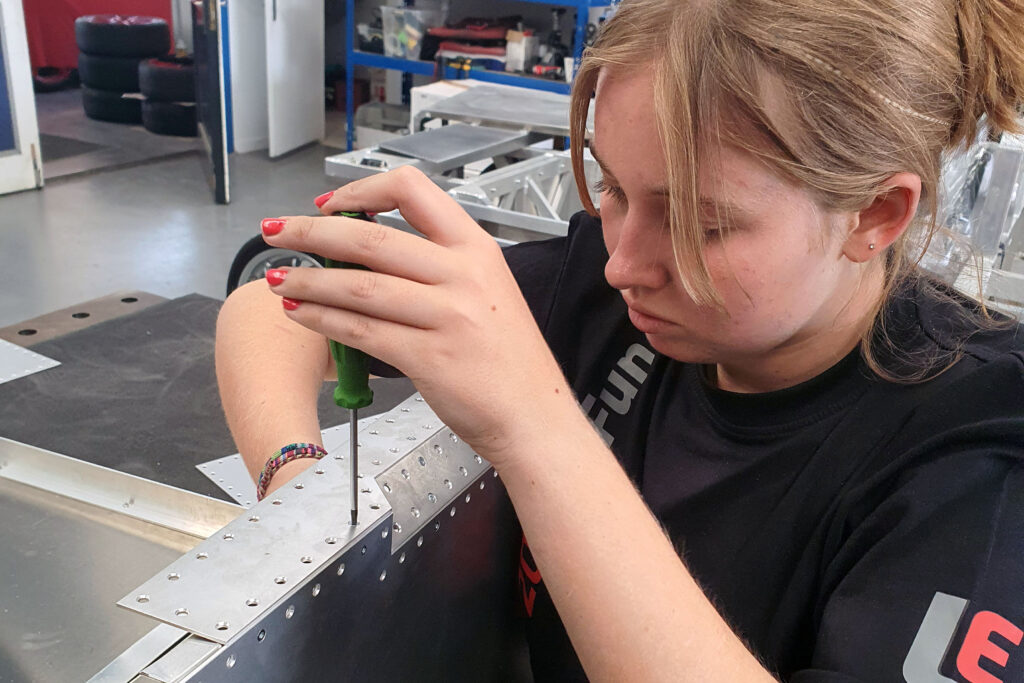
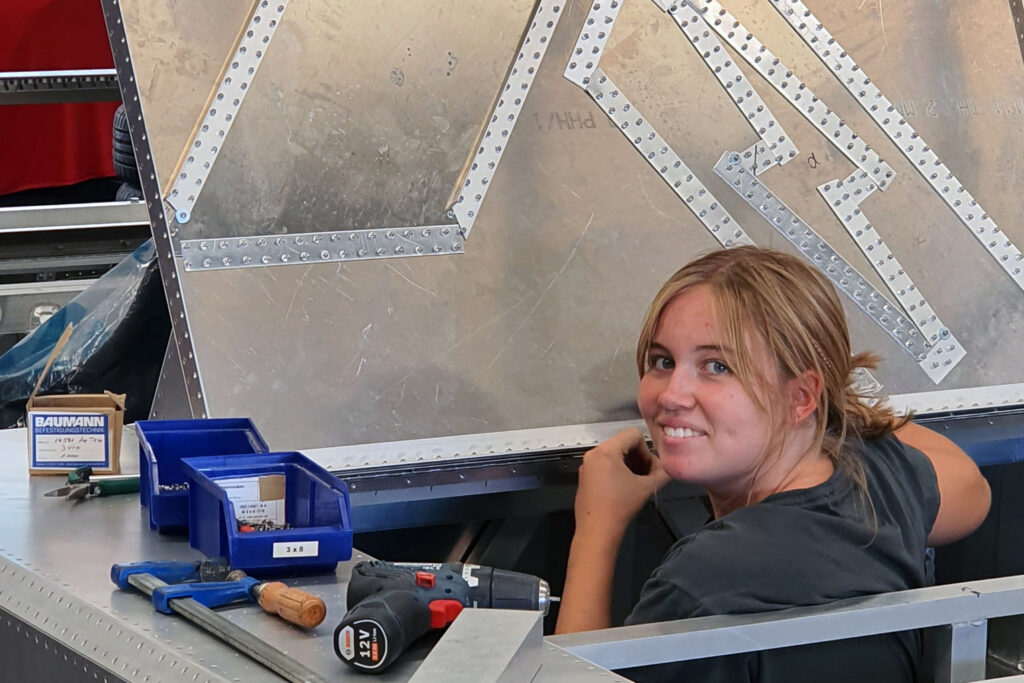
Inventor Charly Bosch and his daughter Leonie have crafted something truly remarkable: a fully electric, Arduino-powered car that’s as innovative as it is sustainable. Called the Batteryrunner, this vehicle is designed with a focus on environmental impact, simplicity, and custom craftsmanship. Get ready to be inspired by a car that embodies the spirit of creativity!
When the Arduino team saw the Batteryrunner up close at our offices in Turin, Italy, we were genuinely impressed – especially knowing that Charly and Leonie had driven over 1,000 kilometers in this unique car! Their journey began on a small island in Spain, took them across southern France, and brought them to Italy before continuing on to Austria.
Building a car with heart – and aluminum
In 2014, Charly took over LORYC – a Mallorca carmaker that became famous in the 1920s for its winning mountain racing team. His idea was to ??build a two-seater as a tribute to the LORYC sports legacy, but with a contemporary electric drive: that’s how the first LORYC Electric Speedster was born. “We’re possibly the smallest car factory in the world, but have a huge vision: to prove electric cars can be cool… and crazy,” Charly says.
With a passion for EVs rooted in deep environmental awareness, he decided to push the boundaries of car manufacturing with the Batteryrunner: a car where each component can be replaced and maintained, virtually forever.
Indeed, it’s impossible not to notice that the vehicle is made entirely from aluminum: specifically, 5083 aluminum alloy. This material is extremely durable and can be easily recycled, unlike plastics or carbon fiber which end up as waste at the end of their lifecycle.
The car’s bodywork includes thousands of laser-cut aluminum pieces. “This isn’t just a prototype: it’s a real car – one that we’ve already been able to drive across Europe,” Charly says.
The magic of learning to do-it-yourself
“People sometimes ask me why I use Arduino, as if it was only for kids. Simple: Arduino never failed me,” is Charly’s quick reply. After over a decade of experience with a variety of maker projects, it was an easy choice for the core of Batteryrunner’s system.
In addition to reliability, Charly appreciates the built-in ease-of-use and peer support: “The Arduino community helps me with something new every week. If you are building a whole car on your own, you can’t be an expert in every single aspect of it. So, anytime I google something, I start by typing ‘Arduino’, and follow with what I need to know. That’s how I get content that I can understand.”
This has allowed Charly and Leonie to handle every part of the car’s design, coding, and assembly, creating a fully integrated system without needing to rely on external suppliers.
Using Arduino for unstoppable innovation
A true labor of love, after four years since its inception the Batteryrunner is a working (and talking!) car, brought to life by 10+ Arduino boards, each with specific functions.
For instance:
• An Arduino Nano is used to manage the speedometer (a.k.a. the “SpeedCube”), in combination with a CAN bus module, stepper motor module, and stepper motor.
• Different Arduino Mega 2560, connected via CAN bus modules, control the dashboard, steering wheel, lights and blinkers, allowing users to monitor and manage various functions.
• Arduino UNO R4 boards with CAN bus transceivers are used to handle different crucial tasks – from managing the 400-V battery system and Tesla drive unit to operating the linear windshield wiper and the robotic voice system.
Charly already plans on upgrading some of the current solutions with additional UNO R4 boards, and combining the GIGA R1 WiFi and GIGA Display Shield for a faster and Wi-Fi®-connected “InfoCube” dashboard.
All in all, the Batteryrunner is more than a car: it’s a rolling platform for continuous innovation, which Charly is eager to constantly improve and refine. His next steps? Integrating smartphone control via Android, adding sensors for self-parking, and experimenting with additional features that Arduino makes easy to implement. “This is a car that evolves,” Charly explains. “I can add or change features as I go, and Arduino makes it possible.”
Driving environmental awareness
Finally, we see Batteryrunner as more than a fun, showstopping car. Given Charly’s commitment to low-impact choices, it’s a way to shift people’s mindset about sustainable mobility. The environmental challenges we face today require manufacturers to go well beyond simply replacing traditional engines with electric ones: vehicles need to be completely redesigned, according to sustainability and simplicity principles. To achieve this, we need people who are passionate about the environment, technology, and creativity. That’s why we fully agree with Charly, when he says, “I love makers! We need them to change the world.”
Follow LORYC on Facebook or Instagram to see Charly and Leonie’s progress, upgrades, and experiments, and stay inspired by this incredible, Arduino-powered journey.
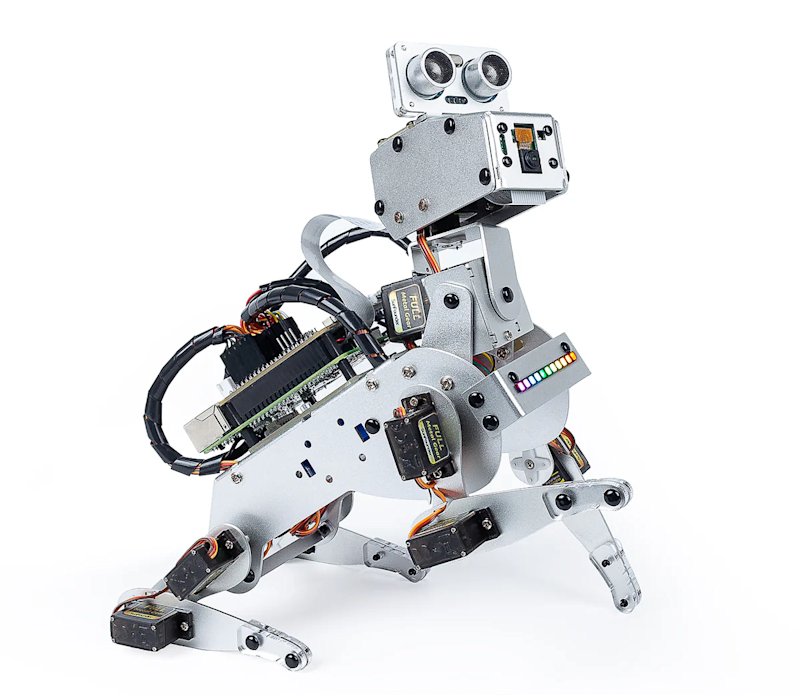
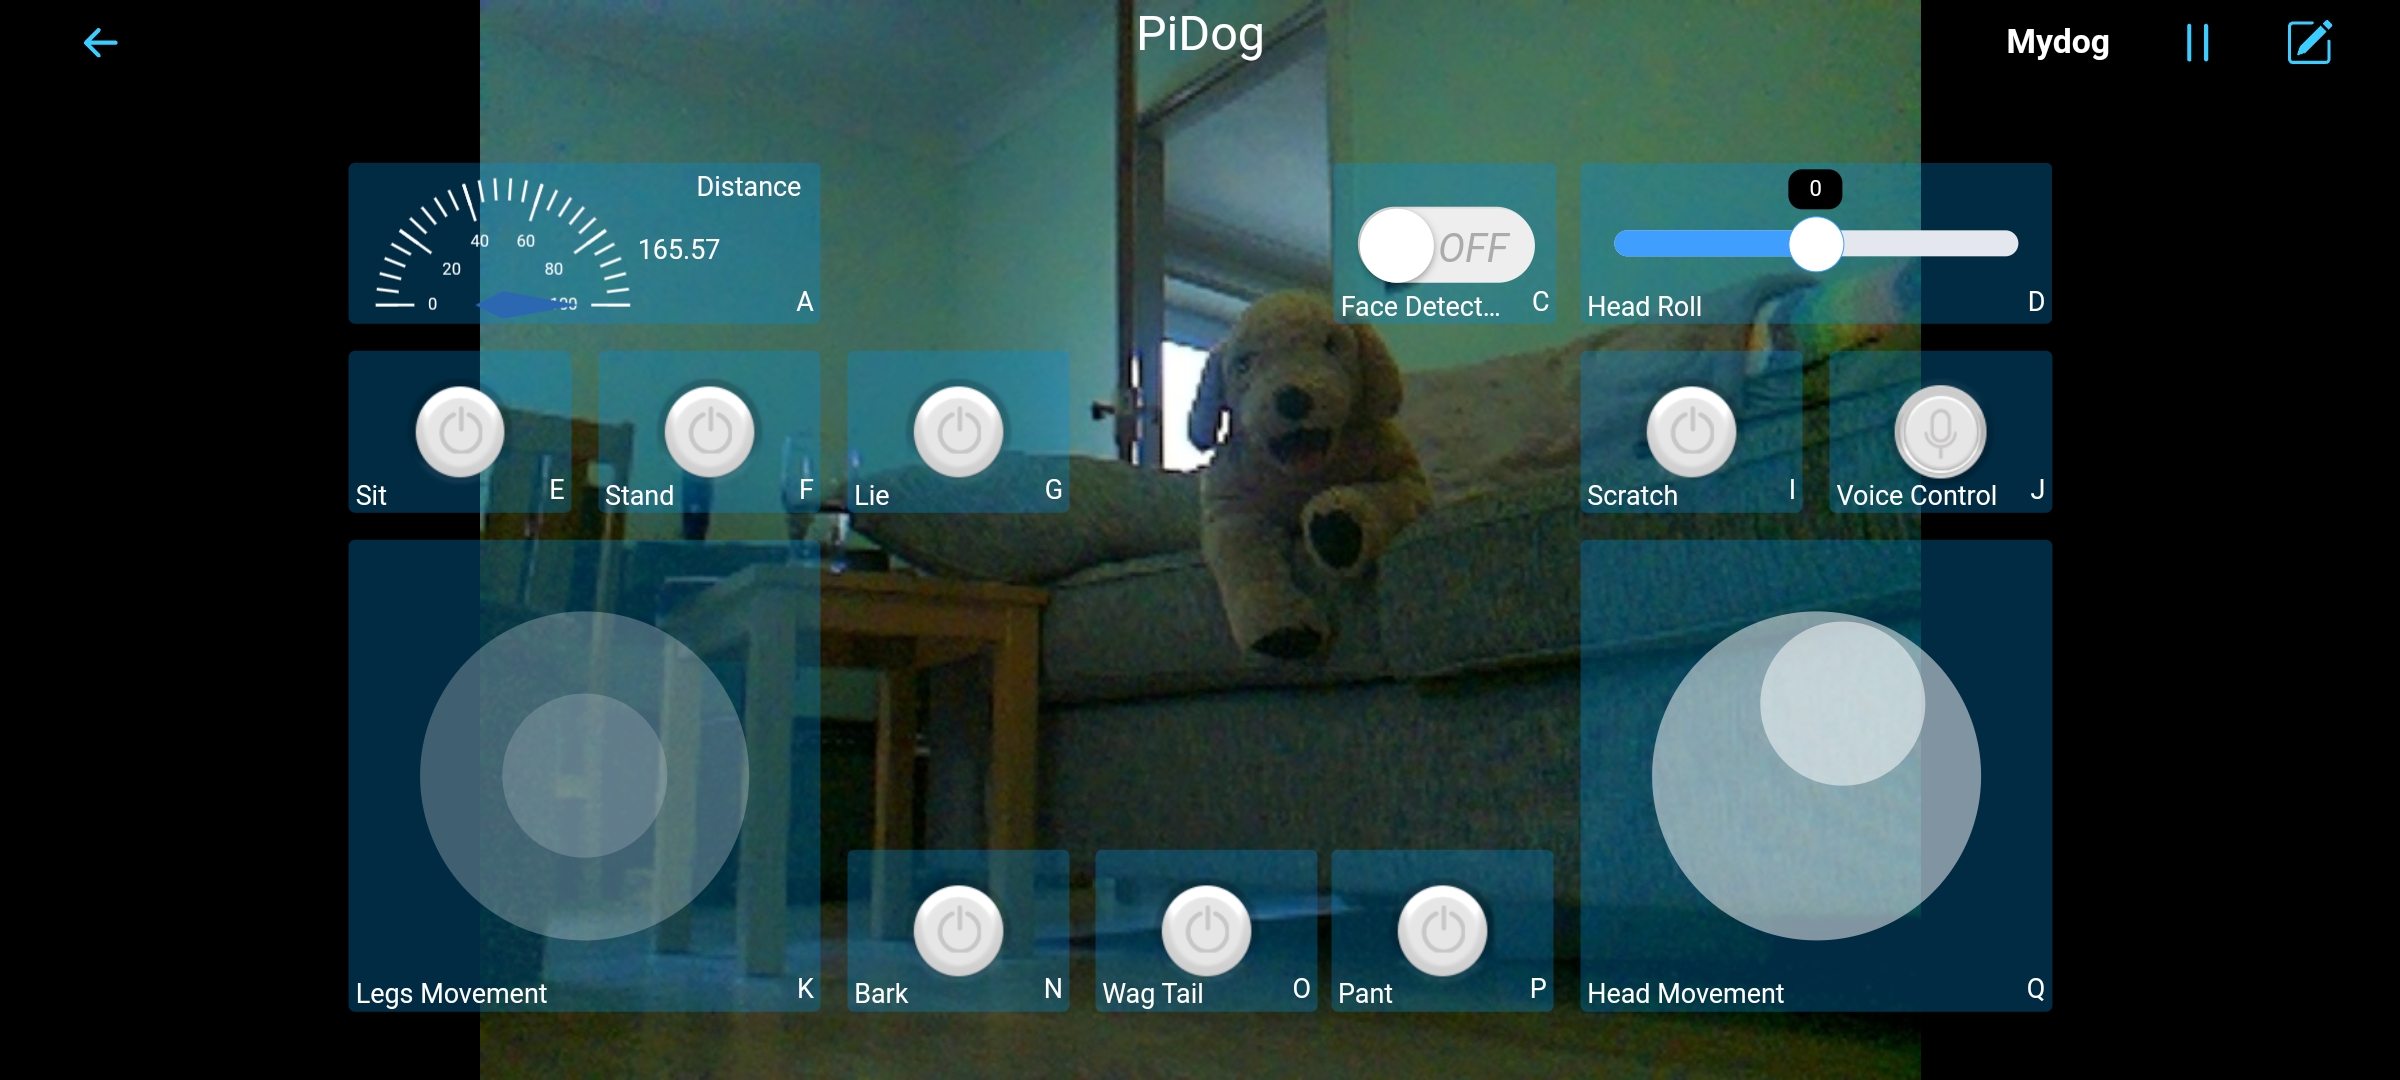
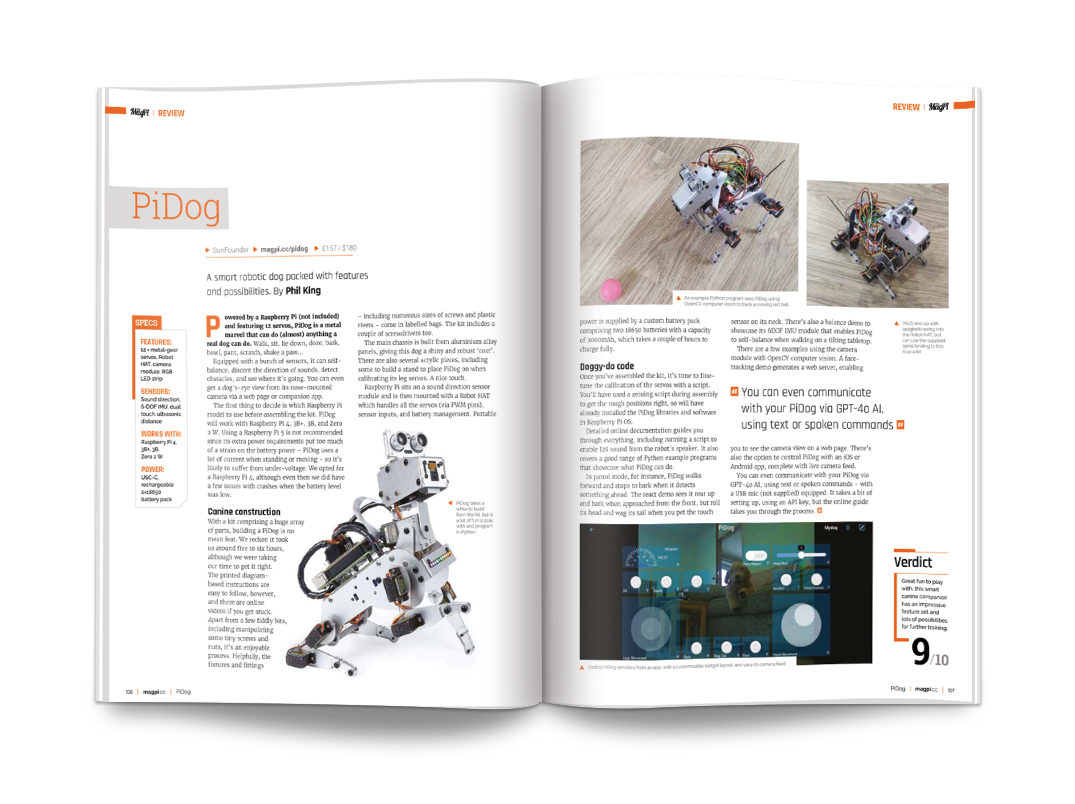
The first thing to decide is which Raspberry Pi model to use before assembling the kit. PiDog will work with Raspberry Pi 4, 3B+, 3B, and Zero 2 W. Using a Raspberry Pi 5 is not recommended since its extra power requirements put too much of a strain on the battery power – PiDog uses a lot of current when standing or moving – so it’s likely to suffer from under-voltage. We opted for a Raspberry Pi 4, although even then we did have a few issues with crashes when the battery level was low.
Canine construction
With a kit comprising a huge array of parts, building a PiDog is no mean feat. We reckon it took us around five to six hours, although we were taking our time to get it right. The printed diagram-based instructions are easy to follow, however, and there are online videos if you get stuck. Apart from a few fiddly bits, including manipulating some tiny screws and nuts, it’s an enjoyable process. Helpfully, the fixtures and fittings – including numerous sizes of screws and plastic rivets – come in labelled bags. The kit includes a couple of screwdrivers too.
The main chassis is built from aluminium alloy panels, giving this dog a shiny and robust ‘coat’. There are also several acrylic pieces, including some to build a stand to place PiDog on when calibrating its leg servos. A nice touch.
Raspberry Pi sits on a sound direction sensor module and is then mounted with a Robot HAT which handles all the servos (via PWM pins), sensor inputs, and battery management. Portable power is supplied by a custom battery pack comprising two 18650 batteries with a capacity of 2000mAh, which takes a couple of hours to charge fully.
Doggy-do code
Once you’ve assembled the kit, it’s time to fine-tune the calibration of the servos with a script. You’ll have used a zeroing script during assembly to get the rough positions right, so will have already installed the PiDog libraries and software in Raspberry Pi OS.
Detailed online documentation guides you through everything, including running a script to enable I2S sound from the robot’s speaker. It also covers a good range of Python example programs that showcase what PiDog can do.
In patrol mode, for instance, PiDog walks forward and stops to bark when it detects something ahead. The react demo sees it rear up and bark when approached from the front, but roll its head and wag its tail when you pet the touch sensor on its neck. There’s also a balance demo to showcase its 6DOF IMU module that enables PiDog to self-balance when walking on a tilting tabletop.
There are a few examples using the camera module with OpenCV computer vision. A face-tracking demo generates a web server, enabling you to see the camera view on a web page. There’s also the option to control PiDog with an iOS or Android app, complete with live camera feed.
You can even communicate with your PiDog via GPT-4o AI, using text or spoken commands – with a USB mic (not supplied) equipped. It takes a bit of setting up, using an API key, but the online guide takes you through the process.
Verdict
9/10
Great fun to play with, this smart canine companion has an impressive feature set and lots of possibilities for further training.
Specs
Features: 12 × metal-gear servos, Robot HAT, camera module, RGB LED strip
Before I played an early version of Crescent County, I didn’t know that an in-game version of a motorized, magical broomstick could feel right. But here I am, drawing wide arcs through the gently swaying grass of the Isle of Morah, identifying the perfect hillock to glide off from, and intuitively following paths of flowers to shortcuts across its open world. You’d think there’d no right way to depict something as bizarre as this, but as I feel a leyline-powered boost ignite the rumble of my controller, I start to think, “well, maybe.”
The debut game from Electric Saint – a two-person development team made up of Anna Hollinrake (Fall Guys) and Pavle Mihajlović (Erica) – Crescent County is part-open world exploration, part-dating game, part-gig economy delivery challenge, part-racer, part-life sim, and all-centered around that motorbroom experience. It’s ambitious, and with so many moving parts, you might expect it to have come together in pieces – but the real origin point was straightforward.
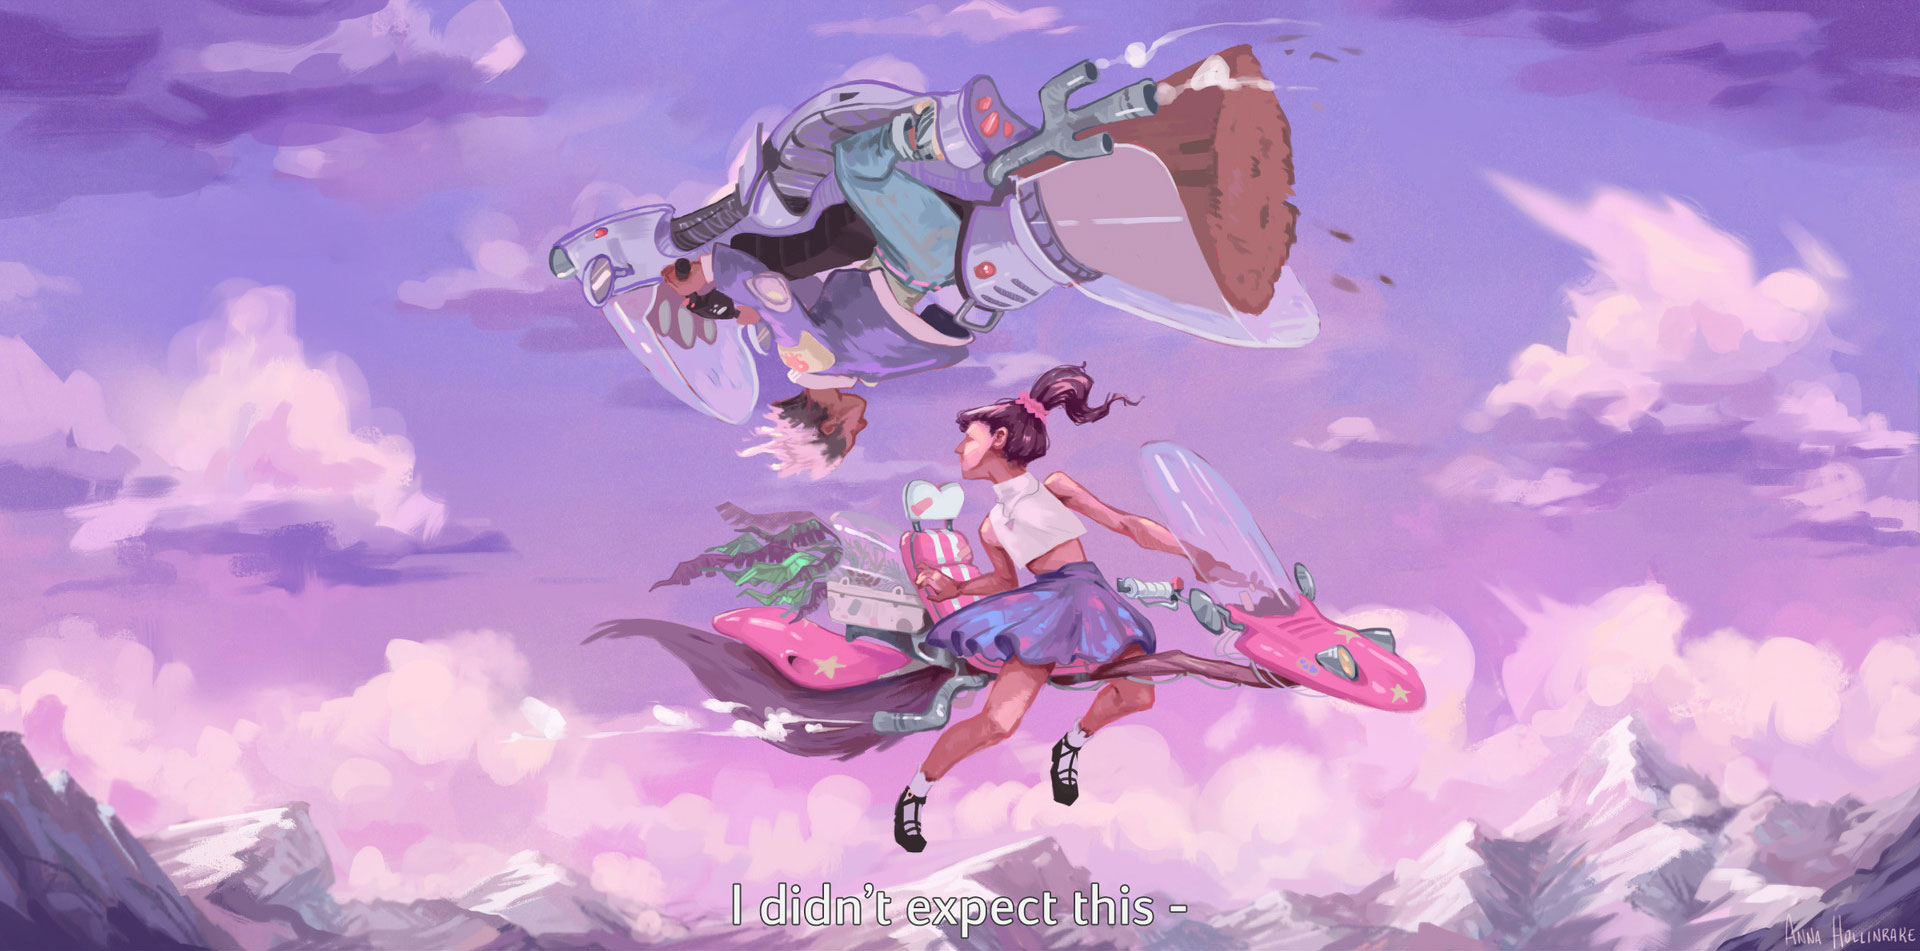
One of the earliest pieces of art that inspired Crescent County. Credit: Anna Hollinrake
Hollinrake has been painting images of what she dubs “witch-tech” for years, building a following as people fall in love with the bright, curious worlds she creates in static form. Choosing to leave the world of AAA development behind, and contacting Mihajlović to create the tech, there was only one setting they wanted to bring to life together.
“The number one piece of feedback I get when I’m at conventions selling art based on this world, or on social media when I post images of it, is that people wish that they could live in the paintings I create,” she tells me. “I’m an art generalist for games and have worked along the whole art pipeline, but my specialty is infusing moreish worldbuilding into my work, from concepts to full 3D environments, that give a sense of place, with little story hints throughout. I really want to give people the opportunity to step into a lovingly crafted, painterly space that feels both joyful and a little melancholy and that, critically, they feel at home within.”
It means that Crescent County wasn’t built out of disparate mechanical ideas that the developers wanted to jam into one playspace – every choice has been made because it fits the theme. Even in the early form of the game I play, that comes across. As main character Lu, your motorbroom is key to everything you do – you arrive on the island and take part in a race, then become the island’s delivery courier. That job allows you to meet characters you can get to know (and romance), afford furniture for your apartment, and to customize your broom and go further, faster. In Crescent County’s world, motorbrooms aren’t a vehicle, they’re a culture.
“Motorbroom racing is an underground sport, practised by a small group of the coolest people you know,” says Hollinrake. “It’s very inspired by roller derby and the roller skating community (I’m an avid quad skater myself!), and we wanted to capture that punk, do-it-yourself attitude within motorbroom subculture.”
“In terms of racing though, it’s more about friends challenging each other in playful ways (like seeing who can get up the mountain first), than it is about big formal races with sponsors and crowds,” adds Mihajlović. “If you win, you can expect to learn some secrets about the island, or maybe get a hot tip on how to get a particular broom part, but you can also choose to lay back and spend some more quality time with a racer you have a crush on.”
That idea, that every activity can affect another, seems key to Crescent County. You’re building a life for Lu on the island – a race can lead to romance, a delivery job could net you new decorations, and even the house creation element (so often a side activity) can have effects on the wider game.
“We’re really interested in how we can take classic, cozy house decoration and make it push our story forward rather than being purely for aesthetics,” explains Hollinrake. “In that classic scouring-Facebook-Marketplace way, you can do jobs around the island for people who’ll pay you back with a couch they have in the shed and aren’t using. Inspired by our own experiences living in crappy house shares in our early twenties, we know how big of a difference each single piece of furniture can have on your social life or sense of place – you can’t have a dinner party without a dinner table, and getting your new friends around it lets you chat late into the night and deepen those relationships. Even if the spaghetti bolognese you made was terrible.”
It leads to what promises a very satisfying loop – the more you play, and the more you engage, the more opportunities await you. Again, building Crescent County as a living world rather than a sandbox, is the key. The game’s organized into days and nights that pass based on what you choose to do (you can deliver by day, and race by night), rather than through a linear cycle, which gives you an incentive to choose the interesting thing rather than the efficient thing.
“Each day brings a host of new opportunities to earn some cash, make your flat less sad, and learn more island drama,” says Mihajlović. “You’ll get to pick who you want to help that day – whether it’s because you want to know a particular bit of gossip, you want to get a specific broom upgrade, or because your friend Rava has promised you she’ll give you her unwanted and admittedly ugly couch if you help round up her wayward sheep. You can either plan out your route carefully, or take it a bit more casually and ride around and see what you get up to. At the end of the day you can take your weird couch home, pick where to place it, and invite your friends over for a movie night – who point out you don’t actually own a TV.”
All of this would be moot if the brooms themselves didn’t feel quite so good, and the Isle of Morah wasn’t quite so fascinating a location. That connection to Hollinrake’s art means that this world is a deeply interesting place – unfamiliar silhouettes clutter the horizon, and the sheer fun meant that I spent as much time simply going places than doing, well, Lu’s job. The final piece in the puzzle, then, is in creating a motorbroom that suits you.
“Broom customization is both about building a motorbroom that looks amazing and feels just like you, but it’s also in how you decide how you’re going to navigate the island,” says Mihajlović. “Whether you want to speed down the straights, cut across a field, or glide over a canyon, different broom setups will open different paths and playstyles. You can also put Sigil Stickers on your broom that give you weird and wonderful powers, like an offensive sideways phase shift that you can use to bump your rivals off the track, or a more forgiving 10 second rewind that lets you retake a corner if you didn’t get it quite right.”
The way the team is winding together mechanical and narrative benefits to the player isn’t just fascinating – it’s unusual. It’s the kind of thing that might have been hard to pitch at their previous studios, meaning self-publishing with ID@Xbox has been a boon:
“We’re huge fans of the ID@Xbox program – and before that Xbox Live Arcade,” says Mihajlović. “It birthed or enabled so many of the games that we love, and in a lot of ways the whole indie wave that got us into the games industry in the first place. I actually remember the first Summer of Arcade, and how exciting and validating it was as a teenager to see indie games on a console, so it’s incredible to now be a part of the program.”
With a two-person team, the game still has a way to go until release – and they’re not set on a release date just yet – but the early version I play makes abundantly clear how wild, weird, and ambitious Electric Saint is getting. Just like its motorbrooms, Crescent County might be unfamiliar, but it’s feeling just right already.
Discover this beautiful open world racing on the back of your very own motorbroom. In Crescent County you play as Lu, as you move to the island under tense pretences, eager to start afresh. It’s a game about finding home in a brand-new witch-tech universe. During the day you’re a motorbroom courier; delivering packages, herding sheep, and setting off fireworks. You find yourself building a life through helping the locals; getting to know their struggles, and their island home. Plan your day every morning by picking your jobs, and then zoom around the island getting things done! The better your broom is the more you can do, and the more of the gossip you uncover. After you’ve made some change, head down to Bo’s workshop to upgrade your motobroom and make it your own! Replace parts to improve your broom’s handling, top speed, or gliding ability, and pop some Sigil Stickers on it to enable special powers such as Phase Shifting and Time Rewind. At night, use your customised motorbroom to defeat your new friends in improvised races around the island. Discover shortcuts on ancient ley lines, and sprint through abandoned power stations in rebellious, secret races to win new broom parts. Start in your cousin’s empty bedsit and collect furniture from the locals to scrap together a cosy new life for yourself on the island. The better your home is, the more activities you can do with your new friends. Can’t have a dinner party with a table, or a date without a couch!
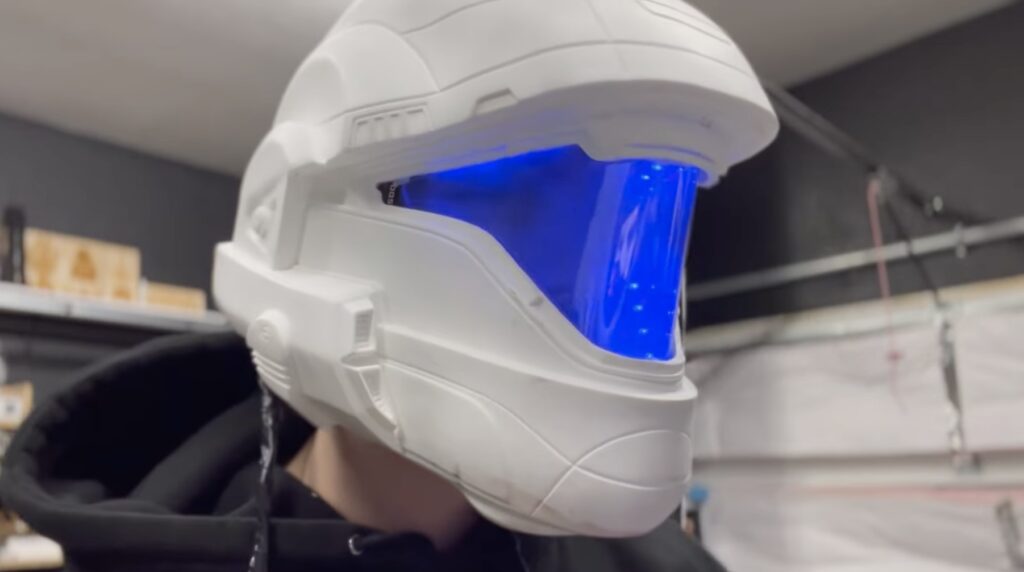
The Halo franchise is full of iconic designs, from vehicles like the Warthog to weapons like the Needler. But the armor, such as the Spartan armor worn by Master Chief, is arguably the most recognizable. The helmets are especially cool, and LeMaster Tech put his own unique spin on an ODST-style helmet by adding an adjustable-transparency RGB-backlit visor.
The ODST helmet that LeMaster Tech used for this project was made by Anthony Andress, AKA “enforce_props,” and it is a solid resin casting. LeMaster Tech’s goal was to make the coolest visor imaginable for that helmet.
He achieved that using a PDLC (Polymer Dispersed Liquid Crystal) “smart film” that changes from opaque to transparent when it receives current. That film can be cut to shape without causing any harm. He further enhanced the effect with some RGB LED backlighting, which illuminates the interior of the helmet and helps to make the wearer’s face more visible when the visor is transparent.
LeMaster Tech used an Arduino Nano board to the control the PDLC film and the NeoPixel individually addressable RGB LEDs. Momentary buttons in a 3D-printed enclosure control the LED lighting color, the lighting effect modes, and the visor transparency. The PDLC needs 20V to become transparent, so LeMaster Tech used a large battery to power that and a step-down converter to power the Arduino and LEDs.
The result looks fantastic and this helmet is going back to enforce_props, who will finish turning it into a cosplay masterpiece.
Indiana Jones has a feeling. It’s not just in the more tangible elements – the stories, the hero, or the music – it’s also in the way it was filmed, the minutiae of choreography, and the tone. Those ineffable qualities are what have made this series so beloved, and so lasting. And that’s a very difficult thing to recreate in a video game.
It presented Indiana Jones and the Great Circle developer MachineGames with an extra challenge – not only did the team have to create a fantastic, modern-feeling game, but one that simultaneously captures the magic that swirls around the movies. It comes down to a question of balance: making a compelling game that still looks, feels, acts, and sounds like the movies it’s drawing inspiration from.
In speaking to developers across MachineGames, it’s fascinating to hear how that was achieved, mixing modern game design with traditional filmmaking techniques, all in service of creating something that hits the sweet spot MachineGames has been striving for.
Perhaps one of the best examples of the deep thinking applied comes out of a single scene – one you might even describe as incidental.
‘Indiana Jones and the Raiders of the Lost Ark’ contains perhaps one of cinema’s best-known jokes. A crowd parts, and our hero is faced with a menacing swordsman, brandishing a scimitar. He chuckles darkly, passing his sword from hand to hand, before twirling it with expert precision – a show of how tough this fight will be. Indy grimaces, pulls out his revolver, and drops him with a single shot. What we thought was about to be a fight scene becomes a punchline. It’s perfect.
And it’s exactly the kind of scene that shouldn’t work in a video game. This is effectively the intro to a boss battle – this guy should have multiple attack patterns, three different health bars, the works. As it turns out, that very scene may have started as the challenge the team faced – but it became part of the solution:
“That scene is a very good example of type of humor that one can experience in the classic Indy movies – priceless!”, says Creative Director Axel Torvenius. “What we absolutely have been inspired by from that, and similar scenes, is that very humor. To have varied, engaging and rewarding combat encounters has been very important – but to make sure we spice them up with the Indy-humor has been equally important.”
Taken on a wider level, this tells us a lot about MachineGames’ approach – in almost every regard, the team has gone the extra mile to help capture the movies’ magic, even if they’re not an immediately natural fit for gaming, in a new form. And as you’ll see, this is just the tip of the iceberg.
Matinée Idol
“Sitting as close as possible to the original look and feel of ’80s cinema was something we wanted to get right from the beginning,” explains Torvenius. “There was never an interest in reinventing the look or feel of Indiana Jones – the core ambition was always to make sure it really hit home in terms of having a style close to ‘Raiders of the Lost Ark’.”
You might be surprised at just how deep that effort goes. The team scrutinized the early films, not just for their tone and writing, but for technical detail. What color palettes and film grading were used? Which kind of film stock was in the cameras? How did the original audio team record sound effects? What kind of stunt work was done? And from there, the hard work began – translating those original techniques into not just a modern context, but an entirely different medium.
Some of the stories here are fascinating. Torvenius explains that the team studied how the original film teams created their sets, and applied those rules to locations in the game:
“Obviously in games, the big challenge is that you can constantly peek behind the curtain and go ‘backstage’ – you can roam freely and break the composition. But there are many locations throughout the game where we know from which direction the player will come, or where they will exit and what type of scenery they will see. So we identified those early and pushed those further so we can set the scene more in certain places.”
For cutscenes, which are naturally more controlled, the team could go further: “Another big thing we did for this project was to have a Director of Photography on set for all the cinematic filming in the motion capture studio,” continues Torvenius. “We had the talented Kyle Klütz helping us and working in the mocap studio with this huge, heavy camera dolly rolling around to make sure we captured the right amount of velocity in pan, angular movement, composition and framing. Once we transfer this data into the cutscene shots in the game engine, it gives us a very solid start in terms of a camera work that feels reminiscent of the early Indiana Jones movies.”
Pitch Perfect
Sound is just as important as look for Indiana Jones, of course. From the iconic John Williams score, to the “feel” of its effects, to the iconic Wilhelm Scream (yes, it’s in the game), the soundscape of the movies is just as nostalgic as the look and story.
“The first thing we did was try to identify the core elements of that Indiana Jones sound,” says Audio Director, Pete Ward. “What did we have to nail to evoke the feeling of playing as Indy, in a cinematic way? We sat down as a team and watched all the Indy movies again, and we realized there were several things we absolutely had to get right – Indy’s voice likeness, the musical score, the whip, the revolver, and the punches. There were other things too, like the sound of the puzzles, and the fantastical elements, where we constantly referenced the original movies and [original Indiana Jones sound designer] Ben Burtt’s sound design.”
It led Ward’s team down some unexpected paths. The aim wasn’t to reuse sound effects directly from the game, but reproduce them as faithfully as possible to serve the game’s needs – which in some cases meant returning to techniques used by the original team more than 40 years ago.
“We did hundreds of hours of original recordings, using props like the whip, the fedora, the leather jacket, and lots of different shoe types on lots of different surfaces,” continues Ward. “For impacts in particular, we also used techniques originally used by Ben Burtt and his team, like beating up leather jackets with baseball bats. We also used practical effects where possible, like plucking metal springs with contact mics attached, to get some of that old-school vibe in our spectacular set pieces.”
The result is a game that sounds reminiscent of an ’80’s movie – it’s still naturalistic, but listen closely and you’ll find it comes across in a different way from most modern games.
The same went for the score – John Williams’ soundtracks are among the most recognizable in cinema history, but the aim was never simply to impersonate them. MachineGames brought in composer Gordy Haab to achieve that – a fitting choice given that he’s won awards for his work on multiple Star Wars games by drawing heavy inspiration from Williams, while making them his own.
“Gordy was such a great composer to work with for this project – he really nailed the style and tone, and was able to emulate and seamlessly extend the original score where needed, while also creating entirely new themes for our story and characters that fit perfectly within the Indiana Jones universe,” enthuses Ward. “We were very careful about where and when we first hear certain themes as well – the Raider’s March is the iconic, instantly recognizable theme for Indiana Jones, and we wanted to incorporate it at the right moments, but also develop our own musical story with our own new themes.”
But the risk of creating new elements amid such an iconic score is that they’ll stick out –and again, MachineGames went the extra mile to ensure that this didn’t happen. Haab and Ward researched how the original soundtracks were recorded, and even recorded in the same studio, Abbey Road. Amazingly, they even found out that they’d created accidental connections to the original along the way:
“We even had a couple of session musicians who played on the original sessions for Raiders,” explains Ward. “It was a lovely moment when they came to the control room after the session was finished and told us that!”
Telling the Tale
But where look and sound allowed the team to look back at what had come before, Indiana Jones and the Great Circle’s story needed to be something entirely new, yet totally fitting for both the franchise – not to mention the game’s setting between ‘Raiders of the Lost Ark’ and ‘The Last Crusade’. For Lead Narrative Designer Tommy Tordsson Björk, it required a different kind of research.
“Indiana Jones has an incredibly rich lore with movies, comic books, games and more that we could dig into and use in different ways, not only for immersing the player in Indy’s world, but also to connect the different stories and characters. In this regard, our great working relationship with Lucasfilm Games helped us enormously.
“From there, a lot of our work when developing the worldbuilding has been devoted to researching the 1930s, and then filtering it through lens of what we call an ’Indy matinée adventure’ to make it feel both authentic and true to the story of this world.”
You’ll see that commitment not just to the Indy series itself, but for the time period in which it’s set, in the ways characters talk, the world around you, and even down to the era-appropriate spelling of Gizeh. MachineGames – and the connection of many of its developers, including Björk, to the acclaimed Starbreeze – means that the team has a lot of experience working with established franchises, from The Chronicles of Riddick to The Darkness, and it’s an experience that guided them in this new endeavour.
“The approach that we’ve had on all of our games is to make them as true to what made the originals so great. We don’t want to retread what has already been told, but instead move into new territory that evokes the same tone and spirit,” says Björk. “I think what the development of Indy has taught us is the importance of letting the character control the path of both the story and the gameplay, because this franchise is so much defined by Indy and who he is to an even greater extent than the previous games we’ve worked on.”
Playing With History
And that leads us to the final piece of the development puzzle – turning the history of a movie series into a playable experience. How do you capture the excitement of a tightly-edited, linear movie in an interactive experience, where every player will choose to do things slightly differently, and take their Indy in different directions?
Part of that is in returning to the movie making of it all, by grounding so much of what we play in real-life performance:
“We have done so much motion capture for this game! I think this is most motion capture and stunts we have ever done,” says Torvenius. “And some of the scenes we have in the game are quite wild from a stunt perspective. We shot a number of scenes at Goodbye Kansas in Stockholm, which has a ceiling height of almost 8 meters, just because some scenes required stunts to be performed from that height.
“We’ve been working with some very talented stuntmen and women throughout the production and together with our talent director Tom Keegan I dare to say we have some of the strongest action scenes from a MachineGames perspective yet. When it comes to capturing the look and feel of the stunts and action sequences in the early Indiana Jones movies, it has been a combined effort from various members within MG; obviously our Animation Director Henrik Håkansson and Cinematic Director Markus Söderqvist has an important part to play here for look and feel of animations. And then the audio work from Audio director Pete Ward and his department also plays an important part in making sure everything sounds true to the movie.”
But even the smallest elements have been scrutinized, like throwing a simple punch, for example:
“It has been very important to make sure the combat feels fun and rewarding and easy enough to get drawn into but then hard to master for the ones that likes to crank up the difficulty settings,” explains Torvenius. “We definitely wanted to capture the cinematic feel of the melee combat! Getting those heavy cinematic impact sounds in, having a good response from the spray of sweat and saliva as you punch someone in the face, interesting animations, and the behaviour of a hulking opponent coming towards you.”
This depth of thought is everywhere in the game. Puzzles have been designed with the spirit of whether they might feel right for the movies; locations given the buzz not just of real-life, but a film set; and even the ability to use almost any disposable item as both a distraction and a weapon is drawn from the comic spirit of the movies.
“One of the core ingredients in Indiana Jones is definitely humour. It is something we have worked hard with across every aspect of the game: environmental storytelling, script and VO, in cutscene and story beats, and it absolutely needs to be conveyed in the minute-to-minute gameplay, such as combat. And it is not only the tools you use but also a lot of hard work from the engineer and animation teams to make sure we have interesting, rewarding and fun take down animations. And on top of all of that you also need the best possible audio! And when that cocktail is shaken just the right amount, voilà – out comes something very delicious and fun!”
Which brings us all the way back round to that iconic scene with the swordsman. In a normal game, no, that scene might not make sense when translated to a video game context. But in Indiana Jones and the Great Circle? Well, MachineGames has put in the research, the work, and the commitment to ensure that, while you’re playing this game – from solving spectacular puzzles to near-slapstick combat – it’ll feel worthy of those classic movies.
Indiana Jones and the Great Circle comes to Xbox Series X|S and Windows PC (with Game Pass), or Steam on December 9. Premium and Collector’s Editions will offer up to 3 days of early access from December 6.
Indiana Jones and the Great Circle™: Digital Premium Edition
Bethesda Softworks
☆☆☆☆☆
★★★★★
$99.99
Pre-order now or Play on Game Pass* to receive The Last Crusade™ Pack with the Traveling Suit Outfit and Lion Tamer Whip, as seen in The Last Crusade™. *** Live the adventure with the Premium Edition of Indiana Jones and the Great Circle™! INCLUDES: • Base Game (digital code) • Up to 3-Day Early Access** • Indiana Jones and the Great Circle: The Order of Giants Story DLC† • Digital Artbook • Temple of Doom™ Outfit ***
Uncover one of history’s greatest mysteries in Indiana Jones and the Great Circle, a first-person, single-player adventure set between the events of Raiders of the Lost Ark™ and The Last Crusade. The year is 1937, sinister forces are scouring the globe for the secret to an ancient power connected to the Great Circle, and only one person can stop them – Indiana Jones™. You’ll become the legendary archaeologist in this cinematic action-adventure game from MachineGames, the award-winning studio behind the recent Wolfenstein series, and executive produced by Hall of Fame game designer Todd Howard. YOU ARE INDIANA JONES Live the adventure as Indy in a thrilling story full of exploration, immersive action, and intriguing puzzles. As the brilliant archaeologist – famed for his keen intellect, cunning resourcefulness, and trademark humor – you will travel the world in a race against enemy forces to discover the secrets to one of the greatest mysteries of all time. A WORLD OF MYSTERY AWAITS Travel from the halls of Marshall College to the heart of the Vatican, the pyramids of Egypt, the sunken temples of Sukhothai, and beyond. When a break-in in the dead of night ends in a confrontation with a mysterious colossal man, you must set out to discover the world-shattering secret behind the theft of a seemingly unimportant artifact. Forging new alliances and facing familiar enemies, you’ll engage with intriguing characters, use guile and wits to solve ancient riddles, and survive intense set-pieces. WHIP-CRACKING ACTION Indiana’s trademark whip remains at the heart of his gear and can be used to distract, disarm, and attack enemies. But the whip isn’t just a weapon, it’s Indy’s most valuable tool for navigating the environment. Swing over unsuspecting patrols and scale walls as you make your way through a striking world. Combine stealth infiltration, melee combat, and gunplay to combat the enemy threat and unravel the mystery. THE SPIRIT OF DISCOVERY Venture through a dynamic mix of linear, narrative-driven gameplay and open-area maps. Indulge your inner explorer and unearth a world of fascinating secrets, deadly traps and fiendish puzzles, where anything could potentially hide the next piece of the mystery – or snakes. Why did it have to be snakes? *Game Pass members get access to all pre-order content as long as Game Pass subscription is active. **Actual play time depends on purchase date and applicable time zone differences, subject to possible outages. †DLC availability to be provided at a later date.
Indiana Jones and the Great Circle™ Standard Edition
Bethesda Softworks
☆☆☆☆☆
★★★★★
$69.99
Pre-order now or Play on Game Pass* to receive The Last Crusade™ Pack with the Traveling Suit Outfit and Lion Tamer Whip, as seen in The Last Crusade™.
***
Uncover one of history’s greatest mysteries in Indiana Jones and the Great Circle™, a first-person, single-player adventure set between the events of Raiders of the Lost Ark™ and The Last Crusade. The year is 1937, sinister forces are scouring the globe for the secret to an ancient power connected to the Great Circle, and only one person can stop them – Indiana Jones™. You’ll become the legendary archaeologist in this cinematic action-adventure game from MachineGames, the award-winning studio behind the recent Wolfenstein series, and executive produced by Hall of Fame game designer Todd Howard. YOU ARE INDIANA JONES Live the adventure as Indy in a thrilling story full of exploration, immersive action, and intriguing puzzles. As the brilliant archaeologist – famed for his keen intellect, cunning resourcefulness, and trademark humor – you will travel the world in a race against enemy forces to discover the secrets to one of the greatest mysteries of all time. A WORLD OF MYSTERY AWAITS Travel from the halls of Marshall College to the heart of the Vatican, the pyramids of Egypt, the sunken temples of Sukhothai, and beyond. When a break-in in the dead of night ends in a confrontation with a mysterious colossal man, you must set out to discover the world-shattering secret behind the theft of a seemingly unimportant artifact. Forging new alliances and facing familiar enemies, you’ll engage with intriguing characters, use guile and wits to solve ancient riddles, and survive intense set-pieces. WHIP-CRACKING ACTION Indiana’s trademark whip remains at the heart of his gear and can be used to distract, disarm, and attack enemies. But the whip isn’t just a weapon, it’s Indy’s most valuable tool for navigating the environment. Swing over unsuspecting patrols and scale walls as you make your way through a striking world. Combine stealth infiltration, melee combat, and gunplay to combat the enemy threat and unravel the mystery. THE SPIRIT OF DISCOVERY Venture through a dynamic mix of linear, narrative-driven gameplay and open-area maps. Indulge your inner explorer and unearth a world of fascinating secrets, deadly traps and fiendish puzzles, where anything could potentially hide the next piece of the mystery – or snakes. Why did it have to be snakes? *Game Pass members get access to all pre-order content as long as Game Pass subscription is active.
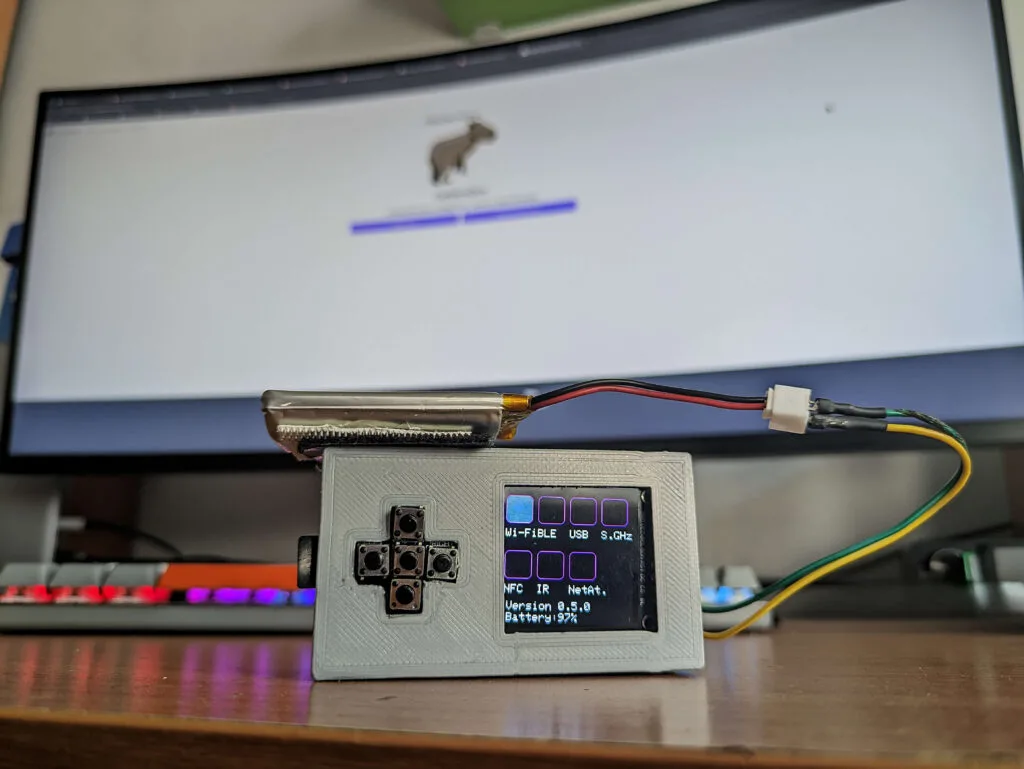
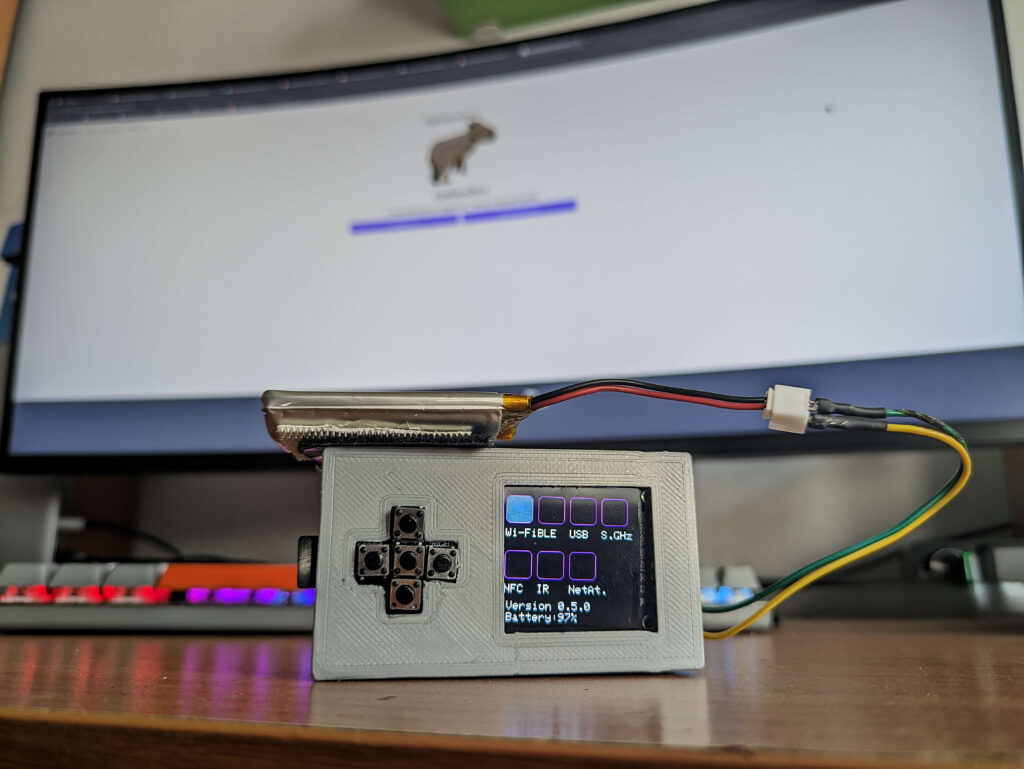
Inventive, open-source, and cost-effective – these words perfectly describe CapibaraZero, a multifunctional security and hacking tool developed by young innovator Andrea Canale.
Inspired by the popular Flipper Zero, a portable device used to interact with digital systems, Canale sought to create a more accessible, Arduino-based alternative.
The original Flipper Zero, known for its ability to read, copy, and emulate RFID tags, NFCs, and even remote control signals, has become a valuable tool for tech enthusiasts. Canale’s CapibaraZero captures much of this functionality but adds his own unique approach and vision.
A student’s vision for an accessible, open-source alternative
A passionate student from the University of Turin, Canale began working on CapibaraZero while still in high school, driven by the desire to build a tool that didn’t just replicate Flipper Zero’s capabilities but improved upon them through the power of open-source design.
CapibaraZero, named after Canale’s favorite animal, combines an Arduino Nano ESP32 with custom-designed PCB boards, making it adaptable and expandable. With sections dedicated to Wi-Fi®, Bluetooth®, infrared, NFC, and even network attacks, CapibaraZero allows users to experiment with multiple forms of wireless communication and digital security protocols in a way that’s affordable and accessible.
A tool for experimentation and learning
What makes CapibaraZero remarkable is not only its functionality but also Canale’s dedication to ensuring it remains open-source, user-friendly, and continually evolving. With additional modules for advanced features like Sub-GHz communication and network attacks (such as ARP poisoning and DHCP starvation), CapibaraZero empowers enthusiasts to expand the tool’s potential beyond traditional hacking devices.
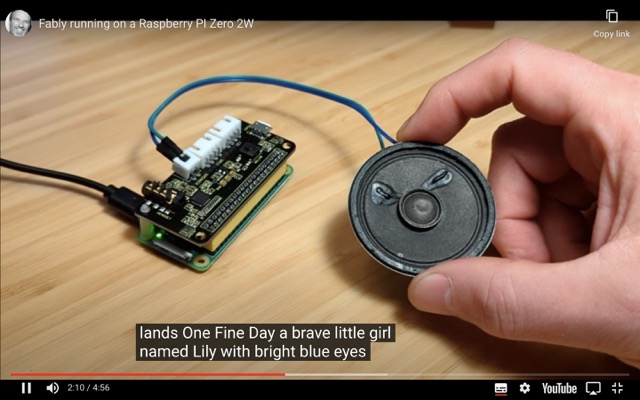
Stefano’s first computer, a Commodore Vic20, was something he could program himself and opened up a world of possibilities. Most importantly, this first computer awakened Stefano to the idea of tinkering and eventually led to him pursuing a degree in electronic engineering. Over the past 20 years he has worked with many tech startups and software companies, often with Apache Frontier Foundation, where he became a fellow and met many passionate inventors. Fably, however, was very much inspired by Stefano’s own family, particularly his nine-year-old daughter who kept asking him to invent new stories.
Stefano had encountered LLMs (large language models) while working at Google Research and wondered whether he could use one to create a storytelling machine. Stefano found the command of language impressive but the LLM “felt like talking to a person that spoke like a college professor but had the understanding of the world of a five-year-old. It was a jarring experience especially when they confidently made stuff up.” The phenomenon is often referred to as ‘hallucination’ but Stefano says some colleagues at Google call it ‘fabulism’. He prefers this term and it is the origin of his Raspberry Pi project’s name. Importantly, ‘fably’ is also a word the text to speech synthesis API can pronounce.
As well as making more sense than an overconfident LLM, the smart storyteller needed to come up with compelling stories that engaged the listener and be sufficiently autonomous that it could be used without continuous adult supervision. Being an ambitious, entrepreneurial type, Stefano also wondered about the commercial possibilities and whether Fably could be made at a sufficiently low cost to build a community around it. He notes that children are demanding users being both “impatient and used to interactivity as a foundational aspect of learning”. It would be critical that the “time to first speech” (the time from the last word the child said and the first word coming out of the machine) could not be more than a few seconds.
Every cloud
Since LLMs are very resource-intensive (as he knew from working on machine learning at Google), Stefano chose a cloud API-based approach to address the need for speed, and Raspberry Pi to keep costs down so other technically minded makers could create their own. Raspberry Pi felt like the best choice because of its price, availability, fantastic and very active community, and because it runs Linux directly – a development environment Stefano felt right at home in. Additional hardware such as a microphone could also be added easily. Stefano praised Raspberry Pi’s “relatively stable” I/O pinout across versions in ensuring “a healthy and diverse ecosystem of extension boards”, which could prove important should Fably become a commercial product.
Fably makes full use of OpenAI cloud APIs, alongside a text-to-speech synthesiser with a warm and cosy voice. Stefano’s daughter enjoys the fact that she hears a slightly different story even if she makes the same request. Using a cloud setup means each story costs a few cents, but Fably can be set up to cache stories as well as to cap cloud costs.
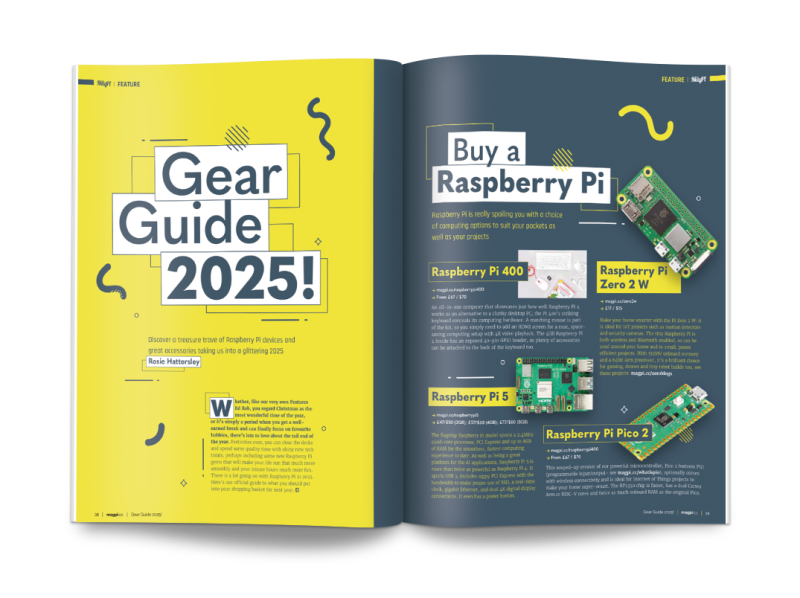
Our Gear Guide 2025! has your back. Discover a treasure trove of Raspberry Pi devices and great accessories taking us into a glittering new year.
Gift a project
Sometimes the perfect gift is one you made yourself. Christmas Elf, Rob Zwetsloot has a fantastic feature for constructing your gifts using Raspberry Pi technology. On a budget? These projects break down the pricing so you can decide on what project to put together.
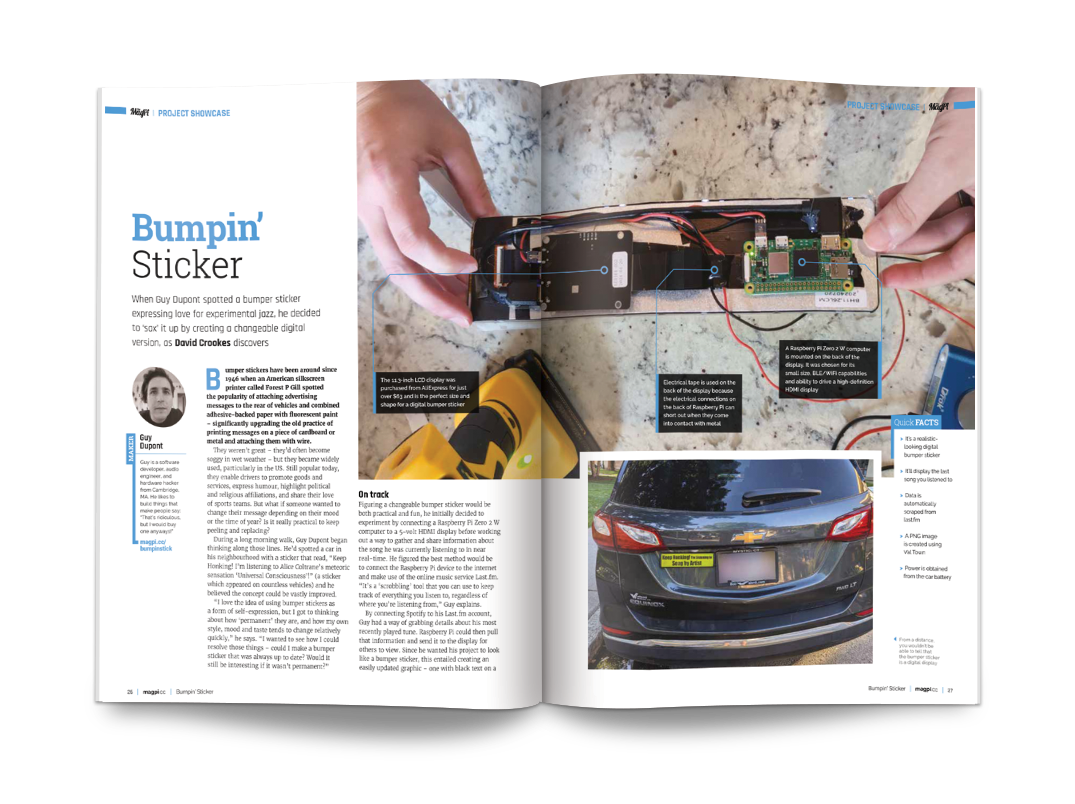
Bumpin Sticker
This issue is packed with amazing projects. Our favourite is this Bumpin Sticker that attaches an 11.3-inch LCD display to the bumper of a car and hooks up to the car radio. It displays the song and artist that you are listening to by scraping data from last.fm. It’s fun, but a serious demonstration of different technologies.
Bluetooth Bakelite phone headset
This Bluetooth headset is built into the body of a Dutch phone from 1950, simply called a ‘type 1950’. It’s powered by an ESP32 development board, and it works well enough that its creator, Jouke Waleson, can use it in a professional setting.
PiDog tested
Featuring 12 servos, PiDog is a metal marvel that can do (almost) anything a real dog can do. Walk, sit, lie down, doze, bark, howl, pant, scratch, shake a paw… Equipped with a bunch of sensors, it can self-balance, discern the direction of sounds, detect obstacles, and see where it’s going. You can even get a dog’s-eye view from its nose-mounted camera via a web page or companion app.
If you want to add a display to your Arduino project, the easiest solution will likely be an LCD or OLED screen. But though those are affordable and work really well, they may not provide the vibe you’re looking for. If you want a more vintage look, Vaclav Krejci has a great tutorial that will walk you through using old-school LED bubble displays with your Arduino.
Krejci’s video demonstrates how to use HPDL-1414 displays, which are what most people call “bubble” displays, because they have clear bubble-like lenses over each character’s array of LEDs. They were fairly popular in the late ‘70s and ‘80s on certain devices, like calculators. These specific bubble displays can show the full range of alphanumeric characters (uppercase only), plus a handful of punctuation marks and special symbols.
The HPDL-1414 displays Krejci used come on driver boards that set the characters based on serial input. In the video, Krejci first connects those directly to a PC via a serial-to-USB adapter board. That helps to illustrate the control method through manual byte transmission.
Then Krejci gets to the good stuff: connecting the HPDL-1414 bubble displays to an Arduino. He used an Arduino UNO Rev3, but the same setup should work with any Arduino board. As you may have guessed based on the PC demonstration, the Arduino controls the display via Serial.print() commands. The hex code for each character matches the standard ASCII table, which is pretty handy. That makes it possible to Serial.write() those hex codes and even Serial.write() the actual characters.
Don’t worry if that sounds a little intimidating, because Krejci has sample code that will let you easily turn any arbitrary array of characters into the serial output you need. Now you can use those awesome bubble displays in your own projects!
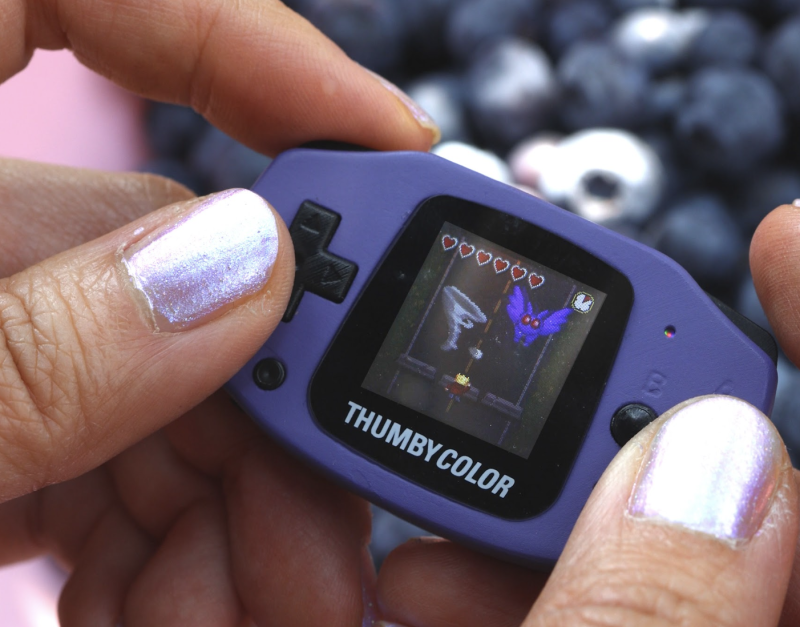
A ton of supporting products launcged with Raspberry Pi Pico 2 and the RP2350, including a lot of items that were powered by RP2350. One of these included the excellent Thumby Color game system, and we finally have a few for a competition – enter below…
Playing drums is a lot of fun, but drum sets are very big and very loud. They also aren’t cheap. Those factors keep them from being an option for many people who would otherwise be interested. Conventional electronic drum sets are much quieter and a bit more compact, but they still take up a fair amount of space and come with hefty price tags. That’s why Cybercraftics designed this DIY drum set mat that solves all of those problems.
This is an electronic drum set in the form of a flexible desk mat. It is affordable to build and can be tucked away in a closet or cupboard when not in use. It doesn’t have the same layout as a real drum set, but it can still help new drummers learn fundamentals like paradiddles. Those require a lot of practice to ingrain the motions into muscle memory and this mat makes it possible to run through the rudiments just about anywhere without loud noises disturbing anyone.
Cybercraftics designed this drum mat to work like a standard MIDI (Musical Instrument Digital Interface) input device, but with piezoelectric sensors instead of buttons. Those produce a signal when struck. They are analog signals and there are seven sensors, so this project uses an Arduino Leonardo board that has enough analog input pins. The Leonardo also has a Microchip ATmega32U4 microcontroller, which means it is configurable as a USB HID — handy for interfacing with whatever MIDI software you may want to use.
On the physical side, this is just two desk mats cut and glued together, which circular pieces covering the piezoelectric sensors. A small 3D-printed enclosure protects the Arduino.
At Cornell University, Dr. Anand Kumar Mishra and his team have been conducting groundbreaking research that brings together the fields of robotics, biology, and engineering. Their recent experiments, published in Science, explore how fungal myceliacan be used to control robots. The team has successfully created biohybrid robots that move based on electrical signals generated by fungi – a fascinating development in the world of robotics and biology.
A surprising solution for robotics: fungi
Biohybrid robots have traditionally relied on animal or plant cells to control movements. However, Dr. Mishra’s team is introducing an exciting new component into this field: fungi – which are resilient, easy to culture, and can thrive in a wide range of environmental conditions. This makes them ideal candidates for long-term applications in biohybrid robotics.
Dr. Mishra and his colleagues designed two robots: a soft, starfish-inspired walking one, and a wheeled one. Both can be controlled using the natural electrophysiological signals produced by fungal mycelia. These signals are harnessed using a specially designed electrical interface that allows the fungi to control the robot’s movement.
The implications of this research extend far beyond robotics. The integration of living systems with artificial actuators presents an exciting new frontier in technology, and the potential applications are vast – from environmental sensing to pollution monitoring.
At the heart of this innovative project is the Arduino platform, which served as the main interface to control the robots. As Dr. Mishra explains, he has been using Arduino for over 10 years and naturally turned to it for this experiment: “My first thought was to control the robot using Arduino.” The choice was ideal in terms of accessibility, reliability, and ease of use – and allowed for seamless transition from prototyping with UNO R4 WiFi to final solution with Arduino Mega.
To capture and process the tiny electrical signals from the fungi, the team used a high-resolution 32-bit ADC (analog-to-digital converter) to achieve the necessary precision. “We processed each spike from the fungi and used the delay between spikes to control the robot’s movement. For example, the width of the spike determined the delay in the robot’s action, while the height was used to adjust the motor speed,” Dr. Mishra shares.
The team also experimented with pulse width modulation (PWM) to control the motor speed more precisely, and managed to create a system where the fungi’s spikes could increase or decrease the robot’s speed in real-time. “This wasn’t easy, but it was incredibly rewarding,” says Dr. Mishra.
And it’s only the beginning. Now the researchers are exploring ways to refine the signal processing and enhance accuracy – again relying on Arduino’s expanding ecosystem, making the system even more accessible for future scientific experiments.
All in all, this project is an exciting example of how easy-to-use, open-source, accessible technologies can enable cutting-edge research and experimentation to push the boundaries of what’s possible in the most unexpected fields – even complex biohybrid experiments! As Dr. Mishra says, “I’ve been a huge fan of Arduino for years, and it’s amazing to see how it can be used to drive advancements in scientific research.”
It’s been over a year since we launched Ada Computer Science, and we continue to see the numbers of students and teachers using the platform all around the world grow. Our recent year in review shared some of the key developments we’ve made since launching, many of which are a direct result of feedback from our community.
Today, we are publishing an impact report that includes some of this feedback, along with what users are saying about the impact Ada Computer Science is having.
Evaluating Ada Computer Science
Ada Computer Science is a free learning platform for computer science students and teachers. It provides high-quality, online learning materials to use in the classroom, for homework, and for revision. Our experienced team has created resources that cover every topic in the leading GCSE and A level computer science specifications.
From May to July 2024, we invited users to provide feedback via an online survey, and we got responses from 163 students and 27 teachers. To explore the feedback further, we also conducted in-depth interviews with three computer science teachers in September 2024.
How is Ada being used?
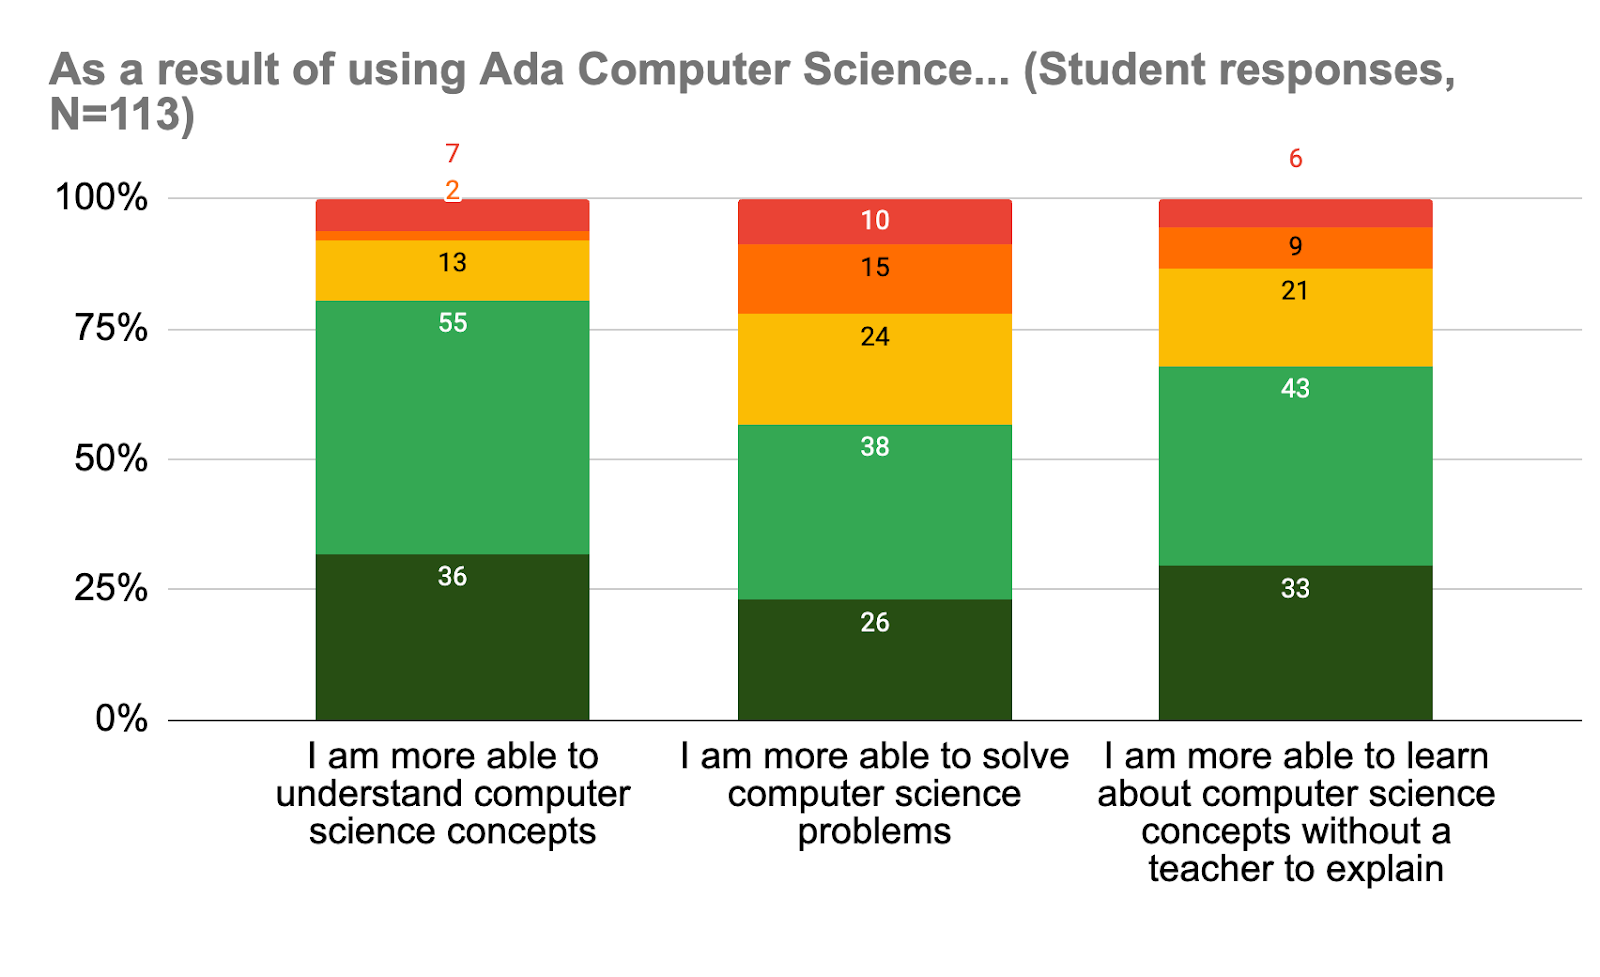
The most common ways students use Ada Computer Science — as reported by more than two thirds of respondents — is for revision and/or to complete work set by their teacher. Similarly, teachers most commonly said that they direct students to use Ada outside the classroom.
“I recommend my students use Ada Computer Science as their main textbook.” — Teacher
What is users’ experience of using Ada?
Most respondents agreed or strongly agreed that Ada is useful for learning (82%) and high quality (79%).
“Ada Computer Science has been very effective for independent revision, I like how it provides hints and pointers if you answer a question incorrectly.” — Student
Ada users were generally positive about their overall experience of the platform and using it to find the information they were looking for.
“Ada is one of the best for hitting the nail on the head. They’ve really got it in tune with the depth that exam boards want.” — Ian Robinson, computer science teacher (St Alban’s Catholic High School, UK)
What impact is Ada having?
Around half of the teachers agreed that Ada had reduced their workload and/or increased their subject knowledge. Across all respondents, teachers estimated that the average weekly time saving was 1 hour 8 minutes.
Additionally, 81% of students agreed that as a result of using Ada, they had become better at understanding computer science concepts. Other benefits were reported too, with most students agreeing that they had become better problem-solvers, for example.
“I love Ada! It is an extremely helpful resource… The content featured is very comprehensive and detailed, and the visual guides… are particularly helpful to aid my understanding.” — Student
Future developments
Since receiving this feedback, we have already released updated site navigation and new question finder designs. In 2025, we are planning improvements to the markbook (for example, giving teachers an overview of the assignments they’ve set) and to how assignments can be created.
If you’d like to read more about the findings, there’s a full report for you to download. Thank you to everyone who took the time to take part — we really value your feedback!
We are thrilled to announce that Alumnus Software, based in India and the United States, has joined our System Integrators Partnership Program (SIPP) at the Gold level. With over 20 years of expertise in embedded software, IoT applications, and Edge AI development, Alumnus has a strong track record of building custom embedded systems and data-driven IoT applications for industries ranging from automotive and healthcare to industrial automation and consumer electronics.
As an official SIPP partner, Alumnus will enable Arduino users to leverage their expertise in resource-constrained environments – overcoming challenges like limited CPU, memory, and storage, low bandwidth, extended battery life requirements, and real-time response demands. This collaboration means faster deployment, quicker revenue generation, and a seamless bridge between connected devices and cloud-based applications for enterprise-scale projects.
Ashis Khan, Board Member at Alumnus Software, shared his enthusiasm for the partnership:
“With Arduino, businesses have achieved a 25-40% faster time-to-market and up to 60% reduction in non-recurring engineering (NRE) costs when connecting their data to the cloud. Through this partnership, Alumnus Software plans to help Arduino users scale enterprise-class applications more efficiently, leveraging data and AI with our two decades of expertise in Data, IoT, Edge AI, Cloud enablement, and embedded software development.”
Rob Ponsoby, Partner Sales Manager – AMER at Arduino, added: “We are excited to welcome Alumnus to the SIPP program. Their depth of experience in embedded software and IoT solutions will provide valuable resources for Arduino users, helping them bring their innovative ideas to life in faster, more efficient ways.”
Follow Alumnus Software’s journey on LinkedIn and Facebook, and learn more about their contributions to advancing embedded technology by visiting the company website.
The System Integrators Partnership Program by Arduino Pro is an exclusive initiative designed for professionals seeking to implement Arduino technologies in their projects. This program opens up a world of opportunities based on the robust Arduino ecosystem, allowing partners to unlock their full potential in collaboration with us.
The Arduino Plug and Make Kit was designed to open up infinite possibilities, breaking down the idea that technology is a “black box” reserved for experts. With its snap-together system, this kit gives everyone – beginners and seasoned makers alike – the power to create and innovate without barriers. Forget being a passive user! With the Plug and Make Kit, technology is accessible and ready to bring your ideas to life.
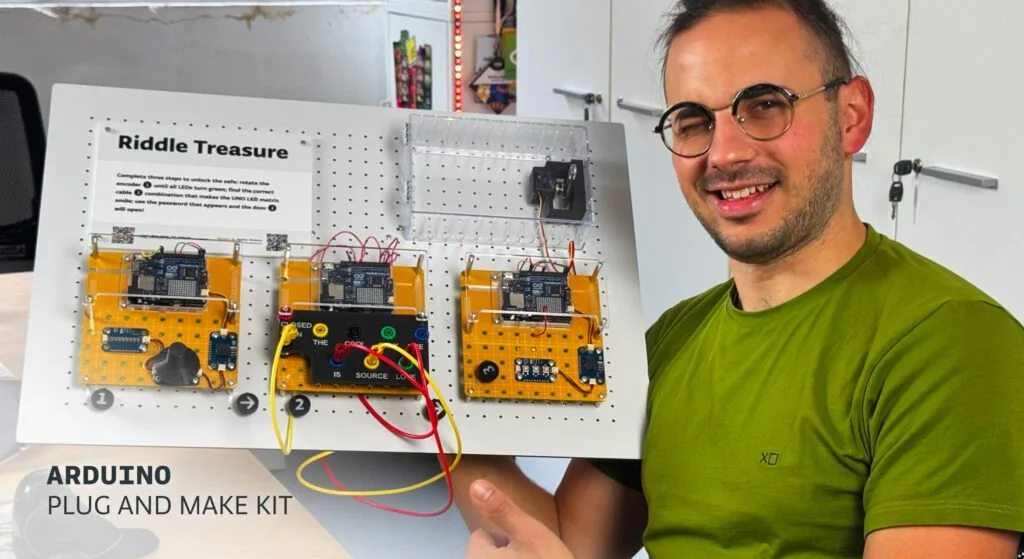
Meet Giulio Pilotto, Plug and Make Kit Star
Giulio Pilotto is one of Arduino’s senior software engineers and works closely on Arduino Cloud projects. When we held a “Make Tank” workshop at our Turin office to showcase the potential of the Plug and Make Kit, he joined in with inspiration from a recent escape room experience.
The result was Riddle Treasure, a puzzle-based game that allows you to recreate the excitement of an escape room anywhere you are.
At this year’s Maker Faire, Pilotto had the opportunity to present Riddle Treasure at the Arduino booth. While he had showcased his own creations at previous Maker Faire editions, this time felt special: “The Maker Faire is always a wonderful high-energy event,” he says. “I was happy to represent the Arduino team as we focus more than ever on the community: all our products were presented in the light of what people can do with them.”
Riddle Treasure
To be honest, this is probably the most advanced project our in-house “Make Tank” came up with (so far!). After all, it has to be somewhat complicated to emulate intricate escape room puzzles! However, following Pilotto’s step-by-step instructions on Project Hub and leveraging the easy snap-together mechanism of Modulino nodes, anyone can recreate Riddle Treasure – or even invent a personal, unique variation.
The goal of the game is to unlock a safe. But to get there, you need to complete three steps in order.
1. Combination Lock: First, you must rotate the encoder in Modulino Knob like a safe’s combination lock. When you hit the right position, one of the lights on Modulino Pixels turns from red to green. When you get all five LEDs to turn green, you can move on to the next step.
2. Secret Sentence: Use the banana cables to connect the words in the panel. When you get them all in the right order to form the secret sentence, a password is revealed on the LED matrix of the UNO R4 included in the Plug and Make Kit.
3. Final Unlock: Input the password via Modulino Buttons, and watch the safe unlock!
We take care of the complexity, so you can simply plug into tech!
Arduino has done the hard work so you can play and have fun even with deliberately complex projects like this one.
“Building this without having to solder, or even worry about settings or any electronics aspect at all, is a game changer. With Plug and Make Kit, Arduino has already selected and optimized the Modulino sensors: all you have to do is put them together to get started on your ideas,” Pilotto says.
You’re managing a network of IoT sensors that monitor air quality across multiple locations. Suddenly, one of the sensors goes offline, but you don’t notice until hours later. The result? A gap in your data and a missed opportunity to take corrective action. This is a common challenge when working with IoT devices: staying informed about the real-time status of each device is crucial to ensure smooth operation and timely troubleshooting.
This is where Device Status Notifications, the latest feature in the Arduino Cloud, comes in. Whether you’re an individual maker or an enterprise, this feature empowers you to stay on top of your devices by sending real-time alerts when a device goes online or offline.
What is “Device Status Notifications?”
Device Status Notifications allow you to receive instant alerts whenever one of your devices changes its connectivity status, whether it’s going offline or coming back online. You can customize these alerts for individual devices or all devices under your account, with the flexibility to exclude specific devices from triggering notifications.
We announced it a while ago, Arduino Cloud already supports Triggers and Notifications, allowing you to create alerts based on specific conditions like sensor readings or thresholds. With the addition of Device Status Notifications, you can now monitor device connectivity itself. This means you can now receive an alert the moment a device loses connection, providing a proactive way to manage your IoT ecosystem. For more details on the original feature, check out our Triggers and Notifications blog post.
Key benefits for users
Real-time monitoring: Get notified instantly when a device disconnects or reconnects, helping you take corrective actions promptly.
Customization: Configure your alerts to focus on specific devices or apply rules to all your devices, with the flexibility to add exceptions. You can also decide when the notification should be sent — either immediately upon a status change or after a set period of downtime.
Convenience: Choose to receive notifications via email or directly on your mobile device through the Arduino IoT Remote app, making it easy to stay informed wherever you are.
Any device (select “Any device (existing and upcoming)”).
If you select “Single device,” you can choose the device that you want to be monitored.
If your selection is “Any device,” you can add exceptions for devices you don’t want to trigger the alert.
3. Configure what you are going to monitor
Choose whether to monitor when the device goes online, offline, or both. Then decide if the notification should be sent immediately or after a set period (options range from 10 minutes to 48 hours).
4. Customize the notification settings
Notifications are configured in the same way as any other Trigger. You can add the action of sending an email or a push notification to your phone via a push notification on the Arduino IoT Remote app.
Ready to test Device Notifications?
Want to make sure your IoT devices stay connected and functioning? Start using the Device Status Notifications feature today. Simply log in to your Arduino IoT Cloud account, and configure your notifications to stay informed whenever your devices go online or offline.
Make sure you’re on a Maker, Enterprise, or School plan to access this feature.
Take your IoT projects to the next level this Black Friday!
For a limited time, enjoy 25% off the Arduino Cloud Maker Yearly plan with code BLACKFRIDAY. Don’t miss this opportunity to access premium features and elevate your creativity. Hurry—this offer is valid for new Maker Yearly plan subscriptions only and ends on December 1st, 2024.
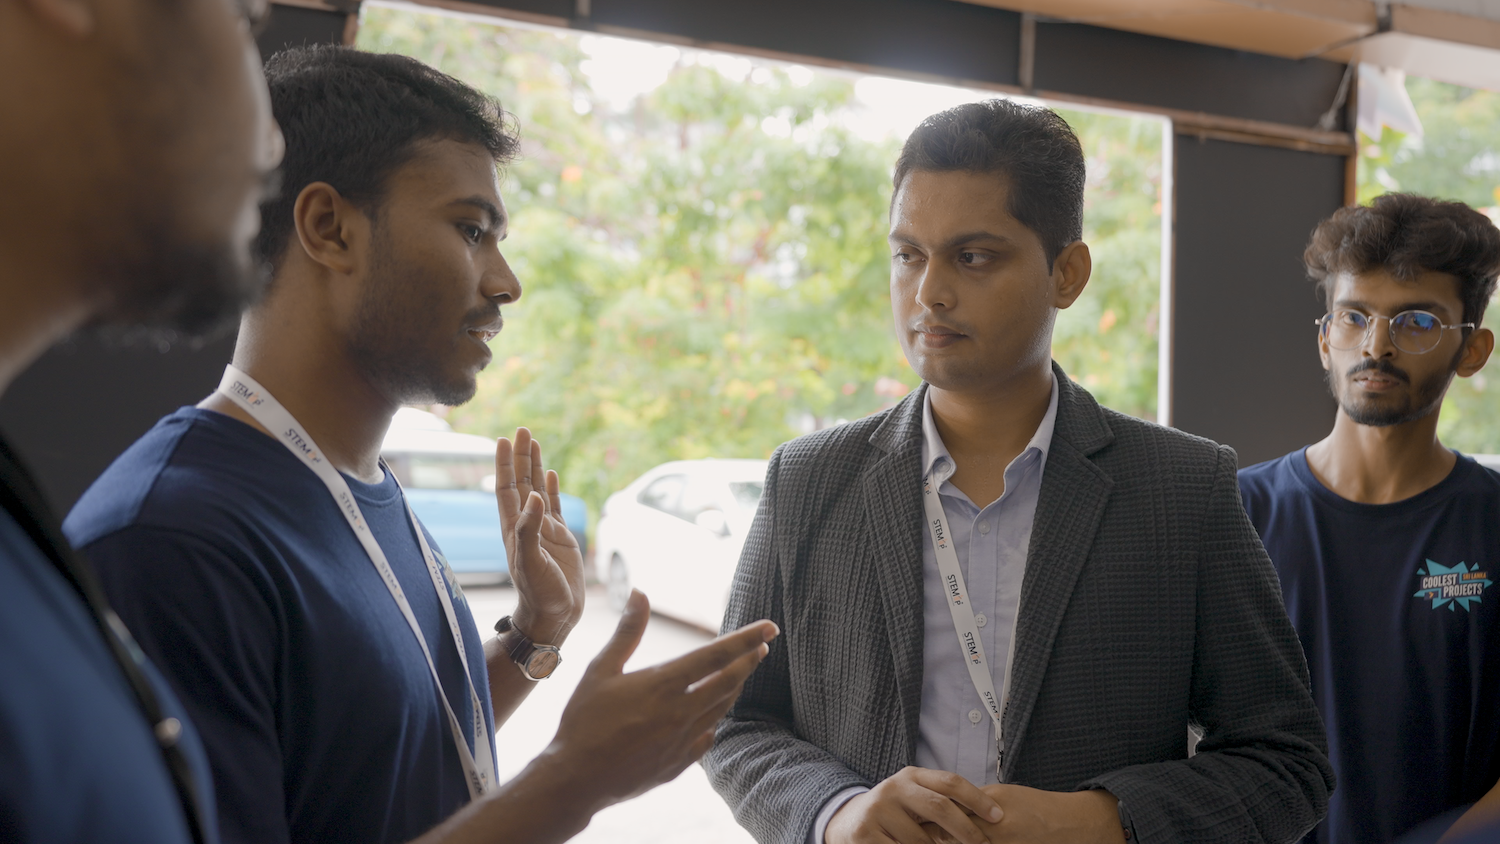
We love hearing from members of the community and sharing the stories of amazing young people, volunteers, and educators who are using their passion for technology to create positive change in the world around them.
Prabhath, the founder of the STEMUP Educational Foundation, began his journey into technology at an early age, influenced by his cousin, Harindra.
“He’s the one who opened up my eyes. Even though I didn’t have a laptop, he had a computer, and I used to go to their house and practise with it. That was the turning point in my life.”
This early exposure to technology, combined with support from his parents to leave his rural home in search of further education, set Prabhath on a path to address a crucial issue in Sri Lanka’s education system: the gap in opportunities for students, especially in STEM education.
“There was a gap between the kids who are studying in Sri Lanka versus the kids in other developed markets. We tried our best to see how we can bridge this gap with our own capacity, with our own strengths.”
Closing the gap through STEMUP
Recognising the need to close this gap in opportunities, Prabhath, along with four friends who worked with him in his day job as a Partner Technology Strategist, founded the STEMUP Educational Foundation in 2016. STEMUP’s mission is straightforward but ambitious — it seeks to provide Sri Lankan students with equal access to STEM education, with a particular focus on those from underserved communities.
To help close the gap, Prabhath and his team sought to establish coding clubs for students across the country. Noting the lack of infrastructure and access to resources in many parts of Sri Lanka, they partnered with Code Club at the Raspberry Pi Foundation to get things moving.
Their initiative started small with a Code Club in the Colombo Public Library, but things quickly gained traction.
What began with just a handful of friends has now grown into a movement involving over 1,500 volunteers who are all working to provide free education in coding and emerging technologies to students who otherwise wouldn’t have access.
A key reason for STEMUP’s reach has been the mobilisation of university students to serve as mentors at the Code Clubs. Prabhath believes this partnership has not only helped the success of Code Club Sri Lanka, but also given the university students themselves a chance to grow, granting them opportunities to develop the life skills needed to thrive in the workforce.
“The main challenge we see here today, when it comes to graduate students, is that they have the technology skills, but they don’t have soft skills. They don’t know how to do a presentation, how to manage a project from A to Z, right? By being a volunteer, that particular student can gain 360-degree knowledge.”
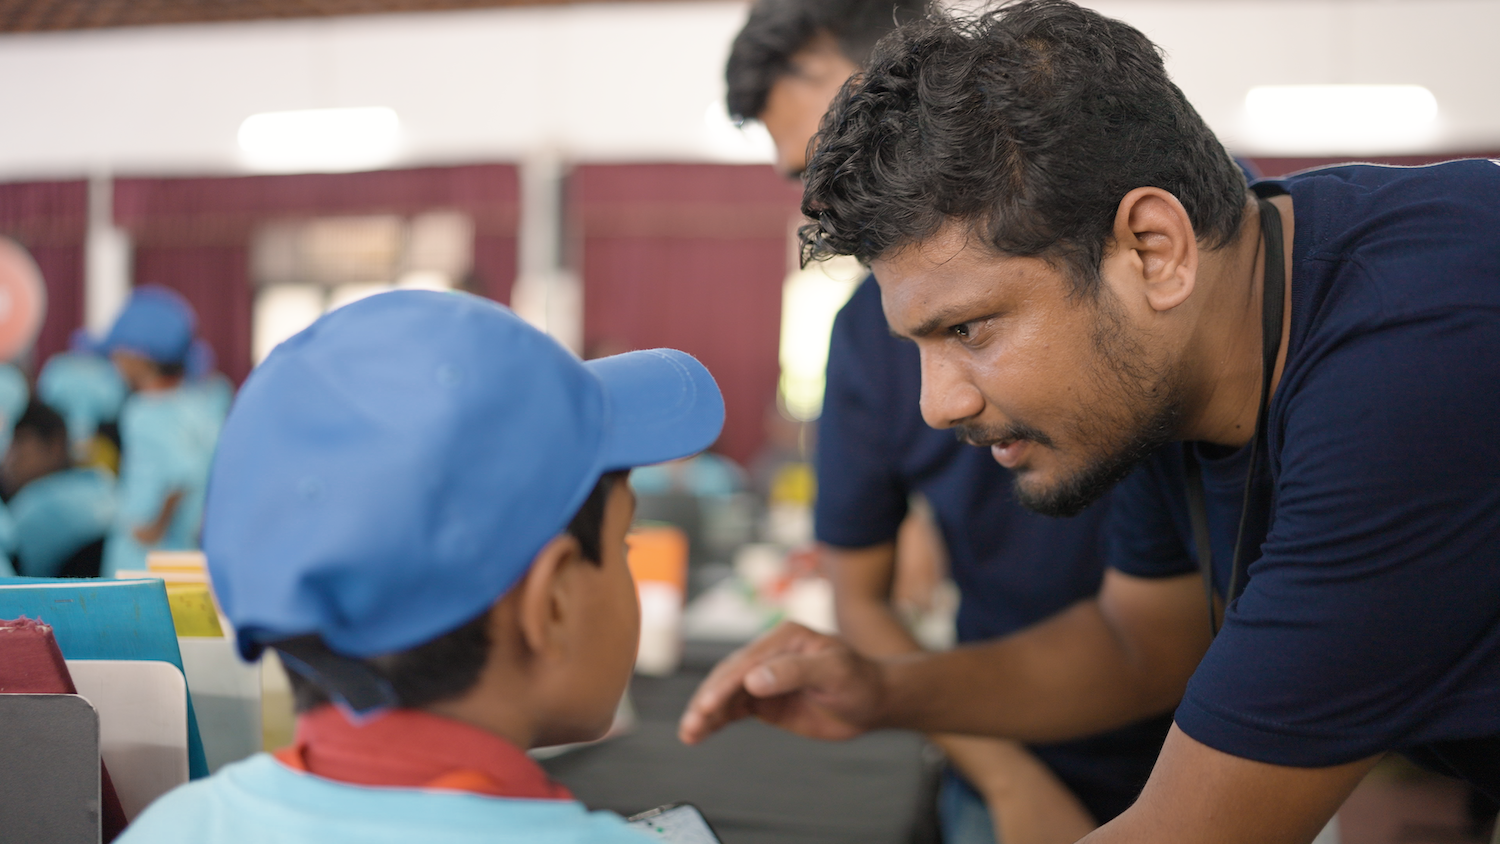
Helping rural communities
STEMUP’s impact stretches beyond cities and into rural areas, where young people often have even fewer opportunities to engage with technology. The wish to address this imbalance is a big motivator for the student mentors.
“When we go to rural areas, the kids don’t have much exposure to tech. They don’t know about the latest technologies. What are the new technologies for that development? And what subjects can they study for the future job market? So I think I can help them. So I actually want to teach someone what I know.” – Kasun, Student and Code Club mentor
This lack of access to opportunities is precisely what STEMUP aims to change, giving students a platform to explore, innovate, and connect with the wider world.
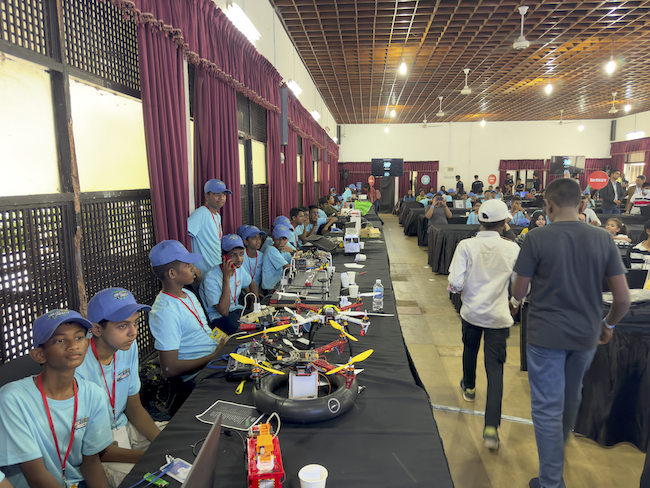
Coolest Projects Sri Lanka
STEMUP recently held the first Coolest Projects Sri Lanka, a showcase for the creations of young learners. Prabhath first encountered Coolest Projects while attending the Raspberry Pi Foundation Asia Partner summit in Malaysia.
“That was my first experience with the Coolest Projects,” says Prabhath, “and when I came back, I shared the idea with our board and fellow volunteers. They were all keen to bring it to Sri Lanka.”
For Prabhath, the hope is that events like these will open students’ eyes to new possibilities. The first event certainly lived up to his hope. There was a lot of excitement, especially in rural areas, with multiple schools banding together and hiring buses to attend the event.
“That kind of energy… because they do not have these opportunities to showcase what they have built, connect with like minded people, and connect with the industry.”
Building a better future
Looking ahead, Prabhath sees STEMUP’s work as a vital part of shaping the future of education in Sri Lanka. By bringing technology to public libraries, engaging university students as mentors, and giving kids hands-on experience with coding and emerging technologies, STEMUP is empowering the next generation to thrive in a digital world.
“These programmes are really helpful for kids to win the future, be better citizens, and bring this country forward.”
STEMUP is not just bridging a gap — it’s building a brighter, more equitable future for all students in Sri Lanka. We can’t wait to see what they achieve next!
Inspire the next generation of young coders
To find out how you and young creators you know can get involved in Coolest Projects, visit coolestprojects.org. If the young people in your community are just starting out on their computing journey, visit our projects site for free, fun beginner coding projects.
For more information to help you set up a Code Club in your community, visit codeclub.org.
Help us celebrate Prabhath and his inspiring journey with STEMUP by sharing this story on X, LinkedIn, and Facebook.
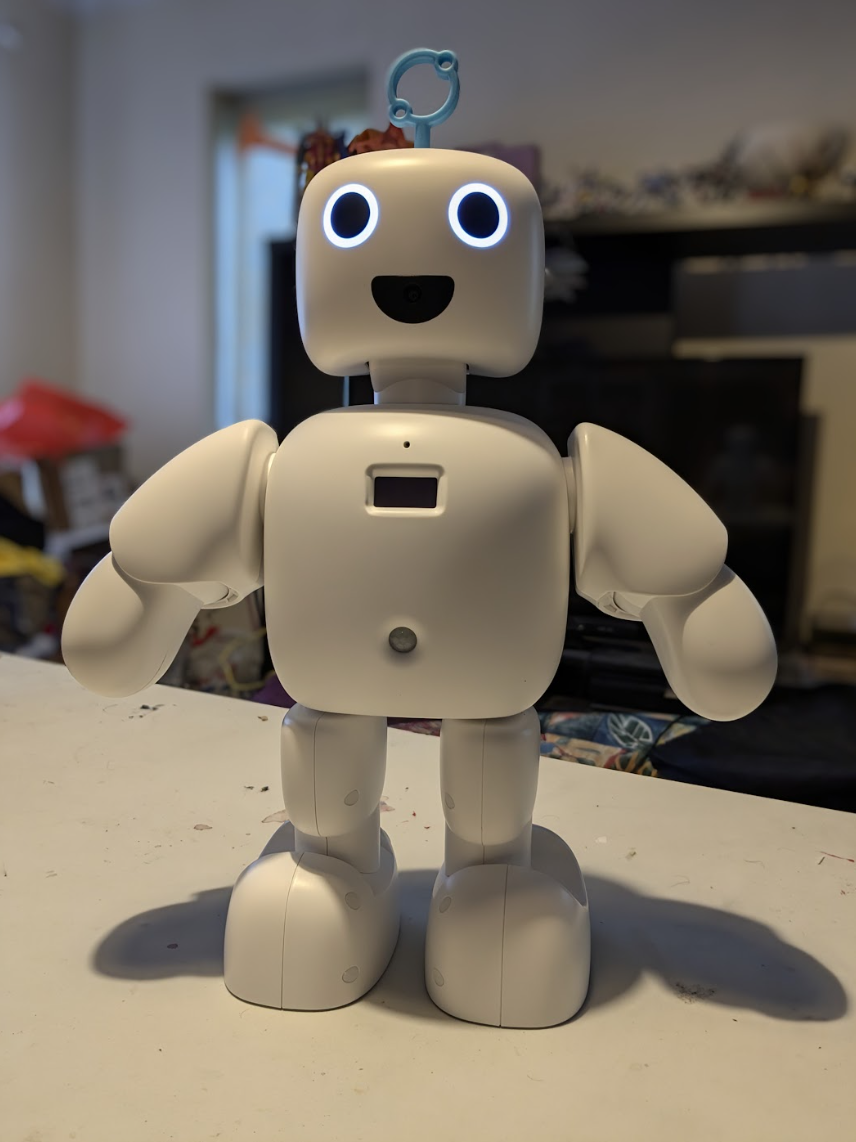
It comes fully assembled, which is very nice as putting together the various motors and other components together correctly has been a pain with similar products in the past. All you need to do is turn it on and get it connected to your Wi-Fi network, either via a wireless access point the robot creates, or via a wired connection if you have a USB to Ethernet adapter handy.
The whole thing is powered by a Raspberry Pi Compute Module 4, so it has plenty of oomph – especially needed for the computer vision and voice recognition tasks.
I have control
The robot itself is made in Korea, and most of the surrounding documentation and such are in Korean as a result. However, the tools and IDE (integrated development environment) can be switched to English just fine, and we didn’t experience any language issues.
The tools allow you to play around with the various functions of the robot. Changing the colours of the eyes (independently if you wish), checking if the motion-sensing and touch inputs are working, recording sounds, playing sounds, moving the various motors – you can get a great feel for what the robot can do. With a solid grasp of this, you can then start programming the robot in the IDE.
There’s a couple of programming methods – one is a block-based flow a little like NODE-Red, which also helps you understand the coding logic and variables of Pibo, and then there’s the Python programming mode which allows for full control.
The functionality is huge, and we were really impressed by the object detection built into the camera. We also like making little messages and images on small LED screens, so having interactive elements that worked with the 128×64 display scratched a specific itch for us.
Learning for all ages
While the whole system may not be useful to teach people on their very first steps into coding, or even maybe robotics, it’s a great next step thanks to its intuitive design that lets you play with its features, and block based programming that can lead into Python. The price is a little hefty, and some English features are still incoming, but we had a great time using Pibo either way – one for the little desk display we think.
Specs
Dimensions: 250(w) × 395(h) × 125(d) mm, 2.2kg
Inputs: Touch sensor, MEMS microphone, PIR sensor, USB 2.0 port
Outputs: 2x speakers, 128×64 OLED display, USB 2.0 port
Verdict
9/10
A cute and very easy to use robot with a ton of functionality that will take some time to fully discover.
The UNESCO competency framework for students serves as a guide for education systems across the world to help students develop the necessary skills in AI literacy and to build inclusive, just, and sustainable futures in this new technological era.
It is an exciting document because, as well as being comprehensive, it’s the first global framework of its kind in the area of AI education.
The framework serves three specific purposes:
It offers a guide on essential AI concepts and skills for students, which can help shape AI education policies or programs at schools
It aims to shape students’ values, knowledge, and skills so they can understand AI critically and ethically
It suggests a flexible plan for when and how students should learn about AI as they progress through different school grades
The framework is a starting point for policy-makers, curriculum developers, school leaders, teachers, and educational experts to look at how it could apply in their local contexts.
It is not possible to create a single curriculum suitable for all national and local contexts, but the framework flags the necessary competencies for students across the world to acquire the values, knowledge, and skills necessary to examine and understand AI critically from a holistic perspective.
How does Experience AI compare with the framework?
A group of researchers and curriculum developers from the Raspberry Pi Foundation, with a focus on AI literacy, attended the conference and afterwards we tasked ourselves with taking a deep dive into the student framework and mapping our Experience AI resources to it. Our aims were to:
Identify how the framework aligns with Experience AI
See how the framework aligns with our research-informed design principles
Identify gaps or next steps
Experience AI is a free educational programme that offers cutting-edge resources on artificial intelligence and machine learning for teachers, and their students aged 11 to 14. Developed in collaboration with the Raspberry Pi Foundation and Google DeepMind, the programme provides everything that teachers need to confidently deliver engaging lessons that will teach, inspire, and engage young people about AI and the role that it could play in their lives. The current curriculum offering includes a ‘Foundations of AI’ 6-lesson unit, 2 standalone lessons (‘AI and ecosystems’ and ‘Large language models’), and the 3 newly released AI safety resources.
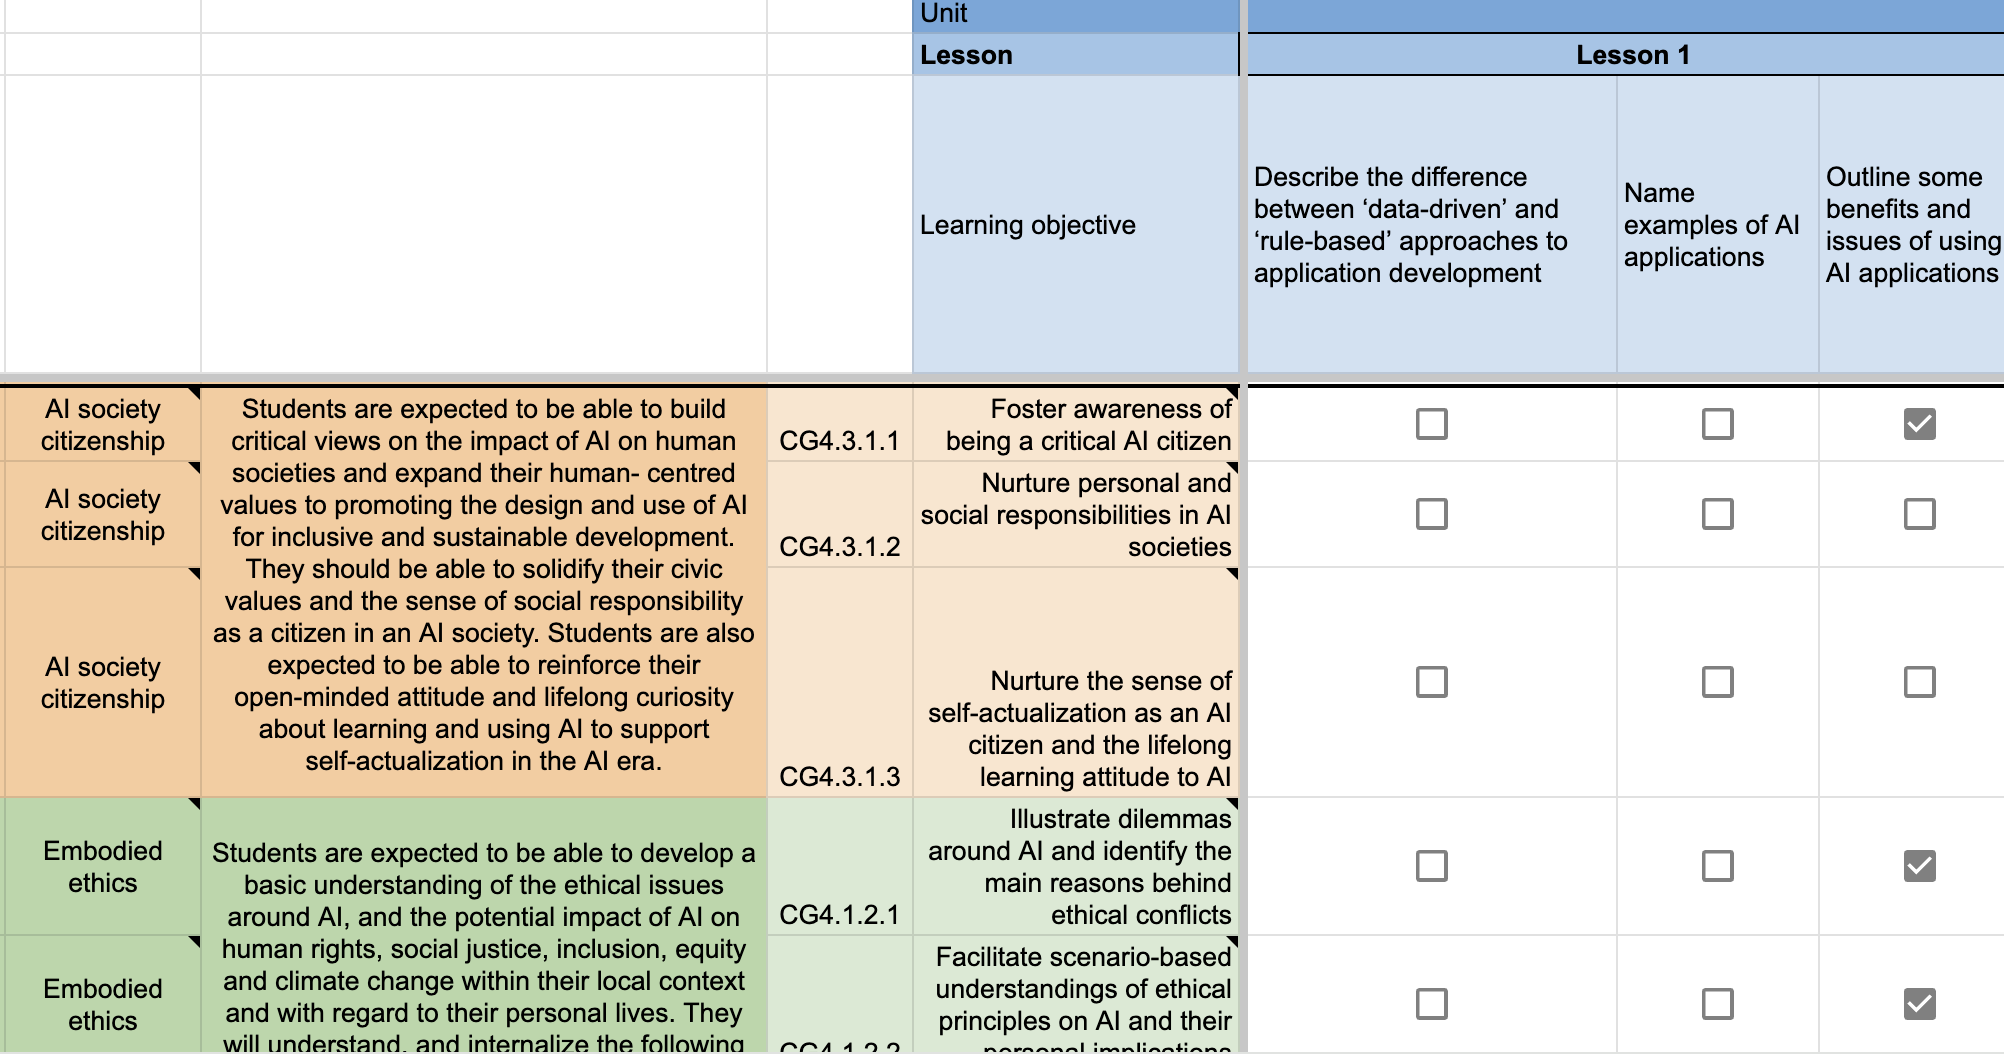
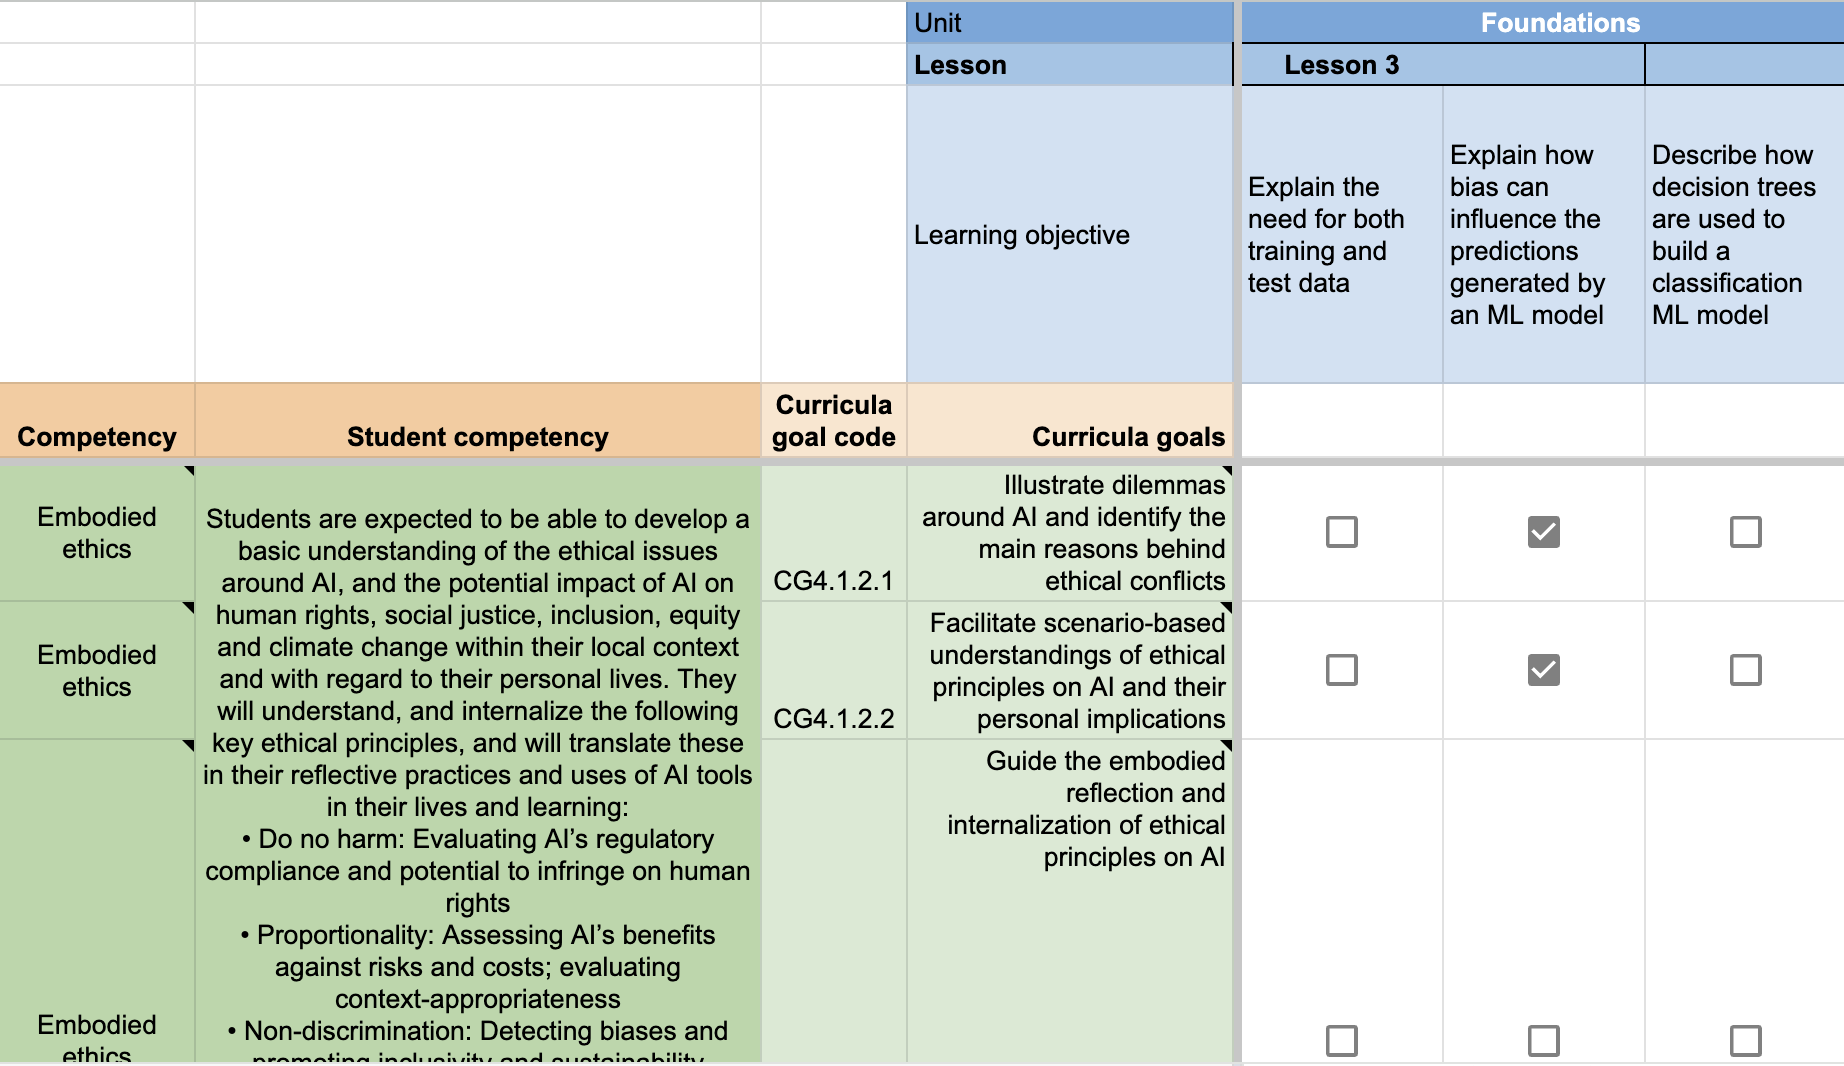
The first thing we discovered was that the mapping of the objectives did not have a 1:1 basis. For example, when we looked at a learning objective, we often felt that it covered more than one curricular goal from the framework. That’s not to say that the learning objective fully met each curricular goal, rather that it covers elements of the goal and in turn the student competency.
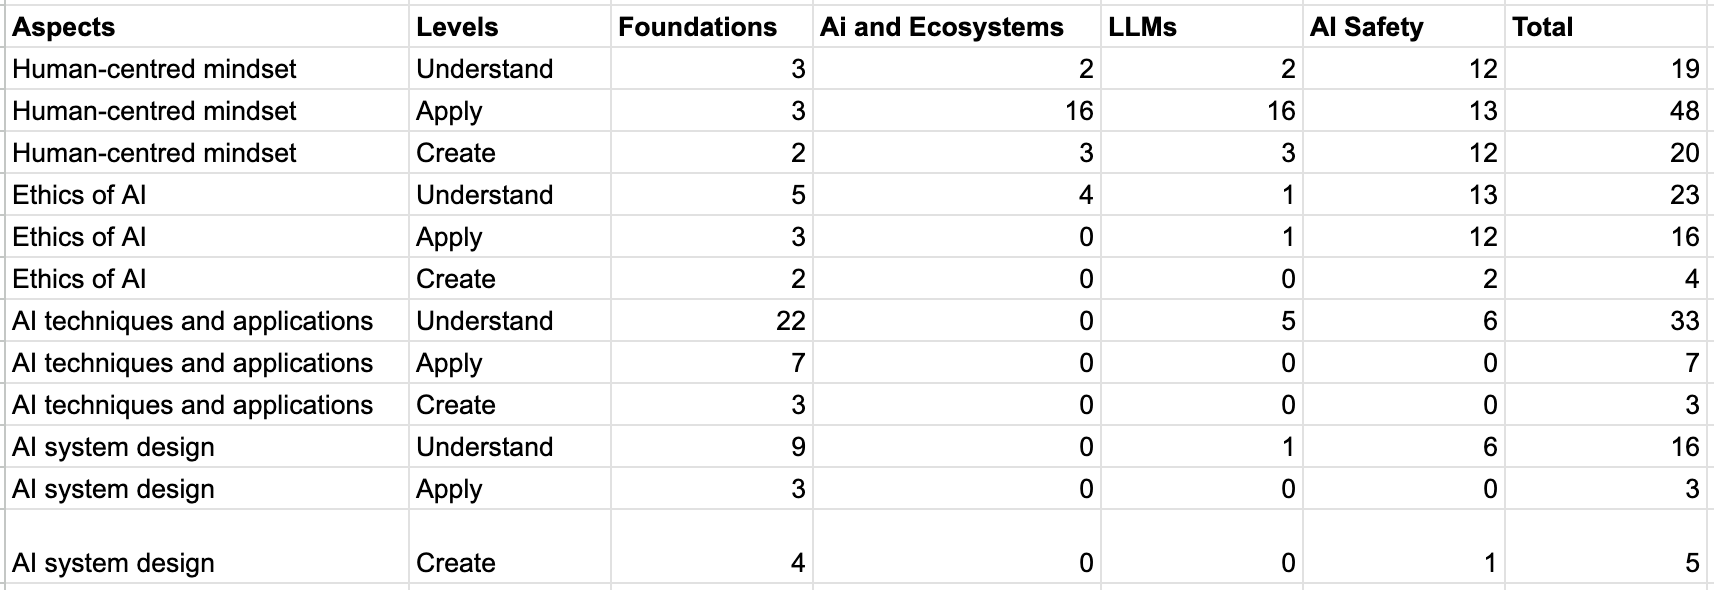
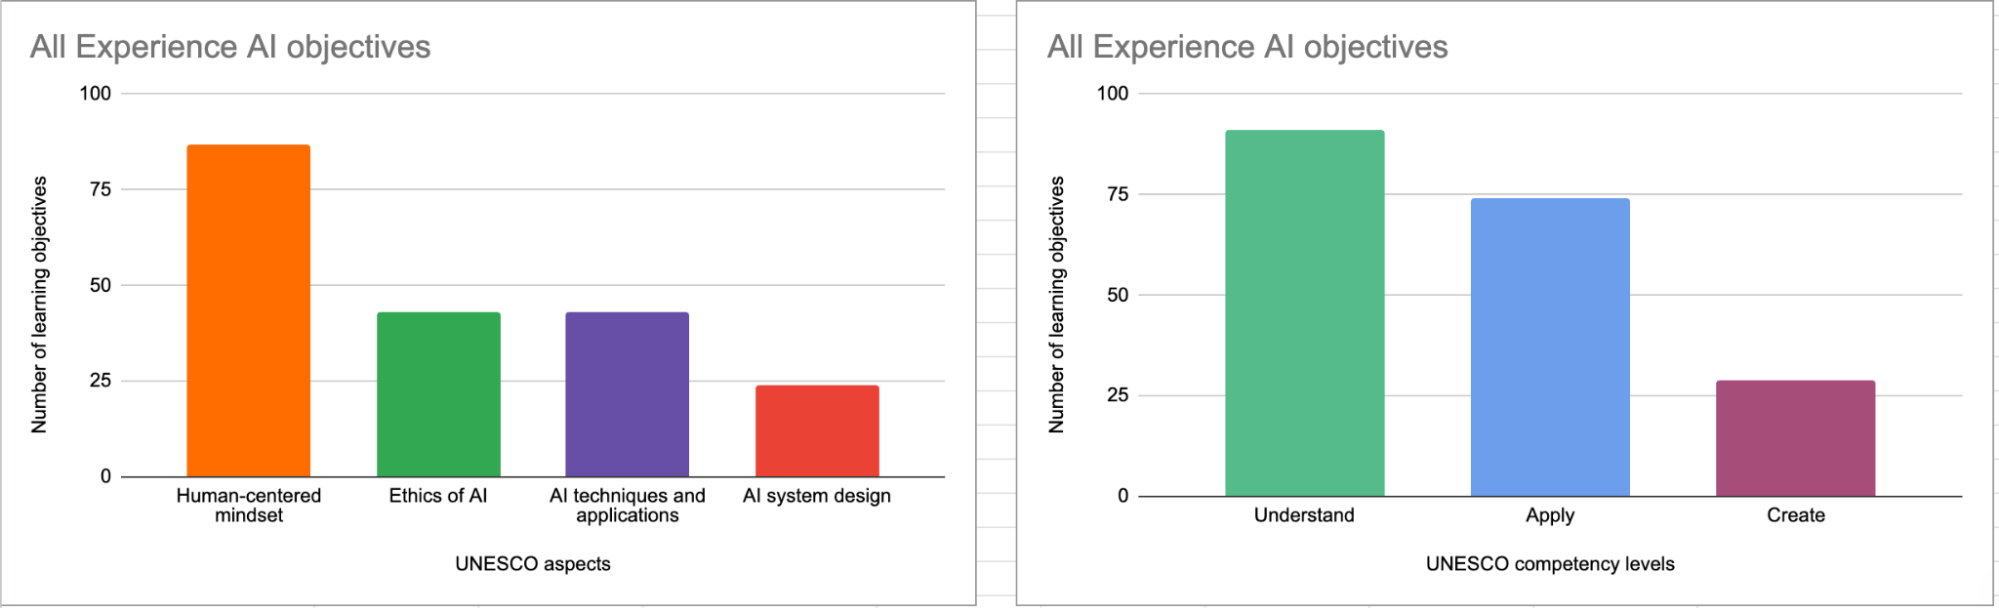
Once we had completed the mapping process, we analysed the results by totalling the number of objectives that had been mapped against each competency aspect and level within the framework.
This provided us with an overall picture of where our resources are positioned against the framework. Whilst the majority of the objectives for all of the resources are in the ‘Human-centred mindset’ category, the analysis showed that there is still a relatively even spread of objectives in the other three categories (Ethics of AI, ML techniques and applications, and AI system design).
As the current resource offering is targeted at the entry level to AI literacy, it is unsurprising to see that the majority of the objectives were at the level of ‘Understand’. It was, however, interesting to see how many objectives were also at the ‘Apply’ level.
It is encouraging to see that the different resources from Experience AI map to different competencies in the framework. For example, the 6-lesson foundations unit aims to give students a basic understanding of how AI systems work and the data-driven approach to problem solving. In contrast, the AI safety resources focus more on the principles of Fairness, Accountability, Transparency, Privacy, and Security (FATPS), most of which fall more heavily under the ethics of AI and human-centred mindset categories of the competency framework.
What did we learn from the process?
Our principles align
We built the Experience AI resources on design principles based on the knowledge curated by Jane Waite and the Foundation’s researchers. One of our aims of the mapping process was to see if the principles that underpin the UNESCO competency framework align with our own.
Avoiding anthropomorphism
Anthropomorphism refers to the concept of attributing human characteristics to objects or living beings that aren’t human. For reasons outlined in the blog I previously wrote on the issue, a key design principle for Experience AI is to avoid anthropomorphism at all costs. In our resources, we are particularly careful with the language and images that we use. Putting the human in the process is a key way in which we can remind students that it is humans who design and are responsible for AI systems.
It was reassuring to see that the UNESCO framework has many curricular goals that align closely to this, for example:
Foster an understanding that AI is human-led
Facilitate an understanding on the necessity of exercising sufficient human control over AI
Nurture critical thinking on the dynamic relationship between human agency and machine agency
SEAME
The SEAME framework created by Paul Curzon and Jane Waite offers a way for teachers, resource developers, and researchers to talk about the focus of AI learning activities by separating them into four layers: Social and Ethical (SE), Application (A), Models (M), and Engines (E).
The SEAME model and the UNESCO AI competency framework take two different approaches to categorising AI education — SEAME describes levels of abstraction for conceptual learning about AI systems, whereas the competency framework separates concepts into strands with progression. We found that although the alignment between the frameworks is not direct, the same core AI and machine learning concepts are broadly covered across both.
Computational thinking 2.0 (CT2.0)
The concept of computational thinking 2.0 (a data-driven approach) stems from research by Professor Matti Tedre and Dr Henriikka Vartiainen from the University of Eastern Finland. The essence of this approach establishes AI as a different way to solve problems using computers compared to a more traditional computational thinking approach (a rule-based approach). This does not replace the traditional computational approach, but instead requires students to approach the problem differently when using AI as a tool.
The UNESCO framework includes many references within their curricular goals that places the data-driven approach at the forefront of problem solving using AI, including:
Develop conceptual knowledge on how AI is trained based on data
Develop skills on assessing AI systems’ need for data, algorithms, and computing resources
Where we slightly differ in our approach is the regular use of the term ‘algorithm’, particularly in the Understand and Apply levels of the framework. We have chosen to differentiate AI systems from traditional computational thinking approaches by avoiding the term ‘algorithm’ at the foundational stage of AI education. We believe the learners need a firm mental model of data-driven systems before students can understand that the Model and Engines of the SEAME model refer to algorithms (which would possibly correspond to the Create stage of the UNESCO framework).
We can identify areas for exploration
As part of the international expansion of Experience AI, we have been working with partners from across the globe to bring AI literacy education to students in their settings. Part of this process has involved working with our partners to localise the resources, but also to provide training on the concepts covered in Experience AI. During localisation and training, our partners often have lots of queries about the lesson on bias.
As a result, we decided to see if mapping taught us anything about this lesson in particular, and if there was any learning we could take from it. At close inspection, we found that the lesson covers two out of the three curricular goals for the Understand element of the ‘Ethics of AI’ category (Embodied ethics).
Specifically, we felt the lesson:
Illustrates dilemmas around AI and identifies the main reasons behind ethical conflicts
Facilitates scenario-based understandings of ethical principles on AI and their personal implications
What we felt isn’t covered in the lesson is:
Guide the embodied reflection and internalisation of ethical principles on AI
Exploring this further, the framework describes this curricular goal as:
“Guide students to understand the implications of ethical principles on AI for their human rights, data privacy, safety, human agency, as well as for equity, inclusion, social justice and environmental sustainability. Guide students to develop embodied comprehension of ethical principles; and offer opportunities to reflect on personal attitudes that can help address ethical challenges (e.g. advocating for inclusive interfaces for AI tools, promoting inclusion in AI and reporting discriminatory biases found in AI tools).”
We realised that this doesn’t mean that the lesson on bias is ineffective or incomplete, but it does help us to think more deeply about the learning objective for the lesson. This may be something we will look to address in future iterations of the foundations unit or even in the development of new resources. What we have identified is a process that we can follow, which will help us with our decision making in the next phases of resource development.
How does this inform our next steps?
As part of the analysis of the resources, we created a simple heatmap of how the Experience AI objectives relate to the UNESCO progression levels. As with the barcharts, the heatmap indicated that the majority of the objectives sit within the Understand level of progression, with fewer in Apply, and fewest in Create. As previously mentioned, this is to be expected with the resources being “foundational”.
The heatmap has, however, helped us to identify some interesting points about our resources that warrant further thought. For example, under the ‘Human-centred mindset’ competency aspect, there are more objectives under Apply than there are Understand. For ‘AI system design’, architecture design is the least covered aspect of Apply.
By identifying these areas for investigation, again it shows that we’re able to add the learnings from the UNESCO framework to help us make decisions.
What next?
This mapping process has been a very useful exercise in many ways for those of us working on AI literacy at the Raspberry Pi Foundation. The process of mapping the resources gave us an opportunity to have deep conversations about the learning objectives and question our own understanding of our resources. It was also very satisfying to see that the framework aligns well with our own researched-informed design principles, such as the SEAME model and avoiding anthropomorphisation.
The mapping process has been a good starting point for us to understand UNESCO’s framework and we’re sure that it will act as a useful tool to help us make decisions around future enhancements to our foundational units and new free educational materials. We’re looking forward to applying what we’ve learnt to our future work!
As computing technologies continue to rapidly evolve in today’s digital world, computing education is becoming increasingly essential. Arto Hellas and Juho Leinonen, researchers at Aalto University in Finland, are exploring how innovative teaching methods can equip students with the computing skills they need to stay ahead. In particular, they are looking at how generative AI tools can enhance university-level computing education.
In our monthly seminar in September, Arto and Juho presented their research on using AI tools to provide personalised learning experiences and automated feedback to help requests, as well as their findings on teaching students how to write effective prompts for generative AI systems. While their research focuses primarily on undergraduate students — given that they teach such students — many of their findings have potential relevance for primary and secondary (K-12) computing education.
Generative AI consists of algorithms that can generate new content, such as text, code, and images, based on the input received. Ever since large language models (LLMs) such as ChatGPT and Copilot became widely available, there has been a great deal of attention on how to use this technology in computing education.
Arto and Juho described generative AI as one of the fastest-moving topics they had ever worked on, and explained that they were trying to see past the hype and find meaningful uses of LLMs in their computing courses. They presented three studies in which they used generative AI tools with students in ways that aimed to improve the learning experience.
Using generative AI tools to create personalised programming exercises
An important strand of computing education research investigates how to engage students by personalising programming problems based on their interests. The first study in Arto and Juho’s research took place within an online programming course for adult students. It involved developing a tool that used GPT-4 (the latest version of ChatGPT available at that time) to generate exercises with personalised aspects. Students could select a theme (e.g. sports, music, video games), a topic (e.g. a specific word or name), and a difficulty level for each exercise.
Arto, Juho, and their students evaluated the personalised exercises that were generated. Arto and Juho used a rubric to evaluate the quality of the exercises and found that they were clear and had the themes and topics that had been requested. Students’ feedback indicated that they found the personalised exercises engaging and useful, and preferred these over randomly generated exercises.
Arto and Juho also evaluated the personalisation and found that exercises were often only shallowly personalised, however. In shallow personalisations, the personalised content was added in only one sentence, whereas in deep personalisations, the personalised content was present throughout the whole problem statement. It should be noted that in the examples taken from the seminar below, the terms ‘shallow’ and ‘deep’ were not being used to make a judgement on the worthiness of the topic itself, but were rather describing whether the personalisation was somewhat tokenistic or more meaningful within the exercise.
In these examples from the study, the shallow personalisation contains only one sentence to contextualise the problem, while in the deep example the whole problem statement is personalised.
The findings suggest that this personalised approach may be particularly effective on large university courses, where instructors might struggle to give one-on-one attention to every student. The findings further suggest that generative AI tools can be used to personalise educational content and help ensure that students remain engaged.
How might all this translate to K-12 settings? Learners in primary and secondary schools often have a wide range of prior knowledge, lived experiences, and abilities. Personalised programming tasks could help diverse groups of learners engage with computing, and give educators a deeper understanding of the themes and topics that are interesting for learners.
Responding to help requests using large language models
Another key aspect of Alto and Juho’s work is exploring how LLMs can be used to generate responses to students’ requests for help. They conducted a study using an online platform containing programming exercises for students. Every time a student struggled with a particular exercise, they could submit a help request, which went into a queue for a teacher to review, comment on, and return to the student.
The study aimed to investigate whether an LLM could effectively respond to these help requests and reduce the teachers’ workloads. An important principle was that the LLM should guide the student towards the correct answer rather than provide it.
The study used GPT-3.5, which was the newest version at the time. The results found that the LLM was able to analyse and detect logical and syntactical errors in code, but concerningly, the responses from the LLM also addressed some non-existent problems! This is an example of hallucination, where the LLM outputs something false that does not reflect the real data that was inputted into it.
An example of how an LLM was able to detect a logical error in code, but also hallucinated and provided an unhelpful, false response about a non-existent syntactical error.
The finding that LLMs often generated both helpful and unhelpful problem-solving strategies suggests that this is not a technology to rely on in the classroom just yet. Arto and Juho intend to track the effectiveness of LLMs as newer versions are released, and explained that GPT-4 seems to detect errors more accurately, but there is no systematic analysis of this yet.
In primary and secondary computing classes, young learners often face similar challenges to those encountered by university students — for example, the struggle to write error-free code and debug programs. LLMs seemingly have a lot of potential to support young learners in overcoming such challenges, while also being valuable educational tools for teachers without strong computing backgrounds. Instant feedback is critical for young learners who are still developing their computational thinking skills — LLMs can provide such feedback, and could be especially useful for teachers who may lack the resources to give individualised attention to every learner. Again though, further research into LLM-based feedback systems is needed before they can be implemented en-masse in classroom settings in the future.
Teaching students how to prompt large language models
Finally, Arto and Juho presented a study where they introduced the idea of ‘Prompt Problems’: programming exercises where students learn how to write effective prompts for AI code generators using a tool called Promptly. In a Prompt Problem exercise, students are presented with a visual representation of a problem that illustrates how input values will be transformed to an output. Their task is to devise a prompt (input) that will guide an LLM to generate the code (output) required to solve the problem. Prompt-generated code is evaluated automatically by the Promptly tool, helping students to refine the prompt until it produces code that solves the problem.
Feedback from students suggested that using Prompt Problems was a good way for them to gain experience of using new programming concepts and develop their computational thinking skills. However, students were frustrated that bugs in the code had to be fixed by amending the prompt — it was not possible to edit the code directly.
How these findings relate to K-12 computing education is still to be explored, but they indicate that Prompt Problems with text-based programming languages could be valuable exercises for older pupils with a solid grasp of foundational programming concepts.
Balancing the use of AI tools with fostering a sense of community
At the end of the presentation, Arto and Juho summarised their work and hypothesised that as society develops more and more AI tools, computing classrooms may lose some of their community aspects. They posed a very important question for all attendees to consider: “How can we foster an active community of learners in the generative AI era?”
In our breakout groups and the subsequent whole-group discussion, we began to think about the role of community. Some points raised highlighted the importance of working together to accurately identify and define problems, and sharing ideas about which prompts would work best to accurately solve the problems.
As AI technology continues to evolve, its role in education will likely expand. There was general agreement in the question and answer session that keeping a sense of community at the heart of computing classrooms will be important.
Arto and Juho asked seminar attendees to think about encouraging a sense of community.
Further resources
The Raspberry Pi Computing Education Research Centre and Faculty of Education at the University of Cambridge have recently published a teacher guide on the use of generative AI tools in education. The guide provides practical guidance for educators who are considering using generative AI tools in their teaching.
Join our next seminar
In our current seminar series, we are exploring how to teach programming with and without AI technology. Join us at our next seminar on Tuesday, 12 November at 17:00–18:30 GMT to hear Nicholas Gardella (University of Virginia) discuss the effects of using tools like GitHub Copilot on the motivation, workload, emotion, and self-efficacy of novice programmers. To sign up and take part in the seminar, click the button below — we’ll then send you information about joining. We hope to see you there.
Worldwide, the use of generative AI systems and related technologies is transforming our lives. From marketing and social media to education and industry, these technologies are being used everywhere, even if it isn’t obvious. Yet, despite the growing availability and use of generative AI tools, governments are still working out how and when to regulate such technologies to ensure they don’t cause unforeseen negative consequences.
The researchers at the Raspberry Pi Foundation have been looking at research that will help inform curriculum design and resource development to teach about AI in school. As part of this work, a number of research themes have been established, which we would like to explore with educators at a face-to-face symposium.
These research themes include the SEAME model, a simple way to analyse learning experiences about AI technology, as well as anthropomorphisation and how this might influence the formation of mental models about AI products. These research themes have become the cornerstone of the Experience AI resources we’ve co-developed with Google DeepMind. We will be using these materials to exemplify how the research themes can be used in practice as we review the recently published UNESCO AI competencies.
Most importantly, we will also review how we can help teachers and learners move from a rule-based view of problem solving to a data-driven view, from computational thinking 1.0 to computational thinking 2.0.
A call for teacher input on the AI curriculum
Over ten years ago, teachers in England experienced a large-scale change in what they needed to teach in computing lessons when programming was more formally added to the curriculum. As we enter a similar period of change — this time to introduce teaching about AI technologies — we want to hear from teachers as we collectively start to rethink our subject and curricula.
We think it is imperative that educators’ voices are heard as we reimagine computer science and add data-driven technologies into an already densely packed learning context.
Join our Research and Educator Community Symposium
In this symposium, we will bring together UK educators and researchers to review research themes, competency frameworks, and early international AI curricula and to reflect on how to advance approaches to teaching about AI. This will be a practical day of collaboration to produce suggested key concepts and pedagogical approaches and highlight research needs.
This symposium focuses on teaching about AI technologies, so we will not be looking at which AI tools might be used in general teaching and learning or how they may change teacher productivity.
It is vitally important for young people to learn how to use AI technologies in their daily lives so they can become discerning consumers of AI applications. But how should we teach them? Please help us start to consider the best approach by signing up for our Research and Educator Community Symposium by 9 December 2024.
Information at a glance
When: Saturday, 1 February 2025 (10am to 5pm)
Where: Raspberry Pi Foundation Offices, Cambridge
Who: If you have started teaching about AI, are creating related resources, are providing professional development about AI technologies, or if you are planning to do so, please apply to attend our symposium. Travel funding is available for teachers in England.
Please note we expect to be oversubscribed, so book early and tell us about why you are interested in taking part. We will notify all applicants of the outcome of their application by 11 December.
We’re pleased to share a new collection of Code Club projects designed to introduce creators to the fascinating world of artificial intelligence (AI) and machine learning (ML). These projects bring the latest technology to your Code Club in fun and inspiring ways, making AI and ML engaging and accessible for young people. We’d like to thank Amazon Future Engineer for supporting the development of this collection.
The value of learning about AI and ML
By engaging with AI and ML at a young age, creators gain a clearer understanding of the capabilities and limitations of these technologies, helping them to challenge misconceptions. This early exposure also builds foundational skills that are increasingly important in various fields, preparing creators for future educational and career opportunities. Additionally, as AI and ML become more integrated into educational standards, having a strong base in these concepts will make it easier for creators to grasp more advanced topics later on.
What’s included in this collection
We’re excited to offer a range of AI and ML projects that feature both video tutorials and step-by-step written guides. The video tutorials are designed to guide creators through each activity at their own pace and are captioned to improve accessibility. The step-by-step written guides support creators who prefer learning through reading.
The projects are crafted to be flexible and engaging. The main part of each project can be completed in just a few minutes, leaving lots of time for customisation and exploration. This setup allows for short, enjoyable sessions that can easily be incorporated into Code Club activities.
The collection is organised into two distinct paths, each offering a unique approach to learning about AI and ML:
Machine learning with Scratch introduces foundational concepts of ML through creative and interactive projects. Creators will train models to recognise patterns and make predictions, and explore how these models can be improved with additional data.
The AI Toolkit introduces various AI applications and technologies through hands-on projects using different platforms and tools. Creators will work with voice recognition, facial recognition, and other AI technologies, gaining a broad understanding of how AI can be applied in different contexts.
Inclusivity is a key aspect of this collection. The projects cater to various skill levels and are offered alongside an unplugged activity, ensuring that everyone can participate, regardless of available resources. Creators will also have the opportunity to stretch themselves — they can explore advanced technologies like Adobe Firefly and practical tools for managing Ollama and Stable Diffusion models on Raspberry Pi computers.
Project examples
One of the highlights of our new collection is Chomp the cheese, which uses Scratch Lab’s experimental face recognition technology to create a game students can play with their mouth! This project offers a playful introduction to facial recognition while keeping the experience interactive and fun.
In Teach a machine, creators train a computer to recognise different objects such as fingers or food items. This project introduces classification in a straightforward way using the Teachable Machine platform, making the concept easy to grasp.
Apple vs tomato also uses Teachable Machine, but this time creators are challenged to train a model to differentiate between apples and tomatoes. Initially, the model exhibits bias due to limited data, prompting discussions on the importance of data diversity and ethical AI practices.
Dance detector allows creators to use accelerometer data from a micro:bit to train a model to recognise dance moves like Floss or Disco. This project combines physical computing with AI, helping creators explore movement recognition technology they may have experienced in familiar contexts such as video games.
Dinosaur decision tree is an unplugged activity where creators use a paper-based branching chart to classify different types of dinosaurs. This hands-on project introduces the concept of decision-making structures, where each branch of the chart represents a choice or question leading to a different outcome. By constructing their own decision tree, creators gain a tactile understanding of how these models are used in ML to analyse data and make predictions.
These AI projects are designed to support young people to get hands-on with AI technologies in Code Clubs and other non-formal learning environments. Creators can also enter one of their projects into Coolest Projects by taking a short video showing their project and any code used to make it. Their creation will then be showcased in the online gallery for people all over the world to see.
Um dir ein optimales Erlebnis zu bieten, verwenden wir Technologien wie Cookies, um Geräteinformationen zu speichern und/oder darauf zuzugreifen. Wenn du diesen Technologien zustimmst, können wir Daten wie das Surfverhalten oder eindeutige IDs auf dieser Website verarbeiten. Wenn du deine Einwillligung nicht erteilst oder zurückziehst, können bestimmte Merkmale und Funktionen beeinträchtigt werden.
Funktional
Immer aktiv
Die technische Speicherung oder der Zugang ist unbedingt erforderlich für den rechtmäßigen Zweck, die Nutzung eines bestimmten Dienstes zu ermöglichen, der vom Teilnehmer oder Nutzer ausdrücklich gewünscht wird, oder für den alleinigen Zweck, die Übertragung einer Nachricht über ein elektronisches Kommunikationsnetz durchzuführen.
Vorlieben
Die technische Speicherung oder der Zugriff ist für den rechtmäßigen Zweck der Speicherung von Präferenzen erforderlich, die nicht vom Abonnenten oder Benutzer angefordert wurden.
Statistiken
Die technische Speicherung oder der Zugriff, der ausschließlich zu statistischen Zwecken erfolgt.Die technische Speicherung oder der Zugriff, der ausschließlich zu anonymen statistischen Zwecken verwendet wird. Ohne eine Vorladung, die freiwillige Zustimmung deines Internetdienstanbieters oder zusätzliche Aufzeichnungen von Dritten können die zu diesem Zweck gespeicherten oder abgerufenen Informationen allein in der Regel nicht dazu verwendet werden, dich zu identifizieren.
Marketing
Die technische Speicherung oder der Zugriff ist erforderlich, um Nutzerprofile zu erstellen, um Werbung zu versenden oder um den Nutzer auf einer Website oder über mehrere Websites hinweg zu ähnlichen Marketingzwecken zu verfolgen.