Schlagwort: voice recognition
-

Discover #Virgil: history comes to life with Arduino
Reading Time: 2 minutesWe’re excited to introduce #Virgil, an innovative project that combines the power of Arduino technology with a passion for history, creating a groundbreaking interactive experience for museums. Using Arduino’s versatile and scalable ecosystem, #Virgil operates completely offline, allowing visitors to interact with 3D avatars in a seamless and immersive way. The project…
-

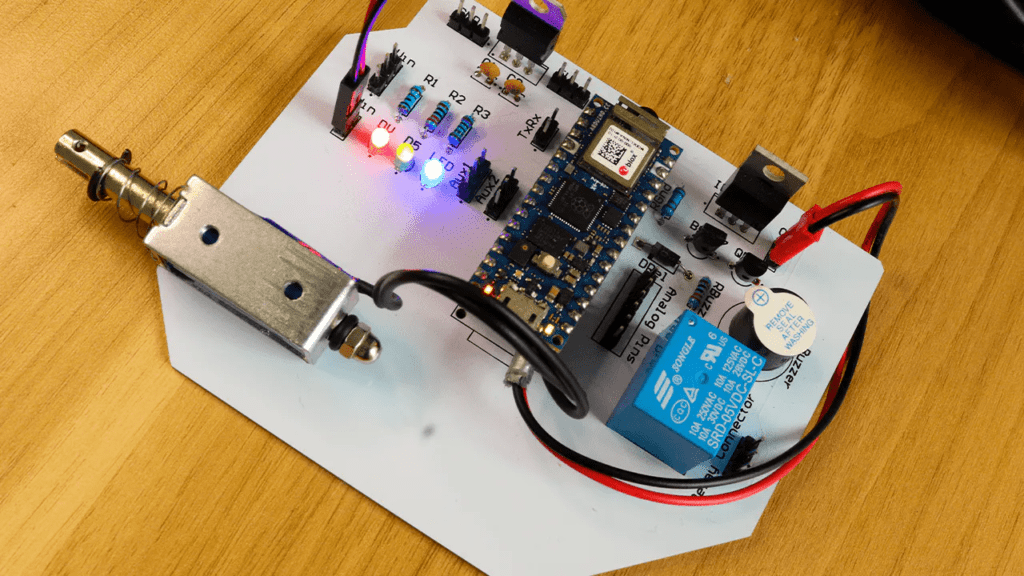
Controlling a power strip with a keyword spotting model and the Nicla Voice
Reading Time: 2 minutesAs Jallson Suryo discusses in his project, adding voice controls to our appliances typically involves an internet connection and a smart assistant device such as Amazon Alexa or Google Assistant. This means extra latency, security concerns, and increased expenses due to the additional hardware and bandwidth requirements. This is why he created a…
-

Fortune Cat uses embedded speech recognition to predict your future
Reading Time: 2 minutesFor well over one hundred years, people have been constructing machines that dispense fortunes to those who ask at the insertion of a coin and the push of a button. In modern days, this has taken the form of mobile apps that can be far more expansive, albeit with a lack of…
-

This smartlock uses voice recognition to control access
Reading Time: 2 minutesA Smartlock are a highly convenient way to secure a house, and they can have their number of connectivity options expanded even further by connecting them to an IoT home assistant service such as Google Assistant or Amazon Alexa. Arduino Team — July 16th, 2022 Jithin Sanal’s project uses Amazon’s Alexa skill to…
-

Build your own adorable, talking WALL-E robot
Reading Time: 2 minutesArduino Team — July 3rd, 2021 Film history is full of cute robots, but for our money, none are more charming than WALL-E. His vocabulary may be limited, but that doesn’t stop him from showing the full range of emotions through body language. Like Baby Yoda, WALL-E was an instant fan-favorite and…
-

Raspberry Pi ‘Swear Bear’ keeps your potty mouth in check
Reading Time: 2 minutesWhy use a regular swear jar to retrain your potty-mouthed brain when you can build a Swear Bear to help you instead? Swear Bear listens to you. All the time. And Swear Bear can tell when a swear word is used. Swear Bear tells you off and saves all the swear words…
-

Watch Game of Thrones with a Raspberry Pi-powered Drogon
Reading Time: 2 minutesChannel your inner Targaryen by building this voice-activated, colour-changing, 3D-printed Drogon before watching the next episode of Game of Thrones. Winter has come This is a spoiler-free zone! I’ve already seen the new episode of season 8, but I won’t ruin anything, I promise. Even if you’ve never watched an episode of…