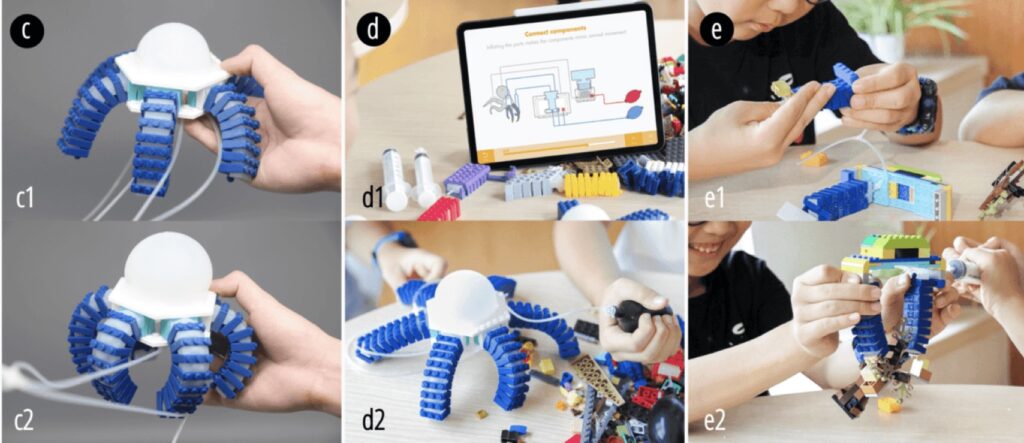
Biomimicry, which is a method for developing new technology inspired by nature, has been one of humanity’s greatest assets. But systems reliant on soft tissue, such as an octopus’s tentacles, have been notoriously difficult to reproduce in the robotics world. To give STEAM students an advantage in the soft robotics arena, a team of Chinese researchers developed a pneumatic biomimicry platform called KiPneu.
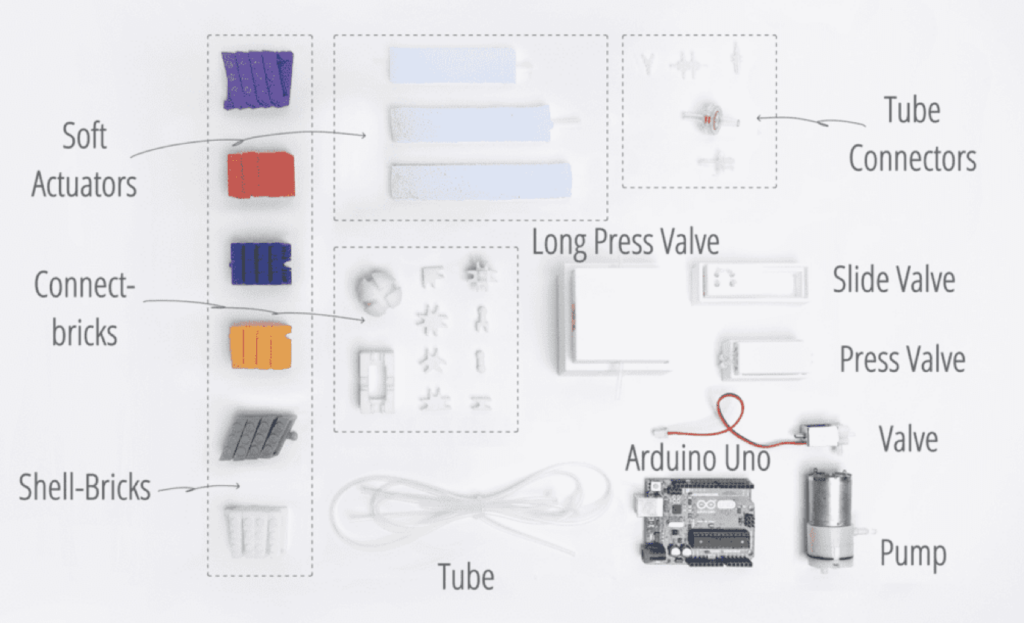
Pneumatics are ideal for biomimetic soft robots because they’re subject to fewer of the constraints typical of electric motors and rigid mechanical linkages. KiPneu is a hardware and software ecosystem designed to speed up the assembly of pneumatically actuated soft robots. It consists of inflatable pneumatic actuators and custom bricks compatible with LEGO bricks. Users can use those bricks and actuators to construct the physical forms of their robots.
After construction, students can make their robot move by pumping in air and controlling the flow of that air using valves. The initial prototype relied on an Arduino UNO Rev3 board to control power going to the pump, as well as the positions of the valves. The Arduino could, of course, perform those functions in sequence or in response to input commands, giving the robots the ability to move in complex ways.
But the team also created an electronics-free version, which relies on a hand pump and “tangible valves.” Together, those allow for similar functionality, but the user must pump air and change valve positions manually.
Both KiPneu systems have potential, with the manual system better suited to younger students and the more versatile Arduino-controlled system for the older students.
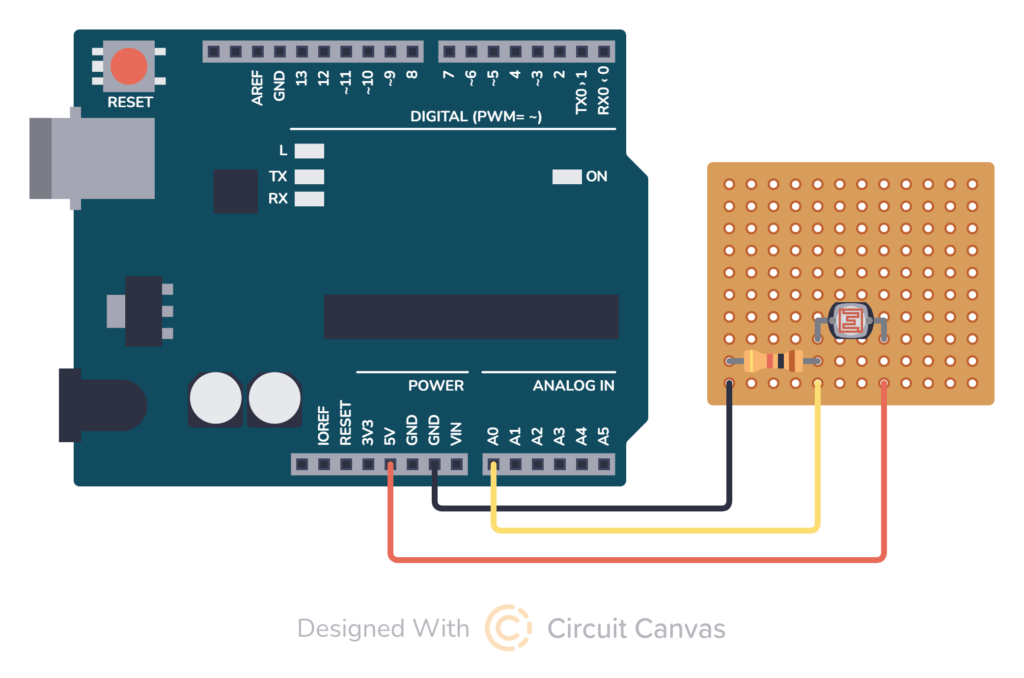
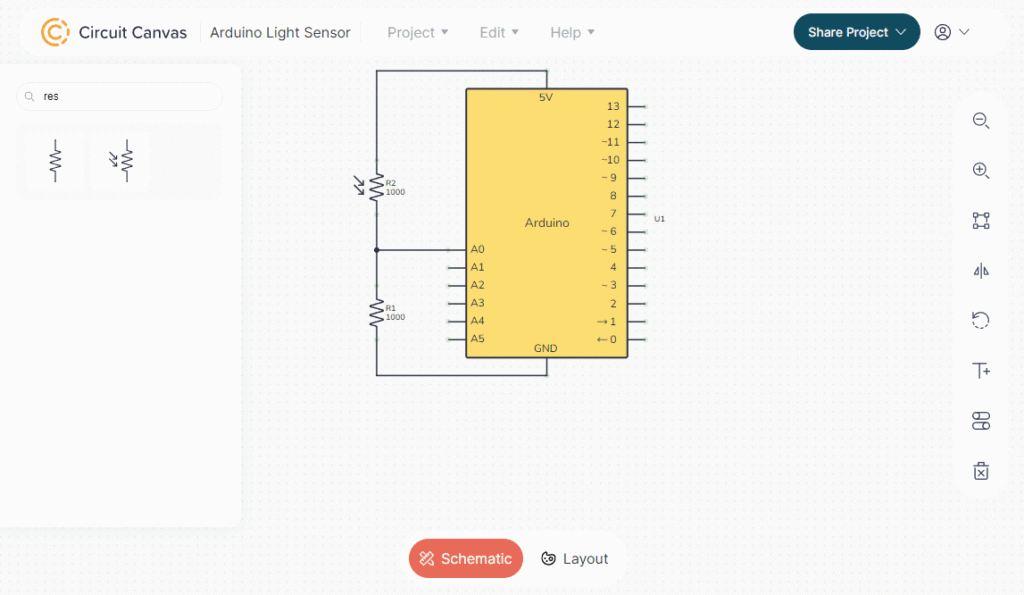
Good documentation is extremely useful when conceiving, building, or sharing electronic circuit designs, but traditional schematics and technical drawings are difficult for non-professionals to interpret and create. Makers can benefit from intuitive illustrations that look good enough to share. Circuit Canvas, developed by Oyvind Nydal Dahl, makes it easy to quickly create beautiful and useful illustrated diagrams.
Circuit Canvas is quite similar to Fritzing, but developed with the goals of being easy to use and fast. A user can create a schematic or an illustrated diagram for a basic circuit in less than a minute — if the components already exist in the library. But as with Fritzing, users may end up in a situation where they need to add custom parts. Circuit Canvas promises to make that process as painless as possible and even supports Fritzing parts, so it can take advantage of that ecosystem’s huge library.
At this time, Circuit Canvas already has a substantial library of parts. That includes Arduino UNO and Arduino Nano development boards, as well as other boards that are compatible with the Arduino IDE, such as the Seeed Studio XIAO ESP32C3 and the Raspberry Pi Pico. And, of course, there are many discrete components, ICs, and modules in the library to work with.
Users can either build schematics using standard symbols, or more friendly illustrated diagrams. In the future, the two document types will link together. Creating a diagram is as simple as placing components and drawing wires between them. After making the connections, users can move components around and the wires will automatically follow.
If you’ve been looking for a way to improve the documentation for your Arduino projects, then Circuit Canvas is worth checking out. It is free to try and you can run it right in your browser now.
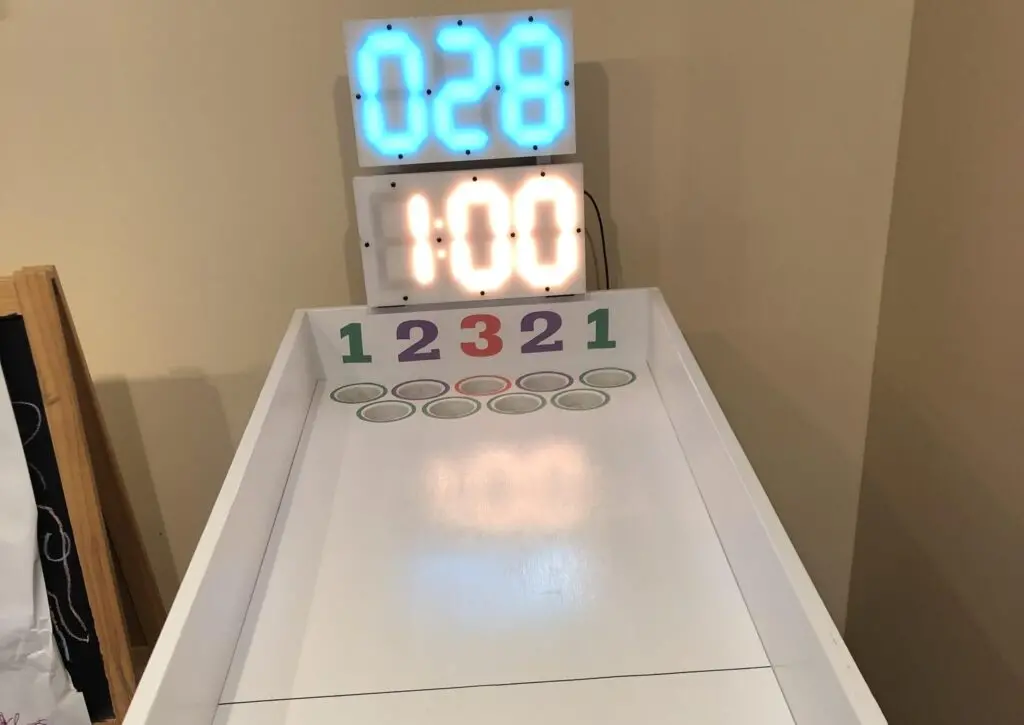
Ask your friends about their favorite games at the arcade and the most common answer will likely be Skee-Ball. But while many other popular arcade games have viable at-home alternatives, Skee-Ball doesn’t — at least not unless you’re willing to spend a serious amount of money. Luckily, you can get your Skee-Ball fix with a similar carnival-style rolling ball game by Gary Nelis.
This isn’t exactly the same as Skee-Ball; it seems to be a unique creation inspired by several different ball-rolling games that you might come across at carnivals and arcades. The player rolls balls across the table and into an array of holes. If the ball falls through a hole, the player gets the number of points associated with that specific hole. To make this even more fun, Nelis added electronic scorekeeping and fun sound effects.
The hardest part of this project is constructing the table, which will require some woodworking experience. Next, you’ll need to add the electronics, including the Arduino UNO Rev3 board that detects balls and keeps score. It detects balls falling through the holes using infrared break beam sensors. Nelis grouped those by point value, wiring the sensors in parallel so that they only use a total of three Arduino pins.
The Arduino shows the score and remaining time on a pair of three-digit, seven-segment displays made using strips of WS2812B individually addressable RGB LEDs. Those can be set to any color and they even support animated effects. Finally, the Arduino plays sound effects through an Adafruit Audio FX Sound Board module.
If you’re lucky enough to visit the Netherlands and you order a hot drink, you’ll likely be given a sweet treat as well. That is a stroopwafel, a crispy little waffle-syrup sandwich that the Dutch like to rest on top of their drink so that the rising heat will soften the pastry. But Eamon Magd is just a visitor to the country and didn’t know how long to leave it, so he built this stroopwafel doneness detection device.
Magd inferred that there are three factors that, together, might help him determine when a stroopwafel becomes ready for consumption: heat, time, and movement. That last one might seem strange, but stroopwafels tend to curl up after they reach a certain point — probably a result of the sandwich style construction and a differential in temperature/moisture. So, by looking for movement, Magd thought he could detect the beginning of that process.
A computer vision application, running on Magd’s laptop, detects that movement by looking for blurry pixels. Assuming the image is otherwise sharp, blurry pixels indicate movement. Magd also used an Arduino UNO Rev3 board to detect the temperature on the surface of the stroopwafel with a simple temperature sensor. The Arduino displays the current time since start on a small LCD and sounds an alarm through a buzzer when it determines that the stroopwafel has softened to Magd’s liking.
The system attempts to guess the right moment using a linear regression model trained on input data Magd collected. He tried to account for beverage types, as some might soften the stroopwaffel faster than others, but the model is really just working on averages anyway. It doesn’t, for instance, differentiate between stroopwafel makers. Regardless, this is an amusing project.
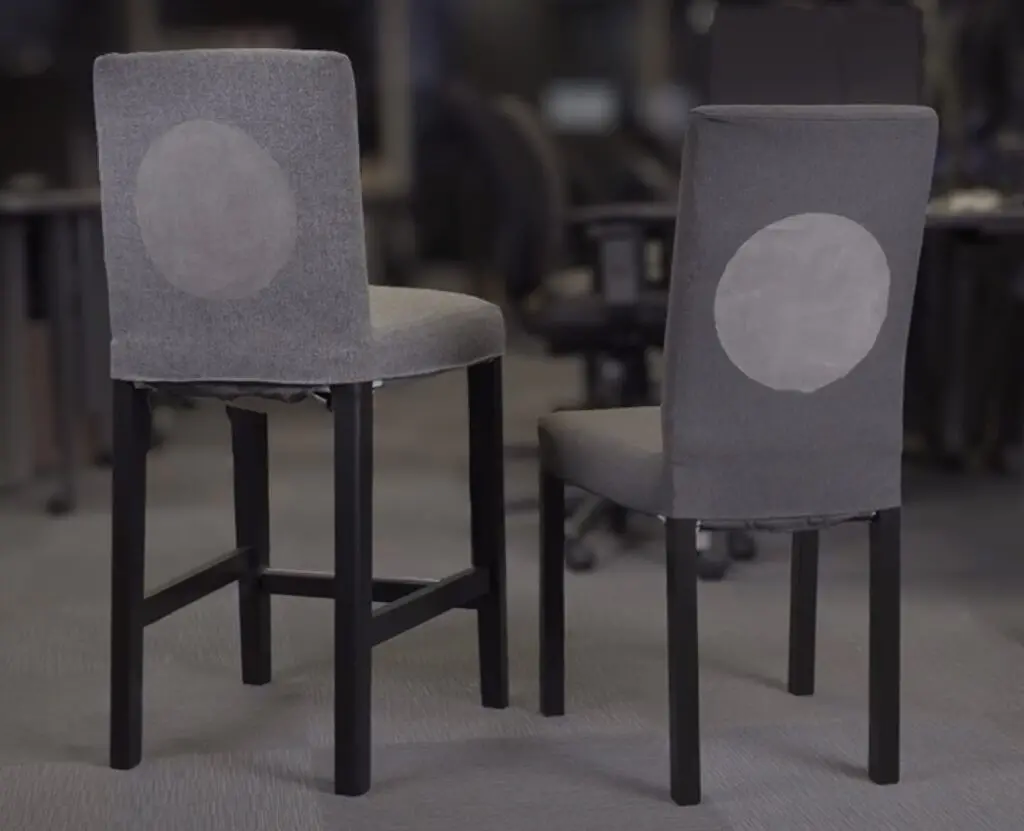
The pandemic made a lot of things obvious, not the least of which is that humans need social interaction to maintain good mental health. Sadly, many of us spend our lives physically separated from our loved ones by great distances or inopportune circumstances. That’s why a team of researchers decided to explore remote co-presence design within the category of smart home technology.
The goal of this design research, conducted by an interdisciplinary team from McMaster University and Simon Fraser University, was to experiment with technology that fosters human connection over long distances. But in contrast to typical communication, like email and video chats, this creates a sense of shared physical proximity.
The team developed two devices to demonstrate the concept. The first is a paired chair system called There Chair, with one chair visually indicating when someone occupies the other. If one chair is in a loved one’s home and the other in your own, then you would see when they sit down — and vice-versa. The visual indicator is a “display” made up of a spiral wire covered in special fabric that changes color when current flow causes that wire to heat up. There are also heating pads in the seat to mimic the warmth of a person’s body. Those operate under the control of an Arduino UNO Rev3 board.
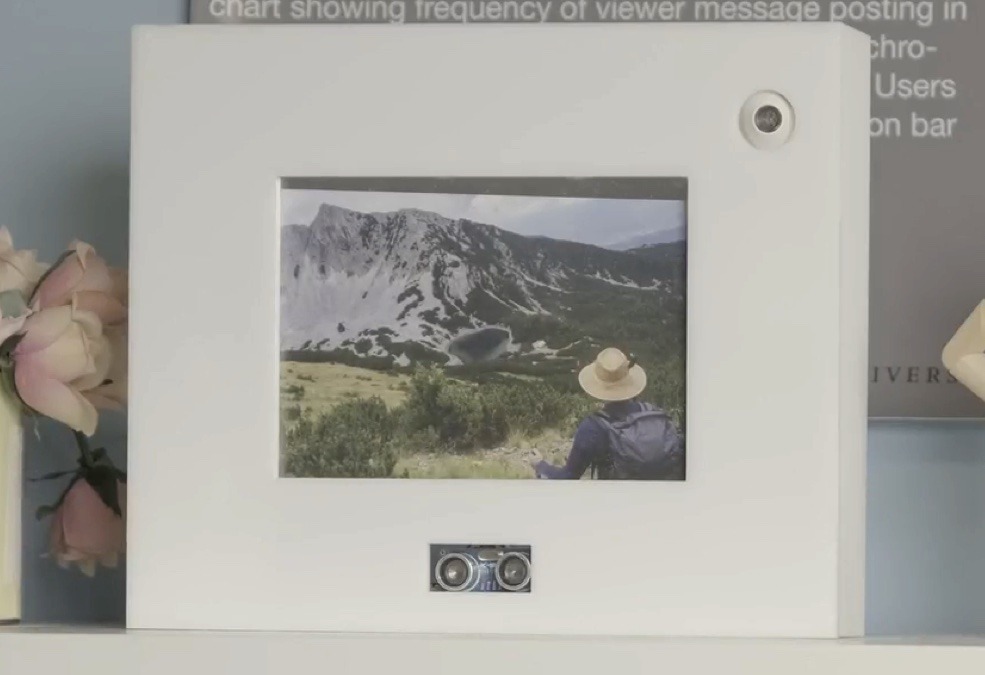
The other device, called The Fragrance Frame, is also intended to pair with a remote equivalent. It, too, contains an UNO Rev3. The device looks like a picture frame, but with an ultrasonic sensor and a fragrance sprayer. When one unit detects someone nearby, it tells the paired unit to spray its scent. Ideally, a specific scent will trigger a memory associated with that individual.
Both of these are an attempt at using technology to create a feeling of closeness. These specific devices may not make it onto the consumer market, but the idea behind them will inevitably catch on.
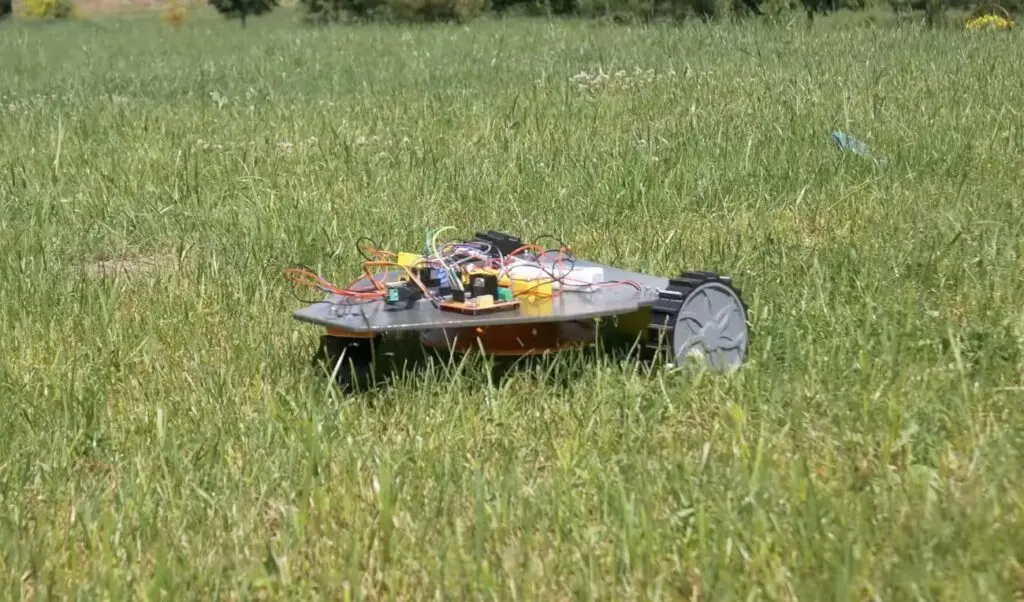
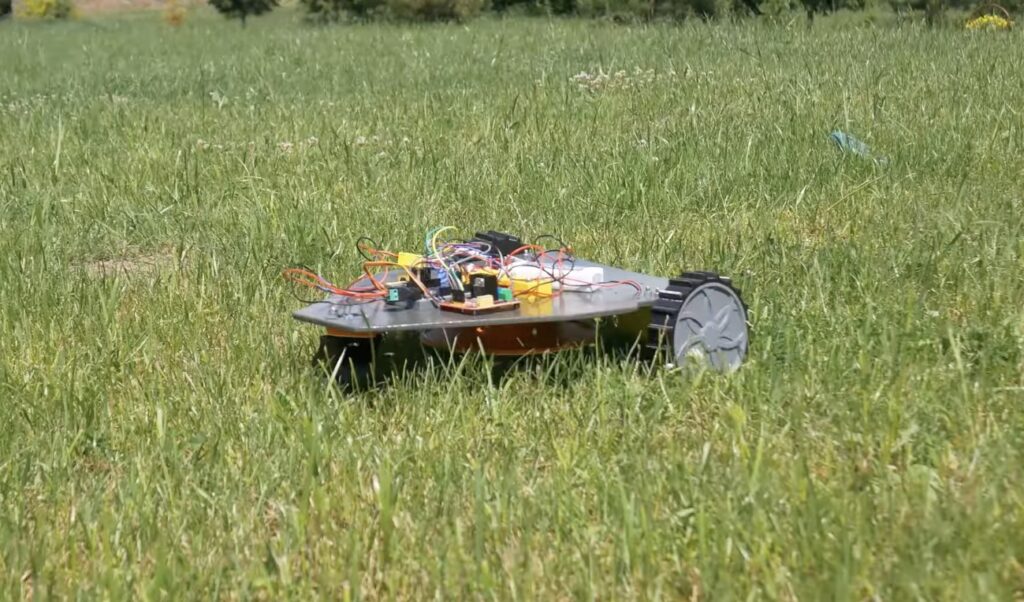
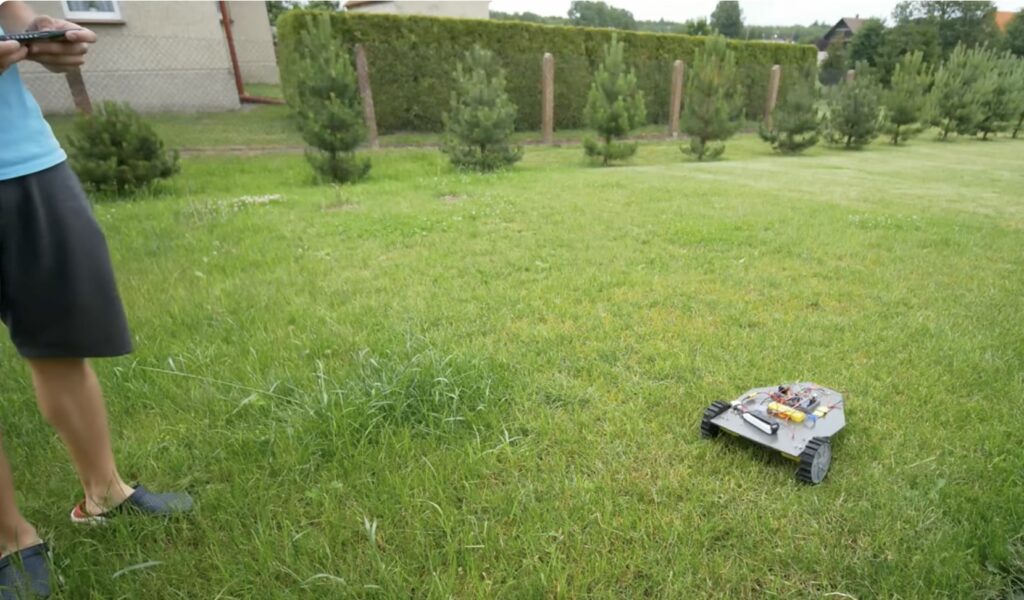
We’re finally starting to see robotic lawn mowers gain a little bit of traction as prices come down and consumer trust goes up. They work a bit like Roomba vacuums and pathfinding sophistication varies from one model to the next. But even the most basic models are still a lot more expensive than their secondhand gasoline powered cousins. So, Nikodem Bartnik decided to cut costs by making his DIY lawn mower robot very small.
To keep this prototype simple and affordable, Bartnik decided not to bother with any kind of mapping, pathfinding, object avoidance, or perimeter detection capabilities. It has no autonomous navigation features and instead the user must control the robot themselves. But sitting on a chair in the shade is still a lot better than pushing around a heavy lawn mower. Though the robot is only about the size of a dinner plate, so mowing an entire lawn will take a while.
Bartnik constructed the robot out of a sheet of plywood and 3D-printed parts. It has two driven wheels and each is turned by a small geared DC motor. The third wheel on the front is a caster that spins freely. An Arduino UNO Rev3 board controls both of those, as well as the brushless DC motor that spins the blades. Those blades swivel where they attach to the central hub, so centrifugal force causes them to swing outwards. Finally, the Arduino can communicate with the user’s smartphone through an HC-05 module for remote operation.
This won’t rival your dad’s zero-turn mower when it comes to power, but that wasn’t Bartnik’s intention. Instead, he sees it as a machine for giving the lawn a light trim every day or two before it can get too long. It’s slow, but that won’t be an issue if Bartnik implements autonomous navigation in the future.
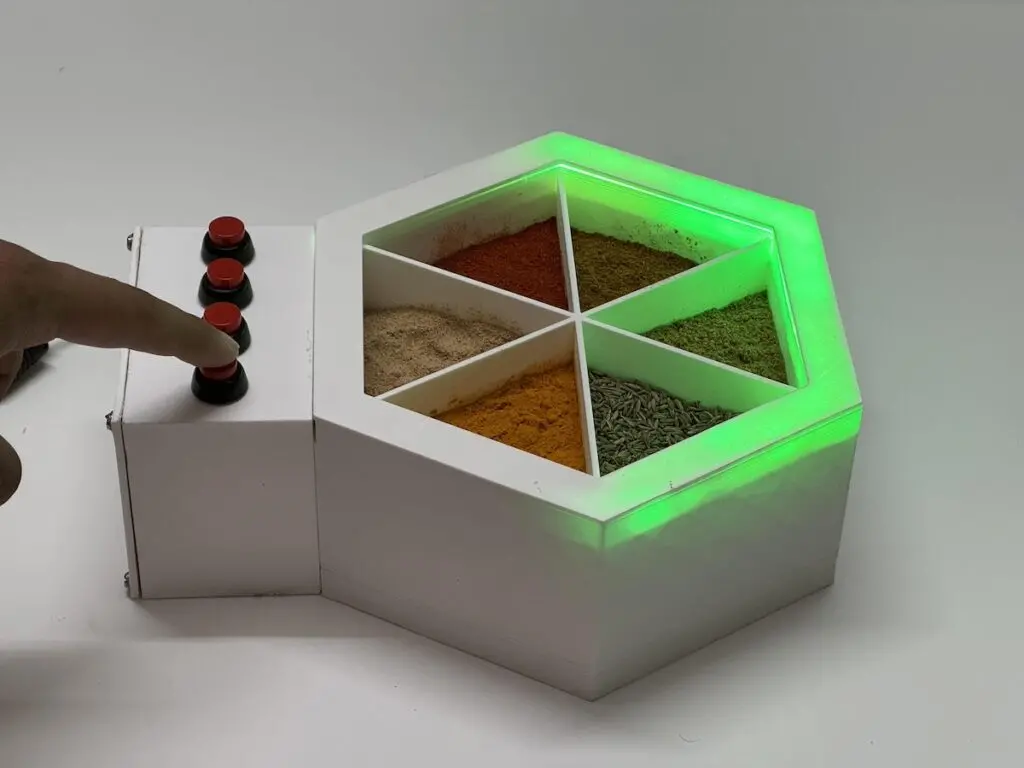
Many people shy away from cooking because they’re overwhelmed by all of the different steps and ingredients. Recipes are useful, but they aren’t very intuitive to those who are more comfortable with visual thinking. To help these people enjoy the cooking experience, Purdue University students Riddhi Gupta and Aarav Garg created a smart spice box.
This is a hexagonal spice storage box divided up into six individual compartments. Four buttons on the front of the spice box let the cook select a pre-programmed recipe. The edges of the corresponding compartments will then light up in green, indicating that they’re necessary for the recipe. For example, a tikka masala chicken marinade recipe might illuminate turmeric, cumin, chili powder, and garam masala.
An Arduino UNO Rev3 board makes this possible. It monitors the buttons to determine which recipe was chosen, then triggers the appropriate RGB LED strips to guide the user as they prepare the meal.
These components fit inside a 3D-printed hexagonal enclosure that Gupta and Garg designed in Autodesk Fusion 360. In theory, the Arduino sketch can support up to 999 different recipes. The user must enter each recipe’s spice combination within that sketch. After that, they just tap the buttons to enter the recipe’s identification number and the proper spice containers will light up.
The Honda Insight was the first hybrid car released in North America and Honda put serious effort into making it as efficient as was practical at the time. That meant aerodynamic streamlining, which is why the first-generation Insight had very distinct covers over the rear wheels. It even had special tires with very low rolling resistance. Those factors made the Honda Insight the perfect platform for Robot Cantina’s Kubota diesel engine swap with a homemade Arduino ECU.
Engine swaps are common in the car enthusiast community, but this is an unusual one. Instead of trying to make the Honda Insight more powerful, Robot Cantina went in the opposite direction. Their project replaces the original engine with a 700cc Kubota diesel engine. That’s the kind of power plant you would typically find in industrial machines and vehicles. For reference, that engine has less displacement than any motorcycle currently offered by Harley-Davidson.
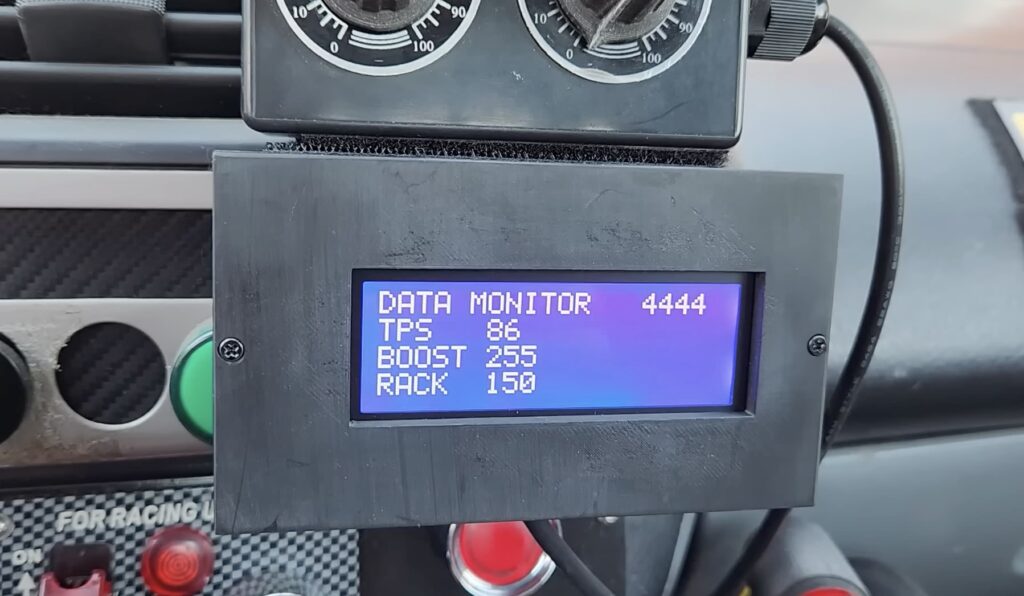
To help this Kubota diesel engine run efficiently and cleanly in the Honda Insight, Robot Cantina needed to construct a custom engine control unit (ECU). They used an Arduino UNO Rev3 for the job. It physically adjusts the boost valve and fuel rack limiter using stepper motors through stepper driver modules. It also monitors the throttle position sensor (TPS) to determine how much the driver is pushing the accelerator. For testing and refinement, an LCD screen shows the current positions and potentiometer knobs let the driver manually set the values.
But while the driver can set boost and rack manually, the goal is to develop a formula to automatically adjust those two values in response to the TPS value. Like a production vehicle’s ECU, this will let the engine run at maximum efficiency without direct driver involvement. It will also reduce visible smog, which is an important factor for a diesel Honda Insight that the driver doesn’t want to drawing attention.
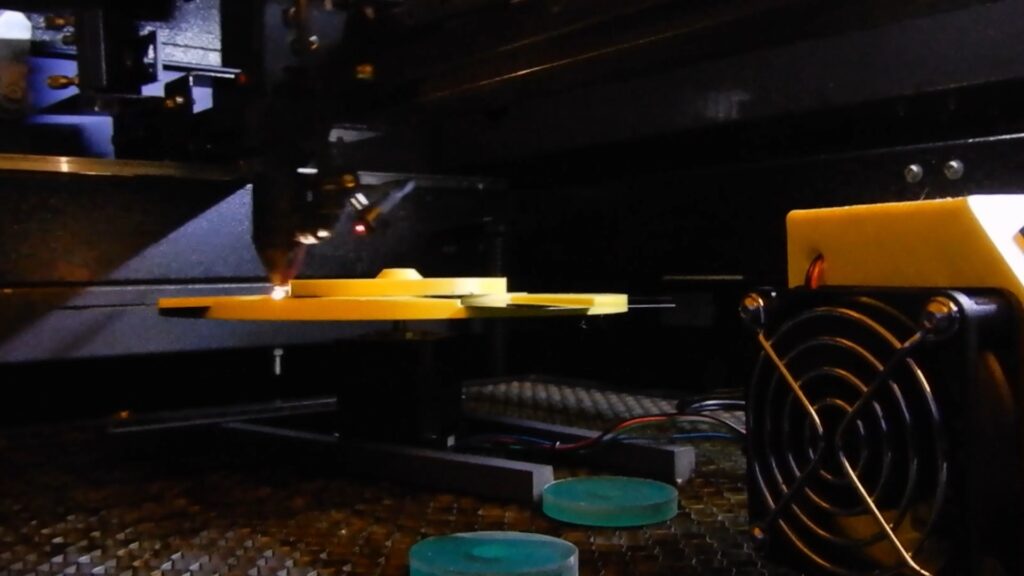
Engraving items with a laser-based system at home is amazingly convenient for one-off parts, but what happens when the production volume needs to increase? For element14 Presents host Clem Mayer, this usually meant preparing many uniform pieces of engraving stock, opening the laser’s enclosure, placing down the material, and then finally running the machine. In doing so, the process could introduce errors and was simply inefficient, leading Mayer to think of a way to automate things instead.
The limiting factor was mostly about how long it took to change the material, so Mayer got to work designing a carousel-like device that could house up to four sheets of stock and rotate each one into place after the previous one had finished. A stepper motor driven by a Trinamic TMC2100 was responsible for moving the drum while an Arduino UNO Rev3 received inputs from external switches and then sent pulses to the motor driver accordingly.
Once placed into the laser cutter’s enclosure, Mayer quickly discovered that his vertical drum design was too tall and interfered with the toolhead. This necessitated swapping the orientation to a flat disc where material could be positioned around a spinning turn table. The original spring-loaded clamps were also exchanged for a magnetic system that is strong yet easily removable.
To see more about this project, you can watch Mayer’s build log video below!
Weather stations are popular projects in the maker community because they’re useful and usually quite affordable to construct. But most that we see are really weather information displays that gather data through the internet from stations in the region. That data is fairly accurate, but there can be minor differences due to microclimate zones. So, Wilson Malone decided to build his own system with a dedicated outdoor sensor station.
Malone’s system consists of two units: the indoor display and the outdoor sensor station. The latter receives its power from a solar panel and battery backup, so Malone can place it anywhere that gets good sunlight within wireless range of his home. It has a sensor to detect wind speed, another sensor to detect wind direction, and a PHT (pressure, humidity, temperature) combination sensor. An Arduino UNO Rev3 board reads those sensors and then transmits the data using a 915MHz radio transceiver.
Inside the home, the indoor display unit receives that data with a radio transceiver of its own. An Arduino UNO R4 WiFi parses that and then shows each value on a four-digit seven-segment display. The Arduino will also publish the values to a self-hosted webpage every eight seconds. Any users on the same local network can visit that page to view the current information.
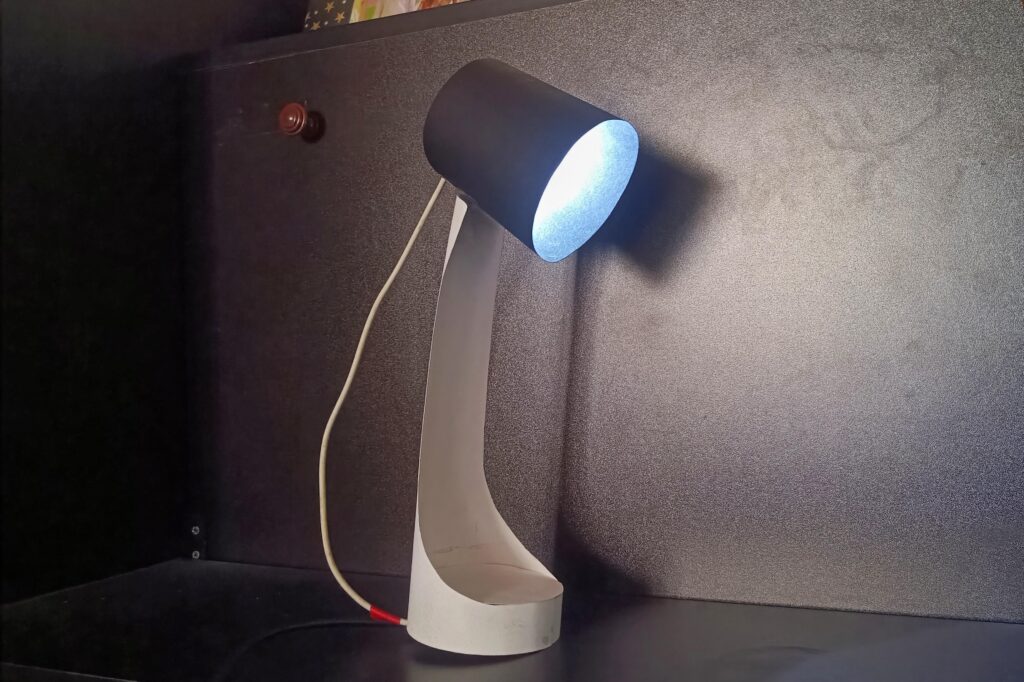
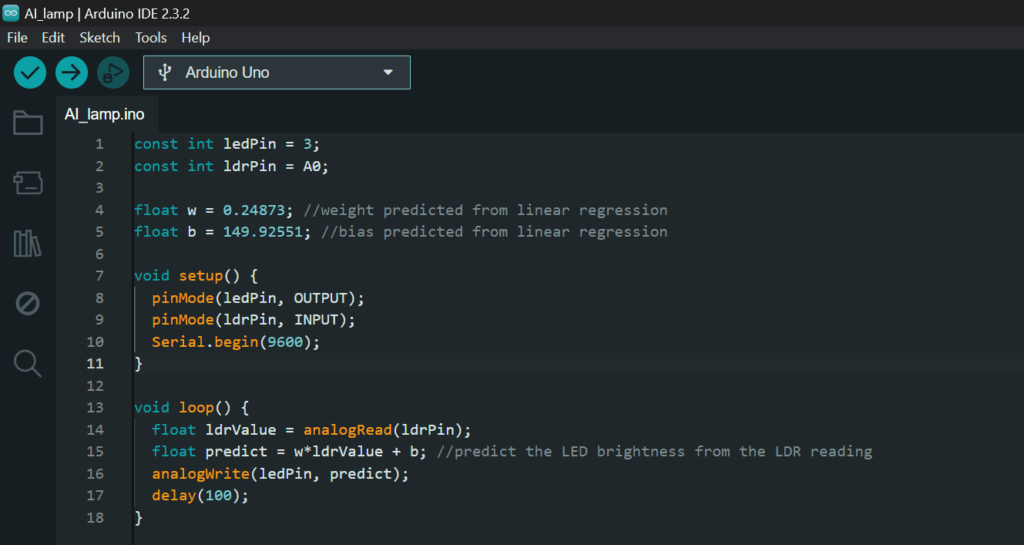
When you hear about all of the amazing things being accomplished with artificial intelligence today, you probably assume that they require a massive amount of processing power. And while that is often true, there are machine learning models that can run on the edge — including on low-power hardware like microcontrollers. To prove that, Shovan Mondal built this AI-enhanced desk lamp.
Mondal’s goal with this project was to demonstrate that AI (specifically machine learning) can be easy to implement on affordable and efficient hardware, such as an Arduino UNO Rev3 board. Here, the ML model adjusts the brightness of the lamp’s LED proportionally to the ambient light in the area as detected by an LDR (light-dependent resistor). The lamp body is heavy cardstock paper.
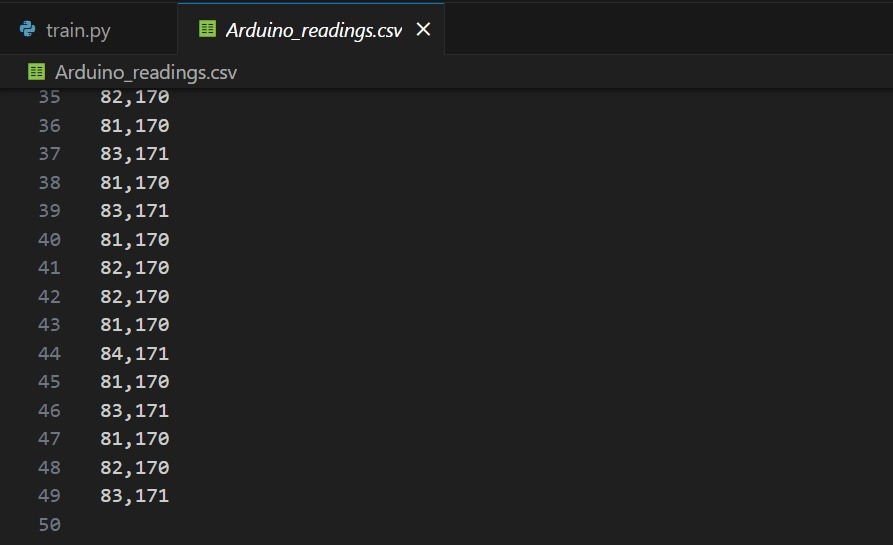
It would be possible to program this behavior explicitly with set thresholds or a manually created formula. But a trained ML model can do the same job without explicit instructions. The training process is simply subjecting the lamp to different lighting conditions and manually adjusting the brightness to suit them. That produces a series of data pairs consisting of the LDR and LED brightness values.
In CSV format, that data can be used to train a linear regression model provided with scikit-learn. That then produces a formula and values that will reproduce the data seen in the training set. The output can then set the LED brightness.
In this case, that formula is very simple, because it only has to account for two variables with a direct relationship. But much more complex relationships are possible, as are ML models that perform tasks more challenging than linear regression.
Held in Hawaii this year, the Association of Computing Machinery (ACM) hosted its annual conference on Human Factors in Computing Systems (CHI) that focuses on the latest developments in human-computer interaction. Students from universities all across the world attended the event and showcased how their devices and control systems could revolutionize how we interact with technology in both the real-world and virtual environments. These 12 projects presented at CHI 2024 feature Arduino at their core and demonstrate how versatile the hardware can be.
First on the list is MouseRing from students at Tsinghua University in Beijing that aims to give users the ability to precisely control mouse cursors with only one or two inertial measurement units (IMUs). Worn as a ring on the index finger, data collected from the MouseRing via an Arduino UNO Rev3 was used to both train a classification neural network and model the finger’s kinematics for fine-grained mouse cursor manipulation.
Because objects in virtual reality are only as heavy as the controller, simulating weight has always presented a challenge, which is why five students from the University of Regensburg in Germany devised their MobileGravity concept. With it, the user can place a tracked object onto a base station where an Arduino Micro then quickly pumps in/extracts water from the object to change its weight.
Another virtual reality device, the AirPush, is a fingertip-worn haptic actuator which gives wearers force feedback in up to eight directions and at five different levels of intensity. Through its system of an Arduino UNO, air compressor, and dual DC motors, this apparatus from students at the Southern University of Science and Technology in Shenzhen can accurately apply pressure around the finger in specific areas for use in games or training.
A Robotic Metamaterial, as described by students at Carnegie Mellon University, is a structure built from repeating cells that, on their own, cannot accomplish much, but when combined in specific configurations are able to carry out very complex tasks. Some of the Arduino Mega 2560-powered cells are able to actuate, sense angles, or enable capacitive touch interactions, thus letting a lattice of cells become a capable robot.
Instead of using pneumatics to bend materials, this team of students from Zhejiang and Tongji universities in China has designed a modular, flexible material using magnets which they call MagPixel. An Arduino UNO powers one such digital clock application leveraging MagPixel by energizing electromagnets within a ring to move the hour “hand” around the clock face.
Proprioception, or the ability to inherently sense where limbs are in 3D space, is vital to how we navigate the world, but VR spaces can limit this ability. The ArmDeformation project from a group of Southern University of Science and Technology students in Shenzhen rests on the wearer’s forearm and then moves the skin below to simulate an external force thanks to an Arduino Mega and several DC motors.
Grasping and moving objects is already quite the task in VR, but sketching a picture takes it to a whole other level of difficulty. Three students from the University of Virginia, therefore, have developed a shape-changing device that attempts to match the forms present in a 3D world for the purpose of sketching. After attaching a piece of paper to the surface, the VRScroll will bend into the correct shape using its two Arduino Uno WiFi Rev 2 boards and six motors.
As an alternative to plastic-based fibers for use in smart textile prototyping/production, four University of Colorado-Boulder students built an open-source machine that is capable of spinning gelatine-based fibers in a compact footprint. Leveraging an Arduino Mega, the machine can spin biofibers through its heated syringe with GCODE input, thus creating a strong thread which potentially integrates wearable sensors.
The art of communication relies on many forms of signals- not just speaking, and harnessing the user’s breathing pattern to better communicate is ExBreath from students at Tsinghua University in Beijing. An Arduino Nano continuously monitors the breathing patterns from a wearer via a bend sensor and translates them into signals for a micro air pump. In doing so, small, externally-worn air sacs are inflated to reflect the sensed breathing pattern.
This smart material, called ConeAct by its creators at Carnegie Mellon University, is a modular system consisting of small cones joined together with four shape memory actuators (SMA) that either flex or become rigid at certain temperatures. An Arduino Nano coordinates the actions of each cone, and when one needs to bend, the onboard ATtiny1616 will activate its MOSFETs to begin heating the corresponding SMA wires.
Targeted to those with blindness or low vision, the Tangible Stats project from a group of students at Stanford University allows them to more easily visualize statistical data by interacting with physical objects. The Arduino Mega-driven platform senses the number of stackable tokens placed into a column and provides quick feedback. Additionally, it can tilt the row of tokens to represent a sloping line.
Everyone needs access to fresh, clean air, but quickly seeing the indoor air quality of somewhere like an office meeting room/lobby is difficult. ActuAir, constructed by students at Newcastle University, is a wall-sized soft robotics display powered by a several Arduino UNO R4 WiFis that can each adjust the shape and color of a wall-mounted pouch to indicate the current CO2, temperature, or humidity levels — all of which is adjustable from an external web application.
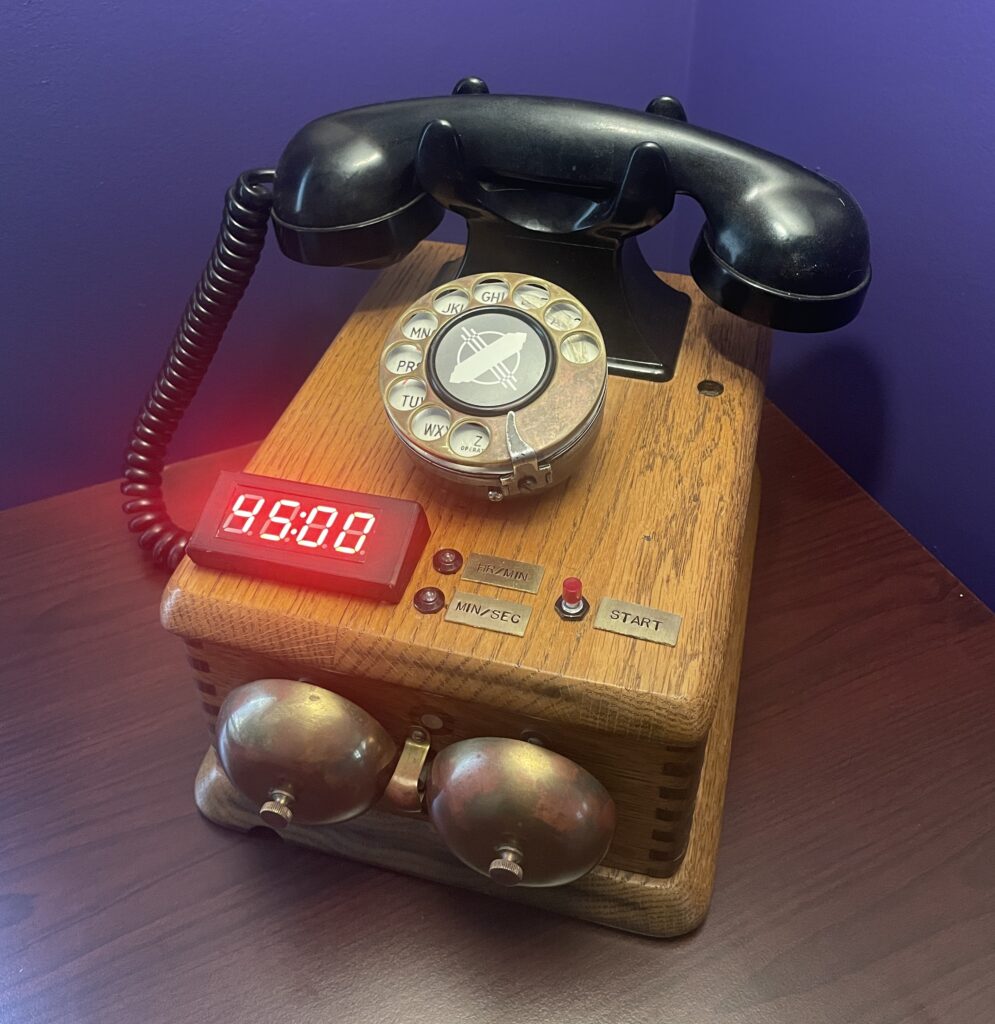
It seems like everything that happens in a kitchen requires exact timing. Whisk the batter for three minutes, knead the dough for 15 minutes, bake for 30 minutes, and so on. A timer is a necessity for cooking and baking, but there is no reason you need to use your phone or a boring egg timer from the dollar store. You can follow Scott-28’s lead and convert an antique rotary phone into a stylish kitchen timer.
This looks like a very old rotary phone, but it is actually a versatile kitchen timer that counts down from as little as one second or as much as 99 hours and 99 minutes. Users enter the time by spinning the rotary dial, which is good fun. Then, when the countdown ends, the old school ringer bells start chiming. A four-digit seven-segment display is a bit anachronistic, but makes the timer more usable by showing the countdown. Lifting and then dropping the handset turns off the timer.
This all happens under the control of an Arduino UNO Rev3 board, which reads the pulses from the rotary dial and the singular input button. It also sets the seven-segment display and the LED indicators.
The only tricky part was sounding the ringer, which requires AC power to function. To provide that from a DC power supply, Scott-28 used a LS057020 Black Magic Sine Wave Generator. That works like a power inverter, turning 5VDC into 70VAC (at 20Hz) to drive the ringer.
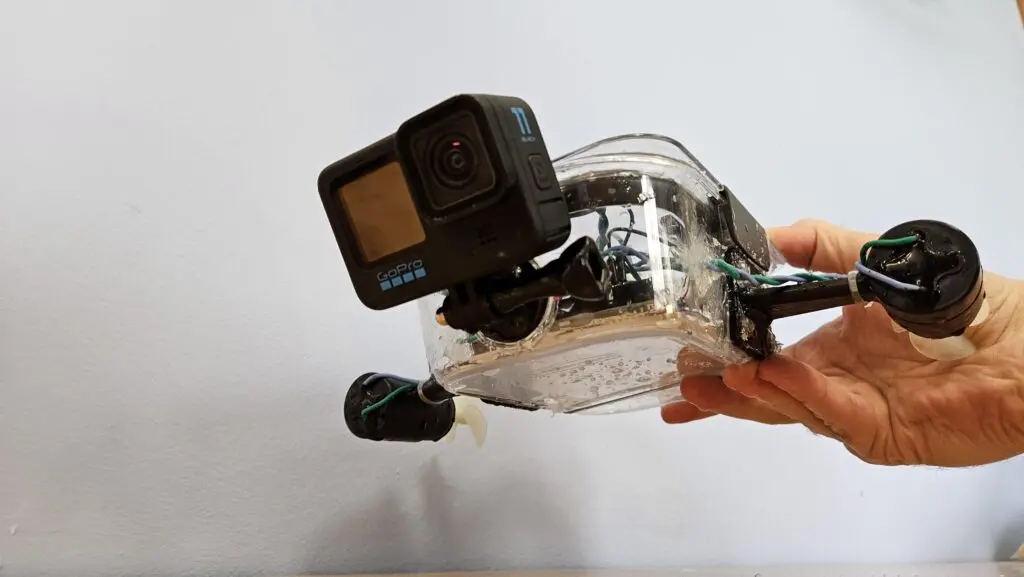
ROVs (remotely operated vehicles) let us explore bodies of water and it is hard not to be excited by the possibilities. But traditional ROVs cost a lot of money and often require serious expertise to operate and maintain. Luckily there are affordable alternatives, such as this DIY underwater rover designed by Science Buddies’ Ben Finio.
Finio created this ROV specifically for educational purposes and so it accommodates a relatively small classroom budget. For about $100-150, a school science club can build this device and start exploring the depths.
In order to keep the costs down, Finio used as many everyday parts as possible. The hull, for example, is a food storage container and the weights to bring the vehicle close to neutral buoyancy are steel bar stock. This design doesn’t include a ballasts or thrusters to alter depth (it can only steer left or right), so users will have to experiment with the weights to reach the desired depth.
This ROV has two thrusters for propulsion and steering. Those are electric DC motors controlled by an Arduino UNO Rev3 board through H-bridge drivers. Power comes from an onboard lithium battery and users pilot the craft with a remote control connected via a tether. That remote has two joysticks, each with one axis tied to one motor’s power.
Finio suggests attaching a GoPro (or any other action camera) to the vessel to record the underwater action.
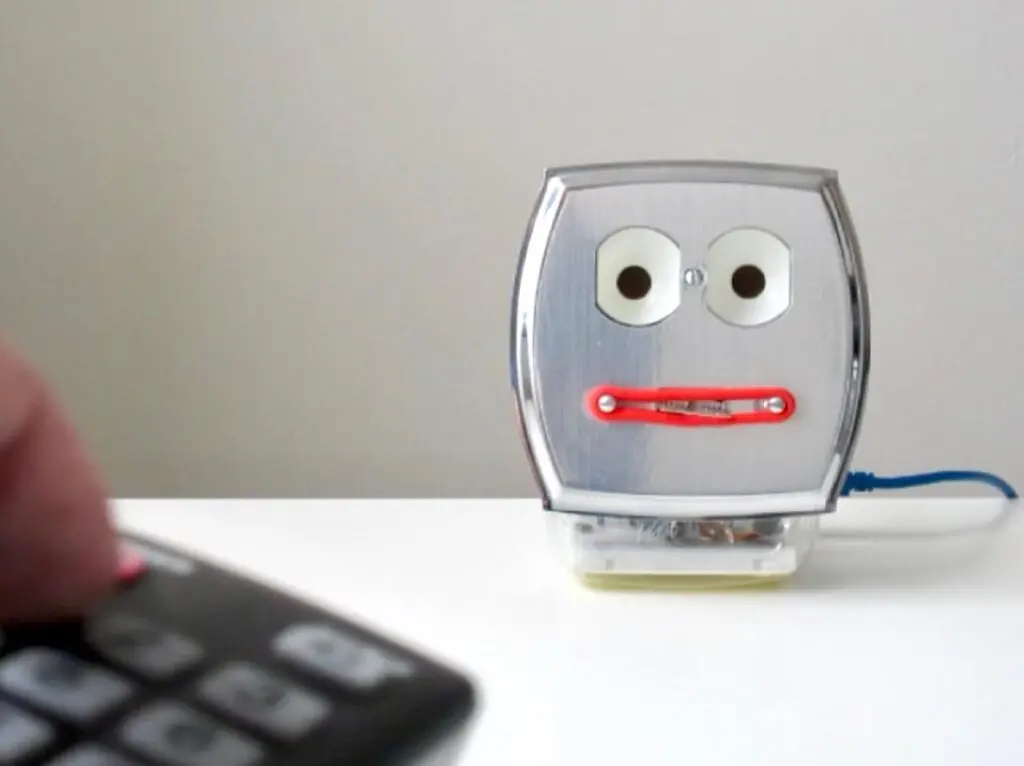
Interactive robots always bring an element of intrigue, and even more so when they feature unusual parts and techniques to perform their actions. Mr. Wallplate, affectionately named by Tony K on Instructables, is one such robot that is contained within an electrical wall plate and uses a servo motor connected to an Arduino UNO Rev3 for mouth movement.
The circuit for Mr. Wallplate is not very complex, as a single Arduino handles all of the processing. Users are able to control the robot with an IR remote thanks to a corresponding receiver that passes along the encoded signals to the Uno for parsing. After a valid code has been found, the Talkie library in the sketch accepts speech synthesis commands before converting them into waveforms for outputting to an amplifier. One of the more challenging aspects was getting the speech to align with the mouth moving, and Tony’s solution was to simply move the servo a predetermined amount based on the word.
After ensuring the electronics worked as intended, Tony fabricated the bot from a clear plastic bottle, a metallic toggle/duplex switch plate for the face, two halves of a ping pong ball for the eyes, and a ponytail holder for the lips. As seen in the demo video below, Tony’s creation is certainly captivating while it talks.
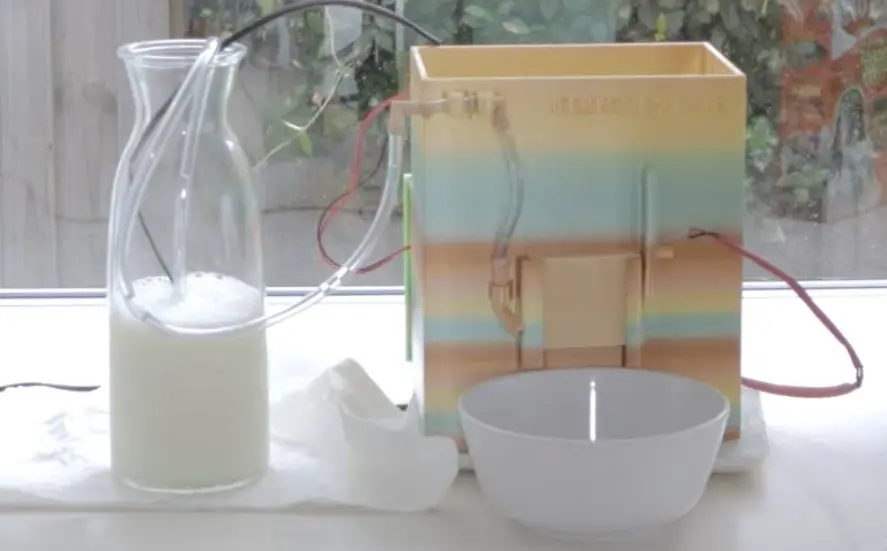
Breakfast cereal is controversial. Milk or cereal first? Best cereal to milk ratio? Favorite cereal? Most attractive mascot? The opportunities for debate never end. But we can all agree that consistency is key when it comes to the milk:cereal ratio — nobody changes that up from day to day. To ensure that every pour is perfect, Engineering Dads built this cereal and milk dispensing machine.
This machine pours dry breakfast cereal from a hopper and pumps milk from a jug, so the hungry user only needs to place the bowl and lift the hopper door. That is nice and automatic, but the more important feature is the ratio adjustment. The user can turn a dial to tweak the amount of milk dispensed with each serving, while controlling the cereal quantity by lifting the hopper chute door to a specific height. A movable sensor detects that door and triggers the milk pump when the door reaches that desired height.
Engineering Dads designed an Arduino UNO Rev3-based circuit to control that functionality. It reads the voltage from the potentiometer to determine the amount of time to power the milk-dispensing pump and it starts that process when it detects a change from the photoresistor. The hopper door moves in front of the photoresistor, blocking the light to kick everything off.
The hopper and electronics enclosure were 3D-printed, which brings up an important point about food safety. 3D-printed parts are generally not food-safe (even if the filament material is), because bacteria can collect in the layer lines and sanitization isn’t easy. But Engineering Dads coated the prints in a layer of epoxy to create a smoother surface and that may help — though they’re not making any guarantees.
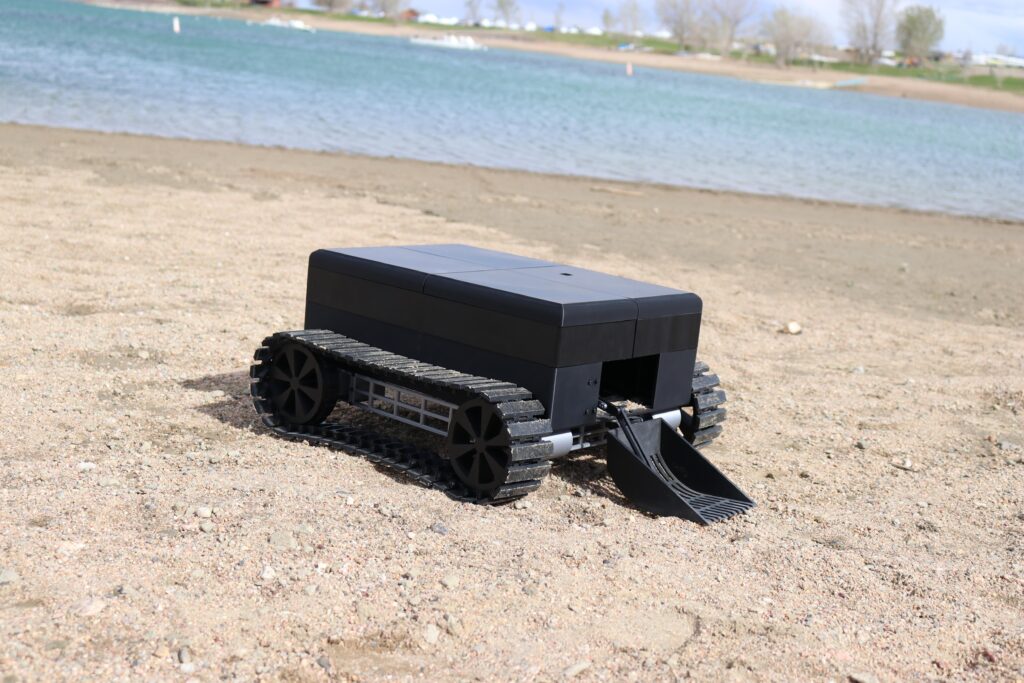
Without anyone caring for them, beaches quickly become trash-covered swaths of disappointment. That care is necessary to maintain the beautiful sandy havens that we all want to enjoy, but it requires a lot of labor. A capstone team of students from the University of Colorado Boulder’s Creative Technology & Design program recognized that fact and they create the Seaside Sweeper beach-cleaning robot to lighten the load.
Seaside Sweeper is like a Roomba for beaches. Either autonomously or through manual control, it can patrol a beach for up to 15 hours on a battery charge and scoop up any trash it comes across. This costs less than $450 to build, which is an important consideration when most beaches are public property and have limited maintenance budgets.
There are two Arduino boards used in this project: an Arduino Mega 2560 in the Seaside Sweeper itself and an Arduino UNO Rev3 in the remote. They communicate with each other through nRF24L01+ radio transceivers. The Mega 2560 is able to track its own position using a Neo-6M GPS module and an Adafruit LIS3MDL compass module. Together, those enable the autonomous navigation functionality — though it isn’t clear how Seaside Sweeper detects trash. The Mega 2560 also controls the four drive motors and the scoop mechanism’s servo motor.
The robot’s body and almost all of its mechanical parts were 3D-printed to keep costs down. That even includes the tracks. The electronic components can be connected via breadboards, so no custom PCBs are required.
We recently covered Vaclav Krejci’s stick shift project, in which he designed a board that surrounds the shift lever and uses Hall effect sensors to detect its position. It then displayed the current gear on a small OLED screen. The idea was that the user could mount that screen wherever they wanted on the dashboard or center console. But now Krejci is back with a more satisfying solution: an LED display built into the shifter knob itself.
The rest of the hardware, aside from the display, is the same. A custom PCB surrounds the shift lever and contains the Hall effect sensors. Jumper cables connect those to a shield on an Arduino UNO Rev3, which looks at the signals from the sensors and calculates the approximate position of a permanent magnet attached to the shift lever. That position tells the Arduino the current gear.
The difference is in how it displays the gear to the user. Before, it was a loose OLED screen. Now, it is a bright Pimoroni 7×11 LED matrix display integrated into the shifter knob. The knob is an inexpensive aftermarket model that Krejci modified for this project. He removed the top half of the knob and replaced it with a 3D-printed version with a cavity where the LED matrix can sit. A sheet of tinted translucent plastic helps to diffuse the light and hide everything else.
This looks absolutely fantastic and would be really cool to see in a car.
The high cost of EV (electric vehicle) chargers may lead you to believe that they’re complex systems. But with the exception of Tesla’s Supercharger, that isn’t true. They’re actually quite simple — basically just glorified switches. All of the nitty gritty charging details are the responsibility of the car’s onboard circuitry. With that in mind, EV owners may want to follow Pedro Neves’ guide on building an affordable Arduino-based EV charging station.
Because the car deals with all of the particulars of charging, the only purpose of the “charger” is to provide a connection to the electrical grid. “Charger” isn’t even the right word, as this is more accurately EVSE (electric vehicle supply equipment). For safety reasons, the car and the EVSE communicate with each other. The car can tell the EVSE when it is safe to provide power and the EVSE will then connect a switch between the charging plug and the electrical grid. It really isn’t any more complex than a $15 smart outlet and most of the cost of an EVSE is the heavy-gauge wiring.
Here, Neves proves that with a DIY EVSE designed around an Arduino UNO Rev3 board. It has a custom shield with relays for switching power and to power the Arduino itself with mains voltage. A few LEDs act as status indicators. EVSE protocols are standardized, so Neves was able to program the Arduino to communicate with any connected car. Once the Arduino receives permission from the car, it switches the relays to provide mains voltage. A heavy-duty 3D-printed enclosure contains those components, with a breaker switch and weatherproofing.
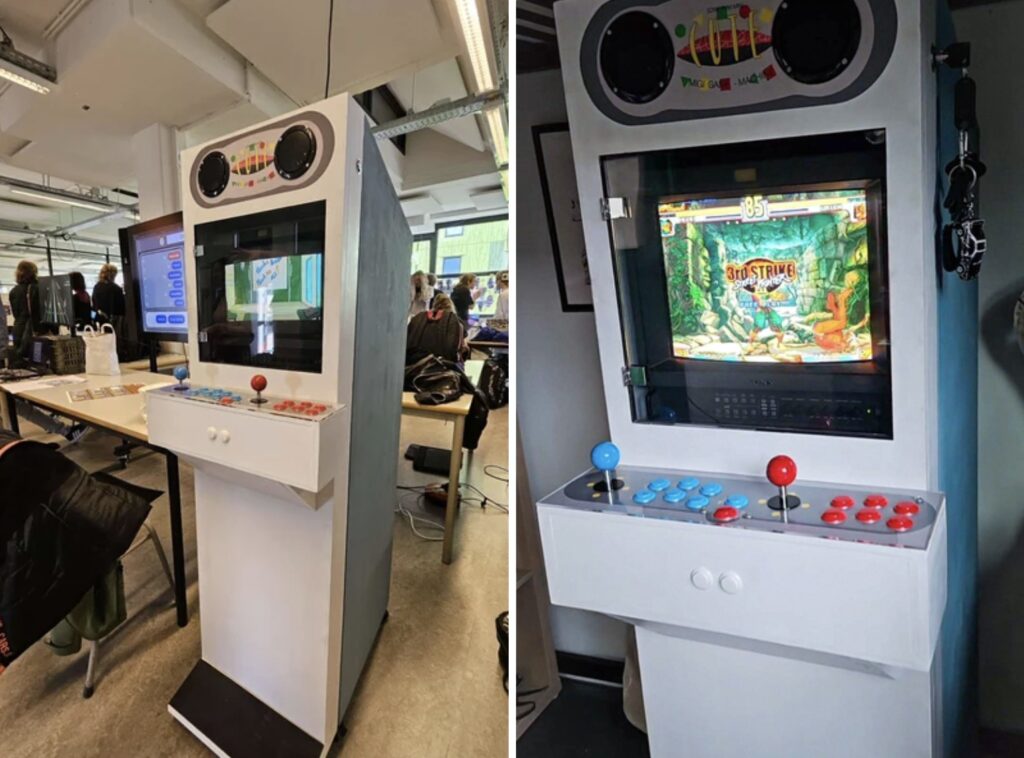
Arcade machines are a dying breed and that’s a shame, because their purpose-built approach to gaming is so wholesome. There is something intrinsically satisfying about a device that does one thing and does it well. If you want to bring that beauty into your own home, Migi has a great Instructables tutorial that will walk you through building your own arcade cabinet with custom Arduino-based controls.
Migi’s cabinet design is inspired by Capcom’s Mini Cute line, which was a series of small arcade machines popular in Japanese cafes. But while it is smaller than standard arcade cabinets, it is still big enough to feel substantial. An old laptop runs MAME or whatever other emulation software the user desires. Because a CRT (cathode-ray tube) display is a must for an arcade cabinet, Migi used a 14” Sony PVM (Professional Video Monitor). Those tend to be pretty pricey these days, so anyone replicating this build may want to entertain other CRT options.
Arcade games need rock-solid controls, so Migi designed this to utilize Sanwa buttons and sticks. The cabinet has controls for two players, with an Arduino UNO Rev3 dedicated to each set of controls. Migi set it up that way to make the software setup easier, as each Arduino will appear as its own gamepad in the emulation software.
Migi constructed the cabinet itself using a combination of MDF and acrylic. A big laser cutter made that fabrication a snap, but less well-equipped hobbyists may have to utilize alternative tools like handheld routers. With a coat of paint and some printed graphics, it looks fantastic. And the Sanwa controls should hold up to decades of heavy use.
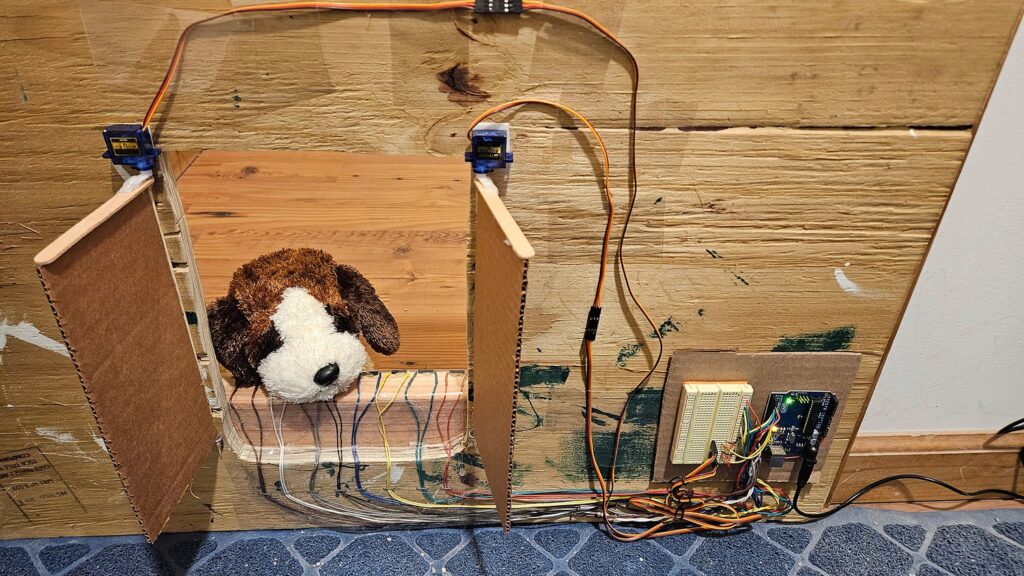
Science Buddies had a problem: their tiny little pug loves eating their cat’s poop. Because the pug is smaller than the cat, they couldn’t simply put the litter box behind a tiny cat door. So they came up with a more sophisticated solution: a motorized door triggered by a magnetic collar.
Riley the pug’s responses to poop access prevention are awfully pugnacious, but she is also pretty skittish. Science Buddies surmised that a cardboard door would be enough to stop her. But that would also stop Trouble the cat, so the door needed to remain open for Trouble and only close when Riley tried to enter the area with the litter box. After experimenting with a few different solutions, Science Buddies landed on servo-actuated cardboard doors that close in the presence of a strong magnetic field.
That magnetic field comes from a permanent magnet dangling from Riley’s collar. An Arduino UNO Rev3 board detects that magnet using several Reed switches arranged along the bottom edge of the door frame. When the magnet causes the Reed switches to close, the Arduino knows that Riley is trying to get to the cat poop. In then closes two cardboard doors using small hobby servo motors.
It took some tinkering to position the Reed switches in a way that they’d trigger consistently, but Science Buddies found a reliable setup in the end. Now whenever Riley attempts to get to the litter box, the cardboard doors slam in her adorable pug snoot and she abandons her quest.
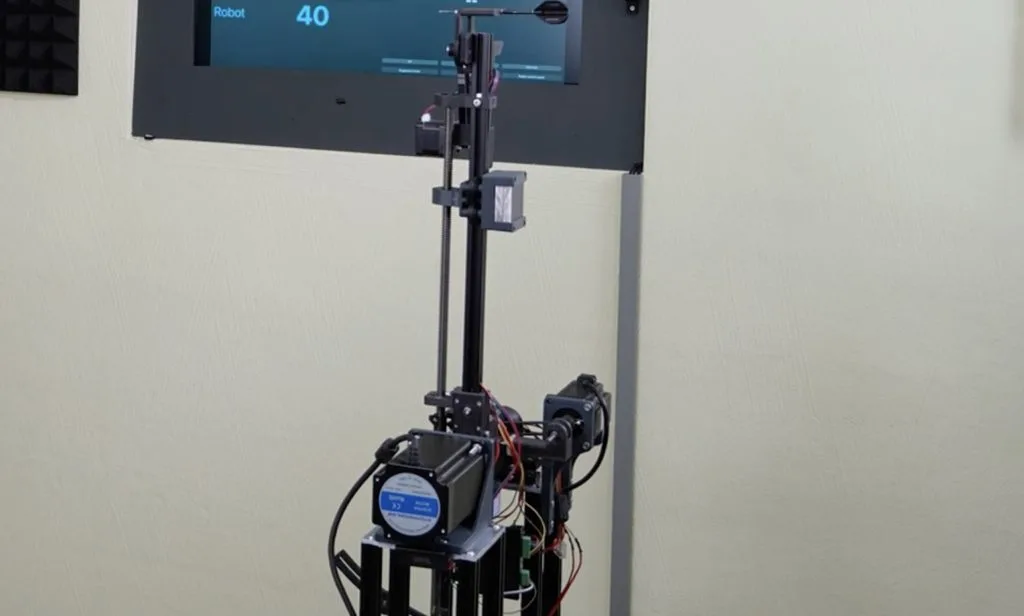
You’ll find dartboards in just about every dive bar in the world, like cheaper and pokier alternatives to pool. But that doesn’t mean that darts is a casual game to everyone. It takes a lot of skill to play on a competitive level and many of us struggle to perform well. Niklas Bommersbach decided that years of practice was too much of a commitment, so he built this robot that can dominate dart games.
This robot can, essentially, throw a dart perfectly every time to hit the desired target on the board. If you’re unfamiliar with the game, you might think that a bullseye is always best. But that isn’t true — especially for certain rulesets. To play strategically, Bommersbach needed his robot to nail the desired space on the board on-demand.
His first step was to make throws repeatable and predictable. His robot has a balanced arm that spins up to a precise rotational speed. At the set angle, it releases the dart. By monitoring many throws with computer vision, Bommersbach was able to dial in the speed and angle variables until the result became very predictable. An Arduino UNO Rev3 board controls the arm speed and calculates the release. But Bommersbach struggled to get the timing of the release exactly right, as the Arduino was running its code sequentially and so there was a small variance — just enough to throw off the throw.
His solution was to add a second Arduino, which has the sole responsibility of releasing the dart using a stepper-actuated mechanism. That allowed for very precise timing and repeatable throws. The timing influences the dart’s vertical position on the board, while a linear motion system controls its horizontal position.
Um dir ein optimales Erlebnis zu bieten, verwenden wir Technologien wie Cookies, um Geräteinformationen zu speichern und/oder darauf zuzugreifen. Wenn du diesen Technologien zustimmst, können wir Daten wie das Surfverhalten oder eindeutige IDs auf dieser Website verarbeiten. Wenn du deine Einwillligung nicht erteilst oder zurückziehst, können bestimmte Merkmale und Funktionen beeinträchtigt werden.
Funktional
Immer aktiv
Die technische Speicherung oder der Zugang ist unbedingt erforderlich für den rechtmäßigen Zweck, die Nutzung eines bestimmten Dienstes zu ermöglichen, der vom Teilnehmer oder Nutzer ausdrücklich gewünscht wird, oder für den alleinigen Zweck, die Übertragung einer Nachricht über ein elektronisches Kommunikationsnetz durchzuführen.
Vorlieben
Die technische Speicherung oder der Zugriff ist für den rechtmäßigen Zweck der Speicherung von Präferenzen erforderlich, die nicht vom Abonnenten oder Benutzer angefordert wurden.
Statistiken
Die technische Speicherung oder der Zugriff, der ausschließlich zu statistischen Zwecken erfolgt.Die technische Speicherung oder der Zugriff, der ausschließlich zu anonymen statistischen Zwecken verwendet wird. Ohne eine Vorladung, die freiwillige Zustimmung deines Internetdienstanbieters oder zusätzliche Aufzeichnungen von Dritten können die zu diesem Zweck gespeicherten oder abgerufenen Informationen allein in der Regel nicht dazu verwendet werden, dich zu identifizieren.
Marketing
Die technische Speicherung oder der Zugriff ist erforderlich, um Nutzerprofile zu erstellen, um Werbung zu versenden oder um den Nutzer auf einer Website oder über mehrere Websites hinweg zu ähnlichen Marketingzwecken zu verfolgen.