Reading Time: 4 minutesLearn how to create game objects that follow the path of the main player sprite. Raspberry Pi’s own Rik Cross explains all.

Options first appeared in 1985’s Gradius, but became a mainstay of numerous sequels and spin-offs, including the Salamander and Parodius series of games.
Gradius
First released by Konami in 1985, Gradius pushed the boundaries of the shoot-’em-up genre with its varied level design, dramatic boss fights, and innovative power-up system.
One of the most memorable of its power-ups was the Option — a small, drone-like blob that followed the player’s ship and effectively doubled its firepower.
By collecting more power-ups, it was possible to gather a cluster of death-dealing Options, which obediently moved wherever the player moved.
Recreate sprite-following in Python
There are a few different ways of recreating Gradius’ sprite-following, but in this article, I’ll show you a simple implementation that uses the player’s ‘position history’ to place other following items on the screen. As always, I’ll be using Python and Pygame to recreate this effect, and I’ll be making use of a spaceship image created by ‘pitrizzo’ from opengameart.org.
The first thing to do is to create a spaceship and a list of ‘power-up’ objects. Storing the power-ups in a list allows us to perform a simple calculation on a power-up to determine its position, as you’ll see later. As we’ll be iterating through the power-ups stored in a list, there’s no need to create a separate variable for each. Instead, we can use list comprehension to create the power-ups:
powerups = [Actor(‘powerup’) for p in range(3)]
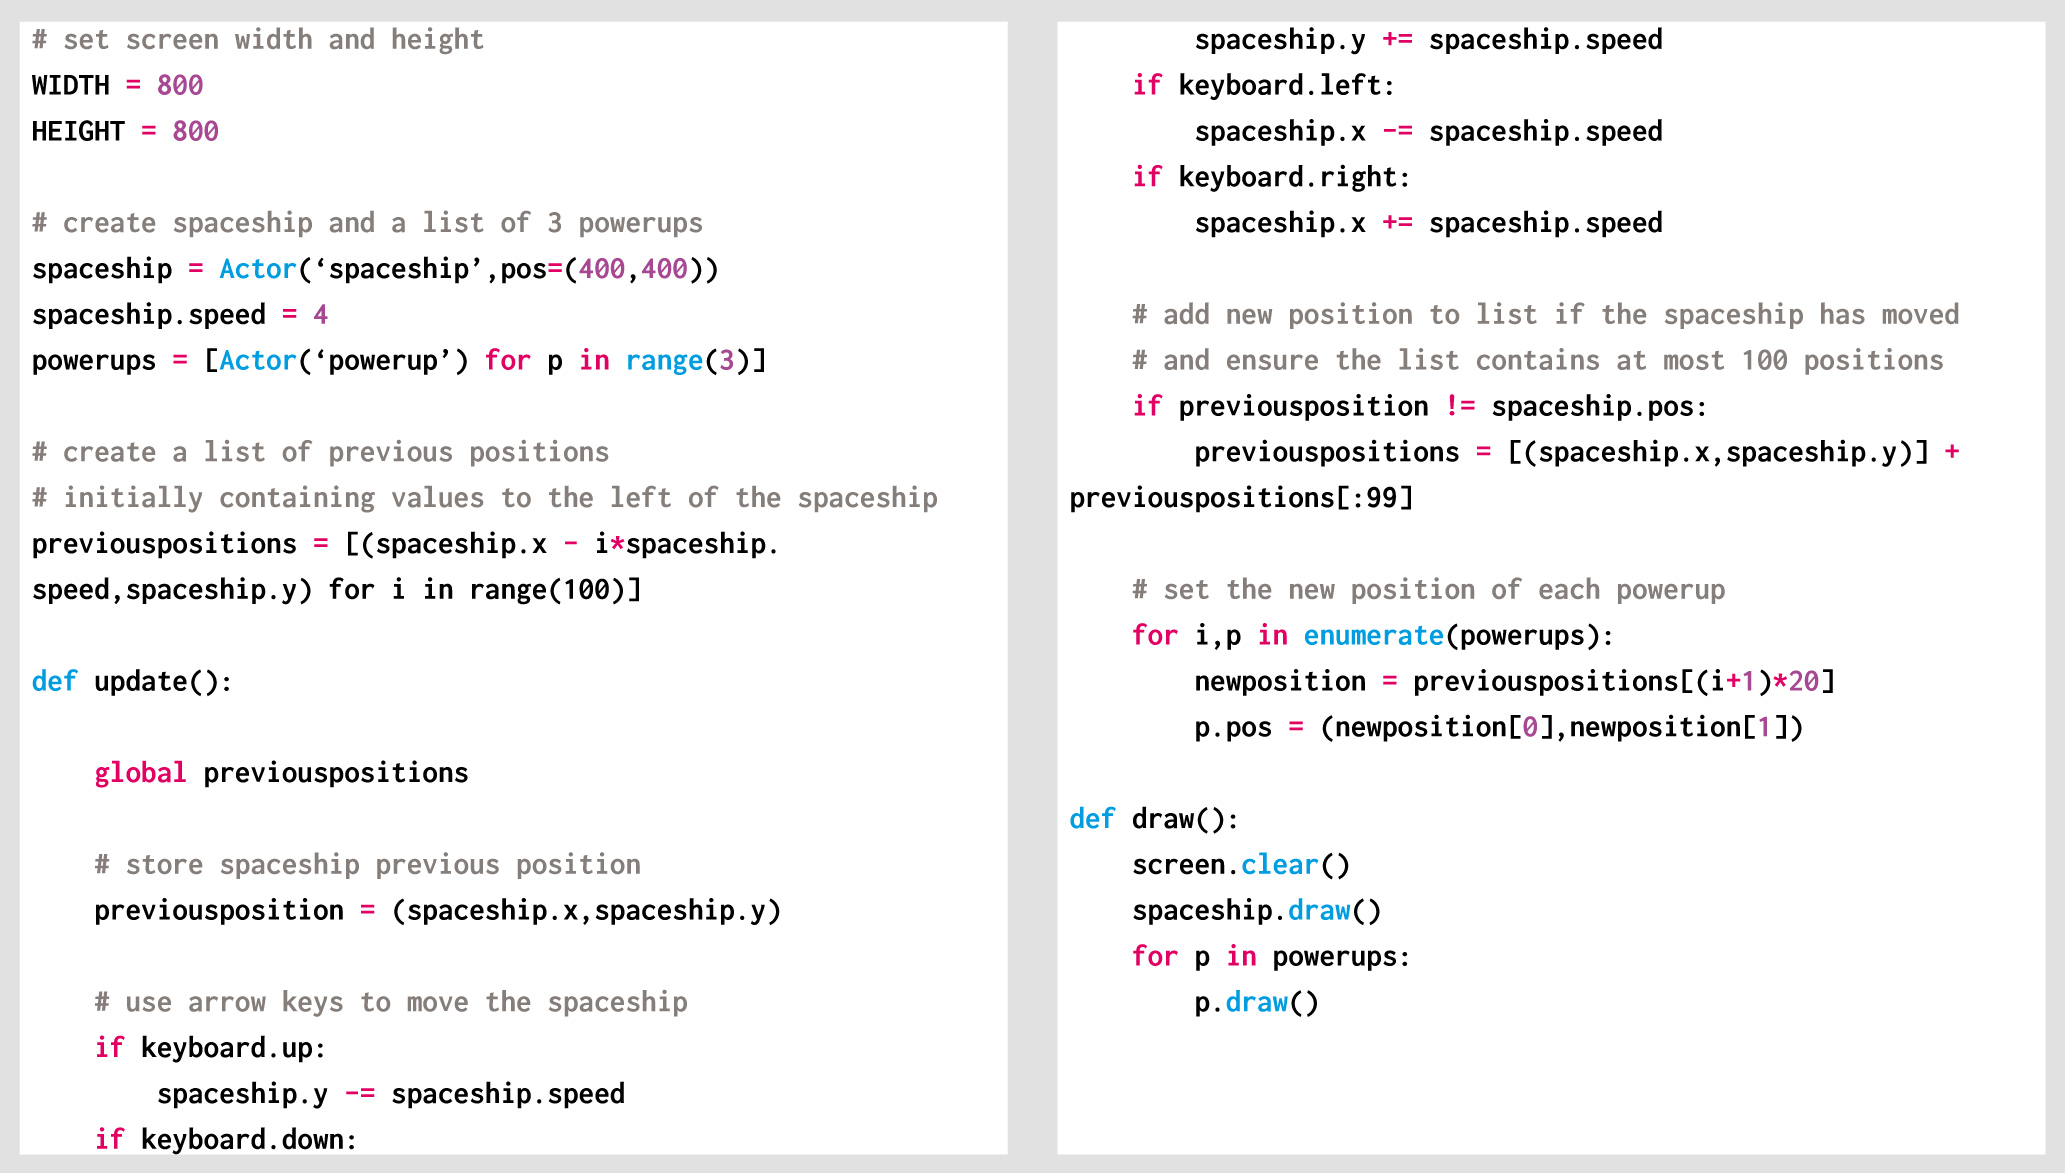
The player’s position history will be a list of previous positions, stored as a list of (x,y) tuples. Each time the player’s position changes, the new position is added to the front of the list (as the new first element). We only need to know the spaceship’s recent position history, so the list is also truncated to only contain the 100 most recent positions. Although not necessary, the following code can be added to allow you to see a selection (in this case every fifth) of these previous positions:
for p in previouspositions[::5]:
screen.draw.filled_circle(p, 2, (255,0,0))

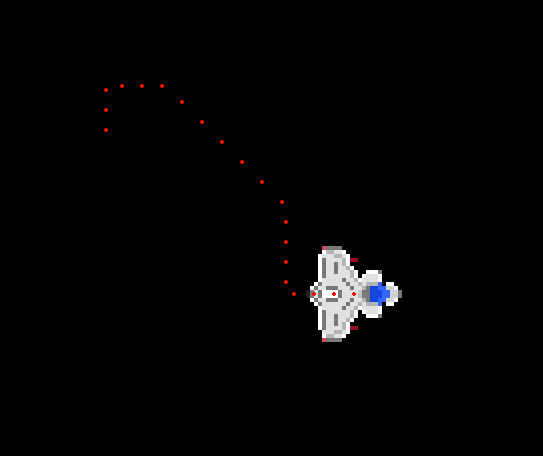
Plotting the spaceship’s position history.
Each frame of the game, this position list is used to place each of the power-ups. In our Gradius-like example, we need each of these objects to follow the player’s spaceship in a line, as if moving together in a single-file queue. To achieve this effect, a power-up’s position is determined by its position in the power-ups list, with the first power-up in the list taking up a position nearest to the player. In Python, using enumerate when iterating through a list allows us to get the power-up’s position in the list, which can then be used to determine which position in the player’s position history to use.
newposition = previouspositions[(i+1)*20]
So, the first power-up in the list (element 0 in the list) is placed at the coordinates of the twentieth ((0+1)*20) position in the spaceship’s history, the second power-up at the fourtieth position, and so on. Using this simple calculation, elements are equally spaced along the spaceship’s previous path. The only thing to be careful of here is that you have enough items in the position history for the number of items you want to follow the player!

Power-ups following a player sprite, using the player’s position history.
This leaves one more question to answer; where do we place these power-ups initially, when the spaceship has no position history? There are a few different ways of solving this problem, but the simplest is just to generate a fictitious position history at the beginning of the game. As I want power-ups to be lined up behind the spaceship initially, I again used list comprehension
to generate a list of 100 positions with ever-decreasing x-coordinates.
previouspositions = [(spaceship.x - i*spaceship.speed,spaceship.y) for i in range(100)]
With an initial spaceship position of (400,400) and a spaceship.speed of 4, this means the list will initially contain the following coordinates:
previouspositions = [(400,400),(396,400),(392,400),(388,400),...]
Storing our player’s previous position history has allowed us to create path-following power-ups with very little code. The idea of storing an object’s history can have very powerful applications. For example, a paint program could store previous commands that have been executed, and include an ‘undo’ button that can work backwards through the commands.
Get your copy of Wireframe issue 16
You can read more features like this one in Wireframe issue 16, available now at Tesco, WHSmith, and all good independent UK newsagents.
Or you can buy Wireframe directly from Raspberry Pi Press — delivery is available worldwide. And if you’d like a handy digital version of the magazine, you can also download issue 16 for free in PDF format.

Make sure to follow Wireframe on Twitter and Facebook for updates and exclusive offers and giveaways. Subscribe on the Wireframe website to save up to 49% compared to newsstand pricing!
Website: LINK


 Website: