Schlagwort: tech

  • PsyLink is a low-cost, non-invasive EMG interface based on the Nano 33 BLE Sense

    PsyLink is a low-cost, non-invasive EMG interface based on the Nano 33 BLE Sense

    Reading Time: 2 minutes

    Arduino TeamJanuary 10th, 2022

    Non-invasive EMG interfaces have the potential to solve many problems that afflict those who suffer from a disability or simply want a more efficient way to perform a task. This is what led one maker, who goes by the name “Hut,” to create their own open source device called PsyLink. It works by measuring the minute electrical impulses that cause muscles to contract and then sending them for further processing and inferencing via a machine learning model. 

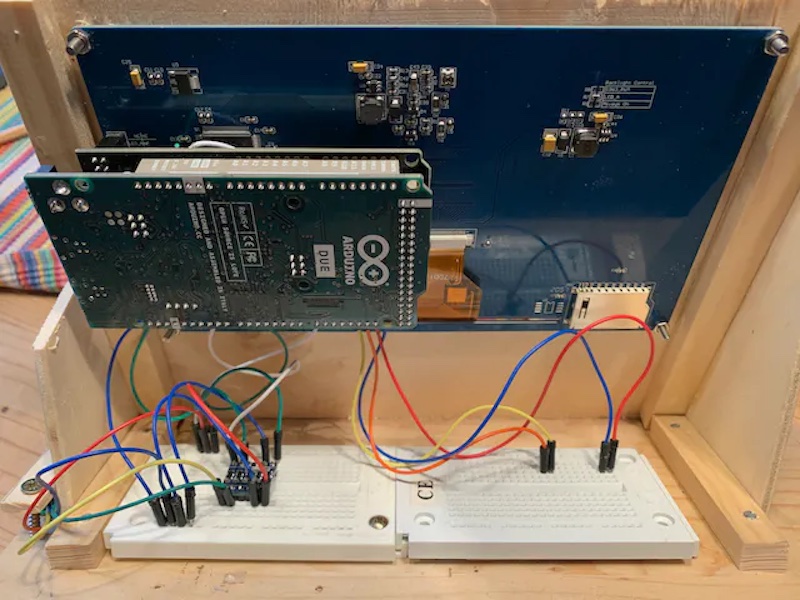
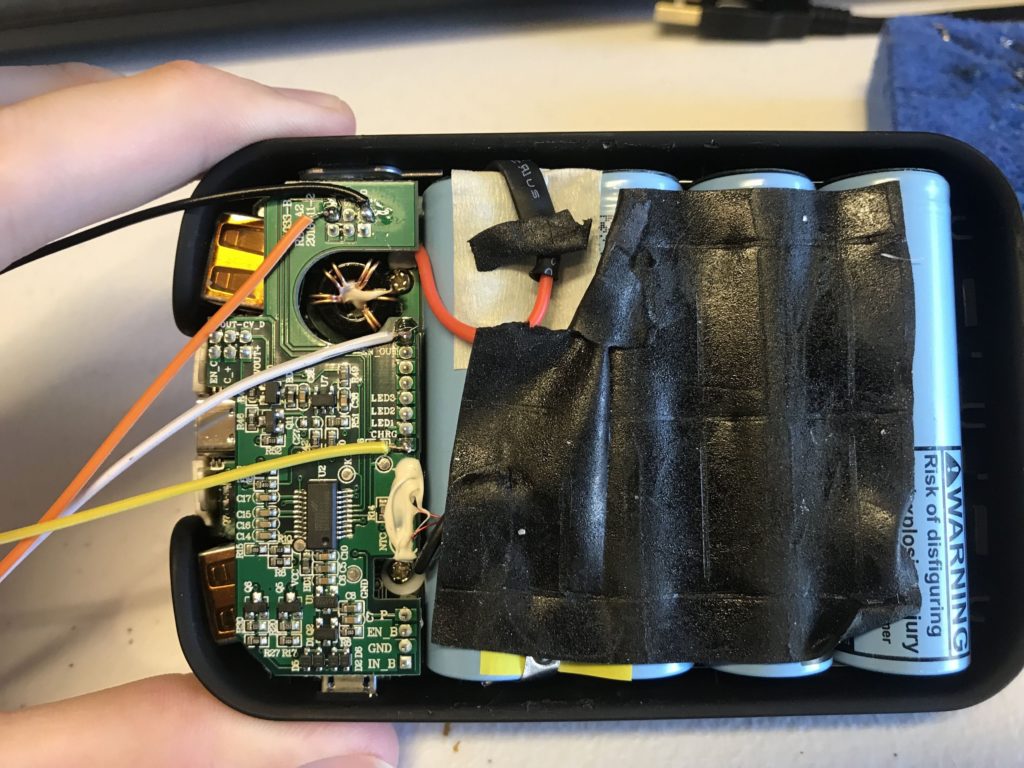
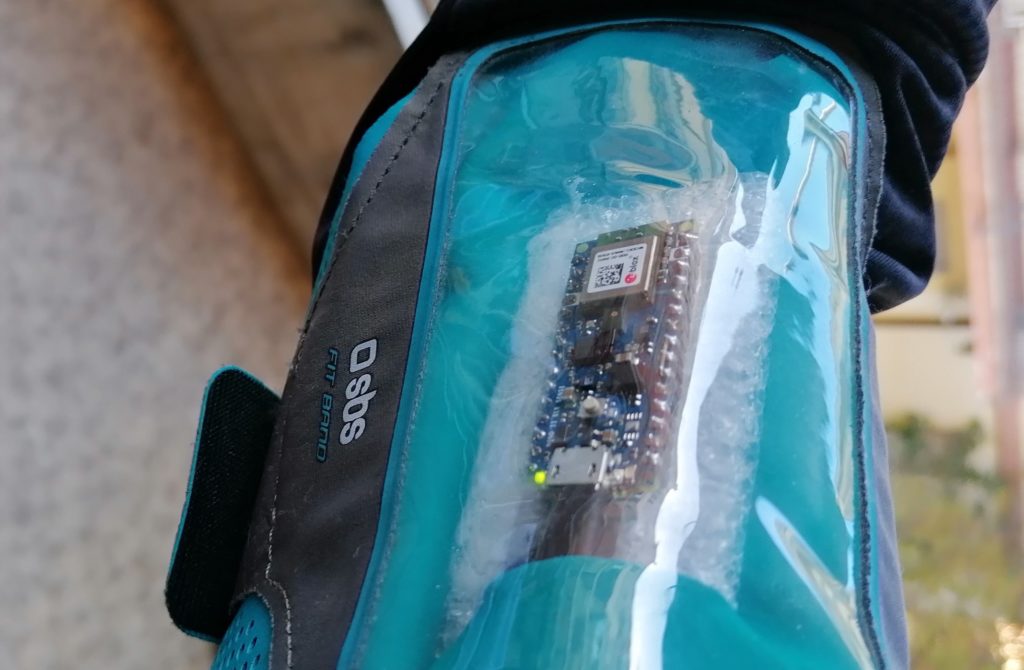
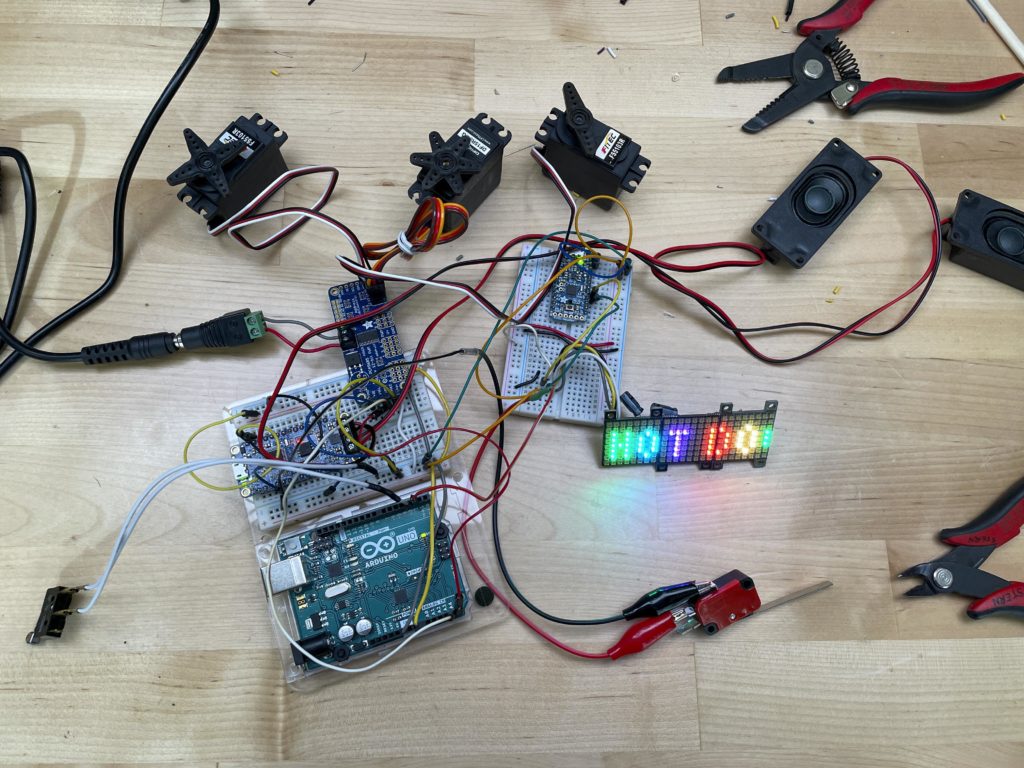
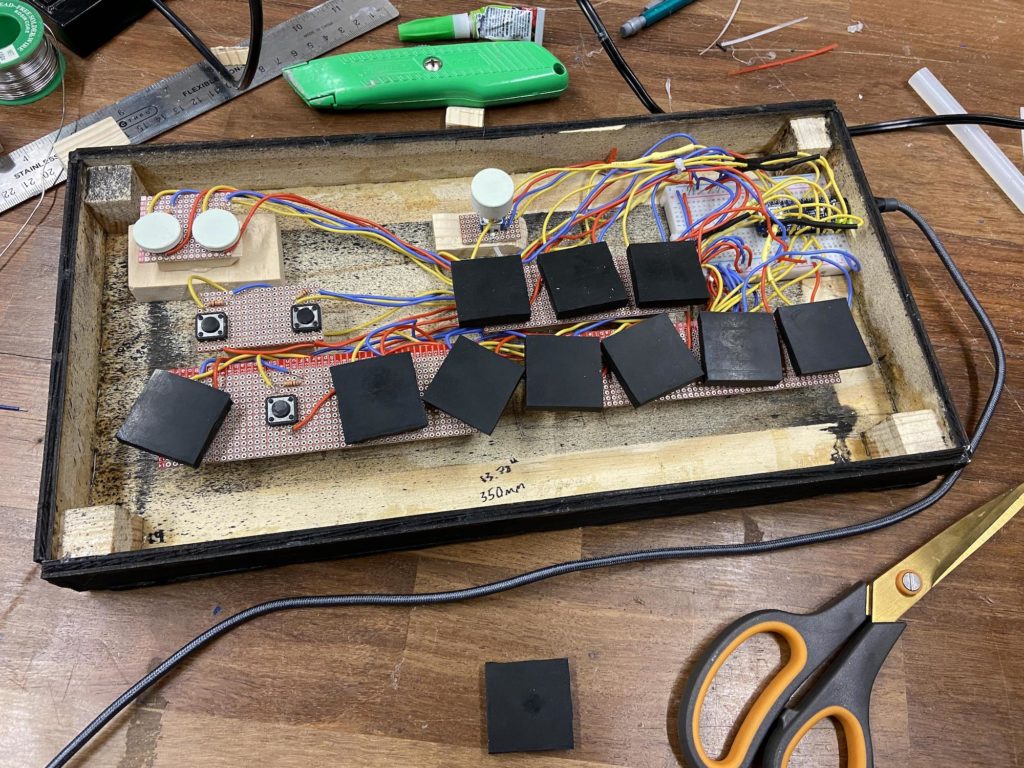
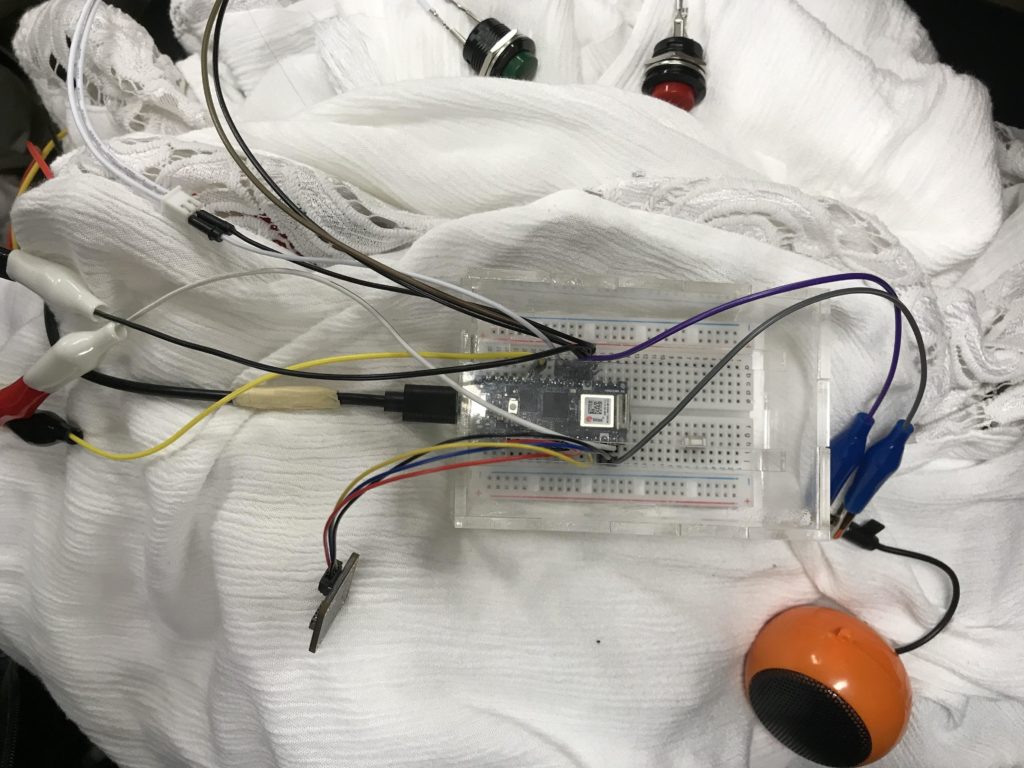
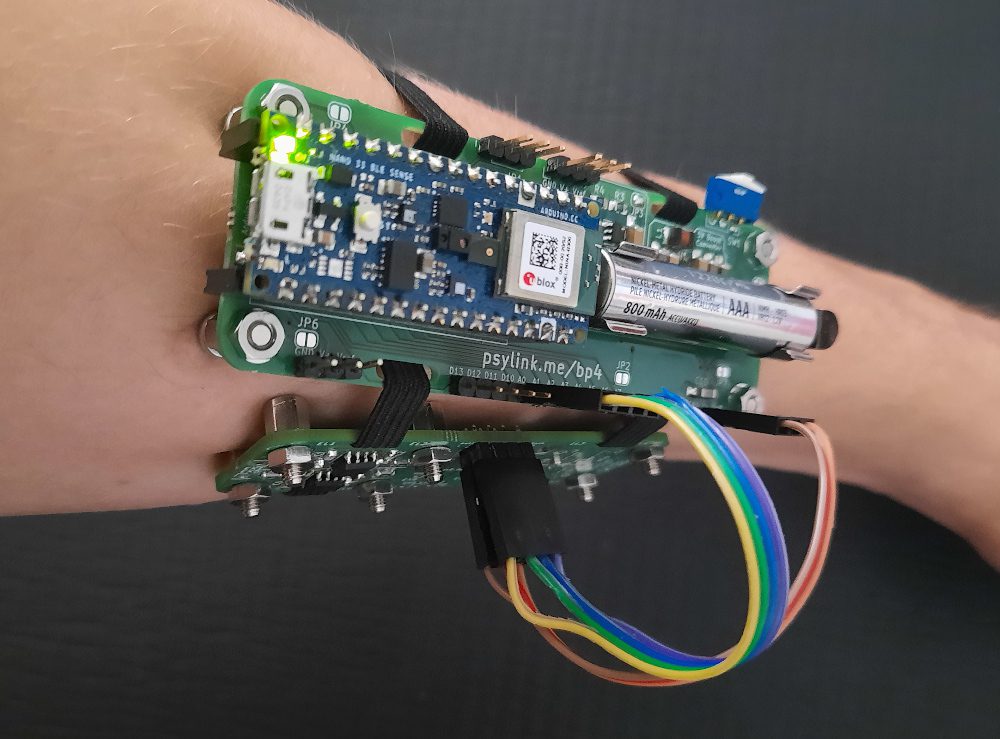
    PsyLink’s initial prototype was based around the Nano 33 BLE Sense due to its large number of ADC pins and potential for Bluetooth connectivity. The device features a pair of aluminum foil pads attached to some wires, although this was later changed out for studs embedded within a more secure sleeve. Signals are read from the electrodes and sent through a series of filters made from op-amps and eventually to an analog multiplexer. After that, the signal is digitized by the onboard ADC and transmitted over Bluetooth Low Energy where it is then displayed in a custom desktop application. 

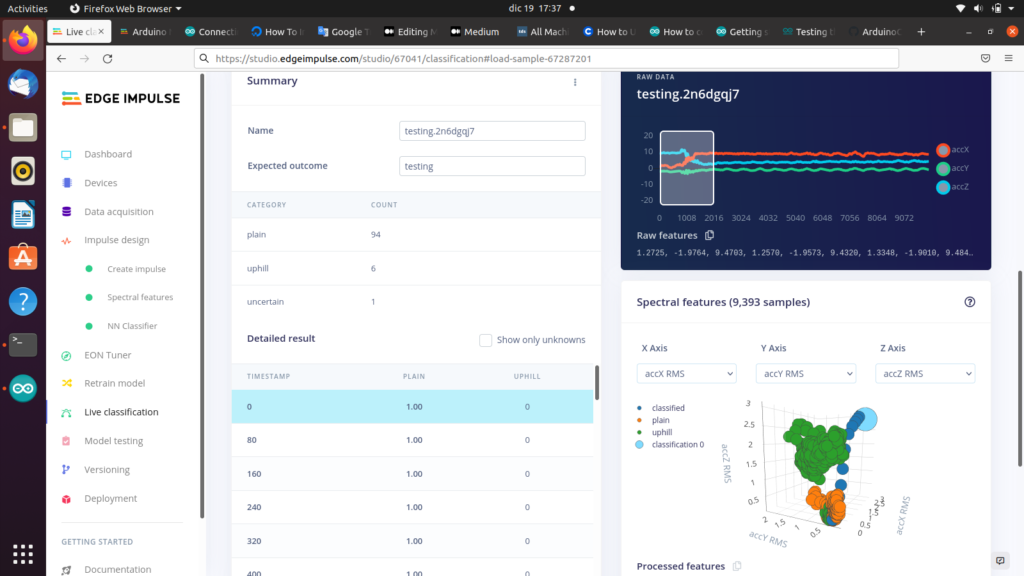
    Hut used TensorFlow Lite to take many samples of data and train a neural network to recognize when a certain kind of signal corresponded to a given keypress. Once training was complete, this model could be deployed and used to do everything from typing faster and performing shortcuts, to even playing a video game.

    You can read more about this impressive project here on a well-detailed blog for the PsyLink.

    Website: LINK

  • ’80s-style home computer made from scratch using an Arduino Due

    ’80s-style home computer made from scratch using an Arduino Due

    Reading Time: 2 minutes

    ’80s-style home computer made from scratch using an Arduino Due

    Arduino TeamJanuary 10th, 2022

    As a continuation from his previous Arduino BASIC interpreter project, Stefan Lenz wanted to take things a step further by recreating a home computer from the 1980s with an Arduino Due board and just a few other components. His system combines a 7″ 800 by 480px TFT screen with an SD card reader acting as the disk, along with a PS/2 port for connecting a keyboard. 

    He began by mounting the TFT display shield to the Arduino by slotting it in place and inserting an SD card to function as the external disk since floppy drives have long since disappeared and would be far too unwieldy. After soldering some additional wires to the SPI and I2C bus pins, a level shifter was attached to two digital pins that serve as the data and clock lines for the external PS/2 port. 

    Most of the “magic” in this project comes from the programming which handles everything from reading inputs to showing graphics on the LCD and even interfacing with other peripherals over either I2C or SPI. All of the code needed for this retro home computer can be found here in Lenz’s tinybasic repository, which contains a plethora of example projects and demonstrations that can be run/modified.

    Website: LINK

  • A cosmic background radiation die for your next game night

    A cosmic background radiation die for your next game night

    Reading Time: 2 minutes

    Arduino TeamJanuary 6th, 2022

    In the aftermath of the Big Bang, a cloud of charged particles, referred to as the cosmic microwave background radiation (CMB), was left over. This can not only be detected by advanced scientific equipment, but also by a Geiger counter. iSax aimed to use this idea for a novel virtual die that measures the truly random amount of time it takes for particles to pass through a counter. 

    The project starts with an old Soviet-style Geiger tube that outputs a signal whenever a charged particle crosses its path. Upon pressing a button, the die begins to shuffle until a number is determined by checking if the elapsed time in microseconds is even or odd. After four of these measurements have been taken, the resulting four-bit binary representation is converted from a series of bits to a digit and sent to an American Nixie tube with the help of an Arduino Nano. Current for the Nixie tube is provided by a high-voltage power supply while the remaining components use 5V.

    This device is a great demonstration of how nuclear physics can be utilized to generate random events. And better yet, it combines both American and Soviet-era components for an interesting mashup between the two superpowers of the Cold War. You can read more about iSax’s build here on Hackaday and watch an explanation of the CMB radiation die below.

    Website: LINK

  • PVC pipe plotter prints pretty pictures

    PVC pipe plotter prints pretty pictures

    Reading Time: 2 minutes

    Arduino TeamJanuary 5th, 2022

    Instructables user tuenhidiy wanted to create a new kind of CNC plotter that was unlike nearly all of the others you’ve seen. Rather than use aluminum extrusions or wood, this machine is constructed from various pieces of PVC pipe all cut to exact lengths, hence its name, the “CoreXZ Puzzle Pipe Plotter.”

    Electronics wise, the plotter runs on an Arduino Uno loaded with an instance of the ubiquitous GRBL firmware. Stacked on top was a CNC GRBL shield, which has three A4988 stepper motor drivers for delivering current to three NEMA17 motors. 

    To assemble this PVC CNC machine, tuenhidiy started by building the lower frame from a plethora of T-joints and connectors along with several inserts for attaching the aluminum rods. The plate at the bottom of the machine glides across the Y axis via a pair of aluminum rods and a set of bearings whereas the perpendicularly placed X axis is stationary and moves in a similar manner using one stepper motor placed to the side. Across from this motor is another one, which manipulates the Z axis vertically. 

    After adding a pen and connecting the motors to the shield, tuenhidiy opened the Universal Gcode Platform application and added a few different toolpaths for testing. As shown in the following video, the plotter does a great job at drawing both pictures and text accurately. For more details about this project, check out its tutorial on Instructables.

    Website: LINK

  • Neatly fold your t-shirts with an Arduino-powered robot

    Neatly fold your t-shirts with an Arduino-powered robot

    Reading Time: 2 minutes

    Arduino TeamJanuary 3rd, 2022

    Folding t-shirts isn’t a fun process for many people, and even worse, it’s difficult to get them looking the exact same way when the pile of folded clothing is completed. So in order to make it easier, mechanical engineering students Pietro Oppici, Corentin Vandebroek, Stefano Pontoglio, and Quentin Bertieaux set out to build a robot of their own that could quickly and precisely fold shirts to perfection and drop them below. They also wanted it to be able to detect what kind of tee was present so the robot could adjust its folding style to match. 

    After designing and fabricating a mechanism consisting of birch and MDF wooden panels held together with 3D-printed hinges, the team opted to use an Arduino Uno board as the brains of the operation. From there, they attached a series of NEMA17 stepper motors, three of which were high torque for fast folding, and a servo motor for the final fold. A set of five DRV8825 drivers were then connected to the Uno, which delivered current from the 12V power supply to the motors.

    The program for the t-shirt folding robot starts off by taking readings from two photoresistors in order to detect if a shirt is present and if it has long or short sleeves. For long sleeves, the outer panels fold first, and then the rest of the movements follow from there. At the very end, a trapdoor opens at the bottom so the now-folded shirt can slide onto a neat pile of clothing below. 

    To see this project in action, you can watch the students’ video below and read more about it here on Instructables.

    Website: LINK

  • This Samsung Ballie-inspired spherical robot gets around on a couple of wheels

    This Samsung Ballie-inspired spherical robot gets around on a couple of wheels

    Reading Time: 2 minutes

    Arduino TeamJanuary 3rd, 2022

    Back in early 2020, Samsung demonstrated their Ballie robot concept at CES, and although it never got off the ground, it inspired Derek Lieber to create his own version of a gyroscopically stabilized robot that moves with a pair of hemispherical “wheels” on each side.

    Lieber’s project, which he calls “Ballbot2”, is based around a single Arduino Mega connected to a set of two LM6234 drivers that take the incoming 5V PWM signals and boost them up to the 12V required by the motors. Speaking of motors, the ones for the Ballbot2 aren’t the typical geared DC or steppers, but rather gimbal motors that use copper coils surrounding a central magnet to turn it. Detecting the current orientation of the magnetic field is done by utilizing four Hall effect sensors to sense its position and then send it in a digitized format to the Arduino for further processing and feedback. He mounted an XBee module to a custom shield, along with the two driver ICs, before attaching it to the Mega. The XBee allows for the robot to be remotely operated with a secondary XBee module, which reads data from a joystick and transmits it wirelessly. 

    With the components chosen and code finished, Lieber then constructed a body out of 3D-printed PLA filament in the shape of a wide ring, several smaller rings, and two hemispheres that flank either side of the robot and act as wheels. From there, he stuffed the battery pack, a few lead weights, and the electronics into the central portion of the robot before attaching the two sides. 

    To see Lieber’s Ballbot2 project in action, you can view his demonstration video below and you can download the design files/code here in his blog post.

    Website: LINK

  • Homemade thermal battery system keeps the shop cool with Arduino

    Homemade thermal battery system keeps the shop cool with Arduino

    Reading Time: 2 minutes

    Arduino TeamJanuary 3rd, 2022

    When trying to cool off a space, most people reach for an air conditioning unit that uses a pump, compressor, refrigerant, and a radiator to move heat from inside a room to the outside air. But in a break from this typical model, YouTuber Curtis in Seattle came up with a system that pumps water between a series of radiators/box fans and a set of five 55-gallon drums to move heat away from a room during the day.

    Curtis employed an Arduino Uno to calculate temperatures via input from four DS18B20 sensors, activate relays, log data, and display the indoor, outdoor, battery, and ground measurements on an LCD module. The components are all housed in a vintage movie projector.

    His setup, more commonly referred to as a thermal battery, works by first storing a large amount of sub-ambient water in a tank, or in this case, a series of daisy-chained drums buried about a foot underground and a couple of feet away from the wall. Then during the day when his shop begins to heat up, the cool water flows from the tanks and through a radiator, which uses a fan to draw warm air from inside the room and transfer its heat into the passing water. Over time, this can keep the room’s temperature at around 71 degrees Fahrenheit even when the outside temperature is several degrees above that. Owing to the name “thermal battery,” this system can then recharge overnight by releasing the heat within the barrels to the outside air using another radiator/fan. 

    Website: LINK

  • Top 10 Arduino blog posts of 2021

    Top 10 Arduino blog posts of 2021

    Reading Time: 4 minutes

    Arduino TeamDecember 31st, 2021

    To say it’s been another challenging year would be an understatement, but it’s reassuring to see that the top 10 Arduino blog posts of 2021 show us that makers have persevered, undaunted.

    As we sprint headlong into 2022 with hope for a return to normality (whatever that might actually look like!) we wanted to cast an eye back over the Arduino blog. These are the top posts from 2021, which prove that you can’t keep good maker down.

    The Arduino community has been creating some of the best projects we’ve ever seen. It’s also exciting to note that it’s been another year when newcomers have taken up the electronics hobby. The presence of Arduino software posts in our top 10 Arduino blog posts of ‘21 suggests lots of people have been getting into the Arduino scene.

    Learn how to build your own massive 3D-printed CNC router

    If you want an affordable option, this guide shows you how to build Ivan Miranda’s 3D-printed CNC machine design.

    Announcing the Arduino IDE 2.0 (beta)

    It was a great day when the famous Arduino IDE reached version 2.0 in March of 2021.

    Hacking a USB battery bank to gather telemetry

    Keenan Johnson needed more info for a new project and so he hacked a USB battery bank to gather telemetry.

    The new Arduino CLI 0.19.0 is out and better than ever!

    This release delivered tons of great enhancements, exciting new features and heaps of bug fixes.

    Arduino MKR IoT Carrier: Control what you want, how you want to!

    By popular demand, we were pleased to announce in early 2021 that it’s possible to buy the Arduino MKR IoT Carrier.

    Cascading LED stair lights prevent late night tumbles

    Stephen Gidge and his roommate could have installed a new hall light, but they were both experienced with Arduino and so they created these cascading LED star lights instead.

    One board to rule them all: History of the Arduino UNO

    With the UNO Mini Limited Edition flying off the shelves, we took a heartfelt look at the history of its inspiration, the ubiquitous UNO.

    The Arduino Nano RP2040 Connect is here

    The first Arduino board to include Raspberry Pi silicon arrived in 2021, to much fanfare.

    Arduino Cloud now supports ESP32 devices

    Support for ESP32 devices (on top of existing support for ESP8266) became available on the Arduino IoT Cloud in May, 2021. A huge step forward in bringing IoT devices of all kinds together.

    Introducing the Arduino UNO Mini Limited Edition: Pre-orders now open

    Even though it only launched a couple of weeks ago, the Arduino UNO Mini Limited Edition announcement is one of the most viewed pages this year.

    Happy New Year from all of us at Arduino!

    Website: LINK

  • This gear turns only once every 346 quintillion years

    This gear turns only once every 346 quintillion years

    Reading Time: 2 minutes

    Arduino TeamDecember 31st, 2021

    Mechanical advantage is the single most important principle in mechanical engineering. Archimedes is quoted as saying “Give me a lever long enough and a fulcrum on which to place it, and I shall move the world.” We could say the same of gear reductions, but they have the added advantage of fitting into a very compact space. To prove that point, Sunday Robotics’ INFINITY GEARS has a final gear that will only make a single revolution once every 346 quintillion years.

    To put that time frame into perspective, consider that our universe is roughly 13.8 billion years old. You would have to exceed 25 billion similar spans of time before the final gear in this device made a full revolution. Thanks to the power of gear ratios, this device achieves that using only 41 individual spur gears (plus the motor’s input gear). The input motor spins at 250RPM and each stage has a gear ratio of 1:5. The final gear ratio, from input to output, is 1:5^41. Not only does that mean the output is spinning extremely slow, it also means that it has an incredible amount of torque — though friction losses keep it from reaching insane levels.

    You can build an INFINITY GEARS machine yourself using a handful of common parts and components, including an Arduino Uno board, a 250RPM geared DC motor, and 3D-printed gears. That final gear is hard-mounted and cannot rotate. But, because the gear before it is rotating so slowly, the heat death of our universe will occur long before the gear’s teeth ever begin to grind. For fun, each of the five black gears has a magnet that the Arduino uses to count revolutions. Those revolution counts display on an LCD. The first will tick up quickly. The second will only tick up once every 135 days. The third won’t tick for 3.6 million years.

    INFINITY GEARS does a fantastic job of illustrating both the passage of time on a cosmic scale and the vast power of gear reductions.  

    Website: LINK

  • Nikodem Bartnik created a powerful robotic chassis using T-Motor AK series actuators and Arduino

    Nikodem Bartnik created a powerful robotic chassis using T-Motor AK series actuators and Arduino

    Reading Time: 2 minutes

    Arduino TeamDecember 28th, 2021

    After attempting to incorporate a few AK80-9 actuators from T-Motor into a robotic arm project, YouTuber Nikodem Bartnik was forced to pivot to a different kind of project: a universal robotic chassis/platform. By using these high-power and high-precision motors, his robot could be both fast and accurate while moving along the floor.

    Once a flat plate had been cut from a piece of plywood with the help of a CNC router, Bartnik mounted the two motors and attached a wheel to each one. To control the motors, he went with a single Arduino Uno and fabricated a custom PCB that routes CAN bus signals between the Uno and the two motors. Power was provided to everything via a pair of LiPo battery packs for a total of around 24 volts. 

    Currently, the robot is essentially an RC car that responds to commands that it receives from somewhere else. In Bartnik’s project, he used an additional Uno connected to a laptop over USB and an nRF24 radio transceiver module to wirelessly send data to the robot’s nRF24 module. He also made a Python script, which can be used to set the speed of the robot’s movements and takes arrow key presses that are then converted to directional movements. 

    You can watch Bartnik’s video below for more information or you can check out the his repo here for the project code and design files.

    Website: LINK

  • This Arduino device knows how a bike is being ridden using tinyML

    This Arduino device knows how a bike is being ridden using tinyML

    Reading Time: 2 minutes

    Arduino TeamDecember 28th, 2021

    Fabio Antonini loves to ride his bike, and while nearly all bike computers offer information such as cadence, distance, speed, and elevation, they lack the ability to tell if the cyclist is sitting or standing at any given time. So, after doing some research, he came across an example project that utilized Edge Impulse and an Arduino Nano 33 BLE 33 Sense’s onboard accelerometer to distinguish between various kinds of movements. Based on this previous work, he opted to create his own ML device using the same general framework. 

    Over the course of around 20 minutes, Fabio collected data for both standing and sitting by strapping a Nano 33 BLE Sense to his arm and connecting it to a laptop. Once the data had been processed and fed through a training algorithm, his freshly minted model was then deployed back to the board for real-time processing. 

    The program Antonini made classifies incoming data from the IMU into one of four different states: seated on a plain, seated on an uphill, jumping on the pedals during an uphill, or pushing on a sprint while on a plain. From here, the built-in RGB LED changes its color to notify the user of what was inferred.

    You can read more about the creation process and usage of this project here in Antonini’s Medium blog post.

    Website: LINK

  • This 3D-printed, Arduino-controlled kit makes microfluidic pumps more accessible

    This 3D-printed, Arduino-controlled kit makes microfluidic pumps more accessible

    Reading Time: 2 minutes

    Arduino TeamDecember 27th, 2021

    In circumstances where extreme precision is required when dealing with the movement of microscopic amounts of liquids, such as lab-on-a-chip (LoC) and organs-on-a-chip (OoC) systems, obtaining a pump that is both cheap and accurate is nearly impossible since they often cost several thousands of dollars to procure or are too bulky. To combat this problem, a team from the Singapore University of Technology and Design Soft Fluidics Lab created a custom solution that can be fabricated with off-the-shelf 3D printers. 

    The device they came up with relies on a single Arduino Micro to control the flowrate of the pump by adjusting the speed of the connected motor. There is also an optional OLED that can be added that lets users see the exact flowrate which has been selected. Altogether, this DIY pump system is capable of moving a mere 0.02 microliters up to 727.3 microliters per minute with a footprint of around 20mm by 50mm. Perhaps best of all, this project can be easily sent as a kit and built onsite with incredible speed, further reducing the cost to use it.

    For more details on this 3D-printed peristaltic pump system, you can read the team’s research paper.

    (Image credit: T. Ching et al.)

    Website: LINK

  • A DIY digital clock with a twist

    A DIY digital clock with a twist

    Reading Time: 2 minutes

    Arduino TeamDecember 27th, 2021

    The digital clock has existed in its current form for decades at this point, so it’s quite exciting to see when a new take on the classic design comes along. The Time Twister 5, created by Hans Andersson, is a fully 3D-printed electromechanical clock that twists certain blocks into place, which make up digits to display the current time.

    Each block consists of five distinct layers, where each layer is a triangular prism with three outer faces. These faces come in a total of five different patterns and are arranged in such a way that any digit from zero up to nine can be represented by simply turning the correct layer(s) a certain amount. The internal electronics — including the Arduino Mega, DS3231 real-time clock module, sensor shield, and power circuitry — are all housed in the gold-colored base. Each layer is stacked upon three metal rods for support and contains a single micro servo that twists planetary gears to move the outside while keeping the inside stationary.

    While watching Andersson’ demonstration video below, it is tough to not become entranced by the synchronous movements the digits all rotating into place within the timespan of a second. To read more about his project or to download the files to build one yourself, you can visit his website here.

    Website: LINK

  • Becky Stern’s machine brings the NYC hot dog experience to you

    Becky Stern’s machine brings the NYC hot dog experience to you

    Reading Time: 2 minutes

    Becky Stern’s machine brings the NYC hot dog experience to you

    Arduino TeamDecember 24th, 2021

    For her gift to Colin Furze as a participant in this year’s YouTube Makers Secret Santa event, Becky Stern opted to bring the street food of New York City in the form of a mostly automatic hot dog dressing machine. It was designed with the intention of letting a user set down a hot dog at the top of a small roller ramp and then have it slide along as it gets covered in various authentic toppings. 

    An Arduino Uno is responsible for controlling all three servo motors via a single PCA9685 driver module and the attached Adafruit Sound Board, which is loaded with sounds that Stern recorded around Manhattan. A separate Adafruit Pro Trinket sits at the base and sends commands to an RGB LED matrix in order to scroll text across the display. 

    There are two servos dedicated to the task of dispensing mustard from a squeeze bottle, as one applies pressure with a pull while the other shakes violently to produce a messy drizzle. At the end of the rollers is a much simpler configuration, which has a servo motor that turns 90 degrees to dump an onion sauce mixture over the hot dog. 

    After producing a few more decorations for her mini-NYC hot dog cart, Stern shipped her creation across the pond to Furze where he got to test it for himself, as seen at the 8:50 timestamp in his video. You can view the process of making this project in more detail here on Instructables or by watching Sterns video below!

    Website: LINK

  • Retrofit your light switch with this remote-controlled device

    Retrofit your light switch with this remote-controlled device

    Reading Time: 2 minutes

    Arduino TeamDecember 23rd, 2021

    It can be extremely annoying and frustrating to finally get comfortable somewhere only to realize that you forgot to turn off a light, thus requiring a short journey to and from the wall switch. Mechanical engineering student and Instructables user alanmerritt ran into the same problem in his dorm room, so he responded by creating a device that could remotely operate a light switch without any modifications to the switch itself. 

    The first step in designing this remote control device was measuring the fixture and modeling it in CAD, after which Alan made a small rack-and-pinion mechanism that uses a servo motor to rotate a gear and thus lift an attached slider up or down. He also 3D printed an enclosure that surrounds the otherwise ugly electronics, hiding them from the view of potential visitors. 

    Commands to toggle the switch are sent from a controller that consists of an Arduino Mega and an nRF24 wireless transceiver module, and a corresponding nRF24 transceiver receives the command and passes the information to an Arduino Uno over the SPI bus. Finally, this Uno board interprets the command and moves the servo motor to their the on or off position accordingly. 

    To read about this project in more detail, including the code and design files, you can check out Alan’s write-up here on Instructables.

    Website: LINK

  • Arduino IoT Cloud Scheduler Brings Enhanced Automation to Your Projects

    Arduino IoT Cloud Scheduler Brings Enhanced Automation to Your Projects

    Reading Time: 3 minutes

    Cloud Scheduler is a brand new feature that’s now live as part of your Arduino Cloud platform. It’s a powerful addition that adds a whole new dimension of automation and control to your projects.

    Triggering Schedule Variables

    The Cloud Scheduler is a new type of variable. It’s pretty simple, consisting of a couple of elements that, together, are incredibly useful. It mainly boils down to being triggered at a specific time, for a predetermined duration. From those two functions you can automate anything you want, however many times you want, whenever you want.

    For example, it can be triggered every 10 minutes and remain on for 10 seconds. Or you could have it trigger for eight hours every day, or even have it switch on for a week before turning itself off.

    It’s incredibly flexible, and the whole thing is handled through a simple widget on your Arduino Cloud dashboard. This offers a huge advantage. You can utilize these actions without needing to figure out the complex code to achieve it.

    To make sure it’s working correctly no matter where you are, one of the variable types allows you to retrieve (and set) your local time zone. Essential for a schedule that’s triggered at a specific time of day. It also means you don’t need to manually work out your location’s relationship to UTC.

    What to do with Cloud Scheduler?

    You don’t need much imagination to figure out the usefulness of automatic timers, but let’s ponder a couple of examples nonetheless.

    Over on our Docs page for the Cloud Scheduler you can see some excellent use cases. Automating your lights, for instance, or watering a plant at regular intervals. Considering it’s available right now, why not set your Christmas light to automatic with the Cloud Scheduler? Actions and events that can jump into action without the need for any manual input at just the right moment.

    And don’t overlook that you can set up multiple schedulers to work together. Whether they’re doing different things at different times, or following on from each other to create a series of connected actions.

    It’s all handled through the widgets with dates, times and durations all visible directly on your dashboards. That includes mobile dashboards too, as the Cloud Scheduler is now available for all devices.

    As always, we’d love to get your feedback on this cool new feature. Give it a shot and join us on the Arduino Forum to tell us how it went.

    Website: LINK

  • Turing-ring is a DIY Turing machine consisting of an Arduino and an RGB LED ring

    Turing-ring is a DIY Turing machine consisting of an Arduino and an RGB LED ring

    Reading Time: 2 minutes

    Arduino TeamDecember 21st, 2021

    With just an infinite tape, a head that can read or write, a state, and some rules, Turing machines (TMs) are capable of running any computer program. So, after winning a NeoPixel ring in a competition, Mark Wilson wanted to implement his own Turning machine using just a few RGB LEDs and a single Arduino Nano.

    When his aptly named Turing-ring starts up, an initial state and cell values on the tape can be loaded from either internal program storage or over a USB serial connection. From there, the TM can be further modified or run in order to perform a given task. Furthermore, a user can input their own states (denoted by LED colors) onto the tape by turning a rotary encoder and pressing down to confirm their choice. The speed at which the machine iterates through each step is controlled from either the menu or by rotating the dial when a program is running.

    Wilson produced a great video (shown below) that demonstrates how one might create a program. In it, his first example is a simple chase sequence that spins a red pixel around the ring, while the second example adds two binary numbers and displays the result.

    To read more about the Turing-ring, check out Wilson’s write-up here on Hackaday.io or his code on GitHub.

    Website: LINK

  • Making music with a Nano 33 IoT-based MIDI keyboard

    Making music with a Nano 33 IoT-based MIDI keyboard

    Reading Time: 2 minutes

    Arduino TeamDecember 21st, 2021

    As part of an assigned project in his class, Peter Ashmore and a partner were tasked with making some kind of interactive object, so they decided to go with a MIDI keyboard due to their shared enjoyment of music production. Modeled somewhat after the typical Launchpad, the team’s system incorporated a set of 13 buttons spanning one octave, as well as two buttons for controlling the current octave and a knob that regulates the volume. 

    The team went with an Arduino Nano 33 IoT as the brains of the operation and wired up the 15 push buttons in a pull-down configuration. After they had finished soldering each component to pieces of perfboard, each element was then assembled into a custom-built chassis that was laser cut from plywood and coated in black spray paint. 

    To enable the Nano 33 IoT to communicate with Ableton running on the host machine, the team loaded both the Hairless MIDI and loopMIDI programs onto their machine, which create a virtual bridge between the USB connection of the Nano and Ableton. Once tested, the final version of the program was loaded that checks the state of each button and either plays a note or adjusts the octave accordingly. 

    You can see this project in action below, or you can read more about it here on Instructables.

    Website: LINK

  • Small-scale autonomous boat made out of recycled water bottles and a Tupperware container

    Small-scale autonomous boat made out of recycled water bottles and a Tupperware container

    Reading Time: 2 minutes

    Arduino TeamDecember 16th, 2021

    As part of their city’s beach restoration project, Instructables users Kousheek Chalraborty and Satya Schiavvina, who go by the team name Technovation, needed to construct a small and cheap boat that could assist in mapping the depth of the sea floor at various locations. The design they were able to come up with achieved this goal and even went beyond it by incorporating an autonomous navigation system into their watercraft. 

    The hull of the boat was made from a leftover Tupperware container and discarded water bottles, therefore reducing the cost significantly and integrating recycled materials. After the pontoons were attached to the bottom, a pair of brushless DC motors were screwed into place at the top, along with an 11.1v LiPo battery and dual 30-amp ESC modules.

    At the core of the robot is a single Arduino Uno that has a custom shield mounted to its top pin headers. This board consists of an nRF24L01 transceiver module for sending/receiving telemetry, a GPS module for tracking position, and a compass module that determines the boat’s orientation. With the firmware loaded onto the Uno, Kousheek and Satya created their own dashboard in Python that allows them to view information in real-time as well as send commands from across the water.

    You can read more about this project here on Instructables.

    Website: LINK

  • This maker designed an interactive LED-lit dress inspired by Katniss Everdeen’s

    This maker designed an interactive LED-lit dress inspired by Katniss Everdeen’s

    Reading Time: 2 minutes

    This maker designed an interactive LED-lit dress inspired by Katniss Everdeen’s

    Arduino TeamDecember 16th, 2021

    Inspired by Katniss Everdeen’s burning dress from the Hunger Games series, Cindy Li set out to create her own version that uses fabric-attached LEDs to both simulate fire when movement is detected and illuminate in other ways when a certain button is pressed.

    This light-up dress was based around two development boards: a Circuit Playground Bluefruit from Adafruit that handles the lights and an Arduino Nano RP2040 Connect, which connects to a sensor, some buttons, and a speaker for extra functionality. Li started building this project by sewing the Circuit Playground onto he fabric and then running a strip of individually addressable LEDs in an arch shape, with conductive thread tying it all together. Next, the Nano RP2040 Connect was wired to the speaker, buttons, and APDS-9960 sensor and placed within a custom-cut acrylic enclosure. Finally, another string of LEDs was wrapped around the bottom of the dress to act as the “fire” component. 

    Once the hardware was finished being sewn onto the dress, licjn moved to the programming step. Her dress has three modes: color matching which uses the APDS-9960 to sense color and recreate it on the LEDs, an “alarm system” that turns the lights red when close to something, and the fiery transformation that senses when the user is spinning and displays an orange glow underneath. As a bonus, a simple tag game was implemented which can be played with flashlights and gives the wearer a certain number of “lives” before they lose. 

    To see more regarding this interactive wearable project, you can read about it here on Instructables or watch Li’s demo below!

    Website: LINK

  • Produce pretty patterns with this Arduino-powered project

    Produce pretty patterns with this Arduino-powered project

    Reading Time: 2 minutes

    Arduino TeamDecember 15th, 2021

    Oftentimes, even the simplest of machines can produce intricate results, and that is perhaps best demonstrated by Instructables user Dee et Ko and their pattern making device. Reminiscent of a Spirograph, it consists of just a few parts — two stepper motors, an Arduino Uno, a motor shield, and a marker — though it’s capable of some intriguing patterns.

    Dee et Ko began this project by laser cutting a pair of discs and arms, along with a base plate, out of a thin sheet of acrylic and then attached them together with machine screws. Next, each stepper motor was mounted underneath the base plate and connected to a dedicated A4988 motor driver on the CNC shield. Finally, a marker was placed at the intersection of the arms so that it hovered just above the paper.

    At its core, the code relies on just a couple of parameters in order to generate the resulting pattern, namely the rate at which the left disc rotates and the rate for the right disc. Eventually, these might be read in from an external sensor or a potentiometer for on-the-fly control, but for now they’re constants. 

    As seen in Dee et Ko’s demonstration video, this DIY device can draw ornate designs across a canvas using only a marker and two steppers. More details can be found in its write-up on Instructables.

    Website: LINK

  • This automated diorama shows a sailboat at sea

    This automated diorama shows a sailboat at sea

    Reading Time: 2 minutes

    Arduino TeamDecember 14th, 2021

    At the intersection of embedded electronics and art lies a balance in which works of creativity can be brought to life through the use of motors, lighting, and much more. This concept is especially apparent in Lincoln Stein’s animated diorama, which utilizes a combination of microcontrollers, LEDs, and a DC motor to create a scene of a boat bobbing across rough waves in the ocean. Stein was inspired to build this project from a sudden email sent by his dad that reminisced about a “magic painting” that used to light up and move once every hour, so the pair set about replicating it. 

    After receiving a wooden boat cutout from his father, Stein connected one end of the ship to a DC motor that causes a cyclical bobbing motion. Next, the attached real-time clock module lets the Arduino Nano know when to wake up and begin playing out the scene given by an array of events. These events could include a flash from the LED strip to simulate lightning or to start playing a sound file off an SD card. 

    You can read about this shadowbox in greater detail here in Stein’s Hackster write-up or watch his demonstration video below.

    Website: LINK