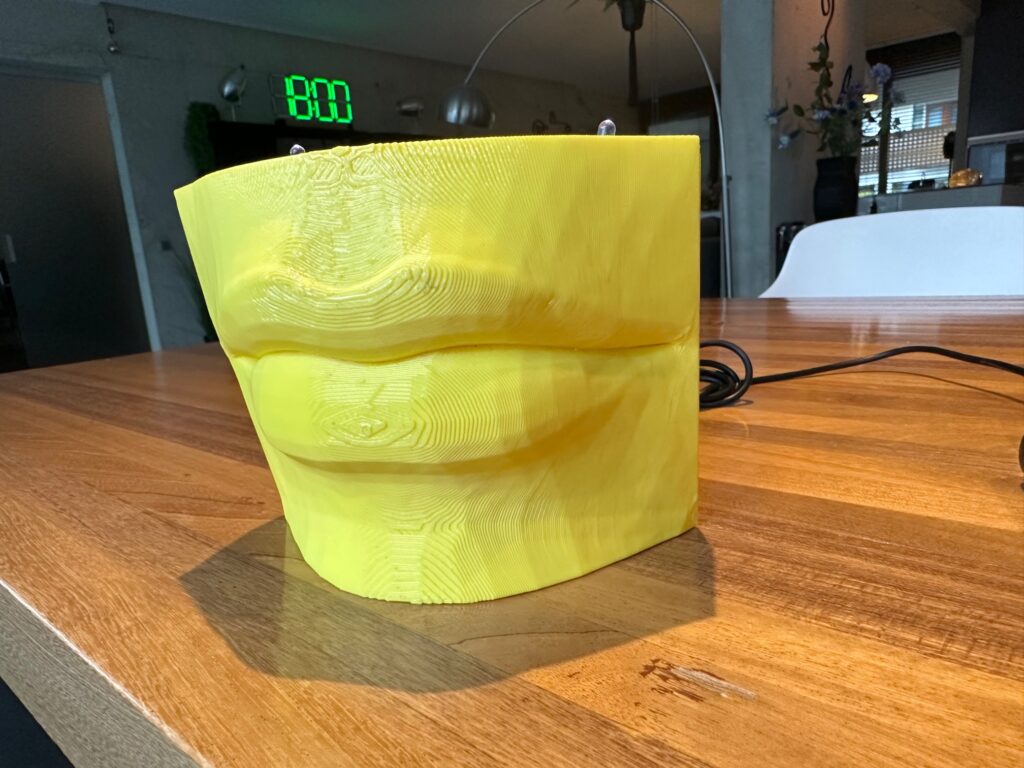
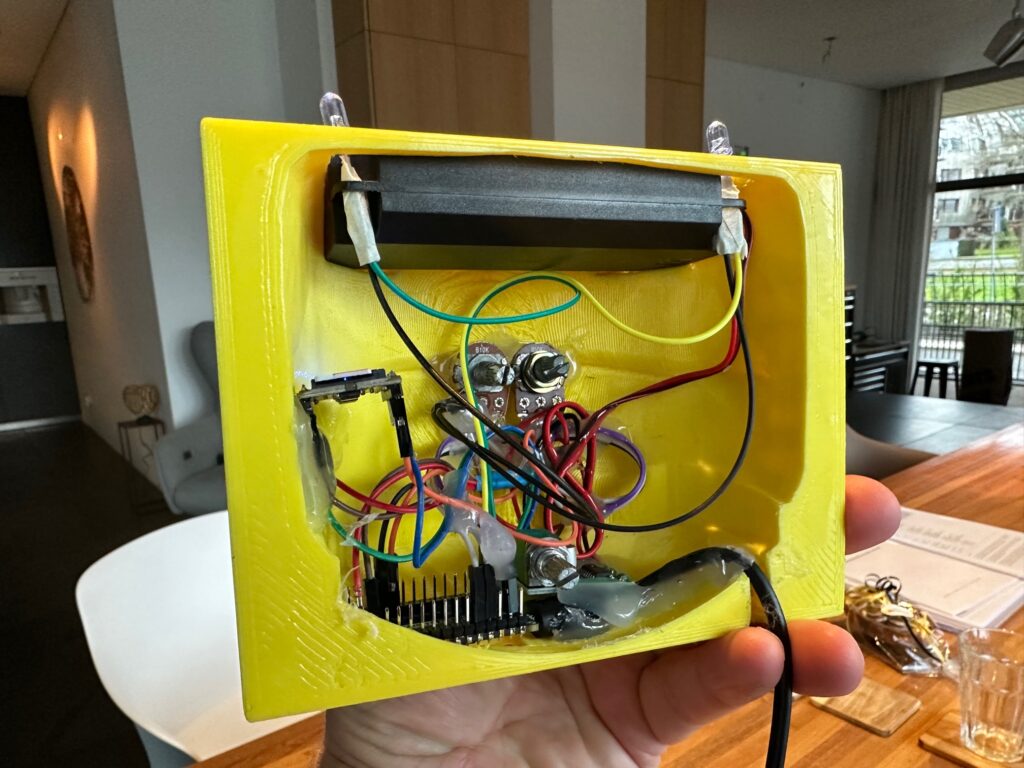
Whether it is a library, conference room, school classroom, or some other public space, we all require peace and quiet to work sometimes, but achieving it can be a challenge. After wondering if loudmouths could be automatically asked to be silent via some kind of sensor-driven system, Bas op ten Berg, the founder of BotBerg, chose to build one using just a few components.
His smart shusher is based on the Arduino Nano 33 BLE Sense board and its built-in MP34DT05 MEMS microphone element. By reading in the pulse-density modulation (PDM) value from the output pin, he could easily convert it into the sound pressure, and thus the ambient noise level. Setting the noise threshold is done by carefully adjusting a connected potentiometer that gets read multiple times per second from an analog input pin. When the set threshold has been exceeded for a predetermined amount of time, a DFRobot MP3 player module is triggered and plays a sound file containing the phrase “Pssst, silence please! Silence please!” which is sure to grab anyone’s interest. All of the parts are housed within an equally attention-grabbing 3D printed lower face so that it appears to be speaking.
Beyond this local, offline functionality, op ten Berg offers other ways to expand the project, including ideas such as BLE connectivity, extra sounds/lights, or even switching on a relay. More details can be found on his website.
If you do any kind of video content creation and you still rely entirely on static shots, then you’re missing out on an opportunity to generate visual interest that draws viewers in. Dynamic shots can do a lot to increase the production value of your videos, but most people can’t afford to hire a camera operator. That’s why you should check out Giovanni Aggiustatutto’s camera robot.
This device attaches to a standard tripod to provide motorized panning and tilting. While those movements are not comprehensive, they do allow for a lot of flexibility for capturing dynamic video. The best part is that the setup includes a remote with a joystick to make controlling the movement a snap. The remote lets users program movements ahead of time, which the device can then execute when it is time to get the shot. There is even a timelapse mode that will move the camera slightly between still captures.
Because this pans and tilts, it needs two motors. Those are stepper motors controlled by an Arduino Nano Every board through two TMC2208 stepper motor driver modules. A joystick on the remote lets the user pan or tilt, while an LCD provides information. The remote connects to the main unit via an Ethernet cable. The enclosures and most of the mechanical parts are 3D-printable, but this project does require some hardware like pulleys, bearings, and aluminum tube.
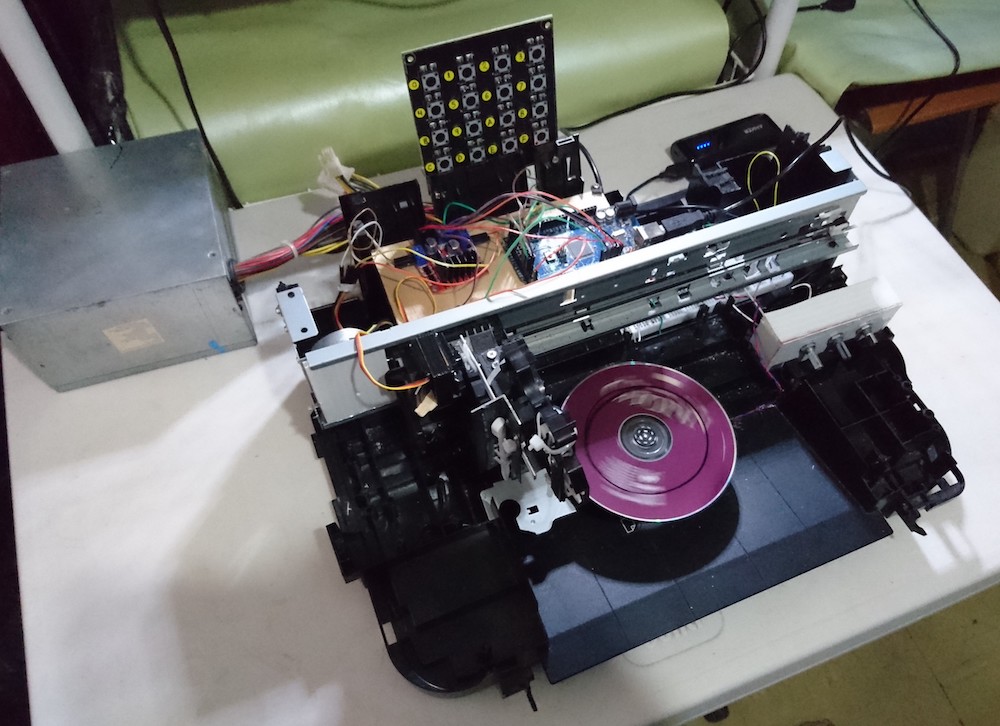
The art of making pottery has existed for tens of thousands of years, and the materials used have stayed relatively similar as nearly all items were made from clay which was left to harden either from the sun or via a kiln. But for those who wish to do only a little sculpting with little regard for the finished product, such as Guillermo Perez Guillen had the idea to employ a cornstarch-based material instead for reduced costs. Beyond merely using one’s hands to shape the “clay”, he also upgraded his 3D pottery machine project with new controls, patterns, and more.
Just like in the first version, this second iteration of the clay sculpting machine relies on an old CD-ROM drive to both spin the platter — handled by an Arduino Nano 33 BLE Sense, and move the toolhead along a single axis. But unlike the previous version, this one introduces far more automation and control. An Arduino Mega 2560 receives inputs from a 4×4 matrix keypad for homing, positioning the toolhead, or running a predefined pattern. A stepper motor, driven by an L298N, moves the gantry left and right while a servo motor can raise or lower the stylus.
With this combination of moveable axes and the ability to creates patterns automatically, this improved system is capable of producing very creative works of cornstarch-based pottery. Guillen hopes that this project could find its way into classrooms as kit for STEM education, helping students intuitively learn how to make 2D figures such as circles, squares and triangles, or even 3D figures like cylinders and cubes. More information about Guillen’s machine can be found here on Hackaday.io.
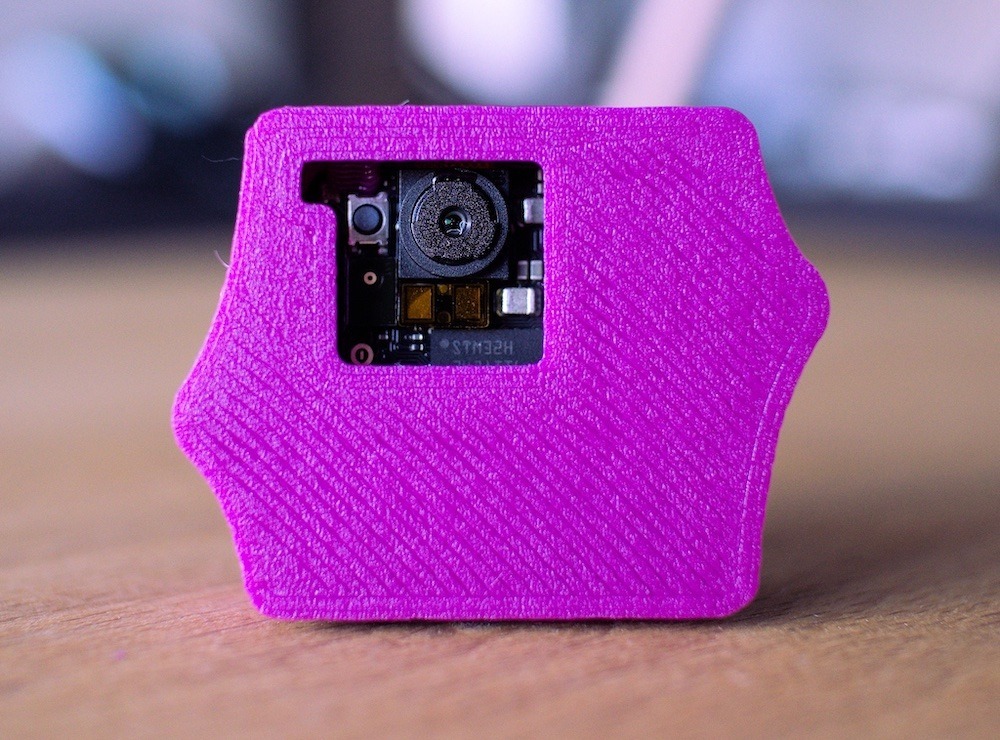
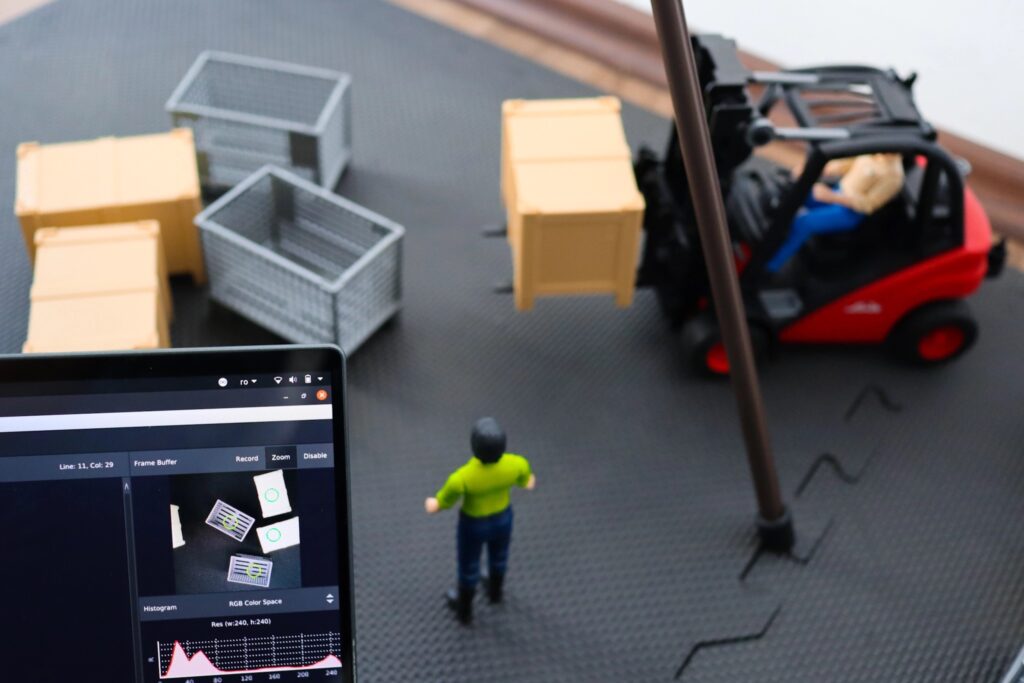
Maintaining accurate records for both the quantities and locations of inventory is vital when running any business operations efficiently and at scale. By leveraging new technologies such as AI and computer vision, items in warehouses, store shelves, and even a customer’s hand can be better managed and used to forecast changes demand. As demonstrated by the Zalmotek team, a tiny Arduino Nicla Vision board can be tasked with recognizing different types of containers and sending the resulting data to the cloud automatically.
The hardware itself was quite simple, as the Nicla Vision already contained the processor, camera, and connectivity required for the proof-of-concept. Once configured, Zalmotek used the OpenMV IDE to collect a large dataset featuring images of each type of item. Bounding boxes were then drawn using the Edge Impulse Studio, after which a FOMO-specific MobileNetV2 0.35 model was trained and could accurately determine the locations and quantities of objects in each test image.
Deploying the model was simple thanks to the OpenMV firmware export option, as it could be easily incorporated into the main Python script. In essence, the program continually gathers new images, passes them to the model, and gets the number of detected objects. Afterwards, these counts are published via the MQTT protocol to a cloud service for remote viewing.
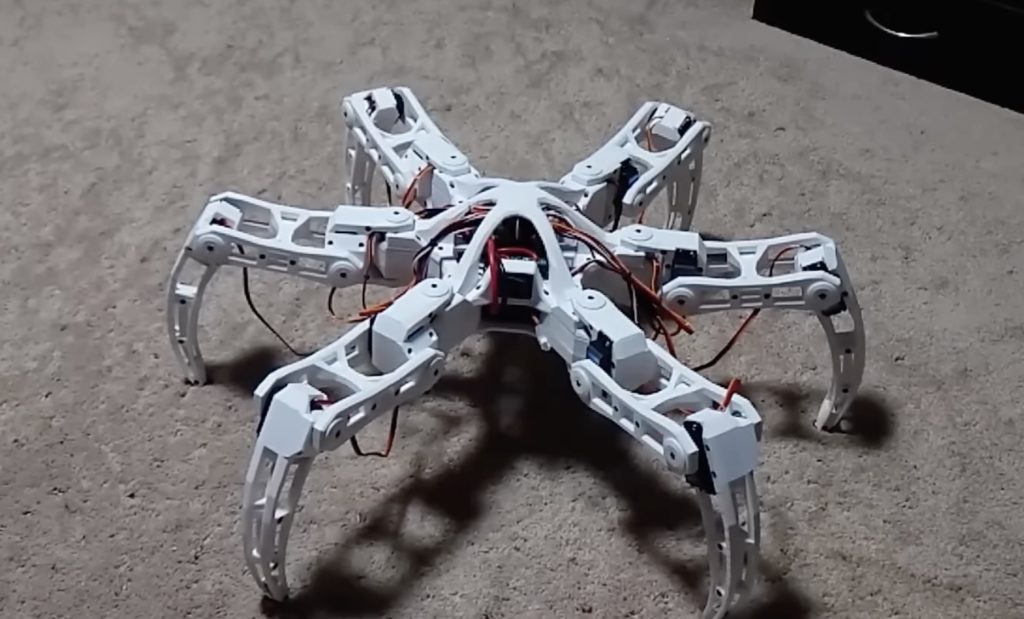
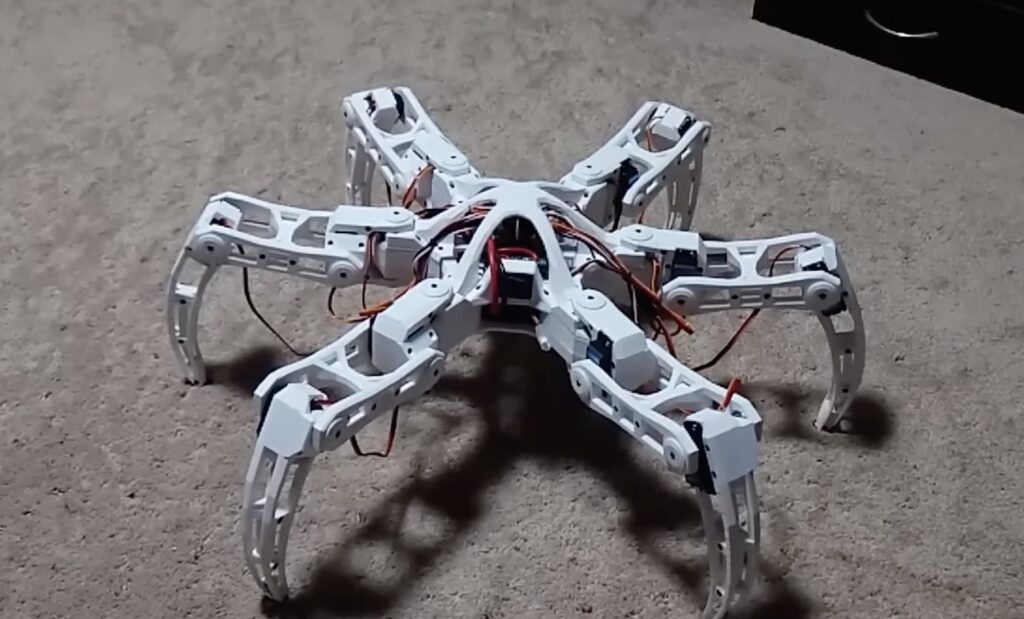
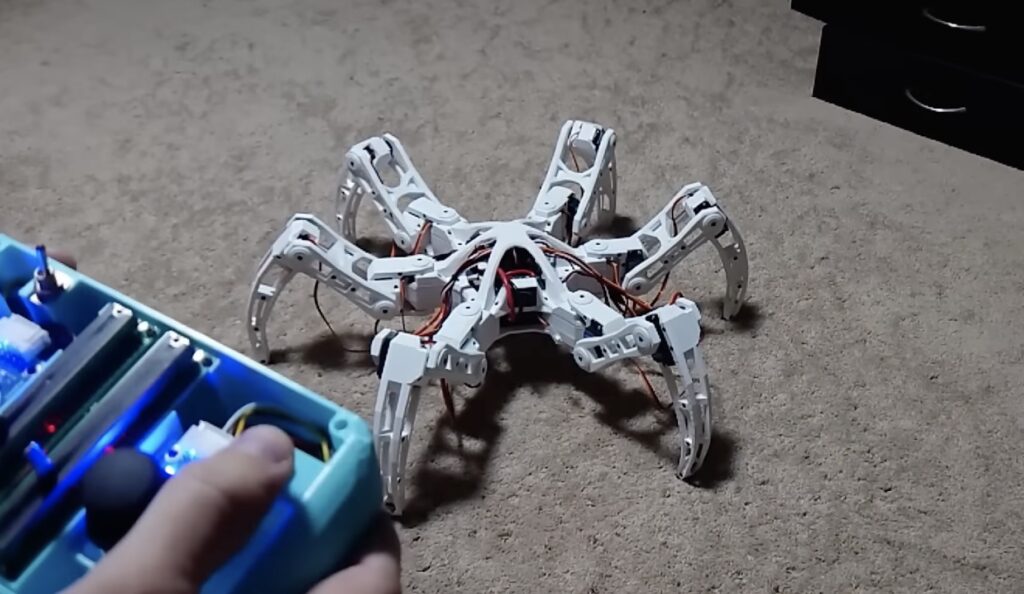
While robots can get around on two legs (or even none), it is difficult to get a smooth and efficient gait. Moving up to four legs improves the situation a bit, but each of those legs will still need multiple joints and careful balance for the robot to move in a stable manner. Once you increase the leg count to six, you can achieve some very good gaits, which is why hexapod robots are so popular. To experiment with six legs, Aecert Robotics built this nimble DIY hexapod robot from scratch.
As you can see in the detailed video, this robot is quite agile. If you watch carefully, you can see that three legs lift and three legs remain in contact with the ground for each step. That keeps the robot very stable, as it can balance easily on the tripod formed by the three legs touching the ground. Each leg has three joints: a “hip” joint that pivots the leg horizontally, a “knee” joint that pivots vertically, and an “ankle” joint that also pivots vertically. Servo motors directly actuate all of those joints, meaning there are 18 servos in total.
To control those servo motors, Aecert Robotics used an Arduino Mega 2560 board. A custom PCB shield made the connections much easier and tidier. The hexapod’s body and all of the legs were 3D printed. Aecert Robotics can control the robot via radio, using a custom controller based on an Arduino Uno. The two Arduino boards communicate via nRF24L01 radio transceiver modules. With the controller, Aecert Robotics can move the robot forward, backwards, left, and right. But the controller will also let the operator extended all the legs simultaneously. That means that they can make the robot hop in place by rapidly extending all of the legs at the same time.
Who said robots had to be all work and no play? For many years, people have been designing and building robots not just to help with chores, but to help us win games. Possibly the most famous examples of this are the robots that play chess.
In this article, we’ll take a look at the history of chess-playing robots, how they’ve evolved over time, and share three famous examples.
And do not forget that with the right inspiration, Arduino, and the Arduino Cloud, creating a robot is not a dream anymore!
The history of robots in chess — Three famous robotic chess prodigies
Chess is an old game. Humans have been playing it for 1,400 years, and for the vast majority of that time, their only opponents were other humans.
As time went on and technology became more advanced, people started to turn their thoughts to ways of using tech to win at chess. One of the first (somewhat clumsy) attempts came in the 18th century.
The Turk
The Mechanical Turk, developed in 1770 by Wolfgang von Kempelen, stunned audiences by repeatedly holding its own against human opponents. The world had changed forever — were machines finally beginning to outsmart their makers!?
Well… not exactly. The Turk actually turned out to be a case of fraud — and featured a human chess player hiding inside the machine and controlling its movements. False alarm.
The Mechanical Turk was destroyed by fire in 1854, after a perplexingly long career.
Boris Handroid
Throughout the 20th century, people worked furiously to build machines that could beat humans at chess. Progress slowly chugged along, and in 1980 the first commercially available chess robot came into being.
It was based on a chess computer called Boris and was extremely rare and limited, to the point where many people doubted it even existed. Due to its incredibly exclusive nature, it’s no surprise that the Handroid never became a household name.
The Milton Bradley Computers
Although the Handroid was not exactly a success story, it did show the world that there was at least an appetite for chess-playing robots, if they could be made effectively and at scale.
In the early 1980s, American board game giant Milton Bradley decided to take on the challenge. Working with computer scientists, they began to develop a robotic chess game that would move the pieces reliably enough to be sold at a mass scale.
The result was actually three different models: the Grandmaster that hit the US market, the Milton which was sold in Germany, France, and the Netherlands, and the Phantom which was built for the British market — although all three devices were extremely similar.
The Milton Bradley chessboard was able to detect where pieces were and used magnets attached to motor-driven belts to pull the pieces around the board. Unlike most of its predecessors, the Milton Bradley chess robot was a success and sold many copies in the US and Europe.
For chess aficionados, an important moment had arrived — you could now play chess at home without the need for a human opponent.
Deep Blue
Although it’s more of a computer program than a robot per se, no article about chess-playing robots would be complete without a mention of Deep Blue. Built on an IBM supercomputer, Deep Blue was the culmination of many years of grueling research and programming — a computer that could finally challenge a human chess champion.
In a series of games over the course of 1996 and 1997 — 10 years after development began on the project at Carnegie Mellon University — Deep Blue beat chess grandmaster Garry Kasparov.
It was a groundbreaking moment not just for chess, but for humanity as a whole — a reminder that, as advanced and intelligent as we are, the machines might just be catching us up.
Build your own chess robots
Today, you don’t need to rely on astronomically expensive novelty gadgets to experience the wonders of chess-playing robots — you can easily make your own at home. With tools like Arduino, amateur tech enthusiasts can assemble chess-playing machines for relatively low cost and without the need for a highly specialized skillset.
The Arduino Project Hub is home to a ton of chess-related projects, including some robots. YouTuber RobotAvatar built this machine that uses 64 reed switches to direct an Arduino Uno where each chess piece is.
Meanwhile, a computer running a Python program takes care of the “thinking” and sends signals to the device to move pieces. It’s a pretty straightforward device that literally adds an extra dimension to the game of computerized chess — allowing you to play games against machines in a much more tangible way.
Another amazing project, created by Greg06 on Instructables, is the automated chessboard that can not only tell where specific pieces are moved but also play against an actual opponent while moving its own pieces.
Chess isn’t the only thing Arduino is capable of. Check out our homepage to learn more about how it all works, the kinds of projects you can build, and how you can get started.
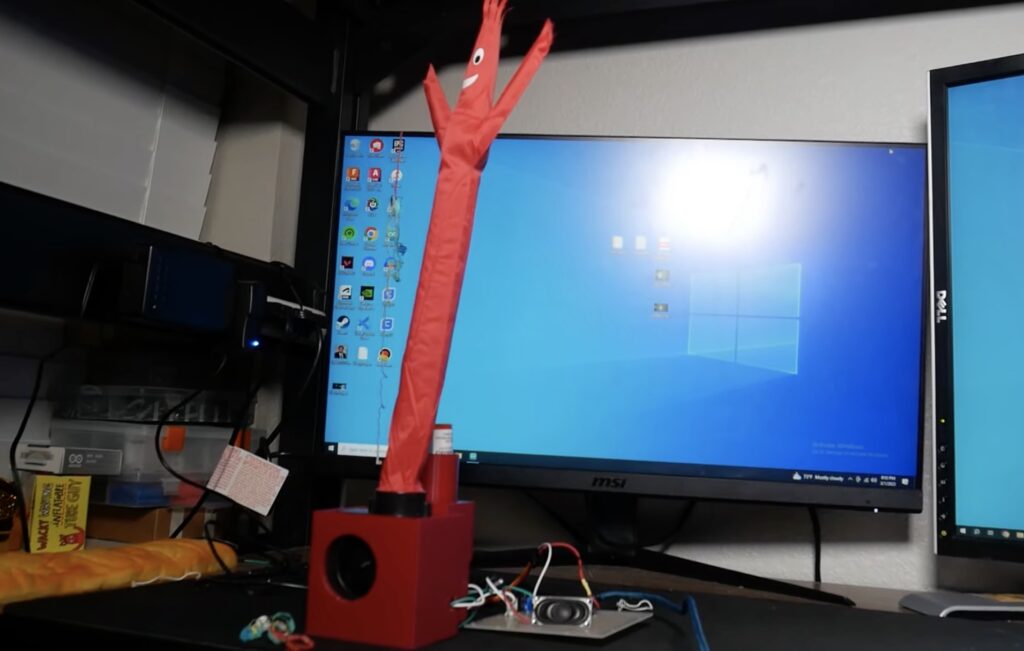
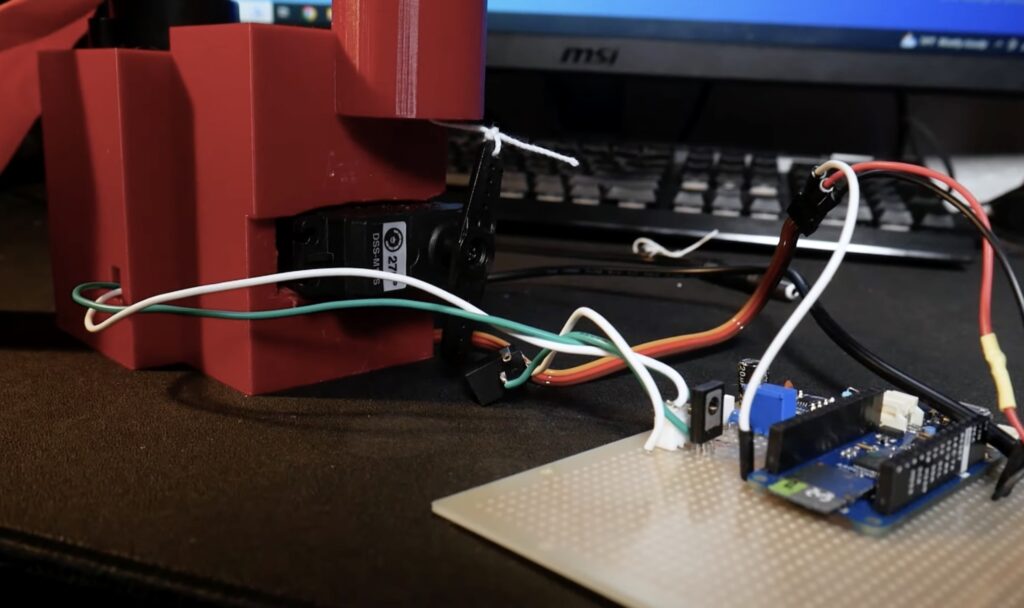
For some students, getting decent grades or even finding the motivation to attempt to do schoolwork is a challenge, and this is often met with incentives such as money, praise, or simply avoiding embarrassment. Adam Soileau of element14 Presents had the idea to build a robot, which is an incentive unto itself by playing music, launching confetti, and waving one of those inflatable car dealership arm-waving tube things when grades cross a predetermined threshold.
The first challenge Soileau was met with involved determining the best way to launch confetti. Due to the prevalence of party poppers, or mini confetti cannons, he chose to use a high-torque servo motor that could pull the string back. The audio portion of the project relies on reading music data from an SD card, outputting it via a digital-to-analog converter (DAC), and then amplifying the sound using an LM386 op-amp for the speaker. Finally, the wacky waving inflatable tube-man is placed onto the fan in order to inflate it, while waving is done by toggling the fan on or off quickly with a MOSFET. An Arduino MKR Zero was employed to control each component due to its DAC and SD card capabilities.
Perhaps the most important aspect, retrieving grade data was done by harnessing Canvas’s web API through which assignment, quiz, and test grades can be programmatically accessed. Once collected, this data was then processed and stored in a CSV file so new grades could be compared to older ones. After an ‘A’ has been spotted, the system activates and rewards the student with the aforementioned confetti, music, and dancing. Detailed information about this project can be found here and seen in Soileau’s video below.
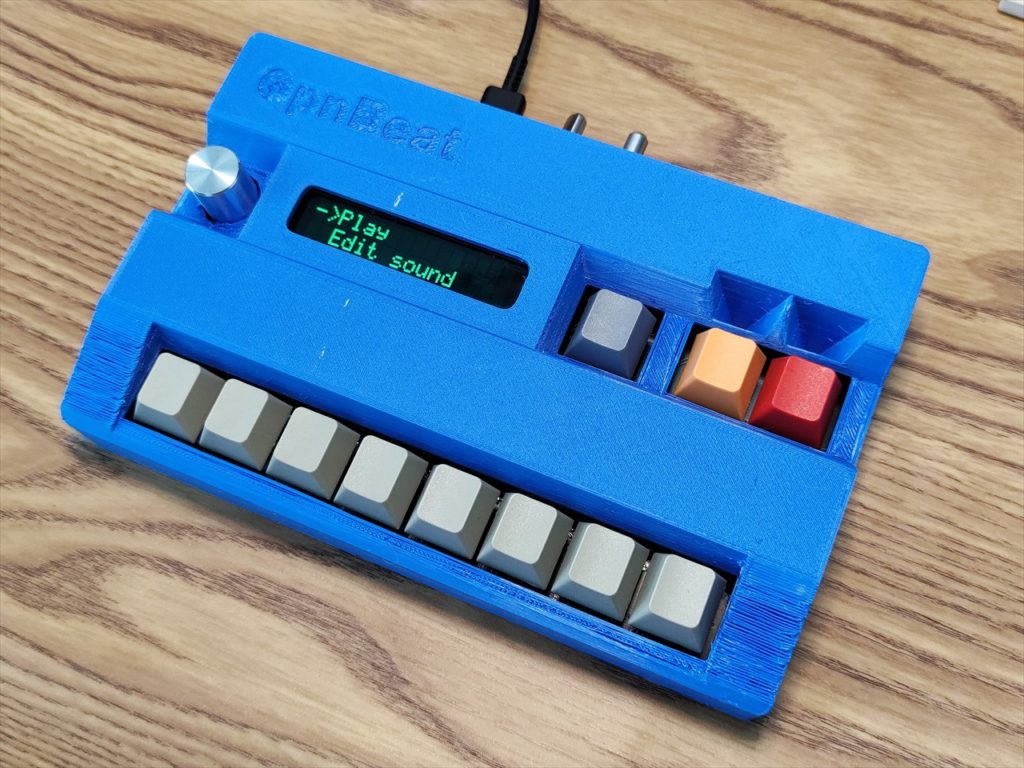
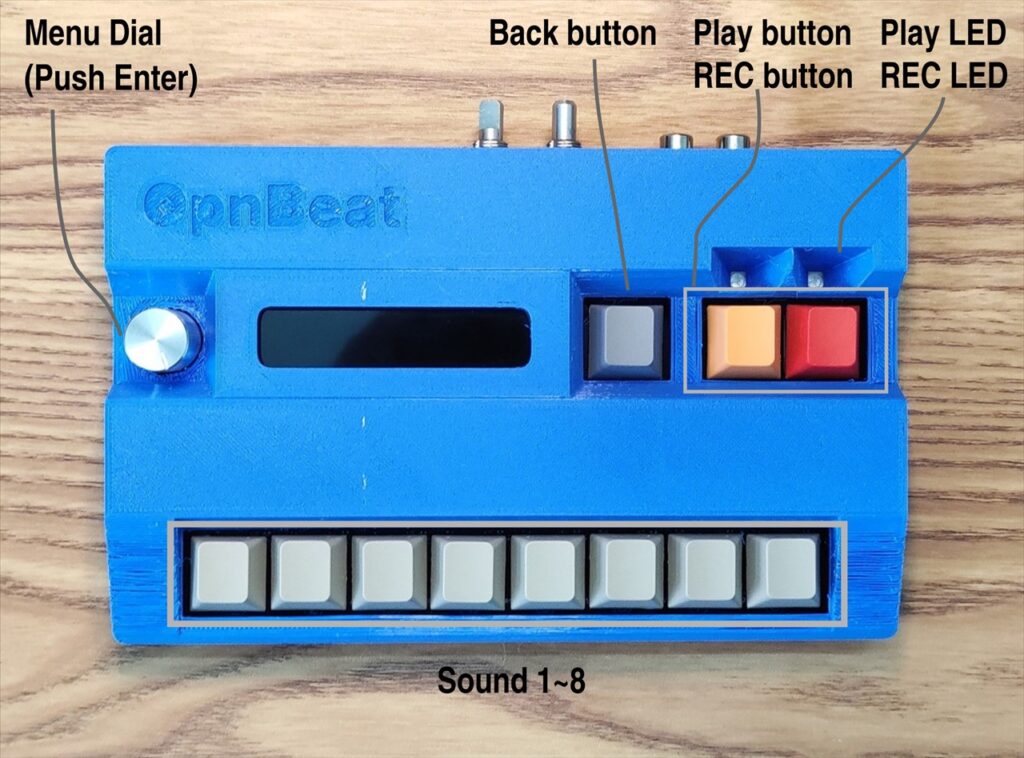
Most electronic music is created through either sampling or synthesizing sounds. A synthesizer generates sounds on demand according to the input parameters (like frequency and amplitude), while a sampler plays prerecorded sound clips — often with overlaid effects to alter the sound. Both are very versatile, but that means that they can be difficult to learn. OpnBeat is a DIY lo-fi sampler that promises to be easy for anyone to understand.
OpnBeat was designed by Hiro Akihabara to be as simple as possible to use. It is therefore fairly limited in capability. But OpnBeat still provides enough functionality to be useful and fun. It is a bit like an advanced Talkboy (the fictional Home Alone 2 device that became a real toy), because it lets users record short clips and then play them back. It can record and store eight different clips at any given time through a line-in jack or the built-in microphone, then can play those back when the user pushes the corresponding key. A sound edit mode lets the user cut and trim recorded clips. A metronome and “rhythm edit mode” help to make playback more musical.
Building an OpnBeat device requires a custom PCB. That PCB contains an Arduino Nano board, a 16×2 character LCD, key switches, potentiometers, rotary encoder, sound chips, and amplifier. The sounds chips are Nuvoton ISD1720SY ICs, which were designed specifically for voice recording and playback. Many of the components are SMDs (surface mount devices), so you will need some soldering skill to assemble the PCB. The enclosure is 3D printable.
If you’ve found yourself intimidated by the complex and expensive samplers on the consumer and professional market, then OpnBeat may be the more approachable alternative that you’ve been looking for.
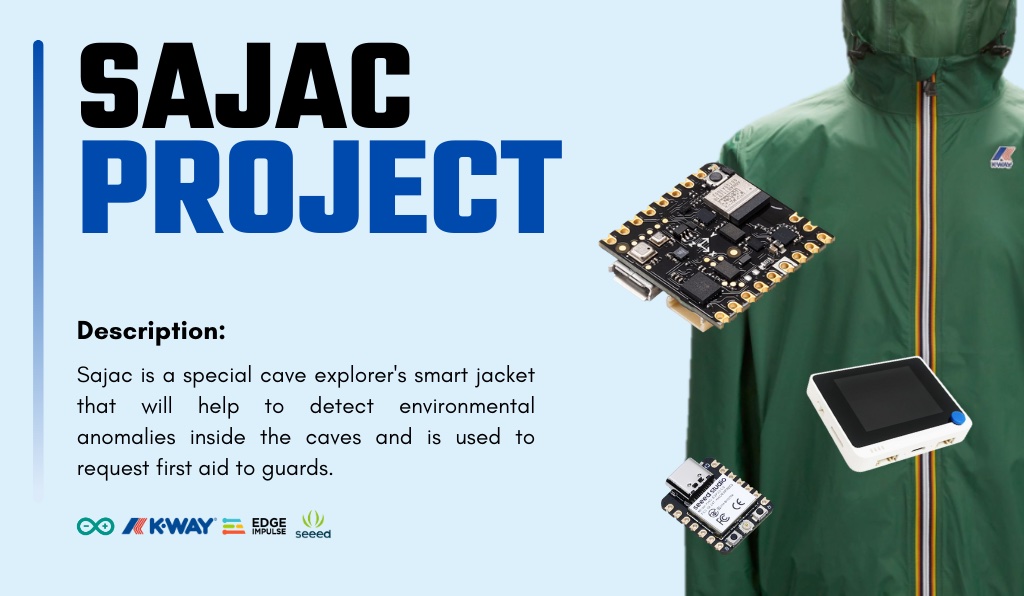
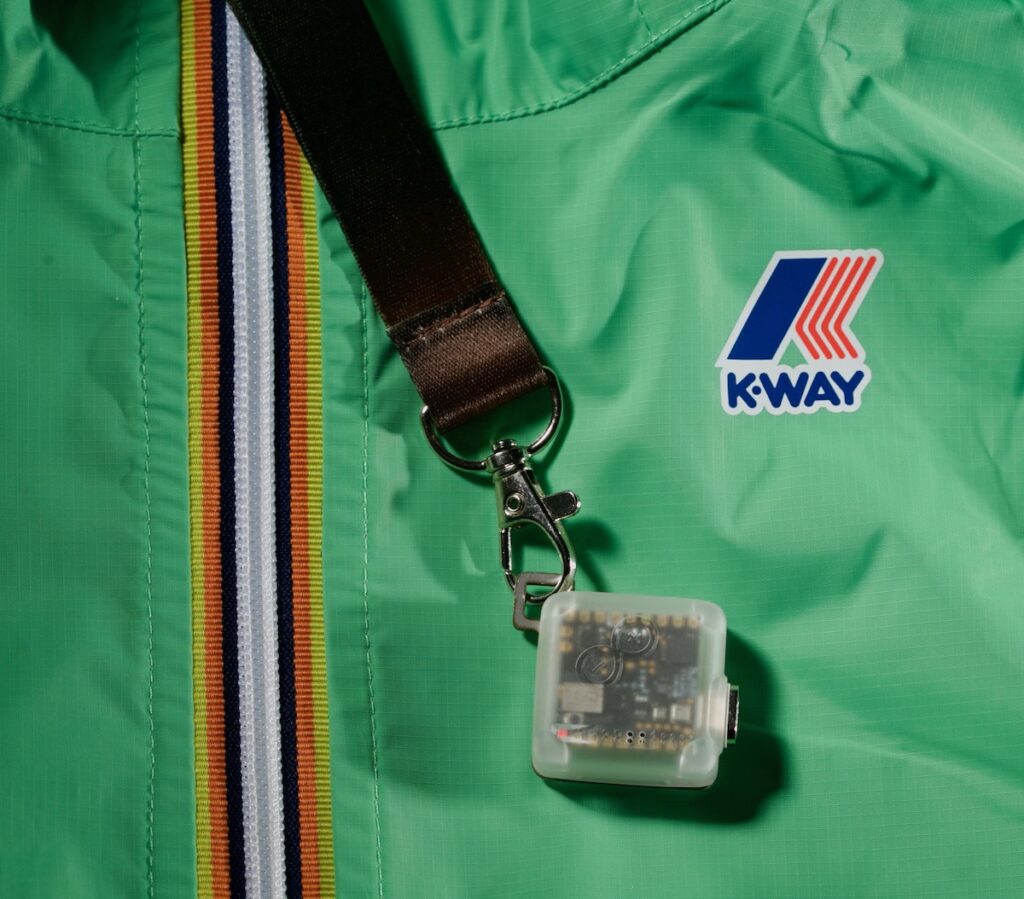
The art of cave exploration, or spelunking, can get its practitioners far closer to nature and the land we inhabit, but it also comes with a host of potential dangers. Some include extreme environmental conditions, lack of oxygen/toxic gases, and simply having their path closed off due to rock falls. Seeing these problems, Rifqi Abdillah decided to create the Sajac Project based on the Nicla Sense ME attached to a K-Way jacket with the aim of assisting cavers.
Because the Nicla Sense ME contains a combination of motion, pressure, and gas sensors onboard, Abdillah used it to gather raw data about the wearer’s surroundings by continuously taking readings and then transmitting the values over BLE to a mobile device. Each sensor fusion sample was then added to the Edge Impulse Studio and labeled with either “safe,” “bad,” or “danger” depending on how harmful the conditions would be. Finally, a Keras classification model was trained and deployed back to the Nicla as an Arduino library, which is used in conjunction with an OLED screen to show the classification result.
With the model now outputting the sensor readings and if they are safe or unsafe, Abdillah went one step further and developed an app to display them in real-time on a Seeed Studio Wio Terminal. Built in MIT’s App Inventor, it allows the user to select the current status as shown by the Nicla and have it appear on the Terminal’s screen. Fellow cavers are able to be notified in an emergency via a connected LoRa radio that can transmit an alert message.
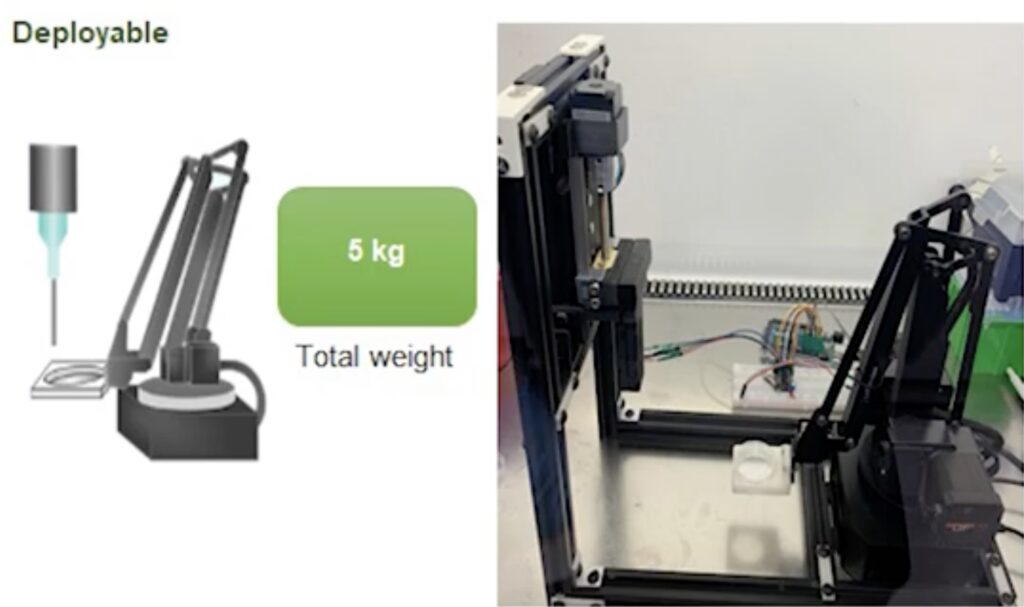
To test experimental cancer-fighting therapies, researchers need cancerous tumors to treat. While lab animals, like mice, can provide those tumors, they come with many downsides. From ethical concerns to practical reasons, such as tumor isolation and repeatability, “natural” tumors come at a cost. Artificial tumors, made using real cells, can solve these problems. To create those, a team of researchers from the University of Cambridge and King’s College London designed a portable bioprinter dubbed “BioArm.”
A bioprinter is a 3D printer capable of fabricating organic tissue. A lot of research has been devoted to developing bioprinters for creating replacement organs and even food, but this purpose is just as important. By printing tumors, cancer researchers can fabricate the tissue to exact specifications. This reduces variables and provides better research control. These 3D-printed tumoroids are made of extruded hydrogel biological ink that contains cells. In about 90 seconds, researchers can print a tumor very similar to those from mice that they’re used to working with.
This entire bioprinter can fold up into a backpack. It has a custom print head driven by an Arduino Mega 2560 development board and Python code. That extrudes the biological ink. An off-the-shelf UFactory uArm Swift Pro robotic arm moves a Petri dish in three dimensions beneath the print head. The upright structure, which contains the print head, folds down when not in use in order to aid in packing. Deployment takes only 15 minutes and the entire machine weighs less than 11 pounds. The total cost to build the complete machine is under £1,000 ($1,250).
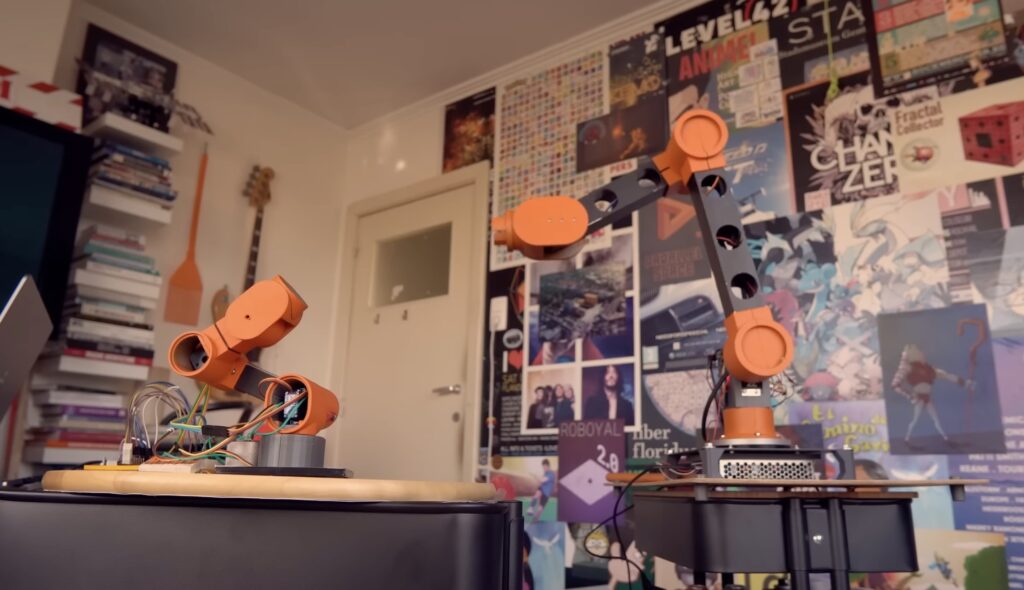
Building a capable robot is only half of the battle. To take advantage of that robot, you’ll need a good way to control it. When it makes sense, you can pre-program movements. But when you want to control a robot in real time, you need suitable controller. Conventional joysticks and gamepads don’t translate well to robot arm movement, which is why Jelle Vermandere built a miniature robot arm to control a larger robot arm.
Vermandere built the larger robot arm in the past, but found that traditional control methods have several shortcomings. His solution was to build a small replica of that robot arm. He can manipulate the small robot arm by hand, and the large robot arm will mirror the movement. This digital puppetry works well, because Vermandere can direct each joint in a fluid and natural manner. This isn’t a new technique, but Vermandere does a great job of explaining how it works and how you might be able to achieve similar results.
The smaller robot arm has the same design as the larger. That means that any rotation of the smaller robot’s joints will translate to the larger; if the small robot’s elbow joint rotates 45 degrees, then so should the larger robot’s. That smaller robot has servo motors in each joint, which contain potentiometers for position feedback. An Arduino Nano 33 BLE board looks at that feedback data to determine the angle of each joint. It then passes that to the computer that controls the larger robot, which sets the larger robot’s joint angles to match.
An additional benefit of this setup is that the smaller robot can still work like a robot. It has servo motors in the joints, which the Arduino can control. So Vermandere can utilize the smaller robot for other tasks.
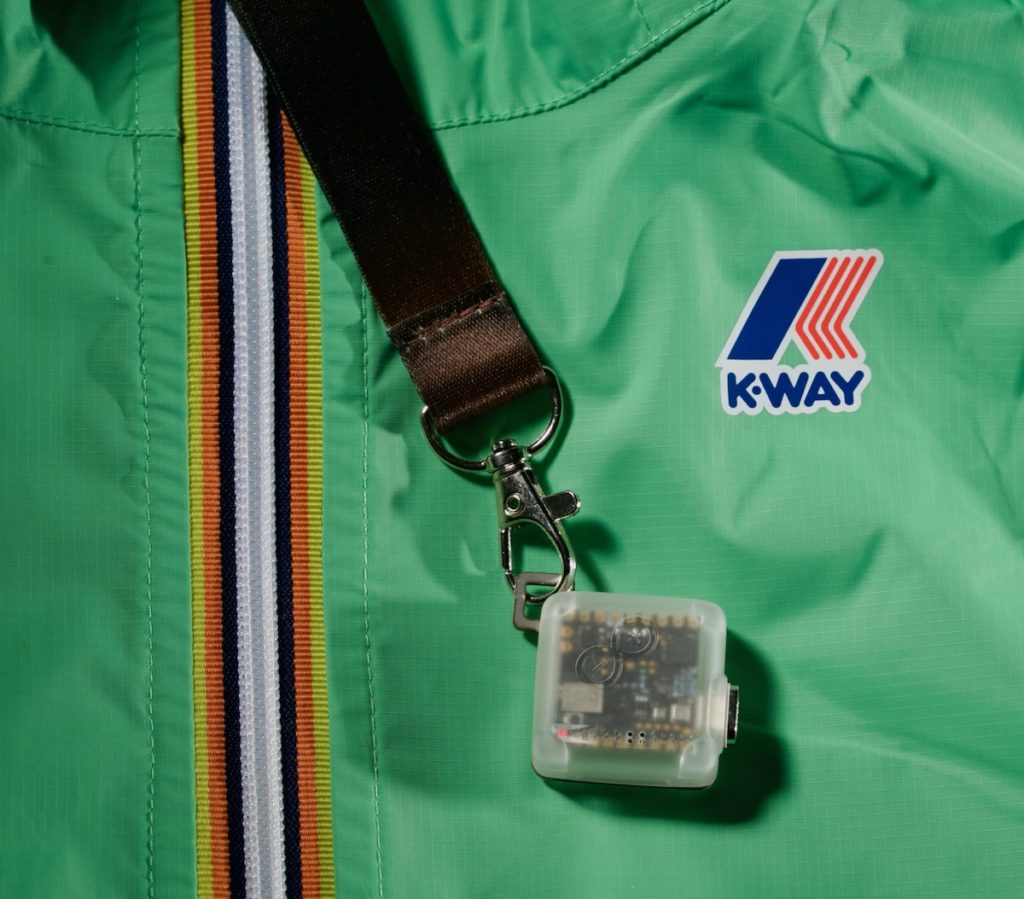
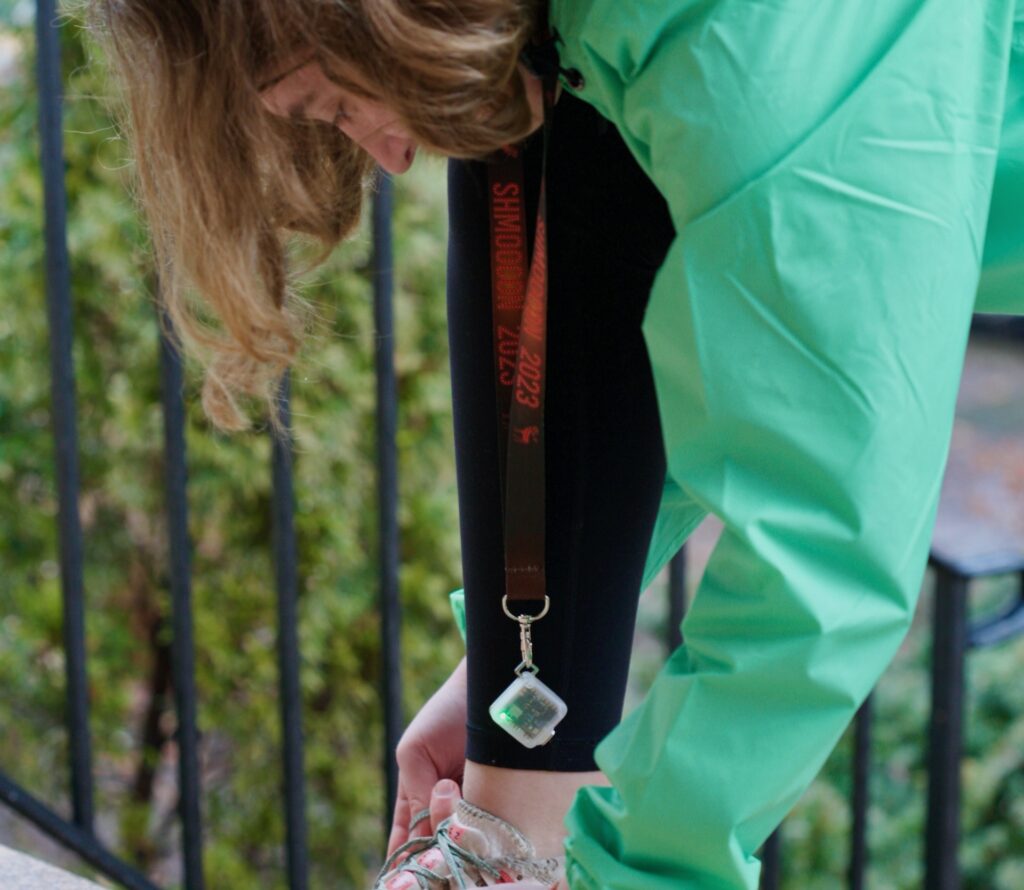
Few things are worse than going to exercise, coming back home, and then realizing that you have been nose blind the entire time to your own odor. In order to detect the potential stench before anyone else does, Luke Berndt and his daughter, Elena, teamed up to create the Smelling Fresh, Feeling Fresh! project.
Their idea was to take a Nicla Sense ME board along with one of K-Way’s jackets as part of our recent collaboration and use it to recognize when the outerwear developed a foul smell. Data was gathered using already stinky clothes from dirty laundry bins and trash, with the BME688 four-in-one gas sensor picking up the slight differences in CO2, humidity, and volatile organic compounds (VOCs) between clean and smelly samples. All of the data was then uploaded to the Edge Impulse Studio and used to train a model, and after a few more rounds of gathering more data, it was finally accurate enough to deploy.
The original plan involved sending an alert over Bluetooth® Low Energy to an accompanying phone app and displaying the message to the user, but this proved too difficult because of low-memory issues. So instead, the duo simply made the code illuminate the RGB either red, yellow, or green to indicate the current air cleanliness.
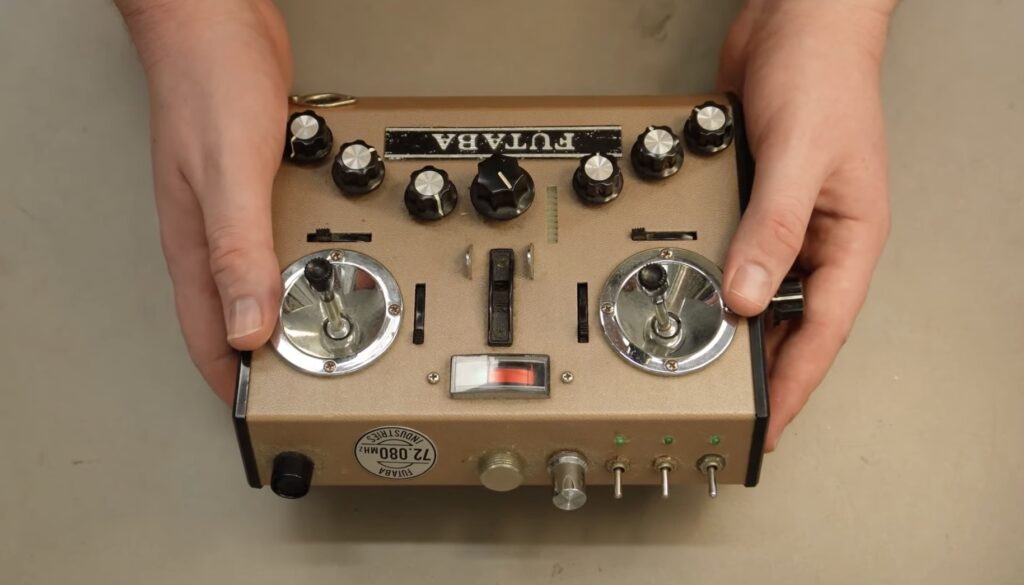
If you’re going to produce electronic music on a PC, you need some sort of input tool. That can be your keyboard and mouse, but most producers prefer to use a dedicated MIDI (Musical Instrument Digital Interface) controller. That will provide a more intuitive and efficient experience. Instead of buying something new, HYPRREAL turned a ’70s Futaba RC transmitter into a MIDI controller.
RC transmitters, like the vintage Futaba model used for this project, are controllers for RC vehicles like planes and cars. While cheap toy RC vehicles tend to come with dedicated transmitters, high-end vehicles work with universal transmitters like this one. They’re of a higher quality and can be used with all the vehicles in a hobbyist’s collection. Being an older model, this unit was quite simple. It only had two potentiometer joysticks and a few sliders. To expand its capability, HYPRREAL added several additional potentiometers.
An Arduino board monitors all of the potentiometers via multiplexers. It runs a MIDI controller library, so it can send MIDI messages to a computer connected through a USB cable. As far as the computer is concerned, the connected device is just a standard MIDI controller. That means that it will work with any MIDI software and HYPRREAL only had to configure the different controls within that software. The result is a useful MIDI controller in a very attractive retro package.
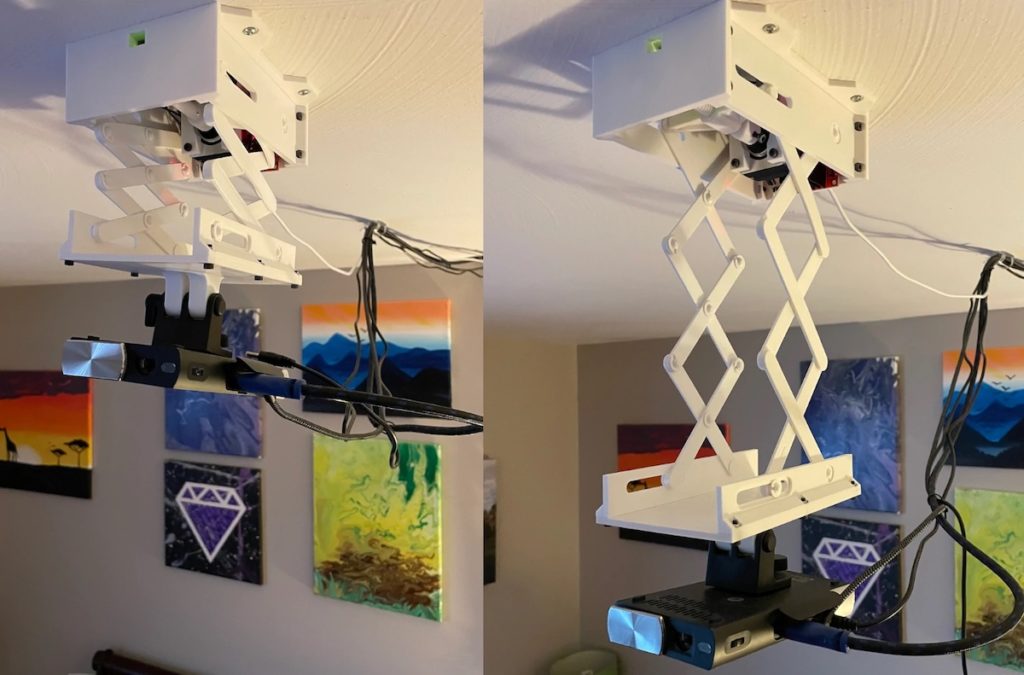
While their popularity seems to be waning as LCD and OLED TVs grow in size and shrink in price, projectors can still be a good choice for home theaters. They can give you a screen bigger than any TV on the consumer market and at a lower price than large TVs. But if you get a projector for your home theater, you’re going to need a way to mount it. To keep his home theater projector out of the way when it isn’t in use, Sam Baker built this scissor lift mounting system.
A scissor lift was a good choice for this application, because it can be made very compact and still quite rigid. A winch-style cable mechanism would have been a bit more compact and simpler, but wouldn’t have kept the projector from swaying — something that would surely ruin the cinema experience. A scissor lift like this one uses the power of parallel linkages to translate short, high-torque movement into long actuation. It keeps the projector up close to the ceiling most of the time, but then allows it to drop down to the proper height when it is time to watch a movie.
The mechanical parts for the scissor lift (including the lead screw) and the enclosure were all 3D-printed. A stepper motor turns the scissor lift’s lead screw and an Arduino Nano Every board controls that motor through a small driver board. A limit switch at each end keeps the motor from turning the lead screw too far. An infrared receiver connects to the Arduino, which lets it look for a specific code coming from an infrared remote. When it sees that code, the Arduino drops the projector down into place so Baker can start a movie.
During Arduino Day 2023, we announced the new UNO R4and we are now looking for contributors from the community to help support the portability of libraries and open source projects based on an AVR Arduino boards such as the UNO R3, Mega, Leonardo, and Nano.
The Arduino UNO R4 is designed for maximum compatibility, maintaining the same form factor, shield compatibility, and 5V operating voltage as its predecessor. The board features a Renesas RA4M1 32-bit Cortex®-M4 processor, providing a significant boost in processing power, memory, and functionality.
Software compatibility is also a priority, with most existing libraries and examples working seamlessly on the new hardware. To grant backwards compatibility for all libraries and projects, we launchedn early access program.
If you are the author or a maintainer of a library or a popular open source project for Arduino, apply to join the early access program and ensure users will be able to also run your code on the UNO R4.
By submitting your request as well as proving some competence on Arduino libraries and projects, you can receive a free board and technical support for the Renesas RA4 architecture.
We’d love to see you contribute in porting libraries!
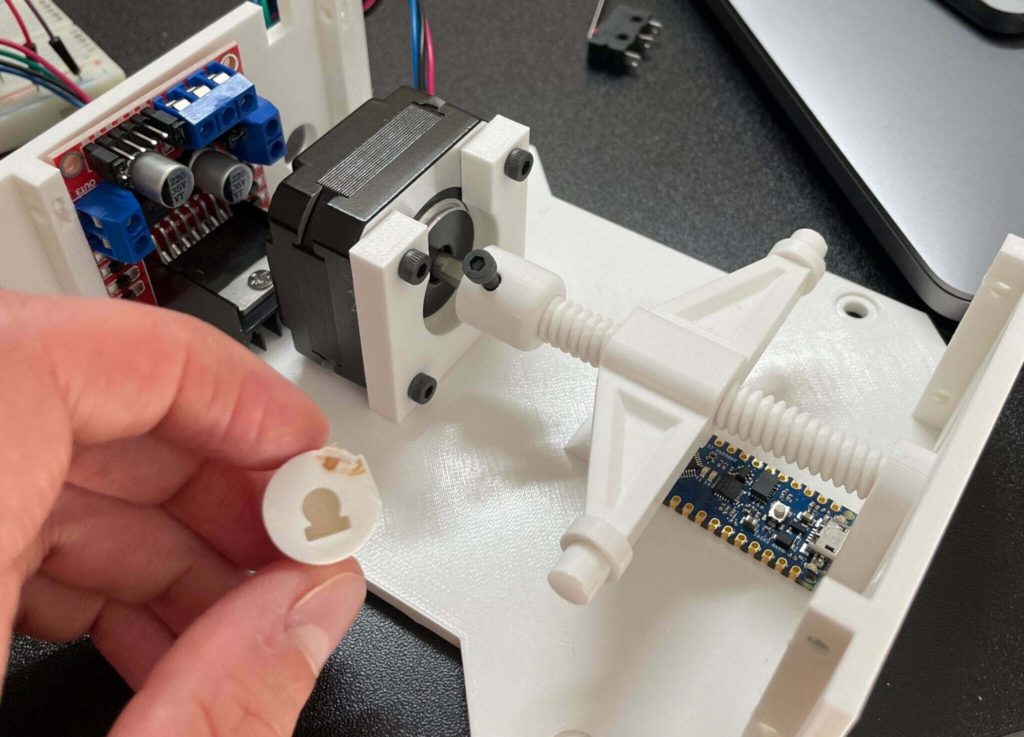
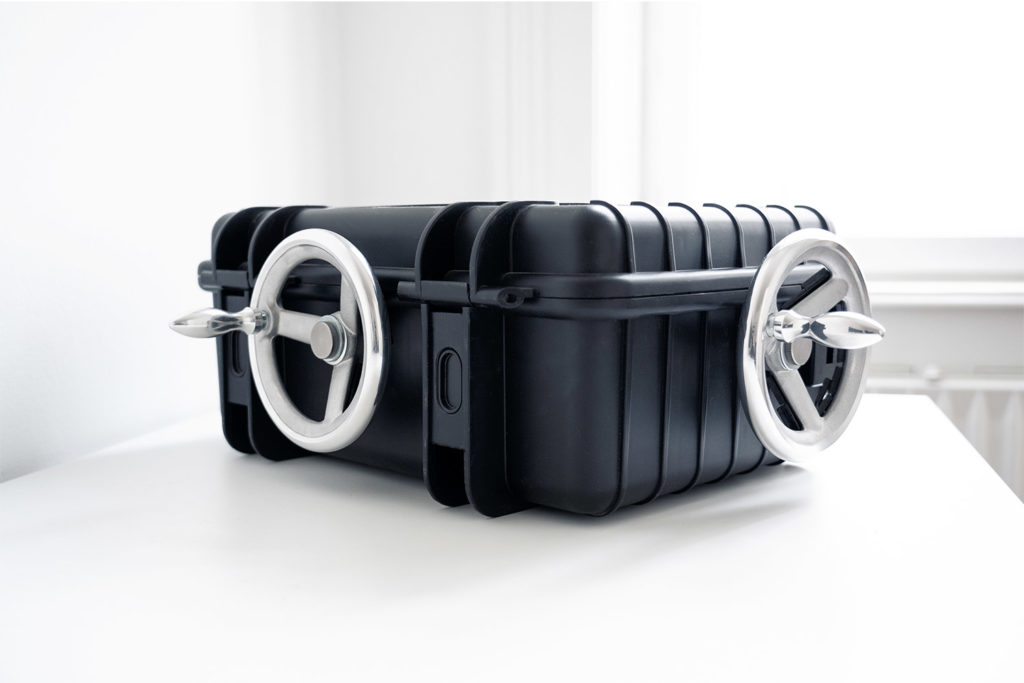
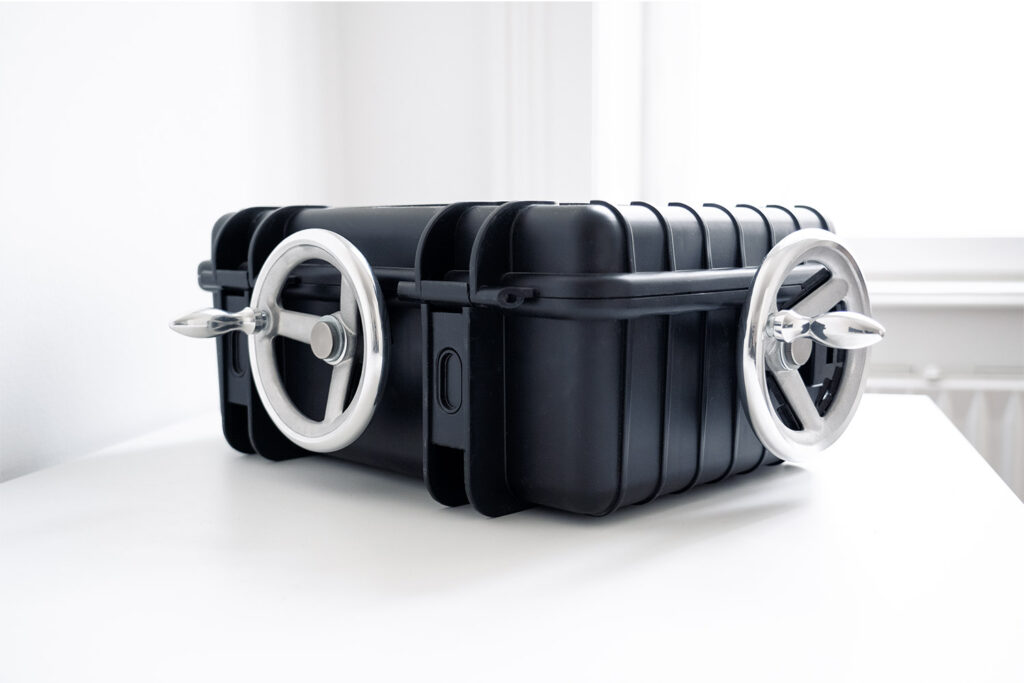
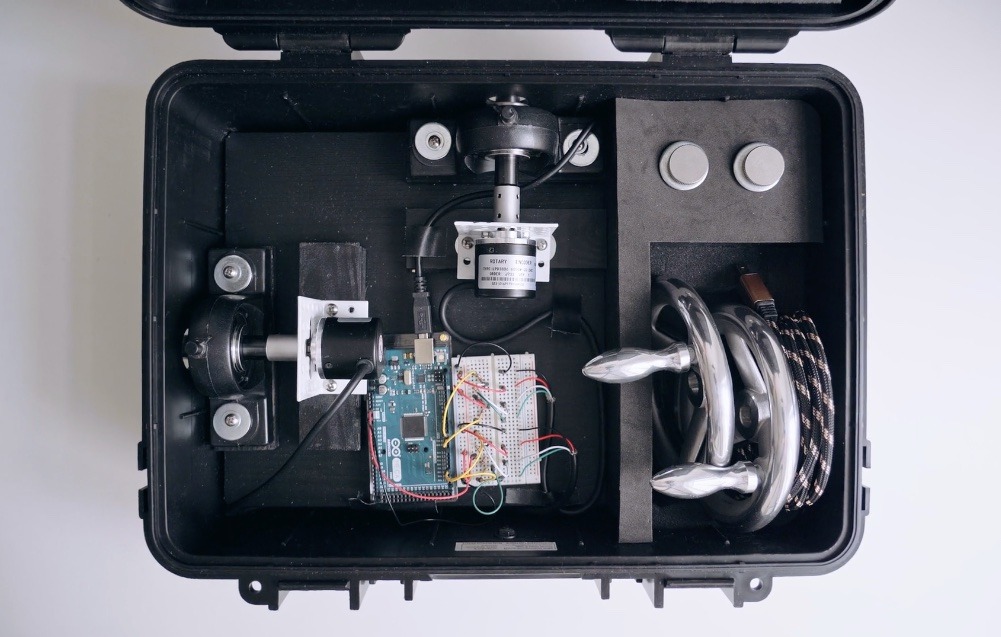
Many tools, such as milling machines, use hand wheels for operation, because they allow for smooth and precise movement. For the same reason, some professional camera rigs also use hand wheels for panning and other moves. To mimic that in a simulated environment, you can build your own virtual camera operation hand wheels.
Kino Wheels is a physical controller device designed to be used with a dedicated simulator. That simulator is a 3D environment that the user films with a virtual camera. The Kino Wheels device contains two hand wheels, which pan and tilt the virtual camera. This serves a very niche purpose, but could be useful for camera operators in training. Kino Wheels isn’t a commercial product, so anyone interested will need to build the controller themselves and then download the simulator.
On the electronics side, Kino Wheels requires an Arduino Mega 2560 board, two rotary encoders, a breadboard, and some jumper wires and resistors. On the mechanical side, a Pelican-style hard case acts as the enclosure and two 140mm hand wheels connect to the rotary encoders through shafts and couplers. The sketch was coded specifically for use with the simulator and sends the rotary encoder positions to the connected PC via USB, and the simulator uses that data as pan/tilt control commands.
Humans have domesticated animals since the dawn of time. Dogs (our oldest furry friends) were owned by humans as far back as 30,000 years ago, and since then we’ve formed bonds with all kinds of different creatures.
It was only in the last century, though, that we started to actually build our own pets. The history of robot pets is a short but fascinating one, going from barely recognisable gadgets to incredibly sophisticated devices in just a few decades.
In this article, we’ll look at some of the biggest milestones in the evolution of robotic pets, and show you a few neat examples from the Arduino Project Hub.
A history of robot pets
The Phony Pony
Built in 1968 at the University of Southern California, the Phony Pony marked the beginning of a new era. As the first ever autonomous quadrupedal robot, it is the common ancestor to which all of today’s robot dogs and cats can be traced back (despite being named after a different species).
By today’s standards, the Pony wasn’t all that sophisticated. It featured four legs, each with its own hip and knee joint, attached to a frame. But, it worked — the Pony was able to walk around at various slow speeds. It wasn’t wireless but, come on, it was the ‘60s.
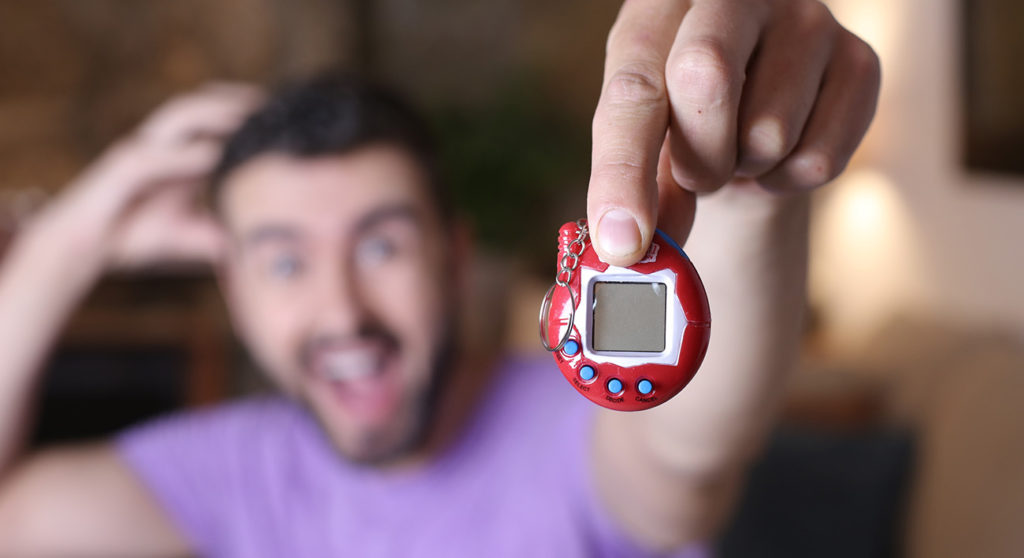
The Tamagotchi
Here’s one for the ‘90s kids. The Tamagotchi, released in 1996 in Japan by Bandai, soon made its way to the rest of the world. This simple, handheld device containing an animated pet which needed to be fed, watered, and cared for like any living animal soon became a smash hit — selling over 80 million units to date.
Anyone who has been through the traumatizing experience of losing their Tamagotchi will testify that these bundles of pixels can inspire surprising amounts of love and devotion from their owners.
The Furby
Another ‘90s classic here — the robotic, furry Furbies were popular throughout the world and sold more than 40 million units. While they weren’t the pinnacle of sophistication in terms of what they could actually do, it’s clear that people enjoyed the novelty of a robotic pet that was, in some small way, kind of alive.
BigDog
Released in 2005, the BigDog was the debut project of the now-famous robotics company Boston Dynamics. The BigDog was designed to be used in the military, and is equipped to do tasks like move easily over challenging terrain and carry up to 154 kg of weight.
Unfortunately, in spite of its physical prowess, the BigDog never quite made the cut, as its engine was deemed to be too noisy to be effectively used in combat situations. However, since then Boston Dynamics have been refining and optimizing their robot war dogs, and the latest iterations look very fearsome indeed.
Pleo the Dinosaur
UGOBE, based in California, set out to build a robotic creature that was also imbued with its own operating system, giving it an uncanny resemblance to a living thing. The result was Pleo — a pet dinosaur that uses cutting-edge research in fields like robotics, sociology, and even philosophy to appear very life-like indeed.
ANYmal Robotic Dog
Developed by Swiss robotics company ANYbotics, the ANYmal Robotic Dog was designed to safely inspect unsafe industrial environments. It comes equipped with an arsenal of tools like laser inspection sensors and the ability to autonomously navigate through different environments, collecting and sharing an impressive amount of data.
Make your own
Inspired by the idea of building your very own robotic pet? The Arduino Project Hub has a number of examples from people who have tried their hands at just that. Let’s take a look at a few.
The Nerd
Built in the same mold as the Tamagotchi, The Nerd is an electronic pet that lives in your pocket (or wherever you put it down) and survives by eating WiFi SSIDs (it also needs rest and sunlight).
To properly care for your Nerd, you need to make sure it has just the right balance of offline and online mode, along with sufficient levels of light and darkness. If it’s disconnected from that tasty WiFi for too long, The Nerd will emit a desperate plea in Morse code,
You can build your own Nerd using the Arduino MKR IoT Bundle, a few other components like an RGB LED, phototransistor, and buzzer, and some code. Just make sure it doesn’t go too hungry — The Nerd makes a lot of noise when it dies. And you can now create your own Nerd with just one click with the ready-to-use The Nerd Arduino Cloud template. Read the full tutorial to learn more about how to use it.
Roger Bot
Arduino user hannu_hell built the Roger Bot in their very own home using an Arduino and a few other components. The Roger Bot features a robotic arm and the ability to move around on flat surfaces. It also contains built-in sensors that collect sensory data and display them on an LCD screen.
While it isn’t well-equipped to handle uneven or challenging terrain just now, this is something hannu_hell is working on for the future.
Build your own with Arduino
With an Arduino, a few simple components, and a free subscription to the Arduino Cloud, you too can create your very own robotic pet. Add to the ranks of historical robotic companions and gain a faithful and useful friend. And who knows… with the way AI is developing, maybe a truly autonomous robot pet is only just around the corner.
The world of mechanical engineering is full of interesting and ingenious mechanisms. The Geneva drive, for example, translates rotary motion into intermittent ticking — perfect for a wristwatch or clock. With a clever mechanism, one can reduce the need for complicated control electronics. That was the case with the self-reversing screw that moves the guide on Mr Innovative’s automated winding machine.
This is a winding machine for loading string, thread, yarn, or wire onto a spool, similar to the bobbin winder that you would find on a sewing machine. To ensure an even and tight winding, the machine must guide the thread back and forth along the length of the spool. Many of us would jump right towards electronic control to guide the thread, maybe involving a stepper motor and limit switches. But as Mr Innovative shows, that isn’t necessary. All he needed was the right mechanism: a self-reversing screw.
Like most of the mechanical parts on this machine, the screw was 3D-printed. It has threads running in both directions, so it can move the guide in either direction. At the ends, there are grooves that cause the guide to flip over to the other threads so it changes direction. This simple mechanism is driven by a single geared DC motor.
A second DC motor turns the spool, so it winds the thread around itself. An Arduino Nano board controls both motors through Mr Innovative’s custom driver board. The sketch is very simple and simply tells the motors to spin at a set speed as long as it has power.
The history of making is now ready for the future: a 32-bit UNO will soon be available thanks to a powerful Renesas processor
Here at Arduino we are thrilled to announce a new, revolutionary revision of the iconic UNO board, which will expand the concept of the open-source brand’s most iconic and popular product while providing the maker community with a long-awaited update on performance and possibilities. Arduino UNO R4 indeed preserves the well-known features of the UNO family – standard form factor, shield compatibility, 5V operating voltage, outstanding robustness – while offering no less than a 32-bit Cortex®-M4 and a 3-to-16x increase in clock speed, memory and flash storage.
This huge leap forward starts with a new processor by Renesas, a global leader in microcontrollers, analog, power and SoC products. While over 10 million users have enjoyed playing and working with Arduino UNO R3’s 8-bit microcontroller for more than a decade, the new RA4-series MCU will open up endless new project opportunities for more advanced makers, and bring the board up to speed with current standards.
The UNOR4 will come in two versions – UNO R4 WiFi and UNO R4 Minima – offering unprecedented performance and possibilities for the maker community.
The WiFi version comes with an Expressif S3 WiFi module, expanding creative opportunities for makers, educators, and hobbyists alike; while the UNO R4 Minima provides a cost-effective option for those seeking the new microcontroller without additional features.
In details, the new Arduino UNO R4 features the Renesas RA4M1 (Arm Cortex®-M4) running at 48MHz, which provides a 3x increase over the UNO R3. In addition to that, SRAM went from 2kB to 32kB, and flash memory went from 32kB to 256kB to accommodate more complex projects. In addition, following the requests from the community, the USB port was upgraded to the USB-C and maximum power supply voltage was increased to 24V with an improved thermal design. The board provides a CAN bus, which allows users to minimize wiring and execute different tasks in parallel by connecting multiple shields. Finally, the new board includes a 12-bit analog DAC.
All in all, Arduino UNO R4 is the answer to the requests for improvement and updates the developer and maker community has been advancing, making it easier than ever to get started with Arduino.
When it comes to hardware compatibility, pinout, voltage and form factor are unchanged from UNO R3, ensuring maximum hardware and electrical compatibility with existing shields and projects.On the software side, a big effort is being made to maximize retrocompatibility of the most popular Arduino libraries so that users will be able to rely on existing code examples and tutorials. In most cases libraries and examples will work out-of-the-box, but a few of them which were optimized for the AVR architecture used in R3 will need to be ported. To help in the transition, Arduino will provide a public list of such libraries, along with links to existing alternatives. In addition, an early adopter program has been launched – with a dedicated website at www.arduino.cc/UNOR4 – for library developers excited to find out more about UNO R4 and willing to port their low-level code to the Renesas architecture.
The Arduino UNO R3 will still be available and supported, at the side of all makers who want to work with its 8-bit AVR microcontroller.
Arduino UNO R4 is scheduled for release in late May, when more details about its features will be disclosed, but you can already subscribe the waiting list and get notified when in stock!
Bandwidth may have increased dramatically over the past couple of decades, but internet connections are often still quite unreliable. For people with unreliable connections, it becomes a chore to check a browser over and over again to find out when the internet is back up. To avoid that hassle, Emily Velasco built this monitor.
This device has only one purpose: to indicate when its internet connection is functioning or not. All it does is ping Google.com and checks if it gets a response. If it does, the device lights up in green to show everyone in the vicinity that the internet is working. If it doesn’t, it lights up in red.
Velasco has a very distinct design aesthetic, which is readily apparent here. The unit’s indicator LEDs reside in a small animal skull’s eye sockets for some “oddities and curiosities” style. That skull sits under a dome of glass, which is a repurposed security camera housing. Velasco has many animal skulls around her home, so this device blends right in.
Inside that base there is an Arduino Nano 33 IoT board, though any WiFi-enabled model should work for this purpose. The sketch is very simple, as it only needs to ping Google.com and then control the two LEDs.
My internet goes out a lot and I got tired of refreshing my browser to see if it's back on, so I made an internet-status indicator out of an IoT Arduino and some other stuff I had around here.
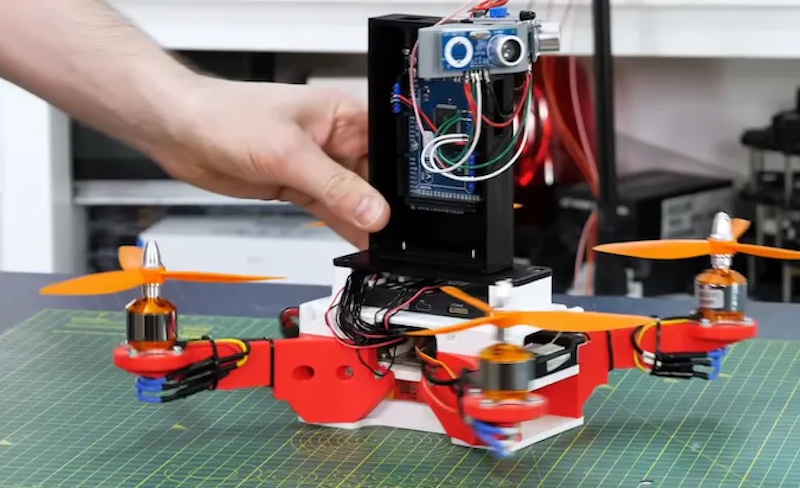
Drone shows have become a big trend over the past few years, with some shows containing thousands of individual drones. Those shows are wildly expensive, because the drones can easily cost a couple thousand dollars each. A big part of the reason for their high cost is their onboard positioning systems, which need to be accurate within a couple of centimeters — far better than standard GPS can achieve. In search of a more affordable option, James Bruton developed this experimental ultrasonic drone positioning system.
Like most positioning systems, this relies on triangulation through time of flight measurements. Triangulation lets you find the position, on a 2D plane, of Point A by measuring its distance to both Point B and Point C and knowing the distance between Point B and Point C ahead of time. This is a triangle and you know the length of every side (the distance between points), so you can calculate the position of Point A. Time of flight is the time it takes a signal to travel between two points. When you know the signal’s rate of travel (which is typically statistic or close enough), you can calculate distance by simply measuring the time it takes the signal to leave Point A and reach Point B (or vice-versa).
Bruton’s design takes advantage of those principles through simple, low-cost ultrasonic sensors. Normally, those measure the time it takes to emit a signal and receive the echo. But in this case, Bruton separated the two jobs so the system doesn’t require a reflective surface. One ultrasonic sensor on a central hub pulses a signal, and another ultrasonic sensor on the drone receives that. An infrared LED array helps to sync the two for precise timing. Arduino Mega 2560 boards on both sides (the hub side and the drone side) control the ultrasonic sensors.
With two hubs (Point B and Point C), the drone (Point A) can use the ultrasonic distance measurements to triangulate its own position in real time. This works in 2D, but a third hub would allow for 3D positioning. This worked well in initial testing, but was susceptible to interference from the drone motors and rotors. Bruton plans to try another idea soon, but this ultrasonic positioning system would work well for other types of vehicles operating within a relatively small area.
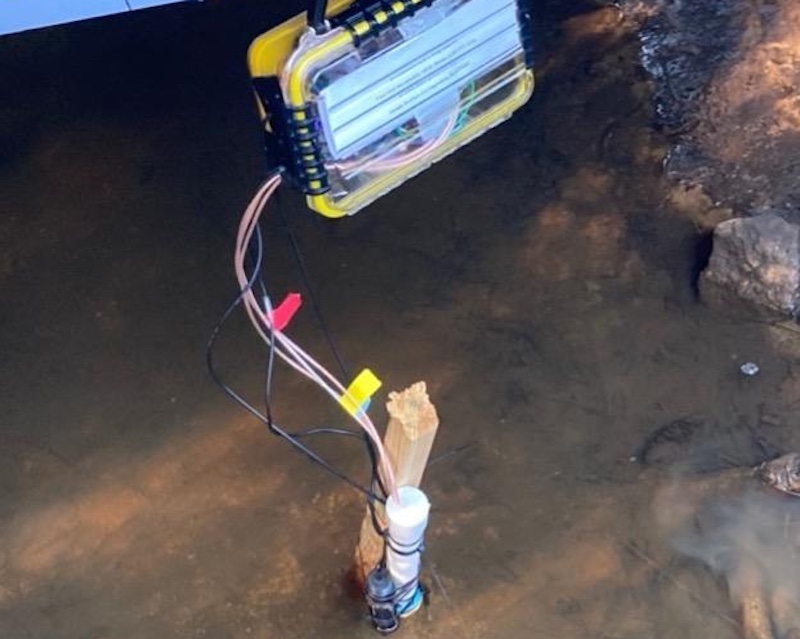
The public often hears from various media outlets and documentaries that many regions in the world lack consistent access to quality drinking water. But what does exactly does that mean? It is more than water that is clear and free of parasites. Distilled water, for example, isn’t recommended as drinking water because it lacks minerals. This off-grid water quality monitoring system checks more factors to determine if water is good.
This monitor has sensors to check a handful of data points: temperature pH, turbidity (clarity/cloudiness), and the total dissolved solids (TDS). When examining otherwise clean drinking water, TDS readings are a result of minerals and a small amount of organic matter. While some level of TDS is okay (and often desirable), the readings shouldn’t be too high. This water quality monitoring system, which is powered by a battery pack, is meant for use in natural bodies of water and wastewater treatment plants. Its comprehensive readings can help to determine the quality of the water and its suitability for drinking and other uses.
The hardware resides inside of a small, waterproof enclosure and includes an Arduino Uno board, a microSD card reader, a 20,000mAh USB battery pack, and the sensors. Those sensors are: a DFRobot Gravity analog turbidity sensor, a DFRobot Gravity analog TDS sensor, a DFRobot Gravity analog pH sensor, and a DS18B20 waterproof temperature sensor. The Arduino sketch takes the sensor readings and stores them on the microSD card for later retrieval.
This low-cost design is perfect for monitoring water supplies, especially in remote regions where on-grid monitors aren’t feasible.
Um dir ein optimales Erlebnis zu bieten, verwenden wir Technologien wie Cookies, um Geräteinformationen zu speichern und/oder darauf zuzugreifen. Wenn du diesen Technologien zustimmst, können wir Daten wie das Surfverhalten oder eindeutige IDs auf dieser Website verarbeiten. Wenn du deine Einwillligung nicht erteilst oder zurückziehst, können bestimmte Merkmale und Funktionen beeinträchtigt werden.
Funktional
Immer aktiv
Die technische Speicherung oder der Zugang ist unbedingt erforderlich für den rechtmäßigen Zweck, die Nutzung eines bestimmten Dienstes zu ermöglichen, der vom Teilnehmer oder Nutzer ausdrücklich gewünscht wird, oder für den alleinigen Zweck, die Übertragung einer Nachricht über ein elektronisches Kommunikationsnetz durchzuführen.
Vorlieben
Die technische Speicherung oder der Zugriff ist für den rechtmäßigen Zweck der Speicherung von Präferenzen erforderlich, die nicht vom Abonnenten oder Benutzer angefordert wurden.
Statistiken
Die technische Speicherung oder der Zugriff, der ausschließlich zu statistischen Zwecken erfolgt.Die technische Speicherung oder der Zugriff, der ausschließlich zu anonymen statistischen Zwecken verwendet wird. Ohne eine Vorladung, die freiwillige Zustimmung deines Internetdienstanbieters oder zusätzliche Aufzeichnungen von Dritten können die zu diesem Zweck gespeicherten oder abgerufenen Informationen allein in der Regel nicht dazu verwendet werden, dich zu identifizieren.
Marketing
Die technische Speicherung oder der Zugriff ist erforderlich, um Nutzerprofile zu erstellen, um Werbung zu versenden oder um den Nutzer auf einer Website oder über mehrere Websites hinweg zu ähnlichen Marketingzwecken zu verfolgen.