Schlagwort: tech

  • Video game head tracking with Wii Remote camera

    Video game head tracking with Wii Remote camera

    Reading Time: < 1 minute

    Video game head tracking with Wii Remote camera

    Arduino TeamFebruary 14th, 2018

    While the Nintendo Wii has been on the market for well over 10 years, its controllers continue to provide a variety of tools for hacking. One component you may want to consider for your next hack is the camera from the Wii Remote, which senses the position of nearby infrared light spots and outputs them as X/Y coordinates via I²C.

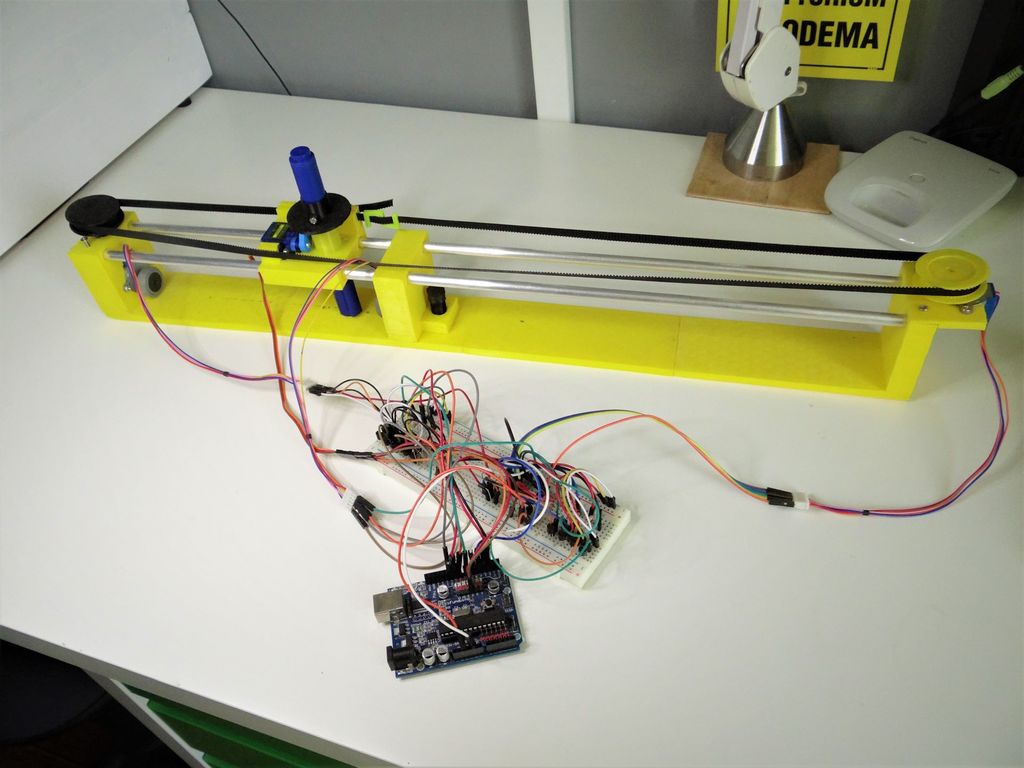
    While that may instantly set off multiple use ideas, if you need inspiration, be sure to check out this setup by Jack Carter. He mounted one of these cameras to the top of a computer screen, and uses it to track an IR LED mounted to the top of his headset.

    From there, an Arduino Uno translates this information as joystick inputs to the computer, which is then configured to control an in-game camera as seen in the video here.


    Website: LINK

  • YouTuber creates an organ out of 44 Furbies

    YouTuber creates an organ out of 44 Furbies

    Reading Time: < 1 minute

    YouTuber creates an organ out of 44 Furbies

    Arduino TeamFebruary 12th, 2018

    If you think Furbies have become extinct, think again, as musical hacker “Look Mum No Computer” has decided to revive a number of them to create his own Furby Organ.

    To make this horrifying yet awesome instrument, he placed 44—yes, 44—of these strange creatures on top of an organ frame with a keyboard and several dials, along with a switch labeled ominously as “collective awakening.”

    Each individual Furby is controlled by two Arduino Nano boards, and as you might imagine, the whole project took a massive amount of work to wire things together. You can see the incredible results in the first video below, while the second gives a bit more background on the device’s origin.


    Website: LINK

  • Recreate Optimus Prime’s blaster with Arduino

    Recreate Optimus Prime’s blaster with Arduino

    Reading Time: 2 minutes

    Recreate Optimus Prime’s blaster with Arduino

    Arduino TeamFebruary 9th, 2018

    YouTuber Bob Clagett has dreamed of creating his own life-sized Optimus Prime ion blaster for years, and now after hours of 3D printing and finishing, he finally has something worthy of that universe.

    While he opted to construct it in a 1:2 scale, it’s still an impressive physical build, looking comically large, but not entirely unwieldy as a full-sized 8-foot blaster would have been.

    Inside, sound and lighting effects are controlled by an Arduino, which plays clips from the show and flashes in different patterns via an Adafruit sound board and RGB LED strip.

    I wanted the blaster to play sounds and have lights come out of the barrel so I rigged up an Arduino Nano with an Adafruit sound board and amp that would cycle blaster sounds and lights when a button was pressed. And because there’s always more than meets the eye, I had a separate button that played just Transformers sound clips. To defuse the LED strip when the lights fired, I printed a semi-translucent disc that would stand-off from the sides so that sound could still escape, but the light would be diffused. I decided to mount all of the audio components in the barrel so that the cannon could be taken apart to charge the battery back.

    You can see the entire process in the video below, or check out his post for a summary.


    Website: LINK

  • Pour Reception turns water into radio controls

    Pour Reception turns water into radio controls

    Reading Time: 2 minutes

    Pour Reception turns water into radio controls

    Arduino TeamFebruary 8th, 2018

    Using a capacitive sensing arrangement, artists Tore Knudsen, Simone Okholm Hansen, and Victor Permild have come up with a way to interact with music with two glasses of water.

    One pours water into a glass to turn the radio on. Channels can then be changed by transferring water from one glass into the other, and fine-tuned by touching the outside of container. Volume can even be adjusted by poking a finger into the water itself.

    An Arduino Leonardo is used to pick up capacitive signals, and data is then sent a computer where a program called Wekinator decodes user interactions.

    Pour Reception is a playful radio that strives to challenge our cultural understanding of what an interface is and can be. By using capacitive sensing and machine learning, two glasses of water are turned into a digital material for the user to explore and appropriate.

    The design materials that we have available when designing digital artifacts expands along with the technological development, and with the computational machinery it is possible to augment our physical world in ways that challenges our perceptions of the objects we interact with. In this project, we aim to change the users perception of what a glass is – both cultural and technical.

    You can see it in action below, and read more about the project in its write-up here.


    Website: LINK

  • Scribble is an Arduino-controlled haptic drawing robot

    Scribble is an Arduino-controlled haptic drawing robot

    Reading Time: 2 minutes

    Scribble is an Arduino-controlled haptic drawing robot

    Arduino TeamFebruary 8th, 2018

    As part of his master’s studies at Eindhoven University, Felix Ros created a haptic drawing interface that uses a five-bar linkage system to not only take input from one’s finger, but also act as a feedback device via a pair of rotary outputs.

    “Scribble” uses an Arduino Due to communicate with a computer, running software written in OpenFrameworks.

    For over a century we have been driving cars, enabling us to roam our surroundings with little effort. Now with the introduction of automated driving, machines will become our chauffeurs. But how about getting us around a road construction, or finding a friend in a crowded area? Or what if you just want to explore and find new places, will these cars be able to handle such situations and how can you show your intentions?

    Currently there is no middle ground between the car taking the wheel or its driver, this is where Scribble comes in: a haptic interface that lets you draw your way through traffic. You draw a path and the car will follow, not letting you drive but pilot the car. Scribble lets you help your car when in need, and wander your surroundings once again.

    You can learn more about Ros’ design in his write-up here, including the code needed to calculate and output forward kinematics to set the X/Y position, and inverse kinematics to sense user input.

    Be sure to check it out in the video below piloting a virtual car through traffic with ease!


    Website: LINK

  • Automated IC testing with Arduino Mega

    Automated IC testing with Arduino Mega

    Reading Time: < 1 minute

    Automated IC testing with Arduino Mega

    Arduino TeamFebruary 5th, 2018

    Arduino boards by themselves are, of course, great for making a wide array of projects. Sometimes, however, you’ll need to add other integrated circuits (ICs) for extra functionality. If you want to be absolutely sure that the IC you’re using in your project is working correctly, this tester by Akshay Baweja will input the signals to the device, and analyze the outputs that it produces on a 2.4” touchscreen.

    While this type of equipment would normally be quite expensive, Baweja’s Arduino Mega-powered gadget can be built for around $25.

    I designed a shield for all components to fit-in and chose the Arduino Mega as my microcontroller board since both the ZIF Socket and LCD can be put side by side giving the build a compact and portable look and feel.

    Be sure to check it out being demonstrated below, and if you want to create your own, code can be found on GitHub.


    Website: LINK

  • Kid’s kitchen beeps with the help of an Arduino

    Kid’s kitchen beeps with the help of an Arduino

    Reading Time: < 1 minute

    Kid’s kitchen beeps with the help of an Arduino

    Arduino TeamJanuary 31st, 2018

    While Roald Hendriks is quite pleased with the build quality of the IKEA DUKTIG play kitchen, it does lack one thing—the ability to say “beep.”

    This feature was requested by his daughter, who for her third birthday wanted “a kitchen that says beep, just like mommie’s.” Not wanting to disappoint, he dutifully installed an Arduino, along with a real-time clock module, buttons, and a speaker to allow her to set the cooking time, and have it count down just like the adult equivalent.

    The mods are extremely well done, and the buttons and time display on the front look like they were meant to be there. Hendriks even installed lighting inside the oven so she can see what she’s baking!

    Check it out in the video below!


    Website: LINK

  • Rotary encoders and Arduino combine for awesome universal remote

    Rotary encoders and Arduino combine for awesome universal remote

    Reading Time: 2 minutes

    Rotary encoders and Arduino combine for awesome universal remote

    Arduino TeamJanuary 31st, 2018

    In his latest hack, “Matlek” has come up with an entirely new take on the universal remote, using a pair of rotary encoders instead of an array of buttons to output up to 400 individual signals.

    One 20-step encoder in his remote selects the device to be controlled, while the other picks the function, like changing the volume or channel.

    Pressing down on a built-in button on the action selection encoder executes a command, while if it’s held down for long enough, it can be programmed via an IR receiver. An Arduino is used to control the gadget because of its small size, and the project expands on several helpful concepts like SD card usage and IR signaling.

    Of course, the remote has an IR receiver to “absorb” the IR signals of the remotes you want to “clone”, and an IR LED to send them. These protocols are saved on a microSD card, therefore you can switch OFF the remote (and the Arduino board), it keeps the information concerning the signals on the microSD card. There are also 2 rotary encoders with 20 positions each, and that is how you can have 400 buttons. Each rotary encoder is also a pushbutton. There is a LED to inform whether the universal remote is receiving or sending IR signals. This device works on a Lithium Ion battery (18650 cell), so it is portable. And finally, there is a switch, so you can switch it ON and OFF.

    Want to create one of your own? You can find out Matlek’s entire tutorial here.


    Website: LINK

  • Automatic guitar strumming with Arduino Uno and chopsticks

    Automatic guitar strumming with Arduino Uno and chopsticks

    Reading Time: < 1 minute

    Automatic guitar strumming with Arduino Uno and chopsticks

    Arduino TeamJanuary 31st, 2018

    If you like to make music, but don’t consider yourself particularly talented, YouTuber Make It And Fake It has come up with an innovative solution.

    Her device uses an Arduino Uno, along with a hobby servo motor to move a pair of chopsticks that holds the pick. This means that the guitar can literally strum itself, and thanks to a small control box, she can even select from one of three rhythm patterns.

    If you’re wondering what this could be used for, the answer comes at 1:40 in the demonstration video, where Make It And Fake It is shown drinking tea, playing another instrument, and even texting her mom while still producing music from the guitar. Code for the build can be found on GitHub.


    Website: LINK

  • Add an Arduino-based tachometer to your CNC router

    Add an Arduino-based tachometer to your CNC router

    Reading Time: 2 minutes

    Add an Arduino-based tachometer to your CNC router

    Arduino TeamJanuary 30th, 2018

    In order to get a good cut with a CNC router, the cutting tool speed needs to be properly set. Since his CNC didn’t come with RPM feedback, Troy Barbour came up with his own solution using an Arduino Nano along with an IR emitter/sensor pair.

    The spindle was set up with a single reflective surface, enabling it to sense one pulse per revolution that is sent to the Arduino at up to up to 30,000 RPM. To ensure accurate measurement, the device was programmed using an interrupt, meaning that if another process is running, it will temporarily drop what it’s doing and count the incoming pulse.

    RPM is displayed on a tiny OLED screen, which shows both an RPM number as well as a dial indicator for quick reference.

    Build an optical RPM indicator for your CNC router with an Arduino Nano, an IR LED/IR photodiode sensor and an OLED display for less than $30. I was inspired by eletro18’s Measure RPM – Optical Tachometer Instructable and wanted to add a tachometer to my CNC router. I simplified the sensor circuit, designed a custom 3D-printed bracket for my Sienci CNC router. Then I wrote an Arduino sketch to display both a digital and analog dial on an OLED display.

    You can see it in action below, and find build instructions and code on Barbour’s write-up.


    Website: LINK

  • Dotter is an Arduino-powered dot matrix printer

    Dotter is an Arduino-powered dot matrix printer

    Reading Time: < 1 minute

    Dotter is an Arduino-powered dot matrix printer

    Arduino TeamJanuary 29th, 2018

    While largely supplanted by more modern forms of printing, dot matrix printers still have their fans. Few, however, are more dedicated than Nikodem Bartnik, who constructed his own model that pulls paper up to 55cm wide and as long as he needs under a gantry that stamps each pixel with a marker.

    The device is controlled via an Arduino Uno, which takes input from a Processing sketch running on a computer to obtain the image to be printed.

    It uses a pair of stepper motors to advance the paper, as well as a third to position the marker to be stamped. A servo motor pushes the marker down as needed, producing a print that, as seen at 5:15 in the video below, is accurate and stylishly pixellated.


    Website: LINK

  • Fall asleep with the help of LEDs and an Arduino

    Fall asleep with the help of LEDs and an Arduino

    Reading Time: 2 minutes

    Fall asleep with the help of LEDs and an Arduino

    Arduino TeamJanuary 29th, 2018

    While some fall asleep nearly immediately with no assistance, others need the drone of a fan or a dedicated noisemaker to help them relax. The Fall Asleep Device, also known as “FADing,” by Youz takes a different approach. FADing shines an LED onto the ceiling out via a piece of acrylic, so that you can use it whether you like to sleep on your back or side.

    An Arduino Nano controls the nicely-shaped wooden unit, and causes light to fade in and out at a pace that decreases from 11 to 6 pulses per minute, prompting you to regulate and relax your breathing accordingly.

    After being started by a button below, FADing is kept on by a relay until it finishes, meaning it uses no power in standby. You can check it out in the video below, and find build instructions and code in Youz’s write-up.


    Website: LINK

  • Create a custom Kerbal Space Program cockpit with Arduino

    Create a custom Kerbal Space Program cockpit with Arduino

    Reading Time: < 1 minute

    Create a custom Kerbal Space Program cockpit with Arduino

    Arduino TeamJanuary 24th, 2018

    When you play a video game, the controls are normally a compromise between what you have available (a keyboard/mouse) and the actions you’re trying to convey. This, however, wasn’t good enough for Kerbal Space Program enthusiast Hugo Peeters, who instead of accepting this limited input method, designed a new control panel with an Arduino Mega as its heart.

    Notable features of his build include dual joysticks, a throttle slider, a multi-purpose LCD display, LED bars for fuel gauges, and a beautifully laser-cut enclosure.

    Want to construct your own? Find more details on the project in Peeters’ write-up, as well as the Arduino code he used and the KSP plugin necessary to interact with his new hardware.


    Website: LINK

  • Crawl through a 1D LED dungeon with TWANG!

    Crawl through a 1D LED dungeon with TWANG!

    Reading Time: 2 minutes

    Crawl through a 1D LED dungeon with TWANG!

    Arduino TeamJanuary 24th, 2018

    While video games have grown more and more complex over the last few decades, TWANG takes things in the opposite direction as an Arduino Mega-based 1D dungeon crawler consisting of an RGB LED strip.

    The player—a dot—is controlled via an accelerometer mounted to a door spring used as a joystick. With it, the player can move forwards, backwards, and attack by “twanging” the spring to make it vibrate. The LEDs display a wide array of colors, including representations of glowing lava, water, and player disintegration when a mistake is made.

    TWANG is inspired by the Line Wobbler game from Robin Baumgarten, and beautifully implemented as shown in the video below by Barton Dring. Code for the build can be found here, and 3D print files for the housing/joystick are also available.


    Website: LINK

  • Arduino Create plans for education now available!

    Arduino Create plans for education now available!

    Reading Time: 2 minutes

    Arduino Create plans for education now available!

    Arduino TeamJanuary 24th, 2018

    Today, we’re excited to announce that Arduino Create is now available for schools with Chrome OS devices in their classrooms.

    With Arduino Create, students and teachers will be able to tinker with Arduino hardware and programming in a collaborative, always up-to-date environment. You can learn how to subscribe using this tutorial.

    Last June, we launched Arduino Create for Chrome OS; however due to limitations with Google Apps for Education (GAFE), educational institutions were unable to purchase subscriptions on the Chrome Web Store.

    The new Arduino Create subscription site allows schools to purchase and manage subscription plans for their students, starting at $0.20/student per month. All you need is a credit card and the email addresses of the students you would like to enroll. We also have a solution for students under the age of 14 who might not have full access to emails.

    The Google Admin console can be used by IT administrators to bulk install the app on a fleet of Chrome OS devices.

    Arduino Create will continue to be available for regular Chrome OS users at $0.99 per month on the Chrome Web Store. Both versions support the following boards: Uno, 101, Mega, Mega ADK, Esplora, Nano (ATmega328), Micro, Zero, MKR1000, MKR Zero, MKR Fox 1200, MKR GSM 1400, MKR WAN 1300, Pro, and Pro Mini (ATmega328).

    Visit the new Arduino Create subscription site to get started. If you have any questions or comments, write to us on this Forum page. We look forward to hearing your feedback!


    Website: LINK

  • This Arduino infinity mirror lights up to music

    This Arduino infinity mirror lights up to music

    Reading Time: < 1 minute

    This Arduino infinity mirror lights up to music

    Arduino TeamJanuary 23rd, 2018

    Infinity mirrors, which make light appear to stretch to infinity by bouncing light between two mirrors, are incredible to observe. Hacker “Evocate” decided to go the extra mile and not only illuminate the inside of his mirror arrangement, but used an Arduino Uno and a sound sensor to enable it to react to sound.

    In addition to this sound sensitivity, a Bluetooth app controls color and brightness, allowing him to customize the device on the fly.

    The mirror also has a built-in microphone which detects sound/music and reacts accordingly by generating eye-catching light strobes on the beat of the music! Simply start up the app, connect to Bluetooth and see the magic happen!

    If you’d like to build your own, full instructions along with Arduino and app code are available here. Or you can simply check it out in action below!


    Website: LINK

  • Make an interactive coffee table with Arduino and LEDs

    Make an interactive coffee table with Arduino and LEDs

    Reading Time: < 1 minute

    Make an interactive coffee table with Arduino and LEDs

    Arduino TeamJanuary 22nd, 2018

    Rather than buying a coffee table, Marija from Creativity Hero decided to build her own, adding an array of 45 programmable LEDs on top of a pine base.

    An Arduino Mega is used to take input from 45 sensors corresponding to each LED in a grid made with MDF baffles, and commands each light to change colors based on whether something is placed on that square section. The on/off colors used can be selected via a Bluetooth smartphone app, allowing you to customize the furniture to your liking.

    This unique LED coffee table can create beautiful atmosphere and will be a real focal point in my living room. I wanted to make a simple design with some interesting features that will take my room to a whole new level. It is controlled via a custom-made Android application, so I can easily change the reactive color, or the background color, and I can even adjust the brightness.

    You can find full details on the project here, as well as the tools and parts you’ll need.


    Website: LINK

  • Light up the elements with this periodic table display

    Light up the elements with this periodic table display

    Reading Time: < 1 minute

    Light up the elements with this periodic table display

    Arduino TeamJanuary 16th, 2018

    If you took chemistry at any point in your life, you were exposed to the periodic table, which organizes different atomic structures by their atomic number. It’s an amazing chart, demonstrating just how much “stuff” our world is made up of!

    To show off the element collection he shares with his girlfriend, elemental hacker “Maclsk” built a light-up periodic table display with square cubes where each sample could be stored.

    What makes this really amazing is that the display uses WS2812B LEDs to light each cube individually. This allows it to produce fun color effects and even categorize the collection by different aspects, like element group, discovery year, or their state at certain temperatures.

    Modes are selected via a Bluetooth phone app. Be sure to see it in action in the video below!


    Website: LINK

  • RFID-controlled dry cleaner machine displays glowing leaves

    RFID-controlled dry cleaner machine displays glowing leaves

    Reading Time: < 1 minute

    RFID-controlled dry cleaner machine displays glowing leaves

    Arduino TeamJanuary 16th, 2018

    While you may not give dry cleaning conveyors much thought, Andrew Quitmeyer and Madeline Schwartzman’s “Replantment” exhibition at the Pratt Manhattan Gallery uses them in an entirely new way, along with glowing silicone molds of leaves from all over the world.

    The machine detects when an RFID tag attached to a laundry ticket is nearby, then moves over a lighting arrangement to display the multitude of glowing leaves.

    An Arduino and a SparkFun Simultaneous RFID Reader are used for control, with relays taking the place of a foot switch to start and stop the conveyor motors.

    You can check it out in action below, or if you are in the New York area, you can see the artwork in person until February 17th.


    Website: LINK

  • Robotic playing card dealer made with cardboard

    Robotic playing card dealer made with cardboard

    Reading Time: < 1 minute

    Robotic playing card dealer made with cardboard

    Arduino TeamJanuary 16th, 2018

    Ruben, aka “Ruubz0r,” a mechanical engineering student, was tasked with building a smart object. As he enjoys card games, he decided to make a playing card distributor.

    The resulting device uses a single servo to slide cards off of a deck, along with a stepper motor and ultrasonic sensor to aim it at the human recipient. An Arduino Uno provides the brains of the operation.

    The system is made out of wood and cardboard, and while it may not be ready for casino use, it’s a great example of what can be done with readily available materials. Check it out in action in the video seen here!


    Website: LINK

  • Automatically open doors with Arduino!

    Automatically open doors with Arduino!

    Reading Time: < 1 minute

    Automatically open doors with Arduino!

    Arduino TeamJanuary 12th, 2018

    Tired of doing the mundane task of opening your door? This hack from Sieuwe Elferink takes care of that for you, using an Arduino Uno for control.

    When someone comes within 50 cm of an ultrasonic sensor attached to the door, the Arduino uses an H-bridge relay to power a windshield wiper motor, which opens and closes it via a linkage setup. Another sensor is implemented on the opposite side of the door, allowing hands-free travel both ways!

    Want to build your own? You can find instructions here, while code is available on GitHub.


    Website: LINK

  • Create an Arduino Mega-powered, cable-cutting machine

    Create an Arduino Mega-powered, cable-cutting machine

    Reading Time: < 1 minute

    Create an Arduino Mega-powered, cable-cutting machine

    Arduino TeamJanuary 12th, 2018

    What do you do when faced with measuring and cutting a bunch of cables? If you’re Edward Carlson, you “simply” build a machine to do it for you!

    While it may not save time on this run, at least on the next occasion that he needs a few cables cut, he can just program his device to snip everything to size!

    His setup uses an Arduino Mega with an LCD/button shield to tell the machine how long to snip each wire, then employs a stepper motor to move the cable between two rollers to the correct length. When in position, a high-torque servo actuates a (normally) manual pair of clippers to cut it to size.

    Be sure to check out the project explanation in the video seen here, or skip to around 5:30 to see it in action!


    Website: LINK