Schlagwort: tech articles

  • The MagPi magazine issue #131

    The MagPi magazine issue #131

    Reading Time: 2 minutes

    Discover articulated robotics with our guide to Python Robots with arms and legs

    Python Robots

    If you ever wanted to get involved with articulated robotics then this feature will hold your hand. Quite literally! We’ve gathered everything you need about servo motors, Python motor control techniques; kits and robot designs. Plus, a great tutorial on using Pico to control a robotic arm. Limber up and get ready for realistic robotics.

    This amazing build uses ChatGPT to tell your future

    Olga The Fortune Teller

    This photo booth uses ChatGPT to take a photo, post it to Instagram and tell your fortune at the same time. We think Olga looks incredible and chatted to the team behind the build.

    Capturing whole trains by automatically snapping and stitching images together

    Trainbot/OnlyTrains

    Software engineer Jonathan Müller has created this amazing automated project that photographs trains and stitches together the images to capture the whole train. It uses Raspberry Pi and AI to snap and stitch the trains as they roll by.

    Capture the animals in your garden with Raspberry Pi and Camera Module

    Raspberry Pi Camera Traps

    Raspberry Pi and a Camera Module can be housed outside to create amazing photography traps. Don’t worry, no critters are harmed. We leave no footprints and take only photos in this great feature about capturing the natural world. 

    We take this Spot-like robot dog powered by Raspberry Pi for walkies

    PuppyPi

    Who’s a good boy? Yes, you are! We love this PuppyPi robot kit from HiWonder and take it for a good long walk as part of our robot special. We think this relatively low-cost robot kit will make a great addition to any robotics course or classroom.

    The best cases for Raspberry Pi

    Amazing Cases

    Keep your Raspberry Pi computers housed and safe with our guide to the best cases around. There are different options here for all kinds of cases.

  • Win one of two Argon POD sets!

    Win one of two Argon POD sets!

    Reading Time: < 1 minute

    Subscribe

  • Adafruit Feather RP2040 review

    Adafruit Feather RP2040 review

    Reading Time: < 1 minute

    The Feather ecosystem continues to grow, and the Adafruit Feather RP2040 ($11.95) still stands strong amongst all the variations of Feather boards. The board features an RP2040 32-bit Cortex-M0+ dual core running at ~125MHz, perfectly packaged into the Feather form factor. This allows you to add dozens of different shields and accessories with ease. Or, you can just design your own circuits and use up the 21 GPIO pins that feature four 12-bit ADCs, two I2C, two SPI, and two UART peripherals. It also has 16 PWM outputs that you can use for servos or LEDs. It’s an impressive board, and a great choice for
    most projects.

    Verdict

    10/10

    A great addition to the Feather ecosystem.

  • MCM/70 Reproduction

    MCM/70 Reproduction

    Reading Time: 3 minutes

    Hardware challenges

    Keen to build his own repro version, Michael began to source components. While obtaining a keyboard was straightforward, from Dave at osiweb.org, he wasn’t sure how to reproduce the MCM/70’s unique APL keycaps. After considering making his own, he discovered a helpful UK supplier of custom keycaps.

    Michael used Inkscape to create SVG versions of the legends that could be scaled to fit the keycaps. Detail is crucial in his reproductions, as he reflects: “With the ‘inside’ of the machine being emulated, it is very important to me for the outside to look as much as possible like the original. I want my reproductions to be clearly recognised, and operate the same as the originals they replicate.”

    Michael spent some time looking for a suitable replacement for the original MCM/70’s plasma display that’s no longer manufactured, and eventually found the high-performance Broadcom HCMS-2972 dot matrix display which offered a close match. “Packaged as eight 5×7 dot matrix arrays, these modules operate at a nice safe 3.3 V and can be cascaded together side by side to create the 32×1 character display desired here.”

    The aesthetically pleasing casing took Michael many hours to 3D-print, and he added two placebo cassette decks for an authentic look: “Virtually all of the online images of the MCM/70 feature the two tape deck model.”

    Retro Raspberry Pi

    Following a research visit to the York University Computer Museum (YUCoM), Toronto, Michael decided to use the YUCoM working MCM/70 software emulator in his project, which has “high historical accuracy” – important if his version was to work just like the original. “Thanks to the hard working folks at York University, I have a great head start with this project.”

    To complement that, he needed a solution with a fairly powerful CPU to run the emulator. After first trying it on a Raspberry Pi 2 he had to hand, he found it only executed at about 33% the speed of an original MCM/70. “When I moved the project to a Raspberry Pi 4B, the emulator ran at twice the speed of the original,” he reveals.

    Raspberry Pi’s large number of GPIO pins also allowed Michael to wire the emulator to interact with the display, keyboard, and cassette deck. Plus, he needed “a target system with a Linux-based OS to build and run the emulator (which was written in C). In fact, the emulator built easily on Raspberry Pi OS after a couple of required libraries were loaded.”

    The result of his hard work is impressive and Michael has already put it to good use. “I’ve been using the MCM/70 Reproduction to learn APL by working my way through the MCM/70 User’s Guide. Mind you, I won’t be writing any APL programs any time soon, but I would like to get a good feel for the language.”

    He has also generously shared a detailed description of his project on Instructables. It’s well worth a read, illustrating his enthusiasm for his retro subject, and taking you through how you can create your own version.

  • RAD Expansion Unit

    RAD Expansion Unit

    Reading Time: 3 minutes

    For those unaware, the REU plugged into the C64’s expansion port and added extra memory while also allowing for direct memory access (DMA) transfers – something the Sidekick64 couldn’t do. This meant data could be transferred to and from the main system memory whole bypassing the MOS Technology 6510/8500 CPU. “My RAD Expansion Unit was designed to do these transfers,” Carsten says. It’s a major triumph!

    Radical thinking

    There are many benefits to having the RAD Expansion Unit, which boosts the amount of available memory from the standard 64kB to as much as 16MB. “It helps to run Geos [a C64 OS] and it makes some tasks less annoying, such as copying disks in one go. It also functions as a RAM disk to accelerate working with the system,” Carsten says.

    In order to create the project, then, two PCBs were produced: one to fit Raspberry Pi 3A+/3B+ and another to fit Raspberry Pi Zero 2 W (the latter creating a less expensive unit). “I didn’t want the glue logic that facilitates the bus communication with the available GPIOs to get too extensive and I wanted to avoid Complex Programmable Logic Devices and such which would prevent many people from building their own RAD,” Carsten says.

    Indeed, the project was designed so that the RAD contains the glue logic to interface Raspberry Pi with the C64 bus. “You simply put it on to Raspberry Pi like a HAT and plug it into the expansion port of the Commodore 64,” Carsten continues. “The combination of a fast SoC and a decent number of GPIOs was great.”

    An explosive result

    There were challenges, of course. “The biggest was getting the bit banging right,” Carsten says. “Most of the communication has to happen within a time window of less than 500 nanoseconds – most often there’s significantly less time between all signals being read and putting data on the bus.”

    To make the device run smoothly, Carsten had to use multiplexers. “More signals on the expansion port need to be read/written to than Raspberry Pi has GPIOs,” he explains. The correct data had to be put on the bus at the right time to prevent memory corruption and, in the worst case, random instructions being executed by the CPU, causing a crash. “In general, to get the timing right, I needed to hit intervals at a spacing of approximately tens of nanoseconds, which I did using CPU cycle counters.”

    With all that in place, it was time to chill and RAD-Doom proved a great way to do so. Most of the processing is being done by Raspberry Pi (“it’s essentially a CPU replacement where the new CPU is a one-core ARM running at 1.4GHz with its own 512MB RAM,” Carsten says). But the important thing is that the tech demo uses the C64’s VIC-II graphics chip – and works! Sound is also streamed to the iconic SID chip.

    “I wanted to see how the C64/C128’s VIC-II and SID performed if CPU power and memory was not an issue,” Carsten says. “I also wanted to experiment with real-time colour dithering for the VIC-II.” By making use of Doom to output graphics and sound, he’s certainly managed to achieve that.

  • Properly pointing telescopes with PiFinder

    Properly pointing telescopes with PiFinder

    Reading Time: 3 minutes

    As such, Richard decided to create his own system. “I was seeing articles and forum posts describing electronic finders (devices that use a camera and computer to determine absolute telescope pointing),” he says. “So I decided to see if I could build something I’d be happy using and sharing.”

    Scoping the sky

    Richard has based his project – called PiFinder – around a Raspberry Pi 4 computer and a Raspberry Pi High Quality Camera, with the idea being to create a device that would take images of the night sky to determine where a telescope is pointing by analysing the pattern of stars.

    “I wanted PiFinder to be easily added to any type of telescope, requiring no setup aside from a clear view of the sky to indicate where the telescope is pointing,” Richard says. “I wanted to combine this ability to know where the telescope is pointed with an extensive catalogue of thousands of object locations to help an observer find objects in the sky with simple guidance on which way to push the telescope.” He achieved all of these things and more.

    By having the camera constantly taking images, the PiFinder can get to work. “So long as the on-board Inertial Measurement Unit indicates the telescope is static, the camera is snapping images and feeding them to the solving algorithm,” Richard explains. “Depending on sky conditions and which camera is being used, it can take anywhere from 0.25 to 1.5 seconds to capture an exposure which contains enough stars to solve.”

    Stars in his eyes

    After an image has been taken, it’s processed using code released by the European Space Agency called Tetra3. “It implements a very fast system for extracting stars from an image and using distances between multiple sets of four stats in the image to produce a hash,” Richard says. “This hash can be quickly matched against a pre-computed database of star patterns to find candidate positions. Each potential position is then checked using other stars in the same image to verify the correct solution.”

    Extracting stars from the image on a Raspberry Pi 4B computer takes just 100 milliseconds, while solving the image takes 44 ms. “This is all done on a separate thread so the next image can be acquired while the previous image is being solved,” Richard says.

    “In practice, this means that the PiFinder can usually achieve one capture/solve per second. If using the Raspberry Pi Global Shutter Camera, it can achieve more than two captures/solves per second due to its much larger pixel size and low-light sensitivity.”

    By cycling through several astronomical catalogues and even typing in the ID of a specific celestial body, users can use PiFinder to locate objects in the night sky, receiving simple guidance on which way to push the telescope in order to view them. Richard says it’s working well, which is why he released it to the public after seven months’ work. “I’ll continue to focus on making it as simple to replicate and build as possible as I get more feedback from others,” he reveals.

  • Argon POD System for Raspberry Pi Zero 2 W review

    Argon POD System for Raspberry Pi Zero 2 W review

    Reading Time: 2 minutes

    The first add-on module, USB/HDMI (£12/$12), connects directly to mini-HDMI and micro-USB ports, breaking them out into full-sized equivalents and separating the power, freeing up another USB port. Installation is as simple as lining up the connectors and pushing together, with no drivers required. Underneath, a header and power connector are exposed that are used to connect other modules, so you may require this module for compatibility.

    But wait, there’s more!

    Need some more USB ports? How about Ethernet? The USB/LAN module (£20/$20) does both. A ‘full-size’ module, it sits below our current setup, connecting via an exposed header on the USB/HDMI module. Easily snapping together, you now get an additional four USB connectors (two on the front, two on the back) and an Ethernet connector for hard-wired networking. Again, a one-minute install and Raspberry Pi OS recognises all peripherals without any additional software.

    Now it’s show-time. The Display Module (£30/$30) is a 2.8-inch capacitive touchscreen that plugs into Zero’s GPIO. Framed in an attractive black bezel, with four programmable buttons, it transforms Zero into a stand-alone unit opening up the potential for makes. Drivers are required to get the screen running, which we found easy to install. A simple configuration system allows the buttons to be preprogrammed with common functions such as power off or reboot. Provided documentation explains how to take control of them yourself using GPIO. The screen is perfectly adequate, although you’ll need a stylus for meaningful use of the touch capabilities.

    All in all, this is a great collection of add-on gadgets for your Zero. The modular nature means you can keep costs (and size) down. Argon has also teased future modules for further expansion. One slight niggle was a lack of access to GPIO and camera connectors, although this can be overcome with USB devices. It would also be interesting if documentation was provided on how you could make your own modules using the through-module header.

    Verdict

    9/10

    Easier GPIO and camera access would be nice, but the exquisite design, tough materials, and sensible pricing more than make up for that. The Argon POD has seriously impressed.

    Specs

    Case: Dimensions: 35 × 80 × 20 mm; SD card access; Removable cover

    USB/HDMI Module: Dimensions: 35 × 80 × 20 mm; 2 × USB; 1 × full-size HDMI; 1 x micro-USB power

    LAN Module: Dimensions: 70 × 80 × 20 mm; 4 × USB; 1 × Ethernet

    LAN Module: Dimensions: 70 × 80 × 16 mm; 2.8˝ capacitive touchscreen; 4 × buttons; IR sensor

  • A retro world tour

    A retro world tour

    Reading Time: 2 minutes

    It reminds me that each country, and often each region within a country, had its own computing startups, and their products reflected the unique cultural and technological idiosyncrasies of the time and place.

    Around the world

    The MCM/70, produced by the Canadian company Micro Computer Machines, holds a special place in the annals of computing history as one of the first, if not the first, personal computers. Introduced in 1973, it boasted an Intel 8008 processor, 4KB of RAM, and an APL (A Programming Language) operating system: another thing I’ve never heard of before.

    The MCM/70’s unique design, including a twin cassette deck and a built-in segmented LED display, reminds me of a modern cyberdeck.

    It’s a pleasure to see a reproduction of this iconic machine today.

    In the US, the Apple II was a revelation when it was launched in 1977. It was the first computer many Americans ever saw (here in the UK, mine was a Dragon 32). The Apple II’s role in popularizing the concept of the personal computer cannot be overstated.

    I preferred the Commodore 64, with its powerful multimedia capabilities. It became a beloved home computer, and also a favourite platform for game developers. It’s still my favourite.

    Moving to the UK, the ZX Spectrum and the BBC Micro were pivotal in the country’s computing history. I had a ZX Spectrum, and despite its rubbery keyboard and modest specifications, it was a revolution in the home computing market due to its affordability. The BBC Micro, on the other hand, was a staple in schools, providing many British children with their first taste of computing. Over in Japan, the NEC PC-8801 and Sharp X1 series were leading the pack. I don’t think I ever saw one until visiting computing museums as an adult. Down under, the Microbee, an Australian-built computer, had a cult following. In the Soviet Union, locally produced machines like the Agat and the Electronika BK series were reverse-engineered Western designs.

    Today, the world of computing can seem homogenous, dominated by a few large corporations. A MacBook is a MacBook all over the world. We use devices with eerily similar designs and identical operating systems. But in the 1980s, computers were wonderfully diverse. They were local, they were personal.

    One of the most fascinating aspects of the Raspberry Pi is its ability to emulate retro computers. This enables enthusiasts to experience the computing past first hand, and younger generations to discover the rich history of personal computing.

  • Love Machine ChatGPT compliment giver

    Love Machine ChatGPT compliment giver

    Reading Time: 4 minutes

    Despite these alarmist news items gaining media coverage every single year for more than a decade, we punters just don’t seem to wise up to such confidence tricks. Tech entrepreneurs Kakapo Labs set about a more benign riff, on the idea that Joe Public loves a bit of flattery, using clever verbal flummery generated by AI darling ChatGPT, creating a Love Machine that dishes out compliments and chocolates in equal measure. So far, the gentle love-bombing experiment doesn’t seem to have a hidden agenda.

    Sweet nothings

    Will and India, from London-based Kakapo Labs, have backgrounds in electronics engineering and graphic design, respectively, and are interested in “building fun, positive things that cross the boundary between the internet and real-world objects.” As with the password insecurity mentioned above, Will notes that behavioural psychology research shows that it’s pretty clear people are highly motivated by small rewards. “We were interested in what people might do to get a small reward and how much they’d enjoy it. ChatGPT was in the news a lot around the time we started this project, but mainly related to its impact on work. “We thought instead we could try to use it to make some fun” – hence the AI cutey sporting a designer fluffy red skirt and matching glowing red LED matrix heart.

    They chose Pico W for this ChatGPT Love Machine “because it’s powerful but also simple, low-cost, and small but, at the same time, can run a full wireless stack which is easy to use.” Kakapo Labs has more than a decade’s experience of using wireless microcontrollers, and often found them complicated to use “as the trade-offs needed to squeeze an internet stack into an environment without a full operating system, and limited resources meant it always felt like a bit of an awkward fit.” However, Will says that, with MicroPython on Pico W, things work painlessly and the development time is short.

    Fiddling about

    The Love Machine was originally a gum ball dispenser that Kakapo bought online for less than £100, replacing its 20p coin-operated mechanism with one they designed in Inkscape and laser-cut themselves. This involved several stacked-up pieces sandwiched together, plus a retractable gear wheel attached to a stepper motor. With lots of fiddly parts to connect up, Will and India realised they could simplify access by removing the vending machine’s base and upending it. They boosted its power using a voltage converter but tried not to over-egg things and cause jams that could damage the mechanical cogs. A stirrer used to push gum balls towards the dispensing slot was not needed; removing this made things work more reliably. They also used brass inserts pushed into the acrylic sheet, instead of nuts, reducing “the number of hands/fingers/things to hold simultaneously and [making] assembly and disassembly quicker and easier.”

    Pimoroni’s ‘phew’ web server provides an access point to the software and allows the team to control access and connect the ChatGPT Love Machine to Wi-Fi via their phones. The Love Machine is controlled using a web socket including, on the client side, the ‘micropython_async_websocket_client’ library for which WSS (Secure WebSocket) support was so recent that its code hadn’t yet been merged into the main library. Using the AWS API gateway keeps running costs down as there’s no need to have a server instance constantly handling requests.

    This technology is hidden behind the Love Machine’s greeting board which tells passers-by how to interact. Users send WhatsApp messages to the compliment machine, configured using Twilio, and ChatGPT “provides the conversation and judges whether people are sending compliments,” says Will.

    With a company named after David Attenborough’s favourite breed of parrot, it was important to the Kakapo team that the build was fast to complete and fun, making it an ideal project that would catch people’s imagination and then discover that they could create similar ones.

    “We think getting people to have a go with tech when they’re young is really important! Making things can be very rewarding and is the ideal career for some people. They are also diversity advocates – opening up the chance to have a go can help people who didn’t realise ‘someone like me can do this’.”

  • Brew your own beer in The MagPi magazine issue #130

    Brew your own beer in The MagPi magazine issue #130

    Reading Time: 3 minutes

    Step back in time with MCM/70

    Learning APL with an MCM/70

    We love Michael Gardi’s impressive reproduction of the classic Canadian-built MCM/70 personal computer. Crafted with meticulous detail, Michael used a Raspberry Pi 4 to emulate the MCM/70’s software and created custom keycaps for authenticity. Not just for show, Michael is using the machine to learn APL (A Programming Language) developed in the 1960s.

    Brew your own beer with a Tilt hydrometer and Raspberry Pi

    Raspberry Pi Micro Brewery

    Brewing beer, a centuries-old practice, is brought bang up-to-date with Raspberry Pi. All you need is a Wi-Fi and Bluetooth-enabled Raspberry Pi, a Tilt hydrometer for accurate measurements, a brewing bucket, and your usual brewing tools and ingredients.

    Create your own bedtime stories with ChatGPT and Stable Diffusion

    Automatically create bedtime stories with AI

    Create a magical bedtime storyteller using artificial intelligence with ChatGPT for narrative and Stable Diffusion for illustrations. Raspberry Pi writes stories while showcasing AI-generated pictures, with characters and settings decided by listeners. This project also provides insights on using ChatGPT and Stable Diffusion APIs, Python modules, and effectively storing and replaying stories.

    Learn Linux and the command line in The MagPi magazine issue #130

    Learn Linux and the command line

    Mastering Linux and its Command Line Interface (CLI) is an essential skill and Raspberry Pi is the ideal platform. In this feature, we will introduce you to the command line interface and the basic commands you need to truly take control of your computer.

    The MagPi community events calendar

    Events Calendar

    Raspberry Pi has a vibrant maker community and there are events taking place around the world. Meet fellow enthusiasts and share your knowledge, network, and inspire each other. Our Raspberry Pi Events calendar and map let you know where to go.

    The MagPi #130 out NOW!

    You can grab the brand-new issue right now from Tesco, Sainsbury’s, Asda, WHSmith, and other newsagents, including the Raspberry Pi Store in Cambridge. You can also get it via our app on Android or iOS.

    You can also subscribe to the print version of The MagPi. Not only do we deliver it globally, but people who sign up to the twelve-month print subscription get a FREE Raspberry Pi Zero Pico W!

    A free PDF of The MagPi magazine will be available in three weeks‘ time. Sign up for our newsletter to be notified when our free digital edition is available.

  • Win one of three Pico Bricks Base Kits

    Win one of three Pico Bricks Base Kits

    Reading Time: < 1 minute

    Subscribe

  • Learn with Raspberry Pi Sense HAT

    Learn with Raspberry Pi Sense HAT

    Reading Time: 3 minutes

    Projects

    Movement and LED-based projects to try for yourself

    Raspberry Pi Sense HAT Pong

    Paying homage to the original computer game, this walkthrough on how combine a Sense HAT and Raspberry Pi, plus some Python code to create classic Pong, is bound to appeal to retro gamers. There’s even a link to a video of the original game being played on an oscilloscope.

     magpi.cc/sensehatpong

    Sense HAT Marble Maze

    Orientation sensors on the Sense HAT detect which way the virtual marble (in the guise of coloured LEDs) is travelling in this tricky maze puzzle. Have fun following the setup guide, before setting a timer and challenging your friends to escape the maze in the fastest time.

    magpi.cc/sensehatmarble

    Night clock

    Lorna Jane’s tutorial shows you how the LED matrix can be used as a useful and quirky display that can be used as an at-a-glance bedside time check, without having to turn on the light or phone display.

    magpi.cc/sensehatnightclock

    Raspberry Pi Sense HAT set up guide

    Now we’ve whetted your appetite about things a Sense HAT can do, head to this useful guide to set up. As this guide explains, the Sense HAT contains a number of on-board sensors to measure temperature, humidity, colour, movement, and orientation, and also has an LED grid to display the results of your investigations. With its origins as a sensing device destined to go into space with the European Space Agency, and as a teaching aid as part of the Astro Pi project, there’s little the Sense HAT can’t do.

    This tutorial walks you through displaying text, images, and measuring the orientation of the Sense HAT device, before detecting movement using the joystick for input, and putting it all together to create your own projects that sense and react to their surroundings.

    magpi.cc/gettingstartedsensehat

    Sense HAT documentation

    The official documentation will walk you through some of the more advanced aspects of Sense HAT and how to use this Raspberry Pi accessory with different computer languages, including C++ as well as Scratch and Python. Each of the sensors (gyroscope and magnetometer and barometric pressure sensor among them) is covered, along with calibration for the magnetometer and accelerometer. The official documentation also covered reading and writing the EEPROM data. Also take a look at the corresponding Sense HAT Python documentation, linked to from the official documentation. Here you will find Python API examples and the Sense HAT API reference guide, ideal for all your coding needs.

    magpi.cc/sensehadocs

  • Get fit with Raspberry Pi

    Get fit with Raspberry Pi

    Reading Time: 4 minutes

    Exercise bike mod

    Breathe new life into that old exercise bike

    One of the newer trends with exercise bikes these days is to have your cycling power a video of a wonderful environment that you could be cycling through if you had the ability to do so. The technical side of it is fairly simple – with some kind of coder or sensor, you can track how much you’re pedalling and translate that to video playback or, in this case, graphic generation.

    This project by paddywwoof uses a Hall effect sensor to keep track of the speed of the bike, feeding into a Python program that renders karst, fjords, and alpine environments as you pedal. It’s easy enough to edit your own maps if you have the time too.

    Some of the instructions are for a slightly older version of Raspberry Pi OS and the Python that comes with it. However, it should still work just fine.

    How to build this.

    HIIT Workout Trainer

    Data analytics for your fitness

    During 2020, when a lot of people were working from home, James Wong decided to improve his workout routine. He also wanted to combine it with his research into machine learning on Raspberry Pi. Hence, combining HIIT (high‑intensity interval training) with Raspberry Pi to track his workout and give him useful data on it.

    How is your data used? To score yourself against others, naturally, taking advantage of competitive streaks to get you improving the efficiency of your workout. A Coral Edge TPU is used to aid in the machine learning part, improving the sampling rate to 30 frames per second.

    The code is open-source and is readily available on GitHub. James believes it should be easily adaptable to other sports or workout types – yoga springs to mind when it comes to tracking body metrics!

    How to build this.

    Pi Fighter

    Here comes a new challenger

    Gamifying your workout has its upsides and downsides. However, having a target to beat, both in terms of a high score and pop culture characters to focus on, can make a workout much more fun. Making use of the kind of technology used by Ivan Dragon in Rocky IV, or even punch machines at arcades.

    Raspberry Pi acts as an accelerometer to measure the power of your punch to calculate how many hit points (HP) are taken off the character you’re fighting – in some cases this means Luke Skywalker or Darth Vader. A simple LED screen is used to let you know how much more fightin’ you’ll need to do.

    Like all good games, the different characters increase in power, meaning you’ll be worn out by the time you take down the Dark Lord of the Sith. Or, maybe you’ll need to face him twice – depends how strong you are.

    How to build this.

    DIY smart scales

    An encouraging weight tracker for those who need it

    Wii Fit was a revolution for fitness video games, spawning loads of motion-controlled workouts. If you don’t really like to use your Balance Board much anymore, you can hack it to be a pair of smart scales using a Raspberry Pi and a pencil.

    The Wii Balance Board connects via Bluetooth much like Wiimotes, although you’ll need a bit of custom code to keep it paired permanently – included with the rest of the code for this project. It does require you to press a button underneath the Balance Board though, achieved by the pencil we mentioned before – a simple solution that won’t need much maintenance.

    Once you step on it, 250 measurements are taken to create an average (due to electronic noise) and it then sends the info to an IoT service called Initial State which does the tracking. It also sends you texts to let you know your progress, including encouraging messages as well.

    How to build this.

  • Greening the Spark

    Greening the Spark

    Reading Time: 2 minutes

    Carl comes from a background of making and simulators, working in space operations in Munich, training astronauts and flight controllers on the Columbus module of the International Space Station, and also being the technical director of the company that made the first commercial Crystal Mazes.

    Renewable interest

    Why did Carl choose Raspberry Pi, though?

    “I wanted a small but powerful single-board computer with Wi-Fi and sound, a wide range of off-the-shelf third party hardware and software, and a suitable well-supported language and IDE to code it with,” Carl says. “Raspberry Pi and Python turned out to be the perfect combination.”

    Building it took a while, and was apparently very hard, as everything else was designed and built from scratch using the Red Robotics RedBoard+, an add-on robotics controller for Raspberry Pi. It does quite a lot, though.

    “There are software models of renewable electricity sources (wind and solar) driven by a weather model, non-renewables (fossil fuels and nuclear) which are controllable, storage devices (batteries and pumped hydro), and consumer demand,” Carl explains. “There is a working model of a wind farm (with three turbines) and a sunlamp. The idea is to control the fossil fuel and nuclear power to meet demand without blackouts or surplus and to keep the storage devices close to half-full.

    “There is an operator control panel to monitor and control the grid, and a visitor control panel to set up a game. There are three ‘characters’ who help visitors understand what is going on with spoken messages: a robotic system voice and two human guides, as well as sound effects and music to add ambience.”

    As it’s a game, players get a result which is uploaded to a dedicated website, including a summary of what you did and a certificate related to your final ‘score’. “In a museum installation, there will also be a themed landscape with physical mock-ups of the various elements,” Carl adds.

    Futuristic energy

    The project is still ongoing, although is already quite impressive. Carl has ideas for what he’d like to do with it, though.

    “I’m hoping to interest museums of science and technology, energy supply companies and possibly the National Grid itself, as well as schools and universities,” Carl says. “I’m also keen to develop both the hardware and software to make it more modular, generic, smarter, and connected. It would be nice to use live data streamed from the National Grid and some AI in the control system.”

  • The importance of taking a break

    The importance of taking a break

    Reading Time: 2 minutes

    On a basic level, making sure to take breaks while making can be a safety precaution. Nobody should be soldering while they can barely stay awake, after all. More importantly, sometimes you need to put some space between yourself and a project to allow your brain to rest. Constantly hitting it against a problem you’re having is hardly a good way to solve it.

    Sleep on it

    I once read a (possibly apocryphal) story about how a scientist fell asleep while trying to figure out how they got some specific results – while asleep they dreamt about a solution and, after waking up, found out it was correct.

    I’ve never quite had a eureka moment in my dreams like that myself, but there have been plenty of times when a bit of engineering and/or code have stumped me until I looked at it with fresh eyes the next morning.

    Even writing stuff for the magazine can benefit from a break. Sometimes an angle or a subject isn’t quite making sense and that little bit of time apart helps focus my thoughts. And in terms of focus, the Pomodoro method of 30 minutes of work with a five minute break also really helps me. We had a project about making your own Pomodoro timer in issue 103 which I should make. However, I’ve just been using my phone and its Focus feature.

    At the other end of the spectrum, all-nighters really are overrated I feel, although as I near my fourties, they’re a little harder to do anyway. It means I’m doing them much less though.

    On hiatus

    As well as short breaks, sometimes you need to just take time off a hobby. Burnout is very real, whether it’s with work or with something you’re doing for fun, and you don’t want to ruin your relationship with your favourite hobby because you forced yourself to keep doing something. When taking breaks from one hobby in the past, I’ve focussed on another hobby instead. Flexing a different part of your mind and/or skill set is always good for growth – and can even aid you in other hobbies. Although, sometimes, you have that con crunch and need to get your prop working by any means necessary. Just make sure not to do any soldering in the hotel room; I speak from experience. It’s not a very suitable space.

  • PicoBricks Base Kit review

    PicoBricks Base Kit review

    Reading Time: 3 minutes

    There’s also a protoboard area, rather than a breadboard (so the holes aren’t already connected in rows), although a mini breadboard is also supplied. Another nice touch is the battery connector for the supplied 2×AAA battery holder, so you can power the kit away from a computer.

    Interestingly, the ten modules are already connected to Pico’s GPIO pins via a frame with solder joints. So, you can use them all straight away without having to do any wiring.

    Alternatively, you can snap the modules off and wire them to Pico with Grove connectors (ten supplied). The beauty of this is that they can subsequently be reused separately for other projects, once you’ve finished going through the ones in the PicoBricks e-book.

    Electronic learning

    The 234-page e-book takes learners through 25 electronics projects of increasing complexity, from blinking an LED to setting up a mini smart greenhouse. Each project features an introductory explanation, wiring diagram, and step-by-step programming guide using the MicroBlocks visual programming system, akin to Scratch, which can be run on any type of connected computer – either in the browser or using an offline app. A PicoBricks library can be installed via its menus.

    Alternative project code is also provided in the e-book in MicroPython and Arduino IDE (C/C++) form, albeit without any explanation as to how it works. There are also links to the code, although it sometimes differs slightly from what’s in the book.

    There are some fun and interesting projects to complete with the PicoBricks Base kit, including a reaction game, magic 8-ball, music player with speed control, thermometer, alarm clock, and colour-matching game. Many of them make good use of the mini OLED. A few community-made projects are also available from the PicoBricks GitHub repo.

    Missing components

    Perhaps the biggest downside is that around half of the projects in the e-book require extra components – such as a 2WD robot car and smart greenhouse kit – that are only included in the more expansive IoT Expert ($69) or Zero to Hero ($99) versions of the PicoBricks kit, available direct from robotistan.com.

    Alternatively, you could supplement the Base kit with standard components already in your toolbox (or buy them separately), such as servos, motors, and ultrasonic distance and PIR sensors. These can be connected with jumper wires to the full female GPIO breakout headers flanking Pico, or to the Grove connectors.

    In addition, instead of using the optional Wi-Fi and Bluetooth boards (that connect to the PicoBricks IoT module), you could always replace the kit’s removable Raspberry Pi Pico with a Pico W. Either way, once you’ve learnt the basics, there’s the potential to experiment with IoT projects not fully explored in the e-book.

    Verdict

    8/10

    While the Base kit is missing a few components for some projects, it offers a value-for-money and well-organised way for newcomers to learn about electronics and programming.

    Specs

    Features: Raspberry Pi Pico, 10 × snap-off electronics modules, protoboard area, reset button

    Connections: 20 × Grove connectors, 2 × 20-pin breakout headers, battery connector

    Extras: 10 × Grove cables, 10 × male-male jumper wires, micro-USB to USB cable, two-piece wooden stand, battery holder (2×AAA), mini breadboard

  • ClippyGPT

    ClippyGPT

    Reading Time: 4 minutes

    By combining Clippy with ChatGPT, the AI chatbot that is still taking the world by storm, David has brought Microsoft’s character back to life in a physical form and given users the ability to hold a conversation with it. The result is a distinctive, fun, AI-powered digital assistant. “All the memes about Clippy being ChatGPT in disguise convinced me that the first ChatGPT-empowered companion bot I should build would be a desktop Clippy,” David says.

    Chatty man

    David has long been interested in robotics and chatbots. “I’ve been building robots as a side project, with a focus on companion or social robotics, for a few years now, and one of the key components that has been hard to implement is open-ended conversational capability,” he says. To that end, he’s found it challenging to hard-code a manually-curated chatbot into a robotic build, but says ChatGPT was the answer.

    “Conversational large language models like ChatGPT are a game-changer, especially for social robotics, so I was keenly interested in integrating this new tool into a robotics build,” he says. “I wanted to use it as a test case to find the best approach for doing this on a budget. It all stems from my desire to create helpful robots that can help people who have difficulty socialising, or cannot leave home due to illness or other situations.”

    Part of this drive is personal. Being able to give people the ability to make friends or create robots that can help with tasks could be of assistance to his son, who has special needs and finds socialising difficult. “I’ve always wanted to help him make friends,” David says. “A conversant chatbot using an inexpensive API really advances that aim, so I had to figure out how and then share that with others.”

    Say it again

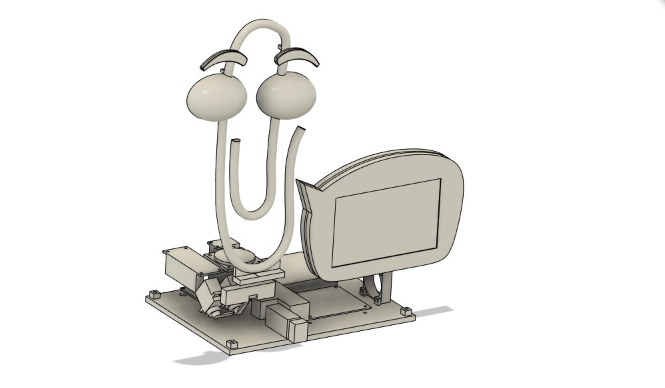
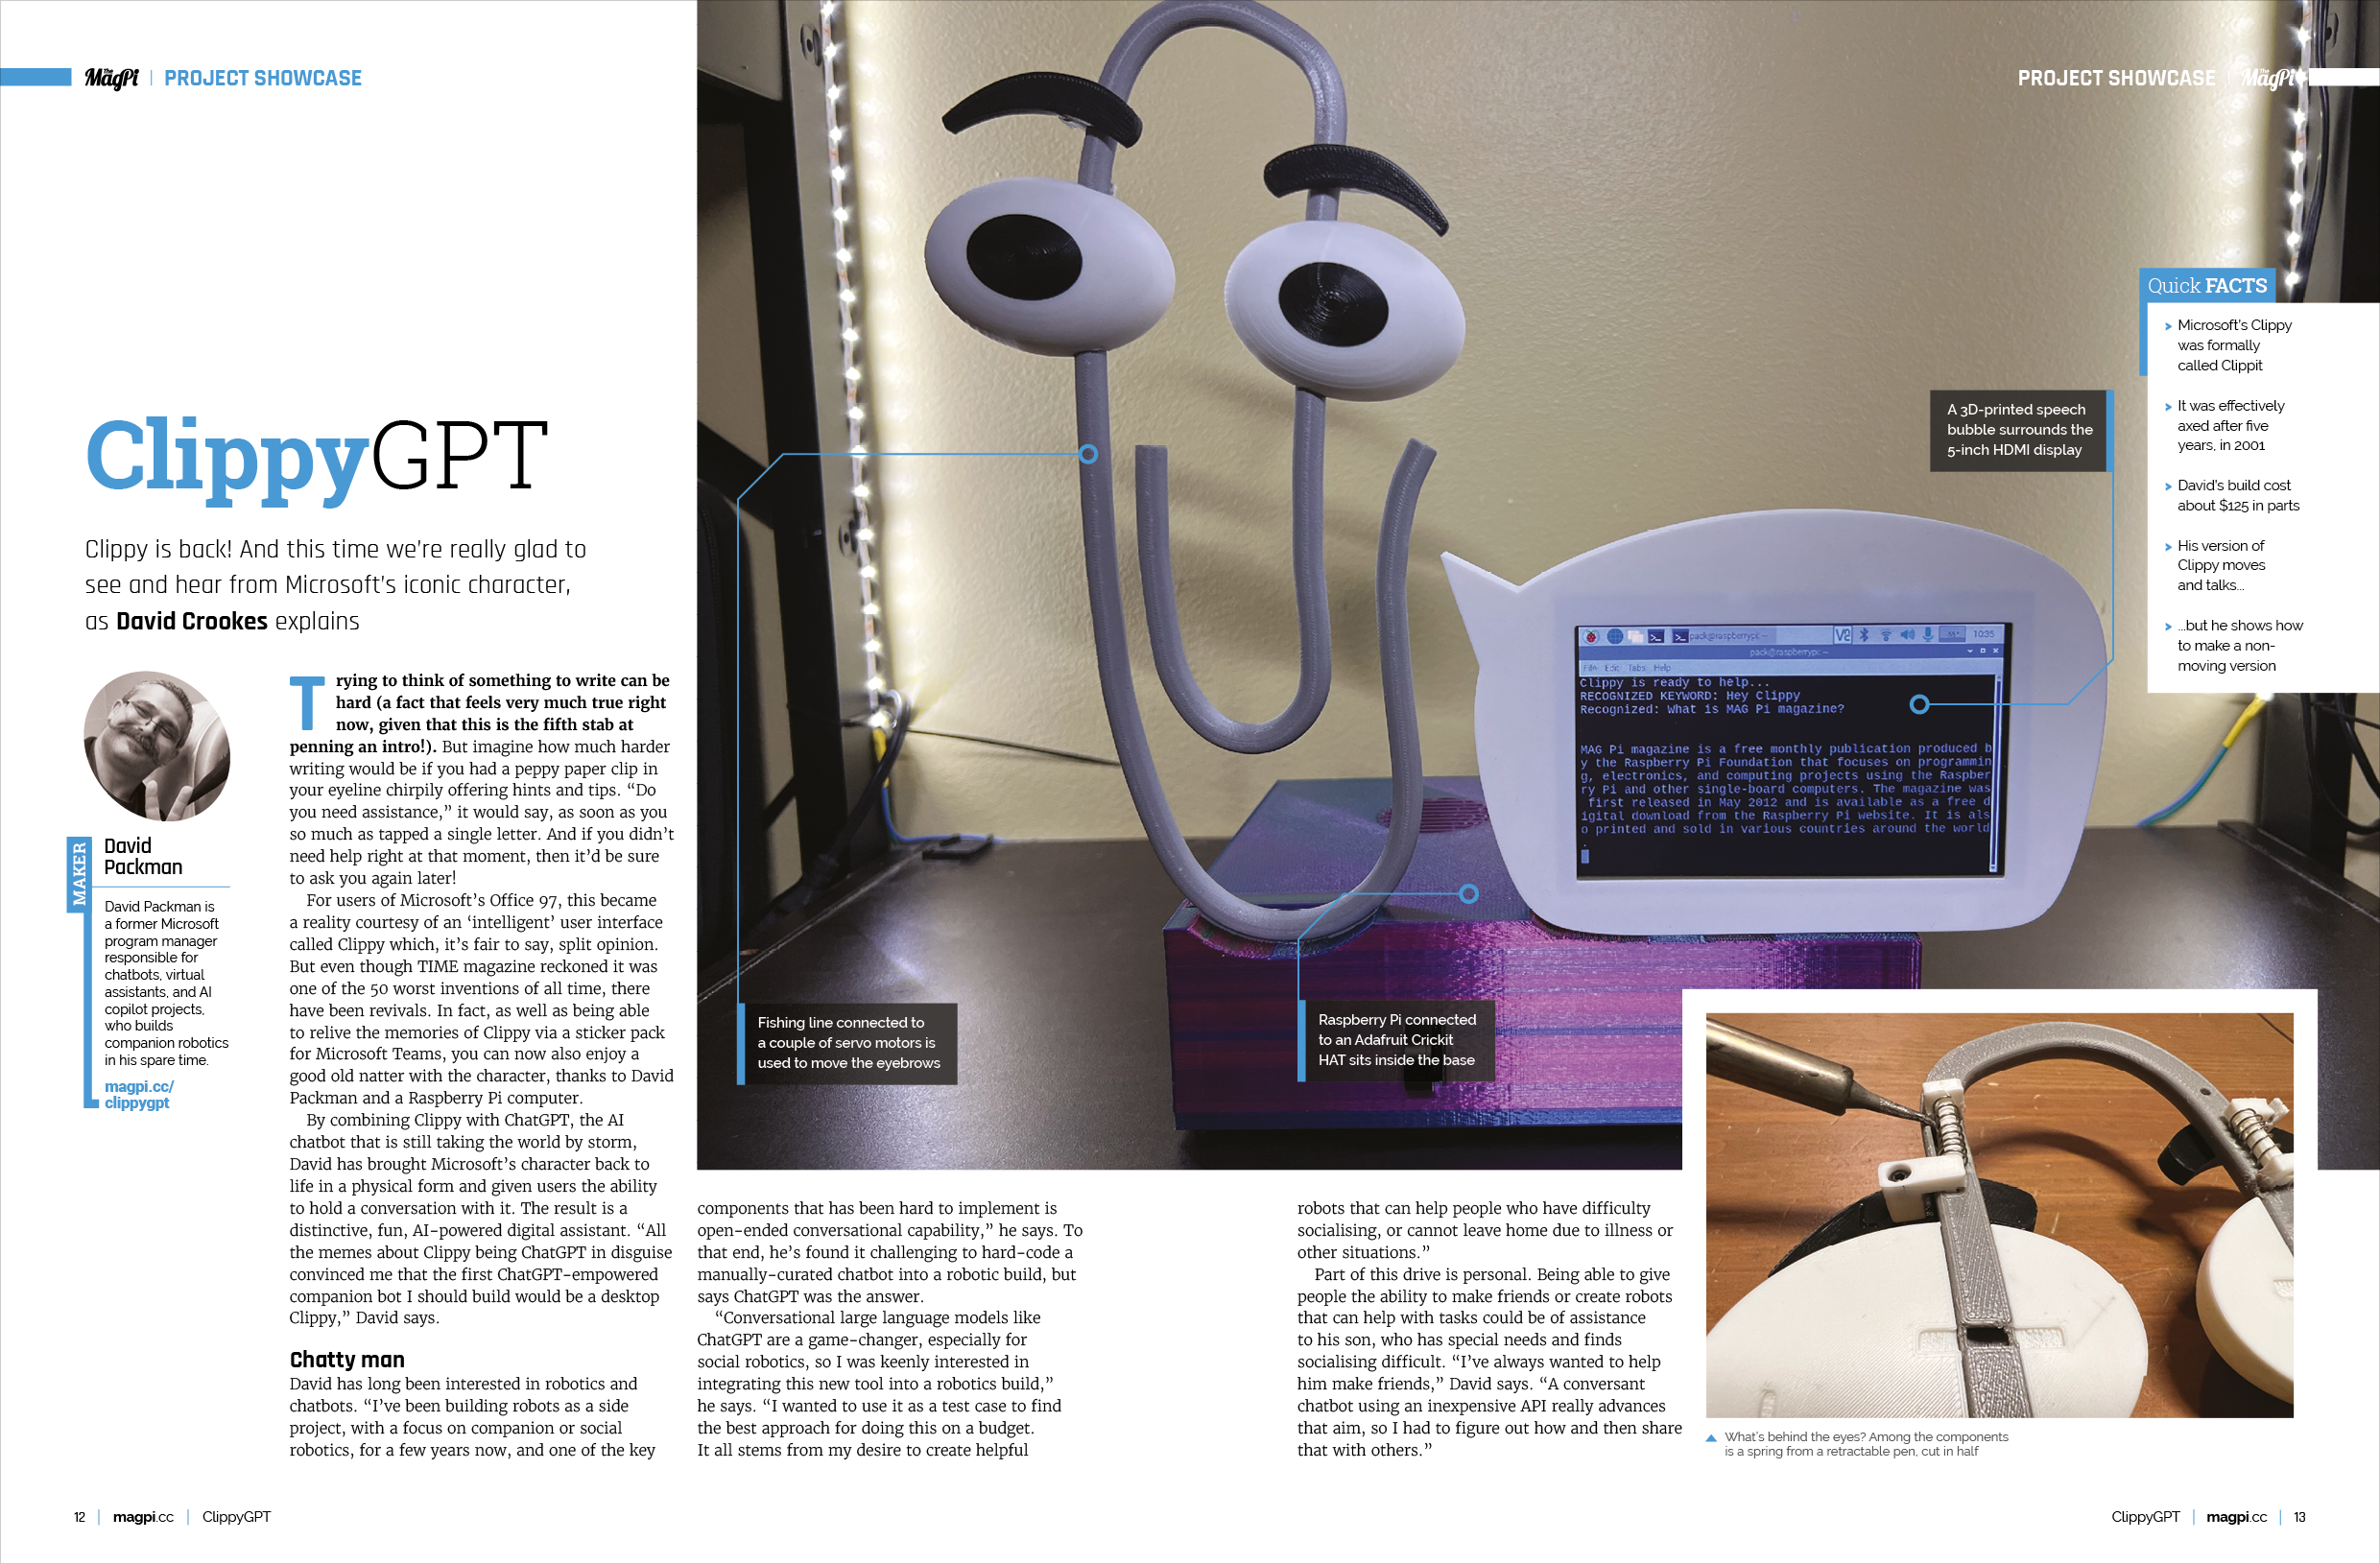
    At the robot’s heart is a Raspberry Pi 3 Model B computer which he took from an older robot build knowing that it was compatible with other components he owned. One such add-on was the Adafruit Cricket HAT that enables the creation of robot friends using Python by allowing motors, servos, or solenoids to be controlled. “There were some software library dependencies that made it easier to use Raspberry Pi OS as well,” he adds.

    To handle speech, David turned to Microsoft Azure’s speech services. This allowed him to convert speech to text and vice versa, with David finding the free tier provided all the capability he needed to provide a speech interface with ChatGPT. “It also has the benefit of recognising an offline wake word,” he says. “So nothing is recorded or sent over the internet until I specifically activate it.”

    David also made use of the OpenAI Python library to run the ChatGPT queries. “The OpenAI API calls are the only expense, but it’s pretty cheap for a build like this,” he says. “One day of heavy usage was only eight cents. Also, the Python SpeechRecognition library is largely broken, so it was a very appealing alternative with extra benefits.”

    Getting animated

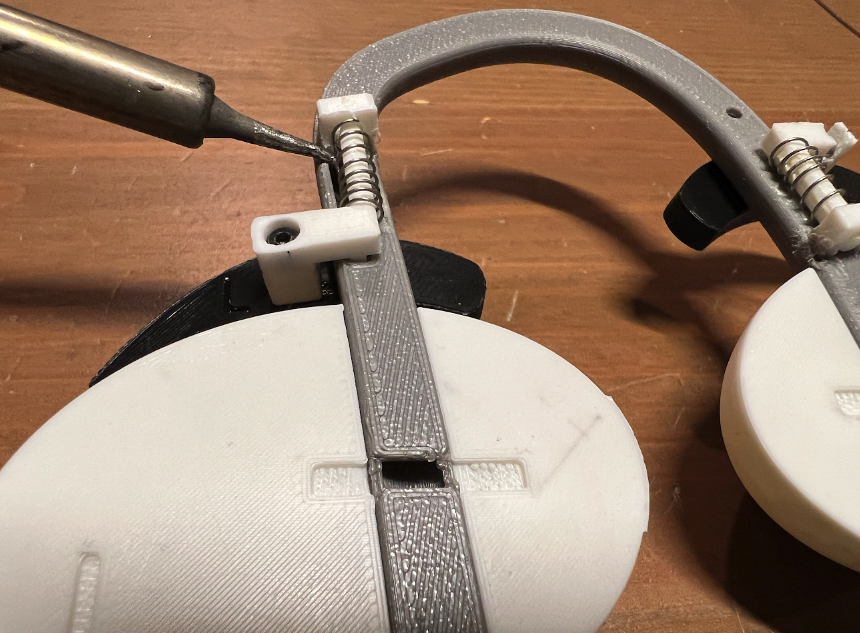
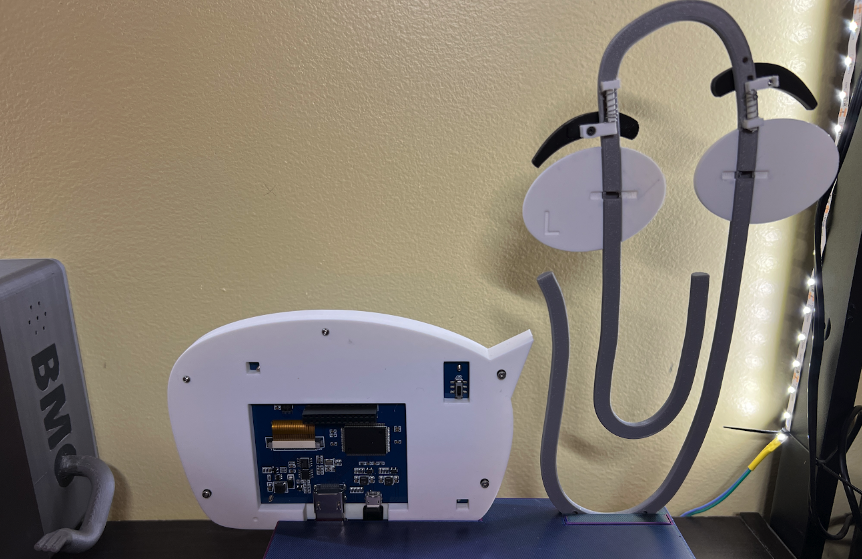
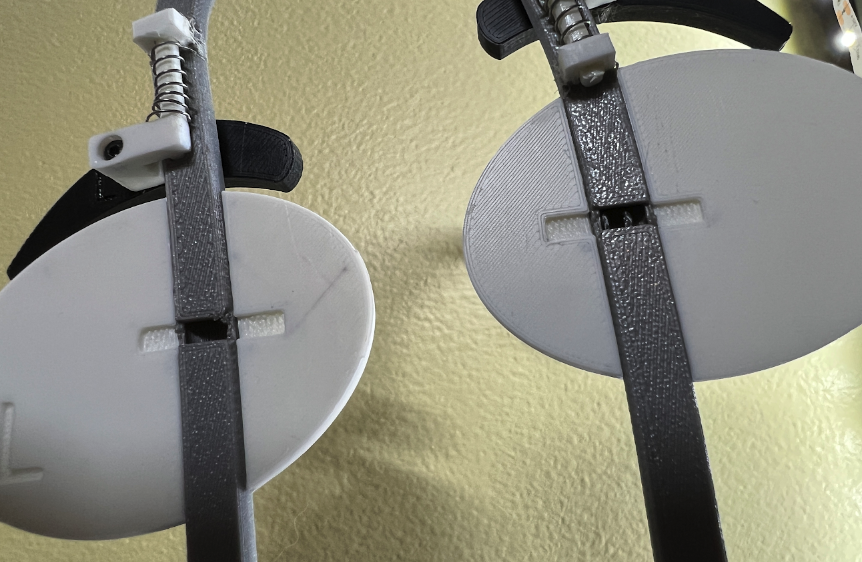
    A key part of the whole build has been the animatronics. While Clippy’s speech is outputted to a speech bubble (essentially a 3D-printed case surrounding a 5-inch HDMI display, fitted with a salvaged speaker from an Amazon Echo Dot), the paper clip has wiggling eyebrows which help to bring this retro cultural icon to life.

    “The animatronics are pretty simplistic, although it was a bit of a bodge to get the eyebrow mechanism to work, since the directional force has to wind through some curved passages inside Clippy,” David says. “In the end, I used a technique that we use to build 3D-printed assistive device hands, which is fishing line.

    “To counter the pull of the lines, I also had to design a spring mechanism to return the movement to a start position after the servos release the tension on the lines. I couldn’t use bands since that would pull the mechanism out of the sockets in the back, so I resorted to the old standby of using compression springs from old retractable ink pens. From a coding perspective, adding movement to the conversational aspect is relatively easy.”

    Looking ahead

    In all, the build took David a week to complete. He was able to do this with a single Python script. “And I did it in a way that made it really easy to integrate into any project, in order to build something that was more engaging and personable than just a canned speaker with a microphone.”

    David says he is now integrating the techniques into more complex robotic builds, such as a conversational companion bot based on BMO from the Cartoon Network’s Adventure Time animated television series, and a counter-top kitchen robot called Whiskrz.

    “That will include some machine vision to help identify ingredients, suggesting recipes on what you show it, and do simple tasks such as mixing,” David adds. “I’ve left the build simple so that it’s easy for others to adjust, allowing them to make more cool things with it. There are lots of improvements that can be made based on what you need.”

  • Shiloh Studios

    Shiloh Studios

    Reading Time: 3 minutes

    The different Raspberry Pi solutions were pulled off by Darrell Lehman, also of Shiloh Studios, who has been making Raspberry Pi-based projects for over five years, and has been working with electronics for over 25 years.

    “I’ve completed a lot of prior projects on Raspberry Pi with touchscreens, [Power over Ethernet], TouchOSC, and Node-RED, so Raspberry Pi was a familiar and easy choice,” Darrell explains. “I gravitate toward Raspberry Pi’s ecosystem when I need to solve problems that aren’t readily addressed by an off-the-shelf hardware solution, or it doesn’t make sense to implement costly proprietary control systems.”

    Musical fruit

    There’s four main ways that Raspberry Pi is used at Shiloh Studios. First of all, as a lot of things are connected via Ethernet, a Raspberry Pi helps monitor those connections.

    There’s also a system for full remote control over the lighting systems, with remote screens in multiple rooms. Similarly, there’s remote control of RDL devices in various studio rooms so performers can listen to audio live.

    The last main way is a USB to Ethernet connected keyboard, as Michael explains: “to facilitate the composer client’s needs, a Native Instruments S88 keyboard was placed in the control room, but it also needed to be flexibly deployable to allow relocation to other studio spaces as needed. The S88 requires a USB connection to the DAW [Digital Audio Workstation] PC. Twisted pair to USB converters were not reliably sufficient to the cause. Long USB cables posed a similar liability. Raspberry Pi 4 with a PoE HAT provided the right solution by enabling a rock-solid USB to Ethernet connection.”

    “I would say construction was probably the easiest part of the project because Raspberry Pi has such a great ecosystem of add-ons available online,” Darrell tells us. “And for each accessory that I needed, I had options to choose from. The most challenging part of the construction was figuring out how I wanted to build the wall brackets.”

    On tour

    On a digital tour of the studio, the various Raspberry Pi implementations had a great professional finish, and the UI created for the light remote looked and worked just like we’d expect from tablets with apps, or touchscreen products specifically made for that use.

  • DIY Home Automation in The MagPi magazine issue #129

    DIY Home Automation in The MagPi magazine issue #129

    Reading Time: 3 minutes

    Home Automation: home assistants, smart sensors and automated doors

    Transform Your Home with Raspberry Pi Home Automation

    Revolutionise your living space with Raspberry Pi home automation! With Home Assistant, a flexible and independent open-source operating system, you can create custom automations for energy efficiency and security. The system can be set up on a Raspberry Pi 3 or 4 with a wired Ethernet connection, and once installed, it can be controlled via any web browser. Follow the simple steps to set up your server and get started on your automation journey. With Home Assistant, you’ll have a digital butler to help you connect devices and design custom dashboards for an unbeatable smart home experience.

    Start using the new Camera Modules with Raspberry Pi

    Raspberry Pi Camera Module: Getting Started

    Learn about the range of Raspberry Pi cameras and their features in this tutorial by David Plowman, a Raspberry Pi engineer specializing in camera software and hardware. From the original camera to the latest Camera Module 3, discover how to set up and test each camera with Raspberry Pi. Whether you’re a beginner or an advanced user, this series of tutorials will take you through everything you need to know about Raspberry Pi cameras.

    Using Raspberry Pi to transform a sound studio

    Raspberry studio sounds

    Discover the potential of Raspberry Pi in a music studio! Join Michael Peters and Darrell Lehman from Shiloh Studios as they transform their professional audio production space using Raspberry Pi. From monitoring Ethernet connections to managing custom lighting, this tiny tech powerhouse brings versatility and creativity to the next level. Get inspired to remix your own studio!

    ClippyGPT: it's been long enough, right? We're glad to see Clippy again

    ClippyGPT: A Blast from the Past

    Remember Clippy, Microsoft Office’s helpful yet often irritating paperclip? Thanks to David Packman, it’s back! By combining Clippy with ChatGPT, the AI chatbot sensation, David has given the character a new lease on life. This AI-powered digital assistant offers users interactive conversations and provides assistance in a fun, engaging way.

    Hear a habitat's health with acoustic monitoring

    Bugg.xyz: Acoustic Ecosystem Monitoring

    Unlock the secrets of nature’s sounds with Bugg.xyz, an innovative Raspberry Pi-based acoustic monitoring system. Developed by Dr. Sarab Sethi, this device records soundscapes in forests worldwide, from Norway to Taiwan, Bali, and Borneo. By tracking the unique sounds of different habitats, Bugg.xyz helps conservationists detect changes in biodiversity and identify potential threats, such as deforestation or natural disasters. Tune into the music of the wild and explore how this cutting-edge technology is shaping the future of conservation.

    Use a Pico-W matrix display to create a visual speaker

    Create a Bluetooth Music Visualizer

    Transform your Pimoroni Galactic or Cosmic Unicorn LED matrix display into a Bluetooth speaker with real-time visual effects using the Blunicorn firmware. The display in this build shows a rainbow effect reacting to the levels of various frequencies in the audio.

  • Win one of five Raspberry Pi Global Shutter Cameras!

    Win one of five Raspberry Pi Global Shutter Cameras!

    Reading Time: < 1 minute

    Dive into this Raspberry Pi extravaganza with DIY binary clocks, Game Boy Interceptors, tank simulators, and astrophotography. Learn to code with Python and build a machine-learning transcriber, while enjoying reviews, interviews, and all things Raspberry Pi!

  • Meteor 10.1″ IPS Capacitive Touch Screen review

    Meteor 10.1″ IPS Capacitive Touch Screen review

    Reading Time: 2 minutes

    One plus point is the full-size HDMI socket, so you can easily plug in a Raspberry Pi using the supplied cable – with a micro-HDMI adapter for Raspberry Pi 4. There’s a mounting point on the rear to secure Raspberry Pi to create an all-in-one unit, complete with a two-part plastic stand.

    Touch control

    Two micro-USB sockets need to be connected (via supplied cables) to Raspberry Pi’s USB ports to supply power and enable touch control. An official PSU is advisable, otherwise the screen may be underpowered and keep switching off. In any case, it shows ‘No signal’ at times while Raspberry Pi OS is booting up, until the desktop appears.

    We found it fiddly to tap icons and window controls, but this improved after changing the system default to ‘Larger screens’ to make them bigger. Pinch-zoom gesture control works well enough, although a bit of jiggery-pokery is needed in Raspberry Pi OS to enable right-clicking with a long press. Unless you want to attach a physical keyboard, you’ll also need to install an on-screen virtual one such as Onboard

    Verdict

    8/10

    The RGB marquee lighting is a bit gimmicky, but the picture quality is good and touch control works well. As a bonus, the screen can also be used with many other devices.

    Specs

    Display: 10.1″ IPS, 1200×800 pixels, 5-point multi-touch control

    Ports & cables: HDMI port, 2 × micro-USB ports, HDMI cable, micro-HDMI adapter,  2 × micro-USB to USB cables

    Other: Raspberry Pi mounting point with screws, 2 × plastic stand legs

  • Tank driving simulator

    Tank driving simulator

    Reading Time: 3 minutes

    Ultimate upcyclers

    In 2004, the Military Museum saved one of the FASIP systems in Thun from being scrapped, and rebuilt it at the museum site in the village of Full. But, after several years, various defects in the antiquated computers and in other electronic components had led to its apparent end. The Full museum’s dedicated helpers, Gerold Handschin, Michael Salathé and René Demarmels, could not resign themselves to this. Instead, they began a thorough analysis of how the FASIP system worked, identified defects, and gradually replaced any components that failed. Their aim was to replace each item “as faithfully as possible.”

    Sadly, the original 1970s MITRA-125 computer which controlled almost every aspect, including responding to the displacement sensors and controlling the simulator’s movements, lamp, and displays, was defective. This central control unit clearly needed to be replaced. “Fortunately, the program in operation on the MITRA-125 was available as a hard copy. So we decided to replace the old computer with a new system,” says Gerold. The only issue: it was all in French. Scanning in the several-thousand-page document and using text recognition software helped, but in some cases the type had faded so much that the characters could not be recognised. “We sometimes had to approach the correct parameter values by trial and error,” says Gerold, but new C-based simulator software for Raspberry Pi was eventually written.

    Restoration challenges

    The decision to use Raspberry Pi 3B+ as the new central control computer was down to its GPIO, its size, and the price. Raspberry Pi was fitted onto a new adapter board via its interface slot, replacing the interface board for the MITRA-125. The original power supply units were in poor condition and voltages were no longer stable, so modern switching power supplies were fitted. “The new adapter board contains multiplexers to connect all the signals needed for the Raspberry Pi GPIO,” explains Gerold. It was also used to adjust the 3.3 V voltage of the GPIO to the 5 V TTL logic of the existing systems.

    The IO plug-in unit’s original boards, XERUDI and XUCI, were replaced by the new board and Raspberry Pi too, but it was a challenge to work out the correct timing when driving the components of the interface plug-in unit. The overhaul of the simulator was completed at the end of July 2020. Since then, it has been possible to drive the Panzer 68 simulator through the grounds at the Swiss Military Museum in Full by appointment.