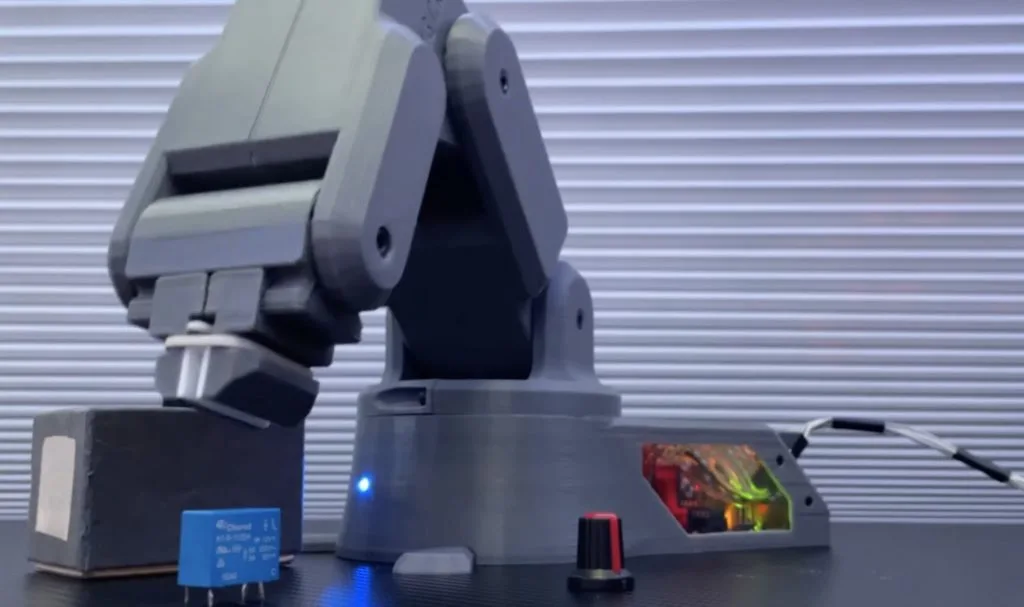
Getting started in the world of robotics can be a very challenging task, even for more experienced hobbyists, due to how difficult it can be to achieve smooth and precise motion through programming. Frustrated by the lack of accessible options, the YouTuber known as “Build Some Stuff” decided to not only design his own, but to do it using as few prefabricated parts as possible and while keeping the total cost under $60.
The premise of the arm project was to utilize a total of five servo motors for manipulating each degree of freedom, as well as an Arduino Leonardo and a PCA9685 driver for controlling them. Once the components had been selected, Build Some Stuff then moved onto the next step of creating 3D models of each of the robot arm’s joints in Fusion 360 before 3D printing them. He also made a scaled-down version of the larger arm assembly and replaced the servo motors with potentiometers, therefore allowing him to translate the model’s position into degrees for the motors.
Although simple, the code running on the Leonardo was still responsive enough to move the servos in nearly perfect synchronization compared to the model. To see more about how Build Some Stuff was able to make this robotic system from scratch and some of the problems he ran into, watch the video below!
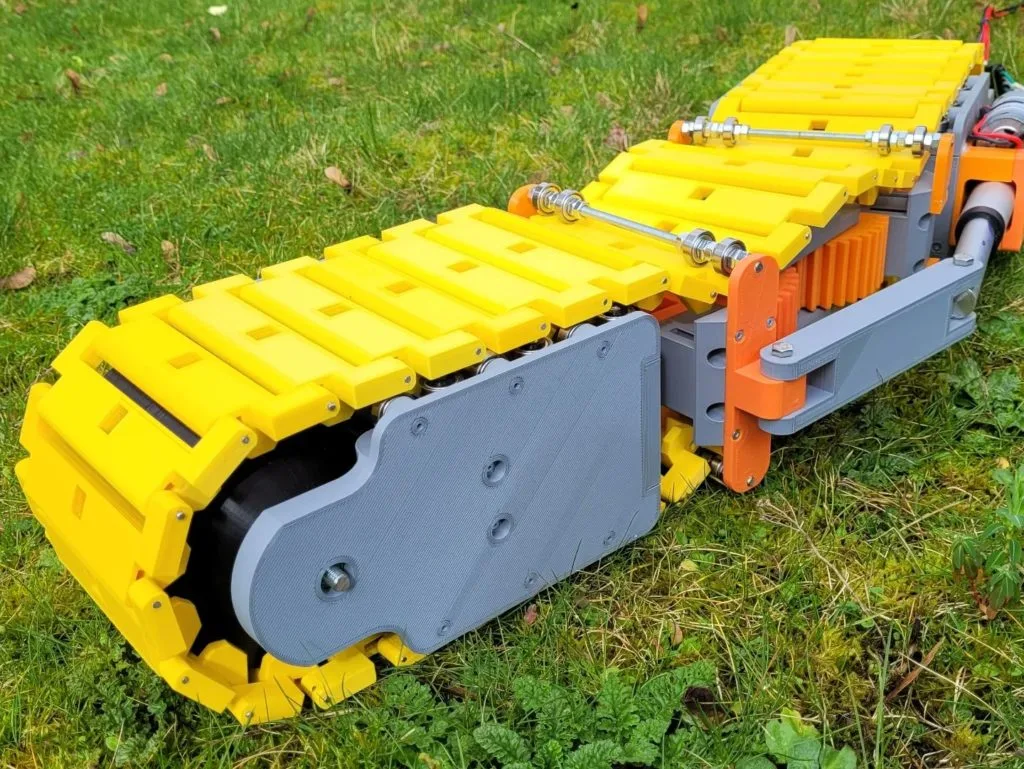
James Bruton has become something of a YouTube sensation by experimenting with unusual drive mechanisms for his robots. While he does do other things, most of his projects seem to focus on designing, building, and evaluating drive types that are far outside of the norm. His newest project is no different. It is a single-track tank vehicle that steers itself by bending its entire body.
Bruton got this idea after looking at the way conveyor belts work. Those belts, which tend to be a series of interconnected segments, are obviously flexible along their length, which is necessary for them to bend and loop back around. But they are also slightly flexible in the direction perpendicular to that, which is necessary for the conveyor belt to make a turn. Bruton figured that if he could make a tank track bend in a similar way, he could make the vehicle turn without the need for a second track.
To test this idea, Burton 3D-printed almost the entirety of the vehicle. That includes the track itself, which is made of several rigid segments that link together. There is just enough movement in the connections to allow a segment to sit at an angle relative to its neighbors. Conventional motors in front and back units spin the track, and an Arduino Mega 2560 board controls them. Between the two units is a joint that pivots horizontally. A linear actuator arm controls the angle between the front and back units, forcing the track to bend.
While the turning radius is massive, this vehicle can maneuver. It isn’t very good at clearing obstacles, but that is more due to Bruton’s design than the drive and steering system. That could be improved with additional design iterations, but this vehicle already proves that the concept works.
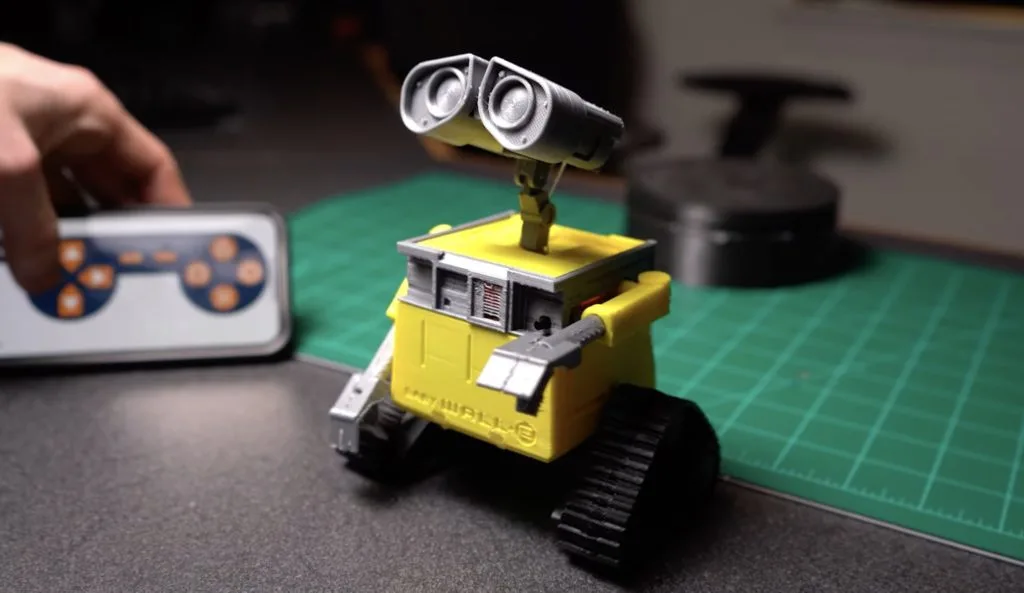
While brainstorming gift ideas, Professor Boots settled upon creating a tiny present-delivering robot that could move around on its own power. Because WALL-E’s design already has a built-in compartment and is quite memorable, it became the jumping off point for the project. The entire robot is 3D-printed from a combination of rigid PLA for the housing and flexible TPU for the tracks.
The lowest portion of the compartment houses two geared DC motors that each control a track independently. They are driven by an H-bridge chip which is, in turn, controlled by an Arduino Nano. A total of five servo motors were used to adjust the positions of the head, arms, and the front compartment. A small speaker and amplifier circuit was added so that the classic “WALL-E” sound effect could be played, and finally, an HM-10 Bluetooth® module was connected via UART for communication with a smartphone.
The mobile app, called Dabble, gives the user a virtual Bluetooth® controller and allows them to push buttons to make the robot drive, open the compartment, and even perform some predefined movement sequences, although the RC mode can be switched to autonomous via a small button at the front.
To see more about how this pint-sized WALL-E-Inspired robot was made, watch Professor Boots’ video below.
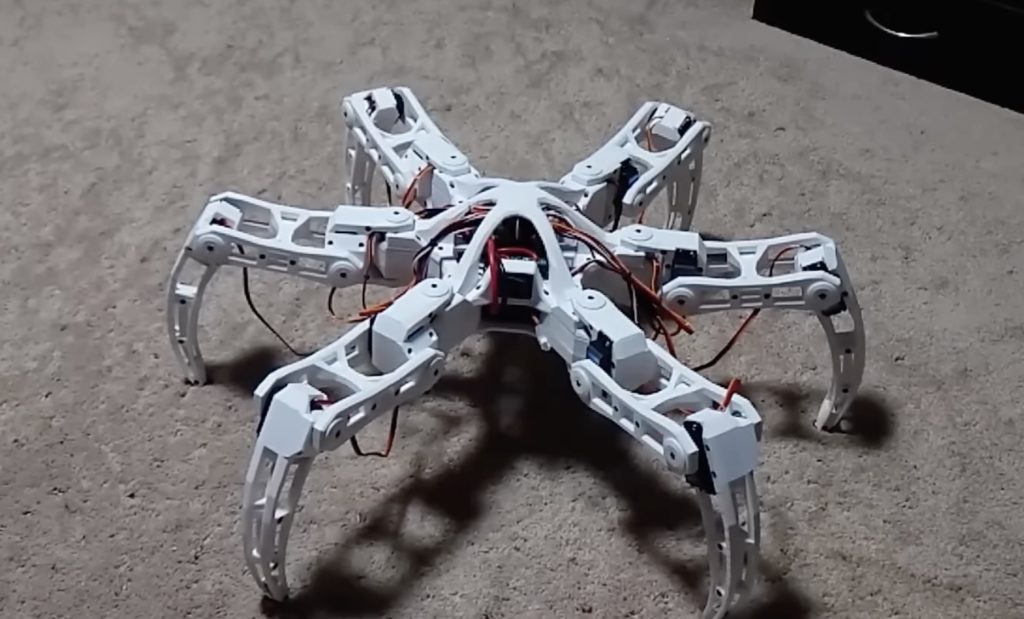
While robots can get around on two legs (or even none), it is difficult to get a smooth and efficient gait. Moving up to four legs improves the situation a bit, but each of those legs will still need multiple joints and careful balance for the robot to move in a stable manner. Once you increase the leg count to six, you can achieve some very good gaits, which is why hexapod robots are so popular. To experiment with six legs, Aecert Robotics built this nimble DIY hexapod robot from scratch.
As you can see in the detailed video, this robot is quite agile. If you watch carefully, you can see that three legs lift and three legs remain in contact with the ground for each step. That keeps the robot very stable, as it can balance easily on the tripod formed by the three legs touching the ground. Each leg has three joints: a “hip” joint that pivots the leg horizontally, a “knee” joint that pivots vertically, and an “ankle” joint that also pivots vertically. Servo motors directly actuate all of those joints, meaning there are 18 servos in total.
To control those servo motors, Aecert Robotics used an Arduino Mega 2560 board. A custom PCB shield made the connections much easier and tidier. The hexapod’s body and all of the legs were 3D printed. Aecert Robotics can control the robot via radio, using a custom controller based on an Arduino Uno. The two Arduino boards communicate via nRF24L01 radio transceiver modules. With the controller, Aecert Robotics can move the robot forward, backwards, left, and right. But the controller will also let the operator extended all the legs simultaneously. That means that they can make the robot hop in place by rapidly extending all of the legs at the same time.
Who said robots had to be all work and no play? For many years, people have been designing and building robots not just to help with chores, but to help us win games. Possibly the most famous examples of this are the robots that play chess.
In this article, we’ll take a look at the history of chess-playing robots, how they’ve evolved over time, and share three famous examples.
And do not forget that with the right inspiration, Arduino, and the Arduino Cloud, creating a robot is not a dream anymore!
The history of robots in chess — Three famous robotic chess prodigies
Chess is an old game. Humans have been playing it for 1,400 years, and for the vast majority of that time, their only opponents were other humans.
As time went on and technology became more advanced, people started to turn their thoughts to ways of using tech to win at chess. One of the first (somewhat clumsy) attempts came in the 18th century.
The Turk
The Mechanical Turk, developed in 1770 by Wolfgang von Kempelen, stunned audiences by repeatedly holding its own against human opponents. The world had changed forever — were machines finally beginning to outsmart their makers!?
Well… not exactly. The Turk actually turned out to be a case of fraud — and featured a human chess player hiding inside the machine and controlling its movements. False alarm.
The Mechanical Turk was destroyed by fire in 1854, after a perplexingly long career.
Boris Handroid
Throughout the 20th century, people worked furiously to build machines that could beat humans at chess. Progress slowly chugged along, and in 1980 the first commercially available chess robot came into being.
It was based on a chess computer called Boris and was extremely rare and limited, to the point where many people doubted it even existed. Due to its incredibly exclusive nature, it’s no surprise that the Handroid never became a household name.
The Milton Bradley Computers
Although the Handroid was not exactly a success story, it did show the world that there was at least an appetite for chess-playing robots, if they could be made effectively and at scale.
In the early 1980s, American board game giant Milton Bradley decided to take on the challenge. Working with computer scientists, they began to develop a robotic chess game that would move the pieces reliably enough to be sold at a mass scale.
The result was actually three different models: the Grandmaster that hit the US market, the Milton which was sold in Germany, France, and the Netherlands, and the Phantom which was built for the British market — although all three devices were extremely similar.
The Milton Bradley chessboard was able to detect where pieces were and used magnets attached to motor-driven belts to pull the pieces around the board. Unlike most of its predecessors, the Milton Bradley chess robot was a success and sold many copies in the US and Europe.
For chess aficionados, an important moment had arrived — you could now play chess at home without the need for a human opponent.
Deep Blue
Although it’s more of a computer program than a robot per se, no article about chess-playing robots would be complete without a mention of Deep Blue. Built on an IBM supercomputer, Deep Blue was the culmination of many years of grueling research and programming — a computer that could finally challenge a human chess champion.
In a series of games over the course of 1996 and 1997 — 10 years after development began on the project at Carnegie Mellon University — Deep Blue beat chess grandmaster Garry Kasparov.
It was a groundbreaking moment not just for chess, but for humanity as a whole — a reminder that, as advanced and intelligent as we are, the machines might just be catching us up.
Build your own chess robots
Today, you don’t need to rely on astronomically expensive novelty gadgets to experience the wonders of chess-playing robots — you can easily make your own at home. With tools like Arduino, amateur tech enthusiasts can assemble chess-playing machines for relatively low cost and without the need for a highly specialized skillset.
The Arduino Project Hub is home to a ton of chess-related projects, including some robots. YouTuber RobotAvatar built this machine that uses 64 reed switches to direct an Arduino Uno where each chess piece is.
Meanwhile, a computer running a Python program takes care of the “thinking” and sends signals to the device to move pieces. It’s a pretty straightforward device that literally adds an extra dimension to the game of computerized chess — allowing you to play games against machines in a much more tangible way.
Another amazing project, created by Greg06 on Instructables, is the automated chessboard that can not only tell where specific pieces are moved but also play against an actual opponent while moving its own pieces.
Chess isn’t the only thing Arduino is capable of. Check out our homepage to learn more about how it all works, the kinds of projects you can build, and how you can get started.
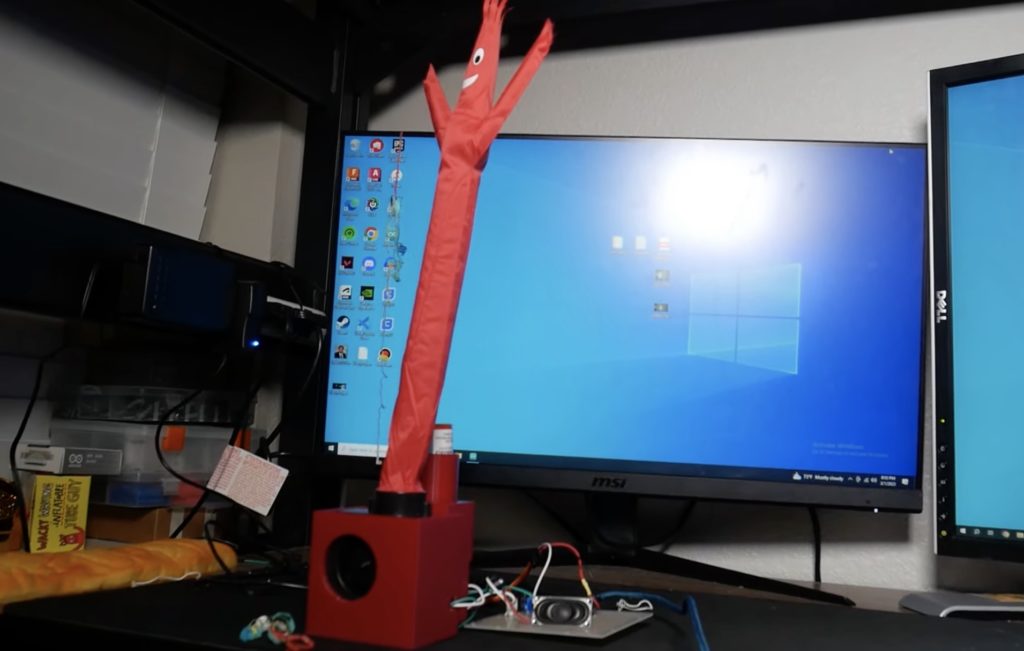
For some students, getting decent grades or even finding the motivation to attempt to do schoolwork is a challenge, and this is often met with incentives such as money, praise, or simply avoiding embarrassment. Adam Soileau of element14 Presents had the idea to build a robot, which is an incentive unto itself by playing music, launching confetti, and waving one of those inflatable car dealership arm-waving tube things when grades cross a predetermined threshold.
The first challenge Soileau was met with involved determining the best way to launch confetti. Due to the prevalence of party poppers, or mini confetti cannons, he chose to use a high-torque servo motor that could pull the string back. The audio portion of the project relies on reading music data from an SD card, outputting it via a digital-to-analog converter (DAC), and then amplifying the sound using an LM386 op-amp for the speaker. Finally, the wacky waving inflatable tube-man is placed onto the fan in order to inflate it, while waving is done by toggling the fan on or off quickly with a MOSFET. An Arduino MKR Zero was employed to control each component due to its DAC and SD card capabilities.
Perhaps the most important aspect, retrieving grade data was done by harnessing Canvas’s web API through which assignment, quiz, and test grades can be programmatically accessed. Once collected, this data was then processed and stored in a CSV file so new grades could be compared to older ones. After an ‘A’ has been spotted, the system activates and rewards the student with the aforementioned confetti, music, and dancing. Detailed information about this project can be found here and seen in Soileau’s video below.
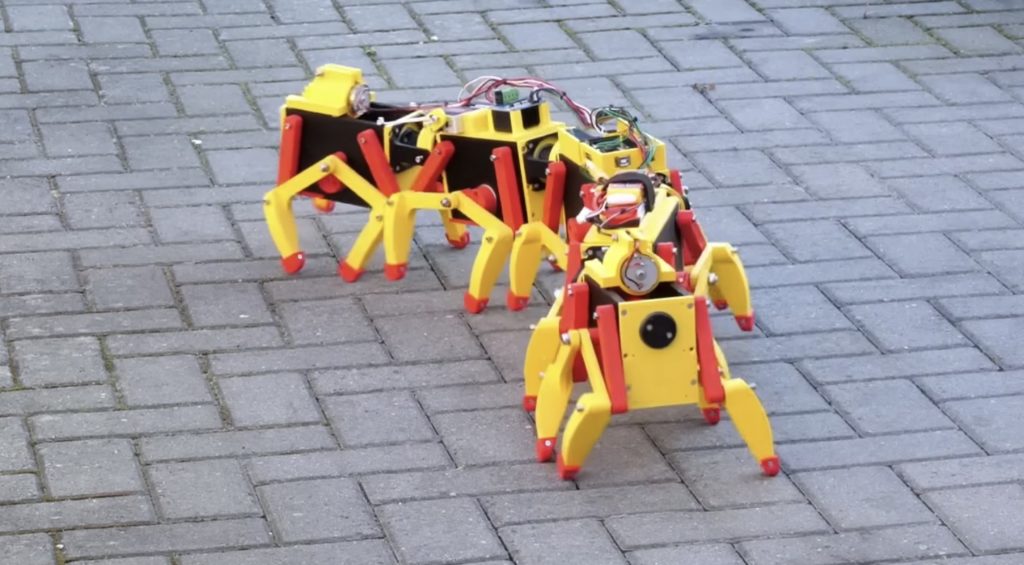
Strangely, no centipede has exactly 100 legs. They can have either more or fewer than 100 legs, but not exactly 100 because they always have an odd number of pairs. Sadly, that means that James Bruton’s centipede robot is anatomically incorrect — though cool nonetheless.
Bruton built this centipede robot as a scaled-down prototype, as he plans to construct a ridable version sometime in the future. This robot, which is still quite large, let him test the unusual walking mechanisms. The robot has five segments, each of which contains two pairs of legs. The mathematicians among you will have deduced that that equals 20 individual legs. But the legs don’t operate independently. In fact, all 20 of those legs are connected mechanically. Each segment has a drive shaft that moves its legs through gears and linkages, and universal joints connect the drive shafts between segments.
That mechanical setup means that the centipede can be driven by a single DC motor. An Arduino Mega 2560 board controls that and the two servo motors used for steering. Those servos pull on elastic cords connecting the first two segments. When one cord tightens, it forces the first segment to pivot to that side (relative to the second segment). The other segments then follow naturally, letting the robot turn. All of the mechanical parts were 3D-printed and Bruton can pilot the robot using his universal remote control.
Unfortunately, this robot’s innovative leg mechanisms didn’t work very well. The feet had a tendency to slide backwards, causing huge efficiency losses. That means that Bruton will have to come up with another leg design before he can scale the robot up to a full-size ridable version.
For those with an interest in robotics, there is little in this world more enticing than a robot arm. A rover may be able to drive around, but so can a cheap RC car. A robot arm, on the other hand, can do real work, like stacking blocks or moving colored balls from one bin to another. But what if you want to control that robot arm over the internet? Engineer Zero has a nice tutorial explaining exactly how to do that.
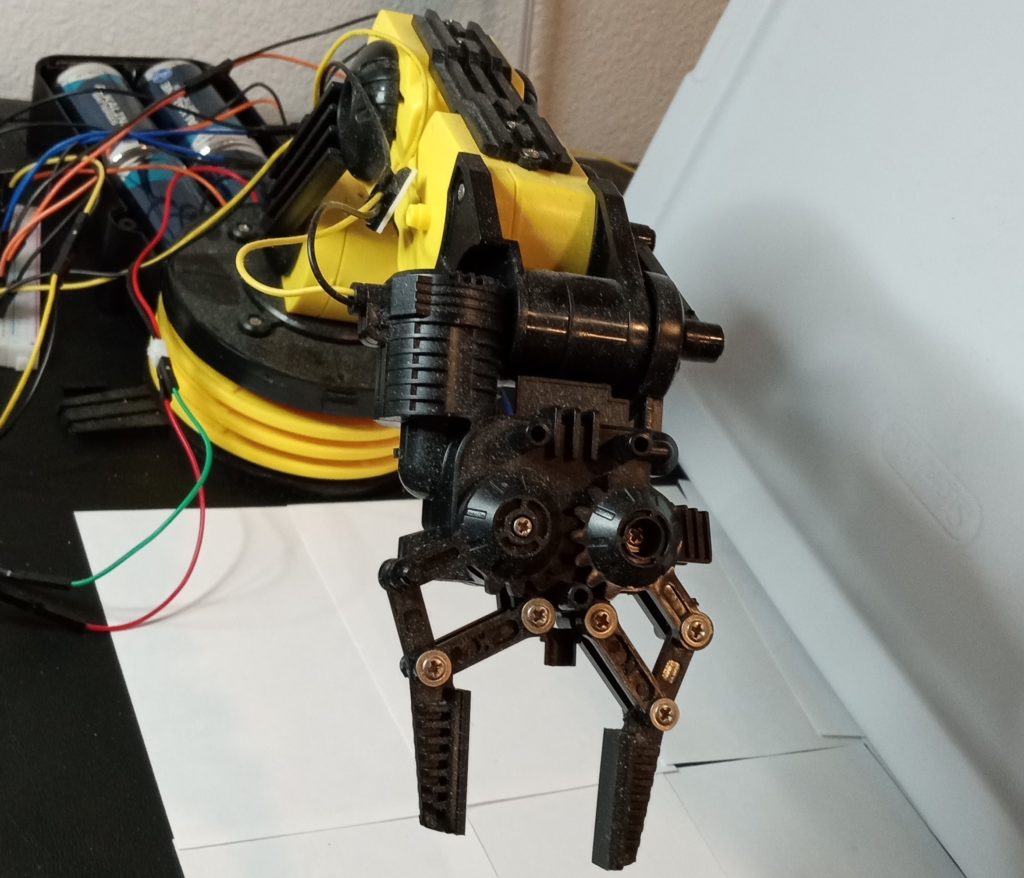
Engineer Zero started with a cheap OWI-535 “Robotic Arm Edge” kit, which isn’t much more than a toy. It comes with a cheap little controller that lets the user manually operate the arm, but that’s it. To upgrade it into a “real” robot arm, Engineer Zero connected its five motors to an Arduino Uno board through L9110 motor drivers. That let them control the robot arm from their computer and provided the potential for other kinds of control.
In this case, the control that Engineer Zero was interested in was remote. Not just from across the room, but from anywhere in the world. They already had the Arduino connected to a cheap old laptop, so they just needed a way to interact with that laptop from afar. To accomplish that, they used a Google Chrome extension called Chrome Remote Desktop. When installed on the local computer’s and remote computer’s browsers, that extension lets the remote computer control the local computer — the remote computer being a second laptop. Engineer Zero can take that second laptop anywhere in the world with an internet connection, and they’ll be able to control their robot arm.
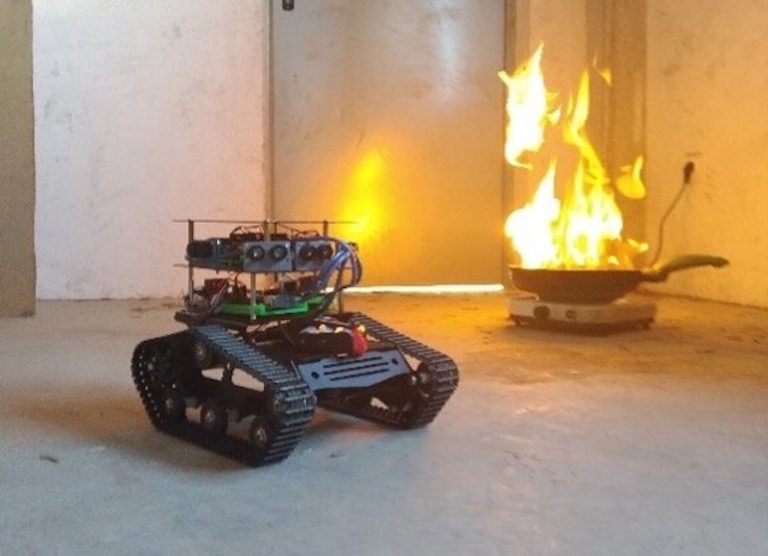
Firefighting is a dangerous profession, but it is possible to mitigate some of that danger with good data. When firefighters entered a burning building, their biggest fear is the unknown. They don’t know if they can trust the structural integrity of the building, if there is a pocket of toxic or explosive gas, or how to navigate the interior to find casualties. As part of a project called HelpResponder, a team of researchers from Universidad Rey Juan Carlos and Universidad Autónoma de Madrid created a robot that can enter a building to gather the data firefighters need to do their job safely.
This robot, which is a mid-sized rover, can operate via manual control or in an autonomous mode. In both cases, its job is to explore buildings, either during a fire or after a disaster, to map the interior and find hazards. Its camera system allows for visual detection, but it also has a host of integrated sensors for detecting elevated temperatures, gas pockets, and more. With that information, firefighters can then enter the building and rescue anyone trapped inside while avoiding hazardous areas or bringing the equipment necessary to deal with them.
Control and monitoring happens on two levels. At the high level, a Raspberry Pi 4 Model B single-board computer records video, handles mapping operations, and coordinates autonomous navigation. At the low level, an Arduino UNO WiFi Rev.2 collects incoming sensor data and controls the motor driver. The onboard sensors include a temperature/humidity sensor, an air quality sensor, and ultrasonic sensors for navigation. Thanks to a modular design, additional hardware can be added to fit specific scenarios.
While the majority of makers are unable to afford the fancy equipment and components that go into modern state-of-the-art battle robots, there do exist lesser-known tournaments for more DIY designs, including sumo robot battles. Instructables user noclaf8810373’s design incorporates all of the high-powered components one would expect to find, along with an innovative defense mechanism.
Construction of the robot began by 3D printing nearly everything from ABS filament due to its strength and resistance to high temperatures, whereas nylon was used in the gear. Once cleaned up, a series of strong magnets were set into both the front blade and undercarriage to assist in preventing the robot from flipping over due to an opposing robot. Internally, a pair of motors drive the wheels through several gears for increased torque, and they are both controlled by an Arduino Micro. In this case, the microcontroller’s role is to take incoming data from the radio transmitter, convert it into commands, and set the motors accordingly.
After assembling the electronic components, including the Arduino, motor drivers, and large capacitors onto a piece of perfboard, they were securely fastened inside the robot’s interior compartment. To see more about the build process, you can check out the project’s write-up here on Instructables.
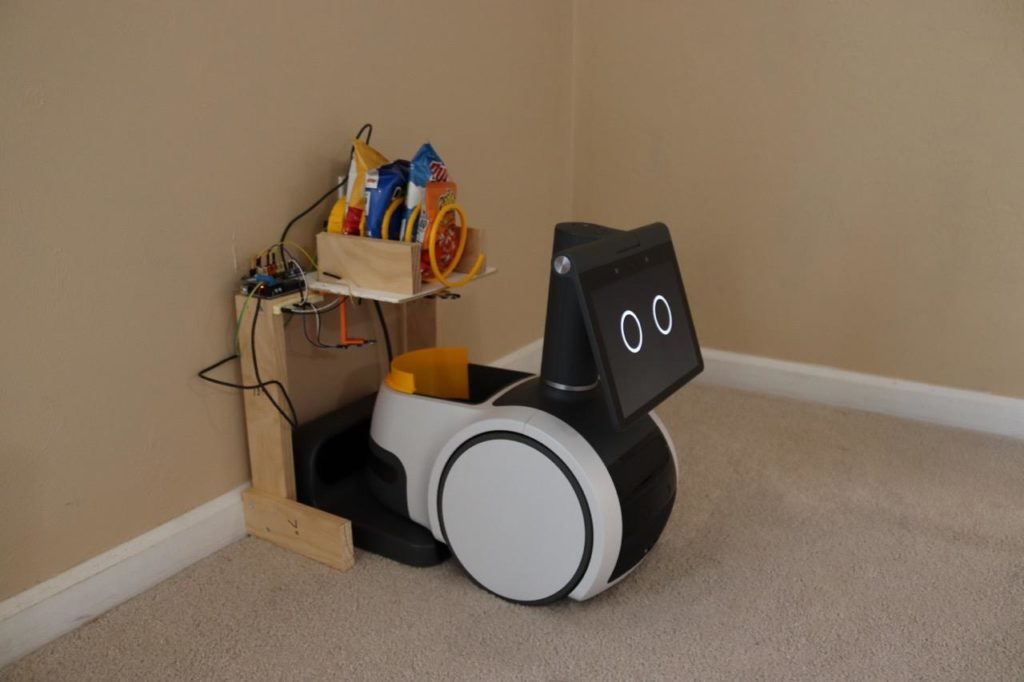
Sometimes you get a hankering for a snack, but there is no snack within arm’s reach. Such a situation is a tragedy and exactly what we built society and technology to avoid. To prevent this frankly appalling possibility, Michael Rigsby made Snacky, which is a snack-dispensing system that lets Amazon Astro robots deliver snacks to peckish people.
The Amazon Astro is a robot designed for helping around the home. It is a bit like an Amazon Echo on wheels, which extends Alexa’s abilities to the physical world. By default, it doesn’t do much except drive around to look at stuff — something that has potential for applications like security and teleconferencing. But because Astro utilizes Alexa, it can take advantage of developer and user-created Skills. In theory, that will make Astro very useful as accessories and abilities become available. Rigsby is leading that charge with Snacky.
Snacky is essentially a vending machine dispenser attached to the Astro robot’s charging dock. At Rigsby’s spoken request, Astro will drive over to the dock, park, wait as snacks drop into its storage bin, and then drive over to him to deliver a treat. The custom Skill tells Astro to head over to its dock, and then the Snacky hardware handles the rest.
That hardware includes an Arduino Uno board, an Arduino Motor Shield, two infrared sensor modules, a continuous rotation servo motor, and a DC power supply. The mechanical parts are a combination of wood and custom 3D-printed pieces. The Arduino detects the presence of Astro using the infrared sensors, then rotates the servo motor to spin the dispenser coil long enough to eject some nibbles.
If you frequent driving ranges, you’ve probably seen a machine (often attached to the front of an armored golf cart) designed to pick up golf balls. Because a driving range can easily fill up with thousands of golf balls an hour, such machines are necessary. After noticing that nobody wanted to pick up the ping pong balls after matches, Maxime Monsieur and his team (Oumaima Achkif, Reda El Marsse, and Amir Farbod) built this robot that collects ping pong balls using a mechanism similar to those used for golf balls.
Like a golf ball collecting machine, this robot picks up golf balls using a spinning mechanism that resembles something you’d see on an agricultural harvester. Any ping pong balls in front of the robot get pushed towards that mechanism by a pair of spring-loaded arms. The rotating mechanism then pushes the ping pong balls up a ramp and into a bin. The robot navigates through the room like an old robot vacuum: by driving forward until it meets a wall, then turning in a random direction.
The team constructed the robot’s frame and body using a combination of laser-cut MDF and 3D-printed plastic parts. It has two stepper motors that spin the two drive wheels, and a DC motor that spins the collection mechanism. An ultrasonic sensor detects walls and other obstacles. An Arduino Uno board controls the two stepper motors via A4988 driver boards and turns the DC motor on via a relay module.
In tests, this robot seems to work quite well, even though its navigation is inefficient. No word on if nearby players attempt to pelt the robot with ping pong balls as it works.
If you look at footage from the search and rescue efforts following any disaster, you’ll see that first responders have a very difficult time navigating through rubble to find people in need of emergency care. They also have to take extra precautions, as gas line ruptures and other hazards present dangers they don’t normally face. To assist in those efforts, Ranit Bhowmick and his team built the SARDA (Search and Rescue Deployable Assistant) robot that can create 3D maps of disaster areas.
SARDA is currently an early prototype and its capabilities are limited, but the idea is sound. It is a little wheeled robot that would (in theory, at least) rove around a disaster area while mapping its surroundings. It could work autonomously or an operator could guide it manually. While moving around an area, it would generate a 3D map of rigid objects, like walls and obstacles, and also health hazards like clouds of smoke, heat, or toxic gases. A computer at a control station would use that data to produce a digital 3D render of the environment that first responders could reference during their search and rescue efforts.
The robot is affordable to build and uses only off-the-shelf components. Those include an Arduino Nano board, a pair of ultrasonic distance sensors, a temperature and humidity sensor, and a smoke sensor. The Arduino controls the drive motors through L239D drivers. The RCU (receiver and controller unit) contains an Arduino Uno and communicates with SARDA through a pair of nRF24L01 radio transceiver modules.
Bhowmick and team created SARDA for a science fair and it is rudimentary, but functional. The mapping software can only generate simple blocks where the ultrasonic sensors detect obstacles and the positioning is based purely on open-feedback motor control. But this is a great start and something to build upon.
Infineon is one of the world’s largest semiconductor manufacturers, but the company is made up of regular people like any other. Many of those people just happen to be engineers and they like to build gadgets and gizmos like the rest of us. Following a water cooler discussion about who had the biggest 3D printer, the Infineon team decided to create this delightful XXL Chatbot to offer yuletide greetings.
The adorable robot was designed after the Infineon Chatbot avatar that offers virtual assistance on the Infineon website. While that internet Chatbot can respond to natural language questions, this XXL Chatbot can only emote through its animated eyes and chest-mounted RGB LED matrix. The team 3D-printed the robot’s body in several sections on a Creality Ender-5 Plus and the assembled figure is quite large, hence the “XXL” designation.
They animated the eyes using two custom PCBs, each of which has a diameter of 60mm and contains 101 SK6812MINI individually addressable RGB LEDs. They controlled those with a pair of Infineon XMC2GO microcontroller development boards. The chest display is a flexible 64×32 RGB LED matrix from Adafruit, which conforms to the cylindrical curve of the robot’s torso. They controlled that LED matrix with an Arduino Mega 2560 board through Adafruit’s RGB Matrix Shield. It displays a Christmas tree animation derived from z1co’s animation set for 32×32 matrices.
The result is a cheerful and adorable robot that fits perfectly with the holiday season!
We are so excited to share another story from the community! Our series of community stories takes you across the world to hear from young people and educators who are engaging with creating digital technologies in their own personal ways.
Selin and her robot guide dog IC4U.
In this story we introduce you to Selin, a digital maker from Istanbul, Turkey, who is passionate about robotics and AI. Watch the video to hear how Selin’s childhood pet inspired her to build tech projects that aim to help others live well.
Meet Selin
Celebrate Selin and inspire other young people by sharing her story on Twitter, LinkedIn, and Facebook.
Selin (16) started her digital making journey because she wanted to solve a problem: after her family’s beloved dog Korsan passed away, she wanted to bring him back to life. Selin thought a robotic dog could be the answer, and so she started to design her project on paper. When she found out that learning to code would mean she could actually make a robotic dog, Selin began to teach herself about coding and digital making.
Thanks to her local CoderDojo, which is part of the worldwide CoderDojo network of free, community-based, volunteer-led programming clubs where young people explore digital technology, Selin’s interest in creating tech projects grew and grew. Selin has since built seven robots, and her enthusiasm for building things with digital technology shows no sign of stopping.
Selin and her robot guide dog IC4U.
One of Selin’s big motivations to explore digital making was having an event to work towards. At her Dojo, Selin found out about Coolest Projects, the global technology showcase for young people. She then set herself the task of making a robot to present at the Coolest Projects event in 2018.
When thinking about ideas for what to make for Coolest Projects, Selin remembered how it felt to lose her dog. She wondered what it must be like when a blind person’s guide dog passes away, as that person loses their friend as well as their support. So Selin decided to make a robotic guide dog called IC4U. She contacted several guide dog organisations to find out how guide dogs are trained and what they need to be able to do so she could replicate their behaviour in her robot. The robot is voice-controlled so that people with impaired sight can interact with it easily.
Selin at Coolest Projects International in 2018.
Selin and her parents travelled to Coolest Projects International in Dublin, thanks to support from the CoderDojo Foundation. Accompanying them was Selin’s project IC4U, which became a judges’ favourite in the Hardware category. Selin enjoyed participating in Coolest Projects so much that she started designing her project for next year’s event straight away:
“When I returned back I immediately started working for next year’s Coolest Projects.”
Selin
Many of Selin’s tech projects share a theme: to help make the world a better place. For example, another robot made by Selin is the BB4All — a school assistant robot to tackle bullying. And last year, while she attended the Stanford AI4ALL summer camp, Selin worked with a group of young people to design a tech project to increase the speed and accuracy of lung cancer diagnoses.
Through her digital making projects, Selin wants to show how people can use robotics and AI technology to support people and their well-being. In 2021, Selin’s commitment to making these projects was recognised when she was awarded the Aspiring Teen Award by Women in Tech.
Listening to Selin, it is inspiring to hear how a person can use technology to express themselves as well as create projects that have the potential to do so much good. Selin acknowledges that sometimes the first steps can be the hardest, especially for girls interested in tech: “I know it’s hard to start at first, but interests are gender-free.”
“Be curious and courageous, and never let setbacks stop you so you can actually accomplish your dream.”
Selin
We have loved seeing all the wonderful projects that Selin has made in the years since she first designed a robot dog on paper. And it’s especially cool to see that Selin has also continued to work on her robot IC4U, the original project that led her to coding, Coolest Projects, and more. Selin’s robot has developed with its maker, and we can’t wait to see what they both go on to do next.
Help us celebrate Selin and inspire other young people to discover coding and digital making as a passion, by sharing her story on Twitter, LinkedIn, and Facebook.
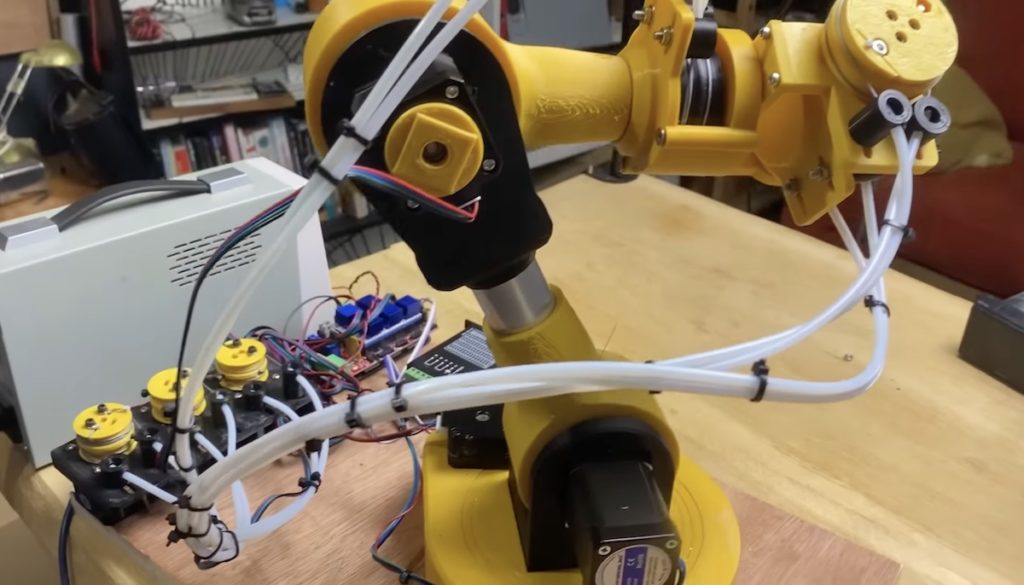
To give an electric car more range, you need a bigger battery pack. But that adds weight, so you need bigger motors and more battery capacity to compensate. This creates a vicious cycle and robot arms are susceptible to a similar problem. A robot arm needs to lift its own weight in addition to whatever it picks up. Bigger motors to increase the payload capacity also increase weight, thereby decreasing the payload capacity. This video from RoTechnic describes how to sidestep that cycle with remote motors.
RoTechnic’s robot arm has six degrees of freedom (DoF): a rotating base, a shoulder joint, an elbow joint, a rotating wrist joint, a tilting wrist joint, and a rotating end effector. If the robot were a conventional design, all of those joints (except the first two) would require a motor that adds levered weight to lift. The weight of those motors would subtract from the amount that the arm could otherwise lift. But three of this robot’s motors sit on the table nearby so that it doesn’t need to lift them.
RoTechnic used an Arduino Mega 2560 board to control those motors. Most of the robot’s other parts were 3D-printed. Some of the motors, like for base rotation and the shoulder joint, remain in the conventional location. But three of the motors actuate their joints via fishing lines fed through Bowden tubes. The motors have spools and when those rotate they loosen one line while tightening the other. Each joint has a similar spool, so the fishing lines turn them. The only limitation is that a joint can’t rotate indefinitely, but one can mitigate that by looping the fishing line around each spool many times to provide an equivalent number of revolutions.
This technique has been in use in the robotics industry for longer than computer control and isn’t groundbreaking. But RoTechnic’s build demonstrates how easy it is for hobbyists to integrate the technique into their robot designs.
Revolutionary new technologies tend to require small, incremental developments. For example, physicist Julius Edgar Lilienfeld filed a patent for a transistor way back in 1925. But it wasn’t possible to actually build transistors until semiconductor production caught up in 1947 — something that took decades of “boring” materials research. Such research may seem trivial, but often turns out to be important to the bigger picture. That is likely the case with this burrowing mole crab robot, called EMBUR, built by UC Berkeley engineers.
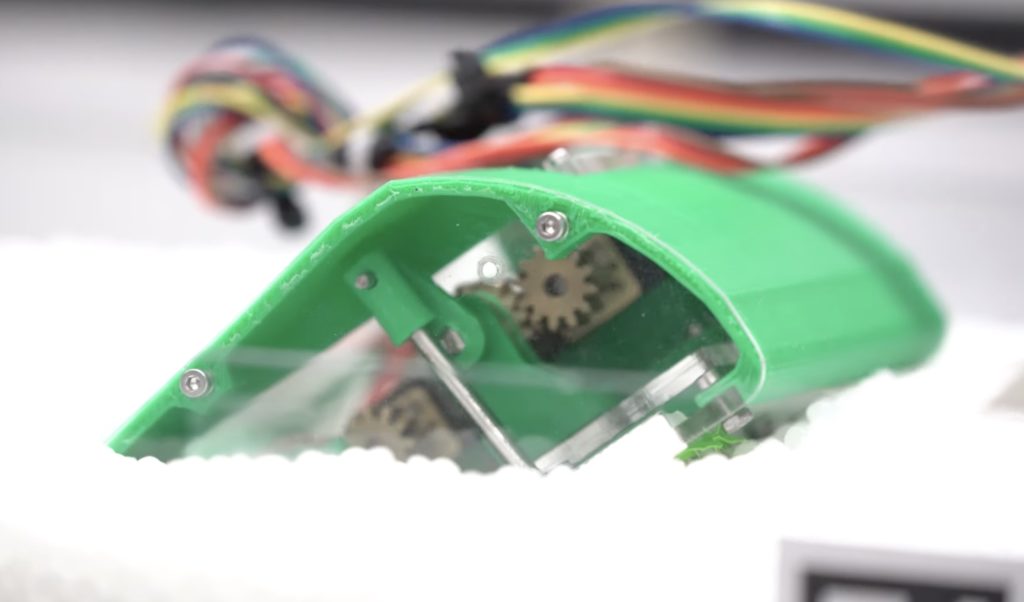
This Arduino Due-controlled robot can burrow into loose substrates like a mole crab in sand. In the wild, mole crabs can bury their bodies in sand within a few seconds. That is surprisingly hard to replicate, as wriggling robots tend to just push themselves up on top of the sand. The key to this robot’s burrowing ability is a special set of flexible legs. The Arduino spins motors that rotate a reciprocating mechanism to actuate legs covered in fabric. When the legs push forward into the substrate, the fabric folds to decrease resistance. Then when the legs move back, the fabric unfurls and creates resistance for propulsion.
It may seem like a novelty, but this practical development actually has wide-ranging and important applications. Robots that can burrow through the ground have many uses, from subterranean data collection to space exploration. Asteroids, for instance, are often made of loose gravel-like rock held together by gravity. If a robot could dig its way through such asteroids, it could analyze the composition and determine if the material is suitable for mining. Here on Earth, a burrowing robot would be useful in agriculture, construction, and many scientific fields.
The new Andor TV show, set in the Star Wars universe prior to the events of Rogue One, is already a hit and a big part of that is thanks to the B2EMO droid. Like many of the other droids in the Star Wars franchise, B2EMO manages to be very expressive despite being cold, hard steel. It conveys emotions and expressions through complex movement, which James Bruton recreated when he built his B2EMO-inspired droid.
B2EMO looks like a conventional rover robot, but it is quite flexible. It can drive in any direction thanks to its omnidirectional wheels and also tilts, leans, and stretches, which makes it seem more like a beloved pet than a soulless robot. The Andor production team actually built a functional B2EMO for filming. Bruton put his own unique spin on the design to create a B2EMO replica that is affordable enough for a hobbyist to tackle.
An Arduino Mega 2560 board controls all of the robotâs motors and servos. It receives commands through an nRF24L01 radio transceiver module with signals coming from Brutonâs universal robot remote. Most of the robotâs structure is a combination of aluminum extrusion and 3D-printed parts. Four omniwheels driven by DC motors let it move in any direction, while several servo-actuated joints (and even an interesting rack-and-pinion linear expansion system) impart the complex movement. With those, it can lean in any direction and also expand its own wheel base.
As it stands, this robot moves like B2EMO but doesnât look much like it. In follow-up videos, Bruton plans to work on the aesthetics and will hopefully end up with something very similar to the onscreen Andor droid.
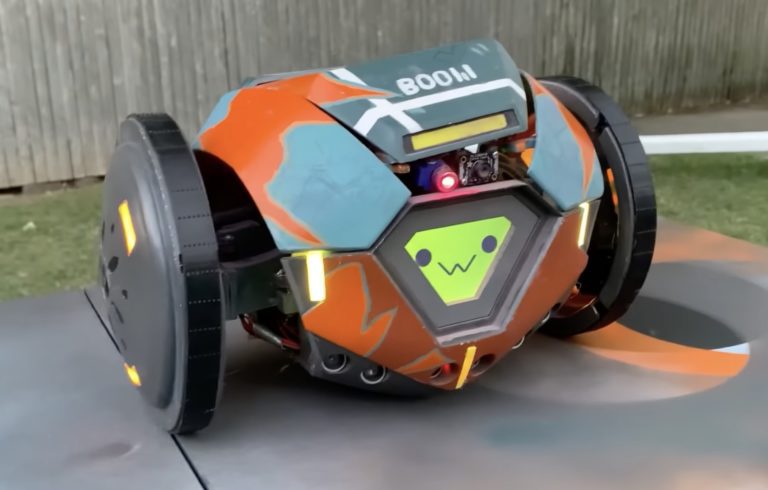
Valorant is a free-to-play 5v5 first-person shooter game. As in most shooters, players want to avoid getting shot. One way they can prevent incoming fire is to use Boom Bot, which is a little robot that will drive forward and chase enemies before exploding — while the player stays safely hidden out of sight. While he probably won’t be getting into any gunfights, Danny Lum built his own functional replica of the Boom Bot.
Boom Bot’s behavior in the game is quite simple. When deployed, it will drive straight forward until it either collides with a wall or detects an opponent. If it runs into a wall, it turns like a Roomba. If it sees a target, it will begin chasing them. Lum was able to recreate that functionality in a conventional two-wheel-drive rover robot. The robot was designed in Solidworks CAD to match in the in-game Boom Bot and then 3D-printed.
An Arduino Nano board controls the two drive motors that rotate special irregular wheels to give the robot wobbly movement like in the game. It also responds to information from two sets of sensors. A trio of ultrasonic sensors handle obstacle detection and tell the robot which way to rotate. An OpenMV face detection camera finds humans so the Boom Bot replica can chase them. An LCD screen gives Boom Bot an emotive face and a servo-actuated hatch on top pops open during targeting.
The final touch was a pneumatic powder puffer system that replaces the in-game explosion.
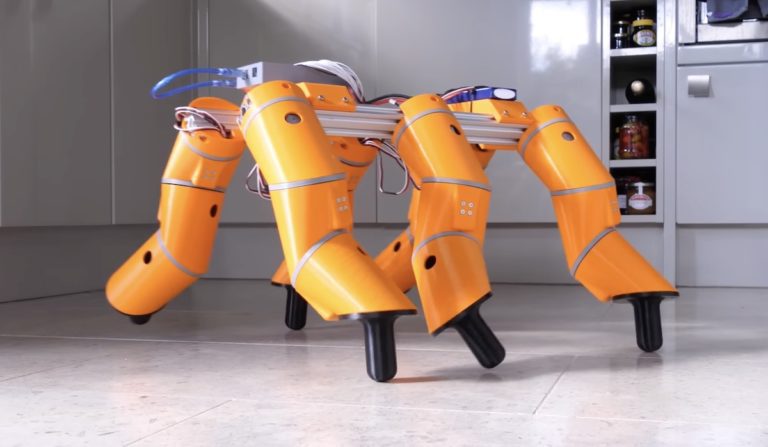
James Bruton gave that title to his most recent video as a good-natured jab at Allen Pan’s project about “giving snakes there legs back.” In Pan’s video, he built a robotic exoskeleton to let snakes walk around on motorized legs. But as Bruton noted in his video intro, those legs didn’t look very snakelike. So Bruton created his own robot that walks around on more serpentine limbs.
This robot’s six limbs each have three degrees of freedom (DoF), all of which are motor-driven. But unlike most robotic limb designs, these use “oblique swivel joint mechanisms.” That mouthful of a term means that each joint rotates on a plane offset at an angle relative to the preceding joint. While that arrangement isn’t suitable for many applications, the kinematics are interesting and the resulting movement does resemble the wriggling of a snake’s body as it slithers along.
Beefy servo motors rotate the joints and an Arduino Mega 2560 board controls them. The servos don’t allow for continuous rotation, but that wasn’t necessary for this robot’s gait. Power comes from a hobby LiPo battery pack and Bruton pilots the robot using the custom universal remote that makes an appearance in most of his videos. All of the leg segments were 3D-printed and attached to a frame made from a couple pieces of aluminum extrusion.
While it is easy for the Arduino to control the position of each servo motor, Bruton had to do a lot of work to figure out how to coordinate their movement. He figured out the basics through trial-and-error, but sophisticated control would require trigonometry and the implementation of inverse kinematics. Bruton decided not to bother with those, since he had already accomplished his goal of building robotic legs that look like they would belong to a snake.
Big names on YouTube like LockPickingLawyer show us that a skilled individual can pick just about any lock that accepts a key. As it turns out, combination padlocks are also very easy to decode and it is even possible to automate that process so that a robot can do the job. Doing so only requires a few affordable parts and a simple algorithm. Mew463 explains how a Master Lock-cracking robot works and how to build your own.
This cracking process works thanks to the mechanics of combination padlocks. While the combination lock on something like a bank vault is very sophisticated, these padlocks have limited space for their mechanisms. They also tend to be cheap. For those reasons, one can feel the mechanisms engaging when stress is on the shackle.
To find the first number, you just pull on the shackle and turn the dial. It will catch just before the correct number. The third number is more complicated, but it is possible to infer by following the proper steps. The second number isn’t identifiable with tricks, but it is easy to try all of the possibilities once you know the other two numbers.This robot follows those steps for you, opening typical combination padlocks in under a minute. The 3D-printed frame holds both a stepper motor and servo motor. The stepper motor rotates the dial and has a magnetic encoder to give precise feedback on the dial position. The servo motor pulls up on the shackle and has an added analog line for feedback. An Arduino Nano board controls the two motors according to the algorithm. A user can navigate a menu and start the cracking process with a rotary encoder knob. The menu appears on an OLED screen, which also shows the lock’s combination after cracking.
Mark Rober isn’t just a talented mechanical engineer and entertaining personality, he is also something of a champion of justice for the common man. He’s already proved that several times with his famous yearly porch pirate-targeted pranks, but now he’s taking on the corrupt fat cats running arcades for children. Those arcades are often full of rigged games that are either more difficult than they seem or downright unwinnable. In his most recent video, Rober built machines that could beat several of those games with ease.
We don’t have enough space here to provide detail on every contraption that Rober created, but they all accomplish a common goal of defeating rigged arcade games. Some of those, like Skee-Ball, are only nefarious in the sense that have misleading difficulty and rely on misdirection to swindle players. Others, like Quik Drop, are almost impossible for humans to win. For good measure, Rober even made a robot that can block every shot a human opponent takes in air hockey.
The exact nature of each machine depends on the game it was intended to beat and a few of them utilized Arduino development boards for control. The Quik Drop-beating machine, for example, uses an Arduino to rapidly actuate a solenoid that presses the button to drop the balls. That speed was necessary to sink all of the balls in the short amount of time allotted. His basketball robot — literally a robot disguised as a basketball — has pneumatic pins and an infrared beam-blocking pop-out section controlled by an Arduino.
For entertainment, a look into the mind of a very clever engineer, and a peek behind the curtain of arcade odds-stacking, be sure to watch Rober’s YouTube video.
Um dir ein optimales Erlebnis zu bieten, verwenden wir Technologien wie Cookies, um Geräteinformationen zu speichern und/oder darauf zuzugreifen. Wenn du diesen Technologien zustimmst, können wir Daten wie das Surfverhalten oder eindeutige IDs auf dieser Website verarbeiten. Wenn du deine Einwillligung nicht erteilst oder zurückziehst, können bestimmte Merkmale und Funktionen beeinträchtigt werden.
Funktional
Immer aktiv
Die technische Speicherung oder der Zugang ist unbedingt erforderlich für den rechtmäßigen Zweck, die Nutzung eines bestimmten Dienstes zu ermöglichen, der vom Teilnehmer oder Nutzer ausdrücklich gewünscht wird, oder für den alleinigen Zweck, die Übertragung einer Nachricht über ein elektronisches Kommunikationsnetz durchzuführen.
Vorlieben
Die technische Speicherung oder der Zugriff ist für den rechtmäßigen Zweck der Speicherung von Präferenzen erforderlich, die nicht vom Abonnenten oder Benutzer angefordert wurden.
Statistiken
Die technische Speicherung oder der Zugriff, der ausschließlich zu statistischen Zwecken erfolgt.Die technische Speicherung oder der Zugriff, der ausschließlich zu anonymen statistischen Zwecken verwendet wird. Ohne eine Vorladung, die freiwillige Zustimmung deines Internetdienstanbieters oder zusätzliche Aufzeichnungen von Dritten können die zu diesem Zweck gespeicherten oder abgerufenen Informationen allein in der Regel nicht dazu verwendet werden, dich zu identifizieren.
Marketing
Die technische Speicherung oder der Zugriff ist erforderlich, um Nutzerprofile zu erstellen, um Werbung zu versenden oder um den Nutzer auf einer Website oder über mehrere Websites hinweg zu ähnlichen Marketingzwecken zu verfolgen.