What happens when you hand an educational robot to a group of developers and ask them to build something fun? At Arduino, you get a multiplayer robot showdown that’s part battle, part programming lesson, and entirely Alvik.
The idea for Alvik Fight Club first came to life during one of our internal Make Tanks, in preparation for Maker Faire Rome 2024. Senior software developer Davide Neri and senior firmware engineer Alexander Entinger started experimenting with ways to turn our educational robot into a game-ready platform. We teased the outcome in this post last December: a sumo-style arena match where players control their robots in real-time, using power-ups like “banana spin,” “reverse slime,” and “freeze blast” to outsmart and outmaneuver their opponents. The last robot standing inside the ring wins.
The tutorial for Alvik Fight Club includes full code, hardware setup, and game logic for multiplayer battles using up to four Alvik robots.
Check it out to learn how to:
Control Alvik in real time with a custom remote based on Arduino Nano ESP32 and Modulino nodes
Add power-up logic with visual feedback using the robot’s onboard RGB LEDs
Detect collisions, edge boundaries, and win conditions
Build an arena and create your own game rules!
Because the code is open and modular, there’s plenty of room to remix and extend the concept – whether you want to add voice commands, integrate more sensors, or simply make the game a bit more chaotic.
Discover our STEM champion!
Yes it’s fun, but Alvik Fight Club also highlights what Alvik does best: it gives students and developers a hands-on way to explore real-world robotics and programming using rock-solid sensors and systems.
Alvik is designed to inspire creativity, problem-solving, and collaboration. It’s an educational tool built by people who love to experiment and share. And projects like Fight Club show just how far that mindset can go! Try the project yourself, or share it with your classroom or club. We’d love to see your own take on the robot battle game – and where Alvik takes you next.
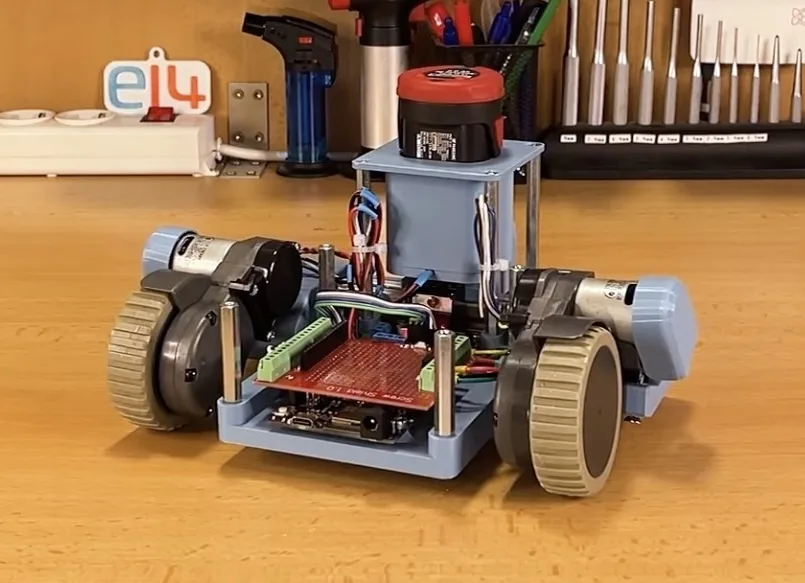
We all love the immense convenience provided by robot vacuum cleaners, but what happens when they get too old to function? Rather than throwing it away, Milos Rasic from element14 Presents wanted to extract the often-expensive components and repurpose them into an entirely new robot, inspired by the TurtleBot3: the PlatypusBot.
Rasic quickly got to work by disassembling the bot into its drive motors, pump, and several other small parts. Luckily, the main drive motors already had integrated encoders which made it very easy to connect them to an Arduino UNO R4 WiFi and an L298N motor driver for precise positional data/control. Further improving the granularity, Rasic added a 360-degree lidar module and enough space for a Raspberry Pi in order to run SLAM algorithms in the future.
For now, this 3D-printed robot assembled from reclaimed robot parts is controlled via a joystick over UDP and Wi-Fi. The host PC converts the joystick’s locations into a vector for the motors to follow, after which the values are sent to the UNO R4 WiFi for processing.
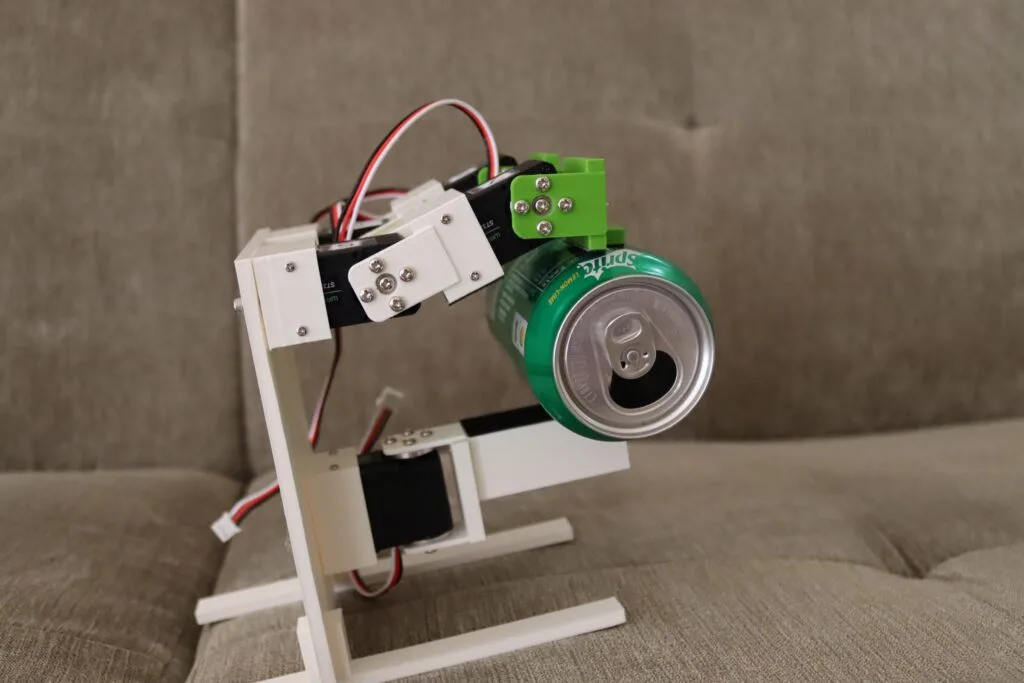
A small startup called K-Scale Labs is in the process of developing an affordable, open-source humanoid robot and Mike Rigsby wanted to build a compatible hand. This three-fingered robot hand is the result, and it makes use of serial bus servos from Waveshare.
Most Arduino users are familiar with full-duplex serial communication, which requires two data lines. The first carries data in one direction, while the second carries data in the other. As such, devices can send and receive data at the same time — they don’t have to wait to until the line is “free” to send data.
But half-duplex serial communication is also possible. Each device just has to wait its turn to send data. That is less common, but it does have some benefits. In this case, Rigsby used Waveshare servo motors that communicate via a half-duplex serial bus. The benefit is that users can daisy-chain multiple servos together, connecting to a single serial pin on the host device. These particular servo motors also have magnetic encoders instead of potentiometers, which are more reliable.
Five of those servos actuate the 3D-printed fingers on Rigsby’s robot hand (the top two fingers have two joints each). He used an Arduino UNO Rev3 board to control them, but couldn’t use the typical RX and TX (0 and 1) pins for communication over the serial bus. For that reason, he included a serial bus module meant specifically for driving servos like these.
This seems to work pretty well and the motors move smoothly — though they currently lack sensors that would enable force/pressure control.
2011’s Real Steel may have vanished from the public consciousness in a remarkably short amount of time, but the concept was pretty neat. There is something exciting about the idea of fighting through motion-controlled humanoid robots. That is completely possible today — it would just be wildly expensive at the scale seen in the movie. But MPuma made it affordable by scaling the concept down to Rock ‘Em Sock ‘Em Robots.
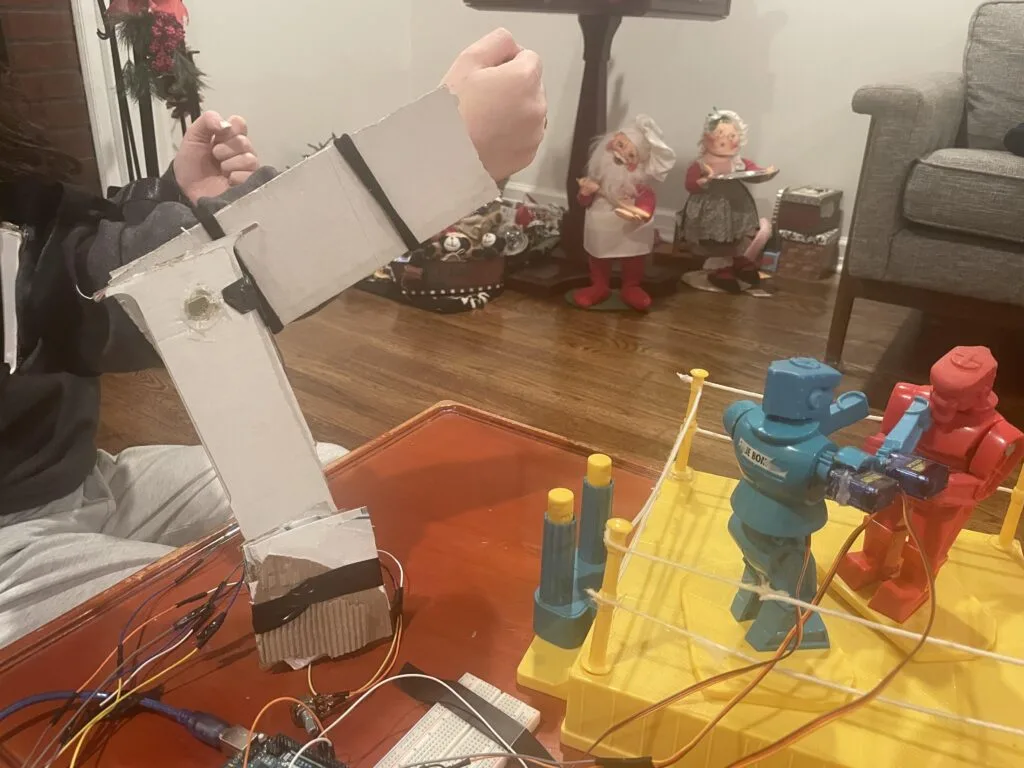
The original Rock ‘Em Sock ‘Em Robots toy was purely mechanical, with the players controlling their respective robots through linkages. In this project, MPuma modernized the toy with servo motors controlled via player motion.
As designed, the motion-controlled robot has three servo motors: one for the torso rotation, one for the shoulder, and one for the elbow. If desired, the builder can equip both robots in that manner. An Arduino UNO Rev3 board controls those motors, making them match the player’s movement.
The Arduino detects player movement through three potentiometers — one for each servo motor. Twisting the elbow potentiometer will, for example, cause the robot’s elbow servo motor to move by the same angle. That arrangement is very responsive, because analog potentiometer readings are quick. It is, therefore, suitable for combat.
The final piece of the puzzle is attaching the potentiometers to the player’s body. MPuma didn’t bother with anything complicated or fancy, they just mounted the potentiometers to pieces of cardboard and strapped those to the player’s arm.
This may not be as cinematic as Real Steel’s robots, but you can recreate MPuma’s project for less than you spent to see that movie in theaters.
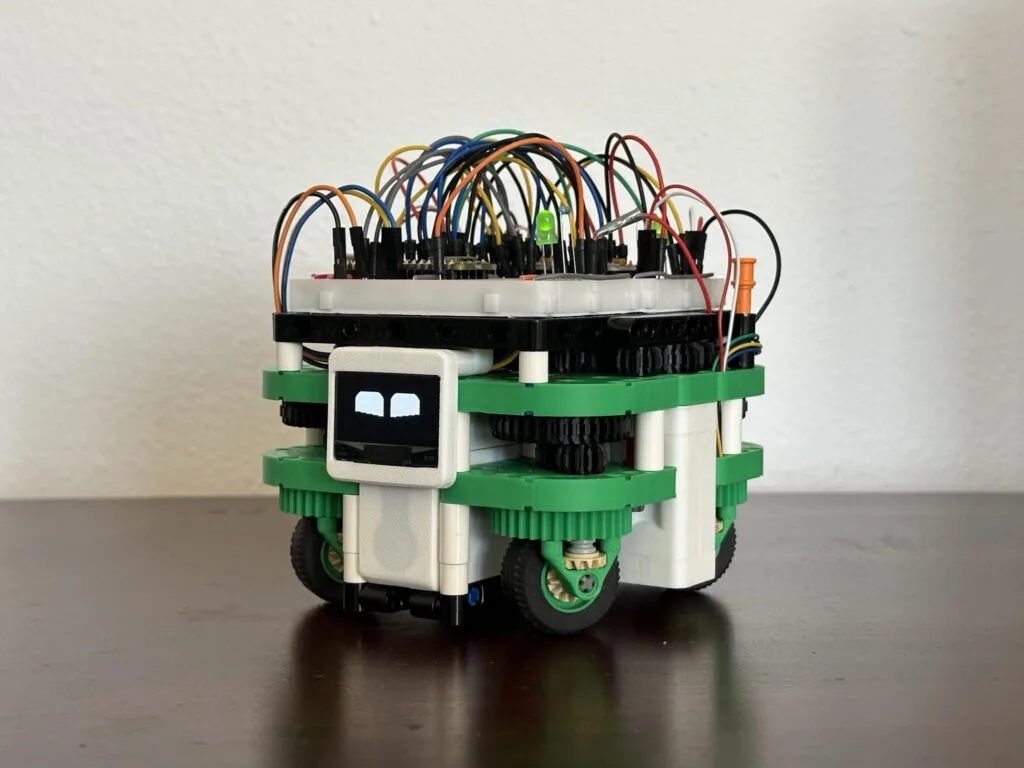
Robotic vehicles can have a wide variety of drive mechanisms that range from a simple tricycle setup all the way to crawling legs. Alex Le’s project leverages the reliability of LEGO blocks with the customizability of 3D-printed pieces to create a highly mobile omnidirectional robot called Swervebot, which is controllable over Wi-Fi thanks to an Arduino Nano ESP32.
The base mechanism of a co-axial swerve drive robot is a swerve module that uses one axle + motor to spin the wheel and another axle + motor to turn it. When combined with several other swerve modules in a single chassis, the Swervebot is able to perform very complex maneuvers such as spinning while moving in a particular direction. For each of these modules, a pair of DC motors were mounted into custom, LEGO-compatible enclosures and attached to a series of gears for transferring their motion into the wheels. Once assembled into a 2×2 layout, Le moved onto the next steps of wiring and programming the robot.
The Nano ESP32 is attached to two TB6612 motor drivers and a screen for displaying fun, animated eyes while the robot is in-motion or idling. Controlling the swerve bot is easy too, as the ESP32 hosts a webpage full of buttons and other inputs for setting speeds and directions.
A vehicle’s wheel diameter has a dramatic effect on several aspects of performance. The most obvious is gearing, with larger wheels increasing the ultimate gear ratio — though transmission and transfer case gearing can counteract that. But wheel size also affects mobility over terrain, which is why Gourav Moger and Huseyin Atakan Varol’s prototype mobile robot, called Improbability Roller, has the ability to dynamically alter its wheel diameter.
If all else were equal (including final gear ratio), smaller wheels would be better, because they result in less unsprung mass. But that would only be true in a hypothetical world on perfectly flat surfaces. As the terrain becomes more irregular, larger wheels become more practical. Stairs are an extreme example and only a vehicle with very large wheels can climb stairs.
Most vehicles sacrifice either efficiency or capability through wheel size, but this robot doesn’t have to. Each of its wheels is a unique collapsing mechanism that can expand or shrink as necessary to alter the effective rolling diameter. Pulley rope actuators on each wheel, driven by Dynamixel geared motors by an Arduino Mega 2560 board through a Dynamixel shield, perform that change. A single drive motor spins the wheels through a rigid gear set mounted on the axles, and a third omni wheel provides stability.
This unique arrangement has additional benefits beyond terrain accommodation. The robot can, for instance, shrink its wheels in order to fit through tight spaces. It can also increase the size of one wheel, relative to the other, to turn without a dedicated steering rack or differential drive system.
Alvik is cute, it’s smart, it’s fun… so what can it actually do?
To answer this question, we decided to have fun and put the robot to the test with some of the most creative people we know – our own team! A dozen Arduino employees volunteered for a dedicated Make Tank session earlier this fall, and came up with a few great in-house projects for us to share – and you to try!
We were so happy with the creative and engaging ideas that we took them on the road for the Maker Faire Rome 2024: they were a hit and attracted many curious visitors to the Arduino booth.
Hello, Alvik!
This interactive project, created by Christian Sarnataro and Leonardo Cavagnis, brings to life Alvik’s friendly personality. By waving your hands in front of a Nicla Vision camera, you trigger a cheerful “big hands” gesture in response: it’s Alvik’s way of welcoming newcomers to robotics!
Why it’s great: The project highlights Alvik’s ease of use and intuitive interactivity, while demonstrating how advanced learners can tap into the robot’s AI capabilities to create meaningful, engaging robotic experiences.
Robo-Fight Club
Developed by Davide Neri and Alexander Entinger, this competitive game turns Alvik into a feisty battling robot. Participants control their Alvik to push opponents out of the arena, while trying special moves like “yellow-banana” for spins, “green-slime” to reverse controls, and “blue-ice” to freeze competitors for five seconds. Any robot stepping out of the arena automatically loses the match.
Why it’s great: Robo-Fight Club demonstrates how Alvik can be used for multiplayer, interactive gaming experiences while teaching users about programming logic and control systems.
Alvik Mini City
In this project by Giovanni Bruno, Julián Caro Linares, and Livia Luo, Alvik works tirelessly in a mini city, moving balls from one floor to another. The project showcases how robotics can assist in repetitive and potentially hazardous tasks, inspiring us to imagine practical applications for robotics in their daily lives.
Why it’s great: This project emphasizes how Alvik is more than just an educational robot – it’s a tool for exploring real-world use cases in automation and problem-solving.
Your turn!
Alvik is the perfect companion to learn coding and robotics because it’s easy to get started with, but powerful enough to support complex projects. With the option to program using block-based coding, in MicroPython or the Arduino language, everyone from beginners to advanced users can choose the environment that suits their needs best!
Inspired by these projects? Check out all of Alvik’s features and specs on this page, or go ahead and start your journey today! Don’t forget to share your creations with us: upload your projects to Project Hub or email creators@arduino.cc – we can’t wait to see what you build!
At Cornell University, Dr. Anand Kumar Mishra and his team have been conducting groundbreaking research that brings together the fields of robotics, biology, and engineering. Their recent experiments, published in Science, explore how fungal myceliacan be used to control robots. The team has successfully created biohybrid robots that move based on electrical signals generated by fungi – a fascinating development in the world of robotics and biology.
A surprising solution for robotics: fungi
Biohybrid robots have traditionally relied on animal or plant cells to control movements. However, Dr. Mishra’s team is introducing an exciting new component into this field: fungi – which are resilient, easy to culture, and can thrive in a wide range of environmental conditions. This makes them ideal candidates for long-term applications in biohybrid robotics.
Dr. Mishra and his colleagues designed two robots: a soft, starfish-inspired walking one, and a wheeled one. Both can be controlled using the natural electrophysiological signals produced by fungal mycelia. These signals are harnessed using a specially designed electrical interface that allows the fungi to control the robot’s movement.
The implications of this research extend far beyond robotics. The integration of living systems with artificial actuators presents an exciting new frontier in technology, and the potential applications are vast – from environmental sensing to pollution monitoring.
At the heart of this innovative project is the Arduino platform, which served as the main interface to control the robots. As Dr. Mishra explains, he has been using Arduino for over 10 years and naturally turned to it for this experiment: “My first thought was to control the robot using Arduino.” The choice was ideal in terms of accessibility, reliability, and ease of use – and allowed for seamless transition from prototyping with UNO R4 WiFi to final solution with Arduino Mega.
To capture and process the tiny electrical signals from the fungi, the team used a high-resolution 32-bit ADC (analog-to-digital converter) to achieve the necessary precision. “We processed each spike from the fungi and used the delay between spikes to control the robot’s movement. For example, the width of the spike determined the delay in the robot’s action, while the height was used to adjust the motor speed,” Dr. Mishra shares.
The team also experimented with pulse width modulation (PWM) to control the motor speed more precisely, and managed to create a system where the fungi’s spikes could increase or decrease the robot’s speed in real-time. “This wasn’t easy, but it was incredibly rewarding,” says Dr. Mishra.
And it’s only the beginning. Now the researchers are exploring ways to refine the signal processing and enhance accuracy – again relying on Arduino’s expanding ecosystem, making the system even more accessible for future scientific experiments.
All in all, this project is an exciting example of how easy-to-use, open-source, accessible technologies can enable cutting-edge research and experimentation to push the boundaries of what’s possible in the most unexpected fields – even complex biohybrid experiments! As Dr. Mishra says, “I’ve been a huge fan of Arduino for years, and it’s amazing to see how it can be used to drive advancements in scientific research.”
Every decade or two, humanity seems to develop a renewed interest in humanoid robots and their potential within our world. Because the practical applications are actually pretty limited (given the high cost), we inevitably begin to consider how those robots might function as entertainment. But Jon Hamilton did more than just wonder, he actually built a robotic performer called Syntaxx and it will definitely make you feel things.
It is hard to describe this robot without sounding like a Mad Libs game filled out by a cyberpunk-obsessed DJ. Hamilton designed it to give performances, primarily in the form of synthetic singing accompanied by electronic music. It looks like a crude Halloween mask given life by a misguided wizard sometime in the 1980s. It is pretty bonkers and you should probably watch the video of it in action to wrap your head around the concept.
Hamilton needed three different Arduino development boards to bring this robot to life. The first, an Arduino Giga R1 WiFi, oversees the robot’s operation and handles voice interaction, as well as audio playback. The second, an Arduino Mega 2560, moves the robot’s neck according to input from two microphones (one on the left, the other on the right). The third, an Arduino Uno R4 WiFi, controls the rest of the servo movement.
The result is a robot that is both impressive and also pretty disconcerting.
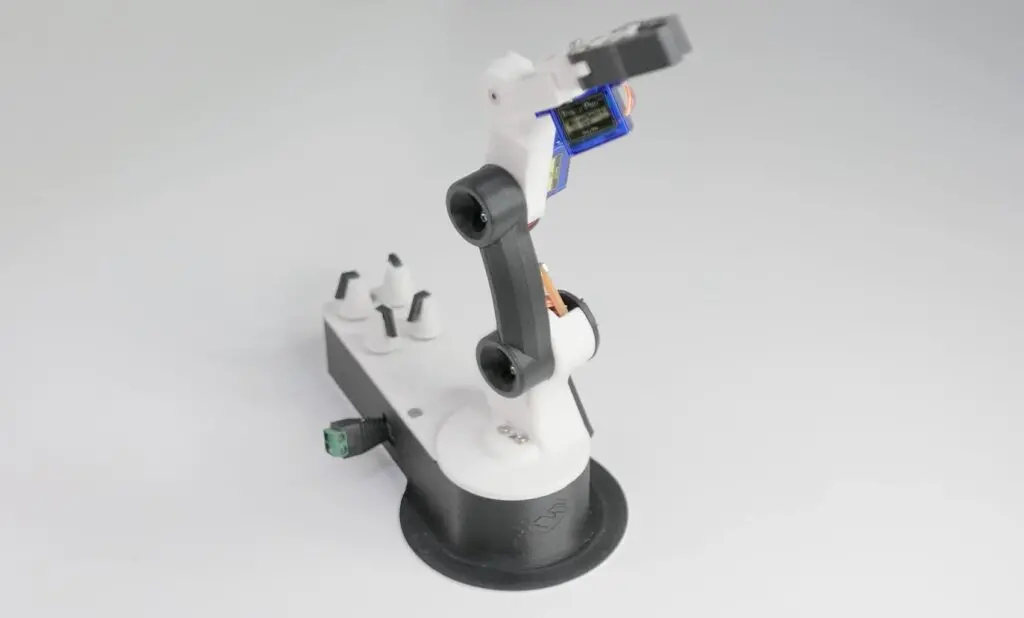
Robotics is already an intimidating field, thanks to the complexity involved. And the cost of parts, such as actuators, only increases that feeling of inaccessibility. But as FABRI Creator shows in their most recent video, you can build a useful robotic arm with just a handful of inexpensive components.
This is pint-sized robotic arm that has some of the same features as big and expensive industrial robots, just on a smaller scale. Users can operate the four joints manually, but can also record a series of positions and let the robot automatically move from one to the next. That is a popular programming technique in many industries, making this robot useful for learning real methodology and for performing practical tasks.
The best part is that this robot is very affordable. All of the parts, with the exception of fasteners and electronic components, are 3D-printable. The electronic components include an Arduino Nano board and four SG90 hobby servo motors that can be found for just a couple of dollars each. FABRI Creator designed a custom PCB to host the Arduino, to provide power input, and to simplify the wiring. That PCB isn’t strictly necessary, but it results in a much tidier robot.
The assembled robot is small, but has enough reach to be useful and enough strength to lift light objects. It is a perfect starting point for people who want to learn robotics basics on a budget.
Channeling his inner Gru, YouTuber Electo built a robotic minion army to terrorize and amuse the public in local shopping malls.
Building one minion robot is, in theory, pretty straightforward. That is especially true when, like these, that robot isn’t actually bipedal and instead rolls around on little wheels attached to the feet. But creating 10 robots is more of a challenge. Assuming a limited budget, the robots would have to be relatively inexpensive. So, how could Electo give them the ability to run around causing mayhem?
Electo’s solution was to make one smart minion, called King Bob, to lead all of the other minions of lesser intelligence. The basic design consists of an Arduino that controls the two drive motors and that can communicate with other Arduino boards via radio transceiver modules. Those components fit inside a 3D-printed shell and this basic minion is pretty affordable to construct.
But King Bob has more advanced hardware and special abilities. He can receive explicit movement commands from Electo’s radio transmitter controller, but also has some intelligence thanks to a single-board computer and a camera. That lets it run a computer vision application to detect and follow specific things that it sees. In this case, that is a banana.
King Bob could follow explicit commands or a banana, but what about the other minions? Electo gave them the ability to follow their leader by simply mimicking its movements. Any movement that King Bob makes is also transmitted over radio to the other minions, so they can make the same movements. This is intentionally clumsy (because minions), but lets the group move together in an entertaining way as they traverse shopping malls and movie theaters.
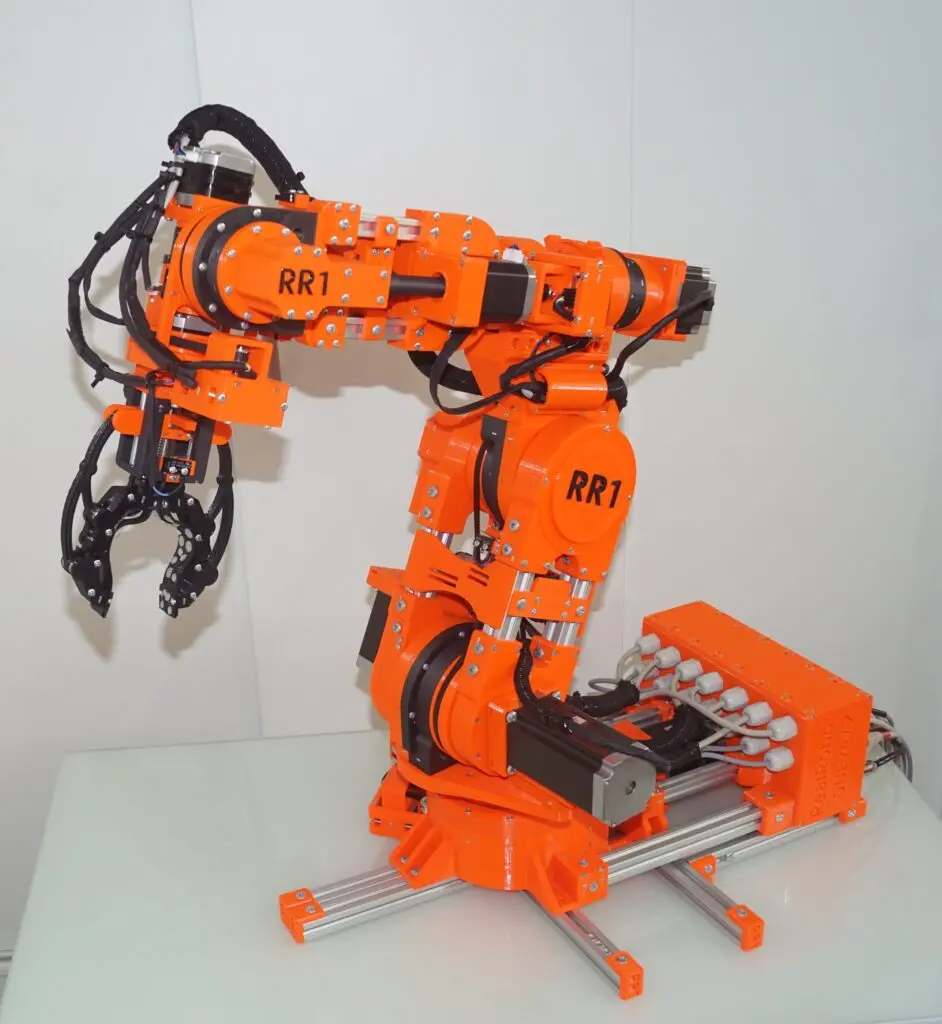
Started in 2022 as an exploration of what’s possible in the field of DIY robotics, Pavel Surynek’s Real Robot One (RR1) project is a fully-featured 6+1-axis robot arm based on 3D-printed parts and widely available electronics. The initial release was constructed with PETG filament, custom gearboxes for transferring the motor torque to the actuators, and a plethora of stepper motors/shaft-mounted encoders to provide closed-loop control.
The lessons learned from V1 were instrumental in helping Surynek design his next iteration of the RR1 project, including improved motion, rigidity, and control schemes. Replacing the more flexible PETG filament is a far stronger polycarbonate composite which aided in reducing backlash in the gearing. Beyond the plastic housing, Surynek also swapped the planetary gearboxes for a series of belt-driven mechanisms as well as moved the encoders to the perimeter of each joint to get better positional tracking. The last major change involved printing the gripper in TPU and securing it to the wrist assembly with more points of contact.
Controlling all seven stepper motors is an Arduino DUE, which talks to the host machine using its serial USB connection and a custom GUI. It is through this interface that each joint can be configured, set, and continuously monitored, thus giving a comprehensive way to operate the arm.
For more information about revision 2 of the Real Robot One project, watch Surynek’s video below!
Almost all human-robot interaction (HRI) approaches today rely on three senses: hearing, sight, and touch. Your robot vacuum might beep at you, or play recorded or synthesized speech. An LED on its enclosure might blink to red to signify a problem. And cutting-edge humanoid robots may even shake your hand. But what about the other senses? Taste seems like a step too far, so researchers at KAIST experimented with “Olfactory Puppetry” to test smell’s suitability for HRI communication.
This concept seems pretty obvious, but there is very little formal research on the topic. What if a robot could communicate with humans by emitting scents?
Imagine if a factory worker suddenly began smelling burning rubber. That could effectively communicate the idea that a nearby robot is malfunctioning, without relying on auditory or visual cues. Or a personal assistant robot could give off the smell of sizzling bacon to tell its owner that it is time to wake up.
The researchers wanted to test these ideas and chose to do so using puppets instead of actual robots. By using puppets — paper cutouts on popsicle sticks — test subjects could act out scenarios. They could then incorporate scent and observe the results.
For that to work, they needed a way to produce specific smells on-demand. They achieved that with a device built using an Arduino Nano R3 board that controls four atomizers. Those emit rose, citrus, vanilla, and musk scents, respectively. Another device performs a similar function, but with solid fragrances melted by heating elements.
This research was very open-ended, but the team was able to determine that people prefer subtle scents, don’t want those to happen too frequently, and want them to mesh well with what their other senses are telling them. That knowledge could be helpful for scent-based HRI experiments in the future.
Most of the robots we feature only require a single Arduino board, because one Arduino can control several motors and monitor a bunch of sensors. But what if the robot is enormous and the motors are far apart? James Bruton found himself in that situation when he constructed this huge “tentacle” robot and his solution was to put an Arduino in each joint.
This is an oblique swivel joint robot arm, which means that each joint sits at an angle relative to the axes of the preceding and succeeding segments. This creates movement that is unlike any other kind of robot arm.
Bruton took this concept and scaled it up to ludicrous proportions. Each joint is a big ring made of plywood and 3D-printed parts, driven by a DC motor geared down 1600:1 and controlled through an ODrive module.
Because the robot is so large, it would have been difficult to run wires from a single Arduino to all of the motor drivers — especially because those have to go through slip rings to allow for continuous joint rotation. Instead, Bruton put an Arduino Mega 2560 board in each joint to control that joint’s motor driver. Those operate under the control of a primary Mega 2560 located in the base, with communication handled through a CAN bus system.
There is also another Mega 2560 in the remote control that Bruton built for the robot. That reads control input from switches and rotary encoders, then sends commands to the robot through a direct Wi-Fi connection (established via two ESP32 development boards).
Bruton designed this robot to exhibit at EMF Camp in the UK, where it was a popular attraction.
Interactive robots always bring an element of intrigue, and even more so when they feature unusual parts and techniques to perform their actions. Mr. Wallplate, affectionately named by Tony K on Instructables, is one such robot that is contained within an electrical wall plate and uses a servo motor connected to an Arduino UNO Rev3 for mouth movement.
The circuit for Mr. Wallplate is not very complex, as a single Arduino handles all of the processing. Users are able to control the robot with an IR remote thanks to a corresponding receiver that passes along the encoded signals to the Uno for parsing. After a valid code has been found, the Talkie library in the sketch accepts speech synthesis commands before converting them into waveforms for outputting to an amplifier. One of the more challenging aspects was getting the speech to align with the mouth moving, and Tony’s solution was to simply move the servo a predetermined amount based on the word.
After ensuring the electronics worked as intended, Tony fabricated the bot from a clear plastic bottle, a metallic toggle/duplex switch plate for the face, two halves of a ping pong ball for the eyes, and a ponytail holder for the lips. As seen in the demo video below, Tony’s creation is certainly captivating while it talks.
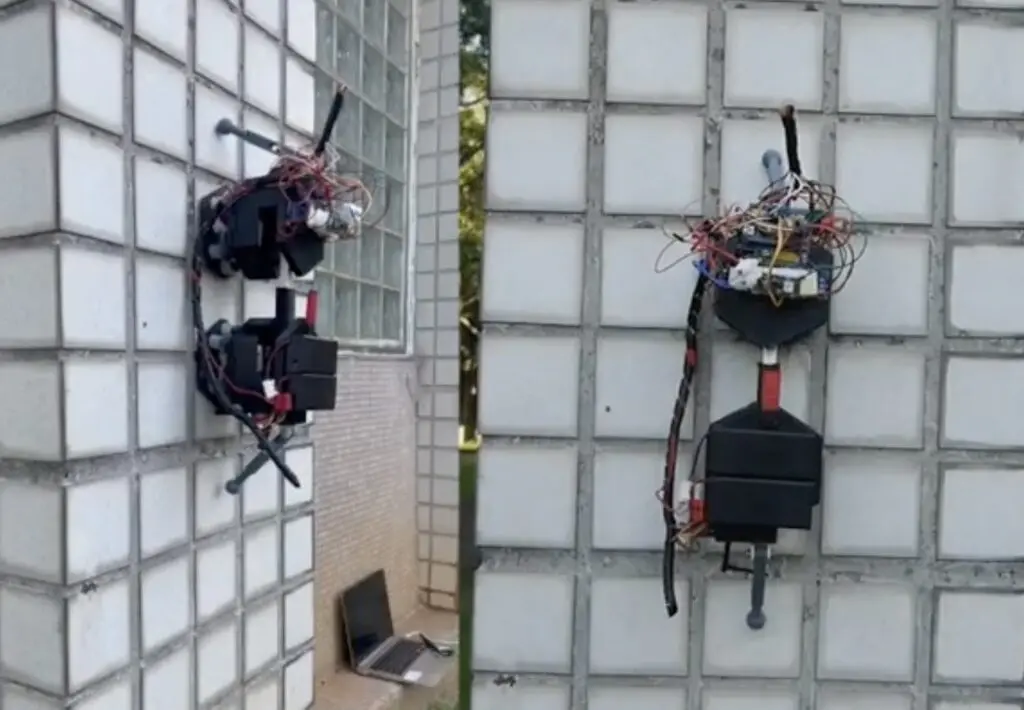
A great deal of building maintenance expenses are the result of simple inaccessibility. Cleaning the windows are your house is a trivial chore, but cleaning the windows on a skyscraper is serious undertaking that needs specialized equipment and training. To make exterior wall tile inspection efficient and affordable, the GLEWBOT team turned to nature for inspiration.
GLEWBOT climbs up walls like a gecko and taps on tiles like a woodpecker to evaluate wall integrity. Like cleaning the windows on a skyscraper, the traditional inspection method requires specialized tools and skills. GLEWBOT can perform the same functions autonomously, dramatically reducing costs.
This robot has a two-part design that lets it scale walls in a manner similar to a climber using ascenders. One part grips, while the other releases. When the bottom part grips, the top part can extend to move up the wall. When the top part grips, the bottom part can retract to repeat the process. The robot grips the tile using suction cup feet connected to micro vacuum pumps and a linear actuator performs the extension/retraction. Each end has a motor that lets it rotate relative to the linear actuator, so the robot can turn.
The system is equipped with two Arduino boards. An Arduino Nano serves as central command and handles general functions, while an Arduino Nano 33 BLE Sense acts as an acoustic recognition module and controls the inspection tool. That tool is a hollow drum hammer that taps each tile and listens for the resulting echo. An audio classification model trained for this task will detect a questionable tile based on the sound it makes, so engineers can investigate further.
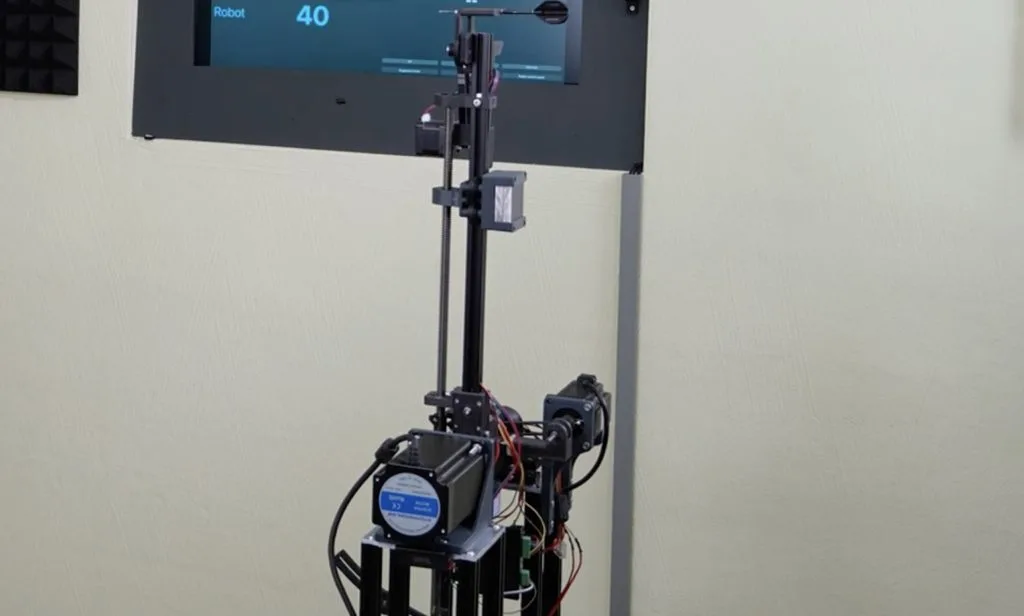
You’ll find dartboards in just about every dive bar in the world, like cheaper and pokier alternatives to pool. But that doesn’t mean that darts is a casual game to everyone. It takes a lot of skill to play on a competitive level and many of us struggle to perform well. Niklas Bommersbach decided that years of practice was too much of a commitment, so he built this robot that can dominate dart games.
This robot can, essentially, throw a dart perfectly every time to hit the desired target on the board. If you’re unfamiliar with the game, you might think that a bullseye is always best. But that isn’t true — especially for certain rulesets. To play strategically, Bommersbach needed his robot to nail the desired space on the board on-demand.
His first step was to make throws repeatable and predictable. His robot has a balanced arm that spins up to a precise rotational speed. At the set angle, it releases the dart. By monitoring many throws with computer vision, Bommersbach was able to dial in the speed and angle variables until the result became very predictable. An Arduino UNO Rev3 board controls the arm speed and calculates the release. But Bommersbach struggled to get the timing of the release exactly right, as the Arduino was running its code sequentially and so there was a small variance — just enough to throw off the throw.
His solution was to add a second Arduino, which has the sole responsibility of releasing the dart using a stepper-actuated mechanism. That allowed for very precise timing and repeatable throws. The timing influences the dart’s vertical position on the board, while a linear motion system controls its horizontal position.
When you think of automation, what’s the first image that comes to mind?
For many of us, it’s a robot. From the blocky, square-headed characters of sci-fi comic fame to household more complex creations like the Replicants of Blade Runner — robots have captured our collective imagination for a long time.
It’s no surprise, then, that lots of Arduino users eventually set out to build a robot of their own.
In this article, we’ll look at how to build your own robot with Arduino and share some project examples from other makers.
What exactly is a robot?
The term “robot” can cover a lot of potential meanings, so let’s agree on a definition.
Here’s what the Oxford Dictionary says:
“(especially in science fiction) a machine resembling a human being and able to replicate certain human movements and functions automatically.”
It’s a good start, but do all robots resemble humans? Here’s Oxford’s second definition:
“a machine capable of carrying out a complex series of actions automatically, especially one programmable by a computer.”
This seems more accurate since it encompasses things like construction robots, robotic pets, and robotic vehicles.
Humans have been attempting to build robots for centuries, although most of our success has taken place within the last few decades. Today, thanks to advancements in hardware and automation technology, almost anyone can build their own robots at home.
What do you need to build a robot?
Building your own robot might seem like an unimaginably complex task. After all, aren’t robots the stuff of sci-fi movies and leaked military prototypes?
The good news is that building a robot doesn’t have to be a monumental undertaking, and can in fact be done with some fairly simple and easily obtained components.
Here’s what you’ll need:
Some simple components like wheels, sensors, and switches (this will vary greatly depending on the type of robot you’re planning to build)
Some basic coding and automation skills (you don’t need to be a coding wizard)
This is, of course, just a starting point. You can build a fairly simple robot, or you can ramp up the complexity and sophistication as much as you like — the sky really is the limit here. For beginners, though, you can find everything you need at the hardware store.
Explore Arduino robots
With Arduino’s products and other components, it’s possible to build your own robots more easily than ever before.
We need to look no further than the Arduino Project Hub to find a ton of inspiring ideas. Let’s explore a few.
Line-following robot
Robots don’t have to be ultra-complex humanoid feats of engineering.
In fact, if you’re just getting started with robotics, it helps to keep things simple. Check out this great example — it’s a simple, car-shaped robot designed to follow a colored line on the floor.
The robot constantly monitors data from its infrared sensors in real time and adjusts movement based on feedback, ensuring it never strays from the line.
If this kind of project interests you, you’ll love the upcoming Arduino Alvik, which will have a line-follower functionality. Alvik’s user-friendly interface makes MicroPython coding and robotics project development easier than ever, making learning and creating a breeze.
Alvik is also equipped with a range of sensors including a ToF distance sensor, line follower array, color sensor, and more. It’s especially impressive when it comes to swiftly detecting and navigating obstacles and colors.
Did you think playing music was a uniquely human trait?
Well… think again — this musically-inclined robot is capable of controlling piano keys automatically. The device was able to play piano keys 1,875 times in the space of a minute, beating the human world record by a significant margin.
The project used a range of tools including solenoids and a custom-designed Java software interface.
A chess-playing robot arm
Robots have been giving us humans a run for our money in the world of chess for quite some time.
For a new spin on the machines vs. humans saga, take a look at this robotic arm capable of physically moving the chess pieces.
The arm was created using a 3D printer and works by using a visual recognition system to watch the opponent’s move and then formulate a response.
One of the most interesting things about this robot is the code used for move recognition. Because the robot uses visual recognition to follow the human’s moves, there’s no need for additional complex hardware like reed switches to be built into the chessboard, unlike other chess-playing robots.
Stay tuned for Robotics Week!
If you have a passion for building robots or just want to learn more about this topic, you’ll love Robotics Week, which takes place this year from April 6th-13th.
It’s a full week of events — many of which are virtual — all centered around robotics and STEM.
In the meantime, visit our Project Hub for more inspiration — where you can search by category and difficulty level. And don’t forget to share your own projects with our community!
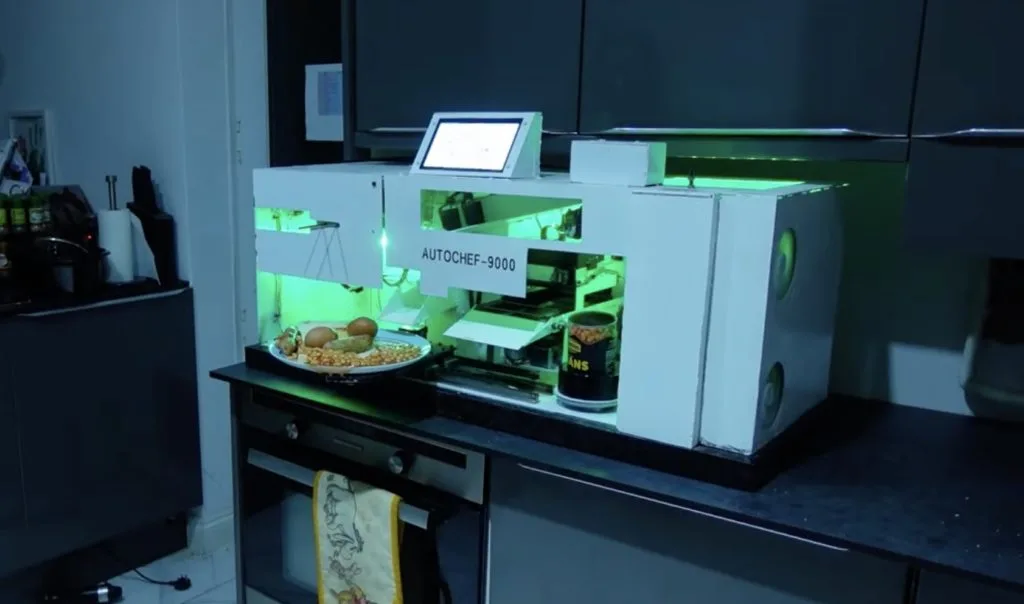
Fans off Wallace and Gromit will all remember two things about the franchise: the sort of creepy — but mostly delightful — stop-motion animation and Wallace’s Rube Goldberg-esque inventions. YouTuber Gregulations was inspired by Wallace’s Autochef breakfast-cooking contraption and decided to build his own robot to prepare morning meals.
Gregulations wanted his Autochef-9000 to churn out traditional full British breakfasts consisted of buttered toast, eggs, beans, and sausage. That was an ambitious goal, because each of those foods requires several steps to prepare. Gregulations’ solution was to, essentially, create one large machine that contains several smaller CNC machines. Each one is distinct and tailored to suit a particular food. In total — if you add up all of the different sections — this is a 12-axis CNC machine.
The Autochef-9000’s central controller is an Arduino Mega 2560 board. But even with the power and number of pins available, that wouldn’t have been able to handle everything. So it divvies out some tasks to Arduino UNO Rev3 boards.
As you would expect, this takes quite a lot of heat to cook everything. That’s why the Autochef-9000 contains several electric heating elements, which the Arduinos control via relays.
Users can order food using a touchscreen menu system or a smartphone interface. Autochef-9000 will then whir to life. It will open and heat a tin of beans, grab and heat a sausage, hard boil an egg, and toast and then butter bread fed from a magazine. Finally, it will deposit all of those items onto a plate.
There is a lot going on inside of this machine and Gregulations breezes past a lot of the technical details, but it is a joy to see in action. And unlike Wallace’s inventions, this one hasn’t caused any serious disasters (yet).
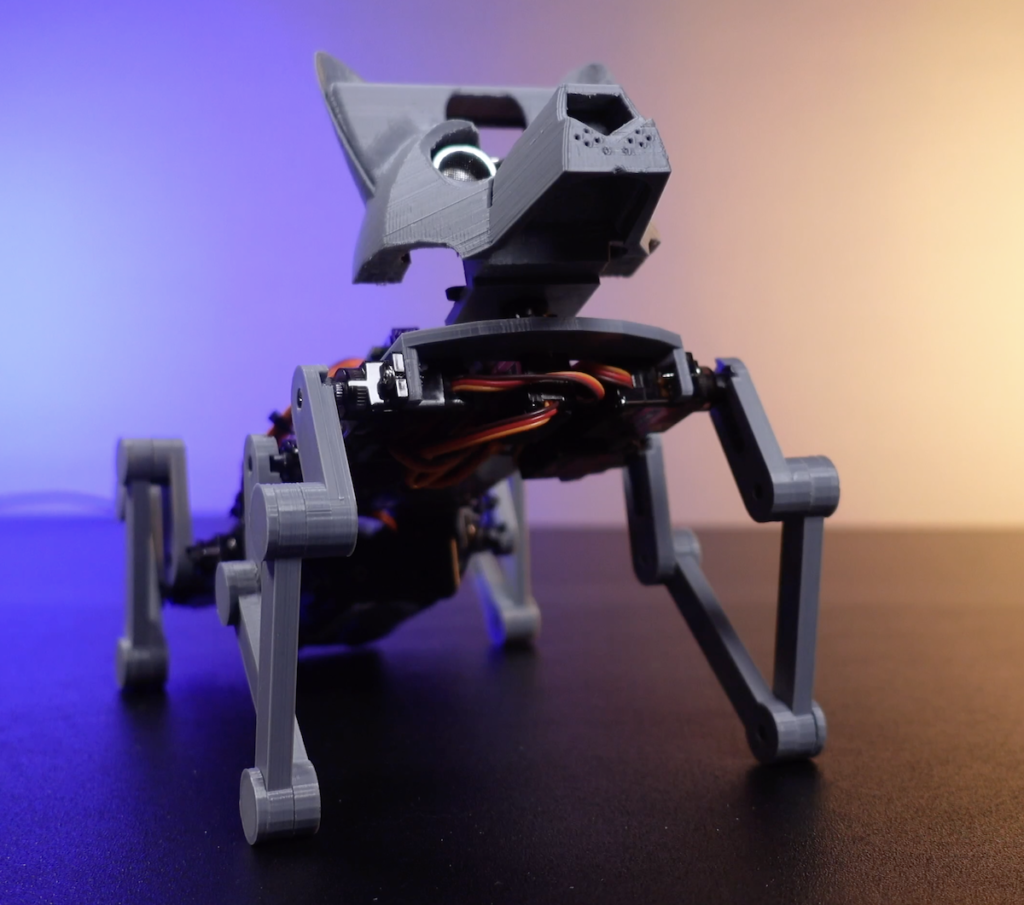
If you have an interest in robotics, it can be really difficult to know where to start. There are so many designs and kits out there that it becomes overwhelming. But it is best to start with the basics and then expand from there after you learn the ropes. One way to do that is by building MertArduino’s adorable app-controlled robot dog.
This is a little more complex than a typical line-following rover kit, but it is still approachable for beginners. It uses eight inexpensive MG90S hobby servo motors to walk on four legs, plus one more servo to rotate the head. The tutorial explains how to create a smartphone app for controlling the robot and there is an ultrasonic sensor hidden in the dog’s eyes to help it detect obstacles.
To construct this robot, you will first need to 3D print the body, legs, and head. Those parts are small enough to print on almost any model of 3D printer. You’ll then need the custom PCB, onto which all of the electronic components attach. You can order that from any PCB fabrication service. Using basic through-hole soldering techniques, you can populate that PCB with an Arduino Nano board, an HC-05 Bluetooth module (for communication with a smartphone), and various miscellaneous components like resistors and a voltage regulator. Power comes from a pair of 18650 lithium battery cells.
After assembly, you can begin controlling the robot using the provided app. Or you can follow the instructions to make your own app with the help of MIT’s handy block-based Scratch programming tool.
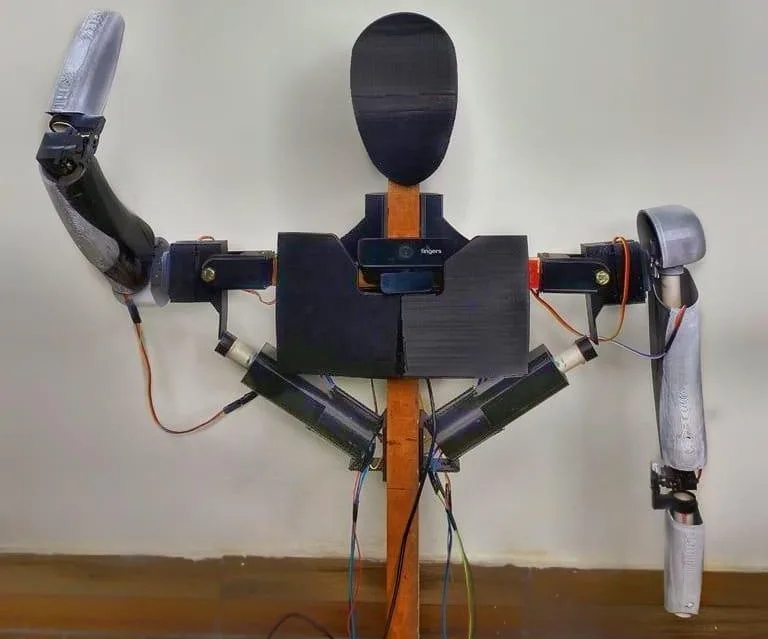
Most people with an interest in robotics probably dream of building android-style humanoid robots. But when they dip their toes into the field, they quickly learn the reality that such robots are incredibly complex and expensive. However, everyone needs to start somewhere. If you want to begin that journey, you can follow these instructions to assemble your own talking humanoid robot.
This robot, dubbed “CHAD,” is a humanoid torso with moving arms, face tracking, and some voice assistant capabilities. It can understand certain voice commands, provide spoken responses, and even hold chat bot-style conversations. The arms weren’t designed to lift anything, but they are capable of movement similar to human arms up to the wrists and that gives CHAD the ability to gesture. It can also move its head to follow a face that it sees.
CHAD achieves that on a remarkably small budget of just ?5000 (about $60 USD) with a handful of components: two Arduino UNO R3 boards, several hobby servo motors, simple L298N motor drivers, and a PC power supply. One Arduino board controls most of the servo movement, while the second focuses on the face tracking movement.
The Arduino boards don’t handle the processing, which is instead outsourced to a PC running Python scripts. Those do the heavy lifting of face recognition, voice recognition, and voice synthesis. The PC then passes movement commands to the Arduino boards through serial.
CHAD’s body and most of its mechanical components are 3D-printable, with two lengths of wood acting as the primary structure. That helps to keep the cost down, giving everyone the chance to create a humanoid robot.
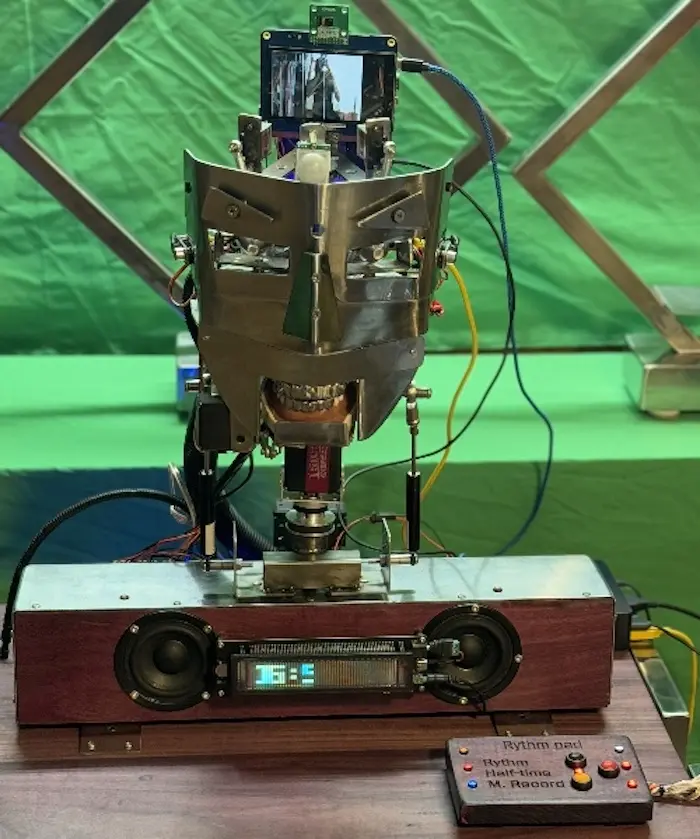
There are many theories that attempt to explain the uncanny valley, which is a range of humanoid realness that is very disconcerting to people. When something looks almost human, we find it disturbing. That often applies to robots with faces — or robots that are faces, as is the case with the TAST-E robot that has a sense of taste and smell.
The TAST-E robot created by M. Bindhammer looks a bit like a human face, sans skin. Servo motors let it pan and tilt, flap its lips, move its unsettlingly realistic eyeballs, and waggle its eyebrows. It can even speak thanks to a Parallax Emic 2 text-to-speech module connected to an Arduino Mega 2560 board.
But TAST-E is most intriguing because of its sense of taste and smell, which let it identify specific compounds and molecules.
Our own tongues can only detect five distinct tastes: saltiness, sweetness, bitterness, sourness, and umami (savoriness). TAST-E can do the same by recognizing the compounds that stimulate those receptors on our tongues. It does so with colorimeters, which detect the color produced when certain reagents mix with those compounds. This is similar to how a woman might look for a blue or pink line on a pregnancy test. TASTE-E has custom colorimeters that look for the reagent colors associated with those taste compounds.
TASTE-E’s sense of smell is a bit more straightforward, but also less analogous to human smell. Its electronic nose uses a Grove gas sensor breakout with four modules: a GM-102B for NO2, a GM-302B for ethanol, a GM-502B for VOCs, and a GM-702B for CO/H2. Those let it analyze the concentration of those compounds in an air sample.
It isn’t clear what M. Bindhammer intends for TAST-E, but this robot is as impressive as it is chilling.
Um dir ein optimales Erlebnis zu bieten, verwenden wir Technologien wie Cookies, um Geräteinformationen zu speichern und/oder darauf zuzugreifen. Wenn du diesen Technologien zustimmst, können wir Daten wie das Surfverhalten oder eindeutige IDs auf dieser Website verarbeiten. Wenn du deine Einwillligung nicht erteilst oder zurückziehst, können bestimmte Merkmale und Funktionen beeinträchtigt werden.
Funktional
Immer aktiv
Die technische Speicherung oder der Zugang ist unbedingt erforderlich für den rechtmäßigen Zweck, die Nutzung eines bestimmten Dienstes zu ermöglichen, der vom Teilnehmer oder Nutzer ausdrücklich gewünscht wird, oder für den alleinigen Zweck, die Übertragung einer Nachricht über ein elektronisches Kommunikationsnetz durchzuführen.
Vorlieben
Die technische Speicherung oder der Zugriff ist für den rechtmäßigen Zweck der Speicherung von Präferenzen erforderlich, die nicht vom Abonnenten oder Benutzer angefordert wurden.
Statistiken
Die technische Speicherung oder der Zugriff, der ausschließlich zu statistischen Zwecken erfolgt.Die technische Speicherung oder der Zugriff, der ausschließlich zu anonymen statistischen Zwecken verwendet wird. Ohne eine Vorladung, die freiwillige Zustimmung deines Internetdienstanbieters oder zusätzliche Aufzeichnungen von Dritten können die zu diesem Zweck gespeicherten oder abgerufenen Informationen allein in der Regel nicht dazu verwendet werden, dich zu identifizieren.
Marketing
Die technische Speicherung oder der Zugriff ist erforderlich, um Nutzerprofile zu erstellen, um Werbung zu versenden oder um den Nutzer auf einer Website oder über mehrere Websites hinweg zu ähnlichen Marketingzwecken zu verfolgen.