Schlagwort: robot
-

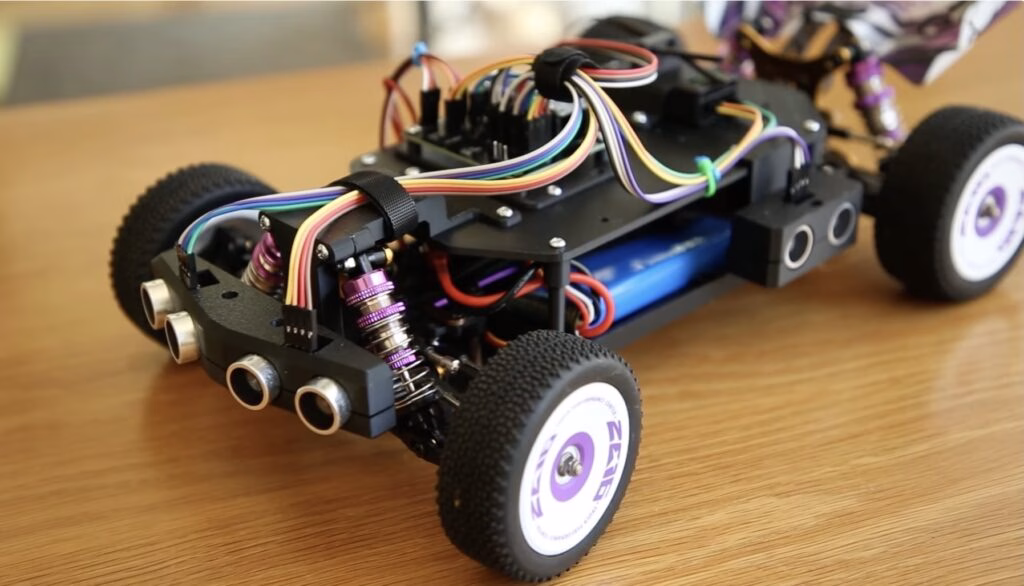
This automatic emergency braking system protects RC cars
Reading Time: 2 minutesIt is a story as old as time (or at least the 1960s): kid gets an RC car for Christmas and excitedly takes it for spin, but crashes it into a wall within five minutes and tears ensue. The automotive industry has cut down on accidents by implementing automatic emergency braking safety…
-

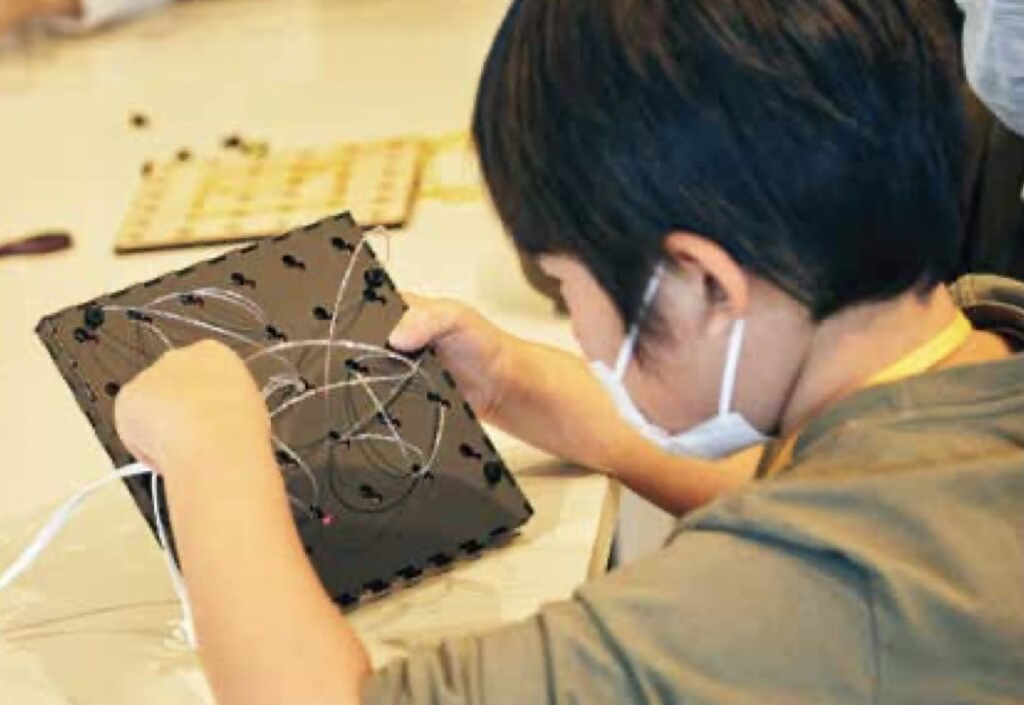
This unique electronic toy helps children learn their shapes
Reading Time: 2 minutesIt isn’t a secret that many kids find math to be boring and it is easy for them to develop an attitude of “when am I ever going to use this?” But math is incredibly useful in the real world, from blue-collar machinists using trigonometry to quantum physicists unveiling the secrets of…
-

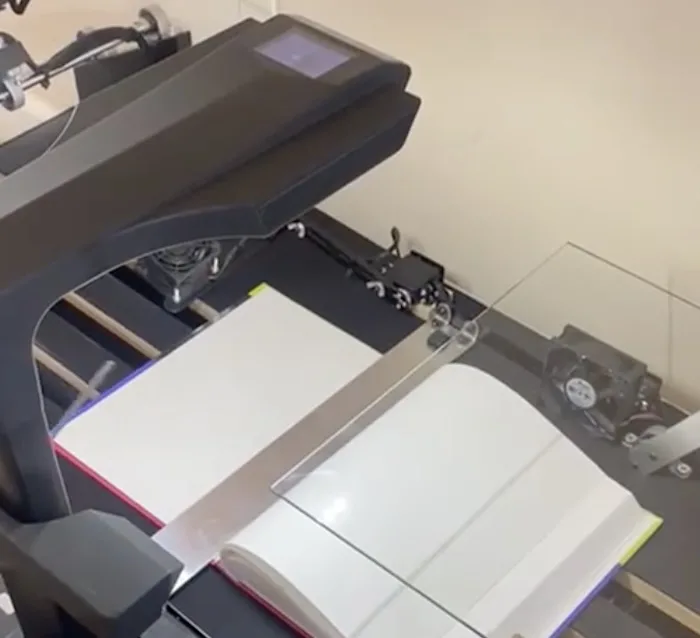
This machine automatically scans books from cover to cover
Reading Time: 2 minutesHard data is hard to find, but roughly 100 million books were published prior to the 21st century. Of those, a significant portion were never available in a digital format and haven’t yet been digitized, which means their content is effectively inaccessible to most people today. To bring that content into the…
-

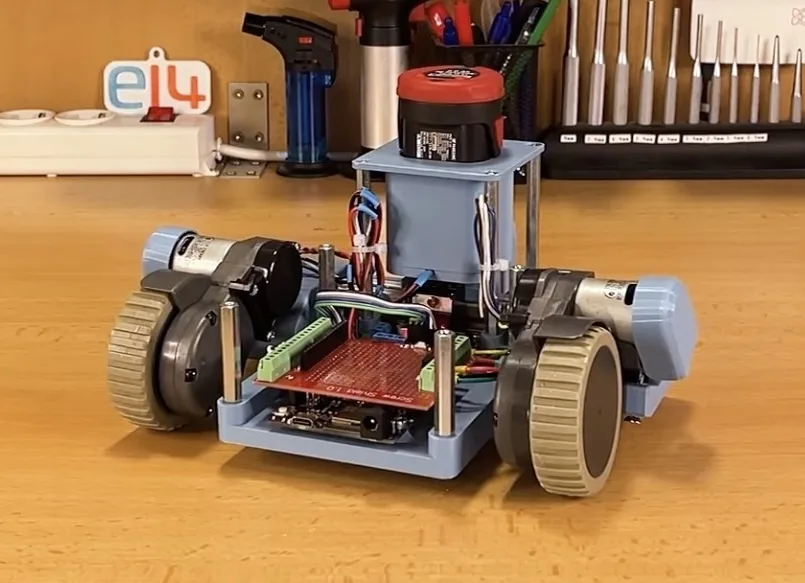
The PlatypusBot is a TurtleBot3-inspired robot built from vacuum cleaner parts
Reading Time: 2 minutesWe all love the immense convenience provided by robot vacuum cleaners, but what happens when they get too old to function? Rather than throwing it away, Milos Rasic from element14 Presents wanted to extract the often-expensive components and repurpose them into an entirely new robot, inspired by the TurtleBot3: the PlatypusBot. Rasic…
-

Why we chose Claude for the Arduino Cloud AI Assistant
Reading Time: 4 minutesWe know that introducing AI into your coding environment comes with questions – about safety, accuracy, privacy, and trust. That’s why we want to be transparent about how we built the recently-announced Arduino AI Assistant in the Cloud IDE, and why we chose to power it with Claude by Anthropic, available via…
-

This 1D camera captures 2D images of things it can’t see
Reading Time: 2 minutesYes, the title of this article sounds pretty crazy. But not only is it entirely possible through the lens of physics, but it is also practical to achieve in the real world using affordable parts. Jon Bumstead pulled it off with an Arduino, a photoresistor, and an inexpensive portable projector. Today’s digital…
-
Arduino Cloud Café: Teach real coding concepts with Arduino AI Assistant
Reading Time: < 1 minuteAre you an educator looking to make coding easier and faster to teach? Join Andrea Richetta, Principal Product Evangelist at Arduino, and Roxana Escobedo, EDU Product Marketing Specialist, for a special Arduino Cloud Café live webinar on July 7th at 5PM CET. You will discover how the new AI Assistant in…
-

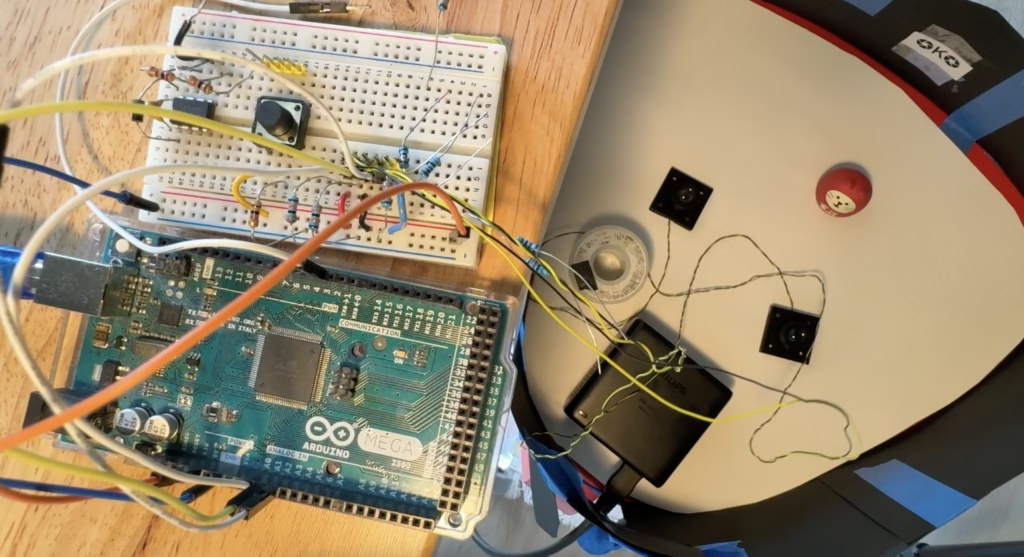
This novel wearable provides touchless haptic feedback for VR typing
Reading Time: 2 minutesOne reason that fans prefer mechanical keyboards over membrane alternatives is that mechanical key switches provide a very noticeable tactile sensation at the moment a key press registers. Whether consciously or not, users notice that and stop pressing the key all the way through the maximum travel — reducing strain and RSI…
-

This spinning water contraption is actually a functional battery
Reading Time: 2 minutesIf you ask someone to think of a battery, they’re probably going to picture a chemical battery, like a AA alkaline or a rechargeable lithium-ion battery. But there are other kinds of batteries that store energy without any fancy chemistry at all. If you find a way to save energy for later,…
-
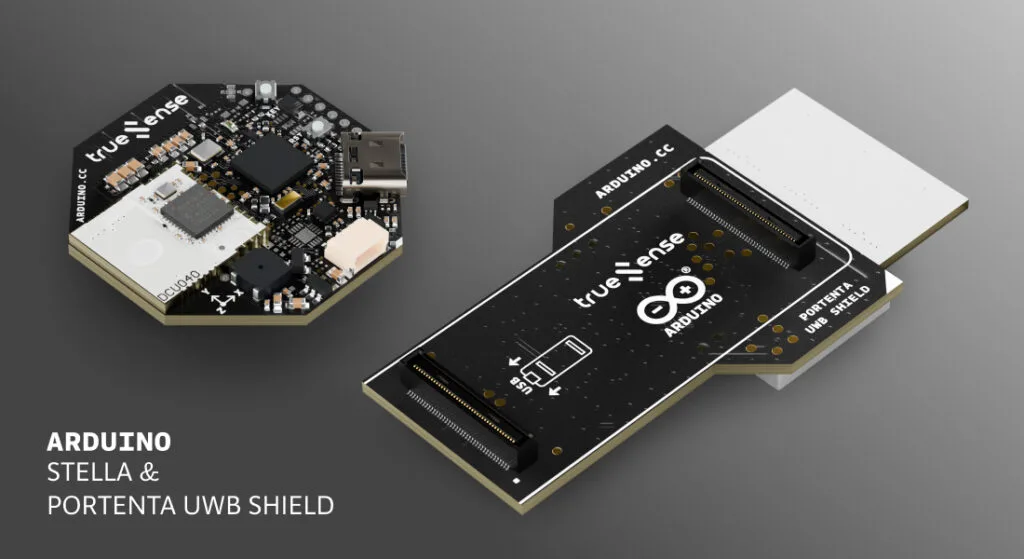
Elevate your IoT with ultra-wideband: Meet Arduino Stella and Portenta UWB Shield!
Reading Time: 2 minutesWe are proud to announce two groundbreaking additions to the Arduino Pro portfolio: the Arduino Stella and Portenta UWB Shield, developed in partnership with Truesense. These advanced tools leverage ultra-wideband (UWB) technology to redefine precision tracking, indoor navigation, and contactless human-machine interactions, empowering IoT innovation across industries. Whatever you have in mind,…
-

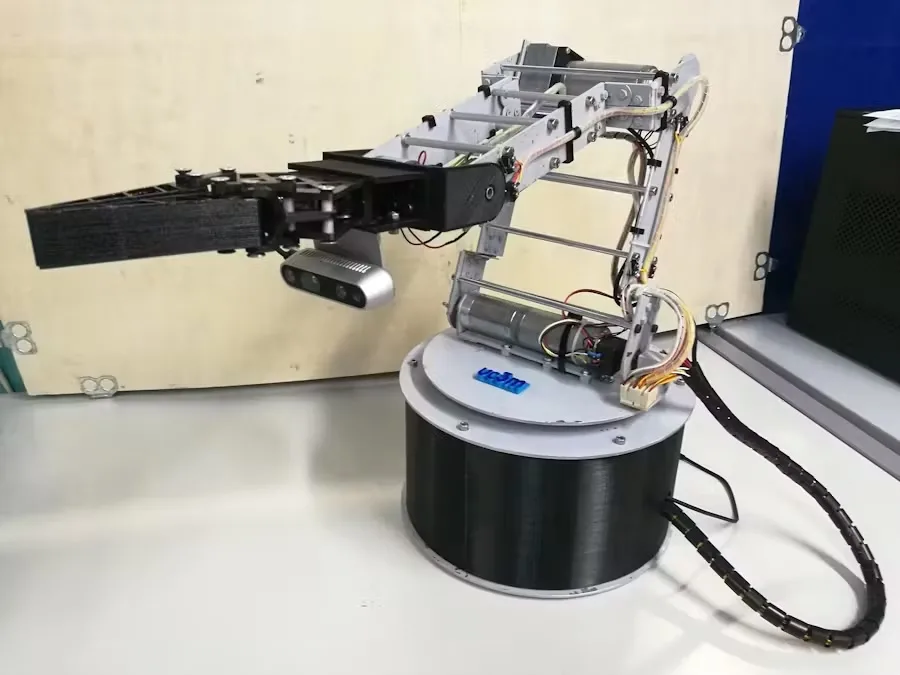
Build your own 4DOF robotic arm on a budget
Reading Time: 2 minutesRobot arms are very cool and can be quite useful, but they also tend to be expensive. That isn’t just markup either, because the components themselves are pricey. However, you can save a lot of money if you make some sacrifices and build everything yourself. In that case, you can follow Ruben…
-
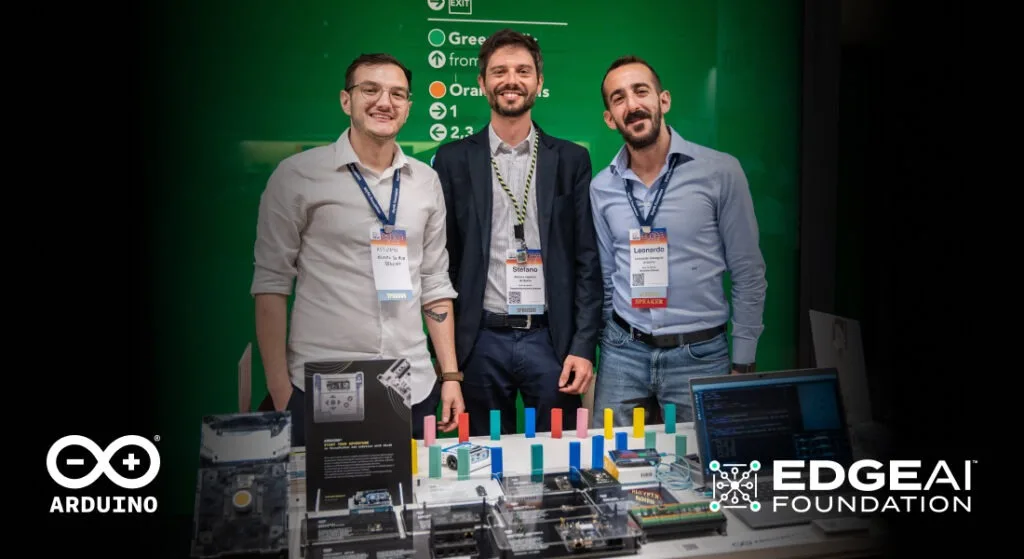
Find your way to AI with Arduino, at the EDGE AI FOUNDATION’s event in Milan
Reading Time: 2 minutesWe’re heading to Milan! On July 2nd-4th, Arduino will be taking part in the EDGE AI FOUNDATION’s annual European event – a three-day gathering dedicated to exploring the future of artificial intelligence at the edge. With a mix of inspiring keynotes, hands-on workshops, product demos, and networking opportunities, this event brings together…
-

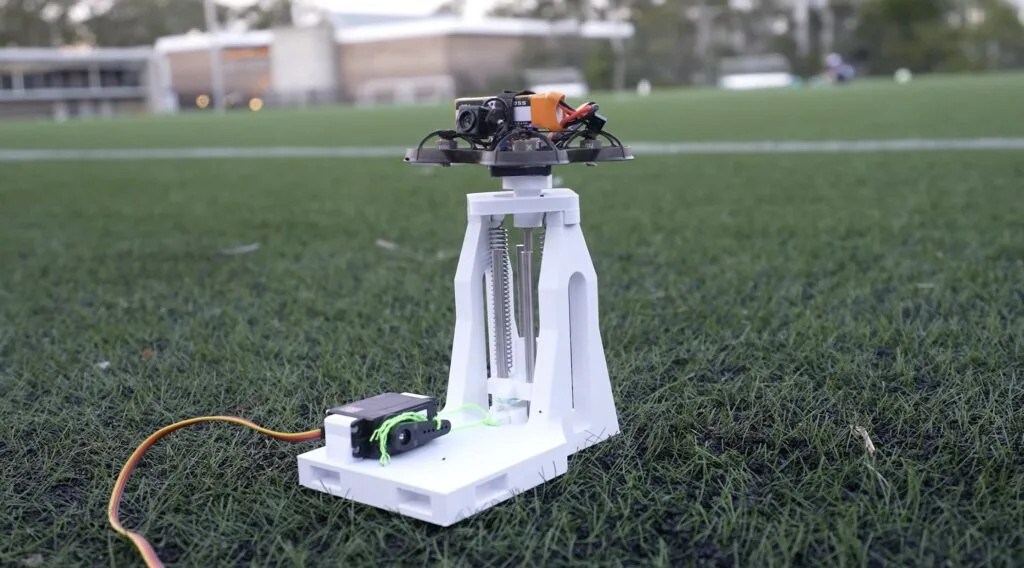
Toss-launching drones is hard — this automatic launcher does it better
Reading Time: 2 minutesTypically, consumer drones take off from the ground or some other solid surface. But that isn’t very cinematic and toss launches — when the pilot throws the drone up into the air — are a lot more interesting to watch. Sadly, NickFPV isn’t very good at tossing his drone and that invites…
-

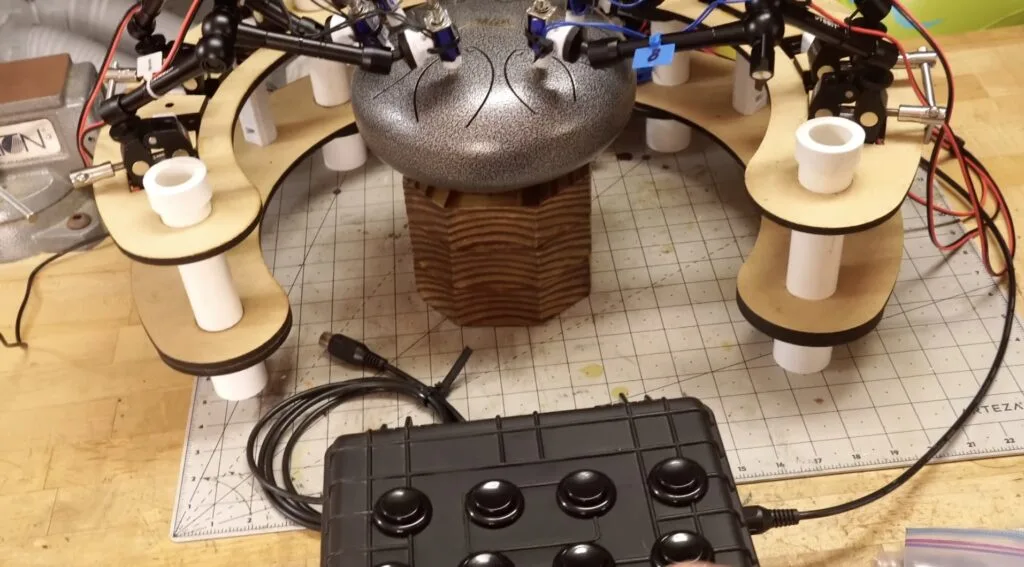
This robotic tongue drummer bangs out all the ambient hits
Reading Time: 2 minutesIf you like to listen to those “deep focus” soundtracks that are all ambient and relaxing, then you’ve heard a tongue drum in action. A tongue drum, or tank drum, is a unique percussion instrument traditionally made from an empty propane cylinder — though purpose-built models are now common. Several tongues are…
-

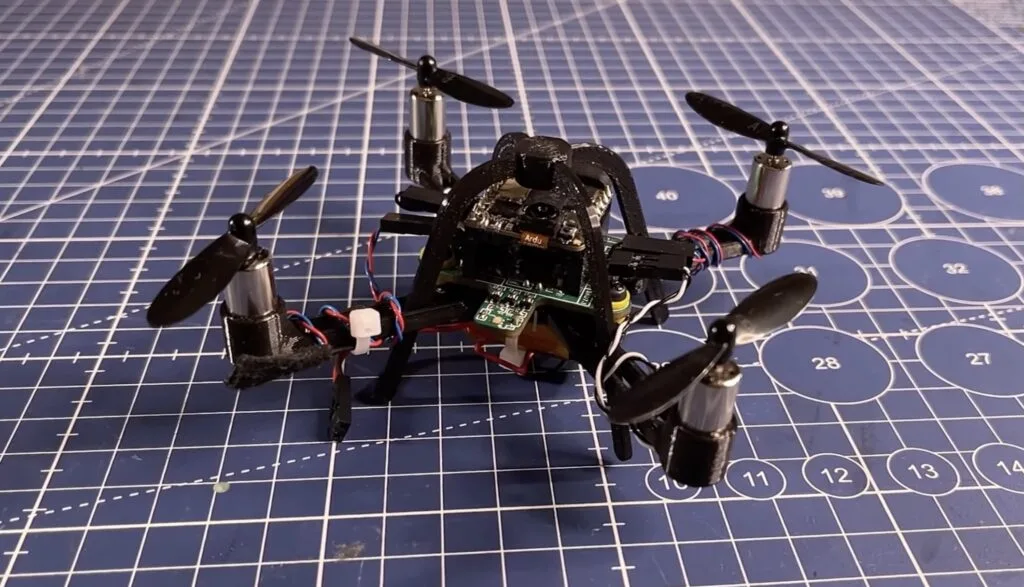
Using an Arduino Nicla Vision as a drone flight controller
Reading Time: 2 minutesDrone flight controllers do so much more than simply receive signals and tell the drone which way to move. They’re responsible for constantly tweaking the motor speeds in order to maintain stable flight, even with shifting winds and other unpredictable factors. For that reason, most flight controllers are purpose-built for the job.…
-

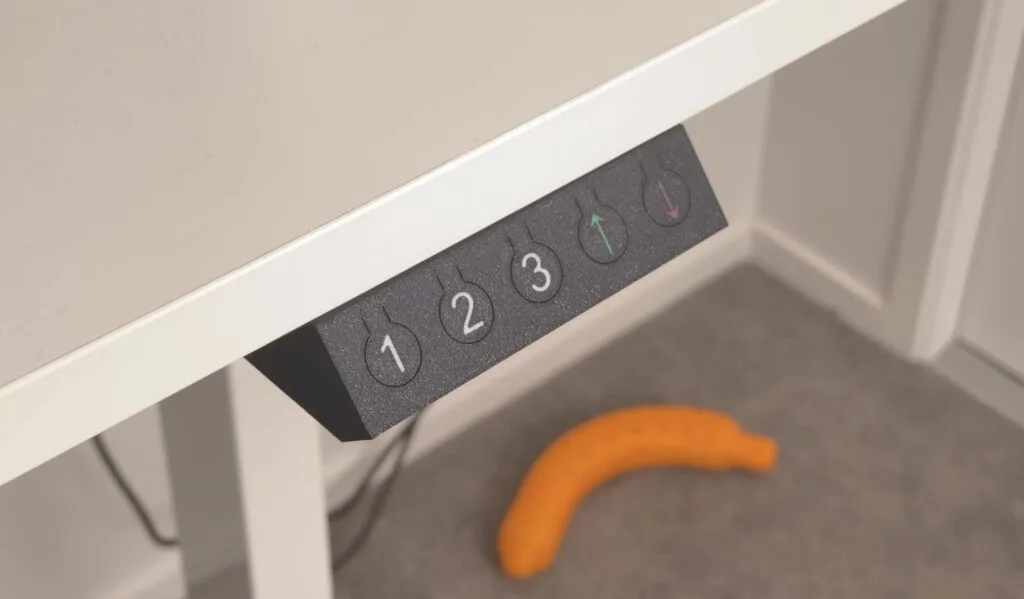
This DIY standing desk controller provides luxury car-style memory settings
Reading Time: 2 minutesOne of the best features you’ll find on a fancy luxury car is seat position memory. Typically, there are at least two profiles that “save” the position of the seat. When switching drivers, the new seat occupant can simply push the button for their profile and the seat will automatically move to…
-
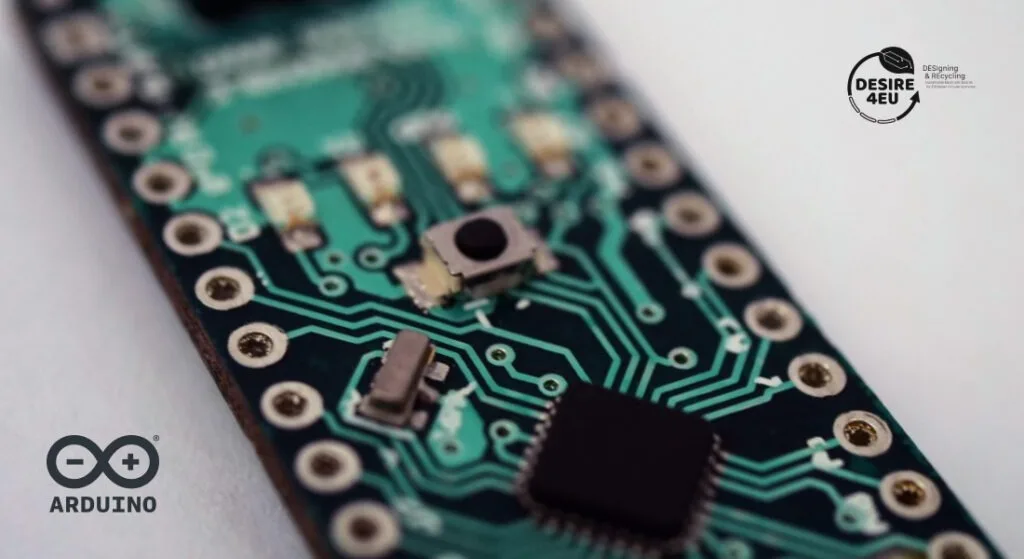
Arduino is at work to make bio-based PCBs!
Reading Time: 4 minutesApril 22 is Earth Day – a powerful reminder of our shared responsibility to preserve the planet for future generations. While the call for climate action grows louder, Arduino is committed to making sustainability an ongoing priority through concrete projects and global collaborations every day of the year. One of the most…
-

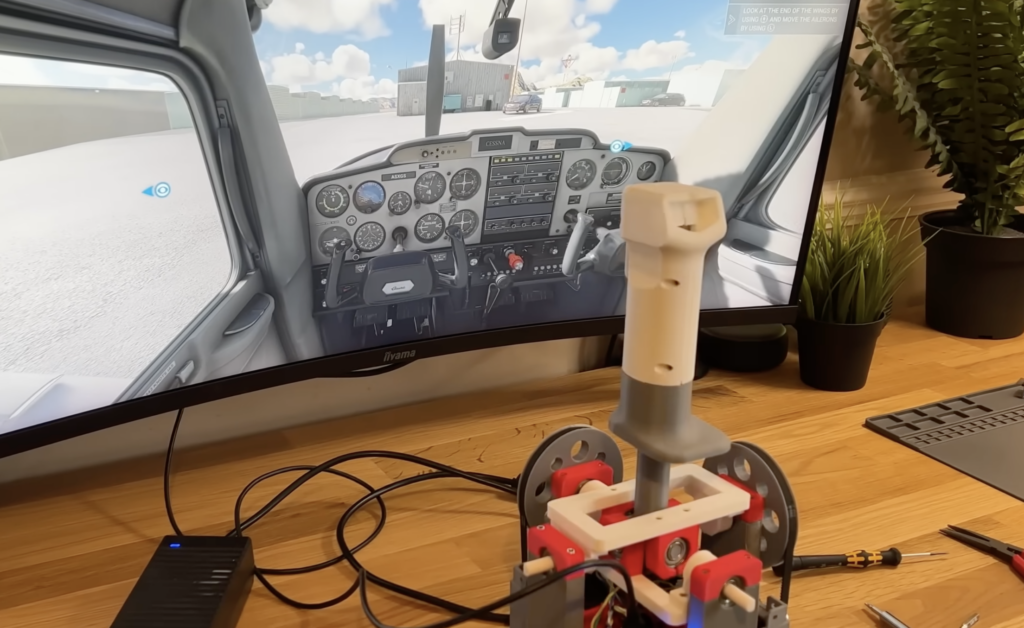
This custom flight joystick provides force feedback with stepper motors
Reading Time: 2 minutesThe joysticks found on ordinary controllers are quite simple, and as a result, they fail to provide much in the way of haptic feedback for the user. This is especially tough in racing or flight simulator games where making sharp turns should require a greater amount of force. YouTuber zeroshot’s project aimed…
-

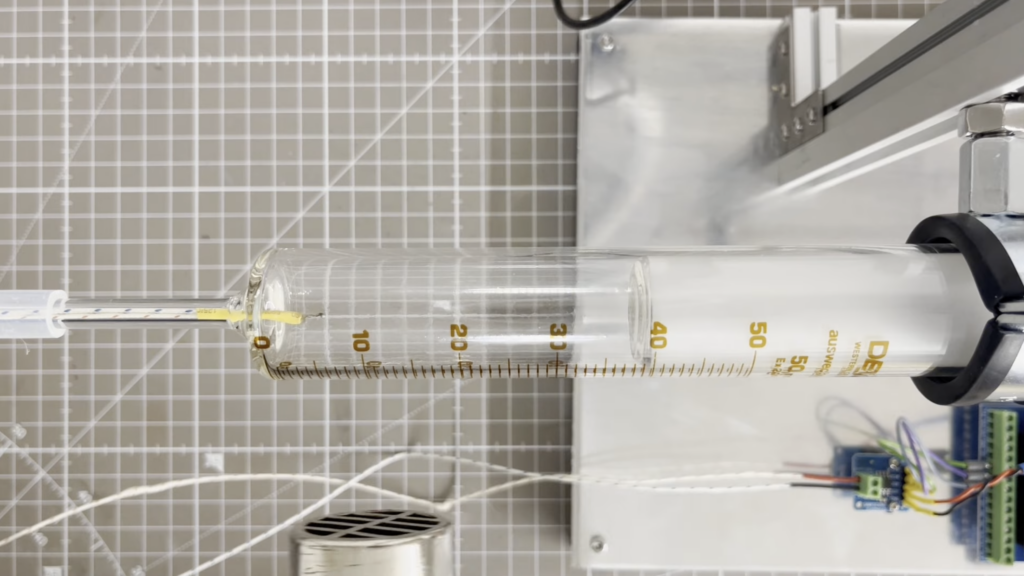
This machine helps to experimentally find an estimation of absolute zero
Reading Time: 2 minutesHow can we ever really know anything? If you listen to the anti-science types, you might believe that we can’t. But if you get past Plato’s Allegory of the Cave, you can start identifying basic truths, through logic and experiments, on which to build upon. One important foundational building block is absolute…
-
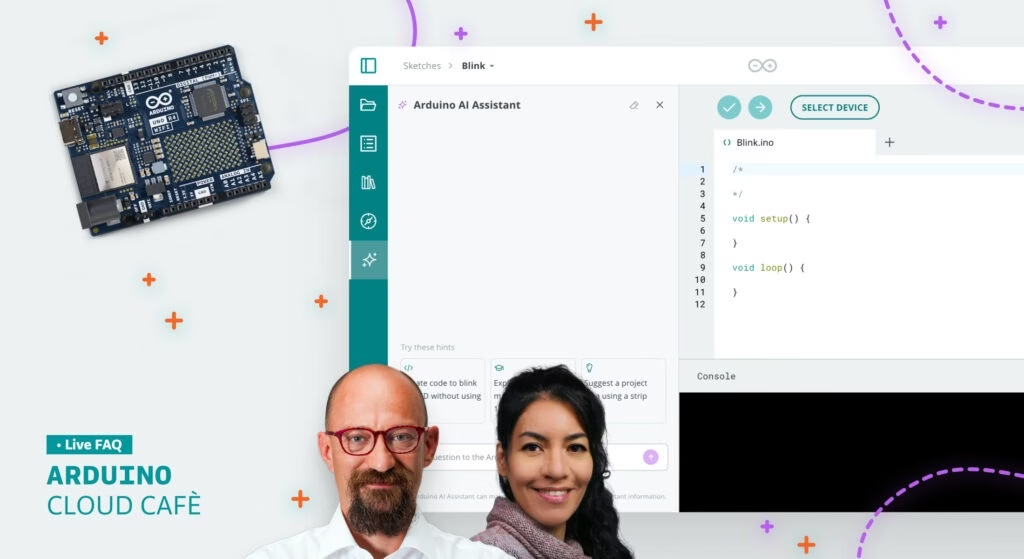
Code faster with the new Arduino AI Assistant
Reading Time: 4 minutesWe’re very excited to share that the Arduino AI Assistant is now available in the Arduino Cloud Editor! This expert coding companion truly understands your project and board, and can generate and fix your code in seconds. We know that many of you already use other AI tools to assist with coding,…
-

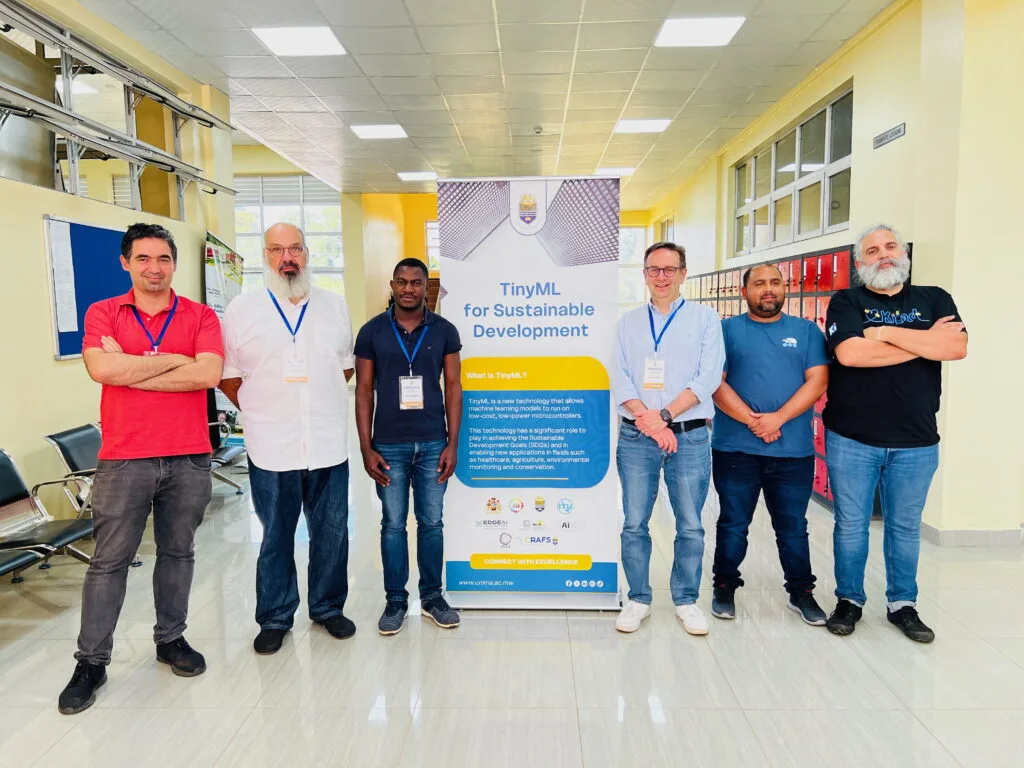
tinyML in Malawi: Empowering local communities through technology
Reading Time: 3 minutesDr. David Cuartielles, co-founder of Arduino, recently participated in a workshop titled “TinyML for Sustainable Development” in Zomba, organized by the International Centre for Theoretical Physics (ICTP), a category 1 UNESCO institute, and the University of Malawi. Bringing together students, educators, and professionals from Malawi and neighboring countries, as well as international…
-
Find the right Arduino Cloud plan for you
Reading Time: 3 minutesArduino Cloud has grown tremendously over the past year, adding powerful features to make development smoother and IoT deployments more scalable. From real-time collaboration to interactive digital twins on a dashboard and AI-powered coding assistance, our platform has evolved to support everyone. Now, if you tuned in to Arduino Days 2025 (watch…