Schlagwort: retro computing

  • Adding a turbo readout to a vintage PC case

    Adding a turbo readout to a vintage PC case

    Reading Time: 2 minutes

    If you are young, you may not remember the turbo buttons of the 1990s. These existed for backwards-compatibility with older games and software that wouldn’t run properly at the blazing-fast processor clock speeds of the time. The turbo button simply told the CPU to run at a slower clock speed that would work with that older software. Joshua Woehlke uses an old PC with a 486 processor and decided to add his own useless turbo readout to complement the turbo button.

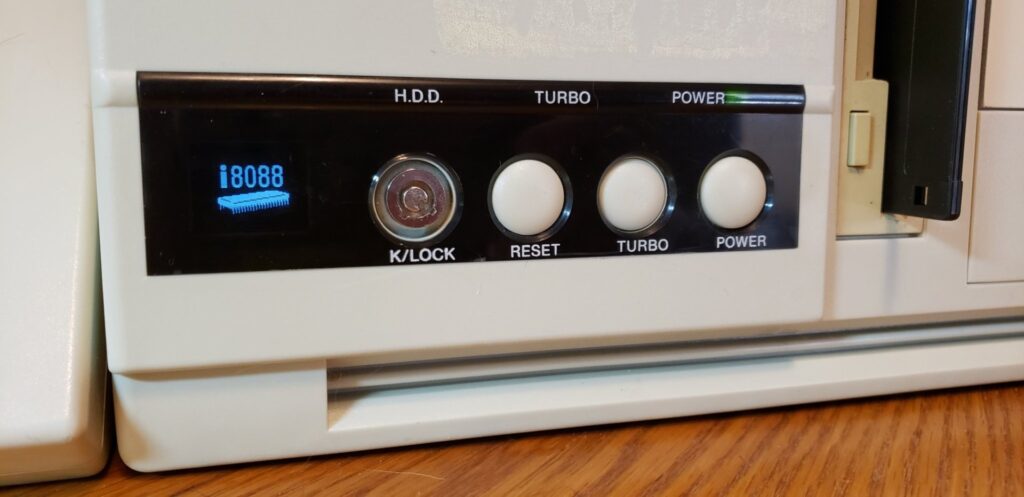
    Woehlke’s computer uses a vintage ATX case from the ’90s that does, in fact, have a turbo button. But that case lacked the kind of clock speed readout that was popular when it was new. Those readouts were usually three-digit seven-segment displays and the implication was that they would show the processor’s current clock speed. Except that was all a farce and, in reality, they just switched between two preset numbers: one for the faster speed and one for the slower speed. Woehlke’s project mimics that non-functionality.

    The hardware for this project includes an Arduino Mega 2560 board and a small OLED screen. Woehlke chose the Mega because he had it on hand, but any Arduino board would have worked. The Arduino receives power from one of the power supply’s 5V rails. And like the real turbo readouts of the ’90s, the Arduino doesn’t measure clock speed at all. It just looks at the LED above the turbo button to see if it is active, then uses that state to determine which number to display on the OLED. For extra flair, Woehlke added a starfield “screensaver” that appears on the OLED 10 seconds after pushing the turbo button.

    The post Adding a turbo readout to a vintage PC case appeared first on Arduino Blog.

    Website: LINK

  • Use Excel to load Commodore 64 software

    Use Excel to load Commodore 64 software

    Reading Time: 2 minutes

    Loading software on a vintage computer, such as a Commodore 64, is a pain. Early eight-bit computers almost never contained any onboard persistent storage, so users had to load software from external media like cassette tapes. To make retro computing far more convenient, RaspberryPioneer developed a method for loading Commodore 64 software from Microsoft Excel.

    This workflow starts with a modern computer running Microsoft Excel. RaspberryPioneer created an Excel spreadsheet that acts as a database of Commodore 64 software, linking to the ROMs and containing information such as specific load commands. The spreadsheet integrates Visual Basic for Applications (VBA) programming, so the user can select a software entry and then launch it. Doing so sends that software’s ROM data to the Commodore 64, which loads the software like it came from conventional media.

    RaspberryPioneer’s workflow relies on a 5V Arduino board to act as an intermediary between the modern computer and the Commodore 64. The Excel VBA script sends the selected ROM data to the Arduino via a USB serial connection. The Arduino then, in turn, sends the data to the Commodore 64 through a hardware serial connection. That requires a Commodore serial cable, with the standard plug at one end and the other end connected to the Arduino’s pins.

    Anyone that frequently uses a Commodore 64 would benefit from adopting RaspberryPioneer’s workflow to load software.

    The post Use Excel to load Commodore 64 software appeared first on Arduino Blog.

    Website: LINK

  • Converting a Commodore PET into a USB docking station

    Converting a Commodore PET into a USB docking station

    Reading Time: 2 minutes

    Arduino TeamJuly 22nd, 2022

    The Commodore 64 is one of the most iconic computers of all time and it is Commodore’s best known model. But Commodore made many other well-loved models, including the VIC-20, the Amiga, and the PET. The Commodore PET 64, which Commodore released late in the model range’s life for educational use, was Dave Luna’s first computer. Sadly, it bit the dust sometime in the ‘90s and Luna was never able to revive it. In 2005, he attempted to convert it into a PC, but never completed the project. Older and wiser, Luna was finally able to give the PET new life as a docking station.

    Docking stations come in many forms with many different purposes, but the general idea is always to expand a laptop’s (or tablet’s) capabilities. In this case, it turns the connected laptop into a desktop experience with a dedicated screen and a full tactile keyboard. The keyboard wasn’t actually very good in the Commodore PET 64, but Luna has plans to upgrade it with a MechBoard64 to keep the original look with modern high-quality mechanical keyswitches. As it stands, the PET 64’s keyboard connects to the docked laptop and a 12” TFT LCD screen (in place of the PET 64’s original CRT monitor) acts as a second monitor for the laptop.

    The screen connects to the laptop through a WAVLINK USB 3.0 DisplayLink adapter, but the keyboard connection is more complex. Because the PET 64 was an all-in-one computer, the keyboard interfaces directly with the mainboard in a manner similar to today’s laptops. There is no USB interface or standardized output at all. For that reason, Luna had to create his own adapter. He used an Arduino Micro to scan the keyboard matrix’s rows and columns looking for key presses. When it registers a key press, it sends the corresponding character to the connected laptop via the USB connection. The Micro appears as a standard USB HID keyboard, so it doesn’t require any special software.

    [youtube https://www.youtube.com/watch?v=8aGDmUnk1no?feature=oembed&w=500&h=375]

    The result is a functional laptop dock in a vintage Commodore PET package. 

    Website: LINK

  • Build a dial-up ISP server using a Raspberry Pi

    Build a dial-up ISP server using a Raspberry Pi

    Reading Time: 3 minutes

    Trying to connect an old, dial-up–compatible computer to modern-day broadband internet can be a chore. The new tutorial by Doge Microsystems walks you through the process of using a Raspberry Pi to bridge the gap.

    The Sound of dial-up Internet

    I was bored so I wanted to see if I could get free dial up internet so I found that NetZero still has free service so I put in the number and heard the glorious sound of the Dial-up. Remind me of years gone. Unfortunately I was not able to make a connection.

    Dial-up internet

    Ah, there really is nothing quite like it: listen to the sweet sound of dial-up internet in the video above and reminisce about the days of yore that you spent waiting for your computer to connect and trying to convince other members of your household to not use the landline for a few hours.

    But older computers have fallen behind these times of ever faster broadband and ever more powerful processors, and getting your beloved vintage computer online isn’t as easy as it once was.

    For one thing, does anyone even have a landline anymore?

    Enter Doge Microsystems, who save the day with their Linux-based dial-up server, the perfect tool for connecting computers of yesteryear to today’s broadband using a Raspberry Pi.

    Disclaimer: I’m going to pre-empt a specific topic of conversation in the comment section by declaring that, no, I don’t like the words ‘vintage’, ‘retro’, and yesteryear’ any more than you do. But we all need to accept that the times, they are a-changing, OK? We’re all in this together. Let’s continue.

    Building a Raspberry Pi dial-in server

    For the build, you’ll need a hardware modem — any model should work, as long as it presents as a serial device to the operating system. You’ll also need a Linux device such as a Raspberry Pi, a client device with a modem, and ‘some form of telephony connection to link the two modems’, described by Doge Microsystems as one of the following:

    We need a way to connect our ISP modem to clients. There are many ways to approach this:

    • Use the actual PSTN (i.e. real phone lines)
    • Use a PBX to provide local connectivity
    • Build your own circuity (not covered here, as it would require extra configuration)
    • Build a fake PSTN using VoIP ATAs and a software PBX

    I’ve gone with the fourth option. Here’s the breakdown:

    • Asterisk — a VoIP PBX — is configured on the dial-in server to accept connections from two SIP client accounts and route calls between them
    • A Linksys PAP2T ATA — which supports two phone lines — is set up as both of those SIP clients connected to the PBX
    • The ISP-side modem is connected to the first line, and the client device to the second line

    Doge Microsystems explains how to set up everything, including the Linux device, on the wiki for the project. Have a look for yourself if you want to try out the dial-up server first-hand.

    The sound of dial-up

    For funsies, I asked our Twitter followers how they would write down the sound of a dial-up internet connection. Check them out.

    Alex on Twitter

    @Raspberry_Pi dialtone, (phone beeps), rachh racchh rachh rechhhhhhh reccchhhhhh rechhhh, DEE-DONG-DEE-DONG-DI, BachhhhhhhhhhhhBACHHHHBACHHHHHHHHHHHHHHHHHHHHHHHHH

    Website: LINK

  • Build your own Commodore PET model 8032

    Build your own Commodore PET model 8032

    Reading Time: 2 minutes

    Build a mini version of one of history’s most iconic personal computers with Lorenzo ‘Tin Cat’ Herrera and his Commodore PET Mini, which is based on the Commodore PET model 8032.

    Commodore PET Mini Retrowave intro

    3D Print your own Commodore PET Mini retro computer with a Raspberry Pi and Retropie for retro gaming or retro emulation. Fully documented DIY project: https://commodorepetmini.com The Commodore PET is one of the most iconic-looking computer of the 70’s, it reminds us of an era of frenetic innovation, harsh competition and bold design choices that shaped the computer industry as we know it today.

    Commodore PET — a (very) brief history

    Presented to the world in 1977, the Commodore PET represents a truly iconic piece of computer history: it was the first personal computer sold to the general public. With a built-in keyboard, screen, and cassette deck, and an introductory price of US$795 — roughly $3287 today — it offered everything a home computer user needed. And it beat the Apple II to market by a few months, despite Jobs and Wozniak offering to sell their Apple II technology to Commodore in September 1976.

    Commodore PET model 8032

    Commodore was also the first company to license Microsoft’s 6502 BASIC, and in the 1980s the Commodore became a staple in many school classrooms, bringing about a surge in the numbers of future computer engineers — a few of which now work in the Raspberry Pi Trading office.

    The Commodore PET model was discontinued in 1982, then resurrected briefly in 1986, before finally stepping aside to make way for the popular Commodore 128, 1571, and 1581 models.

    Redesigning a mini PET

    Based on the Commodore PET model 8032, Lorenzo Herrera’s 3D-printable remake allows users to fit an entire computer — the Raspberry Pi — inside a miniature iconic shell. Lorenzo designed this case to house a working screen, and once you connect the Pi to a Bluetooth keyboard, your Commodore PET Mini will be fully functional as well as stylish and cute as a button.

    You’ll need access to a 3D printer to build your own — all parts are listed on the project’s website. You can also purchase them as a kit directly from Lorenzo if you want to save time on sourcing your own.

    3D-printing the Commodore PET

    To build your own Commodore PET Mini, start by visiting its official website. And if you don’t own a 3D printer, search online for your nearest maker space or 3D printing service to get the parts made.

    We’re definitely going to be building our own here at Raspberry Pi, and if you build one for yourself, or use a Raspberry Pi in any iconic computer rebuild, let us know.

    Website: LINK

  • HackSpace magazine 7: Internet of Everything

    HackSpace magazine 7: Internet of Everything

    Reading Time: 3 minutes

    We’re usually averse to buzzwords at HackSpace magazine, but not this month: in issue 7, we’re taking a deep dive into the Internet of Things.HackSpace magazine issue 7 cover

    Internet of Things (IoT)

    To many people, IoT is a shady term used by companies to sell you something you already own, but this time with WiFi; to us, it’s a way to make our builds smarter, more useful, and more connected. In HackSpace magazine #7, you can join us on a tour of the boards that power IoT projects, marvel at the ways in which other makers are using IoT, and get started with your first IoT project!

    Awesome projects

    DIY retro computing: this issue, we’re taking our collective hat off to Spencer Owen. He stuck his home-brew computer on Tindie thinking he might make a bit of beer money — now he’s paying the mortgage with his making skills and inviting others to build modules for his machine. And if that tickles your fancy, why not take a crack at our Z80 tutorial? Get out your breadboard, assemble your jumper wires, and prepare to build a real-life computer!

    Inside HackSpace magazine issue 7

    Shameless patriotism: combine Lego, Arduino, and the car of choice for 1960 gold bullion thieves, and you’ve got yourself a groovy weekend project. We proudly present to you one man’s epic quest to add LED lights (controllable via a smartphone!) to his daughter’s LEGO Mini Cooper.

    Makerspaces

    Patriotism intensifies: for the last 200-odd years, the Black Country has been a hotbed of making. Urban Hax, based in Walsall, is the latest makerspace to show off its riches in the coveted Space of the Month pages. Every space has its own way of doing things, but not every space has a portrait of Rob Halford on the wall. All hail!

    Inside HackSpace magazine issue 7

    Diversity: advice on diversity often boils down to ‘Be nice to people’, which might feel more vague than actionable. This is where we come in to help: it is truly worth making the effort to give people of all backgrounds access to your makerspace, so we take a look at why it’s nice to be nice, and at the ways in which one makerspace has put niceness into practice — with great results.

    And there’s more!

    We also show you how to easily calculate the size and radius of laser-cut gears, use a bank of LEDs to etch PCBs in your own mini factory, and use chemistry to mess with your lunch menu.

    All this plus much, much more waits for you in HackSpace magazine issue 7!

    Get your copy of HackSpace magazine

    If you like the sound of that, you can find HackSpace magazine in WHSmith, Tesco, Sainsbury’s, and independent newsagents in the UK. If you live in the US, check out your local Barnes & Noble, Fry’s, or Micro Center next week. We’re also shipping to stores in Australia, Hong Kong, Canada, Singapore, Belgium, and Brazil, so be sure to ask your local newsagent whether they’ll be getting HackSpace magazine.

    And if you can’t get to the shops, fear not: you can subscribe from £4 an issue from our online shop. And if you’d rather try before you buy, you can always download the free PDF. Happy reading, and happy making!

    Website: LINK

  • MagPi 67: back to the future with retro computing on your Pi

    MagPi 67: back to the future with retro computing on your Pi

    Reading Time: 3 minutes

    Hey folks, Rob from The MagPi here! While we do love modern computers here at The MagPi, we also have a soft spot for the classic machines of yesteryear, which is why we have a huge feature on emulating and upcycling retro computers in The MagPi issue 67, out right now.

    The MagPi 67 Retro Gaming Privacy Security

    Retro computing and security in the latest issue of The MagPi

    Retro computing

    Noted retro computing enthusiast K.G. Orphanides takes you through using the Raspberry Pi to emulate these classic machines, listing the best emulators out there and some of the homebrew software people have created for them. There’s even a guide on how to put a Pi in a Speccy!

    The MagPi 67 Retro Gaming Privacy Security

    Retro fun for all

    While I’m a bit too young to have had a Commodore 64 or a Spectrum, there are plenty of folks who read the mag with nostalgia for that age of computing. And it’s also important for us young’uns to know the history of our hobby. So get ready to dive in!

    Security and more

    We also have an in-depth article about improving your security and privacy online and on your Raspberry Pi, and about using your Pi to increase your network security. It’s an important topic, and one that I’m pretty passionate about, so hopefully you’ll find the piece useful!

    The new issue also includes our usual selection of inspiring projects, informative guides, and definitive reviews, as well as a free DVD with the latest version of the Raspberry Pi Desktop for Windows and Apple PCs!

    Get The MagPi 67

    Issue 67 is available today from WHSmith, Tesco, Sainsbury’s, and Asda. If you live in the US, head over to your local Barnes & Noble or Micro Center in the next few days for a print copy. You can also get the new issue online from our store, or digitally via our Android and iOS apps. And don’t forget, there’s always the free PDF as well.

    New subscription offer!

    Want to support the Raspberry Pi Foundation and the magazine? We’ve launched a new way to subscribe to the print version of The MagPi: you can now take out a monthly £4 subscription to the magazine, effectively creating a rolling pre-order system that saves you money on each issue.

    You can also take out a twelve-month print subscription and get a Pi Zero W, Pi Zero case, and adapter cables absolutely free! This offer does not currently have an end date.

    We hope you enjoy this issue! See you next time…

    Website: LINK