Schlagwort: raspberrypi

  • RetroFlag GPi Case

    RetroFlag GPi Case

    Reading Time: 2 minutes

    More than a simple enclosure for the Raspberry Pi Zero, this rather familiar-looking unit is a full-blown battery-powered gaming console that (just about) fits in the palm of your hand.

    The RetroFlag GPi Raspberry Pi Case is an ideal size and has a fab IPS screen

    Game on

    The clever design of the RetroFlag GPi case replicates that of eighties handheld consoles, including a cartridge-like unit that slides out of the rear and is quickly disassembled to reveal space for a Raspberry Pi Zero. A very neat ‘pogo’ mounting system means no header or soldering is required: a Raspberry Pi Zero just slots in and pressure maintains the contacts. The reassembled unit then slots into the main body and you’re ready to go. You can even access the microSD card without removing the ‘cartridge’. Power is supplied by three AA batteries or a supplied USB cable.

    A Raspberry Pi Zero or Zero W fits snugly inside the RetroFlag GPi Case

    Full and clear instructions are provided to install support for the gamepad buttons and also the on/off switch that provides easy and safe shutdown. We found the unit easy to assemble and had the retro games simulator RetroPie running in no time at all.

    We were particularly impressed by the RetroFlag’s screen, which uses IPS rather than TFT to give a razor-sharp display from any angle without any of the common side-lighting issues. A small audio speaker is built-in, with the option of headphones. The case itself is injection-moulded, solid and beautifully made.

    Specifications

    • Dimensions: 
138×81×32 mm

    • Weight: 
138 g

    • Display:
 2.8-inch IPS

    • Powered by:
 3 AA batteries or USB

    • Compatibility:
 Raspberry Pi Zero or Zero W (not Zero WH)

    Verdict

    Pi Hut’s RetroFlag GPi is one of the best gaming cases we’ve seen. A great design, easy assembly and, most of all, great fun to use. An essential 
purchase for any retro gamer.
    10/10

  • Pi Wars 2020 robots raring to go

    Pi Wars 2020 robots raring to go

    Reading Time: 2 minutes

    Pi Wars 2020 is going to be an absolute train wreck – at least that’s the hope of its organisers, Mike Horne and Tim Richardson. With a somewhat apocalyptic atmosphere swirling when it came time to choose a theme, Pi Wars organisers declared the 2020 event – the sixth Raspberry Pi robot battle weekend – would have a Disaster Zone theme.  

    Fans of zombie films, dystopia, and event horizons rubbed their hands in glee. The most switched-on 76 teams (of the 128 that applied) nabbed a place in the three-day competition which sees competitor Raspberry Pi-controlled robots pit their skills against each other in a range of non-destructive battles and challenges. Both autonomous and remote-controlled robots jostle for victory by completing up to seven fiendishly complex tasks. 

    Forest Fighters Shrub Bug robot at Pi Wars 2019. Photo by Mark Mellors (https://www.flickr.com/photos/7205519@N08/albums/72157679663827238)

    Catastrophic courses

    In previous years almost all the courses have been built by co-organiser Tim Richardson. This year sees several other course builders get in on the act, including Phil Hall with his Eco Disaster challenge [pictured]. Here, robots must navigate a course away from the toxic sludge spilled by an overturned tanker and reach the safe zone.

    Catastrophe and chaos will proliferate at this year’s Disaster Zone-themed Pi Wars. This is the new Eco Disaster course

    Robots vying for victory at Pi Wars 2020 will also have to face the ‚blind maze‘ of the Escape Route challenge and a bomb defusing Minesweeper course. Autonomous robots will encounter Lava Palava while robots that are remotely controlled face Zombie apocalypse, The Temple of Doom obstacle course and a Hindenburg Disaster version of the fiercely competitive Pi Noon balloon-popping head to head encounter.

    Rival robots circle each other in the Pi Noon ring at Pi Wars 2019

    DIY designs

    Newbies, veterans, and school teams each have dedicated competition days, helping ensure everyone has a fair shot of victory. Teams from 17 countries are taking part. Unlike TV’s Robot Wars (the original inspiration for Pi Wars), there’s no celebrity version – and each team is expected to design, build, and test their own robot.

    Pi Wars 2019 competitor Diddybot (photo by Mark Mellors) https://www.flickr.com/photos/7205519@N08/albums/72157679663827238

    Competitor entries to this year’s event, held over the final weekend of March at the University of Cambridge Computer Laboratory, filled up months ago and many teams have been blogging and tweeting about their robot’s build progress

    Spectator tickets are available here. Volunteers and under 16s get in free.

  • 50 Raspberry Pi 4 Tips and Tools: pt 2

    50 Raspberry Pi 4 Tips and Tools: pt 2

    Reading Time: 6 minutes

    For part I of this guide to tools every maker should have, see here.

    Warning

    Some of these tools use mains electricity and heated parts. Always follow connection instructions and never leave heated elements unattended.

    Cutting, trimming and coverings

    26. Card trimmer

    A card trimmer will enable you to cut crisp straight lines in paper or thin card. It’s much quicker than a ruler and craft knife. Small ones are good for trimming photos, and a good-quality trimmer will last for years.

    27. Robotic craft cutter

    A robotic craft cutter is very much like a plotter, but has a knife instead of a pen. They can cut very intricate designs out of paper and fairly thick card. They can be a bit temperamental and often need a sticky carrier sheet to work well.

    Equipped with a knife for precision cutting, a robotic craft cutter can cut intricate designs out of paper or card

    28. Laser cutter or engraver

    Laser cutters and engravers fire a laser at a material to either cut through it or to leave a mark or indent on the surface, depending on the intensity of the laser. Very effective for cutting irregular wooden shapes.

    29. Laminator

    Lamination is the process of coating a material with a plastic film. This protects the material from moisture and other damage. It also makes the material thicker. Plastic laminate comes in various thicknesses and surface finishes.

    Laminate your prototype model to protect it from moisture and general wear and tear

    30. Conductive paint

    Generally coloured black and supplied in a tube, conductive paint can be used to draw electrical circuits on paper or card, or to improve poor connections between components and even to create touch-sensitive areas on materials. Dries in a few minutes.

    Use conductive paint to draw electrical circuits or to improve connections between components

    31. Acrylic and thermoplastic sheet

    Acrylic plastic sheeting is very tough and can be cut using a saw or CNC router, whereas thermoplastic sheets are malleable when heated with a heat gun. Once cool again, thermoplastic retains its new shape.

    32. Polymorphic plastic

    This material is usually supplied as granules or beads. You can heat them up in boiling water and they will clump together in a mass. While still warm, you can mould the plastic before it sets hard in ten minutes or so.

    Polymorphic plastic beads can be moulded or shaped anyway you like and, once wet, will set hard in 10 minutes

    33. Aluminium foil

    Available from convenience stores and supermarkets, aluminium foil can be used as a conductor in a circuit, as shielding to reduce electromagnetic interference, and also to reflect light and heat either away from or towards an area.

    Tools for connecting electronics

    34. GPIO ruler/chart

    GPIO (general-purpose input/output) pins are the interface between your Raspberry Pi and electronic components. Until you learn which pin is which, you’ll need a guide. There are several GPIO rulers and guides available to make life easier.

    A GPIO ruler provides a handy reference guide to which coloured pin does what

    35. Header connector

    For some projects, you may want to connect a HAT or pHAT to your Raspberry Pi, but not place it right on top of the board. In this case, a female-to-male 40-way ribbon connector enables you to extend the reach of the GPIO pins.

    36. Jumper wires

    Jumper wires connect Raspberry Pi GPIO pins to electronic components. Use them with a breadboard to prototype your circuit, or solder them directly to components. Be sure to get a variety of different colours to make your project easier to understand.

    Jumper wires connect components on a breadboard or can be soldered directly to it

    Tools for soldering

    37. Desoldering kit

    This equipment enables you to clean melted solder from components on a printed circuit board, allowing their removal or replacement.

    If you're doing anything with electronics, a soldering kit is pretty much essential

    38. Soldering station

    A handy stand to place a soldering iron while it is still plugged in and hot. The sponge should be wet to clean the end of the iron.

    39. Soldering iron

    An absolute necessity for soldering or desoldering components onto printed circuit boards. For detailed work, an iron with a pointed end is best.

    40. Third hand tool

    Usually has a solid, heavy base with jointed arms with clips or holders at the end, and a magnifying glass for working on small components.

    41. Multimeter

    You need to be able to measure current, resistance, and voltage in your circuits. Digital multimeters can cost as little as £10.

    Measure voltage, resistance and current using a multimeter

    42. Gorilla Glue

    Similar to superglue, but supplied with a brush to apply it, Gorilla Glue sticks most materials and very good for 3D-printed parts. Usually takes around half an hour to dry.

    Ideal for sticking together 3D parts - or almost anything else - Gorilla Glue is easier to apply than superglue because it comes with an applicator brush

    43. Nuts, bolts & screws

    Having a good range of sizes and shapes of nuts, bolts, and screws is absolutely necessary for making anything that you are not going to glue. Keep a jar full of spares.

    We recommend you have an abundant supply of nuts, bolts and screws

    44. Sticky tape

    For temporarily holding things in place or insulating wires. You can also use tape for wrapping handles of tools. Also good for removing cat fur from jumpers.

    Sticky tape is great for quick fixes and adding grip to tool handles

    45. Blu Tack

    Usually used for keeping posters on walls, but can also be used for holding components in place while soldering. It also rubs out pencil marks if you don’t have an eraser.

    46. Power bank/batteries

    Most maker projects need power, so it is a good idea to have a range of battery holders. Power banks for recharging phones can also be used for 5V supplies.

    Many maker projects depend on a steady supply of batteries

    47. 3D creation software

    You may want to visualise your build before starting, and there are many 3D software packages to help you for free, like Blender; or with free trial versions, such as SketchUp.

    3D creation software such as Blender and SketchUp help you visualise and plan your project

    48. Fritzing

    When you have completed your project, you may want to document how you did it. Fritzing is a great program for laying out circuit diagrams.

    Use Fritzing to document your completed project

    49. Paper clips

    Can be used to connect components, clean out small nooks and crannies, or hold materials in place. Apparently, you can pick locks with them too!

    50. Documentation

    One of the most important tools you will use for just about any maker project is reference material. Your Raspberry Pi may have come with some tips and hints about making, and many kits have worksheets and Frequently Asked Questions sections with them.

    Also, make best use of the online resources that detail other people’s experiences: like Stack Overflow for information about any technical subject; blogs such as modmypi.com, recantha.co.uk, and blog.pimoroni.com; and of course the Raspberry Pi site and magazines. If you’re stuck getting something to work, it’s likely someone else has had the same problem!

    Get advice and how-to guides from invaluable online sites and component maker's blogs

  • Raspberry Pi Recovery Kit project showcase

    Raspberry Pi Recovery Kit project showcase

    Reading Time: 3 minutes

    Should the world ever be plunged into an apocalypse, then Jay Doscher should do just fine. He’s created a rugged-looking laptop using a Raspberry Pi 4 computer and placed it within a small, air- and watertight Pelican case. Aimed at getting technology up and running in the event of a disaster, it should see him through the most testing of times.

    “Most people prioritise food and shelter in the event of a disaster, but what do you do when those are resolved – how do you get technology working again?” asks Jay, an IT professional and technology enthusiast based in the San Diego area.

    “The apocalypse is more of a thought exercise for me, but I’ve certainly created a very useful computer that is much easier to work on or modify than a regular laptop.” Jay likes to focus on open-source projects, as his Twitter and Instagram feeds reveal.

    Jay Doscher is an IT professional and tech enthusiast to enjoys making open-source projects

    Past lessons

    Jay has been here before. In 2015, he popped a Raspberry Pi 2 into a weather-resistant enclosure and created the Raspberry Pi Field Unit that could run off a 12 V or higher power source, in this case a solar panel. Perfect for outdoor use, it also utilised an Adafruit real-time clock to retain accuracy when off the network. But it was far from perfect.

    “The Raspberry Pi Recovery Kit is an evolution of that previous build,” he says. “Although each has different goals, I wanted a Raspberry Pi setup that could be rugged and work in a more hostile environment. I also wanted a system that could serve more than one purpose, since the Raspberry Pi platform is so flexible.”

    One of the first issues he looked to address was the original lack of a keyboard. This time around, he bought a Plaid keyboard kit and, to his delight, noted that it was a perfect fit for his Pelican 1300 case. Jay also chose to use the official 7-inch Raspberry Pi touchscreen. This did away with the need for a mouse, while freeing up a much-needed USB port on Raspberry Pi 4.

    The Plaid ortholinear (grid layout) keyboard was a perfect fit for the Pelican 1300 ruggedised case

    With attention paid to tight wiring and realising that he could get away with powering the unit using 5 V, thereby reducing the need for 12 V circuitry, it wasn’t long before the project began coming together. “A Raspberry Pi computer is perfect for this project because it’s small, flexible on GPIO, and has great support for third-party add-ons like the GPIO breakout HAT I used,” Jay says.

    Future-proofing

    For a neat interior and to ensure all of the components could be easily held in place, internal parts were printed on a Prusa i3 MK3S 3D printer. For the host of connectors, a panel was produced with locking switches that could turn individual components on and off. These allowed control over Raspberry Pi 4, display, and Netgear five-port Ethernet network, saving power in a potential emergency. A switch also allows toggling between an internal and external battery.

    The Raspberry Pi Recovery Kit laptop is based around a Raspberry Pi 4 and has a Netgear network switch mounted on the rear of its 7in touschscreen

    “The internal battery has been the most difficult part, and I am still working on that,” Jay says. “There are no real considerations on the Raspberry Pi board itself for battery management, and Raspberry Pi 4 was pretty power-hungry when I built this kit.”

    Thankfully, coding proved easier. “It’s a regular Raspberry Pi laptop in many ways, but I am working on scripts to mirror my GitHub projects, Wikipedia and Raspbian APT libraries while following their guidelines on proper mirroring,” he reveals.

    The result is a cyberdeck that can work as a portable standalone network core if needed. “It’s a great system to keep air-gapped from the rest of the network when not in use,” Jay concludes. The battle for survival starts here.

    Quick facts

    • No holes were drilled into the Pelican case

    • The entire device is kept watertight

    • The main frame took 24 hours to 3D-print

    • It can be powered internally and externally

    • It’s stored in an electromagnetic pulse shielding box

  • Group test: Best Raspberry Pi 4 thermal cases tested and ranked

    Group test: Best Raspberry Pi 4 thermal cases tested and ranked

    Reading Time: 9 minutes

    Raspberry Pi 4 – like all the other members of the ever-growing Raspberry Pi family – is entirely usable as is, and plenty of people appreciate the aesthetic of a bare board on a desk.

    For those who don’t, there are a wealth of cases – both first- and third-party – available. You’ll find one, the Raspberry Pi 4 Stand, mounted on the cover of this magazine, while the others in this group test can be found at all major retailers.

    Each case here has been tested for aesthetics, complexity of assembly, and its performance in keeping Raspberry Pi 4 running cool.

    How we tested

    Each case was given a heavy synthetic workload to represent a worst-case scenario. This workload, which stresses both the central and graphics processors, runs for ten minutes followed by a five-minute cooldown period. Full details of the workload can be found in The MagPi issue 88.

    Raspberry Pi 4 Stand

    Made by Pimoroni from a single piece of acrylic, the Raspberry Pi 4 Stand is as pure as it gets (and comes free with issue 90 of The MagPi magazine)

    Specifications

    • Dimensions: 120×20×2.8 mm

    • Material: acrylic

    • Weight (including one Raspberry Pi 4): 54 g

    • Number of boards supported: up to 3

    • Cooling method: vertical alignment

    The Raspberry Pi 4 Stand is about as simple as a case could possibly be. Laser-cut from a single piece of acrylic, there’s no complex assembly required: simply slot the stand between the Power over Ethernet (PoE) header and Ethernet port of Raspberry Pi 4 and pop it on your desk.

    The stand is designed to improve cooling by aligning Raspberry Pi 4 vertically, rather than flat on a desk. Previous thermal testing in issue 88 showed this is surprisingly effective, and the Raspberry Pi 4 Stand solves the stability issue which comes from balancing the board on its edge.

    There’s a bonus trick up the Raspberry Pi 4 Stand’s sleeve, too: it holds up to three Raspberry Pi 4 boards side-by-side, making a very cost-effective computing cluster. Whether you install one, two, or three boards, the Raspberry Pi 4 Stand is surprisingly stable and not unattractive – and it retains access to all ports and headers.

    The Raspberry Pi 4 Stand holds up to three boards side-by-side, making a very cost-effective cluster

    Thermal imaging

    The Raspberry Pi 4 Stand improves the bare performance, but Raspberry Pi 4 still gets hot under sustained synthetic load.

    The Raspberry Pi 4 Stand improves base performance but is less effective at dissipating heat under sustained synthetic load

    Thermal load

    Without additional cooling, the Raspberry Pi 4 Stand can’t prevent Raspberry Pi 4 from hitting its throttle point during testing.

    Verdict

    The Raspberry Pi 4 Stand is smart, free, and the only case on test to support more than a single board. Its cooling performance, though, is the weakest.

    Note: We don’t score our own products. [We think our Raspberry Pi 4 Stand is perfect – Ed.]

    Designed to blend in with home theatre products, the Flirc case is undeniably attractive

    Specifications

    • Dimensions: 93.7×66×26.5 mm

    • Material: aluminium

    • Weight (including one Raspberry Pi 4): 134 g

    • Number of boards supported: 1

    • Cooling method: passive heatsink (SoC only)

    • Extras: thermal transfer material pad

    Created as a means of drawing attention away from Raspberry Pi 4 when used as part of a home theatre installation, the £16/$16 Flirc combines a matte-finish silver aluminium housing with soft-touch black plastic to the top and underside. It’s an understated design, but one which does compromise efficacy: the plastic lid covers much of the surface area of the aluminium case, reducing its ability to bleed off heat.

    The case itself makes contact with Raspberry Pi 4’s system-on-chip (SoC) via a single hollow pillar and a bundled thermal interface material pad. Installation is simple, requiring only two protective sheets to be removed from the pad, and four screws to hold the case together.

    For those not interested in attractive home theatre setups, though, the Flirc comes with a major drawback: it offers no ready access to the GPIO, CSI, or DSI headers, though all external ports are easily reached.

    Flirc Raspberry Pi 4 Case is a good choice as part of a home theatre setup

    Thermal imaging

    The plastic lid prevents the Flirc from cooling entirely efficiently, while the hollow pillar can be seen as a cooler spot to the centre-left.

    Flirc's case cools Raspberry Pi 4 effectively but its efficiency is hampered by the plastic lid

    Thermal load

    Even with the lid in place, the Flirc case easily cools Raspberry Pi 4 during the synthetic workload run.

    Verdict

    Unless you need the GPIO, CSI, or DSI headers, the Flirc’s few design flaws are unlikely to matter: the case keeps Raspberry Pi 4 well clear of its thermal throttle point. 8/10

    Impressively feature-packed, the Argon One offers a lot for your money – including temperature-controlled active cooling

    Specifications

    • Dimensions: 105×95.6×35 mm

    • Material: aluminium

    • Weight (including one Raspberry Pi 4): 230 g

    • Number of boards supported: 1


    • Cooling method:
      passive heatsink (SoC, RAM), PWM fan

    • Extras: thermal transfer material pads, AV daughterboard, fan, labelled GPIO header with magnetic cover, smart power board

    The £19/$25 Argon One case packs a whole lot of functionality into a surprisingly small footprint. A daughterboard connects to Raspberry Pi 4’s AV and HDMI ports to re-route these to the rear of the case, alongside Ethernet and USB, while a second board pulls the GPIO header out to a colour-coded and silk-screen labelled header hidden under a magnetic cover on the top.

    The same board powers a fan, which is active when the temperature exceeds a user-configurable limit, and includes a smart power button which can safely turn Raspberry Pi 4 on and off with a press. There’s even space to route out CSI and DSI cables for a camera or display.

    Cooling performance is impressive. The Argon One prevented Raspberry Pi 4 from throttling without even needing to activate the fan – aided by the entire aluminium surface acting as a heatsink for the SoC and RAM chips.

    Argon One for Raspberry Pi 4 offers temperature-controlled active cooling

    Thermal imaging

    There’s enough metal in the Argon One’s aluminium upper shell to keep Raspberry Pi 4 cool even under sustained load.

    Thermal load

    After ten minutes of heavy load, the Argon One didn’t even need to use its temperature-controlled fan once.

    Argon One's aluminium upper shell helps it be the second-most effective case here at keeping Raspberry Pi 4 cool

    Verdict

    There’s little to fault with the Argon One’s design. Cabling is tidied, the GPIO header made more readily accessible, and there’s more than enough aluminium to keep Raspberry Pi 4 cool.
    10/10

    Featuring an open-source housing for a custom-milled heatsink, CooliPi is impressively extensible

    Specifications

    • Dimensions: 92.4×86×54.3 mm

    • Material: aluminium


    • Weight (including one Raspberry Pi 4):
      320 g

    • Number of boards supported: 1

    • Cooling method: passive heatsink (SoC, RAM, USB 3.0 controller), optional fan

    • Extras: case 3D print files supplied

    The CooliPi stands out from the competition not just owing to its size and weight – it’s by far the heaviest case on test – but also by being at least partially open-source: while the custom-milled heatsink is available exclusively from Sensoreq, the plastic lower section can be printed on any 3D printer.

    That’s only part of the story. CooliPi is a family of products, not just a case, and optional extras – some of which are also 3D printable – include a 90-degree adapter for Raspberry Pi 4’s GPIO header, a HAT mount, and even a housing for an optional 5V fan.

    The latter shouldn’t be necessary outside the most extreme environments: in testing, the heavy heatsink of the CooliPi – which contacts the SoC, RAM, and USB 3.0 controller chips, with an optional copper shim available to cool the power management IC (PMIC) – was more than up to the job of cooling Raspberry Pi 4.

    Thermal imaging

    Having a very heavy aluminium heatsink lets the CooliPi absorb more heat than the competition.

    Thermal load

    The CooliPi’s large heatsink made it by far the best-performing cooler in the group.

    The CooliPi has a very heavy aluminium heatsink and proved the most effective cooler in our group test

    Verdict

    The CooliPi can’t be faulted on performance. Its price, however, is an issue: starting at £39/$52 for just the heatsink and case, it’s the most expensive product on test.
    8/10

    A compact two-part design, a few flaws don’t stop this case performing well

    Specifications

    • Dimensions: 88×56×22.4 mm

    • Material: aluminium

    • Weight (including one Raspberry Pi 4): 149 g

    • Number of boards supported: 1

    • Cooling method: passive heatsink (SoC only, RAM and USB 3.0 controller optional)


    • Extras:
      thermal transfer material pads, hex key

    A relatively straightforward two-part design, this all-aluminium affair aims to provide cooling and protection without taking up too much space – its overall footprint is only marginally larger than Raspberry Pi 4 on its own.

    There are a few issues, though, starting with its design. Like all aluminium cases, Pimoroni’s £12 ($13.20) heatsink case includes pillars designed to contact hot-running chips and transfer the heat to the outside of the case. The installation instructions, however, tell you to only add a thermal transfer pad to the one in contact with the central SoC. It turns out that this is because the RAM pillar targets a chip which doesn’t get hot, while the pillar for the USB controller is both too small and in the wrong place.

    This, and a patchy anodised finish, aside, the case does as promised: it prevents Raspberry Pi 4 from throttling, and keeps all ports and headers – including GPIO, DSI, and CSI – readily accessible.

    Thermal imaging

    With so little metal to play with, the Pimoroni heatsink case gets noticeably warmer than the competition.

    Pimoroni Aluminium Heatsink Case for Raspberry Pi 4 is a decent compact option

    Thermal load

    Even contacting only the SoC, the case keeps Raspberry Pi 4 well below its throttle point.

    The Pimoroni Aluminium Heatsink Case becomes noticeably warm in use

    Verdict

    The Pimoroni Heatsink Case does an acceptable job of cooling Raspberry Pi 4, but feels like a missed opportunity. Fixing the USB pillar and adding one for the PMIC (power management integrated controller) would have been welcomed.
    6/10

    A wholly acrylic creation, The Pi Hut’s case relies on a small always-on fan to keep Raspberry Pi 4 cool

    Specifications

    • Dimensions: 97.7×69.7×36.3 mm

    • Material: acrylic

    • Weight (including one Raspberry Pi 4): 125 g

    • Number of boards supported: 1


    • Cooling method:
      fan

    The Pi Hut’s £10 ($11) custom-designed Raspberry Pi 4 case comes in sheet form, laser-cut from a mixture of coloured and transparent acrylic. Assembly is relatively straightforward, though the plastic mounting pillars and screws provided can’t withstand repeated assembly and disassembly, and there are no thermal interface pads required.

    Instead, cooling is provided by a single 5V cooling fan installed beneath vents in the transparent lid. By default, this is set to suck air out of the case and away; flipping it around to blow offers a minor improvement in cooling performance at the cost of a dramatic increase in noise.

    There’s no software or speed control for the fan, and it ties up the 5V and GND pins on the GPIO header – which is inaccessible once assembled. The CSI and DSI headers are likewise locked away, though cables for these can at least be routed between the walls and the case lid.

    The Pi Hut Raspberry Pi 4 Case 2.0 comes as a self-assembly kit

    Thermal imaging

    The acrylic lid effectively insulates Raspberry Pi 4, leaving the fan vent as the only place for heat to escape.

    Thermal load

    Despite its fan, The Pi Hut case’s cooling performance is the second-worst on test – behind only the Raspberry Pi 4 Stand.

    The cooling fan on The Pi Hut's Raspberry Pi 4 Case 2.0's is counteracted by the insulating effect of its acrylic lid

    Verdict

    The Pi Hut case is a cheap option. Despite including active cooling, it fails to outperform any of the passive options on test – bar only the in effect uncooled Raspberry Pi 4 Stand.
    4/10

    And The Winner Is…

    Thermal performance isn’t the be-all and end-all of choosing a case for Raspberry Pi 4 – in fact, as our testing in issue 88 proved, under most real-world workloads Raspberry Pi 4 is more than capable of handling itself. It’s little surprise, then, to find every case on test – except the Raspberry Pi 4 Stand – passed the demanding thermal throttle benchmark with flying colours.

    Heat cooling effectiveness of cases in this group test

    What is perhaps surprising is the variance within the tests. The Pi Hut case’s fan isn’t as effective as passive options like the Pimoroni Heatsink Case and the Flirc – and while the CooliPi is the best performer overall, its high price and bulk make for a difficult case to recommend for most use-cases.

    Under real-world conditions, any of the cases – including the Raspberry Pi 4 Stand – should prove more than adequate to prevent thermal throttling. Only those operating Raspberry Pi 4 in relatively extreme environments need worry about cooling – and there’s nothing wrong with picking your case based on features, accessibility, price or aesthetics instead, opening up the whole group as potential winners depending on personal taste and budget.

    Winner: Argon One

    The Argon One ticks almost every box: it’s attractive, includes a wealth of features, cools well, and won’t break the bank.

  • Interview with Pi Jam Foundation community support lead Pranjali Pathak

    Interview with Pi Jam Foundation community support lead Pranjali Pathak

    Reading Time: 4 minutes

    Like a few educators in the Raspberry Pi and digital making community, Pranjali Pathak of The Pi Jam Foundation started out life as an engineer before becoming a teacher. She’s been a fellow for Teach for India, where she taught students from grade 3, and brought that experience to the Pi Jam Foundation as a program lead, making sure educators are supported when teaching computing.

    Pranjali Pathak is an engineer turned educator at The Pi Jam Foundation

    “Pi Jam Foundation is a Section 8 (not-for-profit) organisation,” Pranjali tells us. “The organisation is entirely impact driven and aims to provide all students from under-resourced schools [with] computing and problem-solving skills, which are essential for them to succeed in the 21st century workplace.

    “Using low-cost, open-source technology, Raspberry Pi and a contextual research-based curriculum coupled with innovative pedagogy, Pi Jam Foundation aims to provide quality computer education to over 100,000 students across India by 2022″, Pranjali explains.

    “We have successfully brought a globally relevant, yet contextual computer science education to 8000+ students across under-resourced schools across urban, suburban, and rural geographies of the country.”

    What are your links to Raspberry Pi?

    We work extensively on Raspberry Pi [computers] across all our Pi Lab programs and feel the Code Clubs would enable us to enhance our curriculum and provide students from different grades and diverse economic backgrounds access to knowledge at par with global standards. Also, being [more] affordable than existing PCs in the market lends itself to use in the context we operate in, i.e. under-resourced public schools.

    What kind of events have you put on or supported?

    Pi Lab is an award-winning flagship programme that enables a complete computer science ecosystem (Raspberry Pi, best of open-source tools, and highly contextualised curriculum and teacher training programmes) that ensures year-long learning and allows kids to explore, tinker, and create. Currently, Pi Jam is impacting 8000+ number of students through 40 Pi Labs across […] the country.

    The Pi Labs, especially the ones in under-resourced schools, have been places of immense transformation of thought and possibility for our students. They have seen technology and computer science as something the more privileged classes had access to, and using Raspberry Pi [computers] has helped us give them the same (if not a more focused and holistic) access.

    We see career possibilities change as they experience the true creativity behind technology, and have even encountered them sharing with us that they always assumed technology to be boring, but the Code Clubs were very exciting for them to be a part of.

    Every February Pi Jam holds an annual showcase known as Makers Factory. Our students are provided with a platform to present their solutions in the form of technology prototypes to problems identified by them.

    We also hold hackathons for students, members of the community, mothers of the Pi Lab students, [and] individuals from corporates.

    Attendees at Pi Jam Foundation sessions come from all backgrounds

    Who attends these events?

    The students hail from communities that have a rich mix of people from different cultures, beliefs, and languages. A lack of resources and rampant poverty unite residents of this locality. Most of the communities are home to tens of thousands of children, many of whom lack access to good quality education.

    All the students come from low income households, and a majority of their parents are first-generation migrants from other states. Additionally, most of the students do not have any formal knowledge or prior experience to computers across these schools.

    Pi Jam projects

    Rotten fruit detector

    Rukaiya’s parents were fruit and veg sellers; however, a problem with the vendor meant some fruit was rotting and affecting the rest of the supply. Unable to inspect the boxes by eye, Rukaiya created a rotten fruit detector using a stick with an MQ3 sensor (which detects alcohol gas) on the end. This would smell any rotting fruit in the box.

    Open manhole alert

    During the monsoon season it’s not uncommon for autos (motorised rickshaws) to get stuck in manholes. Several students had to abandon a taxi auto at the urge of their driver and felt bad for him, so decided to create a system that warned the driver in the future of open manholes in the road ahead. It’s incredibly accurate and can even detect a manhole that is slightly tilted open.

    Students at The Pi Jam Foundation show off their rotting fruit detector

  • How to overclock Raspberry Pi 4

    How to overclock Raspberry Pi 4

    Reading Time: 6 minutes

    You’ll need

    Warning! Crash likely!

    Experimenting to find the highest stable overclock involves crashing Raspberry Pi 4. There is a chance of corrupting the microSD card. Experiment with a clean Raspbian installation and ensure no important data is at risk.

    Getting started

    Although 1.5GHz is its maximum speed, Raspberry Pi typically idles at 600MHz and switches to the maximum speed when needed. Overclocking is the process of setting a higher maximum speed for computer components. We can adjust the settings in config.txt to overclock both the CPU and GPU (graphics processing unit).

    We’ve experimented with speeds up to 2.147GHz for the CPU and 750MHz for the GPU (up from its 500MHz default). These are the kinds of speeds found on high-end desktop computers.

    Your mileage will vary and, if Raspberry Pi gets too hot, it will slow right down. Experimenting with overclocking will crash Raspbian, and there is a high chance your Raspberry Pi will refuse to start at some point. If programs start crashing, or Raspbian refuses to start, you will need to dial back on the speed. But overclocking is fun and potentially a way to get more from Raspberry Pi.

    1. Use a Raspberry Pi 4 Stand

    We start by placing Raspberry Pi 4 in a vertical position. This improves airflow around the components and is surprisingly effective at keeping the temperature down.

    Use the Raspberry Pi 4 Stand on the front of the print edition of The MagPi issue 90 to run Raspberry Pi in a vertical position. If you don’t have a Raspberry Pi 4 Stand, you can 3D-print or laser‑cut your own with the files on our GitHub page.

    Alternatively, place your Raspberry Pi inside a case designed to manage its CPU temperature.

    Place Raspberry Pi 4 in the stand so it sits vertically. This enables the ARM Cortex-A72 CPU to run cooler

    2. Update Raspberry Pi 4

    Make sure you are running the latest version of Raspbian OS. Tweaks to performance are being made all the time and you will hit faster speeds with the latest software.

    Open a Terminal and enter the following:

    sudo apt update
    sudo apt dist-upgrade

    Now reboot the system:

    sudo reboot

    This restarts Raspbian.

    3. Watch your speed

    Before we start overclocking, take a look at the default CPU speed. Open a Terminal and enter: cat /sys/devices/system/cpu/cpu0/cpufreq/scaling_cur_freq

    Terminal will probably return 600000. Divide this result by 1000 and you’ll get the speed in MHz. This is the base speed: 600MHz (or 0.6GHz). This is the speed requested by the kernel. If your Raspberry Pi is being throttled due to low voltage or over temperature, the actual CPU speed may be lower.

    To get the actual speed, enter:

    vcgencmd measure_clock arm

    As you use your Raspberry Pi, the requested speed will boost to its upper level, which is 1500000. You can keep entering vcgencmd in Terminal to see where it’s currently at, but it’s better to use the watch command to monitor the speed.

    watch -n 1 vcgencmd measure_clock arm

    This keeps vcgencmd running as a process and updates the result once per second (the -n 1 option is the interval in seconds). Start using your Raspberry Pi and you’ll soon see the result go slightly above 1500000 (or 1.5GHz).

    4. Overclock your config

    Edit the config.txt settings to overclock Raspberry Pi 4

    We’re going to use the config.txt file to set a new upper limit for the clock frequency. Open another Terminal window and enter: sudo nano /boot/config.txt

    Scroll down to the section marked:

    #uncomment to overclock the arm. 700 MHz is the default.
    #arm_freq=800

    And change the settings to:

    #uncomment to overclock the arm. 700 MHz is the default.
    over_voltage=2
    arm_freq=1750

    Save the file with CTRL+O (press RETURN) and use CTRL+X to exit Nano.

    Restart your Raspberry Pi.

    sudo reboot

    When the system starts up again, watch vcgendcmd again to see your new, faster clock speed in action:

    watch -n 1 vcgencmd measure_clock arm

    Browse a few webpages and you’ll see speeds around 1750000000 (or 1.75GHz).

    The watch vcgencmd command is used to keep an eye on the current CPU speed

    5. Understanding over_voltage

    The over_voltage command adjusts the core CPU/GPU voltage, and accepts figures between -16 and 8. The default value is 0.

    A faster CPU speed demands higher voltage and, if Raspberry Pi doesn’t get enough volts, you will see a small lightning bolt appearing in the top right of the window (at this point, the CPU will be reduced to the 700MHz default speed).

    6. Crank it up

    Let’s try taking things a little faster. We’re going to take the over_voltage setting to 6 and set the ARM CPU to 2.0GHz. Edit the config.txt file with the following settings:

    over_voltage=6
    arm_freq=2000

    This is as high as we’re going to take over_voltage.

    Reboot the Raspberry Pi and you’ll be running at 2.0GHz. Run watch -n 1 vcgencmd measure_clock arm again to see the new upper limit.

    7. Take it to the max

    Now we’re going to boost the gpu_freq and take the CPU to its highest setting. This enables Raspberry Pi to run at its current maximum speed. Use Nano to edit the config.txt file again, this time setting the arm_freq to 2147 and gpu_freq to 750:

    over_voltage=6
    arm_freq=2147
    gpu_freq=750

    The gpu_freq oversees a range of settings: 
core_freq, h264_freq, isp_freq, and v3d_freq. The core_freq setting adjusts the frequency of the GPU processor. It influences CPU performance because it drives the L2 cache and memory bus.

    The default value is 500, and 750 is the highest we can set it and still had a Raspberry Pi 4 run. We have also had Raspberry Pi 4 boards fail to boot at this speed, and others quickly slowed down from overheating or undervoltage. You are unlikely to be able to maintain this speed for the long term and your mileage will vary.

    Save the file and exit Nano (CTRL+O and CTRL+X). Reboot and your Raspberry Pi is hopefully running as fast as it can.

    8. Recover from black screen

    We have started a Raspberry Pi at speeds of up to 2.147GHz but some of our devices failed to boot, and others showed Undervoltage Warnings (thus reducing the speed). Eventually, we settled for arm_freq=2000 in config.txt. Our engineering team told us that the benefits from gpu_freq are marginal at best, and it should be removed if Raspberry Pi 4 fails to boot.

    Your Raspberry Pi will also probably fail to boot at some point when overclocking. See ‘Overclocking problems’ (below) for more information on recovery. Otherwise, have fun and we hope you’ve enjoyed this excursion into overclocking.

    Top tip: Monitoring voltage

    It is essential to keep the supply voltage above 4.8 V for reliable performance. Note that the voltage from some USB chargers/power supplies can fall as low as 4.2 V. This is because they are usually designed to charge a 3.7 V LiPo battery, not to supply 5 V to a computer.

    To monitor Raspberry Pi’s PSU voltage, you will need to use a multimeter to measure between the VCC (5 V) and GND pins on the GPIO. More information is available on the Raspberry Pi website.

    Top tip: Overclocking problems

    Most overclocking issues show up immediately with a failure to boot. If this occurs, hold down the SHIFT key during the next boot. This will temporarily disable all overclocking, allowing you to boot successfully and then edit your settings.

    Alternatively, remove the microSD card from your Raspberry Pi and insert it into another computer. You will be able to access the config.txt file and adjust the settings from there.

    Firmware warning icons

    Under certain circumstances, the Raspberry Pi firmware will display a warning icon on the display, to indicate an issue. If you see these icons routinely appearing, you should reduce the overclocking speed.

    There are currently three icons that can be displayed:

    Undervoltage warning

    If the power supply to the Raspberry Pi drops below 4.63 V (+/-5%), this lightning bolt icon is displayed.

    Over temperature warning (80–85°C)

    If the temperature of the SoC is between 80°C and 85°C, this icon is displayed. The ARM core(s) will be throttled back in an attempt to reduce the core temperature.

    Over temperature warning (over 85°C)

    If the temperature of the SoC is over 85°C, this icon is displayed. The ARM core(s) and the GPU will be throttled back in an attempt to reduce the core temperature.

    Firmware warning icons: over-temperature (80–85°C); over-temperature warning (over 85°C) and undervoltage

  • DARVA: The Event Assistant

    DARVA: The Event Assistant

    Reading Time: 3 minutes

    Felt fusion

    Enter DARVA, a cute little animated robot who just loves to chat, and who runs off a Raspberry Pi 4. Dane says, “DARVA was made by first cutting and sewing all the separate parts of the robot out of felt. Then we took a picture of all these robot parts and cut them out using photo editing software […]. To bring DARVA to life, we created a webpage (with HTML canvas and JavaScript) to which we added all these photographs and animated them.”

    The robot’s sewn felt pieces were photographed and then used to create animations

    Over the period of a week or two, Dane and Nicole’s idea really took shape. The most difficult part of the project was the touchscreen orientation: “As the felt robot is standing upright, we thought it would be best to use the screen in portrait mode,” says Nicole. “Whilst you can easily change the screen rotation on Raspberry Pi, the touchscreen still worked in landscape mode; the mapping between where you touched the screen and where you clicked was wrong.” After a lot of trial and error, they decided to keep Raspberry Pi running in landscape and just rotated all the animations.

    Digital deputy

    They have also worked hard to ensure that DARVA has a lifelike quality, and introduced a degree of randomness to the robot’s actions. “The gauge rotates to a random position, for example, and the eyes randomly look left or right for a random amount of time,” says Nicole. DARVA also loops through a series of texts that Dane and Nicole have written to give some more information about their booth at events, while some animations are activated by clicking or touching parts of the screen, including DARVA’s head and belly.

    The process of animation begins, after the pieces are cut out digitally using photo editing software

    So, how have people reacted to their new digital sidekick? Dane tells us there was some initial confusion at one event: “We placed the original felt version of DARVA next to the touchscreen, because we thought it would be interesting to show how we went from a felt robot to a digital one. However, a lot of people thought the felt robot and the touchscreen were somehow connected and could interact, which was confusing because moving or touching the felt didn’t do anything.” However, DARVA has received a lot of compliments: “Kids especially loved the look and feel of it.”

    Dane and Nicole are considering developing the project further. “Maybe we can make it a video game, or an interactive story, or connect the felt robot to the digital robot as many people expected,” says Nicole. “We have so many ideas, we hardly know what we eventually will end up making, but one thing is for sure: it will involve a Raspberry Pi!”

  • Pirate Audio Headphone Amp

    Pirate Audio Headphone Amp

    Reading Time: 4 minutes

    Raspberry Pi has its fair share of DAC audio boards offering high-quality sound output, but Pimoroni’s new Pirate Audio range adds a mini LCD to show music track details and album art. In this review we’re focusing on the Pirate Audio Headphone Amp, but we also tried out the other three models: Line‑out, 3W Stereo Amp, and Speaker. We understand that another model is also set to be added to the range soon.

    All the boards have the same slimline pHAT form factor that fits perfectly onto a Raspberry Pi Zero, although they’ll work with any 40-pin model. The main difference between them is how the sound is processed and output. On the Headphone Amp, audio is amplified and then output via a 3.5 mm jack – just plug in your wired headphones or earbuds. The positioning of the jack on the side of the board means you may need to take your Raspberry Pi out of its case, or raise it up using a booster header.

    The front of the Pirate Audio Headphone Amp board features four tiny tactile control buttons on either side of the colour LCD screen

    Setting it up

    Getting started with Pirate Audio wasn’t quite as simple as we anticipated, although an online guide (magpi.cc/pirateaudioguide) has since appeared that should prove very helpful. Installing the default software itself is simple enough, by entering three commands in a Terminal window. This does everything needed to configure the DAC and enable SPI for the LCD.

    Based around the Mopidy music server daemon, the software enables you to play local music files or stream tracks from Spotify, although you’ll need a premium account for that. The Spotify extension for Mopidy is installed automatically, along with one for the user-friendly Iris web interface.

    The latter proves essential as you’ll need to use it to actually start playing music on the board. Point a web browser to your Raspberry Pi’s IP address appended with ‘:6680/iris’ to access the web interface – you can do this from another computer or on the same Raspberry Pi if it’s connected to a monitor.

    Accessing local media files required a change to the Mopidy config file to reassign the local directory from the default to our Music folder, then running a local scan in Iris to find the files.

    For Spotify streaming, you’ll first need to authorise the device via the Mopidy website, alter the config file to enable Spotify and add your credentials, and then sign in again via Iris to start using Spotify from its interface.

    Tip: if you still get an error when trying to play files, try restarting the server from Iris’s settings.

    Music to our ears

    The good news is that once you get everything set up, the Pirate Audio board’s 24-bit, 192kHz DAC delivers excellent sound quality with a warm tone, plenty of fine detail, and sufficient bass for our ears. At first, we found it a bit too loud – until we flicked the switch on the rear of the board from high- to low-gain (recommended in most cases).

    The volume level can be adjusted using two tiny control buttons on either side of the LCD. The other two buttons present are for play/pause and skip to next track in the queue, album, or playlist – there’s no way of returning to previous songs unless you use the web interface.

    We do love that built-in LCD, though, which shows you the track details on a background of the blurred album artwork, with a song progress bar at the bottom.

    Pirate Audio range
    Line-Out

    Aimed for use with powered speakers or by connecting to a hi-fi line input, it features line-level digital audio and a 3.5 mm stereo jack.

    3W Stereo Amp

    This board features four tiny push-fit terminals on the rear to attach wires from passive speakers. There’s also a switch for stereo and mixed-down mono modes.

    The Pirate Audio Headphone Amp has a line out for use with powered speakers

    Speaker

    At only 1W, the small built-in speaker isn’t very powerful and sounds rather tinny, but this board is ideal when you need integral audio for a portable project.

    Four tiny push-fit terminals attach to passive speakers

    Specifications

    Audio processing:
 PCM5100A DAC (24-bit / 192kHz), PAM8908 amplifier chip
    Data bus:
 I2S for audio, SPI for LCD
    Display:
 240×240 IPS colour LCD
    Audio out:
 3.5 mm stereo jack
    Controls:
 four tactile buttons

    Verdict

    A little tricky to get it all working, but once set up, the resulting audio is of excellent quality and the LCD is great for showing track details and artwork.
    9/10

  • Free Raspberry Pi 4 Stand, overclocking guide, and cooling case testing in The MagPi 90

    Free Raspberry Pi 4 Stand, overclocking guide, and cooling case testing in The MagPi 90

    Reading Time: 3 minutes

    Raspberry Pi 4 Stand

    Build the ultimate Magic Mirror

    When it comes to relatively easy Raspberry Pi projects, that produce impressive results, few are better than making a Magic Mirror.

    Combine a stock Raspberry Pi touchscreen display with observation glass and a wooden frame, and you get an incredibly impressive mirror that displays information in white letters.

    Our new Magic Mirror feature shows you how to build the device, and also use modules to add extra features such as voice control.

    Build the ultimate Magic Mirror

    How to overclock Raspberry Pi

    Get more power from your Raspberry Pi 4 with our guide to overclocking. Use your free Raspberry Pi 4 Stand to hold your Raspberry Pi vertically and edit the config file to run Raspberry Pi at speeds over 2.0GHz.

    Overclock Raspberry Pi 4

    Raspberry Pi cooling case group test

    There are many options for keeping Raspberry Pi 4 cool, but which ones are ice cold and which are lukewarm? That’s what we tasked Gareth Halfacree to find out. In this month’s The MagPi he turns his now near-famous thermal gun to a range of Raspberry Pi cooling cases.

    Raspberry Pi thermal cases group test

    3D-print a keyring with BlocksCAD

    BlocksCAD is a visual programming language that enables you to design your own 3D printed objects. In this month’s The MagPi magazine, we take a look at using BlocksCAD to build a keyring.

    3D-print a keyring with BlocksCAD

    Upcycling a Sony Walkman into WeatherMan

    We’ve got the best Raspberry Pi projects in The MagPi, and we’re particularly enamoured with this latest offering by Martin Mander. The masterful maker has used Raspberry Pi to give a Sony Walkman a new lease of life. Say hello to WeatherMan, the portable weather forecasting device.

    WeatherMan

    Raspberry Pi Recovery Kit

    There are many laptop projects for Raspberry Pi, but we’re particularly smitten with this rugged build. Raspberry Pi Recovery Kit puts Raspberry Pi inside a weather-resistant case designed to work in some of the world’s most hostile environments.

    Raspberry Pi Recovery Kit

    Plus! Win one of five Raspberry Pi and black Official Case kits.

    The MagPi is available as a free digital download, or you can purchase a print edition online or in stores.

  • Win one of five ProtoDock add-ons!

    Win one of five ProtoDock add-ons!

    Reading Time: < 1 minute

    Subscribe

  • Win one of five ProtoDock add-ons!

    Win one of five ProtoDock add-ons!

    Reading Time: < 1 minute

    Subscribe

  • 50 Raspberry Pi 4 Tips and Tools: pt 1

    50 Raspberry Pi 4 Tips and Tools: pt 1

    Reading Time: 5 minutes

    Whether you are new to making with Raspberry Pi or have been at it for years, there are always new tools and techniques to be learned. For the new arrival to the making community, this list will be a great resource to introduce you to tools that you may not have heard of before, and a short cut to get to the bits of software that work best for Raspberry Pi projects. If you’ve been doing this for a while, you may want to count how many of these tools are already in your makerspace. If you get to 50, you probably need a bigger makerspace.

    Warning

    Some of these tools use mains electricity and heated parts. Always follow connection instructions and never leave heated elements unattended.

    1. 3D printer

    The 3D printer is a fairly recent addition to the maker scene. To be able to print something solid a few years ago was like science fiction, but now it’s a reality. Printers come in many sizes and prices, so you can match your printer to your budget and requirements. There are several choices for filament too, such as PLA (a good beginner’s choice) or ABS and many other more specialised types. If you have the time and patience, you can get a small unassembled one for less than £100, but for better quality (and less frustration) you may want to spend a bit more.

    Affordable 3D printing

    Download a copy of The MagPi 69 to learn all about affordable 3D printing.

    In a 3D printer motors move the printhead and heated flatbed in three dimensions as the melted filament is built up in layers. The filament is pushed into the extruder head and melted before it hits the printing surface

    2. Breadboard

    Breadboards are solderless circuit boards and allow for fast prototyping of projects. The boards come in several sizes and consist of a matrix of small connector holes into which components and jumper wires can be inserted to make circuits. Click here for our breadboard tutorial.

    Breadboards are solderless circuit boards that allow for the fast prototyping of projects

    3. Speaker

    Some projects need to make a noise, and the sound quality depends on the type of speaker you use. There are small piezoelectric speakers if all you need are beeps and pops; alternatively, you may need a larger dynamic speaker.

    A mini speaker can vastly improve Raspberry Pi's audio output

    4. LEDs

    LEDs (light-emitting diodes) are a bit like very small and efficient light bulbs. They glow when current is passed through them, but they need to be connected correctly. Because they are diodes, the current only flows one way, unlike in conventional light bulbs.

    5. Resistors

    Resistors are used in electrical circuits to reduce current flow. They are used for many reasons, including changing the brightness of an LED. They can be a fixed value, with stripes to indicate the resistance; or variable, with a slider or dial to change the resistance.

    6. Motors

    When a current is applied to an electric motor, a spindle in the centre rotates. It spins because of an electromagnetic field that is caused by the flow of current. Motors come in all kinds of sizes, from mini drone motors to industrial ones.

    Motors come in all kinds of sizes, from mini drone motors to industrial ones

    7. Diodes

    Diodes are known as semiconductors because they only conduct electricity in one direction. This can be useful for a number of reasons; for example, to protect your Raspberry Pi from being damaged if you are connecting it to motors.

    8. Sensors

    There are many types of electronic sensors. You may want to detect light or vibration, sound, or heat. There are sensors for all of these and many more. Sensors allow us to capture data about the world around us.

    Use sensors to detect motion, light, heat, sound or vibration

    9. Code editor

    There are several code editors for Raspberry Pi. IDLE used to be the standard Python editor in Raspbian, but now you might want to give Thonny or Geany a go. If you are feeling adventurous, you could try installing PyCharm.

    Use a text editor to craft the code to control your Raspberry Pi

    10. SSH and VNC

    If you want to run your Raspberry Pi headless (without monitor, keyboard, and mouse), you will probably want to connect to it by typing in commands using SSH, which provides a terminal, or you can have a windowed version with VNC.

    Tools for building & prototyping

    11. Clamps

    For holding bits of your build together until it’s stuck or you need to change it.

    12. Crocodile clips

    Connect one component to another without soldering, tape, or breadboard.

    13. Crimping tool

    Pinches connectors onto wire, fixing it to the connector. Can also can cut/strip wires.

    14. Screwdrivers

    You’re going to need several different screwdrivers of different sizes/types.

    15. Craft knife

    Stanley knives are good for most work, but you might also want something lighter.

    16. Tweezers

    Tweezers can get you out of a fix when that little screw disappears.

    17. Hot glue gun

    Sometimes there is no substitute, but it’s not suitable for the young ’uns.

    18. Hand drill

    Most of the time a cordless is best.

    19. Saw

    Hacksaws for metal/plastic parts, jigsaw/circular for big builds, mitre saws for angles.

    20. Pliers

    A good set of long-nose/snipe-nose pliers should be on hand at all times.

    21. Etcher

    Because your Raspberry Pi generally relies on being booted from an operating system on a microSD card, you will require a way to write that data first. The open-source program you need for this is called Etcher from Balena.

    Use balenaEtcher to image your boot file

    22. Gears and wheels

    If you are making any sort of moving robot, you’re probably going to need wheels or gears. Some kits come with them, such as the CamJam EduKit 3. You can buy them separately or even 3D-print them.

    Tools for storage

    23. USB stick

    Add extra storage to your Raspberry Pi with a USB thumb drive. You can store more files than the microSD card, and you can transfer files from another computer to your Raspberry Pi.

    24. Memory card

    Make sure you have multiple microSD cards. An 8GB microSD card can be used to install Raspbian and other operating systems. It’s a good idea to have your regular microSD card and at least one other card for testing out projects.

    25. Storage box

    When making projects, you quickly rack up additional kit – not to mention cables, components, and Raspberry Pi boards. Keep everything in one place by adding a storage box to your shopping list.

  • Sania Box encourages kids to build a PC – no adult required

    Sania Box encourages kids to build a PC – no adult required

    Reading Time: 2 minutes

    Sania Jain is one of a growing band of teenage entrepreneurs keen to share their ideas with peers. In her case, her idea is to spread a love of coding and STEAM skills with children who may not have had a chance to explore it before.

    Sania’s eponymously-named DIY computer box is powered by a Raspberry Pi Model 4 and comes with everything needed to create your own PC, barring a screen. Unlike some products supposedly aimed at inspiring kids to learn computing and electronics skills, the Sania Box computer can be built and used by children aged eight and above without adult supervision. In doing so, they’ll develop crucial STEM (science, technology, engineeering and maths) skills that will stand them in good stead both at school and outside the classroom. 

    Sania’s build-it-yourself computer comes with a Raspberry Pi 4, a keyboard, mouse and cables, plus a bespoke add-on board containing a variety of code. The preinstalled Python code is intended to help those with limited coding experience to jump straight into exploring its possibilities. Python scripts for electronics and IoT (internet of things) projects are included. 

    Sania Box is based around Raspberry Pi 4 but comes with a specially designed add-on board

    Once the Sania Box owner has mastered the codes that come with the device further codes can be downloaded from the Sania Box website. Sania envisages users „never running out of new codes to learn“ and believes coding is critical to developing creativity and problem-solving skills.

    The DIY computer kit was designed and developed by Silicon Valley startup Moonshot Junior, a startup that specifically caters for STEAM products and the youth entrepreneur market. Sania Box is currently fundraising through a Kickstarter campaign and will then be available from either Moonshot Jr or Sania’s own website.

    Sania has ambitions beyond product development, however. She has already published five books and she intends Sania Box to be an “embedded computer [used] as an interactive tool for educational outreach”. With this in mind she recently visited underprivileged parts of India, showing off the possibilities of coding.

    “I became interested in programming because programming makes up so many things in our lives. Everything I was interested in, such as robotics and computer science, was possible due to programming. I wanted to learn it so I could make things from code too,” says Sania. She hopes that, through Sania Box and code, other children will be similarly inspired.

    Sania Jain shares her love of coding and technology with pupils at at school in India

  • Add navigation to a low-cost robot

    Add navigation to a low-cost robot

    Reading Time: 7 minutes

    If you completed the steps in the last low cost robot-building article, you’ll have added a camera to your Raspberry Pi-powered lunchbox robot. This enabled your robot to take photos and provided a robot’s-eye view of the world. Now a robot builder gets to take this much further and make the robot use this camera to make decisions about the world.

    In this tutorial we’ll look at how to make an environment for testing computer vision. It demonstrates using OpenCV to condition images, to remove noise and simplify them. You’ll learn how to extract data, check the content of an image and how to make a robot turn.

    For instructions on how to build your lunchbox robot click here.

    Lunchbox robot in our colour-controlled test area. The robot's camera sees which colour wall is in front of it. The robot uses this information to choose which way to turn

    You’ll need

    1. A test course

    For trying out behaviours, robot builders make test courses. The goal is to create an environment with only the specific features to try out the robot. Find a floor area in a neutral colour, ideally somewhere white or grey without patterns or colour.

    Make walls using flat colours such as red, blue, green and yellow. A toy box or coloured card work for this. Use white or neutral background walls. Cameras take better pictures with bright and consistent lighting. In good lighting, colours are clearer, making processing easier. Good options are daylight or bright white indoor lighting. Avoid tinted or patchy lighting.

    Top tip: Lighting matters

    Lighting should be neutral in colour, bright and diffused. Spotlights, low light and coloured lights cause problems with visual processing.

    2. Installation

    This step may take some time. Plug a mains-powered USB adapter into the robot’s Raspberry Pi before proceeding. Before installing the packages, make sure Raspbian is up to date with:

    sudo apt update –allow-releaseinfo-change

    There are some system packages needed for running the Python libraries.

    sudo apt install libcairo-gobject2 libwebp6 libilmbase23 libgdk-pixbuf2.0-0 libjasper1 libpango-1.0-0 libavcodec58 libavutil56 libcairo2 libswscale5 libatk1.0-0 libgtk-3-0 libtiff5 libpangocairo-1.0-0 libavformat58 libopenexr23 libgfortran5 libatlas3-base

    Finally, install the Python packages needed for OpenCV, NumPy, and picamera:

    sudo pip3 install opencv-python-headless numpy imutils picamera[array]

    3. Set up the camera

    The function setup_camera in the file find_contours.py gets the camera ready. For quick processing time, and to simplify the image, line 11 sets a camera resolution of 128×128.

    Our robot’s camera is upside down, so the rotation is set to 180 degrees. Using camera features saves processing on Raspberry Pi.
    Line 14 creates capture_buffer, space to store image data from the camera. Lines 15 and 16 start the camera with two seconds of warm-up time.

    With the robot in front of a coloured wall, run the following commands:

    export LD_PRELOAD=/usr/lib/arm-linux-gnueabihf/libatomic.so.1

    python3 find_contours.py

    This code send the camera’s captured image to the file original.png.

    4. A little colour theory

    Computers store colours as RGB or BGR, for red, green, and blue pixels. In find_contours.py, on line 21, we convert the image from BGR to the HSV colour system, which is suitable for this image processing.


    Figure 1
    shows how HSV works. Saturation measures how vivid or intense the colour is, from a low value being white or grey, to a full value being vivid. Hue indicates the colour – red, orange, blue, green, yellow, etc.

    Transforming the image into HSV – Hue, Saturation, and Value – lets the robot pick out colour intensity (saturation) and then find its tint (hue), while mostly ignoring the colour brightness (value).

    Figure 1: The HSV colour space

    5. Image processing pipelines

    The code processes images from the camera through a series of transformations to find the colour of a wall. Each transform is a small step; for example, finding all the pixels that match a criteria or making an outline of an area.
    Later stages use the transformed output of earlier ones. The outputs are joined to other inputs, forming a pipeline.

    The diagram in Figure 2 shows where data flows from one process to another, making it easier to understand what is going on. Use images from real outputs, boxes for stages, and lines to show the flow of data.

    Figure 2: It takes a few steps for visual processing, with a number of transformations. A pipeline is a useful way to visualise this

    6. Thresholding or masking

    Thresholding tests if every pixel has values within a range. Line 22 of find_contours.py uses cv2.inRange for this. It makes a new binary image, storing True if the pixel has values between the lower limits and the upper limits.

    The find_contours.py range allows all hue values while filtering for saturation values over 140, for only vivid colours and the value component to values brighter than 30. The output file masked.png shows the output, with coloured walls in white (see Figure 3 for an example).

    The S and V values of the lower bound on line 22 can be adjusted up if too much area is matching, or down if too little is.

    Figure 3: Example of a masked or thresholded image. Pixels are only on (white) or off (black)

    7. Finding contours

    OpenCV can inspect a black and white image and find outlines for different areas. It calls these outlines contours. In find_contours.py, lines 28 and 29 obtain a list of contours. Each contour is a list of points describing the outline.

    On line 30, the contours are sorted by area. By finding the first contour in this list (the biggest), the code has likely found the most significant coloured area.

    On line 48, the contour is drawn out to a debug image with_contours.png. Run the code and download the image to see how the contours look (see Figure 4 for an example).

    Figure 4: This is the original image, after a contour has been found from the threshold image and drawn back on it

    8. Finding the colour

    For this code to choose by colour, it needs the hue from the middle of the contour. It takes this colour from the original picture. The robot uses OpenCV moments for finding the middle of a contour.

    By dividing the sum of X coordinates (m10) by their count (m00), the code obtains the average X, their centre. The code also obtains the average and centre of the Y coordinates (m01 divided by m00). The middle of the contour comes from combining these.

    The code on line 36 of find_contours.py extracts the colour from the hsv output at the middle of the contour.

    9. Using the pipeline in a robot

    The get_saturated_colours function is imported from find_contours.py, enabling this code to reuse the pipeline from already tested code.

    A continuous stream of images is needed to use the pipeline to drive the robot. Line 8 of camera_nav.py creates this stream; line 9 extracts the data. Line 8 sets up the main loop as a for loop that runs forever with a new image each time.

    The main loop puts the image through the pipeline and uses the output to determine if the robot turns right, left, or goes forward. The camera’s image rate sets the timing.

    The colour returned by get_saturated_colours is HSV.

    10. Matching the colour

    The camera_nav.py code uses the hue component from get_saturated_colours.
    OpenCV stores a hue value as degrees divided by 2 to fit into 8 bits (up to 255). Figure 5 shows a colour wheel with hue values in degrees and OpenCV values.

    Figure 5: A hue colour wheel is handy for looking up colours. The figures below the degrees show the OpenCV values

    The code in camera_nav.py matches a yellow range on line 12, and a blue range on line 15, printing the matched colour and turning the robot. By setting up a series of walls of different colours, the robot can now navigate by wall colours. Expect to change these ranges for different test areas.

    Ensure the robot is on battery power and in the test course before running this.

    Extending the pipeline leads to detecting edges and finding the angle of the horizon. This could be used to line a robot up with a wall

    11. Improving robot vision

    The find_contours.py code is a simple demonstration of computer vision. It’s also easy to confuse it. Finding the image under the contour and averaging the colour would make it more stable.

    The code could be combined with distance sensors, so only walls close enough were detected. Encoders or an inertial measurement unit (IMU) could be added to make a precise turn.

    Advanced techniques such as Canny Edge Detection with HoughLines could pick out the horizon, determining the angle and distance, so the robot could line up with a wall. OpenCV is capable of face detection and even has machine learning and neural network modules.

    Top tip: Reduce background clutter

    A cluttered background causes the robot to detect random things. Neutral backgrounds without ‘noise’ make this easier to test.

    12. Further reading

    Robot vision is a significant area of study in robotics, and this article has barely scratched the surface. It’s one of the more rewarding and exciting spaces of robotics, worthy of further reading.

    The PyImageSearch site is a superb resource to learn more about computer vision and dig further into detecting different attributes from an image.

    Danny Staple (this article author’s) book, Learn Robotics Programming, has a section on computer vision, building face- and object-following behaviours, and casting the camera and pipeline stages to a mobile phone browser to view in real time.

  • Bit Time Rotary Dial Phone project showcase

    Bit Time Rotary Dial Phone project showcase

    Reading Time: 4 minutes

    The Rotary Dial Phone project is part of a wider initiative called Bit Time – a project that has been running in Basildon, Essex over recent months. It’s the brainchild of Dave Norton and Laura Travail. Dave is a digital Artist and drama practitioner whose work ranges from large-scale interactive installations to live theatre performed in a virtual world. Laura is an artist and context strategist with an outdoor theatre and live-art background.

    Lead artist Laura explains, “Bit Time is an intergenerational project, combining the skills and knowledge of the very young with those of our elders.

    Artists Dave Norton and Laura Travail run the intergenerational Bit Time project in Basildon, Essex

    „As artists and facilitators, we’ve been bringing together these ideas and possibilities into playable works that in themselves keep that momentum going. These are projects about communication technology, but they are also communication technologies in themselves. By interacting with the art, you are interacting with each other.”

    Cold calling

    So, the retro phones… where do they fit into this story? Phone project artist Dave Norton says, “The inspiration for the question/answer phones came from a desire to build a device that lets you share a message with someone you’ll never meet. A digital time capsule of anonymous thoughts, advice, stories, and memories that could be listened to by anyone. You have no idea who might hear your message and how it could affect them.”

    He explains how the system works: “You walk past a phone and it starts ringing, you pick it up and the operator asks you to answer a question, e.g. ‘what was your first phone?’, ‘what will a phone of the future look like?’ A ‘recording’ light comes on and you leave your message and hang up. Later on, you see another phone that also rings as you walk past; you pick it up and it plays back a random message left by someone else.”

    Testing a phone for use in the Rotary Dial Phone Project. Power constraints mean the phone's bell and the recording sign have to be disconnected when the Raspberry Pi that controls them boots up

    A motion detector identifies when someone walks past, while a push-button detects when the receiver is lifted. The phone’s mic and speaker are hooked up to a Raspberry Pi, which chooses a random audio file question to play. “The mic starts recording the user’s message for 15 seconds, or until they hang up, then the whole process restarts. The answer phone works in a similar way, but only chooses random audio files to play back.”

    The upcycled rotary phone: triggered by a motion detector, each phone starts ringing when someone walks past it. Raspberry Pi randomly selects and plays an audio file containing a question

    Since the installation needed to work in any kind of location, it couldn’t rely on WiFi to transfer audio files between the phones, particularly as the audio files needed to be checked manually before they could be shared with the public. “I ended up having to code a ‘syncing’ mode, which is activated when a USB drive is inserted into Raspberry Pi, which automatically transfers all the audio files to the drive,” reveals Dave.

    
Maker Dave Norton says it was easy to snip the wires from each dial phone’s speaker, microphone and hang-up button and connect them to Raspberry Pi

    You talkin’ to me?

    The Bit Time project, including the rotary dial phones, ultimately became an exhibition which toured Basildon in summer 2019. Dave says, “There’s something really unburdening about being anonymous, and something really pleasing about being given an open platform to speak your mind. I loved the idea that the installation starts as a blank slate and, as it travels to different events and locations, it collects a mixture of stories and thoughts and shares them with anyone who cares to listen, something akin to a travelling storyteller.”

    He says the phones elicited a variety of reactions. “Some people just hang up straight away, some people audibly freak out that they’re actually being recorded, some yell bizarre phrases, but most people genuinely answer the question. No two answers have been similar and it makes for some really interesting listening… We’ve ended up with hundreds of varied audio responses – it would be lovely to build some sort of audio installation using all the clips.”

    The question phone plays a random question to whoever picks up the handset and records their response

    Quick facts

    • The phones project took around three weeks to complete

    • Basildon Library Creator Space provided a location to construct the Bit Time artwork

    • A 5 V solenoid is used to ring each phone’s bell

    • Dave programmed each Raspberry Pi using Python

    • He suggests the phones could be used in the foyer of a venue after an event, to glean honest views from attendees

  • Raspberry Pi Kit and Gadget Guide

    Raspberry Pi Kit and Gadget Guide

    Reading Time: 11 minutes

    We all know that Santa loves a mince pie, but did you know that he is often partial to leaving Raspberry Pi boards under the tree of those on his ‘nice’ list?

    Well, if you got a Raspberry Pi for Christmas, then you may want to know about some of the awesome accessories you can get for it to really get the most out of your brand new computer. With so many cool accessories available, it can be a minefield knowing which ones to go for, so let us help you make up your own mind based on some ideas of ours.

    Raspberry Pi cases

    We think Raspberry Pi looks cool as it is, but a case is a highly recommended accessory. Not only will it protect your Raspberry Pi and the delicate circuitry, it can also enhance the way some of the additional accessories work when used in combination.

    Official Raspberry Pi 4 Case

    If you want an affordable, reliable, and hackable case, then you cannot go wrong with the official Raspberry Pi case. Available in red and white or black and grey, this case will house your Raspberry Pi with ease. If you’re feeling adventurous, you can also hack the case to fit a small fan for cooling!

    Price: £5
    magpi.cc/case

    The official Raspberry Pi 4 case comes in black, red, white or grey

    Pibow Coupé 4

    The Pibow by Raspberry Pi veterans Pimoroni is a classic Raspberry Pi case. Designed to be quick, easy, and cheap, the Pibow is made up of multiple layers of laser-cut acrylic. The Coupé version is slimmed down and gives easy access to Raspberry Pi’s GPIO and other inputs.

    Price: £8
    magpi.cc/pibow

    Assembling the Pibow Coupe case’s rainbow layers is fun and the result looks great

    SecurePi Case

    The SecurePi case looks very futuristic, especially with those angles! This case provides protective covers for your microSD card, USB, Ethernet and micro HDMI ports, and also has venting which is ideal for providing airflow for keeping your Raspberry Pi cool. It has space for the PoE HAT or Fan SHIM too!


    Price:
    £10 magpi.cc/securepi

    SecurePi provides a protective cover for your microSD card, USB, Ethernet and microHDMI slots and also has an air vent on top

    Aluminium Raspberry Pi 4 Case

    Aluminium is a great, lightweight metal that is also strong and is an ideal choice for a Raspberry Pi case because of these properties. This case looks great, especially if used as part of a 4K home media setup. With the holes, the cooling potential is also fantastic.
    Price: Price: £10
    magpi.cc/aluminium

    The Aluminium Raspberry Pi 4 case is strong, light and has holes to keep things cool

    Anidees Raspberry Pi 4 Case

    Made of aluminium, the Anidees case provides ample protection for your precious Raspberry Pi. It comes in two colours – silver or black – and has an extra tall version to accommodate some HATs too. Oh, and it has an clear lid so you can see your Raspberry Pi in all its glory!

    Price: £37
    magpi.cc/anidees

    Anidees Raspberry Pi 4 case: choose the extra-tall model if you want your case to accommodate some HATs too

    Our biggest fan

    Raspberry Pi 4 is the most powerful Raspberry Pi yet. All this horsepower means it can get a bit hot, though. The most effective cooling method is active cooling, which is typically accomplished with a fan. The Fan SHIM is perfect as it is low-profile, inexpensive and allows you to use the GPIO pins for other accessories.

    The Fan SHIM has a low profile and effectively cools the Raspberry Pi 4

    Essential add-ons

    Raspberry Pi Keyboard

    You’ll need a keyboard in pretty much every Raspberry Pi project going. The Raspberry Pi Keyboard comes in a variety of layout options, and is available in two colour schemes. Not only does the keyboard connect via USB, it also has three additional USB 2.0 ports to free up ports on your Raspberry Pi.

    Price: £16 magpi.cc/keyboard

    The Official Raspberry Pi Keyboard double as a hub with three extra USB ports

    Raspberry Pi Mouse

    Something simple, yet extremely effective and an essential accessory for any Raspberry Pi project, allowing you to navigate through any graphical user interface. The Raspberry Pi Mouse, when combined with the Raspberry Pi Keyboard, can be powered from the keyboard’s USB hub, keeping those precious ports free on your Raspberry Pi itself.

    Price: £7
    magpi.cc/mouse

    Rii i8+ Mini Wireless Keyboard

    If you want to go one step further, why not combine the keyboard and mouse into one and make it wireless while you’re at it? With the Rii i8 Mini Wireless Keyboard with Touchpad, you can do just that! The supplied USB wireless dongle plugs into your Raspberry Pi and connects automatically.

    Price: £18
    magpi.cc/wirelesskeys

    The Rii i8+ mini wireless keyboard is a convenient way to add functionality to your Raspberry Pi setup

    Retro Cube Bluetooth Speaker

    Why use a USB port or cable when you can use Bluetooth to keep things wireless? This little speaker, by retro gamepad specialists 8bitdo, is a fantastic little Bluetooth speaker. Styled like a retro console controller, this rechargeable speaker provides up to eight hours play after one hour of charging.

    Price: £18 magpi.cc/speaker

    The 8bitdo Bluetooth speaker entertains for up to 8 hours before needing to be recharged

    4 Port USB Hub

    Whilst Raspberry Pi has four USB ports, they can be used up quickly depending on how you are using it. Having a dedicated USB hub is always handy, particularly if you have a Raspberry Pi Zero. This four-port hub has both USB and micro USB connectors, so works on any Raspberry Pi!

    Price: £8 magpi.cc/usbhub

    With both standard USB-A and microUSB ports, this 4-port hub has you covered

    We recommend: USB microSD card adapter

    If you’re regularly writing microSD card images for your Raspberry Pi, a USB microSD card adapter is a great tool to have, especially if your computer doesn’t have an SD card slot.

    magpi.cc/usbsd

    Cool HATs

    There are hundreds of HATs available for Raspberry Pi. As they are so easy to connect and set up, they are a perfect accessory

    Enviro

    The Enviro is a fantastic piece of kit. It allows you to monitor a number of environmental factors, such as temperature, light, and sound. The fully-featured Enviro + Air Quality version also includes a gas sensor. Simply connect to your Raspberry Pi, install the code, and you’ll have your very own monitoring station.

    Price: £28
    magpi.cc/enviro

    Use the Enviro HAT to monitor temperature, light and sound. There's also a version that measures air quality and acts as a gas sensor

    Display-O-Tron HAT

    The Display-O-Tron HAT is a fantastic little screen, backlit with controllable RGB LEDs, has six capacitive touch buttons, and also features a small LED bar graph! If you want to run your Raspberry Pi ‘headless’ (i.e. without a screen connected), then the Display-O-Tron HAT is ideal.

    Price: £23
    magpi.cc/displayotron

    Display-O-Tron HAT: ideal for displaying data without a computer screen

    Sense HAT

    If you want something a little more ‘out of this world’, then the Sense HAT is a perfect choice. Used on the International Space Station as part of AstroPi, the Sense HAT monitors temperature, humidity, pressure, and orientation. It also has an 8×8 LED matrix on top for additional display purposes.

    Price: £30 magpi.cc/sensehat

    The Sense HAT - as used on the International Space Station - is packed with environment-monitoring sensors

    TV HAT

    TV on a Raspberry Pi? Yes, that’s right! With the TV HAT and a bit of configuration, you can set your Raspberry Pi to receive terrestrial television channels. It is even possible to record TV shows so that you can watch them back at your leisure too!

    Price: £20
    magpi.cc/tvhat

    Use the TV HAT to receive terrestrial TV signals on your Raspberry Pi

    pHAT DAC

    A DAC (digital-to-analogue converter) is a must for anybody who takes listening to music seriously. The quality of your music is much better when a DAC is used, and the pHAT DAC is a great little accessory that you can use to play music to your heart’s content.

    Price: £13
    magpi.cc/phatdac

    pHAT DAC materially improves audio on your Raspberry Pi

    Electronic starter kits

    A Raspberry Pi can do more than play retro games or videos. Thanks to the GPIO pins, you can interact with a variety of sensors and devices.

    Jam HAT (LED & Buzzer Board)

    If you’re not that good at soldering and want something that is pre-assembled in a HAT form, then the Jam HAT is a great alternative. With LEDs, buttons and a buzzer, you can use the code examples provided to create your own unique projects, all for under a tenner!

    Price: £7
    magpi.cc/jamhat

    Jam HAT is a simple board that adds LEDs, buttons and a buzzer to give pizzazz to your coding projects

    CamJam EduKit

    Prototyping is a great way to start experimenting with sensors, LEDs, buzzers, and everything else that can be connected to a Raspberry Pi. The CamJam EduKit contains a breadboard, an essential tool that allows you to make your own prototype circuits without soldering a thing, as well as other essential components.

    Price: £5
    magpi.cc/edukit

    CamJam EduKit provides buzzers, sensors, LEDs, a breadboard and connectors for prototyping circuits

    We recommend: Resistor lead bending tool

    Prototyping is essential, and this handy tool makes it easier to bend those resistors into breadboard-friendly form.

    magpi.cc/resistorbend

    Gaming kits

    Feeling adventurous? Have a go at building your own Raspberry Pi-powered gaming setup.

    TinyPi Pro

    What good is a portable games console unless it fits in the smallest of pockets? Enter the TinyPi Pro – a do-it-yourself kit that is a small but perfectly formed games console. These sell like hot cakes, but are a real gem if you can get a hold of one, and you’ll learn lots during the build.

    Price: £90 magpi.cc/tinypipro

    TinyPi Pro offers a DIY approach to portable gaming

    BASIC Monster Arcade Controller Kit

    If the full Picade kit is a bit too lavish for you, then the Arcade Controller Kit by Monster is a great alternative. With this kit, you’ll build an arcade stick that houses your Raspberry Pi, which can be connected to your TV for a more portable setup.

    Price: £60
    magpi.cc/monsterbasic

    BASIC Arcade Controller Kit is a Raspberry Pi house-cum-joystick

    PiGRRL 2.0 kit

    If you fancy 3D-printing your own case (designs are included) and putting your build skills to the test, then consider the PiGRRL 2.0 kit. You’ll need to supply the Raspberry Pi and the case, but you’ll have a great time putting it all together and testing it out when complete.

    Price: £56
    magpi.cc/pigrll2

    PiGRRL 2: Make your own handheld games console with a case and parts you print yourself

    Picade

    When it comes to arcade kits, Pimoroni’s Picade is king, and for very good reason! The kit is expertly crafted and has been refined since it was initially launched after a successful Kickstarter campaign. It comes in two options – with an 8-inch or 10-inch display – and with detailed step-by-step build instructions and videos.

    Price: £150 to £195
    magpi.cc/picade

    Pimoroni Picade is an expertly crafted miniature arcade machine

    Gaming accessories

    Raspberry Pi is an excellent choice for emulating and playing retro games. But what accessories should you consider?

    SN30 Pro+ Bluetooth Gamepad

    There are so many controllers to choose from, but 8BitDo’s wireless gamepads are an excellent choice. The quality and looks of these controllers really add that ‘wow’ factor to any retro gaming build. This one has analogue thumbsticks and comes in a choice of three colours.

    Price: £45
    magpi.cc/sn30pro

    8bitdo SN30 Pro+ Bluetooth games controller adds a wow factor to Raspberry Pi gaming

    MEGAPi Case

    If you’re going to build a retro gaming system, what better than this fantastic scaled version of the Sega Mega Drive from RetroFlag? Their cases are spectacularly well designed and this one is the perfect combination of nostalgia and functionality, especially with the programmable shutdown buttons and cooling fan.

    Price: £25 magpi.cc/megapi
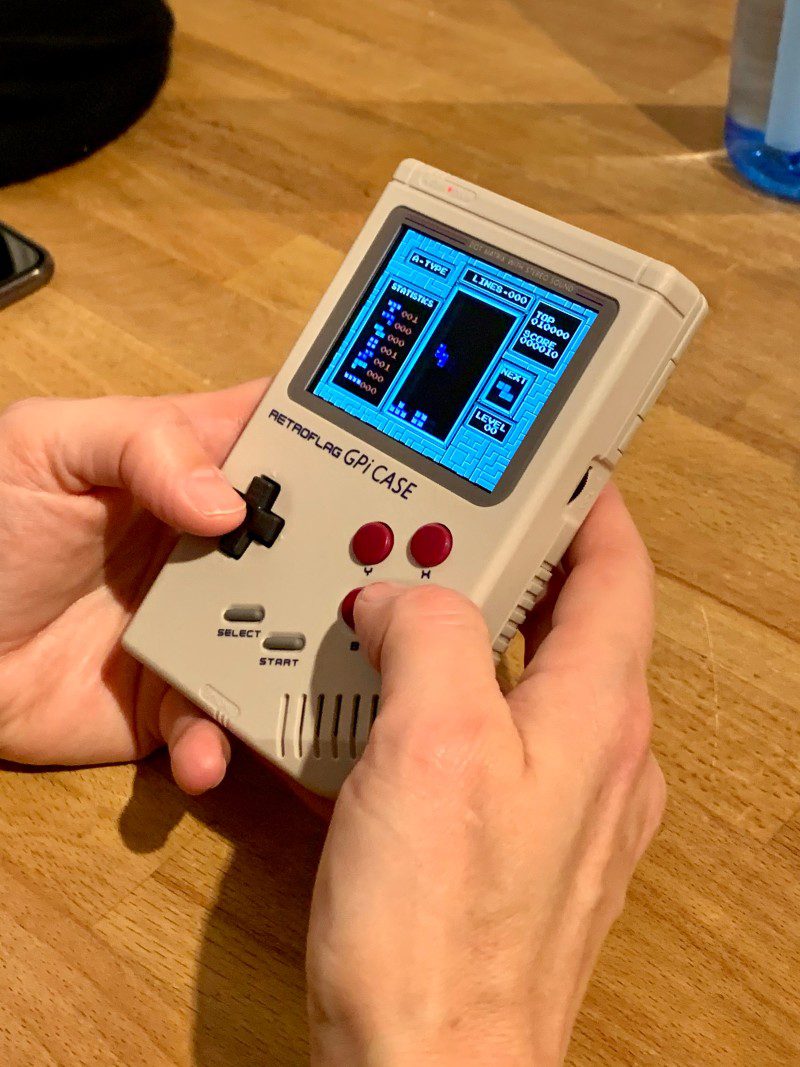
    MEGAPi Case: a scaled-down version of the classic Sega Mega Drive complete with programmable buttons

    GPi Case

    Why not go one step further and make a portable retro gaming system? The GPi Case is a beautiful replica of a retro handheld console, and the attention to detail is breathtaking. A Raspberry Pi Zero (not supplied) is housed in a detachable cartridge and it even runs off regular AA batteries for gaming on-the-go.

    Price: £60
    magpi.cc/gpicase

    Create your own Raspberry Pi Zero-based retro handheld games console with the GPi Case

    Classic USB Games Controller

    If you want functionality without breaking the bank, then the classic USB game controller is an excellent choice. Modelled on a classic controller, this connects to your Raspberry Pi via USB – and a generous cable length means you don’t need to sit too close to your TV to play!

    Price:
    £8
    magpi.cc/usbcontroller

    At £8, the Retro-bit USB game controller is an affordable way to use your Raspberry Pi as a gaming device

    We recommend: Micro USB to USB-C adapter

    This little adapter lets you use your existing micro USB power supplies with the new-style USB-C ports on Raspberry Pi 4.

    magpi.cc/microusbc

    Robot building kits

    R2-D2 or C-3PO? Or are you more of a BB-8 fan? No matter your favourite, you can always build your own with one of these kits.

    CamJam EduKit #3

    If you are after a budget kit, this CamJam one is a great introduction to robotics. You’ll need to supply your own Raspberry Pi and chassis (something to attach the kit to), but it’s a great way of getting into the world of robotics before delving into something a little more complex.

    Price: £18 magpi.cc/edukit3

    CamJam EduKit #3 offers a low-cost introduction to robotics

    STS-Pi

    The STS-Pi is a great little robot kit that gives you the bare bones to build a two-wheeled roving robot. You’ll need to supply a Raspberry Pi, Camera Module, and motor driver (such as the Explorer pHAT), but you’ll learn the basics of robotics with this nifty kit.

    Price: £23
    magpi.cc/stspi

    STS-Pi is a great two-wheeler robot kit

    MeArm

    These types of robots are used in manufacturing and engineering plants – well, maybe not Raspberry Pi versions, but the same style. With the MeArm kit, you can build a robotic arm that is controlled using the two supplied thumbsticks (or with code). An ideal option for a budding robotics engineer!

    Price: £70
    magpi.cc/mearm

    MeArm is a controllable robotic arm - just like those used in industry

    MonsterBorg

    The title says it all here: this is the ultimate Raspberry Pi robot and is designed to withstand some punishment. The chassis is rugged and made of aluminium, and the wheels make it a great off-road choice, especially with the three hours run time. Oh, and it runs any side up, too!

    Price: £210
    magpi.cc/monsterborg

    We recommend: MotoZero

    A motor driver capable of powering four motors, this board is a great and affordable choice for any robotic build.

    magpi.cc/motozero

    Picade X HAT USB-C

    If you fancy building your own arcade setup without a kit, this add-on makes controller configuration a breeze. It works with the Pi 4 too!

    magpi.cc/xhat

    Picade Plasma kit

    Want flashy LED arcade buttons instead of plain ones? This kit adds all the jazziness you’ll need! It comes in six- or ten-button options.

    magpi.cc/picadeplasma

  • Learn R with Raspberry Pi

    Learn R with Raspberry Pi

    Reading Time: 3 minutes

    DataCamp

    Price: FREE (or $568 per year)

    Created by: datacamp.com

    R is a language intrinsically linked to data and statistical analysis. Popular with scientists and number crunchers, it has fans around the globe.

    If you’ve spent a lot of time in Python and other programming languages, some of the features of R are confusing at first. Assignment operators are arrows, and lists are one-indexed (with the first item starting at position one, rather than zero). All of this is designed to make working with large datasets more friendly.

    DataCamp is a great learning resource for R, Python, and SQL. It uses a web-based code editor (which admittedly, we have mixed feelings about). The basic course is free, and you can pay for a DataCamp subscription to access a wide range of advanced courses. A subscription isn’t cheap though, coming in at over $568 per year, although there are frequent half-price sales and it is aimed at budding data scientists.

    Datacamp helps you learn the statistic-focused language and is ideal for wannabe data scientists

    Coursera

    Created by: Duke University & John Hopkins University
    Price: £38 / $49 (per month)

    Coursera offers a range of courses from universities. There are two that should be of interest. The first is Introduction to Probability and Data from Duke University (magpi.cc/courseraprobability), with a 4.7 star rating. Led by Mine Çetinkaya-Rundel, Associate Professor of the Practice Department of Statistical Science, the course features R, but it’s more about learning to crank data. It gives you a grounding in probability and Bayes’ rule. It covers sampling methods, and forms part of a larger Statistics with R Specialization, which you can take to learn more about R.

    The second suggested course is R Programming from John Hopkins University (magpi.cc/courserar). This will get you closer to the R language.
    After a seven-day free trial, you’ll pay Coursera a monthly fee to access the courses.

    Coursera provides access to online learning tools provided by respected academic institutions

    Introduction to R for Data Science

    Created by: Microsoft

    Price: FREE ($99 certificate)

    We’re big fans of the edX platform, which offers a range of courses from respected universities and organisations. Its Introduction to R for Data Science course is provided by Microsoft and runs on the DataCamp platform (so it’s an interactive web approach). This is interspersed with video tutorials and short online quizzes. The edX community is vibrant, with an active forum that is ready to answer any questions you might have.

    It’s an accessible course and, thanks to being on edX, you can enrol and take the course for free. You only need to pay to get a certificate at the end.

    The edX platform offers curated learning content from the likes of Harvard, MIT and Microsoft

    R websites

    Bookmark these webpages while learning R.

    R-bloggers

    R-bloggers is a website aggregator for blogs on R. In it, you’ll find the latest contributions from hundreds of different R bloggers.

    Keep abreast of what's being posted online about R with the R-blogger content aggregator

    R-exercises

    R-exercises aims to help people develop and improve their R programming skills. R-exercises was initiated and is maintained by Research for Decisions, a Dutch research and consulting firm.

    Revolutions

    Revolutions (blog.revolutionanalytics.com) is a blog dedicated to news for the R community. It’s a great place to find out recent developments and news.

    Data sources

    Data

    The US and UK governments have made huge datasets open. Everything from business figures to the environment, through mapping and spending, can be found online at
    data.gov.uk.

    The UK and US governments publish vast data sets you can use. UK ones can be found at data.gov.uk

    Kaggle

    Kaggle is an online community owned by Google. It’s a great resource for datasets, as well as featuring blogs, competitions, and tools.

    Dataquest

    There’s a range of datasets around, from Google, Wikipedia, and Amazon, and even news outlets such as BuzzFeed. Dataquest has a great list of sources for you to bookmark.

  • Smart classroom assistant machine learning tutorial

    Smart classroom assistant machine learning tutorial

    Reading Time: 7 minutes

    First, you’ll create an assistant that uses a list of rules for understanding commands, and you’ll learn why that approach isn’t very good. Next, you will teach the assistant to recognise commands for different devices by training it using examples of each command.

    Smart-Classroom: Use machine learning and Scratch to turn on a lamp and control a fan

    1. Get started

    Head to machinelearningforkids.co.uk in a web browser. You’ll then need to click on ‘Get Started’, and then click on ‘Try it now’.

    The Machine Learning for Kids website helps you get started with AI

    2. Create a project

    Click on Projects in the menu bar at the top, and then click on the ‘+ Add a new project’ button. Name your project ‘smart classroom’ and set it to learn to recognise text, then click on Create. You should now see ‘smart classroom’ in the projects list; click on this project.

    Select Project templates and name your new project 'smart classroom'

    3. Prepare the project

    Now we need to get a project ready in Scratch. Click on Make, click on Scratch 3, then click on ‘Scratch by itself’. The page then warns you that you haven’t done any machine learning yet. Ignore this and click on ‘Scratch by itself’ to launch Scratch. Finally, click on ‘Project templates’ and then click on the ‘Smart Classroom’ template.

    4. Add a list of rules

    Figure 1: click on 'classroom' in the Scratch sprites pane

    In this step, you will edit the project to include a list of rules to activate and deactivate the fan and the lamp. Click the classroom sprite to select it, as shown in Figure 1. Click on the Code tab and create the script shown in Figure 2. Once you’ve done that, click on File and then on ‘Save to your computer’, and save the program to a file.

    Figure 2: The Scratch code for a rules-based approach

    5. First tests

    Click on the green flag to test your program, and then type in a command and watch the program react! The following commands should all work:

    Turn on the lamp
    Turn off the lamp
    Turn on the fan
    Turn off the fan

    Type in anything else and your program does nothing! Even if you make a small spelling mistake, the program does not react.

    6. Beyond rules

    You’re telling your virtual classroom assistant to react to commands using a simple rules-based approach. But if you wanted your program to understand commands that are phrased differently, you would need to add extra ‘if’ blocks.

    The problem with this rules-based approach is that you need to exactly predict all the commands the smart classroom assistant will understand. Listing every possible command would take a very, very long time. Next, you will try a better approach: teaching the computer to recognise commands by itself.

    7. Examples for training

    Close the Scratch window and go back to the Training tool, then click on the ‘< Back to project’ link. Click on the Train button because you need to collect some examples so that you can train the computer. To collect different examples, you need to create ‘buckets’ to put the examples in.

    Train your computer to recognise commands by adding text examples to the project. Make sure you assign each command to the correct 'bucket' so it results in the correct action

    To create a bucket, click on ‘+ Add new label’ and call the bucket ‘fan on’. Click on ‘+ Add new label’ again and create a second bucket called ‘fan off’. Create a third and a fourth bucket called ‘lamp on’ and ‘lamp off’.

    Click on the ‘Add example’ button in the ‘fan on’ bucket, and type in a command asking for the fan to be turned on. For example, you could type ‘Please can you switch on the fan’. For the ‘fan off’ bucket, you’ll need to click ‘Add example’ again and then use something like ‘I want the fan off now’. Do the same for the ‘lamp on’ and ‘lamp off’ buckets.

    Add as many and as varied example phrases as you can for each command

    8. More examples for more training

    Continue to add examples until you have at least six examples in each bucket. Be imaginative! Try to think of lots of different ways to ask each command.

    For example:

    For ‘fan on’, you could complain that you’re too hot.
    For ‘fan off’, you could complain that it’s too breezy.
    For ‘lamp on’, you could complain that you can’t see.
    For ‘lamp off’, you could complain that it’s too bright.

    More is good: the more examples you give your program, the better the program should get at recognising your commands.

    Use equal numbers: add roughly the same number of examples for each command. If you have a lot of examples for one command and not the others, this can affect the way that the program learns to recognise commands.

    Make the examples really different from each other: try to come up with lots of different types of examples. For instance, make sure that you include some long examples and some very short ones.

    9. Start the training

    You will now train the program using the examples, and then test it. The program will learn from patterns in the examples you give it, such as the choice of words and the way sentences are structured. Then, based on the patterns the program finds, it can interpret new commands.

    Click on the ‘< Back to project’ link, then click on ‘Learn & Test’. Click on the ‘Train new machine learning model’ button. If you have enough examples, the program should start to learn how to recognise commands from these examples.

    10. Test the training

    Wait for the training to complete. This might take a minute or two but once the training has completed, a test box appears. Test your machine learning model to see what it has learned by typing in one of the commands you added to a bucket, and then press ENTER. The command should be recognised.

    Now type in commands that are not in the buckets. If you’re not happy with how the computer recognises the commands, go back to the previous step and add some more examples. Then select the ‘Train new machine learning model’ button again.

    Instead of writing rules for the program, you are giving the program examples. The program uses the examples to train a machine learning model. Because you are supervising the program’s training by giving examples, this machine learning approach is called supervised learning.

    11. Use it in Scratch

    Now update your Scratch program to include your machine learning model instead of the rules-based approach. Click on the ‘< Back to project’ link, click on Make, then Scratch 3. Here you can read the instructions on the page to learn how to use machine learning blocks in Scratch.

    Click on Open in Scratch 3, then on File and ‘Load from your computer’, and select the Scratch project you saved earlier. When Scratch asks you whether to replace the current project, click on OK.

    Click on the Code tab, and update your Scratch code (Figure 3) to use your machine learning model instead of the rules you first added. The ‘recognise text’ block is a new block added by your project. This new block can receive a message and return one of the four labels, based on the machine learning model you have trained.

    Figure 3: Revised for a machine learning approach, the code features ‘recognise text’ blocks

    12. Scratch AI

    Click the green flag to test your new code. Test your project by typing a command and pressing ENTER on your keyboard. The fan or lamp should react to your command.

    Make sure you test that this works even for commands that you didn’t include as examples in the buckets.

    Save your project as before. Your Scratch smart virtual classroom now uses a machine learning model instead of a rules-based approach. Using machine learning is better than using rules, because training a program to recognise commands for itself is much quicker than trying to make a list of every possible command.

    Top tip: machine learning

    You need to tell an AI what to learn. The more you give it to learn with, the better it will be. The more examples you use to train the machine learning model, the better your program should get at recognising commands.

    To learn about how to can improve the model with ‘confidence scores’, head to magpi.cc/smartclassroom.

    Top tip: Go further

    Can you get the model to tell you the weather or date? Give it a go!

    Top tip: Bring more projects to life

    Want to discover more great ‚makes‘? You can find this project and others on the Raspberry Pi projects website.

    Head to Raspberry Pi's dedicated Projects website for more great 'makes'

  • Aquatic Mini Observation System

    Aquatic Mini Observation System

    Reading Time: 3 minutes

    “My project is named AMOS (Aquatic Mini Observation System),” Murray tells us. “It is a solar-powered, autonomous airboat for measuring water quality over large, distributed areas.”

    Murray has worked on a couple of prototypes for the boat. The first one was made out of a kayak beer cooler (a small kayak that acts as a beer cooler) and had propellers that would end up getting gunked up. He also tested distance measuring with a Raspberry Pi Compute Module’s stereo vision before settling on a lidar module and a Raspberry Pi 3B+.

    “During this past winter, I built a second prototype, this time using a longer surfboard-type design constructed from glued-together insulation foam that was given a coat of fibreglass to give it some added strength and stiffness,” Murray explains. “Instead of the water propellers, a single 10-inch drone propeller and motor were used and connected to a small waterproof servo motor at the stern end of the boat. This design was lighter (about 13 kg) and longer, and although the air propeller only produced about a tenth of the thrust provided by the dual water propellers, the improved draft and hydrodynamic shape made it slightly faster in the water.”

    Sensors of all kinds are placed on the AMOS, both for navigation and data collection

    A Raspberry Pi controls the speed and angle of the air propeller, takes sensor readings from the water, interacts with the lidar module, and has several other functions so that it knows its speed and heading.

    “I’m hoping that AMOS will be used for water testing by environmental services companies, and industrial customers such as mine operators that may be required by law to confirm that pollution limits in bodies of water surrounding their operations are not exceeded,” Murray reveals. “I’m hoping also to be able to offer it at an attractive price point, with modular components so that researchers or robotic boat enthusiasts could also use it, or some subset of it, in their own projects.”

    Major tests

    The prototypes aren’t just proofs of concept, either: they’re fully functioning test beds, as Murray explains: “Approximately 150 km of testing has been completed on the second AMOS prototype in 2019. It can work well in shallow water (as little as 2 cm depth) and can travel through regions of water with lots of grass or other vegetation without any worries about getting stuck. Its airboat design works best under conditions of low wind (less than 20 km/h) and it can travel at a top speed of about 2.7 knots (5 km/h). Provided the sun is shining on a clear day and higher than about 40 degrees in the sky, AMOS can run at top speed without depleting the charge of its battery.”

    Murray plans for AMOS to be on sale in the summer, so you don’t have too long to wait.

    The AMOS is solar powered, and can maintain itself all day when it's sunny