Schlagwort: printing

  • Printing at home from your Raspberry Pi

    Printing at home from your Raspberry Pi

    Reading Time: 4 minutes

    Yesterday I wrote about working from home with your Raspberry Pi, and talked about things like how to connect to your company VPN, and how to get video conferencing up and working. However, one thing I didn’t talk about – and that many of you have asked for some guidance on – was printing.

    To get printing up and working on your Raspberry Pi the first thing you need to do is install CUPS. CUPS is an open source printing system developed by Apple that uses the Internet Printing Protocol (IPP) to support printing to both local and network printers.

    Installing CUPS

    Go ahead and open a terminal window, and install CUPS.

    $ sudo apt-get install cups

    CUPS has a lot of dependencies, so depending on your broadband connection installation, it could take a while. If you have any left in the house, now might be a good time for a cup of coffee ☕.

    After installation you’ll need to give the pi user administrative rights on CUPS. To do this, go back to your console and type

    $ sudo usermod -a -G lpadmin pi

    to make the pi user part of the lpadmin group.

    Adding a printer

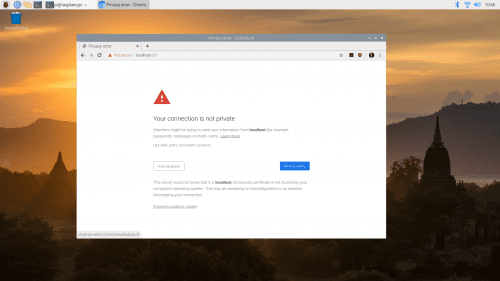
    Now open up your browser and navigate to https://localhost:631 . You’ll receive a security warning from your browser. Hit the ‘Advanced’ button and then ‘Proceed to localhost (unsafe)’.

    Accepting the locally generated certificate

    You’ll be presented with the CUPS interface. Click on ‘Administration’ in the top bar, and a drop-down will appear. Authorise yourself to CUPS as the pi user, which we’d added to the administrator group earlier.

    Authorising yourself with CUPS as an administrator

    After you authorise yourself, click on the ‘Add Printer’ button. CUPS will then look for locally connected (via USB) printers as well as any networked printers it can see on your home network.

    For a lot of printers you’ll be presented with a number of possible options, as most modern printers offer a number of ways to connect. So depending on which printer you have, you might need to go through the process of adding a printer a couple of times to figure out the best method to connect.

    Adding a printer in CUPS

    I have a Brother HL-3140CW, an older model colour laser printer. While Brother offers Linux drivers, they are compiled for the x86 rather than ARM architecture, and the open source ‘brlaser’ driver doesn’t support my model. However, CUPS does list a ‘driverless’ option for communicating without a native printer driver using the Internet Printing Protocol (IPP).

    Selecting a driver, I chose “IPP Everywhere”

    Picking this option, I was presented with a list of drivers for the printer. I picked IPP Everywhere from the list, and hit the ‘Add Printer’ button.

    Successfully added the printer

    After a few seconds CUPS should present you with the ‘Printers’ tab, which should show you your connected printer. If everything is okay it should show that the printer is ‘Accepting Jobs’.

    Testing the printer

    Now we have our printer set up we need to test it. Go ahead and open LibreOffice Writer from the start menu, and enter some test text.

    Writing a test document

    Then click on ‘File > Print’ in the LibreOffice Writer menu.

    Printing our test document from LibreOffice Writer

    If everything has gone smoothly your printer should start making appropriate printing noises and should print your test document.

    Our test documents

    I actually went ahead and printed two test documents just to be sure colour printing was working okay, and happily it was working just fine!

    Wrapping up

    The exact process you’re going to go through to get your printer working will depend heavily on which printer you own. The trickiest bit is always going to be drivers. Thankfully, these days things are a lot easier than they used to be, as most printers – especially networked printers that live on your wireless network – offer standard ways to print and you don’t necessarily have to rely on a native (manufacturer-provided) driver any more.

    Website: LINK

  • Coolest 3D Printing Store Yet, Does Full Body Scans in Seconds

    Coolest 3D Printing Store Yet, Does Full Body Scans in Seconds

    Reading Time: < 1 minute

    Yes, there’s a startup in San Diego, called „QuickScann3D“, in San Diego that can do full body scans in just 5-seconds. The resulting data can then be used to create sculptures and replicas of objects / people.

    sxb

    (mehr …)

  • Cube 3D Printer Lets You Make Complex Objects at Home, Wirelessly

    Cube 3D Printer Lets You Make Complex Objects at Home, Wirelessly

    Reading Time: < 1 minute

    Priced at $1936, the Cube 3D Printer can make plastic items up to 5.5-inches square such as toys, doorknobs, party cutlery, kitchen utensils or chess pieces. It’s not limited to just simple plastic objects, as it can print car wheels and even a replacement windscreen washer nozzle for your car.

    Here’s how it works: „when a design for an object is programmed into it from a memory stick or a wifi link to the internet, The Cube recreates it by building up fine layers of hot melted PLA plastic, which is flexible, or ABS, which is rigid.“ The cartridges come in 16 colors and most importantly, the plastics are recyclable and compostable.

    Official Source: http://www.dailymail.co.uk/sciencetech/article-2440632/The-3D-Cube-printer-gives-production-line-home.html