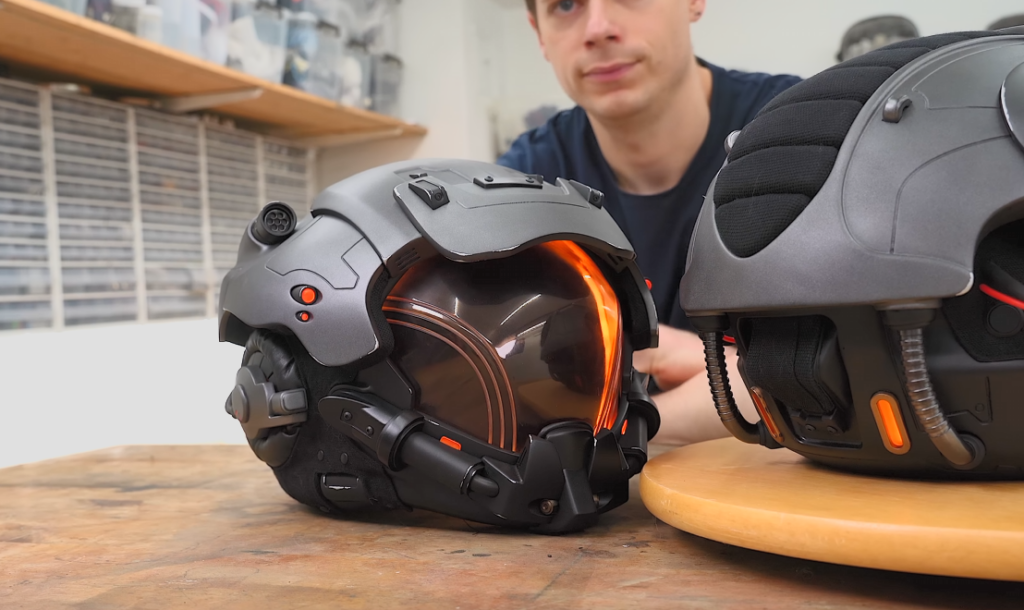
Schlagwort: Nano

  • Agitating homemade PCBs with ease

    Agitating homemade PCBs with ease

    Reading Time: 2 minutes

    If you want to make PCBs at home and you don’t happen to own a CNC mill, then you’ll probably need to turn to chemical etching. Use one of several different techniques to mask the blank PCB’s copper that you want to keep, then toss the whole thing into a bath to dissolve away the unmasked copper. Unfortunately, the last step can be slow, which is why Chris Borge built this PCB agitator.

    Alton Brown’s philosophy on “unitaskers” is wise when it comes to the kitchen, but things are different in the workshop. Sometimes a tool or machine is so useful that it is worth keeping around—even if it only does one job. That’s the case here, because Borge’s machine only does one thing: tilts back and forth. If a container with a PCB in an etchant bath is sitting on top of the machine, that action will slosh the chemicals around and the agitation will dramatically speed up the process.

    On a mechanical level, this is extremely simple. It only requires a handful of 3D-printed parts, some fasteners, and a couple of bearings. The bearings provide a rotational interface between the stationary base (weighed down with poured concrete) and the pivoting platform. The electronics are even simpler and consist of an Arduino Nano board and a small hobby servo motor. The Arduino just tells the servo motor to move back and forth endlessly, tilting the platform and providing constant agitation.

    [youtube https://www.youtube.com/watch?v=brIVOF7fmTs?feature=oembed&w=500&h=281]

    The post Agitating homemade PCBs with ease appeared first on Arduino Blog.

    Website: LINK

  • This Strandbeest-style coffee table can deliver drinks

    This Strandbeest-style coffee table can deliver drinks

    Reading Time: 2 minutes

    More than 30 years ago, Dutch artist Theo Jansen began astounding the world with his Strandbeesten walking sculptures. Even after decades, they have an almost mythical allure thanks to the incredibly fluid way in which they walk. They’re clearly constructs, but with gaits that are almost organic. Inspired by his fellow Dutchman, Giliam de Carpentier built a motorized Strandbeest-style coffee table capable of delivering drinks.

    This coffee table, dubbed “Carpentopod,” walks on six leg mechanisms that look and operate a lot like those of a Strandbeest. They convert rotary motion into complex foot movement through a series of rigid linkages.

    de Carpentier was able to develop the legs’ gait and physical geometry using software he first created way back in 2008. It automatically optimizes the design through a process very similar to natural selection, with the most successful descendants going on to reproduce and ultimately yield very effective geometry for the giving constraints. de Carpentier’s software was efficient enough to evolve dozens of generations every single second, so it produced an optimized leg design in short order.

    In this case, “optimal” mostly means “smooth.” When walking, it almost looks as stable as if it were rolling on wheels. It is, therefore, perfectly capable of carrying drinks without spilling them.

    In contrast to the classic Strandbeesten, de Carpentier wanted this coffee table to be controllable. So, it has a pair of geared brushless DC motors to drive the legs. Like a tank, it steers by turning one side’s motor faster than another. An Arduino Nano board controls those motors, which have Hall effect encoders for closed-loop feedback, according to input that it receives from a Nintendo Wii Nunchuk via a Bluetooth module. With power from a large hobby LiPo battery back, it can roam around de Carpentier’s living room at his command. 

    [youtube https://www.youtube.com/watch?v=xKDY4yWxfJM?feature=oembed&w=500&h=281]

    The post This Strandbeest-style coffee table can deliver drinks appeared first on Arduino Blog.

    Website: LINK

  • Giving a teenage pet turtle a synthetic pizza-ordering voice

    Giving a teenage pet turtle a synthetic pizza-ordering voice

    Reading Time: 2 minutes

    If B. F. Skinner’s famous research proved anything, it is that virtually all animals are capable of some degree of training. Training is really just taking advantage of an animal’s natural inclination to adapt for survival, which is something all living organisms do. With that in mind, YouTuber Bao’s Builds constructed a box to give his teenage pet turtle a synthetic voice capable of ordering pizza.

    The turtle, Lightning, just reached its 18th birthday and Bao decided that this would be the perfect gift. Like those mats covered in buttons that really smart dogs press with their paws to talk, Bao wanted Lightning to have a device with buttons assigned to specific requests, like “feed me” or “play with me.” Turtles aren’t quite as intelligent as border collies, so Bao decided the device only needed four buttons — turtles have pretty modest wants and needs, anyway.

    Aside from the buttons themselves, which are standard arcade buttons, the key hardware components for this project are an Arduino Nano, a generic sound module, and a speaker. That sound module stores audio clips on an SD card to play whenever the Arduino makes a request. It also has a built-in amplifier, so it can feed a signal directly to the speaker. The sound clips contain realistic AI-generated voices: one for requesting food, one for requesting pets, and one for expressing love.

    The final button orders pizza, which is the favorite food of teenage turtles (mutant or otherwise). That works by playing a sound file that tells an Amazon Echo to have Alexa place an order at Dominos. 

    [youtube https://www.youtube.com/watch?v=_6mq4HIqesY?feature=oembed&w=500&h=281]

    Sadly, Lightning seems to have struggled to grasp the concept — maybe Skinner was wrong, after all. But that’s probably a good thing for limiting the Bao’s Dominos budget.

    The post Giving a teenage pet turtle a synthetic pizza-ordering voice appeared first on Arduino Blog.

    Website: LINK

  • Exercise while you game with this interactive treadmill add-on

    Exercise while you game with this interactive treadmill add-on

    Reading Time: 2 minutes

    Motion-based controls for games have been around for decades, but even with the latest generation of virtual reality headsets, gaming is still done with relatively limited movement unless one has access to an expensive VR walking/running setup. As an effort to get more physical activity in, Iacopo Guarneri has developed a motion-capturing add-on that can be worn while on a treadmill, stationary bike, or elliptical to control in-game actions.

    The wearable device itself is comprised of two components: an Arduino Nano and a six-axis MPU-6050 inertial measurement unit (IMU), which captures changes in velocity and orientation. Both of these parts are housed in a custom 3D-printed case that can be attached to the user’s back via a strap. In the sketch, the Nano continuously reads motion data from the IMU, packs it into a serialized representation, and sends it over serial to the host machine for further processing.

    Unlike how running in a video game is performed by holding the left joystick up, the accelerometer outputs a sine wave in the Z-axis while the user is bobbing up and down, which necessitated the use of a smoothing function to prevent sudden stops and starts. Turns, however, are much simpler, as the user’s left or right tilt can be directly translated into sideways motion. Once both axes have been calculated, the virtual gamepad’s inputs are updated with the new values and sent to the game.

    [youtube https://www.youtube.com/watch?v=4EYHZWyAiZI?feature=oembed&w=500&h=281]

    You can read more about Guarneri’s project here on Hackster.io.

    The post Exercise while you game with this interactive treadmill add-on appeared first on Arduino Blog.

    Website: LINK

  • This miniature monorail stays upright with the help of gyro stabilization

    This miniature monorail stays upright with the help of gyro stabilization

    Reading Time: 2 minutes

    Most monorail systems, like the kind at Disney and in Las Vegas, stay upright because the “rail” is actually a very wide beam. The car’s load tires (often literal truck or trailer tires) roll on top of that beam and guide tires clamp the sides of the beam, preventing the car from getting tippy. But what if the rail were more like a conventional train track? In the case of Hyperspace Pirate’s monorail model, active gyro stabilization is the key.

    Nobody has really produced a working full-scale gyroscope-stabilized monorail system since first conceived by Louis Brennan in 1903, because the idea simply isn’t practical at that size. Active gyroscope stabilization requires a lot of energy and is quite complex. If anything goes wrong, disaster is just around the corner. But on a small model scale, such considerations are much less relevant.

    Hyperspace Pirate took advantage of that fact to create a small model of the 20th century experimental monorail that travels along a 24? track. It uses a control moment gyroscope (CMG) to keep the car upright on the single narrow rail. A CMG like this one uses a spinning mass’s inertia to resist torque that would change the axis of rotation. If you’ve ever played with one of those gyroscope hand exercise balls, this works in a similar manner. This monorail utilizes two of them to counteract side-to-side tipping, while cancelling out the tendency of them to reduce forward-backward tilting. 

    The challenge with this design is that it requires active actuation of the individual CMG flywheels, which is a major reason why it would be impractical at a full-scale. But Hyperspace Pirate was able to solve that problem by using an Arduino Nano board to tilt the spinning flywheels using servo motors. It does so in response to any tipping, which it detects using an MPU6050 IMU (Inertial Measurement Unit) sensor. 

    [youtube https://www.youtube.com/watch?v=OpyLmIjZaxY?feature=oembed&w=500&h=281]

    With some added outrigger weights, similar to a tightrope-walker’s pole, Hyperspace Pirate was able to build a monorail that seems to work fairly well. 

    The post This miniature monorail stays upright with the help of gyro stabilization appeared first on Arduino Blog.

    Website: LINK

  • Adjusting office chair height with simple voice commands

    Adjusting office chair height with simple voice commands

    Reading Time: 2 minutes

    A month ago, ElectronicLab modified his office chair with an electric car jack, giving it motorized height adjustment. That worked well, but required that he push buttons to raise or lower the seat. Pushing those buttons is a hassle when one’s hands are full, so ElectronicLab went back to the workbench to add voice control capabilities.

    ElectronicLab was using an Arduino Nano to control the electric jack motor in response to button presses, so he already had most of the hardware necessary to make the system smarter. He just needed the Arduino to recognize specific voice commands, which he was able to achieve using an ELECHOUSE Voice Recognition Module V3.

    That voice recognition modules supports up to 80 voice commands, but ElectronicLab only needed a few of them — just enough to tell the chair which direction to move and how far to go. The module came with a microphone, which ElectronicLab was able to attach outside of the 3D-printed enclosure where it could pick up his voice.

    But there was still one problem: the movement was very slow. The jack was designed to lift a car, so it uses a high-torque motor with a 10:1 planetary gearset to drive a hydraulic pump. ElectronicLab didn’t need that much torque, so he welded the planetary gears to give the motor a direct 1:1 ratio. Sadly, that was a mistake. The hydraulic oil can’t flow fast enough to keep up, so the motor pulls way too much current for the driver.

    Still, the voice control was a success and so ElectronicLab can simply swap out the motor.

    [youtube https://www.youtube.com/watch?v=kZaVKgvQFiE?feature=oembed&w=500&h=281]

    The post Adjusting office chair height with simple voice commands appeared first on Arduino Blog.

    Website: LINK

  • Patrol the pool with this Arduino Nano-powered DIY RC submarine

    Patrol the pool with this Arduino Nano-powered DIY RC submarine

    Reading Time: 2 minutes

    There is something inherently intriguing about submarines that doesn’t seem to apply to other vehicles. Maybe that reflects our natural fears and phobias, or maybe it is a result of our curiosity about the mysterious depths. Maybe it is simply that most of us will never get the chance to ride in a submarine. But you can get some of the experience with a model, like 15-year-old Ben Kennedy did with this DIY RC submarine.

    This is a remote-controlled submarine built entirely from scratch and it is very impressive. It is a 500mm-long vessel loosely modeled after the Soviet (and now Russian) Akula-class submarine. But the resemblance is entirely superficial, as the Kennedy’s design is 100% original. 

    The hull and most of the rest of the parts were modeled in Autodesk Fusion 360 and then 3D-printed. An Arduino Nano board receives radio signals from a Flysky FS-i6X transmitter controller via a Flysky iA10B receiver. The Arduino then controls the various systems that allow the submarine to move through the water.

    Four small aquarium pumps move water in and out of the ballast tanks to control buoyancy. A single brushless DC motor, which is naturally waterproof, provides thrust. Two waterproof MG995 servo motors actuate the rudders for yaw and pitch, which are necessary for diving/surfacing and steering. Most of the hull isn’t watertight, so Kennedy placed a waterproof plastic bag inside the hull to protect the Arduino and the lithium battery that provides power. 

    Kennedy tested the sub in his family’s backyard pool and it seems to have performed nicely. He posted his design files and code, so anyone can build their own RC submarine. 

    The post Patrol the pool with this Arduino Nano-powered DIY RC submarine appeared first on Arduino Blog.

    Website: LINK

  • Ride safer with these DIY bicycle lights

    Ride safer with these DIY bicycle lights

    Reading Time: 2 minutes

    Many people around the world live in cities designed for cars, with bicycle use being a distant afterthought. That makes cycling dangerous and lights can do a lot to make riding safer. That’s why Giovanni Aggiustatutto designed this DIY system that includes headlights, a taillight, turn signals, and even an integrated odometer/speedometer. 

    Aggiustatutto wanted this system to work with most bicycles, so he designed the front lights and controls to clamp onto the handlebars. The rear light pod attaches to a cargo rack and should be compatible with a wide range of models. There are two bright white LED headlight arrays on the front with integrated yellow turn signal LEDs. Also on the front is an OLED display that shows the speed, time, and odometer, as well as three buttons. The back lights consist of red taillight LEDs and yellow turn signal LEDs in a single 3D-printed enclosure.

    An Arduino Nano board controls everything, directing power to the LEDs from an 18650 lithium battery through IRFZ44N MOSFETs. A DS3231 RTC module helps the Arduino track time accurately and that gives it the ability to monitor speed — and therefore total distance — with the help of a Hall effect sensor. That sensor detects the passing of a magnet attached to a spoke, so the Arduino can count each rotation. The Arduino then displays the results on a 0.96” 128×64 monochrome OLED screen. 

    Finally, Aggiustatutto tucked the Arduino and battery into an enclosure disguised as a water bottle to prevent theft. 

    [youtube https://www.youtube.com/watch?v=c7lJhk-3xcM?start=2&feature=oembed&w=500&h=281]

    The post Ride safer with these DIY bicycle lights appeared first on Arduino Blog.

    Website: LINK

  • What if robots could communicate with humans by emitting scents?

    What if robots could communicate with humans by emitting scents?

    Reading Time: 2 minutes

    Almost all human-robot interaction (HRI) approaches today rely on three senses: hearing, sight, and touch. Your robot vacuum might beep at you, or play recorded or synthesized speech. An LED on its enclosure might blink to red to signify a problem. And cutting-edge humanoid robots may even shake your hand. But what about the other senses? Taste seems like a step too far, so researchers at KAIST experimented with “Olfactory Puppetry” to test smell’s suitability for HRI communication.

    This concept seems pretty obvious, but there is very little formal research on the topic. What if a robot could communicate with humans by emitting scents?

    Imagine if a factory worker suddenly began smelling burning rubber. That could effectively communicate the idea that a nearby robot is malfunctioning, without relying on auditory or visual cues. Or a personal assistant robot could give off the smell of sizzling bacon to tell its owner that it is time to wake up.

    The researchers wanted to test these ideas and chose to do so using puppets instead of actual robots. By using puppets — paper cutouts on popsicle sticks — test subjects could act out scenarios. They could then incorporate scent and observe the results.

    For that to work, they needed a way to produce specific smells on-demand. They achieved that with a device built using an Arduino Nano R3 board that controls four atomizers. Those emit rose, citrus, vanilla, and musk scents, respectively. Another device performs a similar function, but with solid fragrances melted by heating elements.

    This research was very open-ended, but the team was able to determine that people prefer subtle scents, don’t want those to happen too frequently, and want them to mesh well with what their other senses are telling them. That knowledge could be helpful for scent-based HRI experiments in the future.

    The post What if robots could communicate with humans by emitting scents? appeared first on Arduino Blog.

    Website: LINK

  • Circuit Canvas can help you quickly create illustrated wiring diagrams

    Circuit Canvas can help you quickly create illustrated wiring diagrams

    Reading Time: 2 minutes

    Good documentation is extremely useful when conceiving, building, or sharing electronic circuit designs, but traditional schematics and technical drawings are difficult for non-professionals to interpret and create. Makers can benefit from intuitive illustrations that look good enough to share. Circuit Canvas, developed by Oyvind Nydal Dahl, makes it easy to quickly create beautiful and useful illustrated diagrams.

    Circuit Canvas is quite similar to Fritzing, but developed with the goals of being easy to use and fast. A user can create a schematic or an illustrated diagram for a basic circuit in less than a minute — if the components already exist in the library. But as with Fritzing, users may end up in a situation where they need to add custom parts. Circuit Canvas promises to make that process as painless as possible and even supports Fritzing parts, so it can take advantage of that ecosystem’s huge library.

    At this time, Circuit Canvas already has a substantial library of parts. That includes Arduino UNO and Arduino Nano development boards, as well as other boards that are compatible with the Arduino IDE, such as the Seeed Studio XIAO ESP32C3 and the Raspberry Pi Pico. And, of course, there are many discrete components, ICs, and modules in the library to work with.

    Users can either build schematics using standard symbols, or more friendly illustrated diagrams. In the future, the two document types will link together. Creating a diagram is as simple as placing components and drawing wires between them. After making the connections, users can move components around and the wires will automatically follow.

    If you’ve been looking for a way to improve the documentation for your Arduino projects, then Circuit Canvas is worth checking out. It is free to try and you can run it right in your browser now.

    The post Circuit Canvas can help you quickly create illustrated wiring diagrams appeared first on Arduino Blog.

    Website: LINK

  • Enjoy a perpetual solar eclipse with this machine

    Enjoy a perpetual solar eclipse with this machine

    Reading Time: 2 minutes

    Total solar eclipses are rare — at least from the perspective of any specific point on the planet. A total eclipse will occur somewhere on Earth once every 18 months or so, but that is more likely to track across the middle of the Pacific Ocean than wherever you happen to be. That made Bernd Kraus feel like he was missing out, so he used an Arduino to build this machine that produces a personal solar eclipse every day.

    This is a kind of robot that can move a cutout of the moon to any point on the 2D plane of Kraus’s window. Like the sun and actual moon, the size relationship is important and the cutout is the precise diameter necessary to block the sun. And also like the real deal, the position of the viewer is important. Luckily, Kraus tends to sit in the exact same location whenever he is in that room and the sun’s path (or, rather, Earth’s rotation and orbit) is predictable. A bit of fancy math is all it takes to determine where to place the cutout to project a shadow over the area where Kraus’s face should be.

    The hardware of the robot consists of two stepper motors, a solar panel with charger, an 18650 lithium battery, an HM-10 module, and an Arduino Nano board to control everything. The solar panel attaches to the back side of the moon cutout so it gets good exposure. It sends power up through the wires from which it hangs. The Arduino receives position data from Kraus’s smartphone via Bluetooth, calculates the point where the cutout should be, and then moves the cutout to that point using the two stepper motors. 

    [youtube https://www.youtube.com/watch?v=WCM7DSpBpg0?feature=oembed&w=500&h=281]

    Now Kraus gets to enjoy an eclipse at all times. And as a bonus, he doesn’t have sun shining in his eyes while he’s trying to watch TV. 

    The post Enjoy a perpetual solar eclipse with this machine appeared first on Arduino Blog.

    Website: LINK

  • The Arduino-controlled Spin Meister helps spin up the perfect pizza

    The Arduino-controlled Spin Meister helps spin up the perfect pizza

    Reading Time: 2 minutes

    Dedicated pizza ovens are all the rage right now, as they provide a better-distributed and higher heat that many find more preferable than a conventional kitchen oven. But even a nice gas-powered pizza oven like the Ooni Koda 12 will have some hot spots and cold spots. To get an even bake every time, Yvo de Haas designed the Spin Meister rotation controller for the Ooni Koda 12 pizza oven.

    The Spin Meister is a DIY device that controls the rotation of a pizza stone in the oven. The Ooni Koda 12 doesn’t come with any hardware to spin the pizza, so it is susceptible to uneven cooking. With the Spin Meister, the user can set a specific rotation speed and time to ensure that the pizza moves constantly and cooks consistently. 

    An Arduino Nano R3 board controls a stepper motor through a TMC2100 drive. That stepper motor’s shaft goes through the bottom of the oven to the pizza stone, which sits on a Lazy Susan-style turntable bearing. To avoid heat damage, the Arduino and other electronic components sit in a 3D-printed enclosure that the user can place a couple of feet away from the oven. 

    The controls consist of two buttons and two linear potentiometer sliders — one set for spin, the other for time. The status and time information shows up on a bright 12-digit vacuum fluorescent display (VFD). Power comes from a USB battery back, so users can cook anywhere. Finally, a DFRobot DFPlayer Mini MP3 player gives the Spin Meister the ability to play sound effects, like button press tones and a timer alarm. 

    [youtube https://www.youtube.com/watch?v=tqMtIWjaeWg?feature=oembed&w=500&h=281]

    The Koda 12 already has very good reviews, but we think that the Spin Meister would make it even better.

    The post The Arduino-controlled Spin Meister helps spin up the perfect pizza appeared first on Arduino Blog.

    Website: LINK

  • Self-leveling workbench can travel without trouble

    Self-leveling workbench can travel without trouble

    Reading Time: 2 minutes

    An actually level workbench is critical for many different jobs, such as pouring resin or calibrating sensors. But it is difficult enough to level a stationary workbench and that becomes a nightmare for a workbench that needs to roll around a shop on casters, as shop floors definitely aren’t level. That’s why Firth Fabrications crafted this self-leveling workbench to eliminate such headaches.

    Firth Fabrications made this workbench because he needed a level rolling platform for his projects, but his garage floor is too far from level to rely on. Instead of manually leveling the workbench every time he moves it, he built this workbench than can level itself. 

    It does this with four heavy duty linear actuators — one at each corner of the table constructed of CNC-cut OSB (oriented strand board). Those extend or retract as necessary to tilt the top (relative to the base) to achieve level. It would have been possible to implement that leveling capability with just three linear actuators, but this is more robust and stable.

    An Arduino Nano board uses an MPU6050’s gyroscope to monitor pitch and roll. In automatic leveling mode, it makes adjustments until both register as level. There are also two other modes: lift and manual. Lift raises and lowers the entire top, like a standing desk. Manual lets Firth Fabrications tilt the table in any way he wishes using a joystick. Power comes from an old 18V/4Ah Ryobi power tool battery, so the workbench is untethered. 

    [youtube https://www.youtube.com/watch?v=Iy2L9dH4VH4?feature=oembed&w=500&h=281]

    While flatness is still a concern, FirthFabrications can now rest easy knowing his workbench is reasonably level. 

    The post Self-leveling workbench can travel without trouble appeared first on Arduino Blog.

    Website: LINK

  • DIY submersible pump controller helps retrieve well water

    DIY submersible pump controller helps retrieve well water

    Reading Time: 2 minutes

    It might surprise our urban-dwelling readers, but wells are still very common in rural areas where it is difficult or prohibitively expensive to run utilities. The CDC reports that more than 15 million households rely on groundwater and wells — and that’s just in the United States. But few people haul up old wooden buckets of water, which is electric pumps come in. Vishal Roy developed a DIY controller perfect for submersible groundwater pumps.

    Roy previously had a centrifugal pump to pull up groundwater and fill a holding tank, but that pump was failing. Because it needed replacement anyway, Roy decided to go ahead and switch to a submersible pump that would likely be more reliable. But the submersible pump he purchased came with a manual control panel, which would introduce a new chore. That motivated Roy to build this Arduino-based controller that automatically runs the submersible pump to fill the holding tank whenever the level drops below a set point.

    The holding tank has a conventional water level sensor system consisting of three exposed wires acting as capacitive sensors at different heights. This sensor design isn’t precise, but it is inexpensive and reliable, and precision isn’t important for this task, anyway.

    The pump itself has a large electric motor that requires a startup sequence that first charges up a starting capacitor. Roy was able to replicate that using the Arduino Nano, which connects the two starting circuits using a Seeed Studio relay module. When the Arduino detects the water below a threshold in the holding tank, it toggles the relays to start the pump motor. Once enough water fills the tank to reach the highest sensor, the Arduino turns the motor back off. 

    Now Roy has a reliable way to automatically keep the holding tank full of water. 

    The post DIY submersible pump controller helps retrieve well water appeared first on Arduino Blog.

    Website: LINK

  • A beautiful custom calculator built with IV-12 VFD tubes

    A beautiful custom calculator built with IV-12 VFD tubes

    Reading Time: 2 minutes

    Nixie tubes have been the go-to option for makers looking for retro display aesthetics for many years, because their distinct orange glow carries a lot of vintage appeal. But VFD (vacuum fluorescent display) tubes have been gaining in popularity recently and have different — though similar — appeal. Oskar took advantage of IV-12 VFD tubes to build this beautiful custom calculator.

    VFDs work like a cross between Nixie tubes and CRTs (cathode-ray tube). These IV-12 VFD tubes have seven segments that glow in a teal/cyan blue color (thanks to phosphor) and work at lower (and safer) voltages than Nixie tubes. They are bright and readable, which is why VFD technology was popular for automotive dashboards for decades. In this case, Oskar used five of these IV-12 VFD tubes for a custom calculator.

    Aside from those very distinct VFD tubes, this calculator also has a lovely wood enclosure and a nice-looking set of key caps for the mechanical Cherry MX Brown key switches. The enclosure is laser-cut plywood with a walnut veneer. Oskar mounted the switches on a 3D-printed base plate.

    An Arduino Nano board reads the keypad input, performs the calculations, and displays the results on the VFD tubes. A custom PCB simplifies the wiring, including for multiplexing to the VFD tubes, power connections from a lithium battery charger module, and altering voltage through boost and buck converters.

    This looks fantastic, but there is a caveat: it can’t display a decimal point. Some VFD tubes include a segment for that purpose, but the IV-12 model does not. Even so, the calculator is usable for people who can deduce where the decimal point should go. 

    The post A beautiful custom calculator built with IV-12 VFD tubes appeared first on Arduino Blog.

    Website: LINK

  • On-body LEDs help this guitar rock harder

    On-body LEDs help this guitar rock harder

    Reading Time: 2 minutes

    You don’t go to watch a band play live for the audio quality — most venues are atrocious in that regard. No, you go to enjoy the show as a whole and that includes the visuals. The more a band can do to make the performance look exciting, the more you’re going to enjoy it. To that end, Luigi Morelli helped luthier (and fellow Italian) Gianluca of Nadar Guitars build this one-of-kind LED-lit electric guitar.

    This guitar’s body looks like a left-handed B.C. Rich Warlock merged into a teardrop. It is a very unique design made all the more special by the LED lighting. Several strips of LEDs on the body resemble the traces of a circuit board, while additional LEDs run the length of the fretboard. There are eight different effects/animation programs and it is possible to switch between them using an infrared remote — a well thought-out feature, because a tech can control that along with the stage lights. 

    These are WS2812B individually addressable RGB LEDs that operate under the control of two Arduino Nano boards. One controls the lights on the neck (which only follow a single program) and the other controls the lights on the body. Power comes from a 5000mAh lithium battery.

    In his writeup, Morelli mentions that the LED circuit produced a hum around 1kHz. We assume that the guitar’s pickups would amplify that, but Morelli says that they were able to solve the problem — they’re just keeping the solution “a little industrial secret.” Hum or not, the guitar looks fantastic.

    [youtube https://www.youtube.com/watch?v=0P6V78JBBKI?feature=oembed&w=500&h=281]

    The post On-body LEDs help this guitar rock harder appeared first on Arduino Blog.

    Website: LINK

  • Check out these Arduino-powered research projects from CHI 2024

    Check out these Arduino-powered research projects from CHI 2024

    Reading Time: 4 minutes

    Held in Hawaii this year, the Association of Computing Machinery (ACM) hosted its annual conference on Human Factors in Computing Systems (CHI) that focuses on the latest developments in human-computer interaction. Students from universities all across the world attended the event and showcased how their devices and control systems could revolutionize how we interact with technology in both the real-world and virtual environments. These 12 projects presented at CHI 2024 feature Arduino at their core and demonstrate how versatile the hardware can be.

    MouseRing

    [youtube https://www.youtube.com/watch?v=vfuhSWn1n6g?feature=oembed&w=500&h=281]

    First on the list is MouseRing from students at Tsinghua University in Beijing that aims to give users the ability to precisely control mouse cursors with only one or two inertial measurement units (IMUs). Worn as a ring on the index finger, data collected from the MouseRing via an Arduino UNO Rev3 was used to both train a classification neural network and model the finger’s kinematics for fine-grained mouse cursor manipulation.

    MobileGravity

    [youtube https://www.youtube.com/watch?v=AnwGVFSCo8Q?feature=oembed&w=500&h=281]

    Because objects in virtual reality are only as heavy as the controller, simulating weight has always presented a challenge, which is why five students from the University of Regensburg in Germany devised their MobileGravity concept. With it, the user can place a tracked object onto a base station where an Arduino Micro then quickly pumps in/extracts water from the object to change its weight.

    AirPush

    [youtube https://www.youtube.com/watch?v=A-zo49cjAzc?feature=oembed&w=500&h=281]

    Another virtual reality device, the AirPush, is a fingertip-worn haptic actuator which gives wearers force feedback in up to eight directions and at five different levels of intensity. Through its system of an Arduino UNO, air compressor, and dual DC motors, this apparatus from students at the Southern University of Science and Technology in Shenzhen can accurately apply pressure around the finger in specific areas for use in games or training.

    Robotic Metamaterial

    [youtube https://www.youtube.com/watch?v=jMP2ZzKdTYA?feature=oembed&w=500&h=281]

    A Robotic Metamaterial, as described by students at Carnegie Mellon University, is a structure built from repeating cells that, on their own, cannot accomplish much, but when combined in specific configurations are able to carry out very complex tasks. Some of the Arduino Mega 2560-powered cells are able to actuate, sense angles, or enable capacitive touch interactions, thus letting a lattice of cells become a capable robot.

    MagPixel

    [youtube https://www.youtube.com/watch?v=LjblfPQ7zv8?feature=oembed&w=500&h=281]

    Instead of using pneumatics to bend materials, this team of students from Zhejiang and Tongji universities in China has designed a modular, flexible material using magnets which they call MagPixel. An Arduino UNO powers one such digital clock application leveraging MagPixel by energizing electromagnets within a ring to move the hour “hand” around the clock face.

    ArmDeformation

    [youtube https://www.youtube.com/watch?v=T5hFRTD4M9Y?feature=oembed&w=500&h=281]

    Proprioception, or the ability to inherently sense where limbs are in 3D space, is vital to how we navigate the world, but VR spaces can limit this ability. The ArmDeformation project from a group of Southern University of Science and Technology students in Shenzhen rests on the wearer’s forearm and then moves the skin below to simulate an external force thanks to an Arduino Mega and several DC motors.

    VRScroll

    [youtube https://www.youtube.com/watch?v=Xe2h-KaK9O8?feature=oembed&w=500&h=281]

    Grasping and moving objects is already quite the task in VR, but sketching a picture takes it to a whole other level of difficulty. Three students from the University of Virginia, therefore, have developed a shape-changing device that attempts to match the forms present in a 3D world for the purpose of sketching. After attaching a piece of paper to the surface, the VRScroll will bend into the correct shape using its two Arduino Uno WiFi Rev 2 boards and six motors.

    Desktop Biofibers

    [youtube https://www.youtube.com/watch?v=MfL6a9ZOTR4?feature=oembed&w=500&h=281]

    As an alternative to plastic-based fibers for use in smart textile prototyping/production, four University of Colorado-Boulder students built an open-source machine that is capable of spinning gelatine-based fibers in a compact footprint. Leveraging an Arduino Mega, the machine can spin biofibers through its heated syringe with GCODE input, thus creating a strong thread which potentially integrates wearable sensors.

    ExBreath

    [youtube https://www.youtube.com/watch?v=saXklFH8lo8?feature=oembed&w=500&h=281]

    The art of communication relies on many forms of signals- not just speaking, and harnessing the user’s breathing pattern to better communicate is ExBreath from students at Tsinghua University in Beijing. An Arduino Nano continuously monitors the breathing patterns from a wearer via a bend sensor and translates them into signals for a micro air pump. In doing so, small, externally-worn air sacs are inflated to reflect the sensed breathing pattern.

    ConeAct

    [youtube https://www.youtube.com/watch?v=blMrTkvVotg?feature=oembed&w=500&h=281]

    This smart material, called ConeAct by its creators at Carnegie Mellon University, is a modular system consisting of small cones joined together with four shape memory actuators (SMA) that either flex or become rigid at certain temperatures. An Arduino Nano coordinates the actions of each cone, and when one needs to bend, the onboard ATtiny1616 will activate its MOSFETs to begin heating the corresponding SMA wires.

    Tangible Stats

    [youtube https://www.youtube.com/watch?v=zAjfhZqQ5cE?feature=oembed&w=500&h=281]

    Targeted to those with blindness or low vision, the Tangible Stats project from a group of students at Stanford University allows them to more easily visualize statistical data by interacting with physical objects. The Arduino Mega-driven platform senses the number of stackable tokens placed into a column and provides quick feedback. Additionally, it can tilt the row of tokens to represent a sloping line.

    ActuAir

    [youtube https://www.youtube.com/watch?v=ezX6QCKcnlA?feature=oembed&w=500&h=281]

    Everyone needs access to fresh, clean air, but quickly seeing the indoor air quality of somewhere like an office meeting room/lobby is difficult. ActuAir, constructed by students at Newcastle University, is a wall-sized soft robotics display powered by a several Arduino UNO R4 WiFis that can each adjust the shape and color of a wall-mounted pouch to indicate the current CO2, temperature, or humidity levels — all of which is adjustable from an external web application.

    The post Check out these Arduino-powered research projects from CHI 2024 appeared first on Arduino Blog.

    Website: LINK

  • GLEWBOT scales buildings like a gecko to inspect wall tiles

    GLEWBOT scales buildings like a gecko to inspect wall tiles

    Reading Time: 2 minutes

    A great deal of building maintenance expenses are the result of simple inaccessibility. Cleaning the windows are your house is a trivial chore, but cleaning the windows on a skyscraper is serious undertaking that needs specialized equipment and training. To make exterior wall tile inspection efficient and affordable, the GLEWBOT team turned to nature for inspiration.

    GLEWBOT climbs up walls like a gecko and taps on tiles like a woodpecker to evaluate wall integrity. Like cleaning the windows on a skyscraper, the traditional inspection method requires specialized tools and skills. GLEWBOT can perform the same functions autonomously, dramatically reducing costs.

    This robot has a two-part design that lets it scale walls in a manner similar to a climber using ascenders. One part grips, while the other releases. When the bottom part grips, the top part can extend to move up the wall. When the top part grips, the bottom part can retract to repeat the process. The robot grips the tile using suction cup feet connected to micro vacuum pumps and a linear actuator performs the extension/retraction. Each end has a motor that lets it rotate relative to the linear actuator, so the robot can turn.

    The system is equipped with two Arduino boards. An Arduino Nano serves as central command and handles general functions, while an Arduino Nano 33 BLE Sense acts as an acoustic recognition module and controls the inspection tool. That tool is a hollow drum hammer that taps each tile and listens for the resulting echo. An audio classification model trained for this task will detect a questionable tile based on the sound it makes, so engineers can investigate further. 

    More details on GLEWBOT can be found in its Hackster.io write-up and the team’s published paper here.

    [youtube https://www.youtube.com/watch?v=wuzpiQVdasQ?feature=oembed&w=500&h=281]

    The post GLEWBOT scales buildings like a gecko to inspect wall tiles appeared first on Arduino Blog.

    Website: LINK

  • Create your own affordable Arduino-powered smart glasses

    Create your own affordable Arduino-powered smart glasses

    Reading Time: 2 minutes

    When Google Glass launched in 2013, the public opinion seemed to be “interesting technology, but the world isn’t ready yet.” Now that more than a decade has passed, the world may finally be ready — especially with the omission of controversial features like video recording. If that appeals to you, then Akashv44 has a great tutorial that will walk you through building your own affordable Arduino-based smart glasses.

    The biggest challenge for a project like this is the geometry of the heads-up display optics. Our eyes cannot focus on a screen that is too close. The screen has to be at least a few inches away to comfortably read. But those few inches don’t need to be in a straight line, so this device uses a mirror, a lens, and a piece of glass to project screen content in front of the user’s eye. The total distance along that path is enough for the user to focus on the content without eye strain.

    That content comes from a small monochrome OLED screen chosen for its high contrast. The dark pixels of the screen are essentially invisible, while the lit pixels are easy to see. The content on that screen comes from an Arduino Nano board. It receives power from a 300mAh lithium battery (this design doesn’t contain a charging circuit) and an HC-05 Bluetooth module lets the Arduino communicate with external devices.

    In theory, the Arduino can display any alphanumeric digits that it receives via Bluetooth. So, the content shown will depend on the user and there are many possibilities. It could, for example, reveal incoming text messages or information about whatever song is playing. 

    The post Create your own affordable Arduino-powered smart glasses appeared first on Arduino Blog.

    Website: LINK

  • This beastly DIY bench power supply will satisfy any requirement

    This beastly DIY bench power supply will satisfy any requirement

    Reading Time: 2 minutes

    Every maker should have a bench power supply in their possession, ready to provide whatever voltage a project or particular component requires. But not all bench power supplies are created equal. Some only have a single output, some have a limited voltage range, and some can’t handle much current. In an attempt to eliminate such concerns forever, Doug Domke built “the Beast.”

    This is a beefy bench power supply that can easily handle any project an electronics tinkerer is likely to tackle. It has three outputs that can all operate at the same time. Two of them can be set anywhere from 2V to 30V and can supply up to 10A each, at 30V. However, the supply transformer is only rated for 240 watts. If both are pulling the full current, then setting them above 24V would exceed the rating. But that isn’t a situation many people will find themselves in. The third output comes from a 20W supply that can provide 3V to 30V (positive or negative).

    The user sets each output’s voltage with a simple potentiometer, but an Arduino Nano monitors the voltage and current of each using the analog input pins. The maximum 30V is far too high for the Arduino to work with directly, so it takes measurements through voltage dividers. With voltage and current readings, the Arduino can then calculate wattage. It displays the information for each output on a dedicated 16×2 character LCD screen, connected via I2C. 

    If you’re in need of a robust bench power supply, the Beast may just fit the bill.

    The post This beastly DIY bench power supply will satisfy any requirement appeared first on Arduino Blog.

    Website: LINK

  • A shift register is all you need to build an Arduino Nano-based retro computer

    A shift register is all you need to build an Arduino Nano-based retro computer

    Reading Time: 2 minutes

    If you’ve ever tried to produce an analog video signal with an Arduino, then you know that it isn’t easy. That’s a bit counterintuitive if you think of analog video as “old” and assume that generating an analog video signal would be trivial with our powerful modern hardware. But there are many ways in which analog signals are tricky and that’s especially true if you want something like VGA output, which requires very precise timing. That’s why it is so impressive that Slu4 was able to build this retro computer with just an Arduino Nano and a shift register.

    This was no simple feat and it really showcases Slu4’s programming prowess. His creation can output 320×200 resolution VGA video while reading PS/2 keyboard inputs, with enough processing power leftover to handle basic video game logic and graphics. He demonstrates that with a Tetris­-like games that runs very smoothly. And Slu4 says that it is even possible to add 16 colors per row, though he doesn’t show that in action.

    Slu4 first achieved a similar result a few years ago, but that required several IC (Integrated Circuit) chips. This version only needs one: a standard 74HC166 shift register. That helped him overcome some of the challenges related to VGA timing, which the Nano’s ATmega328 microcontroller can just barely keep up with. This did necessitate some low-level programming to maximize efficiency, but Slu4 was able to pull it off. Even more impressive, he was able to read PS/2 keyboard input at the same time so the player can control the game. 

    [youtube https://www.youtube.com/watch?v=LnYdvNNgLPM?feature=oembed&w=500&h=281]

    The post A shift register is all you need to build an Arduino Nano-based retro computer appeared first on Arduino Blog.

    Website: LINK